
Docker Compose Volume Relative Path: A Guide
Docker compose is a powerful tool for managing multi-container Docker applications. One of the most important features of Docker compose is the ability to define volumes, which are shared directories that can be mounted into containers.
When defining volumes in Docker compose, you can use either absolute or relative paths. Absolute paths specify the full path to the volume on the host machine, while relative paths specify the path to the volume relative to the directory where the Docker compose file is located.
In this guide, we will discuss the pros and cons of using absolute and relative paths for Docker compose volumes. We will also provide some examples of how to use each type of path.
By the end of this guide, you will have a good understanding of how to use Docker compose volumes and you will be able to choose the right path type for your needs.
Absolute Paths
When you use an absolute path for a Docker compose volume, you are specifying the full path to the volume on the host machine. This can be useful if you want to make sure that the volume is always located in the same place on the host machine, regardless of where the Docker compose file is located.
For example, the following Docker compose file defines a volume named `data` with an absolute path:
version: ‘3’
services:
web:
image: nginx:latest
volumes:
– /data:/var/www/html
In this example, the volume `data` is mounted into the container at the path `/var/www/html`. This means that any files that are created in the `data` directory on the host machine will be accessible in the `/var/www/html` directory inside the container.
Relative Paths
When you use a relative path for a Docker compose volume, you are specifying the path to the volume relative to the directory where the Docker compose file is located. This can be useful if you want to make sure that the volume is always located in the same place relative to the Docker compose file, regardless of where the Docker compose file is located on the host machine.
For example, the following Docker compose file defines a volume named `data` with a relative path:
version: ‘3’
services:
web:
image: nginx:latest
volumes:
– data:/var/www/html
In this example, the volume `data` is mounted into the container at the path `/var/www/html`. This means that any files that are created in the `data` directory on the host machine will be accessible in the `/var/www/html` directory inside the container.
Choosing the Right Path Type
The best path type to use for a Docker compose volume depends on your specific needs. If you need to make sure that the volume is always located in the same place on the host machine, then you should use an absolute path. If you need to make sure that the volume is always located in the same place relative to the Docker compose file, then you should use a relative path.
html
| Docker Compose Volume Relative Path | Description | Example |
|---|---|---|
| ./data | Mounts the current directory into the container |
          volumes:
            - ./data:/data
|
| ../data | Mounts the parent directory into the container |
          volumes:
            - ../data:/data
|
| /data | Mounts the absolute path into the container |
          volumes:
            - /data:/data
|
A Docker compose volume relative path is a path that is relative to the working directory of the Docker compose file. This means that the path will be interpreted as if it were located in the same directory as the Docker compose file, even if it is not.
For example, if you have a Docker compose file called `docker-compose.yml` in the directory `/home/user/my-project`, and you specify a volume with the path `./data`, the volume will be mounted at `/home/user/my-project/data` inside the container.
Relative paths are useful when you want to mount a volume from a directory that is located in the same directory as the Docker compose file. This is often the case when you are developing a project, and you want to mount the project’s source code directory as a volume inside the container.
How to use Docker compose volume relative paths?
To use a Docker compose volume relative path, simply specify the path relative to the working directory of the Docker compose file. For example:
version: “3”
services:
web:
image: nginx:latest
volumes:
– ./data:/data
In this example, the volume `./data` will be mounted at `/data` inside the container.
You can also use multiple relative paths in the same volume declaration. For example:
version: “3”
services:
web:
image: nginx:latest
volumes:
– ./data:/data
– ./logs:/logs
In this example, the volumes `./data` and `./logs` will be mounted at `/data` and `/logs` inside the container, respectively.
You can also use environment variables to specify relative paths. For example:
version: “3”
services:
web:
image: nginx:latest
volumes:
– ${PWD}/data:/data
In this example, the volume `${PWD}/data` will be mounted at `/data` inside the container.
Docker compose volume relative paths are a convenient way to mount volumes from directories that are located in the same directory as the Docker compose file. They are especially useful when you are developing a project, and you want to mount the project’s source code directory as a volume inside the container.
Here are some additional resources that you may find helpful:
- [Docker compose documentation](https://docs.docker.com/compose/)
- [Docker compose volume documentation](https://docs.docker.com/compose/compose-file/compose-file-v3/volume-declarations)
- [Docker compose relative paths](https://docs.docker.com/compose/compose-file/compose-file-v3/working-directory-and-relative-paths)
3. Best practices for using Docker compose volume relative paths
Docker compose volume relative paths can be a powerful tool for managing your Docker containers. However, there are a few best practices you should follow to ensure that you use them effectively.
1. Use absolute paths when possible
Whenever possible, you should use absolute paths when specifying Docker compose volume mount points. This will make your configuration more portable and easier to manage. For example, the following configuration will mount the `/data` directory from the host machine into the `/data` directory of the container:
version: ‘3.7’
services:
web:
image: nginx:latest
volumes:
– /data:/data
2. Use named volumes
Named volumes are a more efficient way to manage Docker volumes than using bind mounts. When you use a named volume, Docker will create a persistent volume on the host machine and mount it into the container. This means that the data in the volume will persist even if the container is stopped or deleted.
To use a named volume, you need to create the volume first, then mount it into the container. For example, the following command will create a named volume called `data`:
docker volume create data
Once the volume has been created, you can mount it into a container using the following syntax:
volumes:
– data:/data
3. Use the `docker-compose up` command to create volumes
When you use the `docker-compose up` command to create your containers, Docker will automatically create any volumes that are specified in your compose file. This is a convenient way to create volumes, as you don’t need to worry about creating them manually.
4. Use the `docker-compose down` command to delete volumes
When you use the `docker-compose down` command to delete your containers, Docker will automatically delete any volumes that were created by those containers. This is a convenient way to clean up your volumes, as you don’t need to worry about deleting them manually.
5. Use the `docker volume ls` command to list volumes
The `docker volume ls` command can be used to list all of the volumes that are currently available on the host machine. This can be useful for troubleshooting problems with volumes or for identifying which volumes are being used by which containers.
6. Use the `docker volume inspect` command to inspect volumes
The `docker volume inspect` command can be used to inspect the details of a specific volume. This can be useful for troubleshooting problems with volumes or for getting information about the data that is stored in a volume.
7. Use the `docker volume prune` command to delete unused volumes
The `docker volume prune` command can be used to delete any unused volumes on the host machine. This can be useful for freeing up disk space or for removing volumes that are no longer needed.
4. Common problems with Docker compose volume relative paths
There are a few common problems that can occur when using Docker compose volume relative paths. These problems can be avoided by following the best practices outlined in the previous section.
1. Using relative paths with bind mounts
As mentioned in the previous section, you should avoid using relative paths with bind mounts. This is because bind mounts are not persistent, so the data in the mount point will be lost if the container is stopped or deleted.
2. Using relative paths with named volumes
You can use relative paths with named volumes, but you need to be careful not to specify a path that is outside of the volume. For example, the following configuration will fail because the `/etc/nginx/conf.d` directory is outside of the `data` volume:
version: ‘3.7’
services:
web:
image: nginx:latest
volumes:
– data:/data
command:
– nginx
– -c
– /etc/nginx/conf.d/default.conf
To fix this problem, you can either move the `/etc/nginx/conf.d` directory into the `data` volume or you can use an absolute path to the directory.
3. Forgetting to create volumes
One of the most common problems with Docker compose volume relative paths is forgetting to create the volumes before you start the containers. This can cause the containers to fail to start or to lose data.
To avoid this problem, you should always create the volumes before you start the containers. You can do this using the
Q: What is a Docker compose volume relative path?
A: A Docker compose volume relative path is a path that is relative to the directory where the Docker compose file is located. For example, if the Docker compose file is located in the `/home/user/my-app` directory, and you specify a volume path of `./data`, the volume will be created in the `/home/user/my-app/data` directory.
Q: Why should I use a Docker compose volume relative path?
A: There are a few reasons why you might want to use a Docker compose volume relative path. First, it makes it easier to move your Docker compose files around. If you change the location of your Docker compose file, the volumes will automatically be moved to the new location. Second, it can help to keep your Docker compose files organized. You can create a separate directory for each project, and then use relative paths to reference the volumes for each project.
Q: What are the limitations of using a Docker compose volume relative path?
A: There are a few limitations to using a Docker compose volume relative path. First, you cannot use a volume path that is outside of the directory where the Docker compose file is located. Second, you cannot use a volume path that contains a period (.).
Q: How do I create a Docker compose volume relative path?
A: To create a Docker compose volume relative path, simply specify the path relative to the directory where the Docker compose file is located. For example, the following code creates a volume named `data` in the `/home/user/my-app/data` directory:
version: ‘3.8’
services:
my-app:
image: my-app
volumes:
– ./data:/data
Q: What are some common problems with Docker compose volume relative paths?
A: There are a few common problems that can occur with Docker compose volume relative paths. First, if you move the Docker compose file to a new location, the volumes will not be moved with it. Second, if you delete the Docker compose file, the volumes will also be deleted. Third, if you change the name of the Docker compose file, the volumes will not be renamed.
Q: How can I avoid problems with Docker compose volume relative paths?
There are a few things you can do to avoid problems with Docker compose volume relative paths. First, make sure that you do not move the Docker compose file to a new location. Second, make sure that you do not delete the Docker compose file. Third, make sure that you do not change the name of the Docker compose file.
Q: What are some best practices for using Docker compose volume relative paths?
Here are a few best practices for using Docker compose volume relative paths:
- Use a separate directory for each project.
- Create a volumes directory in each project directory.
- Use relative paths to reference the volumes in each project’s Docker compose file.
- Make sure that you do not move the Docker compose files or delete the volumes directories.
In this blog post, we discussed the concept of Docker compose volume relative paths. We learned that a relative path is a path that is expressed relative to the current working directory. We also learned that Docker compose uses relative paths by default. This means that when you specify a volume in a Docker compose file, you don’t need to specify the full path to the volume. You can simply specify the path relative to the directory where the Docker compose file is located.
We also discussed the advantages of using relative paths for Docker compose volumes. One advantage is that it makes it easier to move your Docker compose files around. If you move your Docker compose file to a different directory, the volumes will still be valid. You don’t need to update the paths to the volumes.
Another advantage of using relative paths for Docker compose volumes is that it makes it easier to share Docker compose files with others. When you share a Docker compose file, you don’t need to worry about the paths to the volumes. The other person can simply use the same relative paths that you used.
Overall, using relative paths for Docker compose volumes is a best practice. It makes it easier to move your Docker compose files around and share them with others.
Author Profile
-
Hatch, established in 2011 by Marcus Greenwood, has evolved significantly over the years. Marcus, a seasoned developer, brought a rich background in developing both B2B and consumer software for a diverse range of organizations, including hedge funds and web agencies.
Originally, Hatch was designed to seamlessly merge content management with social networking. We observed that social functionalities were often an afterthought in CMS-driven websites and set out to change that. Hatch was built to be inherently social, ensuring a fully integrated experience for users.
Now, Hatch embarks on a new chapter. While our past was rooted in bridging technical gaps and fostering open-source collaboration, our present and future are focused on unraveling mysteries and answering a myriad of questions. We have expanded our horizons to cover an extensive array of topics and inquiries, delving into the unknown and the unexplored.
Latest entries
Description
On Windows, using Docker Compose V2, volumes specified using a relative path are not correctly mounted.
Steps to reproduce the issue:
- Create the following docker-compose.yml
services:
  demo-fail:
    image: busybox
    entrypoint: /bin/true
    volumes:
    - demo_volume:/tmp/demo-volume
volumes:
  demo_volume:
    driver: local
    driver_opts:
      type: none
      device: ./demo-volume
      o: bind
- Create the directory
demo-volumenext to thedocker-compose.yml - run
docker compose up
Describe the results you received:
Mounting the volume fails with the error
Error response from daemon: error while mounting volume '/var/lib/docker/volumes/tinkerbox_demo_volume/_data': failed to mount local volume: mount demo-volume:/var/lib/docker/volumes/tinkerbox_demo_volume/_data, flags: 0x1000: no such file or directory
Describe the results you expected:
Volume is mounted correctly inside the docker container.
Additional information you deem important (e.g. issue happens only occasionally):
Using an absolute path, the volume is mounted as expected.
As opposed to Docker Compose V1, Docker Compose V2 on Windows does not resolve relative paths into absolute paths.
Using Docker Compose V1:
> docker volume inspect tinkerbox_demo_volume
[
    {
        "CreatedAt": "2021-11-12T10:36:51Z",
        "Driver": "local",
        "Labels": {
            "com.docker.compose.project": "tinkerbox",
            "com.docker.compose.version": "1.29.2",
            "com.docker.compose.volume": "demo_volume"
        },
        "Mountpoint": "/var/lib/docker/volumes/tinkerbox_demo_volume/_data",
        "Name": "tinkerbox_demo_volume",
        "Options": {
            "device": "C:\\ABSOLUTE\\PATH\\TO\\demo-volume",
            "o": "bind",
            "type": "none"
        },
        "Scope": "local"
    }
]
Using Docker Compose V2:
> docker volume inspect tinkerbox_demo_volume
[
    {
        "CreatedAt": "2021-11-12T10:37:59Z",
        "Driver": "local",
        "Labels": {
            "com.docker.compose.project": "tinkerbox",
            "com.docker.compose.version": "2.0.0",
            "com.docker.compose.volume": "demo_volume"
        },
        "Mountpoint": "/var/lib/docker/volumes/tinkerbox_demo_volume/_data",
        "Name": "tinkerbox_demo_volume",
        "Options": {
            "device": "./demo-volume",
            "o": "bind",
            "type": "none"
        },
        "Scope": "local"
    }
]
Output of docker compose version:
Docker Compose version v2.0.0
Output of docker info:
Client:
 Context:    default
 Debug Mode: false
 Plugins:
  buildx: Build with BuildKit (Docker Inc., v0.6.3)
  compose: Docker Compose (Docker Inc., v2.0.0)
  scan: Docker Scan (Docker Inc., v0.8.0)

Server:
 Containers: 2
  Running: 1
  Paused: 0
  Stopped: 1
 Images: 142
 Server Version: 20.10.8
 Storage Driver: overlay2
  Backing Filesystem: extfs
  Supports d_type: true
  Native Overlay Diff: true
  userxattr: false
 Logging Driver: json-file
 Cgroup Driver: cgroupfs
 Cgroup Version: 1
 Plugins:
  Volume: local
  Network: bridge host ipvlan macvlan null overlay
  Log: awslogs fluentd gcplogs gelf journald json-file local logentries splunk syslog
 Swarm: inactive
 Runtimes: io.containerd.runc.v2 io.containerd.runtime.v1.linux runc
 Default Runtime: runc
 Init Binary: docker-init
 containerd version: e25210fe30a0a703442421b0f60afac609f950a3
 runc version: v1.0.1-0-g4144b63
 init version: de40ad0
 Security Options:
  seccomp
   Profile: default
 Kernel Version: 5.4.72-microsoft-standard-WSL2
 Operating System: Docker Desktop
 OSType: linux
 Architecture: x86_64
 CPUs: 12
 Total Memory: 15.63GiB
 Name: docker-desktop
 ID: 5PON:NFXZ:GKCC:FXEA:NDR2:HM42:GO4Q:6HES:D5MR:RIE7:6SKY:SUMV
 Docker Root Dir: /var/lib/docker
 Debug Mode: false
 Registry: https://index.docker.io/v1/
 Labels:
 Experimental: false
 Insecure Registries:
  127.0.0.0/8
 Live Restore Enabled: false

WARNING: No blkio throttle.read_bps_device support
WARNING: No blkio throttle.write_bps_device support
WARNING: No blkio throttle.read_iops_device support
WARNING: No blkio throttle.write_iops_device support
Additional environment details:
Host OS: Windows 10, Version 20H2, Build 19042.1288
Docker volumes are import components of containerized applications that enable data shareability across containers and portability across platforms. Managing Docker volumes involves handling the lifecycle of the Docker volume from creation to deletion. Docker provides simple commands to manage them.
This article provides you with a complete guide on how to use Docker volumes. It describes how you can create and mount a volume, inspect a volume, and delete Docker volumes. The article also guides on performing other useful Docker volume management tasks, including volume backup and restore.
#What are Docker volumes?
Docker volumes are storage blocks where data related to containers can be stored separately outside the containers’ file system and portable across various platforms. Therefore, it enables users to share the containers with other containers. This shareability allows developers to create shared volumes to store dependencies used by different containers.
The volume data persists even if the container gets restarted, updated, or deleted. Also, you can take volume backups of snapshots independent of the container. Therefore, Docker volumes enable persisting important data in case of any failure to the Docker containers. Since you can directly access data from the host’s storage or other outside systems, it reduces the extra work tied to containerized file actions. As a result, those features help increase the performance of containerized applications.
#Docker volume types
There are three different Docker volume types, and it is important to know their differences.
- Anonymous volumes — The volumes the Docker generates when creating a container are not persistent. Hence, anonymous volumes that cannot be shared will be destroyed upon container termination.
- Named volumes — Named volumes are created using the dockers’
volume createcommand, which will be stored in a folder in the host machine. These are allied named volumes as the user specifies a specific name to the volume at their creation. Docker handles the creation and management of named volumes. - Host volumes or Bind mounts — A directory or file on the host system mounted directly into the container are called host volumes. Host volumes are useful when you need a container to tap into certain data or files on your computer directly. However, be careful because when you remove a file or folder from the host, it disappears. Similarly, any alterations made within the container to a host volume will reflect on the host.
Docker provides several useful commands for managing the lifecycle of the Docker volumes, which we discuss below.
Ready to supercharge your Docker infrastructure? Scale effortlessly and enjoy flexible storage with Cherry Servers bare metal or virtual servers. Eliminate infrastructure headaches with free 24/7 technical support, pay-as-you-go pricing, and global availability.
#Where are Docker volumes stored?
In Linux, Docker volumes are stored in the host system file path /var/lib/docker/volumes/. Each volume is stored in its own folder within this directory, and the data for each volume can be found in a subfolder named _data.
If you are using Docker Desktop for Windows, Docker volumes are stored within the virtual machine that Docker Desktop uses, not on the Windows host machine itself. Therefore, the file path for Docker volumes in Docker Desktop for Windows is the same as it is on a Linux machine.
#How to use Docker volumes: Commands for managing volumes in Docker
Docker provides a set of commands for managing docker volumes. In this section, we will learn how to use Docker commands for creating Docker volumes, mounting Docker volumes, and checking various information about Docker volumes.
#1. How to create a Docker volume?
You can create a Docker volume using the following CLI command.

There are specific options you can apply with this command. If you do not specify any name, Docker will create a random name and assign it to the volume in the local driver, as in the above example.
The options include -d or --driver, which specifies the volume driver name, --label from which you can set a list of metadata for the volume, and -o, or --opt for setting driver-specific options as a map.
With all the options, let’s create a sample volume called ‘myVolume11’.

#2. How to mount a Docker volume?
Mounting a Docker volume is like plugging it into a Docker container. This allows the container to access a special folder, which could be on your computer (the host) or a separate storage space managed by Docker (a named volume).
#1) Mounting a Docker volume using the -v command
Using the -v or --volume command, you can attack previously created named volumes to a container.
docker run -v <volume_name>:/<path_to_mount> <imageName>
In the above command, you must include the volume name, the path to mount it, and the image or container name. The following is an example.
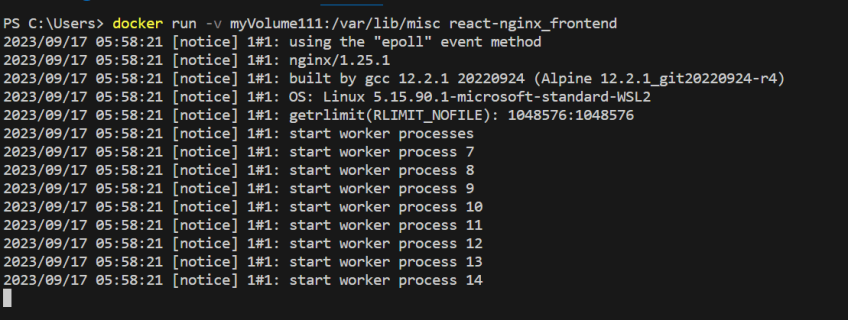
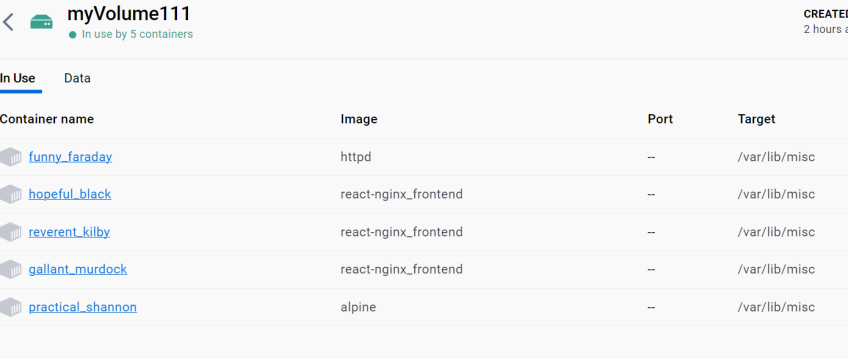
When you mount the named volume, it will begin to use the volume specified in the target path. Therefore, the data will remain even if you terminate or delete the container. Also, you can mount the same volume to multiple containers.
#2) Mounting a Docker volume using the — -mount command
Alternatively, you can use the --mount command to mount host or named volumes to a container.
Using the --mount flag gives you a better way to perform volume mounting than the -v or --volume options. You can specify your target volume and the destination container to which you want to place it.
Docker run --mount type=<volumeType>,source=<volumeName>, target=<path_to_mount> <imageName>
For named volumes, you can use the type volume, and for host volumes, you can specify the type and bind.
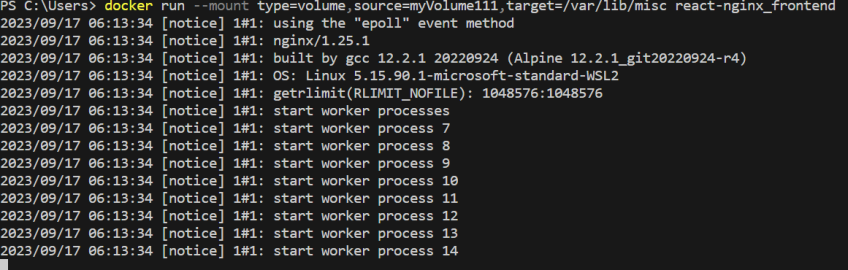
In addition, you can use the option readonly so that the volume will be mounted as a read-only volume.
Following is an example of Docker volume being used by multiple containers.
#3. Creating and mounting with docker-compose
Think Docker Compose** **is a tool that lets you create Docker containers with volumes. Instead of using multiple commands and configurations in CLI, you can specify the configurations for your container application in ‘docker-compose.yml.’
The following is an example content of a docker-compose.yml.
services:
  frontend:
    image: nginx:latest
    volumes:
      - myVolume222:/var/lib/misc

volumes:
  myVolume222:
In the above example, a named volume called myVolume222 is specified to be attached to the nginx: latest at /var/lib/misc. When you run the docker-compose up command, it will create this volume at the initial run. For preceding executions, it will re-use the same volume. In addition to the above specifications, you can also specify the backup paths to backup and restore the backups.
#4. How to check Docker volumes?
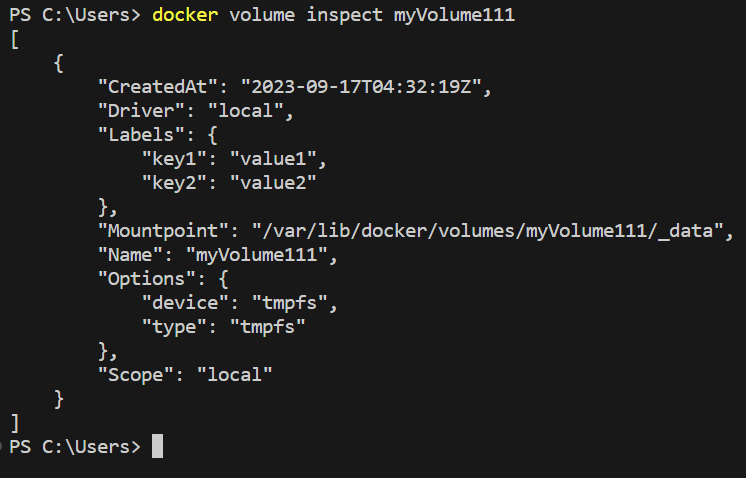
After you have created the volume, you can inspect and check information about a Docker volume using the following Docker command.
#1) Inspect a specific volume
docker volume inspect <volume_name>
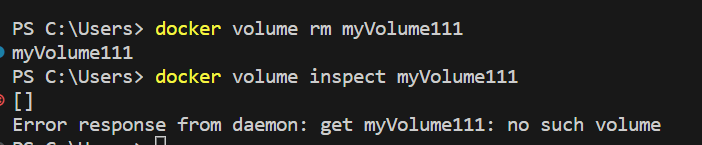
The following shows the information returned by Docker for the above-created Docker volume myVolume111. As you can see, it shows information like when you created it, the options and labels you have specified, name, and driver. Additionally, it shows the mount point or the location at the host where it stores the data.
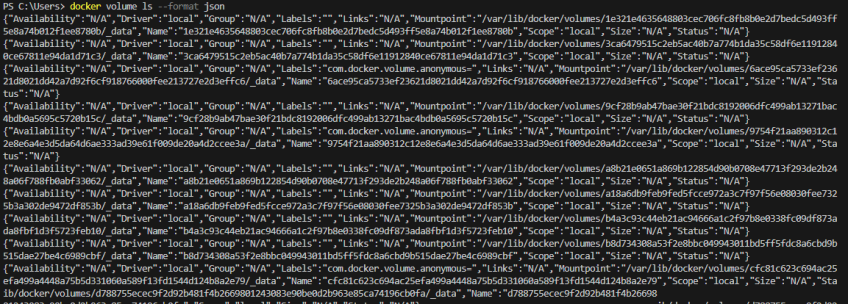
#2) Inspect specific volume information
If you want to see only specific information, you can use the following commands.
In Windows
docker volume inspect <volumeName> | ConvertFrom-Json | ForEach-Object { $_.<speciafc_data_you_want> }
Following is an example of getting only the label information

You can do the same in a Linux machine with grep or jq command-line JSON processing tools.
#3) Check all available volumes
Use the following command to see all the available volumes in your host machine.
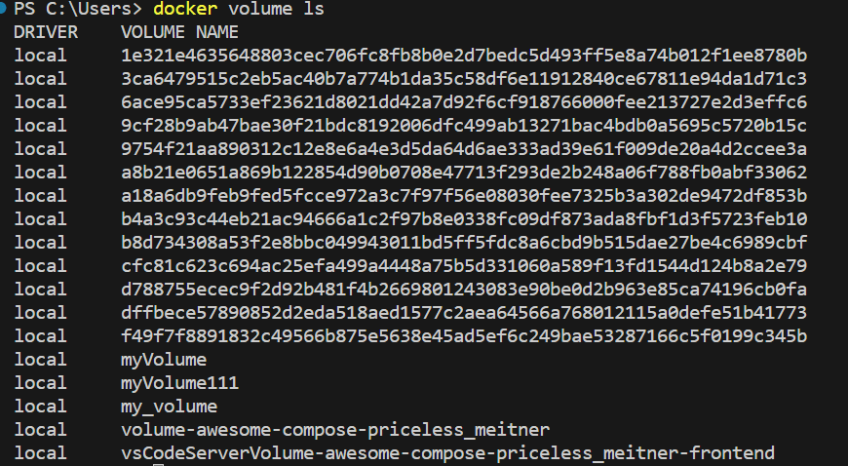
This will only give you the driver and the name of the volume. If you want to view all the information about each volume, set the option --format as json
#5. How to delete Docker volumes?
When managing Docker volumes, it is also important to know what commands you can use to delete them which we will discuss in this section.
#1) Delete a single Docker volume
You can use the following command to delete a Docker volume.
docker volume rm <volumeName>
#2) Delete all Docker volumes
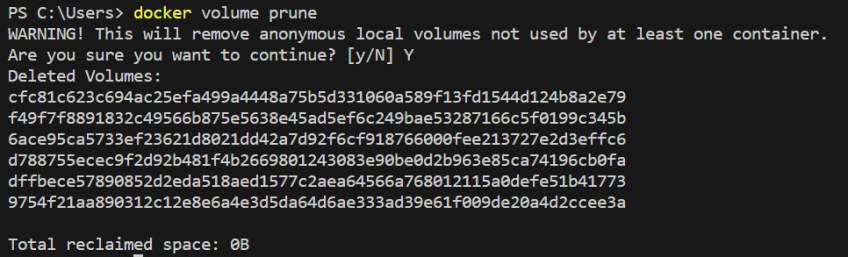
When managing Docker volumes, checking and deleting unused volumes is important to avoid wasting container and host machine storage space. Especially when creating and removing containers frequently for testing or learning purposes, you might accumulate several old and unused Docker volumes, which can eat up disk space.
You can use the Docker volume prune command to search for and remove all Docker volumes not attached to any containers. It offers a quick way to clean your created volumes for testing or development purposes.
When you run this command, Docker will ask to confirm if it is okay to proceed with the removal to prevent accidental deletions.
#6. How to back up and restore the Docker volumes?
Backing up Docker volumes is critical when managing Docker volumes to restore them in case of any disaster to the container. The backup commands vary according to the platform you run the containers.
You can use the following command to back up the volume data into your local machine.
docker run --rm -v <volumeName>:/volume_data -v <path_to_store_the_backup>:/backup <imageName> tar cvzf /backup/backup.tar /volume_data
The following shows an example of its usage.
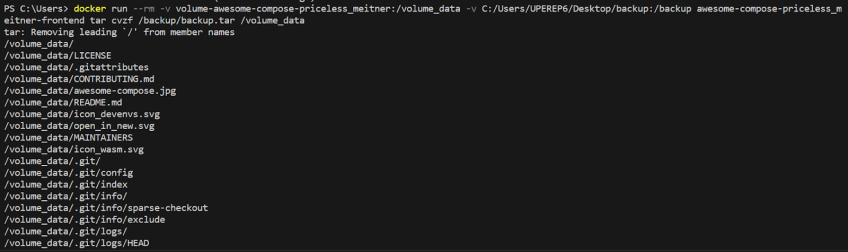
You want to run the tar cvzf /backup/backup.tar /volume_data command inside the container and attempt to create a tarball of the /volume_data directory.

If you extract the backup, you can see the backup data.

If you want to restore the docker volume from the backup on your local machine, use the following command.
docker run --rm -v <volumeName>:/volume_data -v <path_to_store_the_backup>:/backup <imageName> tar xvz /backup/backup.tar /volume_data
#Conclusion
In this guide, we discussed how to manage Docker volumes using various ways, including creating and mounting Docker volumes through simple CLI commands and Docker compose. Docker provides commands for volume management tasks, including deleting, pruning, and inspecting to view required information. What’s more, Docker allows the backup and restore of Docker volumes using simple CLI commands so that you can preserve what is stored in Docker volumes in case of any container failure.
Thanks for learning with Cherry Servers!
Our open cloud infrastructure offers developers affordable dedicated servers and VPS providing the robust hardware required for Docker deployments with full control, stable workloads, and free technical support 24/7.
Learn more about us here.
Intro
“Where are the Docker volumes?”
This question comes up a lot on the Docker forum.
There is no problem with curiosity, but this is usually asked when someone wants to
edit or at least read files directly on the volume from a terminal or an IDE,
but not through a container. So I must start with a statement:
Important
You should never handle files on a volume directly without entering a container,
unless there is an emergency, and even then, only at your own risk.
Why I am saying it, you will understand if you read the next sections.
Although the original goal with this tutorial was to explain where the volumes are,
it is hard to talk about it without understanding what the volumes are
and what different options you have when using volumes.
As a result of that, by reading this tutorial, you can learn basically
everything about the local volumes, but you can also
search for volume plugins on Docker Hub.
Where does Docker store data?
Before we talk about the location of volumes, we first have to talk about
the location of all data that Docker handles.
When I say “Docker”, I usually mean “Docker CE”.
Docker CE is the community edition of Docker and can run
directly on Linux. It has a data root directory, which is the following by default:
You can change it in the daemon configuration, so if it is changed on your system,
you will need to replace this folder in the examples I show.
To find out what the data root is, run the following command:
docker info --format '{{ .DockerRootDir }}'
In case of Docker Desktop of course, you will always have a virtual machine,
so the path you get from the above command will be in the virtual machine.
What is a Docker volume?
For historical reasons, the concept of volumes can be confusing.
There is a page in the documentation
which describes what volumes are, but when you see a Compose file or a docker run command,
you see two types of volumes, but only one of them is actually a volume.
Example Compose file:
services:
  server:
    image: httpd:2.4
    volumes:
      - ./docroot:/usr/local/apache2/htdocs
Did I just define a volume?
No. It is a bind mount.
Let’s just use the long syntax:
services:
  server:
    image: httpd:2.4
    volumes:
      - type: bind
        source: ./docroot
        target: /usr/local/apache2/htdocs
The “volumes” section should have been “storage” or “mounts” to be more clear.
In fact, the “docker run” command supports the --mount option in addition to
-v and --volume, and only --mount supports the type parameter
to directly choose between volume and bind mount.
Then what do we call a volume? Let’s start with answering another question.
What do we not call a volume? A file can never be a volume. A volume is always a
directory, and it is a directory which is created by Docker and handled by Docker
throughout the entire lifetime of the volume. The main purpose of a volume is
to populate it with the content of the directory to which you mount it
in the container. That’s not the case with bind mounts. Bind mounts just
completely override the content of the mount point in the container, but at least
you can choose where you want to mount it from.
You should also know that you can disable copying data from the container to your
volume and use it as a simple bind mount, except that Docker creates it in the Docker
data root, and when you delete the volume after you wrote something on it, you will lose
the data.
volumes:
  docroot:

services:
  server:
    image: httpd:2.4
    volumes:
      - type: volume
        source: docroot
        target: /usr/local/apache2/htdocs
        volume:
          nocopy: true
You can find this and other parameters in the
documentation of volumes in a compose file.
Scroll down to the “Long syntax” to read about “nocopy”.
Custom volume path
Custom volume path overview
There is indeed a special kind of volume which seems to mix bind mounts and volumes.
The following example will assume you are using Docker CE on Linux.
volume_name="test-volume"
source="$PWD/$volume_name"

mkdir -p "$volume_name"
docker volume create "$volume_name" \
  --driver "local" \
  --opt "type=none" \
  --opt "device=$source" \
  --opt "o=bind"
Okay, so you created a volume and you also specified where the source directory is (device),
and you specified that it is a bind mount.
Don’t worry, you find it confusing because it is confusing.
o=bind doesn’t mean that you will bind mount a directory into the container,
which will always happen,
but that you will bind mount the directory to the path where Docker would have
created the volume if you didn’t define the source.
This is basically the same what you would do on Linux with the mount command:
mount -o bind source/ target/
Without -o bind the first argument must be a block device.
This is why we use the “device” parameter, even though we mount a folder.
This is one way to know where the Docker volume is.
Note
Even the the above example assumed Linux, custom volume path
would work on other operating systems as well, since Docker
Desktop would mount the required path into the virtual machine.
Let’s just test if it works and inspect the volume:
docker volume inspect test-volume
You will get a json like this:
[
    {
        "CreatedAt": "2024-01-05T00:55:15Z",
        "Driver": "local",
        "Labels": {},
        "Mountpoint": "/var/lib/docker/volumes/test-volume/_data",
        "Name": "test-volume",
        "Options": {
            "device": "/home/ta/test-volume",
            "o": "bind",
            "type": "none"
        },
        "Scope": "local"
    }
]
The “Mountpoint” field in the json is not the path in a container, but the path where
the specified device should be mounted at. In our case, the device is actually a directory.
So let’s see the content of the mount point:
sudo ls -la $(docker volume inspect test-volume --format '{{ .Mountpoint }}')
You can also check the content of the source directory:
Of course, both are empty as we have no container yet.
How would Docker know what the content should be?
As we already learned it, we need to mount the volume into a container
to populate the volume.
docker run \
  -d --name test-container \
  -v test-volume:/usr/local/apache2/htdocs \
  httpd:2.4
Check the content in the container:
docker exec test-container ls -lai /usr/local/apache2/htdocs/
Output:
total 16
 256115 drwxr-xr-x 2 root     root     4096 Jan  5 00:33 .
5112515 drwxr-xr-x 1 www-data www-data 4096 Apr 12  2023 ..
 256139 -rw-r--r-- 1      501 staff      45 Jun 11  2007 index.html
Notice that we added the flag “i” to the “ls” command so we can see the inode number,
which identifies the files and directories on the filesystem in the first column.
Check the directory created by Docker:
sudo ls -lai $(docker volume inspect test-volume --format '{{ .Mountpoint }}')
256115 drwxr-xr-x 2 root root  4096 Jan  5 00:33 .
392833 drwx-----x 3 root root  4096 Jan  5 00:55 ..
256139 -rw-r--r-- 1  501 staff   45 Jun 11  2007 index.html
As you can see, only the parent directory is different, so we indeed see the same files
in the container and in the directory created by Docker.
Now let’s check our source directory.
Output:
total 12
256115 drwxr-xr-x  2 root root  4096 Jan  5 00:33 .
255512 drwxr-xr-x 11 ta   ta    4096 Jan  5 00:32 ..
256139 -rw-r--r--  1  501 staff   45 Jun 11  2007 index.html
Again, the same files, except the parent.
We confirmed, that we could create an empty volume directory,
we could populate it when we started a container and mounted the volume,
and the files appeared where Docker creates volumes. Now let’s check one more thing.
Since this is a special volume where we defined some parameters,
there is an opts.json right next to _data
sudo cat "$(dirname "$(docker volume inspect test-volume --format '{{ .Mountpoint }}')")"/opts.json
Output:
{"MountType":"none","MountOpts":"bind","MountDevice":"/home/ta/test-volume","Quota":{"Size":0}}
Now remove the test container:
docker container rm -f test-container
Check the directory created by Docker:
sudo ls -lai $(docker volume inspect test-volume --format '{{ .Mountpoint }}')
It is empty now.
392834 drwxr-xr-x 2 root root 4096 Jan  5 00:55 .
392833 drwx-----x 3 root root 4096 Jan  5 00:55 ..
And notice that even the inode has changed, not just the content disappeared.
On the other hand, the directory we created is untouched and you can still find the
index.html there.
Avoid accidental data loss on volumes
Let me show you an example using Docker Compose. The compose file would be the following:
volumes:
  docroot:
    driver: local
    driver_opts:
      type: none
      device: ./docroot
      o: bind

services:
  httpd:
    image: httpd:2.4
    volumes:
      - type: volume
        source: docroot
        target: /usr/local/apache2/htdocs
You can populate ./docroot in the project folder by running
You will then find index.html in the docroot folder.
You probably know that you can delete a compose project by running
docker compose down, and delete the volumes too by
passing the flag -v.
You can run it, and the volume will be destroyed, but not the content of the
already populated “docroot” folder. It happens, because the folder
which is managed by Docker in the Docker data root does not physically
have the content. So the one that was managed by Docker could be
safely removed, but it didn’t delete your data.
Docker CE volumes on Linux
This question seems to be already answered in the previous sections, but let’s
evaluate what we learned and add some more details.
So you can find the local default volumes under /var/lib/docker/volumes
if you didn’t change the data root.
For the sake of simplicity of the commands, I will keep using the default path.
The Docker data root is not accessible by normal users, only by administrators.
Run the following command:
sudo ls -la /var/lib/docker/volumes
You will see something like this:
total 140
drwx-----x 23 root root  4096 Jan  5 00:55 .
drwx--x--- 13 root root  4096 Dec 10 14:27 ..
drwx-----x  3 root root  4096 Jan 25  2023 0c5f9867e761f6df0d3ea9411434d607bb414a69a14b3f240f7bb0ffb85f0543
drwx-----x  3 root root  4096 Sep 19 13:15 1c963fb485fbbd5ce64c6513186f2bc30169322a63154c06600dd3037ba1749a
...
drwx-----x  3 root root  4096 Jan  5  2023 apps_cache
brw-------  1 root root  8, 1 Dec 10 14:27 backingFsBlockDev
-rw-------  1 root root 65536 Jan  5 00:55 metadata.db
These are the names of the volumes and two additional special files.
-
backingFsBlockDev
-
metadata.db
We are not going to discuss it in more details. All you need to know at this point is
that this is where the volume folders are. Each folder has a sub-folder called “_data”
where the actual data is, and there could be an opts.json with metadata next to the
“_data” folder.
Note
When you use rootless Docker, the Docker data root will be in your user’s home.
$HOME/.local/share/docker
Docker Desktop volumes
Docker Desktop volumes are different depending on the operating system
and whether you want to run Linux containers or Windows containers.
Docker Desktop always runs a virtual machine
for Linux containers and runs Docker CE in it in a quite complicated way,
so your volumes will be in the virtual machine too. Because of that fact
when you want to access the volumes, you either have to find a way to run a shell
in the virtual machine, or find a way to share the filesystem on the network
and use your filebrowser, IDE or terminal on the host.
Parts of what I show here and more can be found in my presentation which
I gave on the 6th Docker Community All-Hands. Tyler Charboneau wrote a
blog post
about it, but you can also
find the video in the blog post.
Docker Desktop volumes on macOS
On macOS, you can only run Linux containers and there is no such thing as
macOS container yet (2024. january).
You can get to the volumes folder by running the following command:
docker run --rm -it --privileged --pid host ubuntu:22.04 \
  nsenter --all -t 1 \
    sh -c 'cd /var/lib/docker/volumes && sh'
Or just simply mount that folder to a container:
docker run --rm -it \
  -v /var/lib/docker/volumes:/var/lib/docker/volumes \
  --workdir /var/lib/docker/volumes \
  ubuntu:22.04 \
  bash
You can also run an NFS server in a container that mounts the volumes
so you can mount the remote fileshare on the host.
The following compose.yml file can be used to run the NFS server:
services:

  nfs-server:
    image: openebs/nfs-server-alpine:0.11.0
    volumes:
       - /var/lib/docker/volumes:/mnt/nfs
    environment:
      SHARED_DIRECTORY: /mnt/nfs
      SYNC: sync
      FILEPERMISSIONS_UID: 0
      FILEPERMISSIONS_GID: 0
      FILEPERMISSIONS_MODE: "0755"
    privileged: true
    ports:
      - 127.0.0.1:2049:2049/tcp
      - 127.0.0.1:2049:2049/udp
Start the server:
Create the mount point on the host:
sudo mkdir -p /var/lib/docker/volumes
sudo chmod 0700 /var/lib/docker
Mount the base directory of volumes:
sudo mount -o vers=4 -t nfs 127.0.0.1:/ /var/lib/docker/volumes
And list the content:
sudo ls -l /var/lib/docker/volumes
Docker Desktop volumes on Windows
Docker Desktop on Windows allows you to switch between Linux containers
and Windows containers.
To find out which one you are using,
run the following command:
docker info --format '{{ .OSType }}'
If it returns “windows”, you are using Windows containers, and if it returns
“linux”, you are using Linux containers.
Linux containers
Since Linux containers always require a virtual machine, you will have
your volumes in the virtual machine the same way as you would on macOS.
The difference is how you can access them. A common way is through
a Docker container. Usually I would run the following command.
docker run --rm -it --privileged --pid host ubuntu:22.04 `
  nsenter --all -t 1 `
    sh -c 'cd /var/lib/docker/volumes && sh'
But if you have an older kernel in WSL2 which doesn’t support the time namespace,
you can get an error message like:
nsenter: cannot open /proc/1/ns/time: No such file or directory
If that happens, make sure you have the latest kernel in WSL2.
If you built a custom kernel, you may need to rebuild it from a new
version.
If you can’t update the kernel yet, exclude the time namespace,
and run the following command:
docker run --rm -it --privileged --pid host ubuntu:22.04 `
  nsenter -m -n -p -u -t 1 `
    sh -c 'cd /var/lib/docker/volumes && sh'
You can simply mount the base directory in a container
the same way as we could on macOS:
docker run --rm -it `
  -v /var/lib/docker/volumes:/var/lib/docker/volumes `
  --workdir /var/lib/docker/volumes `
  ubuntu:22.04 `
  bash
We don’t need to run a server in a container to share the volumes,
since it works out of the box in WSL2. You can just open the Windows
explorer and go to
\\wsl.localhost\docker-desktop-data\data\docker\volumes
Warning
WSL2 let’s you edit files more easily even if the files are owned by root
on the volume, so do it at your own risk.
My recommendation is using it only for debugging.
Windows Containers
Windows containers can mount their volumes from the host.
Let’s create a volume
docker volume create windows-volume
Inspect the volume:
You will get something like this:
[
    {
        "CreatedAt": "2024-01-06T16:27:03+01:00",
        "Driver": "local",
        "Labels": null,
        "Mountpoint": "C:\\ProgramData\\Docker\\volumes\\windows-volume\\_data",
        "Name": "windows-volume",
        "Options": null,
        "Scope": "local"
    }
]
So now you got the volume path on Windows in the “Mountpoint” field,
but you don’t have access to, it unless you are Administrator.
The following command works only from Powershell run as Administrator
cd $(docker volume inspect windows-volume --format '{{ .Mountpoint }}')
If you want to access it from Windows Explorer, you can first go to
Note
This folder is hidden by default, so if you want to open it, just type
the path manually in the navigation bar, or enable hidden folders
on Windows 11 (works differently on older Windows):
Menu bar » View » Show » Hidden Items
Then try to open the folder called “Docker” which gives you a prompt
to ask for permission to access to folder.
and then try to open the folder called “volumes”
which will do the same.
After that you can open any Windows container volume from Windows explorer.
Docker Desktop volumes on Linux
On Windows, you could have Linux containers and Window containers,
so you had to switch between them.
On Linux, you can install Docker CE in rootful and rootless mode,
and you can also install Docker Desktop. These are 3 different
and separate Docker installations and you can switch between them
by changing context or logging in as a different user.
You can check the existing contexts by running the following command:
If you have Docker CE installed on your Linux, and you are logged
in as a user who installed the rootless Docker,
and you also have Docker Desktop installed, you can see at least the
following three contexts:
NAME                TYPE                DESCRIPTION                               DOCKER ENDPOINT                                       KUBERNETES ENDPOINT   ORCHESTRATOR
default             moby                Current DOCKER_HOST based configuration   unix:///var/run/docker.sock
desktop-linux *     moby                Docker Desktop                            unix:///home/ta/.docker/desktop/docker.sock
rootless            moby                Rootless mode                             unix:///run/user/1000/docker.sock
In order to use Docker Desktop, you need to switch to the context
called “desktop-linux”.
docker context use desktop-linux
Important
The default is usually rootful Docker CE and the other too are obvious.
Only the rootful Docker CE needs to run as root, so if you want to
interact with Docker Desktop, don’t make the mistake of running the docker commands
with sudo:
NAME                TYPE                DESCRIPTION                               DOCKER ENDPOINT               KUBERNETES ENDPOINT   ORCHESTRATOR
default *           moby                Current DOCKER_HOST based configuration   unix:///var/run/docker.sock
In terms of accessing volumes, Docker Desktop works similarly on
macOS and Linux, so you have the following options:
Run a shell in the virtual machine using nsenter:
docker run --rm -it --privileged --pid host ubuntu:22.04 \
  nsenter --all -t 1 \
    sh -c 'cd /var/lib/docker/volumes && sh'
Or just simply mount that folder to a container:
docker run --rm -it \
  -v /var/lib/docker/volumes:/var/lib/docker/volumes \
  --workdir /var/lib/docker/volumes \
  ubuntu:22.04 \
  bash
And of course, you can use the nfs server compose project with
the following compose.yml
services:
  nfs-server:
    image: openebs/nfs-server-alpine:0.11.0
    volumes:
       - /var/lib/docker/volumes:/mnt/nfs
    environment:
      SHARED_DIRECTORY: /mnt/nfs
      SYNC: sync
      FILEPERMISSIONS_UID: 0
      FILEPERMISSIONS_GID: 0
      FILEPERMISSIONS_MODE: "0755"
    privileged: true
    ports:
      - 127.0.0.1:2049:2049/tcp
      - 127.0.0.1:2049:2049/udp
and prepare the mount point. Remember, you can have Docker CE running as root,
which means /var/lib/docker probably exists, so let’s create the mount point
as /var/lib/docker-desktop/volumes:
sudo mkdir -p /var/lib/docker-desktop/volumes
sudo chmod 0700 /var/lib/docker-desktop
And mount it:
sudo mount -o vers=4 -t nfs 127.0.0.1:/ /var/lib/docker-desktop/volumes
And check the content:
sudo ls -l /var/lib/docker-desktop/volumes
You could ask why we mount the volumes into a folder on the host,
which requires sudo if the docker commands don’t.
The reason is that you will need sudo to use the mount command,
so it shouldn’t be a problem to access the volumes as root.
Editing files on volumes
The danger of editing volume contents outside a container
Now you know how you can find out where the volumes are.
You also know how you can create a volume with a custom path,
even if you are using Docker Desktop, which creates the default
volumes inside a virtual machine.
But most of you wanted to know where the volumes were to edit the files.
Danger
Any operation inside the Docker data root is dangerous,
and can break your Docker completely, or cause problems
that you don’t immediately recognize, so you should never
edit files without mounting the volume into a container,
except if you defined a custom volume path
so you don’t have to go into the Docker data root.
Even if you defined a custom path, we are still talking about
a volume, which will be mounted into a container,
in which the files can be accessed by a process which
requires specific ownership and permissions. By editing
the files from the host, you can accidentally change the permission
or the owner making it inaccessible for the process in the container.
Even though I don’t recommend it, I understand that sometimes
we want to play with our environment to learn more about,
but we still have to try to find a less risky way to do it.
You know where the volumes are, and you can edit the files
with a text editor from command line or even from the graphical
interface. One problem on Linux and macOS could be setting
the proper permissions so you can edit the files even
if you are not root.
Discussing permissions could be another tutorial,
but this is one reason why we have to try to separate the data
managed by a process in a Docker container from the source code
or any files that requires an interactive user.
Just think of an application that is not running in a container,
but the files still have to be owned by another user.
An example could be a webserver, where the files has to be
owned by a user or group so the webserver has access to the files,
while you still should be able to upload files.
View and Edit files through Docker Desktop
Docker Desktop let’s you browse files from the GUI,
which is great for debugging, but I don’t recommend it for editing files,
even though Docker Desktop makes that possible too.
Let’s see why I am saying it.
Open the Containers tab of Docker Desktop.
Click on the three dots in the line of the container in which you want to browse files
Go to a file that you want to edit
Note
Notice that Docker Desktop shows you whether the files are modified
on the container’s filesystem, or you see a file on a volume.
Right click on the file and select “Edit file”.
Before you do anything, run a test container:
docker run -d --name httpd -v httpd_docroot:/usr/local/apache2/htdocs httpd:2.4
And check the permissions of the index file:
docker exec -it httpd ls -l /usr/local/apache2/htdocs/
You will see this:
-rw-r--r-- 1 504 staff 45 Jun 11 2007 index.html
You can then edit the file and click on the floppy icon on the right side or just
press CTRL+S (Command+S on macOS) to save the modification.
Then run the following command from a terminal:
docker exec -it httpd ls -l /usr/local/apache2/htdocs/
And you will see that the owner of the file was changed to root.
total 4
-rw-r--r-- 1 root root 69 Jan  7 12:21 index.html
One day it might work better, but I generally don’t recommend
editing files in containers from the Graphical interface.
Edit only source code that you mount into the container during development
or Use Compose watch to update the files when you edit them,
but let the data be handled only by the processes in the containers.
Some applications are not optimized for running in containers and there are
different folders and files at the same place where the code is,
so it is hard to work with volumes and mounts while you let the process
in the container change a config file, which you also want to edit occasionally.
In that case you ned to learn how permissions are handled on Linux
using the chmod and chown commands so you both
have permission to access the files.
Container based dev environments
Docker Desktop Dev environment
One of the features of Docker Desktop is that you can run a development
environment in a container. In this tutorial we will not discuss it in
details, but it is good to know that it exists, and you can
basically work inside a container into which you can mount volumes.
More information in the documentation of the Dev environment
Visual Studio Code remote development
The dev environment of Docker Desktop can be opened from Visual Studio Code
as it supports opening projects in containers similarly to how it supports
remote development through SSH connection or in Windows Subsystem for Linux.
You can use it without Docker Desktop to simply open a shell in a container
or even open a project in a container.
More information is in the documentation of VSCode about containers.
Visual Studio Code dev containers
Microsoft also created container images for creating a dev container,
which is similar to what Docker Desktop supports, but the process
of creating a dev container is different.
More information in the documentation of VSCode about dev containers.
Conclusion
There are multiple ways to browse the content of the Docker volumes,
but it is not recommended to edit the files on the volumes.
If you know enough about how containers work and what are the folders
and files that you can edit without harming your system,
you probably know enough not to edit the files that way in the first place.
For debugging reasons or to learn about Docker by changing things
in the environment, you can still edit the files at your own risk.
Everything I described in this tutorial is true even if the user is not
an interactive user, but an external user from the container’s point of view,
trying to manage files directly in the Docker data root.
So with that in mind if you ever think of doing something like that,
stop for a moment, grab a paper and write the following sentence
20 times to the paper:
“I do not touch the Docker data root directly.”
If you enjoyed this tutorial, I also recommend reading about
Volume-only Compose projects.
Ever wondered how to handle data in your Docker applications? Docker Compose and Docker volumes are your secret weapons. These tools are the cornerstone of data management in Docker’s ecosystem. This article will unravel the intricacies of Docker Compose volumes, their function, implementation, and real-world applications.
Consider this: you’re an internet startup with a mountain of data that needs persistent storage and easy accessibility. Docker Compose volumes provide an elegant solution, ensuring your data is always available, even if your containers aren’t.
Let’s dive in and explore Docker Compose and Docker volumes, and understand their importance in managing data in your Dockerized applications.
TL;DR: What are Docker Compose and Docker Volumes?
Docker Compose is a tool that allows you to define and manage multi-container Docker applications, while Docker volumes are a mechanism for persisting data generated by and used by Docker containers. Docker Compose volumes combine these two, enabling efficient data management in Dockerized applications. Read on for a comprehensive understanding, practical examples, and insightful tips.
Understanding Docker Compose Volumes
Docker Compose volumes are, fundamentally, a tool for persisting data created by and utilized by Docker containers. They are the unsung heroes of data management, ensuring your data survives even if your containers don’t.
Declaring Docker Compose Volumes
So, how do we manage Docker volumes using Docker Compose? Docker Compose simplifies this process by providing a way to define and manage multiple volumes for your services. It enables a declarative approach to defining volumes in your Compose file, streamlining the management of your data’s lifecycle alongside your containers.
Docker Compose volumes are declared under the ‘volumes’ section of your Docker Compose file. Here, you define both the source and target paths, which represent the host and container paths, respectively. For instance:
volumes:
  my_volume:
    driver: local
services:
  my_service:
    image: my_image
    volumes:
      - my_volume:/path/in/container
      - /host/path:/another/path/in/container
This simple declaration can significantly impact your application’s data management.
Implementing Docker Volumes with Docker Compose
Now, let’s look at a step-by-step guide to implement Docker volumes with Docker Compose.
First, define your volume in the Docker Compose file under the ‘volumes’ section. Then, under each service that needs to use the volume, add a ‘volumes’ section and specify the volume with the syntax volume_name:/path/in/container. Once your Docker Compose file is set up, you can create and start your services with the docker-compose up command.
Example of implementing Docker volumes with Docker Compose:
docker-compose up
This command will start your services and create the volumes as defined in your Docker Compose file.
Docker Compose will automatically create the volumes and attach them to the containers as defined in your Compose file.
Advantages of Docker Compose Volumes
Docker Compose volumes facilitate easy data sharing between containers and even between different Docker hosts, making them a formidable tool for distributed applications.
The real charm of Docker Compose volumes is their efficacy in ensuring data persistence in containers. By separating your data from your containers, Docker Compose volumes ensure your data’s safety and accessibility, even when your containers are no more.
This feature can be transformative for applications that need to maintain state or share data between different parts of your application.
An Overview of Docker Compose
Having explored the basics of using Docker Compose volumes, it’s time to step back and get a broader perspective on Docker Compose itself.
Docker Compose is a tool designed for defining and managing multi-container Docker applications. It leverages YAML files to configure your application’s services, enabling you to create and start all these services with a single command.
Docker Compose File Structure
The heart of this process is a Docker Compose file. This file sketches out the structure and components of your Dockerized application, encapsulating services, networks, and volumes.
It offers a comprehensive and organized view of your application’s architecture. Let’s look at a simplified example of a Docker Compose file structure:
version: '3'
services:
  web:
    build: .
    ports:
      - '5000:5000'
    volumes:
      - .:/code
    depends_on:
      - redis
  redis:
    image: redis
In this file, we define two services: web and redis. The web service is built using the Dockerfile in the current directory and is mapped to port 5000. It also mounts the current directory to /code in the container and depends on the redis service.
Example of a more complex Docker Compose file:
version: '3'
services:
  web:
    build: .
    ports:
      - '5000:5000'
    volumes:
      - .:/code
      - data_volume:/var/lib/data
    depends_on:
      - redis
  redis:
    image: redis
volumes:
  data_volume:
    driver: local
With Docker Compose, managing multi-container Docker applications becomes a breeze. Docker Compose serves as the maestro, coordinating all the containers to ensure they’re running and communicating as expected.
Pros and Cons of Docker Compose
Docker Compose simplifies the orchestration of multi-container applications by providing a clear, declarative format for defining your application and automating the process of starting and connecting your containers.
However, it’s crucial to remember that Docker Compose is primarily designed for development and testing environments. For production environments, more robust solutions like Kubernetes or Docker Swarm might be more suitable.
| Docker Compose Pros | Docker Compose Cons |
|---|---|
| Simplifies orchestration of multi-container applications | Primarily designed for development and testing environments |
| Provides a clear, declarative format for defining your application | More robust solutions may be needed for production environments |
| Automates the process of starting and connecting your containers |
Despite this, Docker Compose holds a significant role in container orchestration, particularly in development environments. It offers a streamlined way to define and manage your application, making it an indispensable tool in your Docker toolkit.
Introduction to Docker Volumes
After exploring Docker Compose, it’s time to shift our focus to Docker volumes. Docker volumes are instrumental in ensuring data persistence in your Docker containers.
They offer a way to store and share data among containers, regardless of the container’s lifecycle. This implies that even when a container is stopped or deleted, the data in the Docker volume remains intact and accessible for future use.
Docker Volumes vs Bind Mounts
How do Docker volumes stack up against bind mounts? While both aim to persist data, there are notable differences.
Bind mounts have been a part of Docker since its inception. They depend on the host machine’s filesystem to store data and can be located anywhere on the host system.
Docker volumes, in contrast, are managed by Docker and are stored in a Docker-managed area of the host filesystem (/var/lib/docker/volumes/ on Linux).
| Feature | Docker Volumes | Bind Mounts |
|---|---|---|
| Managed by Docker | Yes | No |
| Stored in Docker-managed area of host filesystem | Yes | No |
| Can be located anywhere on host system | No | Yes |
Advantages of Docker Volumes
Docker volumes offer several benefits. They are easier to back up or migrate than bind mounts, they can be safely shared among multiple containers, and they can be managed using Docker CLI commands or the Docker API. Moreover, Docker volumes are compatible with both Linux and Windows containers, while bind mounts are only reliable on Linux.
One of the most significant advantages of Docker volumes is their role in risk mitigation. By separating data from the container’s lifecycle, Docker volumes minimize the risk of data loss when a container is deleted.
They also provide a degree of isolation from the host filesystem, protecting the host from potential security risks posed by containers.
Docker Volumes and Data Security
In the context of data security, Docker volumes play a crucial role. They enable you to store sensitive data securely and control who has access to it. This is particularly important for applications that handle sensitive user data or proprietary information.
With Docker volumes, you can ensure that this data is securely stored, properly isolated, and accessible only to the appropriate containers.
Conclusion
We’ve journeyed through the world of Docker, exploring Docker Compose, Docker volumes, and the powerful combination of the two – Docker Compose volumes. These tools play a critical role in managing data persistency in containerized applications, ensuring that your data survives the ephemeral life of containers.
Docker Compose, with its declarative format and automated management of multi-container applications, simplifies the orchestration of your Docker environment. It offers a straightforward way to define and manage volumes for your services, making it an invaluable tool in both development and production settings.
Docker volumes, on the other hand, serve as the backbone of data management in Docker. They ensure data persistency, facilitate data sharing among containers, and provide a mechanism for data backup and recovery. Their implementation with Docker Compose further enhances their usability, making them a go-to solution for effective data management.
In practical terms, Docker volumes find their use in a variety of scenarios – from persisting database data to sharing code in development environments. Their role becomes even more significant in production environments, where they contribute to scalability, efficiency, and disaster recovery.
In conclusion, Docker Compose volumes offer a robust solution for managing data in Dockerized applications. Whether you’re an internet startup or a seasoned software company, understanding and effectively using Docker Compose volumes can significantly enhance your data management strategy. So, here’s to seamless data management in your Docker journey!