
In this post, we will explore how to install and configure Docker CLI on Windows without the need for Docker Desktop. Although Docker Desktop is a convenient and popular tool for managing Docker containers in development environments, there are situations where a lighter or more specific alternative is preferred or required. Whether due to licensing restrictions, minimal resource needs, or personal preferences, installing only Docker CLI can be the ideal solution. I will guide you through the necessary steps to set up your Windows environment to use Docker CLI, leveraging the capabilities of WSL 2 (Windows Subsystem for Linux version 2) and without the overhead of Docker Desktop. This will not only provide you with more granular control over your Docker containers but will also optimize resource usage on your machine.
Preliminary steps for installation
The following steps have been tested on Windows 10, but I assume they will work the same for Windows 11.
The first thing to do is to install WSL, and for that, open a PowerShell console and type the following command.
wsl --install
Enter fullscreen mode
Exit fullscreen mode
After the previous step, you need to restart the operating system.
Note: As I read, the following command does the same but additionally restarts the computer when it finishes the necessary installation.
Enable-WindowsOptionalFeature -Online -FeatureName Microsoft-Windows-Subsystem-Linux
When the computer has restarted, a window like the following will open:
After waiting for some time, an English message will appear, which will tell you to enter the username for your Linux user and will also ask for the password. Write down your username and password carefully because we will need them later.


Once it has finished successfully, then it’s time to start installing the Docker CLI and we will be located in the console of our Linux distribution.

Note: It’s important to keep in mind that the distribution installed by default is Ubuntu 22 at the time of writing this tutorial.
Once at this point, the first thing to do is to update the repositories and programs of the distribution with the following command:
sudo apt update && sudo apt upgrade
Enter fullscreen mode
Exit fullscreen mode
This action will request the password that we assigned to our user.

Note: don’t forget to say yes (press Y) to confirm that you want to proceed with installing the updates.
Adding the official Docker CLI repository
When the updates are finished, then we will run the following command to perform some necessary installations prior to Docker CLI.
sudo apt -y install apt-transport-https ca-certificates curl gnupg lsb-release
Enter fullscreen mode
Exit fullscreen mode
After that, we will run the following command to add the necessary signature for the Docker CLI repository.
curl -fsSL https://download.docker.com/linux/ubuntu/gpg | sudo gpg --dearmor -o /usr/share/keyrings/docker-archive-keyring.gpg
Enter fullscreen mode
Exit fullscreen mode
Now it’s time to add the Docker CLI repository in Ubuntu for its subsequent installation with the following command.
echo "deb [arch=$(dpkg --print-architecture) signed-by=/usr/share/keyrings/docker-archive-keyring.gpg] https://download.docker.com/linux/ubuntu \
  $(lsb_release -cs) stable" | sudo tee /etc/apt/sources.list.d/docker.list > /dev/null
Enter fullscreen mode
Exit fullscreen mode
Installing Docker CLI
Since we now have the Docker CLI repository ready, it’s time to do the required installation with the following command:
sudo apt update && sudo apt -y install docker-ce docker-ce-cli containerd.io docker-buildx-plugin docker-compose-plugin docker docker-compose
Enter fullscreen mode
Exit fullscreen mode
At this point, we now have Docker CLI installed in our WSL, let’s test it with the following commands:
docker --version
docker-compose --version
Enter fullscreen mode
Exit fullscreen mode
We should get a response similar to the one in the following image:

How to run Docker without root user
Now we will create the docker group and add our user to that group so our user can run containers without needing to run commands as root.
sudo groupadd docker
sudo usermod -aG docker $USER
newgrp docker
Enter fullscreen mode
Exit fullscreen mode
Note: When you try to create the docker group, you will probably get a message saying the group already exists. If that’s the case, don’t worry, just proceed.
Now what we need to do is start Docker and verify it’s working correctly, and for that we’ll use the following commands:
sudo service docker start
sudo service docker status
docker run hello-world
Enter fullscreen mode
Exit fullscreen mode
When you run the sudo service docker status command, you’ll get something like the following image:

To exit that, press the Q key
When using the docker run hello-world command, you may receive a message like the one in the following image:

Don’t forget to run the following command and then run the Docker hello-world again:
newgrp docker
Enter fullscreen mode
Exit fullscreen mode
Now if everything went well, you should get an image like the following when running the Docker hello-world:
With everything we’ve done previously, it’s time to make this work «natively» in Windows through PowerShell.
Docker in the PowerShell console
Now that Docker is installed, it’s time to make it work in the PowerShell console. At the moment, Docker works great but in the console of our WSL.
When opening a PowerShell console we can use the following commands:
wsl docker --version
wsl docker-compose --version
Enter fullscreen mode
Exit fullscreen mode

The idea is that we can use the commands but without the wsl prefix. To do this, we need to modify the Microsoft.PowerShell_profile.ps1 file, but to know where to create it, we should run the following command in a PowerShell console:
echo $PROFILE
Enter fullscreen mode
Exit fullscreen mode

As you can see in the previous image, it shows a path and if you check that path, it probably won’t exist. Well, we must create those folders and the file itself. Once you’ve done that, you should put the following text in the file:
Function Start-WslDocker {
    wsl docker $args
}

Function Start-WslDockerCompose {
    wsl docker-compose $args
}

Set-Alias -Name docker -Value Start-WslDocker

Set-Alias -Name docker-compose -Value Start-WslDockerCompose
Enter fullscreen mode
Exit fullscreen mode
With the above, don’t forget to close the PowerShell consoles and reopen them so they take the changes. And with that, we should be able to run the following Docker commands normally in the PowerShell console:
docker --version
docker ps
docker-compose --version
Enter fullscreen mode
Exit fullscreen mode

Visual managers
If somehow you don’t like managing Docker from the console, but you long for a visual manager in the style of Docker Desktop, then I have two very powerful and free solutions for both personal and business use.

Portainer CE (Community Edition) is a lightweight service delivery platform for containerized applications that facilitates the management of Docker, Swarm, Kubernetes, and ACI environments. This is an open-source project with community support, offering a free option for both businesses and personal use.

Lazydocker is a simple terminal UI for both docker and docker-compose, written in Go with the gocui library. Its goal is to simplify Docker management, making it more accessible and less tedious for those who prefer to work from the terminal. It provides a clear overview of Docker containers, images, and volumes, allowing users to perform common actions with just a keypress or click, making it an efficient tool for both personal and business use. As an open-source project, Lazydocker is a free option that facilitates uncomplicated Docker management, making it ideal for personal and business use.
Final conclusions
As you can see, the Docker CLI can be managed in Windows without the need to rely on Docker Desktop, and easily through the console.
References
- How To Install Docker Without Docker Desktop On Windows
- Using Docker and Kubernetes without Docker Desktop on Windows 11
- How to run docker on Windows without Docker Desktop
- How to install Linux on Windows with WSL
- Install Docker Engine on Ubuntu
- Install Lazydocker on Ubuntu 22.04
- How to Install Portainer 2.0 on your Docker
Learn how to use PowerShell or Command prompt to install the Docker CLI & Desktop GUI on Windows 11 or 10 for creating Containers to run Virtual machines. You don’t need to visit any website to download the setup manually, everything will be done from the Command Terminal.
Use Command Prompt to install Docker on Windows 11 or 10Requirements:Step 1: Open PowerShellStep 2: Check Winget AvailablityStep 3: Install Docker Dekstop on WindowsStep 4: Launch Docker Desktop GUIStep 5: Access Docker CLIUninstallation
Docker is a powerful containerization platform that allows developers to package and distribute applications and their dependencies as lightweight containers. The Docker Command-Line Interface (CLI) is a crucial tool for interacting with Docker and managing containers and images on your system without accessing any GUI. Whereas, those who need some convenience can use the Docker Desktop GUI on Windows. However, it is a necessary step to install Docker first to leverage the full capabilities of it on this operating system
Use Command Prompt to install Docker on Windows 11 or 10
Requirements:
Some system requirements must be fulfilled before you are planning to install Docker Desktop on Windows. Here are those:
- WSL Enabled
- Windows 11 or 10
- Virtual Machine Platform Enabled
Those who have not enabled WSL and VMP, can go to the Windows search box and type “Turn Windows features on or off“. Open it and after that select the “Windows Subsystem for Linux” and “Virtual Machine Platform” options. After that press the OK button both will be on your system.
Step 1: Open PowerShell
As we discussed at the beginning of the tutorial we will use the command line to install Docker Desktop. So, right-click on the Start button and select “PowerShell (Admin) or “Terminal (Admin)”.

Step 2: Check Winget Availablity
On all the latest versions of Windows 11 and 10, Winget is available by default to use. Just like Ubuntu’s APT, Winget is also a package manager by Microsoft to use on Windows for the installation of common applications. Using it we don’t need to visit different websites to download the setup of the apps we want to install, hence saving our time.
To check if it is available, on your PowerShell or CMD, run:
winget

Step 3: Install Docker Dekstop on Windows
Now, in your PowerShell or CMD, run the given command. It will install not only Docker Desktop but also Docker-CLI to manage the containers using the command line.
winget install Docker.DockerDesktop

Soon the Docker Desktop will be installed on your system. After that Restart your system for proper integration of the Docker.
Step 4: Launch Docker Desktop GUI
Go to Windows search and type Docker Desktop, you will see its icon, click that to run the program. The GUI of Docker will appear to manage Images, Containers, Volumes, and with an option to extend the features of Docker by adding various extensions.

Step 5: Access Docker CLI
If you want to create and manage containers but using the command line tool of Windows 11 or 10 such as PowerShell or CMD, then open any of them. Now, on the terminal start using Docker commands. Such as a command to pull a docker image and create a container.
Here is an example:
docker pull hello-world

Docker Version: Check the Docker CLI version installed on your system.
docker --version
Docker Info: Get detailed information about your Docker installation.
docker info
Docker Help: Display a list of available Docker commands and their descriptions.
docker --help
Pull a Docker Image: Download a Docker image from a registry (e.g., Docker Hub).
docker pull image_name:tag
Uninstallation
So far we have discussed the installation but in the future, if you want to remove the Docker Desktop using the command line on Windows then that can be done again using Winget. Here is the command to do that:
winget uninstall Docker.DockerDesktop
Other Articles:
- How to install Cockpit CMS on Docker
- How to Tag existing Docker images
- How to install Docker on Amazon Linux 2023
- How to install Docker using SNAP on Ubuntu Linux
- 2 Ways to start Docker Container automatically on Boot in Linux
Docker is a powerful platform that allows you to develop, ship, and run applications inside lightweight containers. Install Docker on Windows to create consistent development environments, streamline deployment processes, and enhance system efficiency.
This guide will provide step-by-step instructions for installing Docker on Windows using the GUI or the command line.
Prerequisites
- A machine running Windows 10 22H2 or Windows 11.
- At least 4GB of RAM.
- A user account with administrator privileges.
- WSL 2 enabled.
Install Docker Desktop on Windows via GUI
Installing Docker via a GUI is simple, with a full desktop app, and it is great for beginners and GUI users. It involves downloading the Docker Desktop Installer from the official website and installing the program through a wizard.
Follow the steps in the sections below.
Step 1: Download Docker Desktop Installer
Download the Docker Desktop Installer for Windows x86/x64 from the official Docker website.
Note: A paid subscription is required if you plan to use Docker Desktop in large enterprises with over 250 employees or if your annual revenue exceeds $10 million USD. Docker is free for personal use, small businesses, and education. Refer to the official page for pricing details.
Step 2: Install Docker Desktop
The steps below will guide you through the installation process:
1. Find and double-click the downloaded installer to start the installation.
2. The installer initializes, and the configuration screen appears, allowing you to customize your setup.
Keeping the default options checked is recommended, as WSL 2 offers faster performance, better integration with the Windows filesystem, and uses fewer system resources compared to Hyper-V.
Uncheck the box to use Hyper-V instead if you need to run traditional Windows-based virtual machines or if you require stricter isolation and security controls than WSL’s.
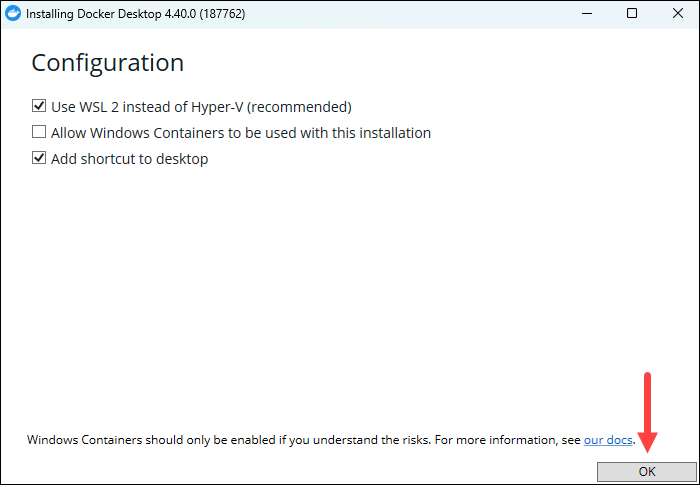
Click OK to start the installation.
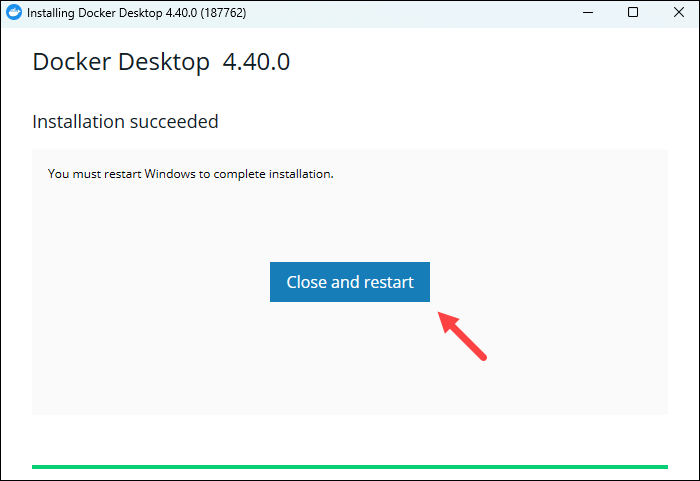
3. When the process completes, click the Close and restart button to close the installer and reboot Windows for the changes to take effect:
Step 3: Start Docker Desktop
After installation, start the Docker tool manually:
1. Press the Windows button and type Docker desktop to find the app.
2. Open the Docker Desktop app from the search results.

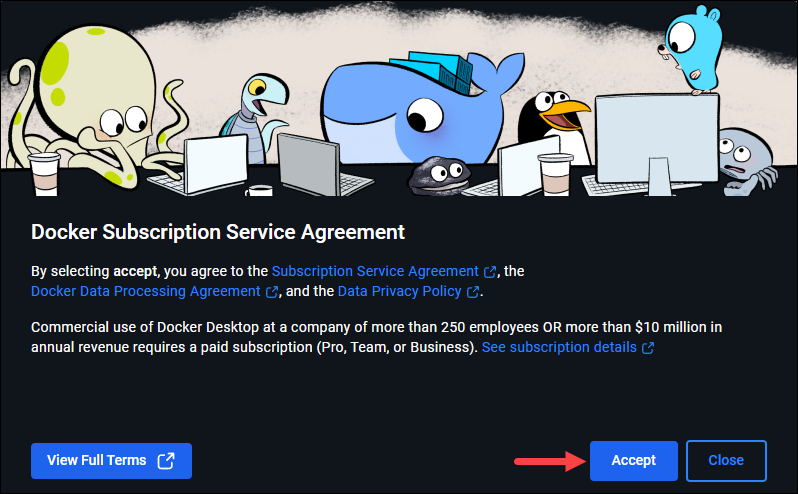
3. The app requires you to accept the Docker Subscription Service Agreement first. If you agree with the terms, click Accept to proceed.
4. The app presents a Welcome survey. The survey is optional, and you can click Skip in the top right corner to move on to the sign-in step.
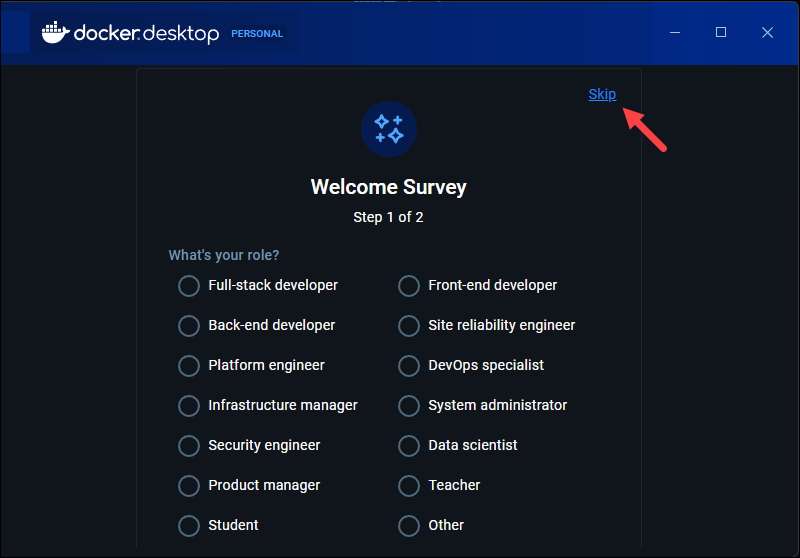
5. The Welcome to Docker screen appears, where you can sign in to Docker if you already have an account or create a new account. Complete the sign-in process to finish the installation.

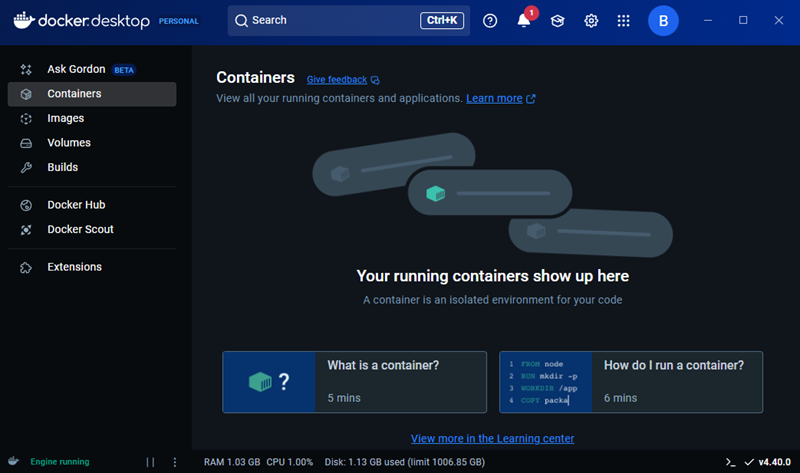
6. After signing in, the Docker Desktop dashboard opens, which means Docker Desktop is successfully running on Windows.
Install Docker Desktop via CLI
This method shows a terminal-based, manual setup that installs Docker in a Linux environment inside Windows, without using the GUI installer. The installation is silent, via PowerShell, and it is ideal for sysadmins or DevOps users who want automation or script-based installs.
Note that Docker still runs on Windows through the Docker Desktop app (with GUI components), even if it is installed and started via the terminal.
Step 1: Download the Installer
Download the Docker Desktop Installer and save it in an easily accessible location. Remember the path as you will need it in the following step.
Step 2: Install Docker
After you download the installer, there are two ways to install Docker Desktop, depending on which command line option you want to use:
Windows PowerShell
1. Open PowerShell as an administrator and use the cd command to navigate to the folder in which you downloaded the installer.
2. Run the command below to install Docker Desktop:
Start-Process 'Docker Desktop Installer.exe' -Wait --quiet install3. If prompted, click OK to complete the installation.
Command Prompt
1. Open Windows Command Prompt as an administrator and navigate to the installer location.
2. Run the command below to start the installation:
start /w "" "Docker Desktop Installer.exe" install3. When prompted, click OK to finish the installation.
The default installation location for Docker Desktop is C:\Program Files\Docker\Docker.
Step 3: Add User Account
If your admin account and user account are not the same, use the syntax below to add user accounts to Docker user groups:
net localgroup docker-users [user] /addReplace [user] with the respective username.
Step 4: Start Docker Desktop
Open the Docker Desktop app and sign in to your account to enable the Docker engine. Follow the steps outlined in Step 3: Start Docker Desktop section above, and when you finish, you can start using Docker.
Step 5: Verify Docker Installation
To verify that Docker installed correctly, pull a sample image. In PowerShell or the Command Prompt, run the command below:
docker pull nginx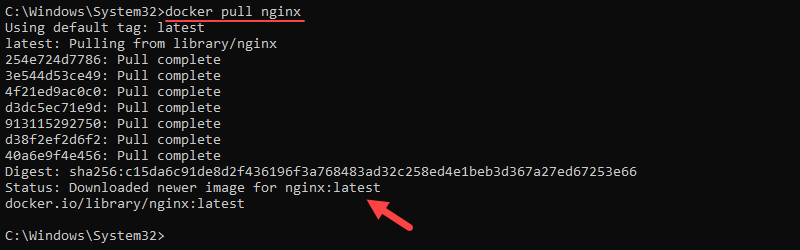
If the image pulls successfully, Docker Desktop has been installed correctly.
Install Docker on Windows via Command Line
This method shows how to bypass Docker Desktop completely and install the Docker Engine inside a Linux environment (Ubuntu on WSL). Installing Docker inside a Linux environment is closer to how Docker works natively on Linux systems. It is ideal for developers who want a lightweight, GUI-free, native-Linux experience or dislike Docker Desktop’s licensing or resource overhead.
Follow the steps in the sections below.
Step 1: Enable WSL
If you do not have WSL enabled, you must first install it. Open PowerShell or Windows Command Prompt as an administrator and run the following command:
wsl --installThe command enables the required features for running WSL and installs the default Linux distro (Ubuntu).
If you want a specific Linux distribution, you can specify it using the -d flag. In this tutorial, we will use Ubuntu 24.04:
wsl --install -d Ubuntu-24.04
Step 2: Initialize Distro and Create User
After the installation, it is time to set up the Linux distribution.
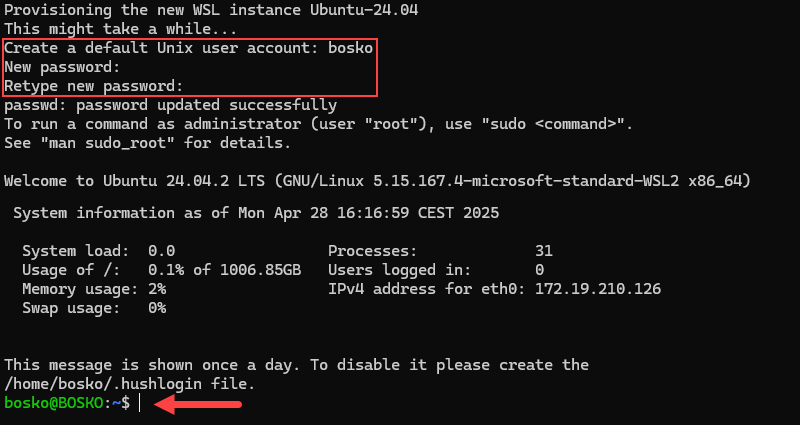
1. Press the Windows button and type Ubuntu to find the distribution. Press Enter to initialize it.
2. After the instance initializes, it prompts you to create a new default user account. Provide the username and password to start using Ubuntu within WSL.
Step 3: Install Docker
After initialization, the system is ready for Docker installation. Follow the steps below:
1. Update the system package index with:
sudo apt update2. Install the dependencies:
sudo apt install ca-certificates curl3. Set the permissions for the /etc/apt/keyrings directory that will hold the GPG key:
sudo install -m 0755 -d /etc/apt/keyrings4. Download the GPG key:
sudo curl -fsSL https://download.docker.com/linux/ubuntu/gpg -o /etc/apt/keyrings/docker.asc5. Change the key permissions:
sudo chmod a+r /etc/apt/keyrings/docker.asc6. Add the Docker repository to apt sources:
echo \
"deb [arch=$(dpkg --print-architecture) signed-by=/etc/apt/keyrings/docker.asc] https://download.docker.com/linux/ubuntu \
$(. /etc/os-release && echo "${UBUNTU_CODENAME:-$VERSION_CODENAME}") stable" | \
sudo tee /etc/apt/sources.list.d/docker.list > /dev/null
7. Refresh the package index one more time to pull information from the Docker repository:
sudo apt update8. Install Docker and all required packages:
sudo apt install docker-ce docker-ce-cli containerd.io docker-compose-plugin docker-buildx-pluginWait for the installation to complete. For more detailed instructions on enabling non-root access and a QuickStart guide on using Docker in Ubuntu, refer to our tutorial for installing Docker on Ubuntu.
If you have installed a different distribution on WSL, refer to our guides for installing Docker on Raspberry Pi, Rocky Linux and CentOS, or Debian.
9. After you set up and customize the installation to your needs, verify the installation with:
docker --versionThe output should print the Docker version if the installation completed successfully:

Conclusion
This tutorial showed how to install Docker on Windows using the GUI or the CLI. Installing Docker on Windows allows users to benefit from streamlined development processes, reliable application deployment, and greater operational efficiency.
Next, learn how to check and reduce Docker image size or set up and use a private Docker registry. If you already use Docker, download our handy Docker commands cheat sheet.
Was this article helpful?
YesNo
Docker CLI for Windows
Get docker cli
At the moment the docker cli to download is a beta version
You can download it from releases page https://github.com/mars-86/docker-cli/releases
Overview
Use docker on windows from command line.
Installation
Prerequisites
Windows subsystem for linux
- turn windows features on or off
- enable windows subsystem for linux
- enable virtual machine platform
- wsl —update
- wsl —set-default-version 2
Mingw
You will need to install mingw if you download the docker-cli version without libraries.
Install docker CLI
Just run install.bat and it will install docker cli on user’s root folder

Usage
Run docker command from console.

Building for source
- Install mingw https://www.mingw-w64.org/
- Add bin folder to path
- Clone the repository
- Run compile.bat
It should generate a bin folder with an executable file inside every module and install.bat on root folder
⚠️ Antivirus
You may have problems due to antivirus, specifically McAfee.
Troubleshooting
- The operation could not be started because a required feature is not installed.
-> enable virtual machine platform (https://github.com/mars-86/docker-cli/tree/main#prerequisites). - Daemon does not starts on init or stops unexpectedly
-> go to %USERPROFILE%\docker-cli\daemon\ and run dockerd.exe manually. - WSL stops instances after windows sleeps (microsoft/WSL#8763)
-> go to edit plan settings and change all the options in «choose what the power buttons do» to hibernate,
also go to «change when the computer sleeps» and set the options under «put the computer to sleep» to never.
License
MIT
Windows 10 now comes with container features available to pro and enterprise versions. To get started with containers on Windows 10, please make sure the below prerequisites are met.
Pre-requisites
Let’s ensure we have prerequisites installed before we get started with docker cli and container installation. If you already have the below items installed, you can skip them and proceed with the setup.
- Windows 10 Professional or Enterprise with Anniversary Update (version 1607) or later.
- How to setup Hyper-V
- How to setup choco package management on windows 10
- How to install docker for windows 10
Windows 10 now comes with container feature available for developers and devops engineers to start using Docker containers in their local environment. To enable containers for Windows 10, execute the below command.
Enable-WindowsOptionalFeature -FeatureName containers -Online -allNOTE: Upon installation, you will be prompted to reboot your system after the container feature is enabled. It is recommended that you select yes to reboot your system.
Install Docker CLI
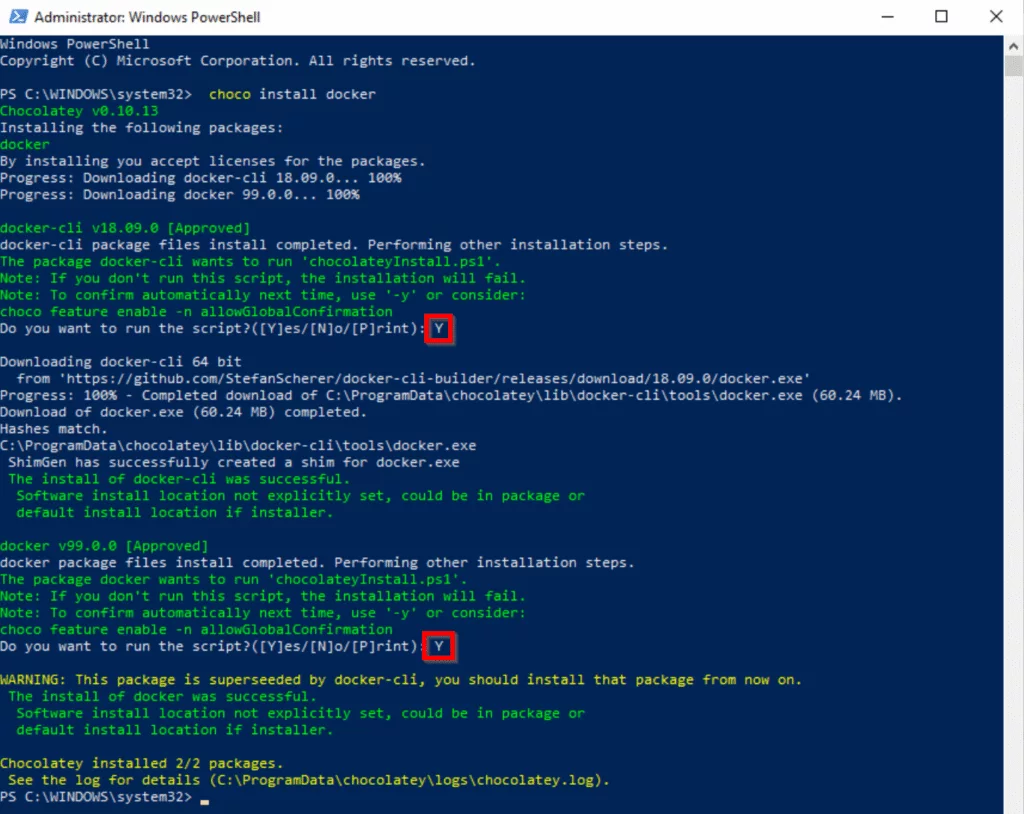
Now we will go ahead and download latest docker cli by using the Chocolate package management tool.
Once you have choco installed, go ahead and open PowerShell as an administrator and execute the below command.
You will be asked to say yes or no. Go ahead and continue with the interactive installation process by pressing Y. The output should look like below if the installation was successful.
Now that you have docker cli installed, you are now ready to run your first Docker container.
Installing Docker Enterprise Edition (EE)
To install Docker EE on Windows 10, please make sure above setup is successfully completed. To get started, go ahead and execute the below commands from an elevated PowerShell console.
To go to the Downloads’ folder of your current user.
Download Docker Enterprise Edition from online
Invoke-WebRequest -UseBasicParsing -OutFile docker-18.09.3.zip https://download.docker.com/components/engine/windows-server/18.09/docker-18.09.3.zipNOTE: In this tutorial I am using Docker 18.09.3 version. This may change in the future. You can follow the updated document from here.
Unzip the Docker package.
Expand-Archive docker-18.09.3.zip -DestinationPath $Env:ProgramFiles -ForceExecute the below script to set up and start Docker.
# Add Docker to the path for the current session.
$env:path += ";$env:ProgramFiles\docker"

# Optionally, modify PATH to persist across sessions.
$newPath = "$env:ProgramFiles\docker;" +
[Environment]::GetEnvironmentVariable("PATH",
[EnvironmentVariableTarget]::Machine)

[Environment]::SetEnvironmentVariable("PATH", $newPath,
[EnvironmentVariableTarget]::Machine)

# Register the Docker daemon as a service.
dockerd --register-service

# Start the Docker service.
Start-Service docker
Test your Docker setup by executing the below command.
docker container run hello-world:nanoserverRunning your first Docker container
In this example, I will be using nanoserver image from Docker hub to run an IIS application.
Step 1: Let’s first check if we have any Docker images pulled from Docker hub. Based on the above setup for Docker, you should have a hello-world Docker image pulled from Docker hub.
Step 2: Let’s pull a new Docker image from Docker hub to run nanoserver with IIS configured.
docker pull nanoserver/iisYour final output should look like below.
Step 3: After we have pulled the latest image from Docker hub, let’s run our first windows container by executing the below command.
docker run --name nanoiis -d -it -p 80:80 nanoserver/iisAfter it will return a container ID that you can use to check container status, configuration, etc.
Step 4: Check our first container status by executing the below command.
docker ps -a -f status=runningStatus output:
Step 5: Now let’s get the IP address of our container to access it from the browser.
docker inspect -f "{{ .NetworkSettings.Networks.nat.IPAddress }}" nanoiisStep 6: Copy the IP address that was returned to the PowerShell console and browse it in Internet Explorer.
In my case, I received 172.19.231.54. Yours may be different.
This is it! You have run your first Windows container on your Windows 10 machine. Thank you for following this tutorial.