
Всем привет! Недавно я столкнулся с проблемой нехватки памяти на основном диске под крупный проект, который разворачивается в Docker. Вопрос переноса ресурсов Docker на HDD в 1ТБ стоят принципиально, так как не было других вариантов развернуть проект. И вот, что из этого вышло…
Для начала скажу, что у меня стоит SSD WD Green 120G, где стоит Windows и некоторый важный софт, а на HDD 1ТБ стоят другие программы, проекты и «личная жизнь».
Прислали инструкцию по разворачиванию проекта, где был довольно большой дамп MySql размером более 50Гб и множество контейнеров. Как-то не обращал внимания на этот вопрос, но в процессе оооооочень долгой установки Docker схлопнулся и сказал:
Работать я не буду, я вообще выключаюсь, мне душно и не хватает места на диске, чтобы я тут тебе твои проекты поднимал.
Я устал, я ухожу!
Новость не из приятных была. Крутил этот Docker и так и сяк по всем инструкциям в инете и офф документации, но именно под Windows ничего не выходило. И да, если вы в daemon.json поменяете data-root, то он попросту не будет работать… Здорово, правда?!
Спустя много времени тестов и перенастроек я смог найти решение! Возможно, вы уже знаете о нем, так что не судите строго. Я лишь пытаюсь помочь «путникам в мире Windows с кастрированными жесткими дисками».
И так, хватит болтать и приступим. Делайте все в точности по инструкции и будет вам счастье. Сразу скажу, что у меня Windows с Docker лежит на диске C, а хочу я перенести его на диск D, где есть папка Programs.
# выключаем wsl
wsl --shutdown
# экспортируем данные docker-desktop
wsl --export docker-desktop D:\docker-desktop.tar
# убираем регистрацию данных docker-desktop
wsl --unregister docker-desktop
# импортируем данные docker-desktop в новую директорию
wsl --import docker-desktop D:\wslStore\ D:\docker-desktop.tar --version 2
# удалите D:\docker-desktop.tar
После этих манипуляций, все ваши истории с DockerDesktop будут располагаться в D:\wslStore\. Но, это не означает, что данные (контейнеры, снимки и прочие) будут тоже находиться там. Для переноса именно данных Docker нужна дополнительная связка команд:
# выключаем wsl
wsl --shutdown
# экспортируем данные docker-desktop-data
wsl --export docker-desktop-data D:\docker-desktop-data.tar
# убираем регистрацию данных docker-desktop-data
wsl --unregister docker-desktop-data
# импортируем данные docker-desktop-data в новую директорию
wsl --import docker-desktop-data D:\Programs\Docker\ D:\docker-desktop-data.tar --version 2
# удалите D:\docker-desktop-data.tar
И вот только теперь именно под Windows ваш Docker будет храниться все свое барахло именно по пути D:\Programs\Docker\
Аналогично можно перенести и Ubuntu, и другие истории с wsl/Docker куда вам надо:
wsl --export Ubuntu ubuntu.tar
wsl --unregister Ubuntu
wsl --import Ubuntu D:\wslStore\Ubuntu\ ubuntu.tar --version 2
На эти решения я потратил целый день: то одно пробовал, то другое — и вот нашел рабую схему изменения директории хранения данных Docker под Windows.
Надеюсь, что эта информация была полезна. Ну, а если нет, то сильно не бейте 
Docker Desktop в Windows 10 создаёт WSL 2 дистрибутив docker-desktop-data и соответствующий виртуальный диск для него, который обычно расположен здесь:
%USERPROFILE%\AppData\Local\Docker\wsl\data\ext4.vhdxИменно тут хранятся все контейнеры и образы докера. Для перемещения этого диска в другое место нужно выполнить несколько шагов.
Шаг 1. Выйти из Docker Desktop (если запущен).
Завершение работы Docker Desktop
Шаг 2. В командной строке выполняем команду для вывода списка дистрибутивов Linux:
wsl --list -vwsl— команда для взаимодействия с подсистемой Linux в Windows;--list— вывести список дистрибутивов Linux;-v— вывести расширенную информацию.
Результат выполнения команды должен быть примерно таким:
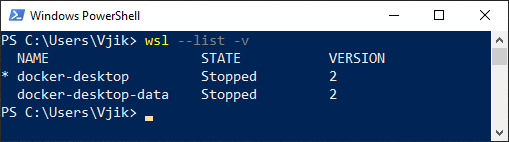
Список дистрибутивов Linux с расширенной информацией
Состояние дистрибутивов (STATE) должно быть Stopped.
Шаг 3. Экспортируем данные в файл. Можно экспортировать в любое место, этот файл позже можно будет удалить. Например, в корень диска f::
wsl --export docker-desktop-data "f:\docker-desktop-data.tar"Шаг 4. Удалим дистрибутив docker-desktop-data из WSL. Во время выполнения этой операции виртуальный диск со всеми данными докера будет удалён.
wsl --unregister docker-desktop-dataШаг 5. Импортируем дистрибутив обратно в WSL, но теперь в новое место. Например, в папку f:\docker\wsl (папка должна быть предварительно создана):
wsl --import docker-desktop-data "f:\docker\wsl" "f:\docker-desktop-data.tar" --version 2Шаг 6. Запускаем Docker Desktop и проверяем, что всё работает. Если всё хорошо, можно удалить файл, который мы создали при экспорте дистрибутива на 3 шаге (f:\docker-desktop-data.tar).
На этом всё. Данные докера хранятся теперь в новом месте.
Статья основана на ответе на вопрос «How can I change the location of docker images when using Docker Desktop on WSL2 with Windows 10 Home?» cо StackOverflow.
При написании статьи использовалось следующее ПО:
- Windows 10 Pro 20H2
- Docker Desktop 3.5.1 (66090)
Ajeet Raina Follow
Ajeet Singh Raina is a former Docker Captain, Community Leader and Distinguished Arm Ambassador. He is a founder of Collabnix blogging site and has authored more than 700+ blogs on Docker, Kubernetes and Cloud-Native Technology. He runs a community Slack of 9800+ members and discord server close to 2600+ members. You can follow him on Twitter(@ajeetsraina).
1 min read

Docker Desktop is a powerful tool that allows developers to build, ship, and run applications in containers. By default, Docker stores its images and containers in the system drive, which can sometimes lead to storage space issues. In this blog post, we’ll explore how to change the Docker image installation directory on the Windows platform.
Tested System:
- Lenovo ThinkPad X1
- Microsoft Windows 11 Pro
- 32 GB RAM
- 13th Gen Intel Core i7-1355U
Pre-requisite:
- Install Visual Studio Code
- Install Docker Desktop for Windows
- Ensure that you have installed the latest version of Docker Desktop for Windows 4.26.1.
2. Ensure that “Use the WSL2 based engine” is enabled under Dashboard > Settings > General.
3. Open Settings > Resources > WSL Integration option.
As shown, the current default Docker Image location is C:\Users\ajeet\AppData\Local\Docker\wsl.
Changing the Installation Directory
Go ahead and try changing the default Disk Image location.
Quick Note: The Resource section also allows you to configure limits on the memory, CPU and Swap size allocated to WSL2 by editing the .wslconfig file.
The wsl.conf and .wslconfig files are used to configure advanced settings options, on a per-distribution basis (wsl.conf) and globally across all WSL 2 distributions (.wslconfig). This guide will cover each of the settings options, when to use each file type, where to store the file, sample settings files and tips.
What is the difference between wsl.conf and .wslconfig?
You can configure the settings for your installed Linux distributions that will automatically be applied every time you launch WSL in two ways, by using:
- .wslconfig to configure global settings across all installed distributions running on WSL 2.
- wsl.conf to configure local settings per-distribution for each Linux distribution running on WSL 1 or WSL 2.
Both file types are used for configuring WSL settings, but the location where the file is stored, the scope of the configuration, the type of options that can be configured, and the version of WSL running your distribution all impact which file type to choose.
WSL 1 and WSL 2 run with different architecture and will impact the configuration settings. WSL 2 runs as a lightweight virtual machine (VM), so uses virtualization settings that allow you to control the amount of memory or processors used (which may be familiar if you use Hyper-V or VirtualBox). Check which version of WSL you are running.
Configuring which WSL 2 distros you want to access Docker from
You can “Enable integration with my default WSL distro” under Resources > WSL Integration option.
Conclusion
Changing the Docker image installation directory on Windows is a straightforward process. By selecting a different location with more available space, you can avoid running into storage issues when working with containers.
Remember to be cautious when modifying Docker settings, and always ensure that you have adequate disk space on the chosen drive. Happy containerizing!
Keep Reading
-

Testcontainers and Playwright
Discover how Testcontainers-Playwright simplifies browser automation and testing without local Playwright installations. Learn about its features, limitations, compatibility, and usage with code examples.
Read More
-

Getting Started with the Low-Cost RPLIDAR Using NVIDIA Jetson Nano
Conclusion Getting started with low-code RPlidar with Jetson Nano is an exciting journey that can open up a wide range of possibilities for building robotics projects. In this blog post, we covered the basic steps to get started with low-code RPlidar with Jetson Nano, including setting up ROS, installing the RPlidar driver and viewing RPlidar…
Read More
-
-
Forget Ranking First—Be Agent-Ready First
Let’s face it—search isn’t what it used to be. It’s not just about how people find information, but who (or what) is doing the searching. Think about it. Users aren’t just typing into search bars anymore. They’re having conversations with voice assistants, chatting with AI copilots, and letting embedded agents help them make decisions on…
Read More
-
5 Reasons to Switch from Ollama to Docker Model Runner
In recent months, the LLM deployment landscape has been evolving rapidly, with users experiencing frustration with some existing solutions. A Reddit thread titled “How to move on from Ollama?” highlights growing discontent with Ollama’s performance and reliability issues. As Docker enters this space with Model Runner, it’s worth examining why many users are making the…
Read More
-
CI for AI: Running Ollama + LLMs in GitHub Actions with Open Source Tools
AI is rapidly transforming how we build software—but testing it? That’s still catching up. If you’re building GenAI apps, you’ve probably asked:“How do I test LLM responses in CI without relying on expensive APIs like OpenAI or SageMaker?” In this post, I’ll show you how to run large language models locally in GitHub Actions using…
Read More


Have Queries? Join https://launchpass.com/collabnix
Ajeet Raina Follow
Ajeet Singh Raina is a former Docker Captain, Community Leader and Distinguished Arm Ambassador. He is a founder of Collabnix blogging site and has authored more than 700+ blogs on Docker, Kubernetes and Cloud-Native Technology. He runs a community Slack of 9800+ members and discord server close to 2600+ members. You can follow him on Twitter(@ajeetsraina).
- #Docker
The default path of Docker Desktop data is C:\ProgramData\Docker. The main issue with Docker in C drive is the space limitation. We might have allocated low space to C drive while installing Windows Operation System. Also, the Docker images and containers need a good amount of space on the disk. In such cases, we have to move the Docker images and containers to another drive having sufficient space. This tutorial provides all the steps required to change the images and containers path of the Docker Desktop on Windows 10. The steps should be the same on other versions of the Windows Operating System.
Notes: In case you are using WSL 2 for Docker Desktop, you can skip to the section Configuring WSL 2 Virtual Disk location. You may also follow the Symlink approach as mentioned in the Approach C section. Also, make sure to take the required backups before starting the process in case of any failure in either of the approaches.
Approach A — Configure Data Root
Add daemon.json
Open the location C:\ProgramData\Docker\config and add daemon.json if it does not exist.
Stop Docker Desktop
Stop the Docker Desktop before making the changes.
Update daemon.json
Now update the daemon.json as shown below.
{
 "data-root": "E:\\ProgramData\\Docker"
}
It will specify the path to store all the images, containers, and layers out of the C drive.
Start Docker Desktop
Now start the Docker Desktop after applying the changes.
Test Changes
We can also test the changes by issuing the below-mentioned command using PowerShell.
docker pull hello-world
It should create the files to the new location.
Approach B — Configure WSL 2 Data Location
Configuring WSL 2 Virtual Disk location
This step is specific for the Docker Desktop installation with WSL 2. The WSL 2 Docker Desktop Data Virtual Machine default location is %USERPROFILE%\AppData\Local\Docker\wsl\data\ext4.vhdx. You can follow the below-listed steps to relocate the docker data.
Step 1 — Shut down the Docker Desktop by right-clicking the Docker Tray Icon as shown in Fig 1.
Fig 1
Step 2 — Relocate the docker-desktop-data virtual machine disk image using the below-mentioned commands as shown in Fig 2.
wsl --shutdown
wsl --export docker-desktop-data docker-desktop-data.tar
wsl --unregister docker-desktop-data
wsl --import docker-desktop-data e:\docker\wsl\data docker-desktop-data.tar --version 2

Fig 2
Step 3 — Delete %USERPROFILE%\docker-desktop-data.tar.
Step 4 — Start Docker Desktop. It should start using the new location of WSL data.
Approach C — Configure Symlinks
In this approach, we will simply stop the Docker Desktop, move the space-eating directories to another drive having sufficient space, and finally creating symlinks.
Step 1 — Stop Docker Desktop.
Step 2 — Relocate the existing directories %USERPROFILE%\AppData\Local\Docker and C:\ProgramData\Docker to new directories. For example — move %USERPROFILE%\AppData\Local\Docker to E:\Docker\AppData and C:\ProgramData\Docker to E:\Docker\ProgramData. Make sure that you completely remove the existing directories from the C drive before creating the symlinks as shown below.
# Link AppData - Replace youruser with actual user
mklink /j "C:\Users\youruser\AppData\Local\Docker" "E:\Docker\AppData"

# Link ProgramData
mklink /j "C:\ProgramData\Docker" "E:\Docker\ProgramData"
Step 3 — Now start the Docker Desktop. It should start the Docker Engine using the new directories.
Summary
This tutorial provided all the steps required to specify the Docker Desktop location to store the containers, images, and volumes. It also provided the steps to relocate the WSL docker-desktop-data virtual machine disk image to a new location for Docker Desktop installed with WSL 2.
By default, Docker Desktop stores all images and container data in folder C:\ProgramData\Docker. This can lead to massive space consumption in your system drive. The space can be quickly consumed if you run containers like Windows 10 or Windows 11. To avoid this issue, you can try to change Docker Desktop root data path.
Tested version
The solution is tested with the following engine:
- Docker Desktop for Windows: v4.15.0
- Docker Engine version: v20.10.21
Approach 1 — use UI
Follow the steps below to change data folder:
warningtjos Alert — This approach doesn’t work on my Windows 10.
- Open Docker Desktop window.
- Go to Settings
- Click tab Docker Engine.
- In the JSON settings, add a new property data-root with values of the location for storing docker data as the following screenshot shows:
- Click button Apply & restart.
Approach 2 — Update config file directly
If the above approach doesn’t work, try the following steps:
- Stop Docker Desktop.
- Go to your user home folder on Windows, for example, C:\Users\username\ or %USERPROFILE%.
- Go to folder .docker.
- Open or create file daemon.json.
- Add data root config into the above mentioned file:
{
  "data-root": "E:\\Docker\\ProgramData",
  "experimental": false,
}
*Change the highlighted path to yours accordingly.
Switch to Windows Containers
You may need to switch to Windows Containers if you are using Linux containers. You can achieve this by following these steps:
- Open a Command Prompt with Administrative rights
- Change directory to `C:\Program Files\Docker\Docker`.
- Run command resources\dockerd.exe. It prints out the following logs:
time="2022-12-05T11:33:32.418794600+11:00" level=info msg="Starting up"
time="2022-12-05T11:33:32.435137700+11:00" level=info msg="Windows default isolation mode: hyperv"
time="2022-12-05T11:33:32.856620000+11:00" level=info msg="Loading containers: start."
time="2022-12-05T11:33:32.857876500+11:00" level=info msg="Restoring existing overlay networks from HNS into docker"
time="2022-12-05T11:33:34.999317000+11:00" level=info msg="Loading containers: done."
time="2022-12-05T11:33:35.000407400+11:00" level=info msg="Docker daemon" commit=03df974 graphdriver(s)=windowsfilter version=20.10.20
time="2022-12-05T11:33:35.001475000+11:00" level=info msg="Daemon has completed initialization"
time="2022-12-05T11:33:35.122102600+11:00" level=info msg="API listen on //./pipe/docker_engine_windows" - Open another Command Prompt with Administrative rights.
- Type command C:\Program Files\Docker\Docker\DockerCli.exe -SwitchDaemon
- Verify the results by running command
docker version:Client: Cloud integration: v1.0.29 Version: 20.10.21 API version: 1.41 Go version: go1.18.7 Git commit: baeda1f Built: Tue Oct 25 18:08:16 2022 OS/Arch: windows/amd64 Context: default Experimental: true Server: Docker Engine - Community Engine: Version: 20.10.21 API version: 1.41 (minimum version 1.24) Go version: go1.18.7 Git commit: 3056208 Built: Tue Oct 25 18:03:04 2022 OS/Arch: windows/amd64 Experimental: false
To start dockerd (Docker Daemon) automatically, make sure docker system services (Docker Engine) is setup correctly:

"C:\Program Files\Docker\Docker\resources\dockerd.exe" --run-service --service-name docker -G docker-users --config-file C:\ProgramData\Docker\config\daemon.json
The service by default use the above command line. Make sure the daemon.json configuration file exists. And also change the config file to add data-root configuration property as the above example does.
Daemon issue
If you encounter this error — Error response from daemon: open \\.\pipe\docker_engine_windows: The system cannot find the file specified, try the following commands using PowerShell (Administrator mode):
Enable-WindowsOptionalFeature -Online -FeatureName $("Microsoft-Hyper-V", "Containers") -All
If the issue still exists, try uninstall Docker Desktop and downgrade to version 4.13.1.
*Credit: Error response from daemon: open \\.\pipe\docker_engine_windows: The system cannot find the file specified — Docker Desktop for Windows — Docker Community Forums
Other settings
To find out all the other supported settings, refer to official documentation: dockerd | Docker Documentation.