
После установки Windows Server на VDS вам доступна только одна учётная запись — Administrator. Однако во многих случаях сервер нужен для работы нескольких человек — причём одновременной. В таких случаях в систему необходимо добавлять дополнительных пользователей — при условии, что у вас уже настроен терминальный сервер и подключено требуемое количество RDP-лицензий.
Добавление учётной записи в Windows Server 2016
Добавление учётной записи в Windows Server 2019/2022
Зачем нужны RDP-лицензии и где их взять
Для начала подключитесь к вашему серверу по RDP под пользователем Administrator. Если сервер только приобретён, для удобства работы можно сразу включить русский язык в настройках:
- Как добавить русский язык в Windows Server 2016
- Как добавить русский язык в Windows Server 2019/2022
Добавление учётной записи в Windows Server 2016
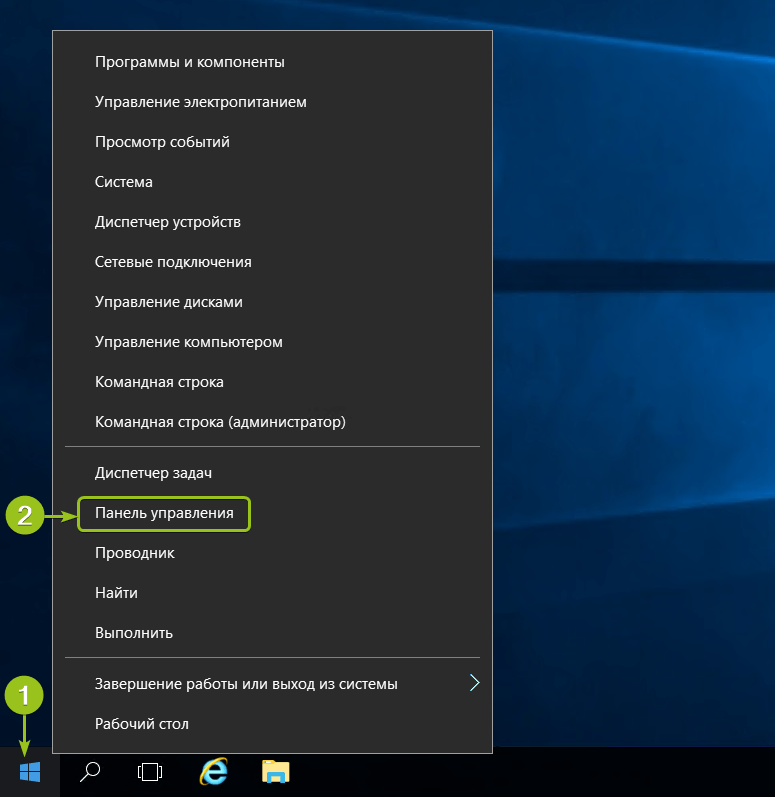
В Windows Server 2016 в панель управления можно перейти из контекстного меню при клике правой кнопкой мыши по меню «Пуск»:
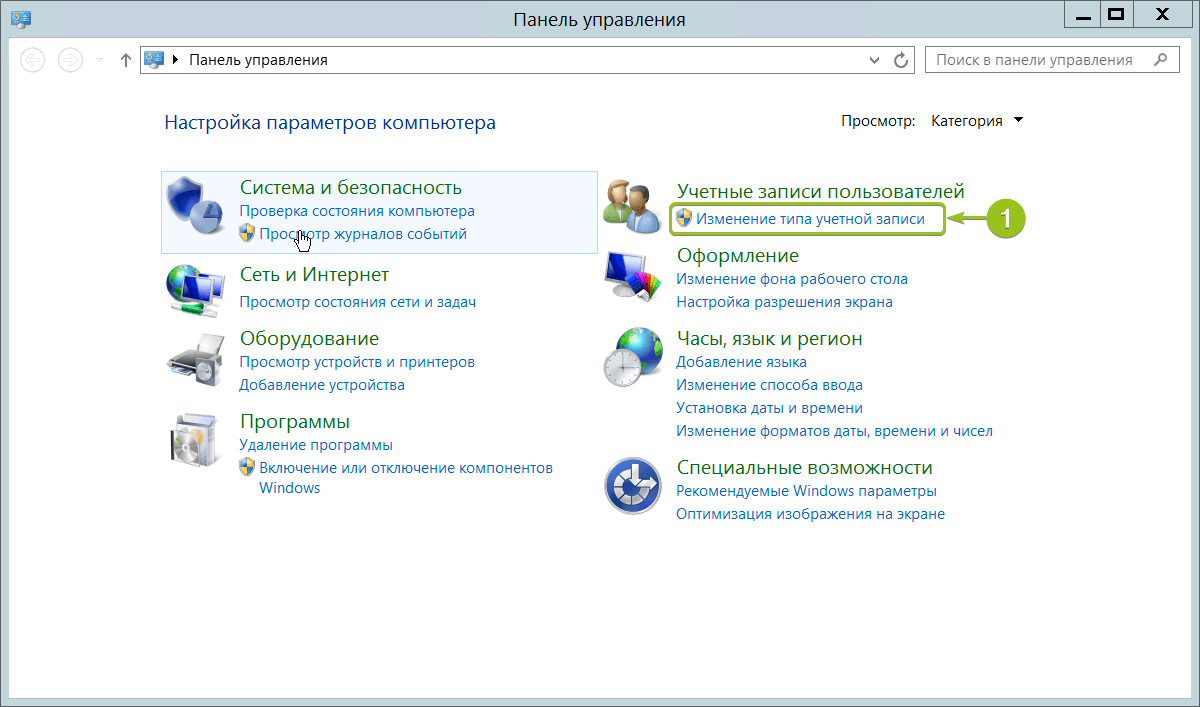
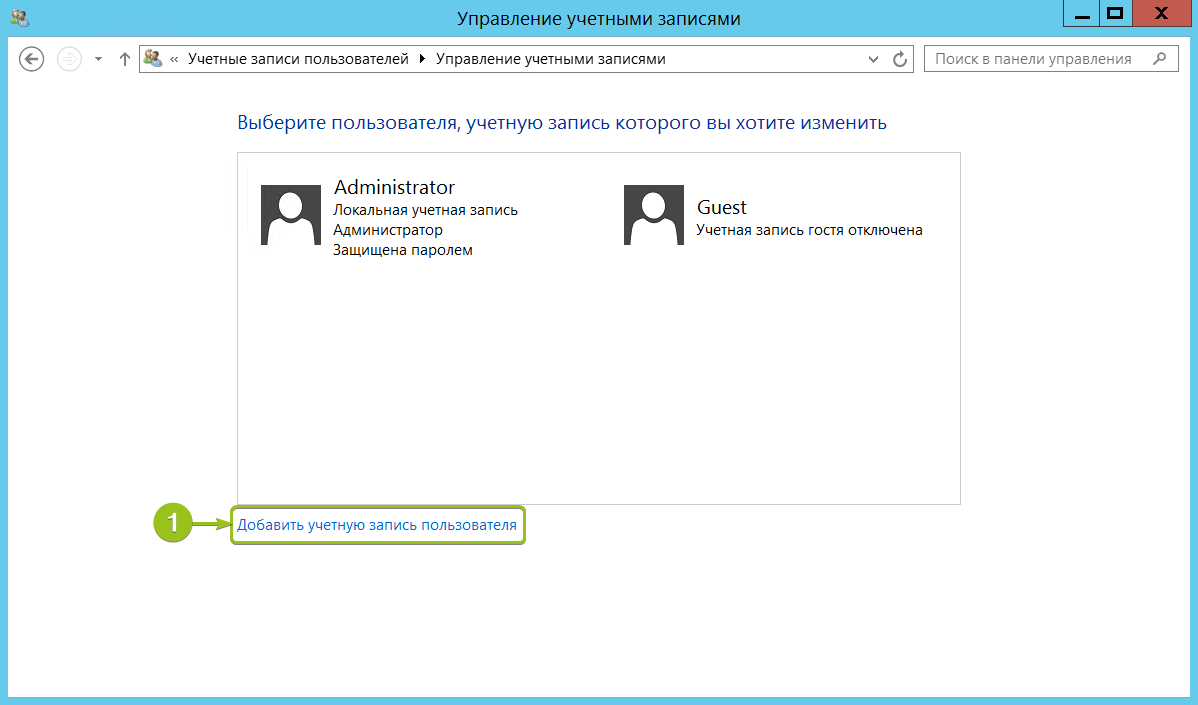
В панели управления в разделе «Учётные записи пользователей» нажмите «Изменение типа учётной записи». Откроется список пользователей вашего сервера. Здесь выберите опцию «Добавить учётную запись пользователя»:
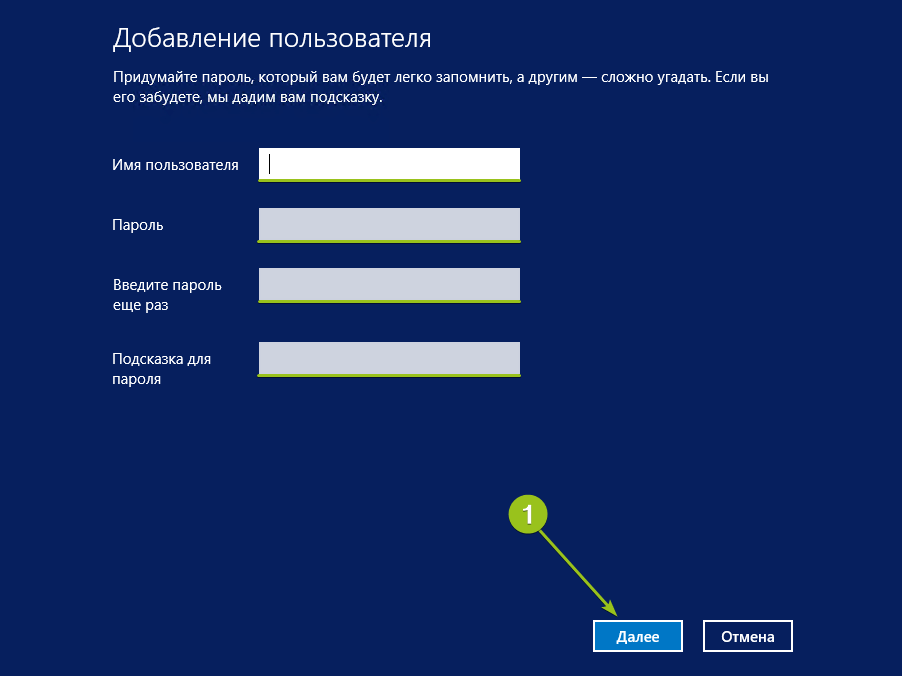
Запустится мастер создания пользователей. Введите логин, пароль, подтверждение пароля, подсказку и нажмите «Далее».
Система добавит новую учётную запись и отобразит её данные — имя и уровень прав. Для завершения настройки нажмите «Готово»:
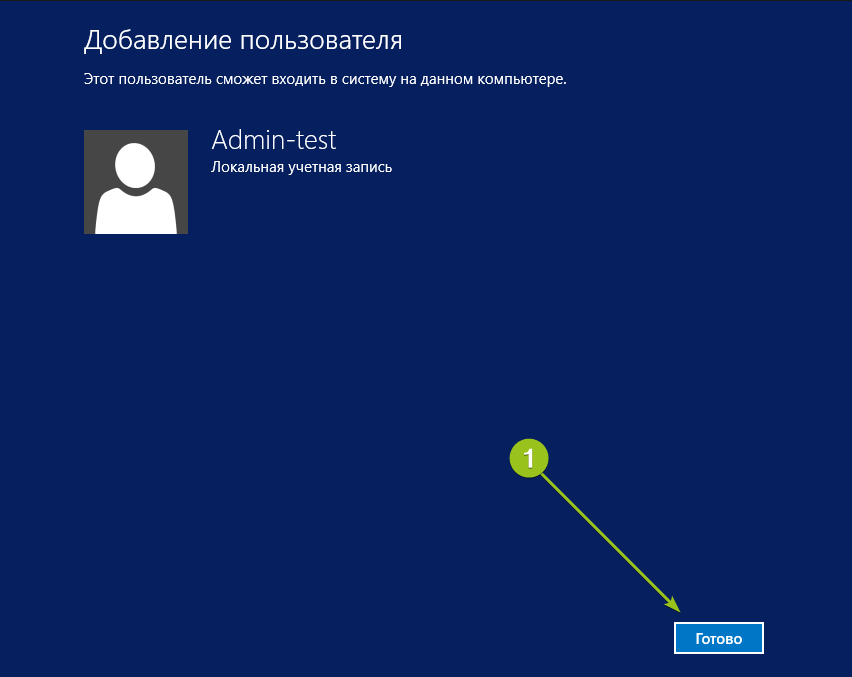
После этого в списке пользователей появится новая учётная запись.

При необходимости вы можете изменить тип созданного пользователя — дать ему права администратора. Для этого кликните на карточку учётной записи — откроется окно настройки:
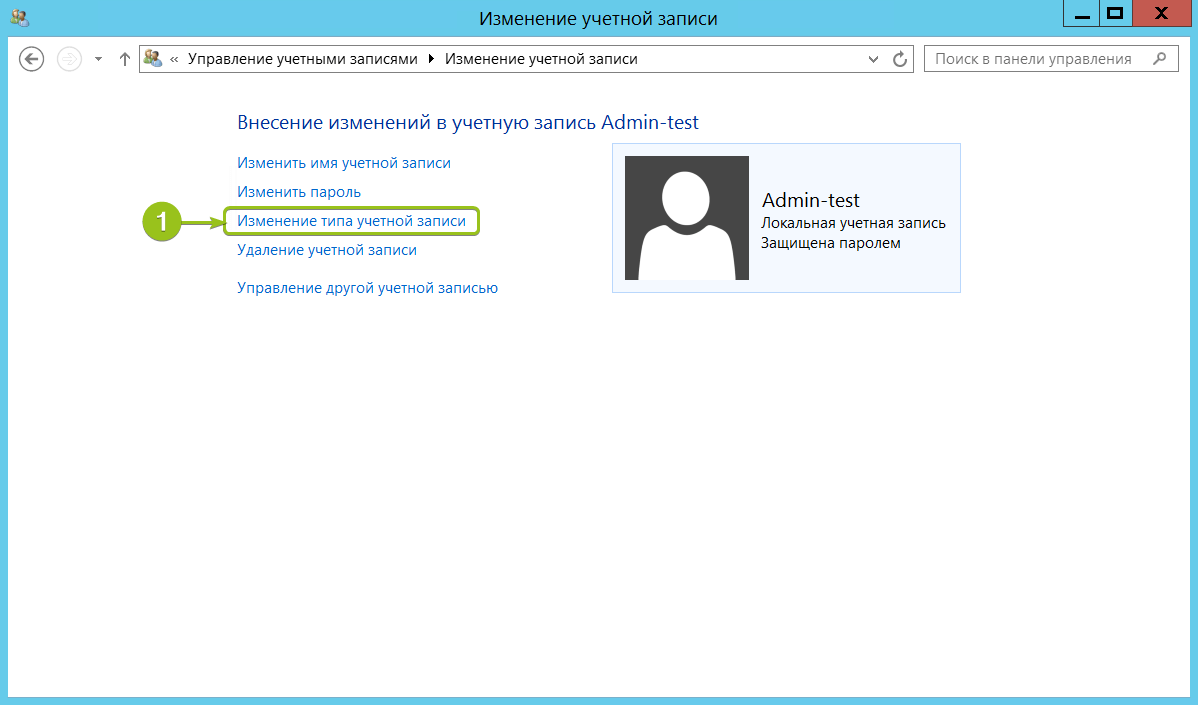
В меню слева выберите «Изменение типа учётной записи» — система предложит настроить уровень доступа:
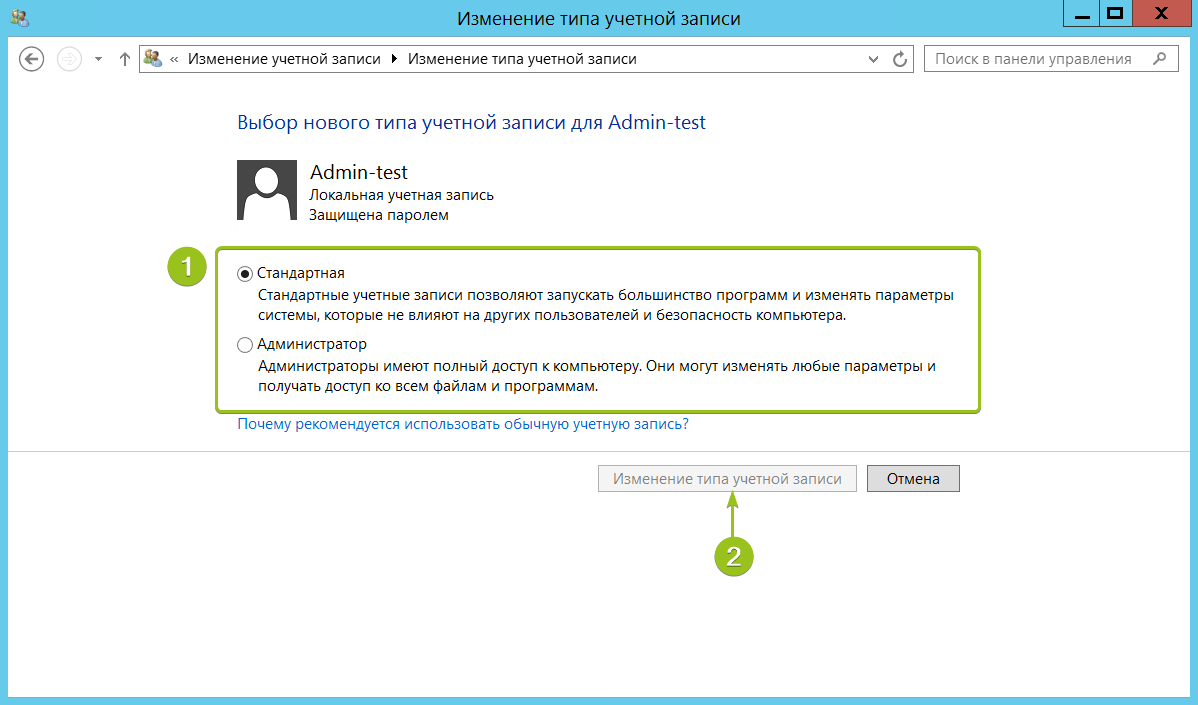
Укажите требуемый уровень прав и нажмите «Изменение типа учётной записи» для вступления настроек в силу.
На этом процесс создания пользователя на Windows Server 2016 завершён. Чтобы новый пользователь мог подключиться к серверу по RDP, ему потребуются следующие данные:
- IP-адрес вашего сервера / домен;
- логин пользователя;
- пароль пользователя.
Добавление учётной записи в Windows Server 2019/2022
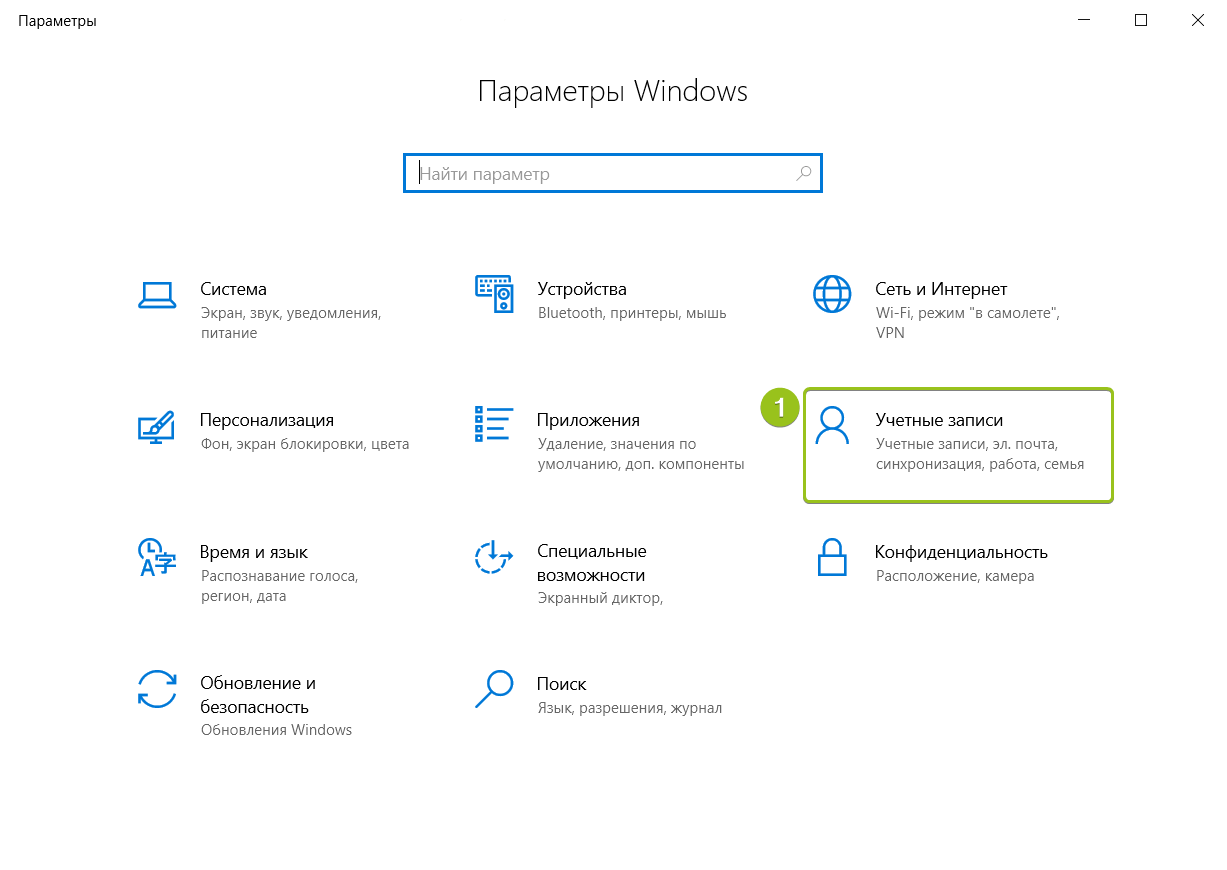
Алгоритм создания пользователей на Windows Server 2019 и 2022 немного отличается. После подключения к серверу откройте меню «Пуск» и перейдите в раздел «Параметры».

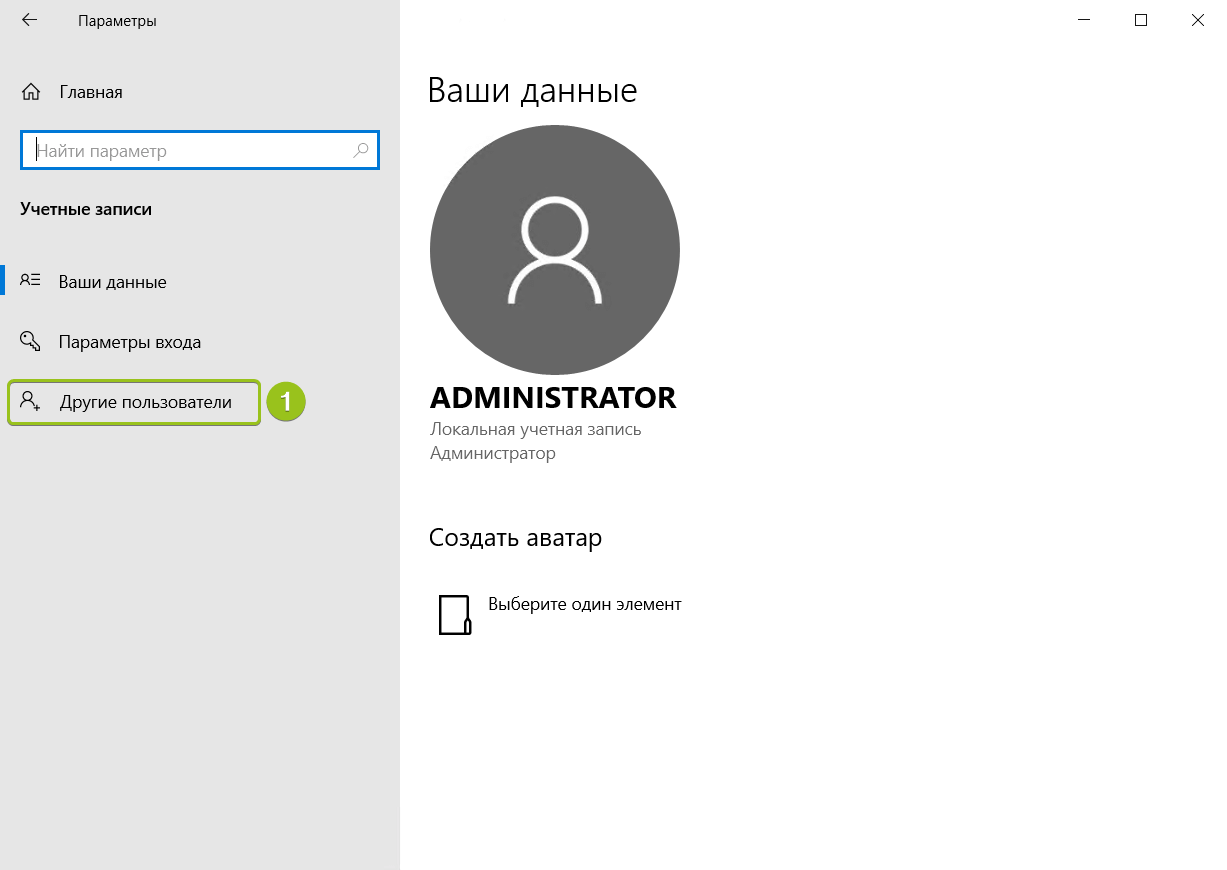
В панели управления выберите раздел «Учётные записи».
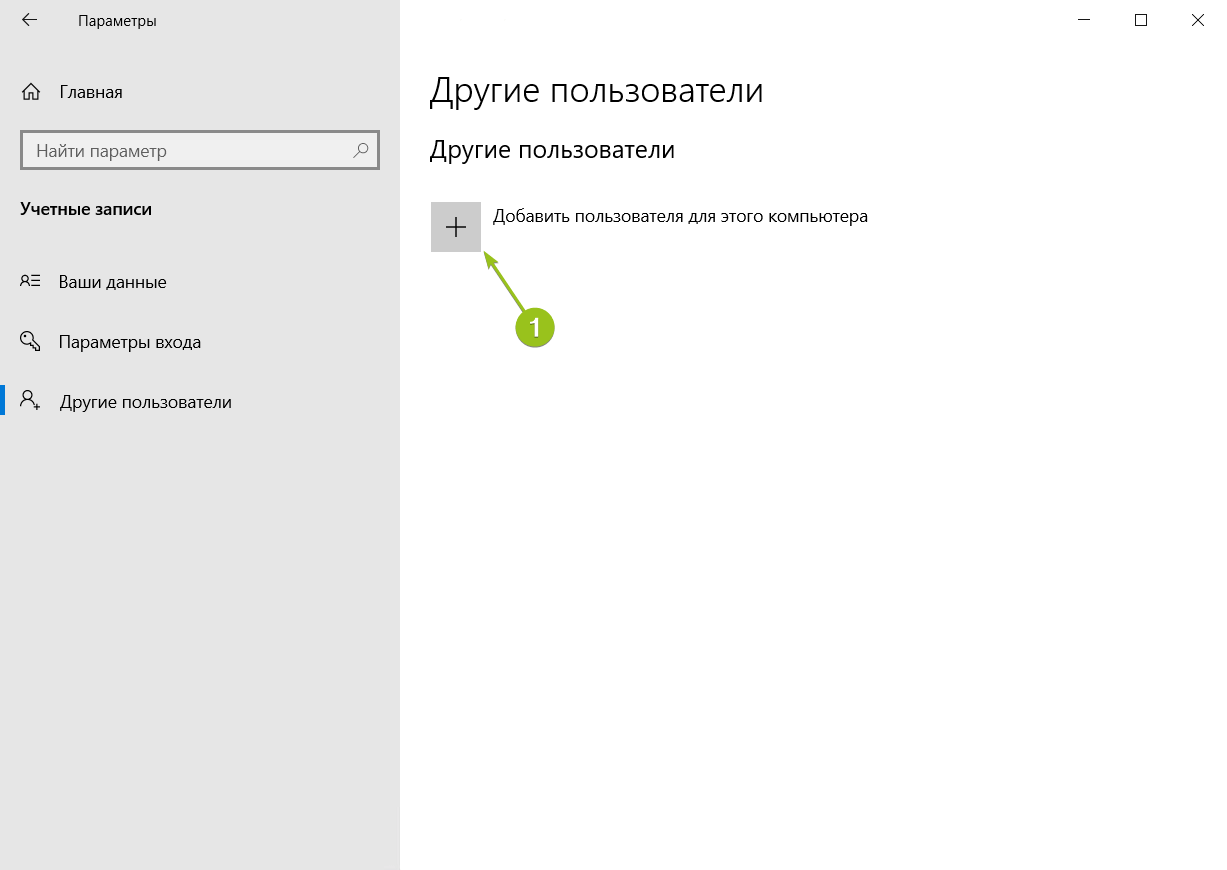
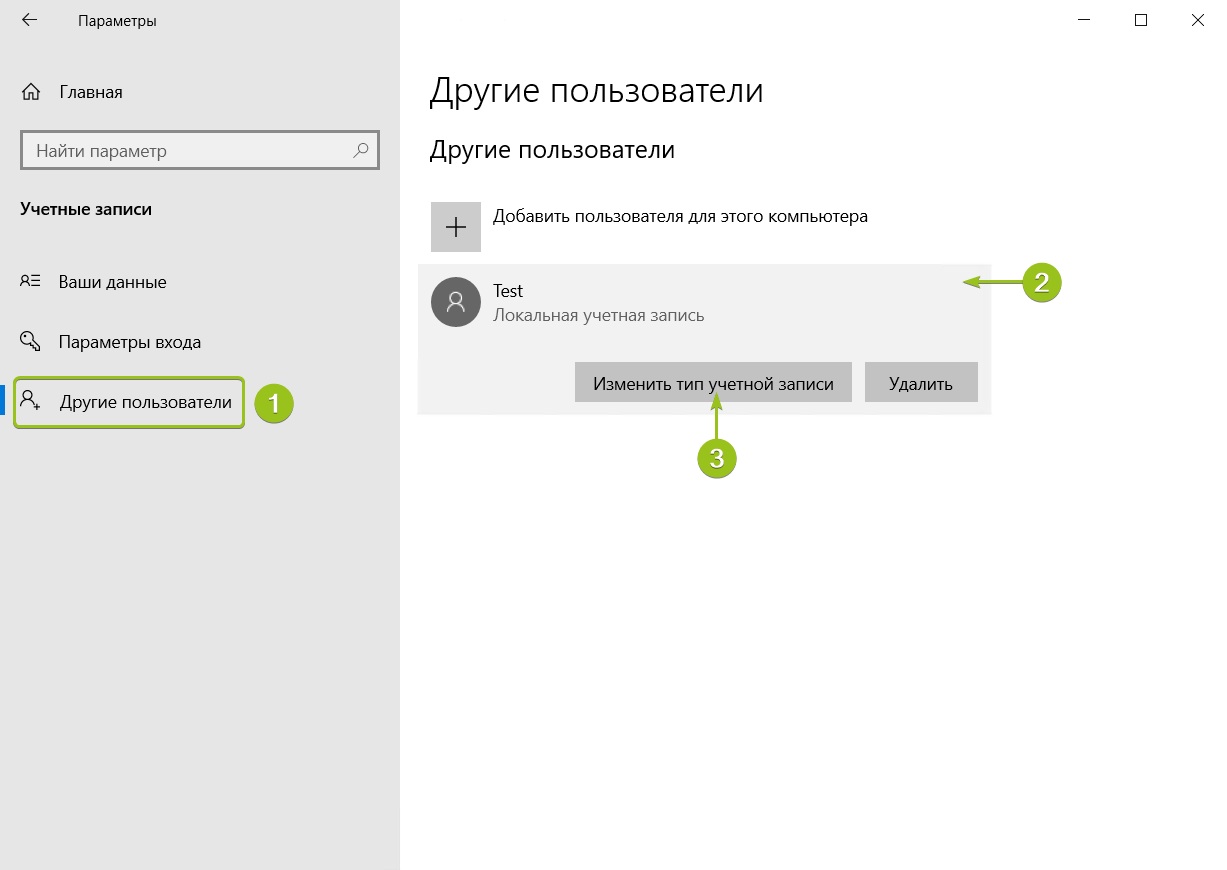
Система перенаправит вас на страницу с данными текущего пользователя. В меню слева перейдите в раздел «Другие пользователи» и нажмите «Добавить пользователя для этого компьютера»
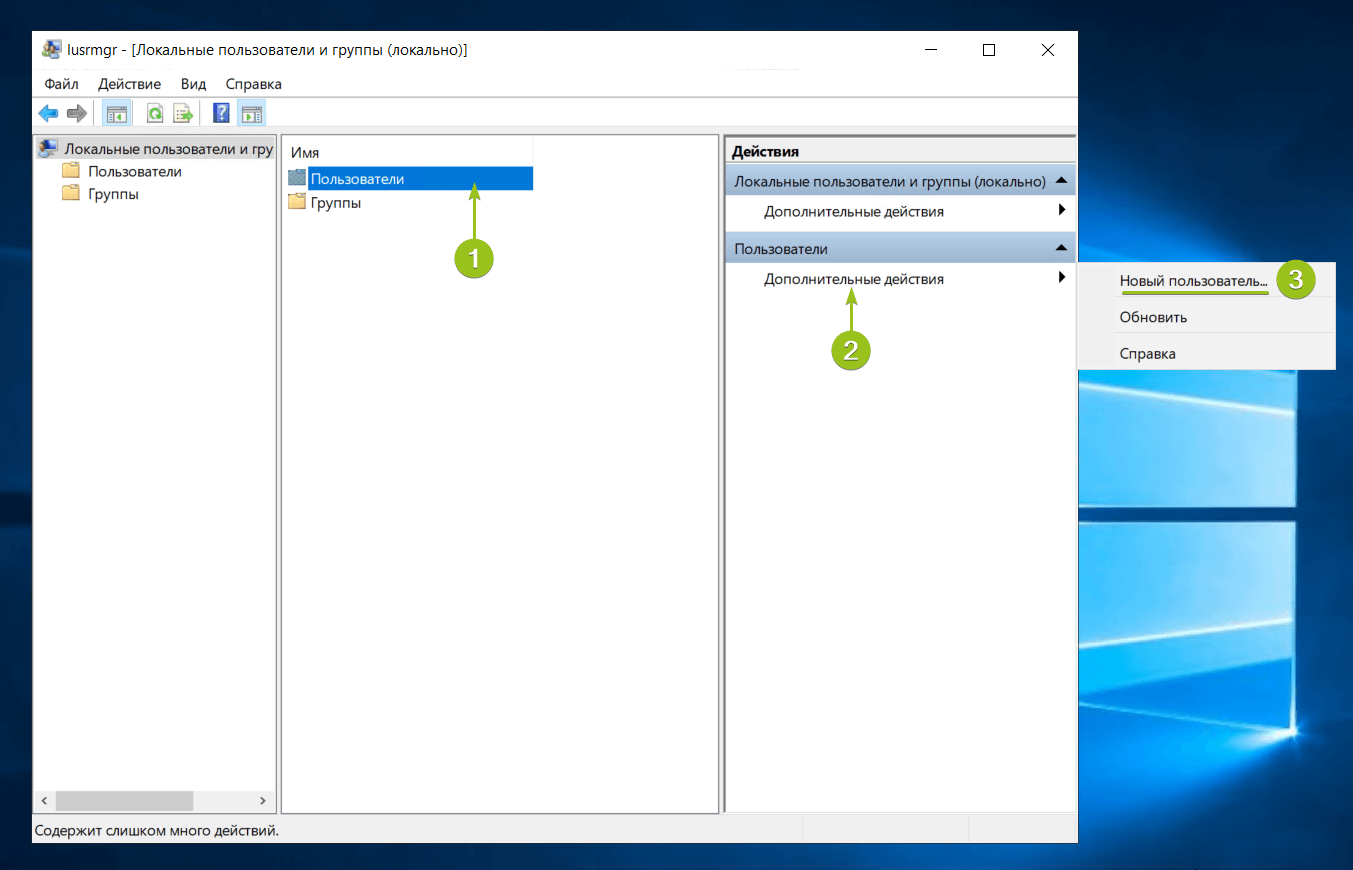
Запустится оснастка настройки локальных пользователей и групп. Выберите раздел «Пользователи» и в блоке «Действия» в соответствующем подразделе справа перейдите в меню «Дополнительные действия» — «Новый пользователь...»:
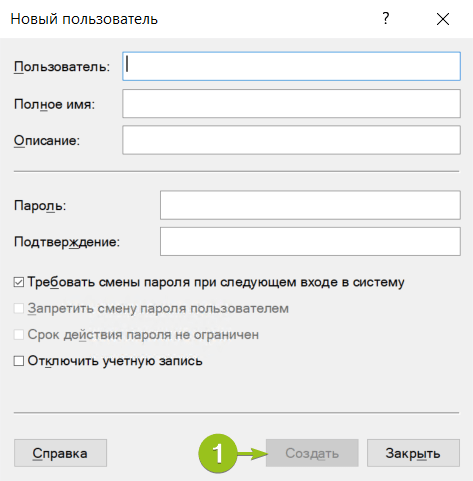
Система предложит ввести данные нового пользователя: логин, имя для отображения в системе, описание и пароль с подтверждением. После заполнения данных нажмите «Создать». Поля в форме сбросятся к пустому состоянию — при отсутствии ошибок это означает, что новый пользователь успешно добавлен.
После добавления нужного количества пользователей нажмите «Закрыть» — вы вернётесь к списку пользователей, где появятся созданные учётные записи.

По умолчанию новые учётные записи создаются со стандартным уровнем прав. Если вы хотите предоставить новому пользователю права администратора, вернитесь в Параметры — Учётные записи — Другие пользователи. Выберите созданного пользователя и нажмите «Изменить тип учётной записи».
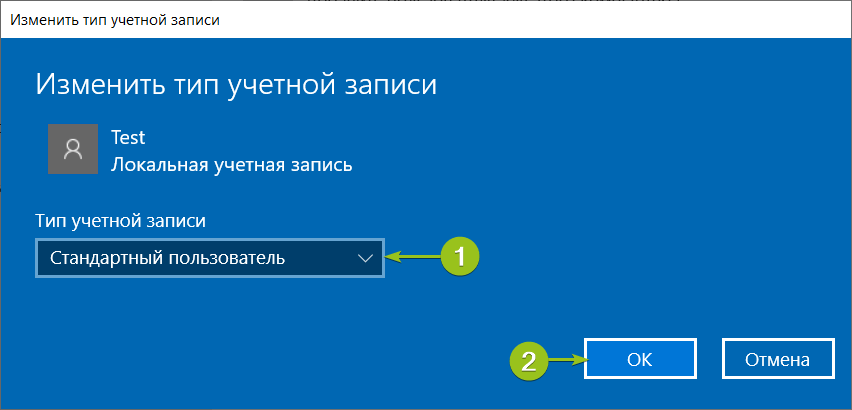
В окне настройки выберите в списке «Тип учётной записи» уровень прав и нажмите «ОК».
На этом процесс добавления пользователя завершён. Чтобы новый пользователь мог подключиться к серверу по RDP, ему потребуются следующие данные:
- IP-адрес вашего сервера / домен;
- логин пользователя;
- пароль пользователя.
Зачем нужны RDP-лицензии и где их взять
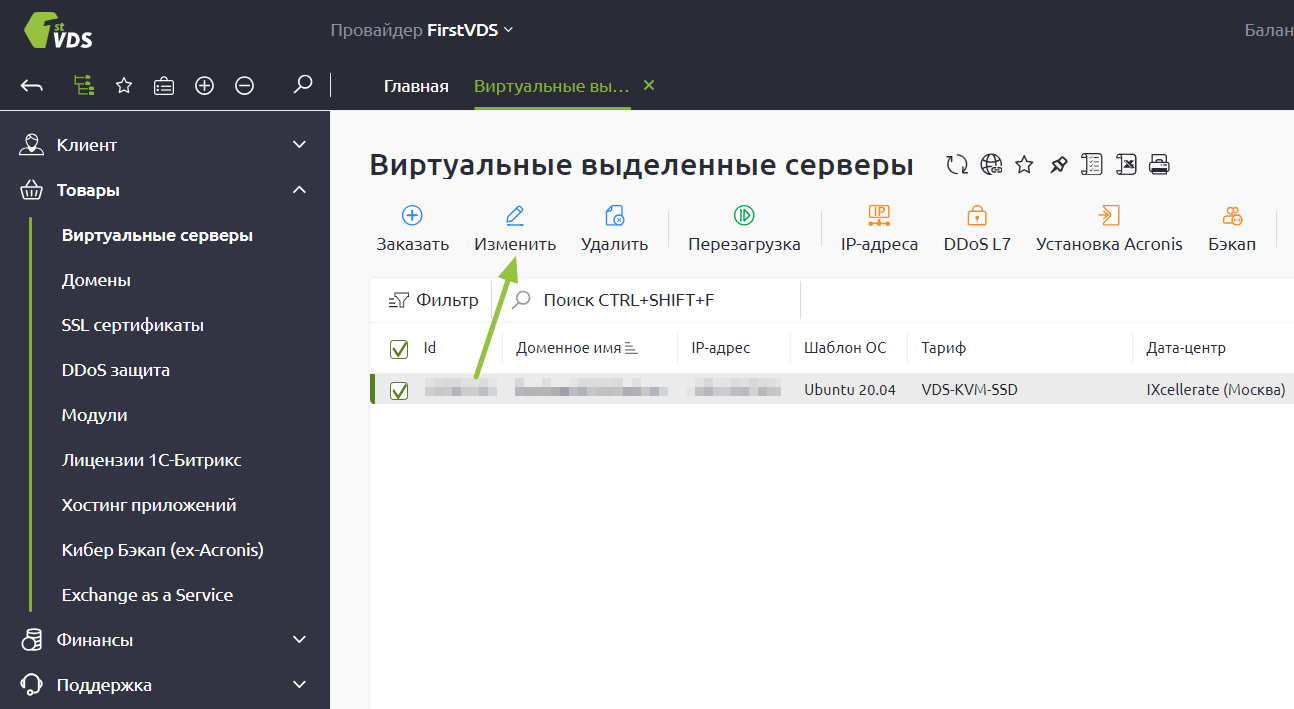
По умолчанию в Windows Server одновременно могут работать только два пользователя уровня Administrator. Для совместной работы большего числа пользователей к серверу нужно подключить RDP-лицензии — по одной на каждого дополнительного пользователя. Их можно приобрести в Личном кабинете: для этого откройте раздел Товары — Виртуальные серверы, выберите ваш сервер в списке, сверху «Изменить».
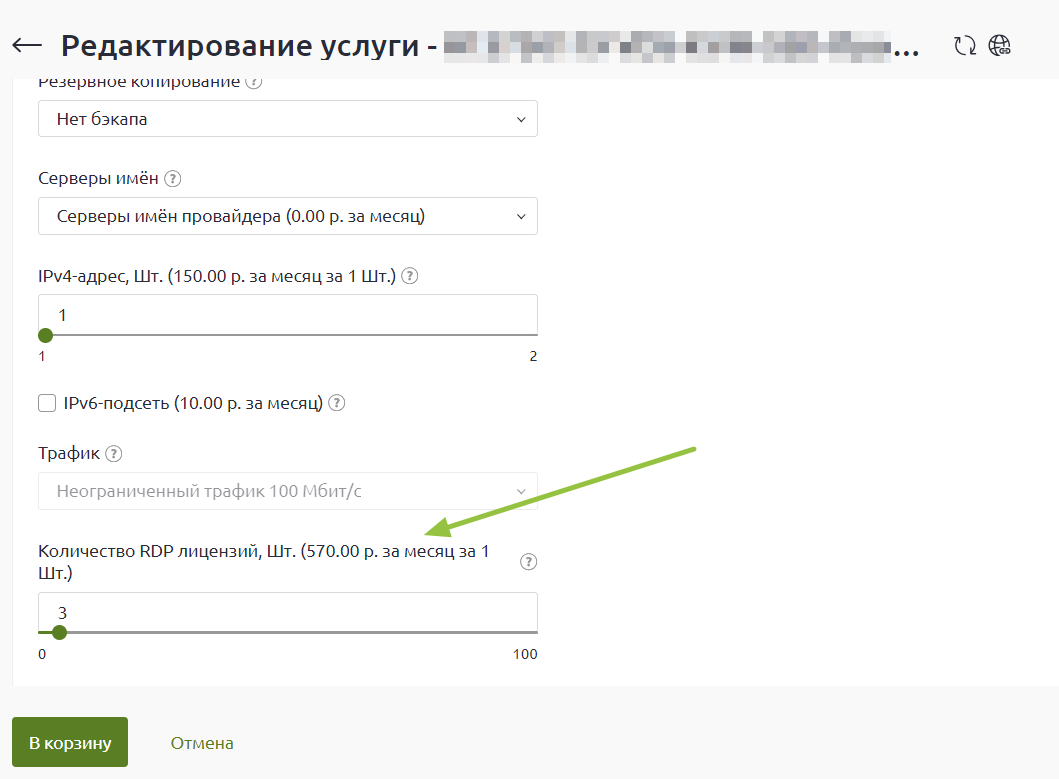
В списке настроек услуги в блоке «Дополнительно» измените значение поля «Количество RDP-лицензий» и нажмите «В корзину». Стоимость одной RDP-лицензии составляет 1200 ₽ в месяц. После активации лицензия включается в стоимость сервера и автоматически продлевается вместе с ним.
После оплаты в течение получаса к серверу подключится наш системный администратор для активации лицензий и настройки терминального сервера.
Этот материал был полезен?
Создание дополнительных пользователей на сервере — важная практика для обеспечения безопасности, управления ресурсами и поддержания порядка в сетевой среде. В нашей статье рассмотрим способы создания учётных записей с правами на подключение к удалённому рабочему столу в операционной системе Windows Server 2016.
Данное действие может быть необходимо по нескольким причинам:
- Отдельные учётные записи для пользователей позволяют администраторам более точно управлять доступом к ресурсам сервера. Каждый пользователь может иметь собственные права доступа и разрешения на файлы, папки, службы и другие ресурсы.
- Когда каждый пользователь имеет свою собственную учётную запись, становится легче отслеживать его действия. Это может быть полезно для анализа аудита, мониторинга безопасности и выявления проблем в работе сервера.
- Создание дополнительных учётных записей позволяет разделить обязанности среди пользователей и администраторов. Данная процедура необходима для обеспечения безопасности, а также для снижения риска ошибок или злоумышленных действий.
- Если происходит инцидент безопасности или нарушение, наличие дополнительных пользователей облегчает выявление и устранение уязвимостей, позволяя определить учётные записи, вовлеченные в инцидент.
Создание учётной записи
Первый способ
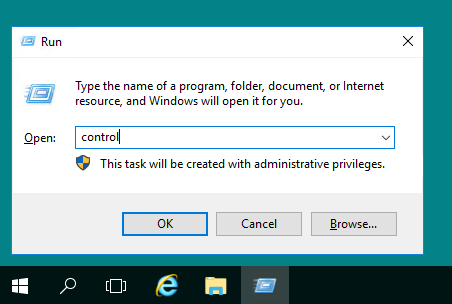
Для того, чтобы создать учётную запись в Windows Server, откройте Control Panel, для чего используйте комбинацию клавиш Win R, где наберите control.
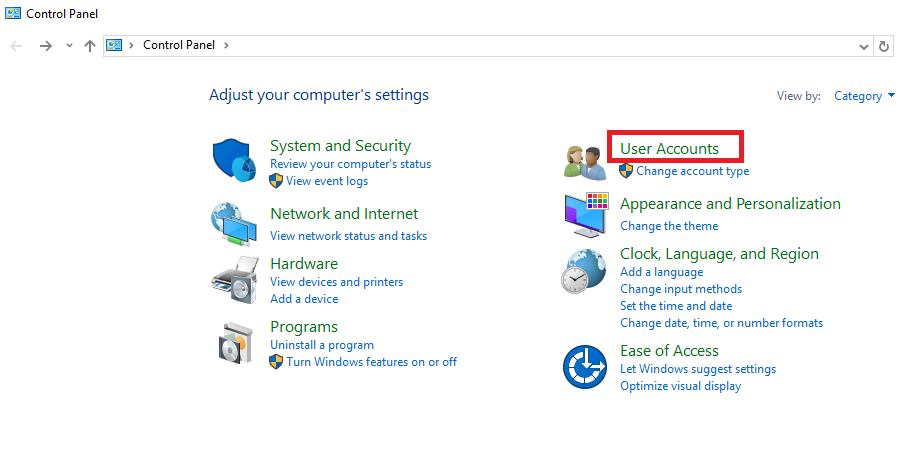
В открывшейся панели перейдите в раздел User Accounts.
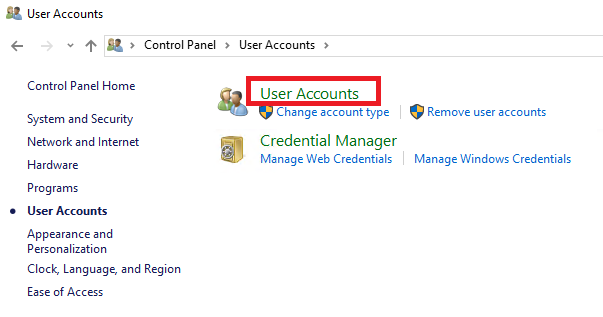
Затем ещё раз нажмите на User Accounts.
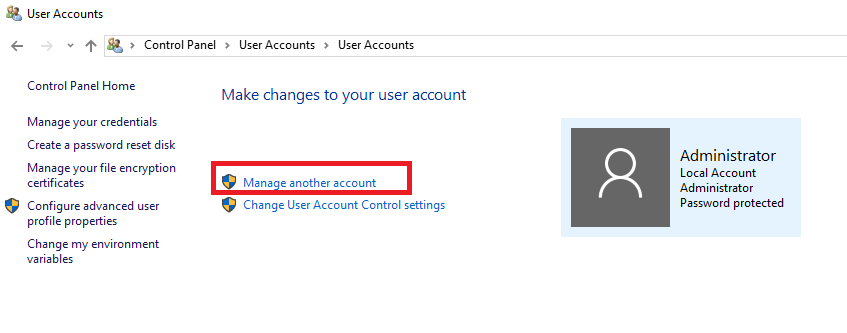
В данном разделе перейдите в Manage another account.
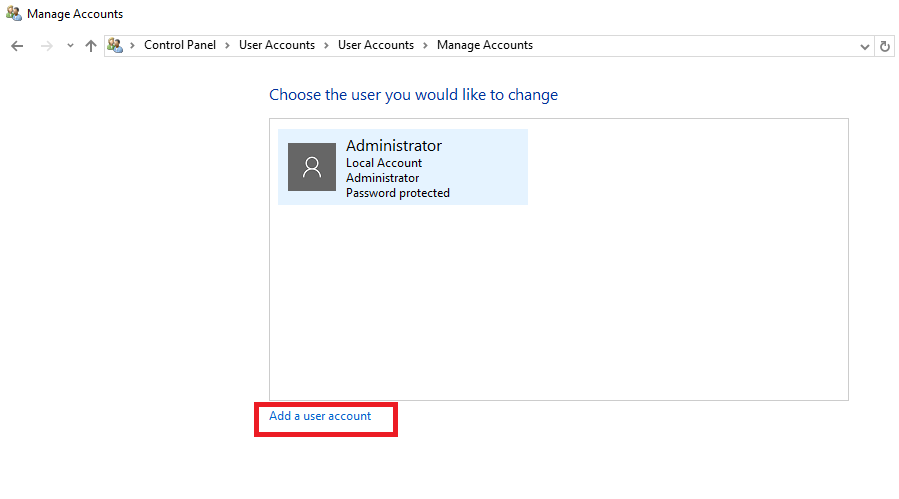
Здесь нажмите на Add a user account.
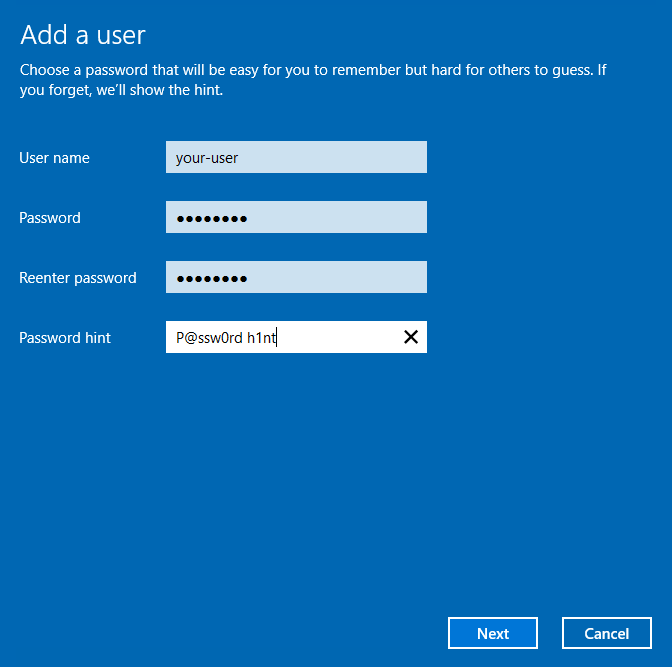
В данной форме внесите в соответствующие поля имя учётной записи, пароль и подсказку на случай, если пользователь забудет свой пароль. После чего нажмите Next.
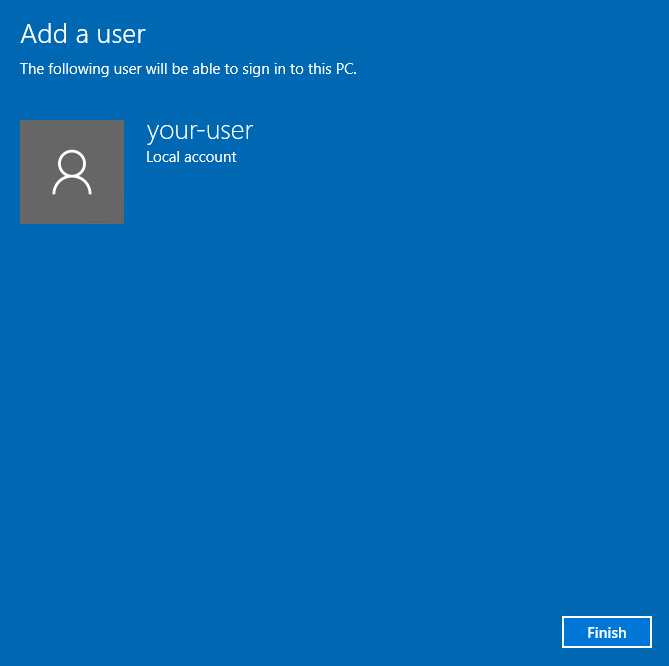
Для завершения процесса создания пользователя нажмите Finish.
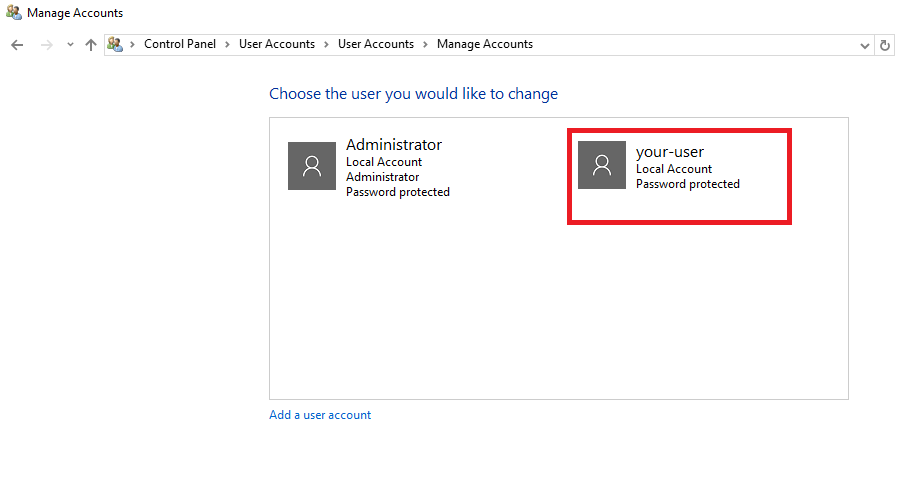
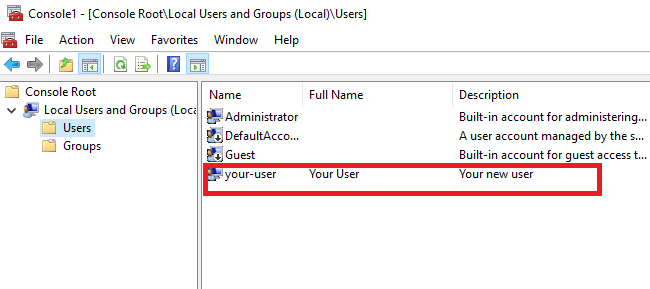
Таким образом, в списке пользователей вашего сервера появится ещё одна только что добавленная учётная запись.
Второй способ
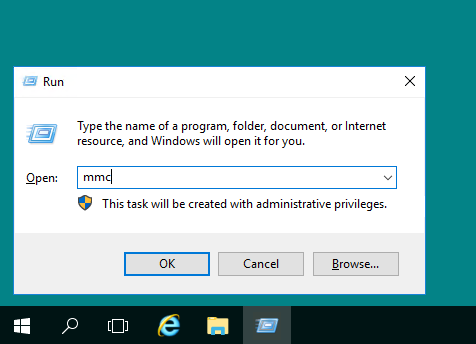
Ещё одним способом добавления в систему нового пользователя является использование консоли управления. Для её запуска используйте комбинацию клавиш Win R, где в открывшем окошке наберите mmc и нажмите ОК.
В окне консоли перейдите File → Add/Remove Snap-in...
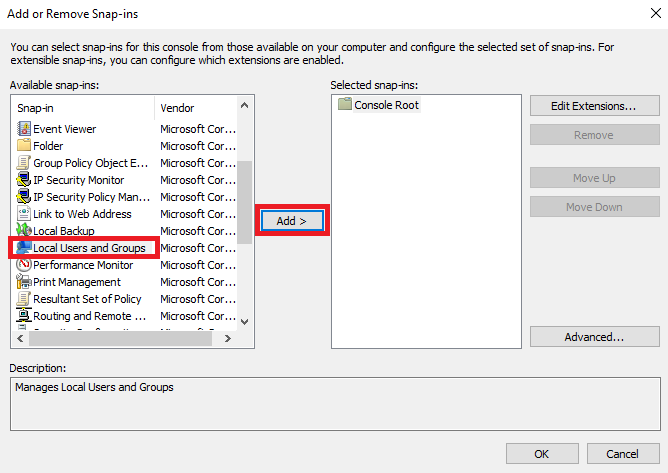
В правой части окна найдите и выделите оснастку Local Users and Groups, после чего нажмите Add.
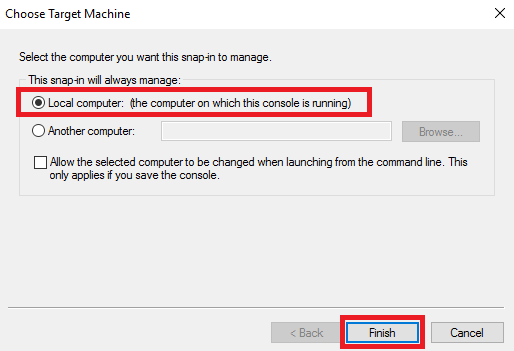
Далее, в окне выбора целевой машины укажите Local computer и нажмите Finish.
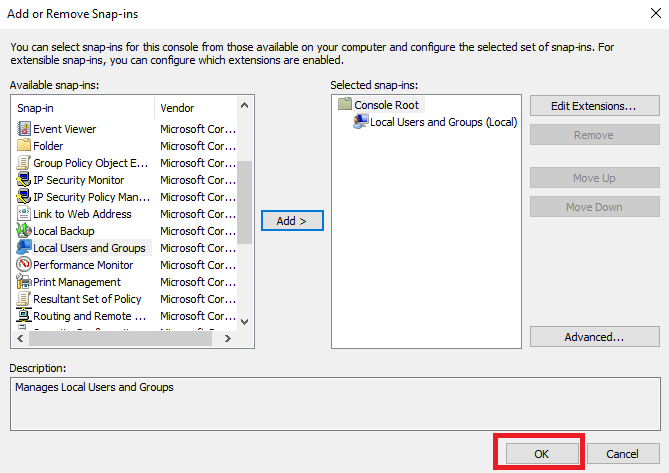
Для завершения процесса добавления оснастки нажмите ОК.
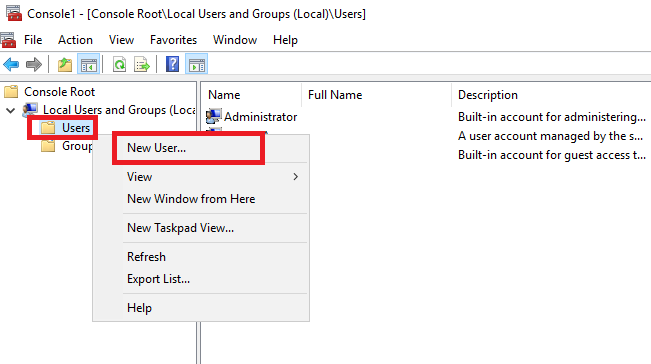
Теперь в консоли управления раскройте ветку добавленной оснастки, нажмите правую кнопку мыши на строке Users и в открывшемся контекстном меню выберите New User...
Далее, заполните поля, соответствующие названию создаваемой учётной записи, полному имени и описанию. В строках ниже введите пароль и его подтверждение, а также, активируйте необходимые опции. Чтобы завершить создание учётной записи, нажмите Create.
В итоге новая учётная запись появится в списке пользователей вашего сервера.
Присвоение прав на подключение к удалённому рабочему столу
Первый способ
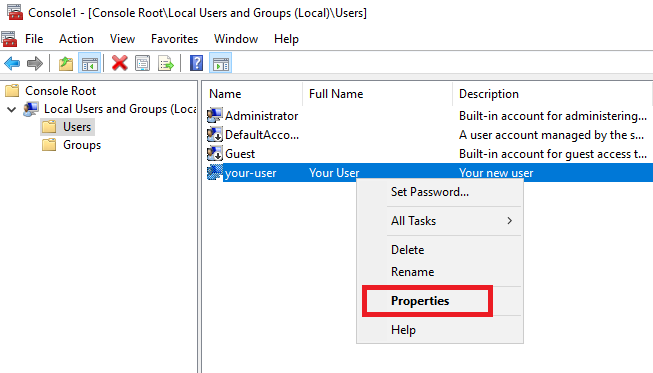
Для того, чтобы дать пользователю подключаться к вашему серверу по RDP, необходимо присвоить ему соответствующие полномочия. Чтобы это осуществить, в консоли управления перейдите в оснастку Local Users and Groups, далее выделите ветку Users, где найдите нужную учётную запись. На строке данного пользователя нажмите правую кнопку мыши и в контекстном меню выберите Properties.
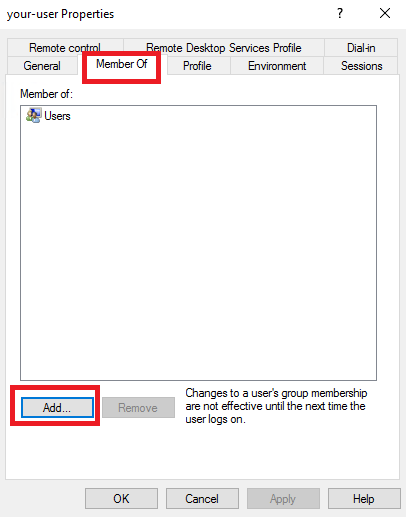
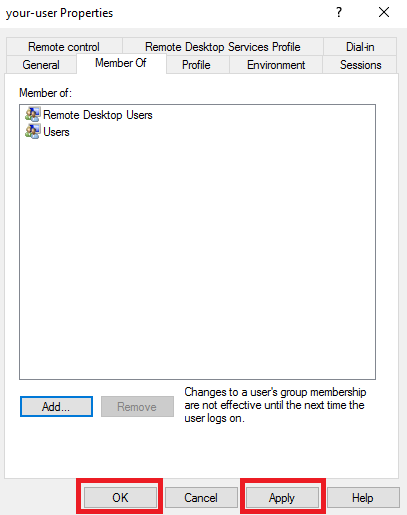
В открывшемся окне перейдите во вкладку Member Of и нажмите Add...
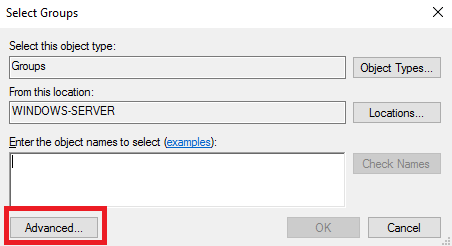
Далее, в окне Select Groups нажмите Advanced...
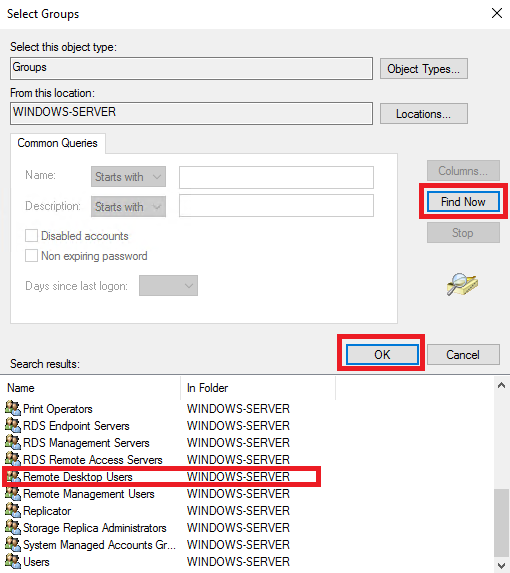
Затем нажмите Find Now, выберите Remote Desktop Users и подтвердите свой выбор кнопкой ОК.
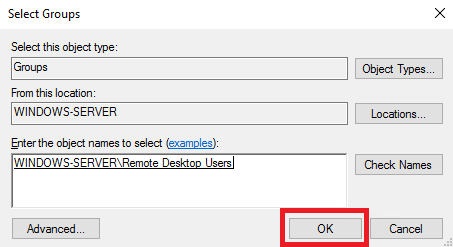
Название выбранной группы появится в окне Enter the object name to select. Если это так, нажмите ОК.
Для сохранения внесённых изменений нажмите Apply и закройте окно кнопкой OK.
Второй способ
Добавить созданному пользователю права на подключение к удалённому рабочему столу вашего сервера можно ещё одним способом. Чтобы это сделать, нужно добавить требуемую учётную запись в список пользователей, имеющих разрешение на подключение по RDP.
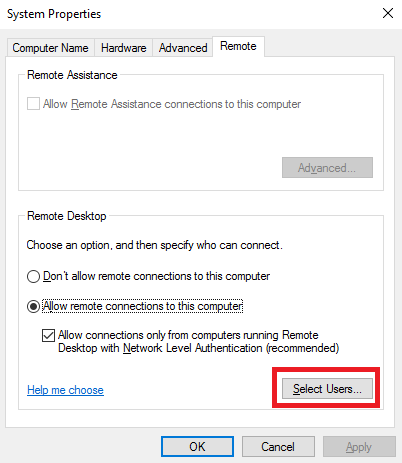
Итак, откройте Control Panel и перейдите System and Security → System. Затем нажмите Change settings. В окне System Properties откройте вкладку Remote и нажмите Select Users в разделе Remote Desktop.
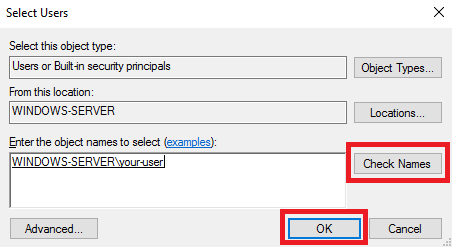
В открывшемся окне нажмите кнопку Add...
Затем в поле Enter the object names to select введите имя необходимой учётной записи и нажмите кнопку Check Names. Если вы набрали имя пользователя корректно, система найдёт его. После чего нажмите ОК.
В результате в списке Remote Desktop Users должен появиться ваш пользователь. Для сохранения изменений нажмите ОК.
Чтобы закрыть окно System Properties, нажмите ОК.

Таким образом, новая учётная запись теперь имеет полномочия для подключения к удалённому рабочему столу вашего виртуального сервера. То, как это сделать, подробно описано описано в посвящённой данному вопросу статье нашего справочника.
Что у вас должно быть
- Собственно, сам сервер с Windows Server 2016. Куда же без него;
- Вы должны быть подключены к серверу под администратором (локально или через RDP – не важно).
Шаг 1. Создаем пользователя
Нажмите правой кнопкой мыши на стартовое меню и найдите Computer Management. Кликните на него:

В меню навигации раскройте список Local Users and Groups и нажмите на Users:

Нажмите правой кнопкой мыши и выберите New User. Осталось только заполнить данные о новом пользователе: юзернейм, полное имя, описание и пароль. Особое внимание к галочкам User must change password at next logon (смена пароля после первого входа) и Password never expires (пароль никогда не устаревает – его не нужно менять регулярно):

По окончанию настройки нажмите Create. Готово!
Шаг 2. Даем права на RDP
Нажимаем на Groups и выбираем Remote Desktop Users/ — мы добавим созданного в шаге №1 пользователя в эту группу тем самым, дадим ему права на RDP подключение:

Дважды кликните на Remote Desktop Users и нажмите кнопку Add:

В поле Enter the object names to select начните вводить имя созданного ранее пользователя и нажмите Check Names:

Имя пользователя заполнится автоматически до нужного формата. Нажмите OK в двух местах чтобы завершить настройку:

Шаг 3. Проверяем пользователя
Отключитесь от учетной записи администратора и подключитесь под новым пользователем. Работает!
In today’s digital age, managing user accounts efficiently and securely is a vital aspect of IT administration. Windows Server 2016 provides an array of powerful tools and features to simplify the process of adding users to a server. Whether you are an IT professional or a system administrator, understanding how to add users to Windows Server 2016 is essential for maintaining an organized and secure network environment.
This blog post will provide you with a step-by-step guide on the various methods you can use to add users to Windows Server 2016. We will explore different techniques, each with its own advantages and considerations. By the end of this article, you will have a comprehensive understanding of the process and will be able to confidently add users to your Windows Server 2016.
Video Tutorial:
What’s Needed
Before we dive into the methods of adding users to Windows Server 2016, let’s first go over what you will need to get started. Here’s a list of the essential requirements:
1. Windows Server 2016 installed on your system.
2. Administrative privileges to access the server and perform user management tasks.
3. Basic knowledge of user account management concepts and Windows Server 2016 interface.
What Requires Your Focus?
When adding users to Windows Server 2016, there are a few key areas that require your attention:
1. User Security: It is essential to create strong and secure user passwords to prevent unauthorized access to the server. You should also assign appropriate user roles and permissions to restrict access to sensitive information.
2. User Roles: Depending on the needs of your organization, you may need to create different user roles with varying levels of access privileges. Designating roles will ensure that users have the right level of access to perform their tasks accurately and securely.
3. User Groups: Grouping users with similar roles or responsibilities can streamline the administration processes. By assigning permissions to groups rather than individual users, you can simplify access management and ensure consistency across the network.
4. User Account Management: Regularly reviewing and updating user accounts is important to maintain an organized and secure environment. You should periodically disable or remove accounts that are no longer required and update account information as needed.
Now that we have highlighted the key areas to focus on let’s explore the different methods to add users to Windows Server 2016.
Method 1: How to Add Users via Active Directory Users and Computers
Adding users via Active Directory Users and Computers is the most common and straightforward method to add new user accounts to Windows Server 2016. Here’s how you can do it:
Step 1: Launch Active Directory Users and Computers: Click on the Start button, search for «Active Directory Users and Computers,» and open the application.
Step 2: Navigate to the Users Container: In the left pane, expand the domain name, and select the «Users» container.
Step 3: Create a New User: Right-click on the «Users» container and select «New» > «User.» This will open the «New Object – User» wizard.
Step 4: Enter User Details: In the wizard, enter the required user details such as the user’s first name, last name, and user login name. You can also set the user’s password and define additional properties if needed.
Step 5: Specify User Options: In the next window, you can set various user options, such as enabling or disabling the account, specifying a user logon script, or configuring the user’s home folder.
Step 6: Complete the Wizard: Follow the remaining steps of the wizard, reviewing the settings and making adjustments as necessary. Click «Finish» when you are done.
Pros:
1. Easy and intuitive user interface.
2. Ability to set various user options during account creation.
3. Can manage user roles, group memberships, and other properties.
Cons:
1. Requires administrative privileges to access and use Active Directory Users and Computers.
2. Limited to managing local users and groups on the server.
Method 2: How to Add Users via PowerShell
PowerShell is a powerful command-line tool that allows you to automate and manage Windows Server tasks, including adding users. Here’s how you can add users via PowerShell:
Step 1: Launch PowerShell: Open the PowerShell console by searching for «PowerShell» in the Start menu.
Step 2: Run as Administrator: Right-click on the PowerShell icon and select «Run as Administrator» to ensure you have the necessary privileges.
Step 3: Create a New User: Use the «New-ADUser» cmdlet to create a new user account. For example, the following command creates a user named «John Smith» with the username «johnsmith«:
New-ADUser -Name «John Smith» -SamAccountName johnsmith
Step 4: Set User Properties: You can use additional parameters with the «New-ADUser» cmdlet to set various properties such as the user’s password, group memberships, and organizational unit.
Step 5: Verify User Creation: Use the «Get-ADUser» cmdlet to verify that the user has been successfully created:
Get-ADUser -Identity johnsmith
Pros:
1. Allows for automated user creation and management using scripts.
2. Supports advanced user account configuration options.
3. Can easily handle bulk user creation using CSV files.
Cons:
1. Requires knowledge of PowerShell scripting and syntax.
2. Can be less intuitive for users unfamiliar with the command-line interface.
Method 3: How to Add Users via Windows Admin Center
Windows Admin Center is a modern web-based management interface that provides a simplified way to manage Windows Server environments. Here’s how you can add users via Windows Admin Center:
Step 1: Launch Windows Admin Center: Open a web browser and enter the URL for your Windows Admin Center server.
Step 2: Authenticate and Select the Server: Log in to Windows Admin Center with your administrative credentials and select the Windows Server 2016 machine you want to manage.
Step 3: Navigate to Users: From the left-hand menu, select «Server Manager» and then go to «Local Users and Groups» > «Users.«
Step 4: Create a New User: Right-click anywhere in the «Users» pane and select «New User.» This will open the «New User» wizard.
Step 5: Enter User Details: In the wizard, enter the required user details such as the user’s name, password, and group memberships.
Step 6: Complete the Wizard: Follow the remaining steps of the wizard, reviewing the settings and making adjustments as necessary. Click «Finish» when you are done.
Pros:
1. Modern and intuitive web-based interface.
2. Provides a centralized management platform for multiple servers.
3. Supports various management tasks beyond user account management.
Cons:
1. Requires setting up and configuring Windows Admin Center.
2. Limited to managing local users and groups on the server.
Method 4: How to Add Users via Command Prompt
If you prefer the command-line approach, you can use the Command Prompt to add users to Windows Server 2016. Here’s how:
Step 1: Launch Command Prompt: Search for «Command Prompt» in the Start menu, and open the application.
Step 2: Run as Administrator: Right-click on the Command Prompt icon and select «Run as Administrator» to ensure you have the necessary privileges.
Step 3: Create a New User: Use the «net user» command to create a new user account. For example, the following command creates a user named «John Smith» with the password «password«:
net user johnsmith password /add
Step 4: Set User Properties: You can use additional parameters with the «net user» command to set various properties such as the user’s full name, logon script, or group membership.
Step 5: Verify User Creation: Use the «net user» command again to verify that the user has been successfully created:
net user johnsmith
Pros:
1. Simple and straightforward command-line interface.
2. Works well for basic user account creation and management tasks.
3. Useful for scripting and automation purposes.
Cons:
1. Limited to managing local users and groups on the server.
2. Requires knowledge of the Command Prompt commands and syntax.
| Pros | Cons |
|---|---|
| 1. Easy and intuitive user interface. | 1. Requires administrative privileges to access and use Active Directory Users and Computers. |
| 2. Ability to set various user options during account creation. | 2. Limited to managing local users and groups on the server. |
Why Can’t I Add Users via Windows Server 2016?
There can be several reasons why you might encounter difficulties when adding users to Windows Server 2016. Here are a few common issues and their potential fixes:
1. Issue: Lack of administrative privileges.
Solution: Ensure that you have sufficient administrative rights to perform user management tasks. Contact your system administrator if necessary.
2. Issue: Server is not configured properly.
Solution: Make sure that Windows Server 2016 is installed correctly and functioning without any issues. Check for any errors or conflicts in the system logs.
3. Issue: Insufficient disk space.
Solution: Verify that the server has enough available disk space to create new user accounts. Consider freeing up disk space by removing unnecessary files or expanding storage capacity.
4. Issue: Active Directory issues.
Solution: If you are having problems with Active Directory-related tasks, ensure that the Active Directory Services role is installed and functioning correctly on the server.
| Pros | Cons |
|---|---|
| 1. Easy and straightforward process to open CSV files. | 1. May require adjustments to import settings depending on the CSV file. |
| 2. Allows easy manipulation and analysis of data in Excel. | 2. Limited formatting options compared to dedicated spreadsheet formats. |
| 3. CSV files can be easily shared and opened on various platforms. | 3. May not support all types of data formatting and features available in Excel. |
Implications and Recommendations
When adding users to Windows Server 2016, it is essential to consider the implications and make informed decisions to ensure the security and efficiency of your network environment. Here are three recommendations:
1. Regularly Review User Accounts: Perform periodic audits of user accounts to verify that they are still necessary and up to date. Remove or disable any accounts that are no longer required to minimize security risks.
2. Enforce Strong Password Policies: Implement password policies that enforce complex passwords and regular password changes. This will help protect user accounts from unauthorized access and potential security breaches.
3. Implement Role-Based Access Control (RBAC): Assign users to specific roles with tailored privileges and permissions based on their responsibilities. RBAC ensures that users have the appropriate level of access to perform their tasks while maintaining security and data integrity.
5 FAQs about Adding Users to Windows Server 2016
Q1: Can I add multiple users at once?
A: Yes, you can add multiple users at once using methods like PowerShell or importing user data from a CSV file.
Q2: Can I add users to a domain controller?
A: Yes, you can add users to a domain controller using the Active Directory Users and Computers tool or PowerShell.
Q3: How many user accounts can I create on Windows Server 2016?
A: Windows Server 2016 does not impose a strict limit on the number of user accounts you can create. However, system resources and performance may affect the total number of accounts you can manage effectively.
Q4: Can I add users with different roles and permissions?
A: Yes, you can create different user roles and assign appropriate permissions to each role. This allows you to manage access privileges based on user responsibilities.
Q5: How can I disable or remove a user account?
A: To disable a user account, you can use tools like Active Directory Users and Computers or PowerShell to change the account status. To remove a user account, you can perform a similar action, but exercise caution as removing an account permanently deletes its data.
Final Words
Adding users to Windows Server 2016 is a crucial task for maintaining a secure and organized network environment. By following the methods and recommendations outlined in this blog post, you will be well-equipped to handle user management effectively. Whether you prefer the graphical interface of tools like Active Directory Users and Computers or the command-line power of PowerShell, Windows Server 2016 provides a range of options to suit your needs. Remember to prioritize user security, implement role-based access control, and regularly review user accounts to keep your network environment in top shape.
После того как Вы установили Windows Server 2012, 2016 или 2019 на VDS, там доступна только учётная запись Administrator.
Но когда на сервере необходимо работать нескольким пользователям, и одновременно, тогда необходимо добавить дополнительного пользователя, или пользователей. Так же, в данном случае, необходимо учесть, что бы на сервере был установлен терминальный сервер, и необходимое количество лицензий для RDP соединения. Как установить и настроить сервер терминалов, Вы можете увидеть в этой статье.
Для того что бы добавить второго пользователя, подключитесь к серверу со своими учетными данными Administrator. Потом перейдите в Computer Management. Это можно сделать, кликнув правой мышкой по меню Start, и в контекстном меню выбрать Computer Management.
Или нажмите комбинацию Win+R и в окне Run введите команду compmgmt.msc и нажмите OK.
Теперь в окне Computer Management переходим в Local Users and Groups => Users и в верхнем Action меню выбираем New User.
В открывшемся окне New User необходимо прописать имя пользователя, в графе User Name которое Вы будете использовать для входа на сервер. В пункте Full Name можно прописать полное имя, которое будет видно на экране приветствия. В поле Description можно ничего не писать.
В поле Password и подтверждение пароля, введите пароль который будете использовать для данного пользователя.
Чекбокс User must change password at next logon можете снять, если не нужно будет изменять пароль при первом подключении пользователя.
Чекбокс User cannot change password оставляем, что бы пользователь не смог изменять пароль.
Чекбокс Password never expires оставляем так же если нет необходимости в смене пароля. Account is disabled включает/отключает возможность подключения/входа пользователя на сервер. Снимаем галочку.
Чтобы создать пользователя, нажимаем Create.
Теперь для созданного пользователя, необходимо предоставить необходимые права, на подключение к серверу. Чтобы это сделать, нужно кликнуть правой кнопкой мыши и выбрать пункт Properties.
Чтобы созданному пользователю разрешить доступ по RDP к данному серверу, на вкладке Remote control необходимо установить соответствующие разрешения, как показано на иллюстрации ниже.
Но для того чтобы пользователю дать права Администратора, его необходимо добавить в соответствующую группу. На вкладке Member of
нажимаем Add… и в окне выбора группы выбираем Advanced… затем кнопку Find Now в окне подбора групп. Выбираем группу Administrators и нажимаем Ок.
Теперь, таким же образом, Вы можете создавать нужное количество пользователей на своем сервере.
Те же действия, только через Power Shell
Создадим пользователя User2, с описанием Manager и паролем QWErty1! (Не создавайте такие легкие пароли!!!)
$PASSWORD= ConvertTo-SecureString –AsPlainText -Force -String QWErty1!; New-LocalUser -Name "User2" -Description "Manager" -Password $PASSWORDСоответственно, вместо User2 используйте имя своего пользователя, и пароль не меньше 12 символов.
Теперь добавим данного пользователя в нужную нам группу.
Add-LocalGroupMember -Group "Remote Desktop Users" -Member "User2"В группу Remote Desktop Users
Чтобы добавить в группу Administrators используем следующую команду:
Add-LocalGroupMember -Group "Administrators" -Member "User2"