
Время на прочтение3 мин
Количество просмотров117K
Была необходимость ввести в домен Windows машину с Ubuntu. Для этих целей обычно используют Samba и Winbind. Но возможен альтернативный вариант с sssd, краткое руководство по нему ниже.
Для примера будем использовать:
Домен = contoso.com
Контроллер домена = dc.contoso.com
Запускаем терминал Ubuntu:
1. Переключаемся под рута
sudo -i2. Устанавливаем необходимые пакеты
apt install sssd heimdal-clients msktutil3. Редактируем /etc/krb5.conf, в качестве отступов используется табуляция
[libdefaults]
	default_realm = CONTOSO.COM

[realms]
	CONTOSO.COM = {
		kdc = DC
		admin_server = dc.contoso.com
		default_domain = contoso.com
	}

[login]
	krb4_convert = true
	krb4_get_tickets = false

[domain_realm]
        .contoso.com = CONTOSO.COM
        contoso.com = CONTOSO.COM
4. Редактируем файл /etc/hosts, указываем FQDN для данного хоста:
127.0.0.1       localhost
127.0.1.1       <hostname>.contoso.com  <hostname>
5. Пробуем получить Kerberos ticket от имени администратора домена:
root@ubuntu:~# kinit YourDomainAdmin
YourDomainAdmin@CONTOSO.COM's Password:
Проверяем:
root@ubuntu:~# klist
Credentials cache: FILE:/tmp/krb5cc_0
        Principal: YourDomainAdmin@CONTOSO.COM

  Issued                Expires               Principal
Dec  1 15:08:27 2018  Dec  2 01:08:22 2018  krbtgt/CONTOSO.COM@CONTOSO.COM
Если тикет получен успешно, то теперь можно сгенерировать Kerberos principals для данного хоста, регистр важен:
msktutil -c -b 'CN=YourComputersOU' -s HOST/HOSTNAME.contoso.com -k /etc/sssd/HOSTNAME.keytab --computer-name HOSTNAME --upn HOSTNAME$ --server dc.contoso.com —user-creds-only

msktutil -c -b 'CN=YourComputersOU' -s HOST/HOSTNAME -k /etc/sssd/HOSTNAME.keytab --computer-name HOSTNAME --upn HOSTNAME$ --server dc.contoso.com --user-creds-only
Сейчас наш хост должен отобразиться в списке компьютеров в каталоге. Если все так — удаляем полученный Kerberos ticket:
kdestroy
6. Создаем файл /etc/sssd/sssd.conf со следующим содержимым:
[sssd]

services = nss, pam
config_file_version = 2
domains = contoso.com


[nss]

entry_negative_timeout = 0
debug_level = 3


[pam]

debug_level = 3


[domain/contoso.com]

debug_level = 3

ad_domain = contoso.com
ad_server = dc.contoso.com
enumerate = false

id_provider = ad
auth_provider = ad
chpass_provider = ad
access_provider = simple
simple_allow_groups = users #каким группам разрешено логиниться, через запятую. Есть ограничение — названия групп должны быть с маленькой буквы.
ldap_schema = ad
ldap_id_mapping = true
fallback_homedir = /home/%u
default_shell = /bin/bash
ldap_sasl_mech = gssapi
ldap_sasl_authid = <HOSTNAME>$
ldap_krb5_init_creds = true
krb5_keytab = /etc/sssd/<HOSTNAME>.keytab
Описание параметров конфигфайла sssd можно посмотреть тут
Устанавливаем права доступа для файла sssd.conf:
chmod 600 /etc/sssd/sssd.confПерезапускаем SSSD service
service sssd restart7. Редактируем настройки PAM
Плохое решение:
редактируем файл /etc/pam.d/common-session, после строки
session required pam_unix.soдобавляем строку
session required pam_mkhomedir.so skel=/etc/skel umask=0022Хорошее решение:
переопределить параметры через системные настройки PAM, вызываем
pam-auth-update
и отмечаем пункты sss auth и makehomdir. Это автоматически добавит
строчку выше в common-session и она не будет перезатерта при обновлении системы.
Теперь мы можем логиниться на машине доменными пользователями, которым разрешен вход.
P.S.: Можно дать права на использование sudo доменным группам. Используя visudo, редактируем файл /etc/sudoers, или лучше, как рекомендует maxzhurkin и iluvar, создаем новый файл в /etc/sudoers.d/ и редактируем его
visudo -f /etc/sudoers.d/ваш_файлдобавляем требуемую группу — например, Domain Admins (если в названии группы есть пробелы — их необходимо экранировать):
%Domain\ Admins ALL=(ALL) ALLP.S.S.: Спасибо gotch за информацию о realmd. Очень удобно — если не нужны специфические настройки, то ввод машины в домен занимает, по сути, три (как заметил osipov_dv четыре) команды:
1. Устанавливаем нужные пакеты:
sudo apt install realmd samba-common-bin samba-libs sssd-tools krb5-user adcli2. Редактируем файл /etc/hosts, указываем FQDN для данного хоста:
127.0.0.1       localhost
127.0.1.1       <hostname>.contoso.com  <hostname>
3. Проверяем, что наш домен виден в сети:
realm discover contoso.com4. Вводим машину в домен:
sudo realm --verbose join contoso.com -U YourDomainAdmin --install=/5. Редактируем настройки PAM
sudo pam-auth-updateДополнительный плюс данного варианта — сквозная авторизация на файловых ресурсах домена.
Для того чтоб при входе не указывать дополнительно к логину домен, можно добавить суффикс по умолчанию. В файле /etc/sssd/sssd.conf, в блоке [sssd] добавляем строку:
default_domain_suffix = contoso.comСодержание
Введение
Зачастую возникает необходимость ввести Linux-машину в существующий домен Windows. Например, чтобы сделать файловый сервер с помощью Samba. Сделать это очень просто, для этого вам понадобятся клиент Kerberos, Samba и Winbind.
Перед установкой желательно обновиться:
sudo aptitude update
sudo aptitude upgrade
Установить всё это добро можно командой:
sudo aptitude install krb5-user samba winbind
Также может понадобиться установить следующие библиотеки:
sudo aptitude install libpam-krb5 libpam-winbind libnss-winbind
Либо, если вы используете Ubuntu Desktop, те же пакеты можно поставить через менеджер пакетов Synaptic.
Далее вам потребуется настроить все вышеперечисленные инструменты для работы с вашим доменом. Допустим, вы хотите войти в домен DOMAIN.COM, доменконтроллером которого является сервер dc.domain.com с IP адресом 192.168.0.1. Этот же сервер является и первичным DNS сервером домена. Кроме того допустим у вас есть второй доменконтроллер1), он же DNS — dc2.domain.com с IP 192.168.0.2. Ваш же компьютер будет называться smbsrv01.
Настройка DNS
Для начала необходимо изменить настройки DNS на вашей машине, прописав в качестве DNS сервера доменконтроллер2) и в качестве домена поиска — нужный домен.
Если у вас статический IP-адрес, то в Ubuntu Desktop это можно сделать через Network Manager, в Ubuntu Server необходимо изменить содержимое файла /etc/resolv.conf на примерно такое:
domain domain.com
search domain.com
nameserver 192.168.0.1
nameserver 192.168.0.2
В современных дистрибутивах файл resolv.conf создается автоматически и править вручную его не нужно.
Для получение нужного результата нужно добавить необходимые изменения в файл: /etc/resolvconf/resolv.conf.d/head
Данные которые будут добавлены в него, будут автоматически вставлены в файл /etc/resolv.conf
Если IP-адрес динамический и присваивается DHCP сервером то после перезагрузки resolv.conf может формироваться «неправильный» resolv.conf’ , например присутствует только один nameserver 192.168.0.1 и не указаны domain и search. Нужно отредактировать /etc/dhcp/dhclient.conf. Чтобы появились записи domain и search нужно убрать комментарий перед строкой supersede domain-name, и вписать свой домен:
supersede domain-name "domain.com";
Чтобы добавить еще один nameserver нужно убрать комментарий перед prepend domain-name-servers и указать ip сервера:
prepend domain-name-servers 192.168.0.2;
Для применения изменений остается перезапустить службу:
/etc/init.d/networking restart
Теперь убедитесь, что вы задали нужное имя компьютера в файле /etc/hostname:
smbsrv01
Кроме того необходимо отредактировать файл /etc/hosts так, чтобы в нём была запись с полным доменным именем компьютера и обязательно коротким именем хоста, ссылающаяся на один из внутренних IP:
# Имена этого компьютера
127.0.0.1	localhost
127.0.1.1	smbsrv01.domain.com	smbsrv01
Сразу нужно проверить что нормально пингуется наш контроллер домена, по короткому и полному имени, чтобы в будушем не получать ошибки что контроллер домена не найден:
ping dc
ping dc.domain.com
Не обязательно, но если вы что-то поменяете — перезагрузите компьютер для применения изменений.
Настройка синхронизации времени
Далее необходимо настроить синхронизацию времени с доменконтроллером. Если разница будет более 5 минут мы не сможем получить лист от Kerberos.
Для единовременной синхронизации можно воспользоваться командой:
sudo net time set dc
Если в сети существует сервер точного времени, то можно воспользоваться им или любым публичным:
ntpdate ntp.mobatime.ru
Автоматическая же синхронизация настраивается с помощью ntpd, это демон будет периодически выполнять синхронизацию. Для начала его необходимо установить:
sudo aptitude install ntp
Теперь исправьте файл /etc/ntp.conf, добавив в него информацию о вашем сервере времени:
# You do need to talk to an NTP server or two (or three).
server dc.domain.com
После чего перезапустите демон ntpd:
sudo /etc/init.d/ntp restart
Теперь пора настраивать непосредственно взаимодействие с доменом.
Настройка авторизации через Kerberos
Начнём с настройки авторизации в домене через протокол Kerberos. Вам потребуется изменить файл /etc/krb5.conf. В общем случае он выглядит так:
[libdefaults]
	default_realm = DOMAIN.COM
	kdc_timesync = 1
	ccache_type = 4
	forwardable = true
	proxiable = true
	v4_instance_resolve = false
	v4_name_convert = {
		host = {
			rcmd = host
			ftp = ftp
		}
		plain = {
			something = something-else
		}
	}
	fcc-mit-ticketflags = true

[realms]
	DOMAIN.COM = {
		kdc = dc
		kdc = dc2
		admin_server = dc
		default_domain = DOMAIN.COM
	}

[domain_realm]
	.domain.com = DOMAIN.COM
	domain.com = DOMAIN.COM
[login]
	krb4_convert = false
	krb4_get_tickets = false
Вам, конечно, нужно изменить domain.com на ваш домен и dc и dc2 на ваши доменконтроллеры. Кстати, возможно вам понадобится написать полные имена доменконтроллеров dc.domain.com и dc2.domain.com. Поскольку у меня прописан домен поиска в DNS, то мне это делать не нужно.
Обратите особое внимание на регистр написания имени домена — везде, где домен написан в верхнем регистре, его обязательно нужно писать именно в верхнем регистре. Иначе волшебным образом ничего может не заработать.
Это не все возможные опции настройки Kerberos, только основные. Однако их обычно достаточно.
Теперь настало время проверить, что мы можем авторизоваться в домене. Для этого выполните команду
kinit username@DOMAIN.COM
Вместо username естественно стоит вписать имя существующего пользователя домена.
Имя домена необходимо писать заглавными буквами!
Если вы не получили никаких ошибок — значит вы настроили всё верно и домен отдаёт вам билет Kerberos. Кстати, некоторые распространённые ошибки перечислены чуть ниже.
Убедиться в том, что билет получен, можно выполнив команду
klist
Удалить все билеты (они вам вообще говоря не нужны) можно командой
kdestroy
Итак, будем считать, что авторизацию вы настроили, пора настроить непосредственно вход в домен, об этом после списка распространённых ошибок kinit.
Распространённые ошибки kinit
kinit(v5): Clock skew too great while getting initial credentials
Это значит, что у вашего компьютера не синхронизировано время с доменконтроллером (см. выше).
kinit(v5): Preauthentication failed while getting initial credentials
Вы ввели неверный пароль.
kinit(v5): KDC reply did not match expectations while getting initial credentials
Самая странная ошибка. Убедитесь, что имя realm в krb5.conf, а так же домен в команде kinit введены большими буквами:
DOMAIN.COM = {
# ...
kinit username@DOMAIN.COM
kinit(v5): Client not found in Kerberos database while getting initial credentials
Указанного пользователя не существует в домене.
Настройка Samba и вход в домен
Для того, чтобы войти в домен, необходимо прописать правильные настройки в файле /etc/samba/smb.conf. На данном этапе вас должны интересовать только некоторые опции из секции [global]. Ниже — пример части файла конфигурации Samba с комментариями по поводу значения важных параметров:
[global]
   # Эти две опции нужно писать именно в заглавном регистре, причём workgroup без
   # последней секции после точки, а realm - полное имя домена
   workgroup = DOMAIN
   realm = DOMAIN.COM

   # Эти две опции отвечают как раз за авторизацию через AD
   security = ADS
   encrypt passwords = true
   # Просто важные
   dns proxy = no
   socket options = TCP_NODELAY

   # Если вы не хотите, чтобы самба пыталась при случае вылезти в лидеры в домене или рабочей группе,
   # или даже стать доменконтроллером, то всегда прописывайте эти пять опций именно в таком виде
   domain master = no
   local master = no
   preferred master = no
   os level = 0
   domain logons = no

   # Отключить поддержку принтеров
   load printers = no
   show add printer wizard = no
   printcap name = /dev/null
   disable spoolss = yes
После того, как вы отредактируете smb.conf выполните команду
testparm
Она проверит вашу конфигурацию на ошибки и выдаст суммарную сводку о нём:
# testparm
Load smb config files from /etc/samba/smb.conf
Loaded services file OK.
Server role: ROLE_DOMAIN_MEMBER
Press enter to see a dump of your service definitions
Как видно мы задали правильные параметры для того, чтобы наш компьютер стал членом домена. Теперь пора попытаться непосредственно войти в домен. Для этого введите команду:
net ads join -U username -D DOMAIN
И в случае успеха вы увидите что-то похожее на:
# net ads join -U username -D DOMAIN
Enter username's password:
Using short domain name -- DOMAIN
Joined 'SMBSRV01' to realm 'domain.com'
Используемые параметры команды net
-U username%password: Обязательный параметр, вместо username необходимо подставить имя пользователя с правами администратора домена, и указать пароль.
-D DOMAIN: DOMAIN — собственно сам домен, домен можно и не указывать, но лучше всё же это всегда делать — хуже не будет.
-S win_domain_controller: win_domain_controller, можно не указывать, но бывают случаи когда автоматически сервер не находит контроллер домена.
createcomputer=«OU/OU/…» : В AD часто используется OU (Organizational Unit), есть в корне домена OU = Office, в нем OU = Cabinet, чтобы сразу добавить в нужный можно указать так: sudo net ads join -U username createcomputer=«Office/Cabinet».
Если больше никаких сообщений нет — значит всё хорошо. Попробуйте попинговать свой компьютер по имени с другого члена домена, чтобы убедиться, что в домене всё прописалось так, как надо.
Так же можно набрать команду:
net ads testjoin
Если все хорошо, можно увидеть:
#net ads testjoin
Join is OK
Но иногда после сообщения о присоединении к домену выдаётся ошибка наподобие3):
DNS update failed!
Это не очень хорошо, и в этом случае рекомендуется ещё раз прочитать раздел про настройку DNS чуть выше и понять, что же вы сделали не так. После этого нужно удалить компьютер из домена и попытаться ввести его заново. Если вы твердо уверены, что всё настроили верно, а DNS всё равно не обновляется, то можно внести вручную запись для вашего компьютера на ваш DNS сервер и всё будет работать. Конечно, если нет никаких других ошибок, и вы успешно вошли в домен. Однако лучше всё же разберитесь, почему DNS не обновляется автоматически. Это может быть связано не только с вашим компьютером, но и с некорректной настройкой AD.
Прежде чем выяснять, почему же не обновляется DNS, не забудьте перезагрузить компьютер после введения в домен! Вполне возможно, что это решит проблему.
Если всё прошло без ошибок, то поздравляем, вы успешно вошли в домен! Можете заглянуть в AD и убедиться в этом. Кроме того хорошо бы проверить, что вы можете видеть ресурсы в домене. Для этого установите smbclient:
sudo aptitude install smbclient
Теперь можно просматривать ресурсы компьютеров домена. Но для этого нужно иметь билет kerberos, т.е. если мы их удалили, то получаем опять через kinit (см. выше). Посмотрим какие ресурсы предоставлены в сеть компьютером workstation:
smbclient -k -L workstation
Вы должны увидеть список общих ресурсов на этом компьютере.
Настройка Winbind
Если вам необходимо как-либо работать с пользователями домена, например, настраивать SMB-шары с разграничением доступа, то вам понадобится кроме самой Samba ещё и Winbind — специальный демон, служащий для связи локальной системы управления пользователями и группами Linux с сервером Active Directory. Проще говоря Winbind нужен, если вы хотите видеть пользователей домена на своём компьютере с Ubuntu.
Winbind позволяет спроецировать всех пользователей и все группы AD в вашу Linux систему, присвоив им ID из заданного диапазона. Таким образом вы сможете назначать пользователей домена владельцами папок и файлов на вашем компьютере и выполнять любые другие операции, завязанные на пользователей и группы.
Для настройки Winbind используется всё тот же файл /etc/samba/smb.conf. Добавьте в секцию [global] следующие строки:
   # Опции сопоставления доменных пользователей и виртуальных пользователей в системе через Winbind.
   # Диапазоны идентификаторов для виртуальных пользователей и групп.
   idmap uid = 10000 - 40000
   idmap gid = 10000 - 40000
   # Эти опции не стоит выключать.
   winbind enum groups = yes
   winbind enum users = yes
   # Использовать домен по умолчанию для имён пользователей. Без этой опции имена пользователей и групп
   # будут использоваться с доменом, т.е. вместо username - DOMAIN\username.
   # Возможно именно это вам и нужно, однако обычно проще этот параметр включить.
   winbind use default domain = yes
   # Если вы хотите разрещить использовать командную строку для пользователей домена, то
   # добавьте следующую строку, иначе в качестве shell'а будет вызываться /bin/false
   template shell = /bin/bash
   # Для автоматического обновления билета Kerberos модулем pam_winbind.so нужно добавить строчку
   winbind refresh tickets = yes
Параметры :
idmap uid = 10000 — 40000
idmap gid = 10000 — 40000
в новых версиях Samba уже устарели и при проверке конфига самбы с помощью testparm
будет выдваться предупреждение:
WARNING: The «idmap uid» option is deprecated
WARNING: The «idmap gid» option is deprecated
Чтобы убрать предупреждения нужно заменить эти строки на новые:
idmap config * : range = 10000-20000
idmap config * : backend = tdb
Теперь перезапустите демон Winbind и Samba в следующем порядке:
sudo /etc/init.d/winbind stop
sudo smbd restart
sudo /etc/init.d/winbind start
Запускаем
sudo testparm
Смотрим есть ли ошибки или предупреждения, если появится:
«rlimit_max: rlimit_max (1024) below minimum Windows limit (16384)»
Без перезагрузки можно устранить так:
ulimit -n 16384
Для сохранения после перезагрузки отредактировать файл /etc/security/limits.conf
# Добавить в конец файла строки:
*               -    nofile            16384
root            -    nofile            16384
После перезапуска проверьте, что Winbind установил доверительные отношения с AD командой:
# wbinfo -t
checking the trust secret for domain DCN via RPC calls succeeded
А так же, что Winbind увидел пользователей и группы из AD командами4):
wbinfo -u
wbinfo -g
Эти две команды должны выдать список пользователей и групп из домена соответственно. Либо с префиксом DOMAIN\, либо без него — в зависимости от того, какое значение вы указали параметру «winbind use default domain» в smb.conf.
Итак, Winbind работает, однако в систему он ещё не интегрирован.
Добавление Winbind в качестве источника пользователей и групп
Для того, чтобы ваша Ubuntu прозрачно работала с пользователями домена, в частности, чтобы вы могли назначать пользователей домена владельцами папок и файлов, необходимо указать Ubuntu использовать Winbind как дополнительный источник информации о пользователях и группах.
Для этого измените две строчки в файле /etc/nsswitch.conf:
passwd:         compat
group:          compat
добавив к ним в конец winbind:
passwd:         compat winbind
group:          compat winbind
также рекомендую привести строку files в файле /etc/nsswitch.conf к виду:
files: dns mdns4_minimal[NotFoud=return] mdns4
ubuntu server 14.04, файл /etc/nsswitch.conf не содержал строку
«files: dns mdns4_minimal[NotFoud=return] mdns4»
вместо неё было:
«hosts: files mdns4_minimal [NOTFOUND=return] dns wins»
Которую я преобразовал в:
«hosts: dns mdns4_minimal[NotFoud=return] mdns4 files»
после чего всё заработало
Теперь проверьте, что Ubuntu запрашивает у Winbind информацию о пользователях и группах, выполнив
getent passwd
getent group
Первая команда должна вам вернуть всё содержимое вашего файла /etc/passwd, то есть ваших локальных пользователей, плюс пользователей домена с ID из заданного вами в smb.conf диапазона. Вторая должна сделать тоже самое для групп.
Теперь вы можете взять любого пользователя домена и сделать его, например, владельцем какого-нибудь файла.
Авторизация в Ubuntu через пользователей домена
Несмотря на то, что все пользователи домена фактически стали полноценными пользователями системы (в чём можно убедиться, выполнив последние две команды из предыдущего раздела), зайти ни под кем из них в систему всё ещё нельзя. Для включения возможности авторизации пользователей домена на компьютере с Ubuntu необходимо настроить PAM на работу с Winbind.
Он-лайн авторизация
Для Ubuntu 10.04 и выше добавьте всего одну строку в файле /etc/pam.d/common-session, т.к. PAM и так неплохо справляется с авторизацией:
session optional pam_mkhomedir.so skel=/etc/skel/ umask=0077
Для Ubuntu 13.10 чтобы появилось поле ручного ввода логина необходимо в любой файл из папки /etc/lightdm/lightdm.conf/ снизу добавить строку:
greeter-show-manual-login=true
Для Ubuntu 9.10 и ниже придется редактировать несколько файлов (но никто не запрещает использовать этот способ и в 10.04 — он тоже работает):
Последовательность строк в файлах имеет значение!
/etc/pam.d/common-auth
auth        required      pam_env.so
auth        sufficient    pam_unix.so likeauth nullok try_first_pass
auth        sufficient    pam_winbind.so use_first_pass krb5_auth krb5_ccache_type=FILE
auth        required      pam_deny.so
/etc/pam.d/common-account
account     sufficient    pam_winbind.so
account     required      pam_unix.so
/etc/pam.d/common-session
session     optional      pam_mkhomedir.so skel=/etc/skel/ umask=0077
session     optional      pam_ck_connector.so nox11
session     required      pam_limits.so
session     required      pam_env.so
session     required      pam_unix.so
/etc/pam.d/common-password
password    sufficient    pam_unix.so try_first_pass use_authtok nullok sha512 shadow
password    sufficient    pam_winbind.so
password    required      pam_deny.so
И, наконец, необходимо перенести запуск Winbind при загрузке системы после всех остальных служб (по умолчанию он запускается с индексом 20). Для этого в терминале выполните следующую команду:
sudo bash -c "for i in 2 3 4 5; do mv /etc/rc$i.d/S20winbind /etc/rc$i.d/S99winbind; done"
Что эквивалентно запуску для каждого уровня (в примере — 4) команды:
mv /etc/rc4.d/S20winbind /etc/rc4.d/S99winbind
В некоторых случаях winbind может иметь иной уровень запуска (например, S02winbind). Поэтому сначала проверьте имена файлов, вполнив команду «ls /etc/rc{2,3,4,5}.d/ | grep winbind» (без кавычек).
Готово, все настройки завершены. Перезагружайтесь и пытайтесь войти с учетной записью пользователя домена.
Офф-лайн авторизация
Часто возникает ситуация, когда домен-контроллер недоступен по различным причинам — профилактика, отключение света или вы принесли ноутбук домой и хотите поработать. В этом случае для Winbind можно настроить кэширование учетных записей пользователей домена. Для этого необходимо сделать следующее.
Добавьте в секцию [global] файла /etc/samba/smb.conf следующие строки:
[global]
   # Возможность оффлайн-авторизации при недоступности доменконтроллера
   winbind offline logon = yes
   # Период кэширования учетных записей, по умолчанию равен 300 секунд
   winbind cache time = 300
   # Необязательная настройка, но избавляет от нудных пауз, указываем контроллер домена dc,
   # можно указать и ip, но это является плохим тоном
   password server = dc
Обычно этого достаточно. Если же возникают ошибки, то необходимо создать файл /etc/security/pam_winbind.conf со следующим содержанием5):
Внимание! При использовании советов ниже может возникать совершенно случайная ошибка «Сбой аутентификации»! Поэтому все что Вы делаете, Вы делаете на свой страх и риск!
#
# pam_winbind configuration file
#
# /etc/security/pam_winbind.conf
#
[global]
  # turn on debugging
  debug = no
  # request a cached login if possible
  # (needs "winbind offline logon = yes" in smb.conf)
  cached_login = yes
  # authenticate using kerberos
  krb5_auth = yes
  # when using kerberos, request a "FILE" krb5 credential cache type
  # (leave empty to just do krb5 authentication but not have a ticket
  # afterwards)
  krb5_ccache_type = FILE
  # make successful authentication dependend on membership of one SID
  # (can also take a name)
  ;require_membership_of =
  silent = yes
Файл /etc/pam.d/gnome-screensaver в таком случае принимает вид:
auth    sufficient      pam_unix.so nullok_secure
auth    sufficient      pam_winbind.so use_first_pass
auth    required        pam_deny.so
А также изменяется файл /etc/pam.d/common-auth:
auth    optional        pam_group.so
auth    sufficient      pam_unix.so nullok_secure  use_first_pass
auth    sufficient      pam_winbind.so use_first_pass
auth    required        pam_deny.so
Ссылки
The Linux operating system has come a long way since 1991 when it was first introduced by Linux Torvalds as a free operating system. Today, some form of Linux is used in everything from high-end servers and virtual machines to IoT devices and embedded devices. More often than not, common database platforms such as Oracle, PostgreSQL, MySQL, and MongoDB are deployed on servers running Linux.
One notable exception was Microsoft SQL Server. That changed when Microsoft announced support for Linux starting with SQL Server 2017. However, Microsoft does not provide a straightforward way to integrate Linux hosts into Active Directory (AD), making it harder to manage them.
Fortunately, there is an easy way to integrate Linux with AD for cloud and on-premise Windows systems — by using realmd and System Security Services Daemon (SSSD).
Read this guide to learn how to integrate Linux with Active Directory. We’ll also cover how to join AD using realmd, what using SSSD is like, and how to map Linux unique identifiers (UIDs) and group IDs (GIDs) to site identifiers (SIDs) in AD.
A Brief Summary of Linux Interaction with Active Directory
As an introduction, here’s a brief summary of how Linux interacts with AD.
The main reasons to join a Linux machine to a Lightweight Directory Access Protocol (LDAP)-based directory service like Windows AD include:
- Business policies
- Access control
- Centralized identity management
When joining a Linux host to Active Directory (AD), two components are required:
- One to manage the central identity and authentication source (Active Directory)
- One to handle domain discovery and act as a middleman between the first component and the identity source
Over the years, there have been a few configuration options to join a Linux machine to AD. Most have been inconvenient to configure and required you to manually set up (SSSD to join domains. However, the realmd suite lets you complete the task without cumbersome configuration file editing.
How to Integrate a Linux Host into a Windows AD Domain
Now let’s walk through the steps of integrating a Linux host running on CentOS 8 into a Windows Active Directory (AD) domain configured on Windows 2012 R2 Server Standard Edition. (The reason we specify the versions and types of the Linux distribution and Windows Server is because there are subtle differences between versions of Linux and Windows. For example, in CentOS/RHEL 8, Network Time Protocol (NTP) client and server activities were managed using the ntp daemon, but in CentOS/RHEL 8, it has been replaced with the chrony daemon.)
Step 1: Ensure that the hostname and FQDN are specified.
Ensure that the hostname and the fully qualified domain name (FQDN) are specified in the /etc/hosts file. The hostname cannot be localhost, as it is mapped to the loop-back adapter 127.0.0.1. If you need to change the existing hostname, use the following command to change it to the desired name. There is no need to specify the FQDN as part of the hostname.
[root@oldhostname ~]# hostnamectl set-hostname <new_host_name>

[root@newhostname~]# echo 192.168.44.9 sblinmssql2019 >> /etc/hosts
Step 2: Specify the AD domain controller.
Specify the AD domain controller (DC) in the /etc/hosts file using the following command:
[root@newhostname~]# echo 192.168.xx.x sbad.sbits.net sbad >> /etc/hosts

[root@newhostname~]# ping sbad.sbits.net
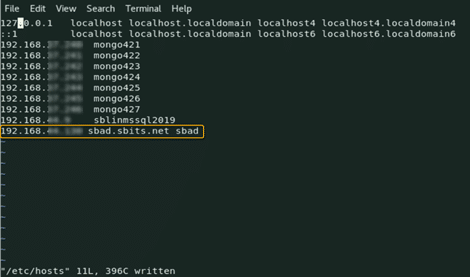
Step 3: Ping the AD domain controller.
Ping the AD domain controller that was specified in Step 2 and make sure you get a ping response.

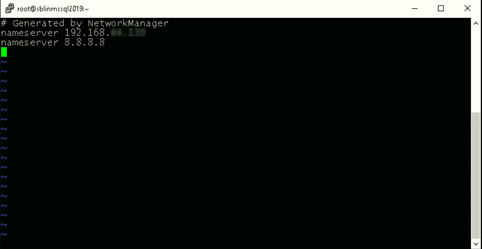
Step 4: Point the DNS server to the AD domain controller.
In my case, the DNS server needs to be pointed to the AD domain controller because my DC is also the DNS server for my domain, sbits.net.
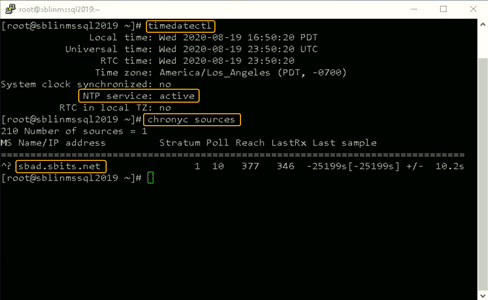
Step 5: Configure the NTP server, if necessary.
If the primary DC that you are planning to use as the NTP server does not have the NTP server configured, follow the steps in the screenshot to configure and enable the NTP server on the primary DC.

Step 6: Install chrony and configure it to use a DC.
The Linux host needs to synchronize time with one of the DCs in the AD domain. In my case, there is only one domain controller, so the Linux host will be synchronizing the time with it.
If chrony is not already installed, install it and configure it to use the DC to synchronize the time. (If it is already installed, you will get a message reporting that.)
[root@newhostname~]# vi /etc/resolv.conf

[root@newhostname~]# systemctl restart NetworkManager

[root@sblinmssql2019~]# vi /etc/chrony.conf

  [root@sblinmssql2019~]# systemctl enable chronyd

  [root@sblinmssql2019~]# systemctl restart chronyd

  [root@sblinmssql2019~]# systemctl enable chronyd
If chrony is already installed, we need to edit thechrony.conf config file and set the time server to the AD domain controller and restart the chronyd service. If the service was not preinstalled, enable it to start up on reboot and ensure that the firewall is configured to allow NTP traffic after installation.

Once chronyd is configured and enabled, the timedatectl command will show whether the NTP service is active. After confirming that NTP service is active, run the chronyc sources command to confirm that it is using the domain controllers as the time server, as shown below.
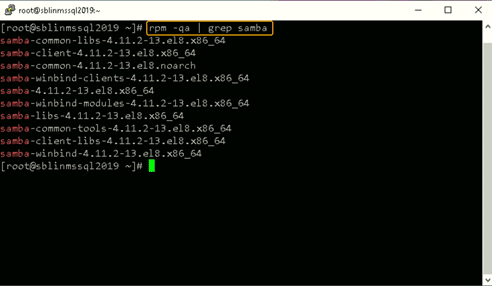
Step 7: Install the Samba suite on Linux.
Next, install the Samba suite, including winbind, on the Linux host. The winbind service enables the Linux host to interact with the AD domain like a Windows host. After installation is complete, confirm that the packages shown in the screenshot below are installed.
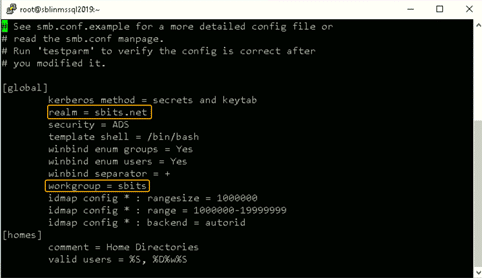
Step 8: Modify the /etc/samba/smb.conf file to reflect the realm value.
Next, modify the /etc/samba/smb.conf file to reflect the realm value to the fully qualified domain name, and change the workgroup value to the name of the domain, as shown in the screenshot below.
[root@sblinmssql2019~]# yum -y install samba samba-client

[root@sblinmssql2019~]# yum -y install samba-winbind samba-winbind-clients
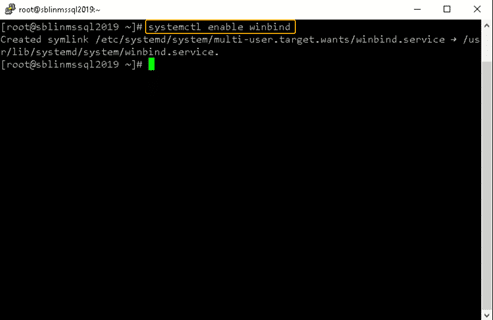
Step 9: Enable the winbind daemon on system reboot.
Enable the winbind daemon on system reboot using the systemctl command as shown in the screenshot below. Please note that there is no reason to reboot the Linux host, unlike Windows hosts.
Note: The realm parameter is the name of your domain. In this example, it is “sbits.net” and the workgroup parameter is set to “sbits”. The workgroup parameter can instead be set to the Windows default of “WORKGROUP” if you prefer. The security = ADS designates that this host is part of the AD domain. The winbind separator =+ specifies that the plus sign (+) will be used to separate the domain name and username. The traditional Windows separator is not compatible with Linux, and an escape character has to be used every time a username is specified with the domain prefix.
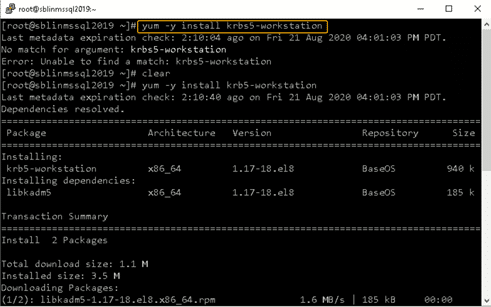
Step 10: Install the Kerberos realms package.
Install the Kerberos realms package using the yum command:
[root@sblinmssql2019~]# yum -y install krb5-workstation
Step 11: Add the Linux host to the AD domain.
Now, add the Linux host to the AD domain using the command below. It is highly likely that you will get the error “DNS update failed: NT_STATUS_INVALID_PARAMETER”.
In my case, even though I got the error, the Linux host was added to the AD domain. I reissued the command with the –no-dns-updates flag, and the error did not pop up.

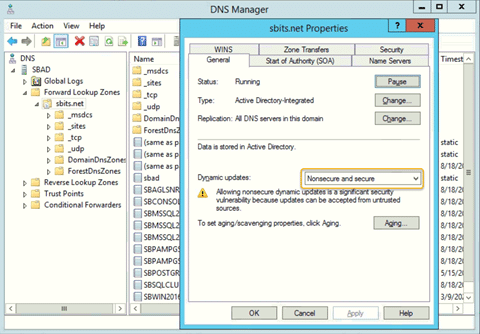
Step 12: Change the security setting using DNS Manager.
If you do not want to encounter the error and would like to have the DNS update the information about the new Linux hosts, change the security setting using DNS Manager as shown below.
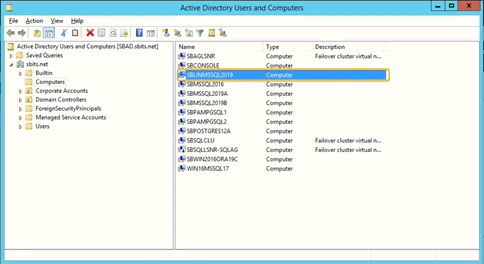
Step 13: Verify that the Linux computer object was added.
On the primary domain controller, verify that the Linux computer object was added by using the Active Directory Users and Computers tool.
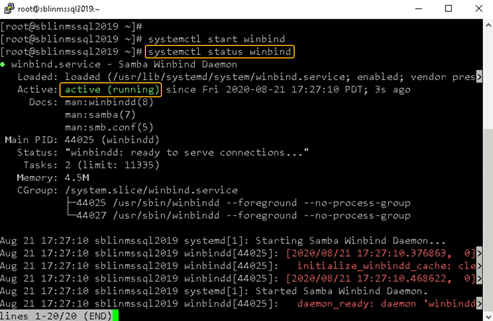
Step 14: Confirm that the winbind service is running.
Confirm that the winbind service is running on the Linux host.
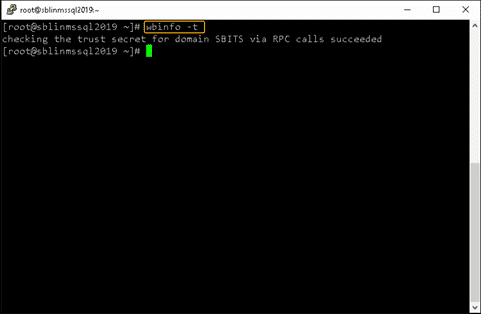
Step 15: Validate that the Linux host is part of the AD domain.
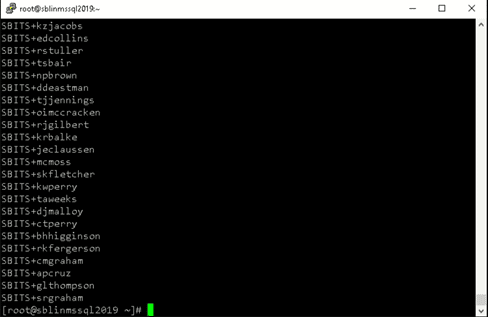
Validate that the Linux host is actually part of the AD domain and is able to communicate with the DC by using the wbinfo package to run encrypted RPC calls to the DC:
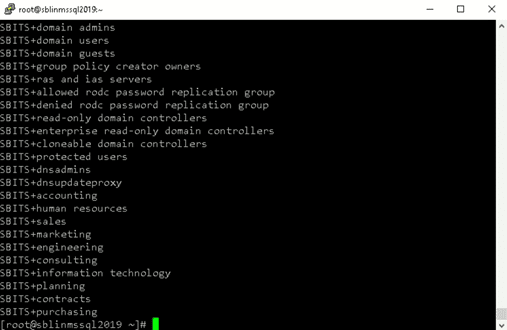
[root@sblinmssql2019~]# wbinfo -t    # verifies if encrypted RPC are supported

[root@sblinmssql2019~]# wbinfo – u  # enumerates AD the list of users

[root@sblinmssql2019~]# wbinfo – g  # enumerates AD the list of groups
Step 16: Ensure that winbind is selected as the authorization provider.
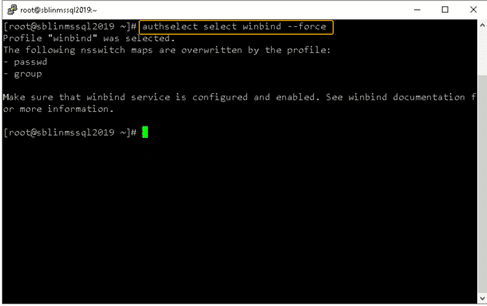
Next, we need to ensure that winbind is selected as the authorization provider by using the authselect select winbind –force command as shown below. The –force flag will overwrite the entries in the /etc/nsswitch. conffile.
Step 17: Ensure the passwd and group entries are listed to use winbind.
To ensure that Linux will use winbind for user authentication prior to local Linux authentication, make sure the passwd and group entries are listed to use winbind in the /etc/nsswitch.conffile.

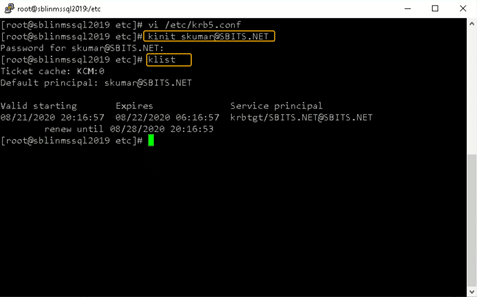
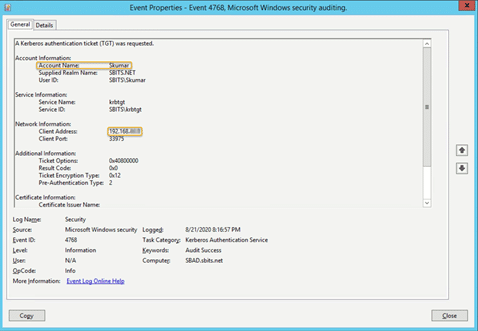
Step 18: Use kinit to get a Kerberos TGT.
Finally, use kinit to try to get Kerberos Ticket Granting Ticket (TGT):
[root@sblinmssql2019~]# wbinfo -t    # kinit skumar@sbits.net

[root@sblinmssql2019~]# wbinfo – u  # klist

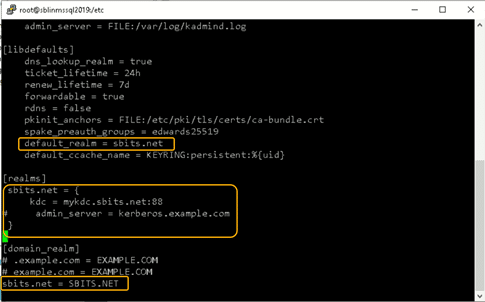
Chances are you will encounter the error shown in the screenshot above. If so, edit the /etc/krb5.conf file and change the setting as shown below:
Once the file is modified, there is no reason to start any services on the Linux host, and the ticket request should work fine.
You can verify it on the AD domain controller as well, as shown below:
Congratulations! You have added a Linux host to a Windows AD domain.
Joining AD Domains using realmd
Now that you know how to integrate Linux with an Active Directory domain, let’s turn to joining the AD domain. There’s a quick and easy way to set up SSSD to join domains without cumbersome configuration file editing: the realmd suite. This command-line tool can be used to manage enrollment in Kerberos realms, like Active Directory domains or IPA domains. The realmd system provides a clear and simple way to discover and join identity domains to achieve direct domain integration. It’s not too much of a lift, either, as realmd handles the configuration of complex underlying Linux system services, such as SSSD or winbind.
Realmd is also a great tool for access management, event management, configuring domain membership, achieving an integrated direct domain, and network and user SSH authentication. Many enterprise cybersecurity teams use realmd to reduce the attack surface by controlling who has access to what.
Follow these steps to join the Active Directory server using the realmd Desktop Bus (D-Bus) tool. These instructions work for all Linux distributions, including Fedora and Ubuntu.
- To add Linux to an Active Directory domain, ensure that your Linux host can communicate with the DC over the network. Proper DNS and hostname resolution are essential to this process.
- Next, install realmd using root access on your computer account and check to see if we’re already a member of a domain.
sudo apt install realmd

realm list
If realmd wasn’t previously installed, the output should be empty, indicating that:
- The host isn’t joined to AD or other domain services
- We don’t have any domain membership.
If the output lists a domain you’d like to leave, run the following as the domain administrator user account originally used to join the domain:
sudo realm leave example.com -U user@example.com
3. Next, we’ll want to discover our domain:
realm discover <domain_controller_hostname_or_ip_address>
The output is a list of packages that must be installed to join the domain:
example.com

  type: kerberos

  realm-name: EXAMPLE.COM

  domain-name: example.com

  configured: no

  server-software: active-directory

  client-software: sssd

  required-package: sssd-tools

  required-package: sssd

  required-package: libnss-sss

  required-package: libpam-sss

  required-package: adcli

  required-package: samba-common-bin
Realm discovery output may differ depending on your specific host and domain controller setup.
Note that realmd uses SSSD as its default Active Directory client software. SSSD allows local services to check with local user and credential caches in SSSD, but those caches may be taken from any remote identity prover, including AD, an LDAP directory, an identity management domain or a Kerberos realm.
If you don’t want to use SSSD, you can specify winbind to use Samba Winbind.
4. Confirm that the Windows server and Linux are on the same network. If they’re not, your Linux hosts won’t be able to join Active Directory. We highly recommend having a static IP address for the domain controller.
5. Once everything has been confirmed, go ahead and install the listed required packages (shown above) and then use the realm join command. This will do several things, including setting up the local machine for use with a specific domain and creating a host keytab file at /etc/krb5.keytab. It will also join Linux to the Windows domain using credentials with AD Domain Admin permissions:
sudo apt install sssd sssd-tools libnss-sss libpam-sss adcli samba-common-bin

sudo realm join --client-software=sssd <domain_controller_hostname_or_ip> -U <domain_admin>
When specifying the Domain Admin, we can just use the username instead of using example.comuser format, since we’re already specifying a domain controller in the command.
Additionally, we can use the –computer-ou parameter to specify the organizational unit for the computer to be joined to, using distinguished name format (for example, # realm join –computer-ou=”ou=Linux Computers,dc=example,dc=com”). Specifying –computer-ou is also great for creating directory computer accounts in non-default locations.
Note that an invalid hostname error can occur if a hostname isn’t set with the proper format. To resolve this, simply set the hostname properly:
sudo hostnamectl set-hostname '<new_hostname>'
6. After joining the domain, we can run realm list again to confirm success and review the domain info:
example.com

  type: kerberos

  realm-name: EXAMPLE.COM

  domain-name: example.com

  configured: kerberos-member

  server-software: active-directory

  client-software: sssd

  required-package: sssd-tools

  required-package: sssd

  required-package: libnss-sss

  required-package: libpam-sss

  required-package: adcli

  required-package: samba-common-bin

  login-formats: %U@example.com

  login-policy: allow-realm-logins
In this case, the login-formats property indicates that domain accounts will be specified in user@example.com format on this host, rather than domainuser format.
7. Finally, restart the SSSD service and use the command below to verify the Active Directory user information. The output should show a domain user’s UID, groups and more:
sudo service sssd restart

id user@example.com
That’s all there is to it! This is by no means a comprehensive guide for all the options you can manually perform and configure along the way; however, this is the quickest route to get Linux hosts joined to Active Directory using a modern approach.
Optional Steps
Once you’ve joined AD using realmd, you can take optional steps to customize your experience, such as tweaking realmd’s behavior and managing the properties of AD objects by using various options and tools. These include:
OS-Version
The os-version and os-name settings let you specify your operation system version and name. Specifically, you can use them to control the values that are placed in the computer account’s operatingSystemVersion and operatingSystem attributes.
AD Attribute Editor
This is a built-in graphical tool for managing the properties of AD objects, such as computers, users and groups. You can use it by installing the dsa.msc snap-in, which is part of the Windows Remote Server Administration Tools (RSAT).
Deny and Permit
The realm deny command denies local login by real accounts. You can use realm permit to restrict logins to certain accounts.
Changing the Default User Configuration
The realmd system allows you to modify the default user home directory and shell POSIX attributes. You can override the default directory and attributes by specifying the following options in the [users] section in the /etc/realmd.conf file:
- Default-shell: This defines the default user shell; it accepts any supported system shell.
- Default-home: This sets a template for creating a home directory for accounts with no home directory explicitly set.
Mapping Linux UIDs/GIDs to SIDs in Active Directory
You now know how to integrate Linux with Active Directory. However, we’re not done yet. We also need to touch on how POSIX UIDs and GIDs are mapped to SIDs in Active Directory, since Linux clients don’t have a concept of SIDs like Windows does.
Benefits of using SSSD rather than Winbind
As previously mentioned, realmd uses SSSD rather than winbind by default. One big benefit of this approach is that SSSD automatically handles POSIX UID/GID generation using the SID of each Active Directory user or group. If you keep the default SSSD settings on each Linux host that you join to the domain, then these UID and GID values should be mapped consistently across Linux hosts.
For example, in my lab, this result is consistent no matter which Linux machine I run it on, as long as the machines are joined to the same domain:
user@my-linux-host:~$ id user@example.com

uid=778006423(user@example.com) gid=778001234(domain users@example.com) groups=778001234 (domain users@example.com)
Another benefit of this approach is that UIDs and GIDs generated by SSSD can also be applied to the uidNumber and gidNumber attributes in Active Directory for users and groups. This allows applications that query these AD attributes to perform mapping of the UID or GID to the SID, ultimately resulting in the same AD users or groups being referenced regardless of whether a user or group is in use on a Windows or Linux system.
Viewing and Editing the uidNumber and gidNumber Attributes
To view the uidNumber and gidNumber attributes in Active Directory Users and Computers on Windows Server, make sure you have Advanced Features enabled under the View dropdown:
You’ll then be able to view and edit those fields in the user’s or group’s Properties menu on the Attribute Editor tab:
Listing All AD Users and Groups with their UIDs and GIDs
Depending on the number of users and groups in your domain, it may take a long time to manually assign uidNumber and gidNumber values. Although methods to programmatically populate these fields will be environment-specific, we can at least list all AD users and groups, with their UIDs and GIDs, using the getent command from a Linux host joined to the domain.
By default, getent will list only the users and groups on the local machine. Luckily, this can be modified by adding a line to your /etc/sssd/sssd.conf file and restarting SSSD. However, enabling this enumeration option can cause significant stress on the Active Directory server.
Typically, I like to step through this process outside of production hours, save the results, and then disable the full enumeration. Here’s how I do that:
- First, we add enumerate = True to sssd.conf, and then we restart the SSSD service:
echo "enumerate = True" | sudo tee -a /etc/sssd/sssd.conf &> /dev/null

sudo service sssd restart
Depending on the size of your Active Directory, it can take up to 10 minutes to complete the initial enumeration into the local cache. During this period, you’ll notice domain users and groups populating in the outputs from getent passwd and getent group, respectively.
2. Once enumeration to the local credential cache is complete, we can use the following commands to format the getent output (<domain> needs to be replaced with your domain name):
getent passwd | awk -F: '{print $1 "," $3 "," $4}' | grep <domain>

getent group | awk -F: '{print $1 "," $3}' | grep <domain>
The first command outputs each domain user with their UID and their GID in comma-separated format:
user@example.com,778006423,778001234
The second outputs each domain group with its GID in comma-separated format:
domain users@example.com,778001234
3. You can redirect the output to text or CSV files for parsing into Active Directory’s uidNumber and gidNumber attributes. With the UID and GID information in CSV format, you could create a script that imports each CSV and automatically updates uidNumber and gidNumber for Active Directory users and groups. For example, the following Windows PowerShell command adds the specified UID and GID to those attributes in AD:
Set-ADUser <ad_user> -Replace @{uidNumber="<uid>"; gidNumber="<gid>"}
With this command (and Set-ADGroup), you can easily generate a script that fits your environment and speeds up the process of mapping UIDs/GIDs to uidNumber and gidNumber in AD, which ultimately map to Windows SIDs.
4. Once you’ve saved the output from the getent commands, you can remove the enumerate value from sssd.conf and restart the SSSD service to prevent the expensive LDAP enumeration from occurring in the future:
sudo sed -i '/enumerate = True/d' /etc/sssd/sssd.conf

sudo service sssd restart
Conclusion
Linux hosts are often used for critical functions, so admins need to monitor these hosts, understand how they’re used, observe who accesses them and verify how they’re secured.
Admins need to especially be careful when joining Linux hosts to Active Directory. Remember, it takes only one compromised host or user for attackers to move laterally into admin rights in your domain, by exploiting issues like over-provisioned user access, weak passwords and open SMB/NFS shares.
One of the best ways to reduce cybersecurity risks is to use the Netwrix Active Directory Security Solution. Comprehensive and user-friendly, this software makes integrating Linux with Active Directory stress-free and simple. It includes:
- Preconfigured and customizable auditing, logging, analyzing and reporting jobs on both Unix/Linux and Active Directory
- Tools for protecting other parts of your infrastructure, including Google Cloud, network devices, virtualized systems and Kubernetes containers
Interested in experiencing the Netwrix difference? Request a free trial today.
FAQ
Can you join a Linux machine to Active Directory?
Yes. You can join any distro to an AD domain by manually connecting the SSSD client or using the realm join command.
How does Linux connect to Active Directory?
System Security Services Daemon (SSSD) provides a set of daemons to manage access to remote directory services and authentication mechanisms on Linux machines.
What is realmd in Linux?
realmd is a Linux system service that allows callers to configure network authentication and domain membership via SSSD or winbind services.
What is the sudo systemctl command?
The sudo systemctl command is the main management tool for controlling the init system. You can use the start command after it to start a systemd service.
What is the sudo apt-get update command?
The sudo apt-get update command is for downloading package information from all configured sources.
What is sudoers?
Linux and Unix administrators can use the sudoers file to allocate system rights to system users. In other words, it allows administrators to control who does what. You can find this file in /etc/sudoers.
Senior Director of Product Management at Netwrix. Farrah is responsible for building and delivering on the roadmap of Netwrix products and solutions related to Data Security and Audit & Compliance. Farrah has over 10 years of experience working with enterprise scale data security solutions, joining Netwrix from Stealthbits Technologies where she served as the Technical Product Manager and QC Manager. Farrah has a BS in Industrial Engineering from Rutgers University.

This article will describe the process of adding a Linux machine (Ubuntu 20.04) into a Windows Active Directory Domain.
Step 1. Install packages and preparation.
Let’s update packages first.
sudo apt update

sudo apt upgrade
After that, install the required packages.
sudo apt -y install realmd sssd sssd-tools libnss-sss libpam-sss adcli samba-common-bin oddjob oddjob-mkhomedir packagekit
Next, we will configure all of these tools to work with the domain. All we need to know is:
- Domain name: office.local
- DNS server IP: 192.168.0.1
- Second DNS server IP: 192.168.0.2
Step 2. Configure DNS.
Look in netplan config file.
sudo nano /etc/netplan/*.yaml
If you see there ‘dhcp4: true’ and your DHCP server is configured in a right way, go to the next step.
If you configure the network connection parameters manually, here is an example for setting up static addresses:
network:

ethernets:

enp0s3:

addresses:

- 192.168.0.15/24

gateway4: 192.168.0.10

nameservers:

addresses: [192.168.0.1, 192.168.0.2]

search:

- office.local

optional: true

version: 2
- addresses — this ip address will be assigned to your network card;
- gateway4 — ip address of your router;
- nameservers — DNS servers;
- search — target domain.
sudo netplan apply
Step 3. Discover the domain, join it, and check the result.
First, discover the domain.
realm discover office.local
We’ll see something like this. This means that the network settings are correct and our machine received an answer from the domain. If not, you need to check your network settings, domain, and DNS health.
office.local

type: kerberos

realm-name: OFFICE.LOCAL

domain-name: office.local

configured: no

...
Next, join the AD domain. Replace ‘admin’ with the domain administrator’s username and enter the password for it if prompt.
realm join -U admin office.local

Password for admin:
Now let’s check if we can get information about the AD user. Replace ‘user’ with the name of the domain user account.
id user@office.local

uid=687821651(user@office.local) gid=687800512(user@office.local) groups=687800512(domain users@office.local)
Step 4. Last settings and logging in.
To avoid adding the domain name to the username every time, let’s configure this.
sudo nano /etc/sssd/sssd.conf
Change the ‘use_fully_qualified_names’ value to False. Restart and check:
sudo systemctl restart sssd

id user

uid=687821651(user@office.local) gid=687800512(user@office.local) groups=687800512(domain users@office.local)
Now we need to to set up a creation of Home Dirs for AD users when they log in.
sudo nano /etc/pam.d/common-session

#add this line in the end of file

session optional pam_mkhomedir.so skel=/etc/skel umask=077
Let’s try to log in as an AD user.
su – user

Password:

Creating directory '/home/user@office.local'.

user@ubuntu-server:~$
This means that you have successfully logged in as an AD user.
Additionally, you can allow authorization for some AD users or groups and restrict others. The example below is set to deny everyone and allow for user, user2, Domain Admins group.
sudo realm deny –all

sudo realm permit user@office.local user2@office.local

sudo realm permit -g 'Domain Admins'
Configuring AD users to get root privileges is the same as for local users, but in another file.
sudo nano /etc/sudoers.d/admins
Add the necessary lines to it. For example:
user ALL=(ALL) ALL

%Domain\ Admins ALL=(ALL) ALL
1101
CT Amsterdam
The Netherlands, Herikerbergweg 292
+31 20 262-58-98
700
300
ITGLOBAL.COM NL
1101
CT Amsterdam
The Netherlands, Herikerbergweg 292
+31 20 262-58-98
700
300
ITGLOBAL.COM NL
Для упрощения добавления Ubuntu или Debian в домен Active Directory вместо связки samba+winbind можно использовать пакет realmd (Realm Discovery), который позволяет автоматически настроить службу SSSD (System Security Services Daemon) в Linux. Эта статья применима для Ubuntu 20.04/22.04 и Debian 10/11.
Прежде всего обновите пакеты на вашем хосте Linux:
$ sudo apt -y update
Выведите текущее имя хоста:
$ hostnamectl
Если нужно, измените имя хоста:
$ sudo hostnamectl set-hostname ubnt22.vmblog.ru
Проверьте, что в Linux корректно настроен клиент DNS и он указывает на ваши контроллеры домена AD:
# cat /etc/resolv.conf
nameserver 192.168.42.10
nameserver 192.168.142.10
search vmblog.ru
Т.к. пакет SSSD используется Kerberos для аутентификации, убедиться, что у вас корректно настроен NTP клиент и настроена синхронизация времени с контроллерами домена AD. Можно настроить так:
$ sudo systemctl status systemd-timesyncd
$ sudo nano /etc/systemd/timesyncd.conf
NTP=192.168.42.10
$ sudo systemctl restart systemd-timesyncd
Установите необходимые пакеты:
$ apt -y install realmd sssd sssd-tools libnss-sss libpam-sss adcli samba-common-bin oddjob oddjob-mkhomedir packagekit
Проверьте, что ваш хост может обнаружить домен AD:
$ realm discover vmblog.ru --verbose
vmblog.ru
type: kerberos
realm-name: VMBLOG.RU
domain-name: vmblog.ru
configured: no
server-software: active-directory
client-software: sssd
required-package: sssd-tools
required-package: sssd
required-package: libnss-sss
required-package: libpam-sss
required-package: adcli
required-package: samba-common-bin
Вы можете задать атрибуты вашего хоста Linux, которые нужно сохранить в учетной записи компьютера в Active Directory (атрибуты operatingSystem и operatingSystemVersion):
$ nano /etc/realmd.conf
[active-directory]
os-name = Ubuntu GNU/Linux
os-version = 22.04 (Jammy Jellyfish)
Для добавления Linux хоста в домен Active Directory вам понадобится учетная запись AD с правами администратора домена (или пользователь, которому делегированы права на добавление компьютеров в домен).
В самом простом случае для добавления хоста Ubuntu/Debian в домен достаточно выполнить команду:
$ sudo realm join -U apetrov vmblog.ru
Введите пароль доменного пользователя.
По умолчанию для вашего хоста Linux будет создана учетная запись компьютера AD в корневом OU (Organizational Unit) с именем Computers. Вы можете сразу поместить вам хост в нужную OU. Для этого используйте другую команду добавления в домен:
$ sudo realm join --verbose --user=apetrov --computer-ou="OU=Linux Servers,OU=HQ,DC=vmblog,DC=ru" vmblog.ru
Проверьте, что ваш хост теперь находится в домене AD:
$ sudo realm list
type: kerberos
realm-name: VMBLOG.RU
domain-name: vmblog.ru
configured: kerberos-member
server-software: active-directory
client-software: sssd
required-package: sssd-tools
required-package: sssd
required-package: libnss-sss
required-package: libpam-sss
required-package: adcli
required-package: samba-common-bin
login-formats: %U@vmblog.ru
login-policy: allow-realm-logins
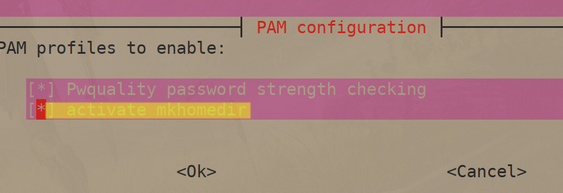
Чтобы автоматически создавать домашний каталог пользователям, выполните:
sudo bash -c "cat > /usr/share/pam-configs/mkhomedir" <<EOF
Name: activate mkhomedir
Default: yes
Priority: 900
Session-Type: Additional
Session:
required pam_mkhomedir.so umask=0022 skel=/etc/skel
EOF
$ sudo pam-auth-update
Выберите пункт activate mkhomedir.
Проверьте конфигурацию sssd в файле:
$ cat /etc/sssd/sssd.conf
Чтобы применить изменения из файла sssd.conf, нужно перезапустить службу:
$ systemctl status sssd
Теперь вы может выполнить аутентификацию в Linux с помощью учетной записи Active Directory (указывается в формате UPN: user@vmblog.ru).
Проверьте, что вы можете получить информацию о пользователе AD:
$ id apetrov@vmblog.ru
Можно переключиться на пользователя:
su - apetrov@vmblog.ru
Creating directory '/home/apetrov@vmblog.ru'.
apetrov@vmblog.ru@ubnt22:~$
Чтобы разрешить доменным пользователям вход на хост Linux (консоль+SSH), выполните:
$ realm permit apetrov1@vmblog.ru ivanov2@vmblog.ru
Или разрешить доступ для пользователей доменных групп безопасности:
$ ream permit -g LinuxAdmins@vmblog.ru
Чтобы разрешить, запретить доступ всем пользователям домена:
$ sudo realm permit --all
$ sudo realm deny --all
Вы можете разрешить определенным пользователям и группам повышать привилегии с помощью sudo. Создайте файл:
$ sudo nano /etc/sudoers.d/linux-admins
Добавьте в него пользователей и/или группы, которым разрешено sudo:
%LinuxAdminx@vmblog.ru ALL=(ALL) ALL
aivanov@vmblog.ru ALL=(ALL) ALL
Измените права на файл:
$ chmod 0440 /etc/sudoers.d/linux-admins
Теперь попробуйте аутентифицироваться на вашем Linux хосте с доменной учетной записью.
Процесс добавления rpm-based дистрибутивов (CentOS/Rocky Linux/RHEL/Fedora) в домен Active Directory немного отличается и описан в отдельной статье.