
Watch VIDEO
This How to is based on Windows 10×64 Pro image installation. The other windows versions are supported
For this you will need an actual Windows installation ISO.
We are using: Windows-10×64-Pro.iso. Be sure that distro name does not have spaces in the filename!
The procedure is the same for any other Windows version 7, 8.1, 10, 11 hosts.
1. Create a new directory for this image according to the naming convention:
root@eve:~# mkdir /opt/unetlab/addons/qemu/win-10x64-PRO/
2. Use WinSCP or FileZilla SFTP or SCP (port 22) to copy distro ISO image into the newly created directory path: /opt/unetlab/addons/qemu/win-10×64-PRO/
3. Go to that directory via CLI
root@eve:~# cd /opt/unetlab/addons/qemu/win-10x64-PRO/
4. Rename this ISO file to cdrom.iso
root@eve:~#/opt/unetlab/addons/qemu/win-10x64-PRO# mv Windows-10x64-Pro.iso cdrom.iso
5. Create a new virtual HDD named virtioa.qcow2 inside of your new image folder. Size you can choose per your needs. This example is used 60Gb HDD.
root@eve:~# cd /opt/unetlab/addons/qemu/win-10x64-PRO/
root@eve:~#/opt/unetlab/addons/qemu/win-10x64-PRO# /opt/qemu/bin/qemu-img create -f qcow2 virtioa.qcow2 60G
6. Create a new lab and add the newly created win-10×64-PRO node
7. Connect the node to your home LAN cloud/internet in order for it to be able to get updates from the internet
8. Start the node inside the lab and customize the installation of your Windows as you like, as you have connected it to your home LAN and internet this installation will be like any normal Windows installation
9. IMPORTANT: When windows installation asks you to choose an HDD where Windows will be installed, choose Load driver, Browse, choose FDD B/storage/2003R2/AMD64 or x86, (AMD or x86 depends which version of windows you are installing 64 or 32 bit), click next and you will see HDD RedHat VIRTIO SCSI HDD now.
10. Select this HDD and continue to install Windows as usual.
11. Optional: if you would like to use this image with the EVE RDP console, then you have to allow RDP on this Windows machine and create a user and password. In this example, we use user/Test123. Be sure that in the Windows Firewall the Remote Access inbound rules are permitted for Public access.
12. Finish installation and shutdown properly the VM from inside VM OS. Start/shutdown
IMPORTANT: Commit the installation to set it as the default image for further use in EVE-NG:
13. On the left side-bar within the lab in the EVE Web-UI choose “Lab Details” to get your lab’s UUID details: In this example: UUID: 3491e0a7-25f8-46e1-b697-ccb4fc4088a2
14. Find out the POD ID of your used and the Node ID of your newly installed node.
The POD number is assigned to your username, and can be found in the EVE GUI, Management/User Management. The Admin user uses POD number 0 by default.
The Node ID can be obtained by right clicking the node on the topology. In this Example it is 8
15. From the EVE CLI, locate the installed image and commit your changes to be used as default for further use in EVE-NG:
root@eve:~# cd /opt/unetlab/tmp/0/3491e0a7-25f8-46e1-b697-ccb4fc4088a2/8/
root@eve:~#/opt/unetlab/tmp/0/3491e0a7-25f8-46e1-b697-ccb4fc4088a2/8/ /opt/qemu/bin/qemu-img commit virtioa.qcow2
16. Remove cdrom.iso from /opt/unetlab/addons/qemu/win-10×64-PRO/
root@eve:~# cd /opt/unetlab/addons/qemu/win-10x64-PRO/
root@eve:~#/opt/unetlab/addons/qemu/win-10x64-PRO/ rm -f cdrom.iso
DONE
Advanced instructions on how to make your image smaller in size (sparsify&compress).
- After you have done all the steps above and your default image is created, you can compress its HDD and make it smaller.
IMPORTANT: for compressing an image you must have sufficient free space on your EVE host, the free space must exceed the total space (60GByte in this example) of the HDD you plan to shrink. The space needed can vary but will be the total space of the disk to be shrunk plus the size of the final sparsified and compressed image. To be safe you should have double the size of the HDD you want to shrink as free space on your EVE host. In our example we needed 65Gb of free HDD space. Once this process is done, the temporary file(s) will be deleted and free space reclaimed.
- From the CLI: go to your windows image directory:
root@eve:~# cd /opt/unetlab/addons/qemu/win-10x64-PRO
and perform the sparsify command:
root@eve:~#/opt/unetlab/addons/qemu/win-10x64-PRO/ virt-sparsify --compress virtioa.qcow2 compressedvirtioa.qcow2
- This will take some time and another compressed image will be created in the same image directory (win-10×64-PRO)
- now you can rename your original virtioa.qcow2 file to orig.qcow2
root@eve:~#/opt/unetlab/addons/qemu/win-10x64-PRO/ mv virtioa.qcow2 orig.qcow2
- Rename the compressed image name to virtioa.qcow2:
root@eve:~#/opt/unetlab/addons/qemu/win-10x64-PRO/ mv compressedvirtioa.qcow2 virtioa.qcow2
- now you can test your new compressed image on a lab, just wipe the node and start it.
- If the compressed node works fine, you can delete your original source image orig.qcow2:
In this article, we will add Windows 7 Host to the EVE-NG Simulator. EVE-NG is a Ubuntu operating system-based simulator that allows you to run network devices. To add Windows 7 to the EVE-NG simulator, you just need to download the Windows 7 qcow2 file. Let’s complete this step by step.
Download and Install EVE-NG on VMWare Workstation / ESXi
First, you need to set up the VMWare Workstation on your machine. VMWare Workstation comes with a 30-day trial. After the trial, you need to purchase it. VMWare Workstation lets you run virtual machines just like physical machines. You can download the VMWare Workstation and install it on your machine. It is also a cross-platform application. You can install it on Windows, Linux, and MacOS. If you have VMWare ESXi, please check the guide EVE-NG Configuration on VMWare ESXi.
EVE-NG comes with both commercial and community editions. You need to pay for the commercial version of EVE-NG. The community edition of EVE-NG is free. You can download the EVE-NG ISO and OVF templates. If you are new to EVE-NG, I recommend downloading EVE-NG OVF and using it on VMWare. If you have separate hardware just for EVE-NG, you can download the ISO file and install it like an operating system.
Download Windows 7 Host File for EVE-NG
First, we need to download the Windows 7 Host file. You can either download the ISO file of Windows 7 or the qcow2 file. For ease of deployment, you can download the Windows 7 qcow2 file from google drive. This image already contains applications like Google Chrome, Firefox, Putty, etc.
Create a folder for Windows 7 on EVE-NG
Now, we need to take the SSH of the EVE-NG VM. Once you have access to the EVE-NG VM, you need to create a directory for Windows 7 Host.
C:\Users\Public>ssh root@192.168.83.137
root@192.168.83.137's password:
Welcome to Ubuntu 16.04.7 LTS (GNU/Linux 4.20.17-eve-ng-ukms+ x86_64)

Documentation: https://help.ubuntu.com
Management: https://landscape.canonical.com
Support: https://ubuntu.com/advantage
Last login: Mon Jan 3 18:11:09 2022
root@eve-ng:~#
Now, create the directory for Windows 7 Host that you want to add in EVE-NG. Your directory name should start from win-7. In my case, the Windows 7 directory name is win-7.
[root@eve-ng:~# mkdir /opt/unetlab/addons/qemu/win-7
Upload the Windows 7 File to the created directory/folder
Now, we must upload the Windows 7 file downloaded in step 1. Use WinSCP or FileZilla applications to upload this file to the newly created directory. If you have a Windows 10 machine, you can upload it using cmd. You can refer to the below command for the same.
scp "Windows7.qcow2" root@192.168.83.137:/opt/unetlab/addons/qemu/win-7/
root@192.168.83.137's password:
You might have noticed that 192.168.83.137 is my EVE-NG IP address. Once the Win-7 upload part is completed, you can see the image in the created directory.
root@eve-ng:~# cd /opt/unetlab/addons/qemu/win-7/
root@eve-ng:/opt/unetlab/addons/qemu/win-7# ls
Windows7.qcow2
Rename the Windows 7 directory file name using mv.
Here, we need to rename the file name of Windows 7 to virtioa.qcow2. You can run the below command to rename this file.
root@eve-ng:/opt/unetlab/addons/qemu/win-7# mv Windows7.qcow2 virtioa.qcow2
Fix the permissions on EVE-NG
Finally, we should fix the permissions on the EVE-NG simulator to run Windows 7. Hit the below command to fix the permissions.
root@eve-ng:/opt/unetlab/addons/qemu/win-7# /opt/unetlab/wrappers/unl_wrapper -a fixpermissions
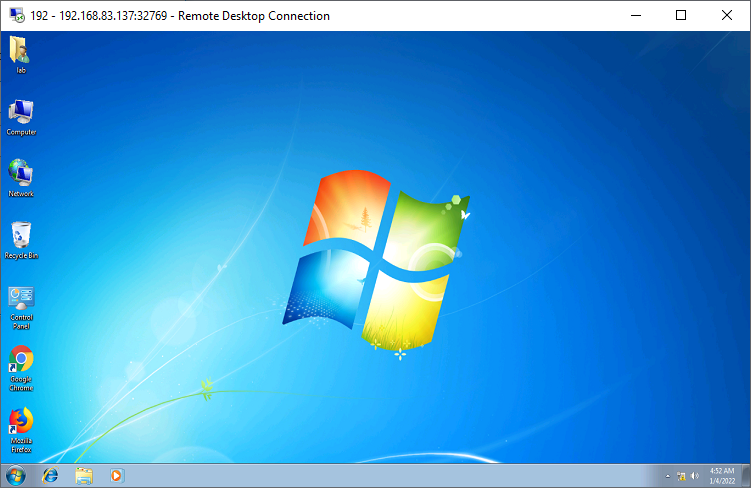
That’s it. We have successfully deployed the Windows 7 host on the EVE-NG Simulator. Now, we will create a lab to run it.
Running Windows7 on a Lab in EVE-NG
Let’s create a lab to test the newly added Windows 7 machine. Go to the web browser and open the eve-ng simulator. Create a new lab, select a Windows Node, and add Windows 7 to the lab.
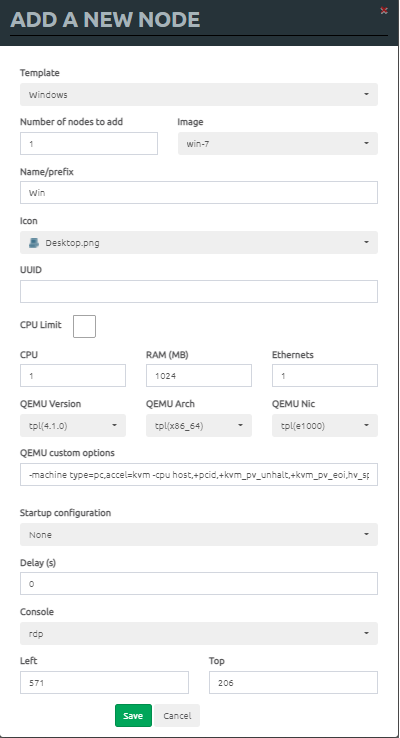
I’ve already configured the Windows to accept RDP Console. While adding the node to the lab, you can select either RDP Console or VNC Console.
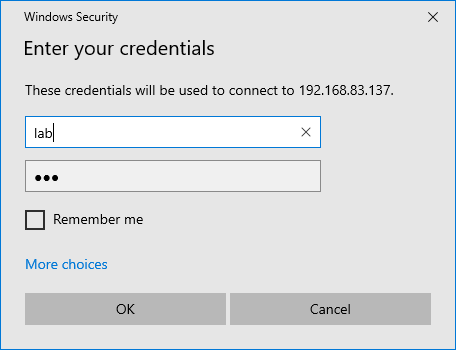
The username and password will be lab & 123.
Related Articles
- How to install Cisco ASAv Firewall in EVE-NG Simulator
- Configure Cisco ASA Firewall for ASDM Access
- [Fixed] Word Error 24 – Microsoft Windows 10/11
- Automated backup from Palo Alto Networks Firewall without Panorama
- How to generate SSL SAN Certificate CSR using OpenSSL
- Install Apache Web Server on Ubuntu 22.04
- A Step-by-Step Guide to Deploy Ubuntu on AWS Lightsail
Summary
In this article, we have configured Windows 7 on the EVE-NG Simulator. First, we have downloaded the Windows 7 host file. After that, we have created a directory/folder on EVE-NG. After that, we uploaded the file to the eve-ng directory. Finally, we fixed the permissions and created a lab to test Windows 7.
This post will help you to add Windows 7 Host to eve-ng in the simplest way.
Follow the below Steps to add Windows 7 Host to Eve-ng.
- Create a folder for Windows 7 in Eve-ng.
- Download Windows 7 Host image.
- Upload the image to the newly created folder in eve-ng.
- Fix the permission
- Test the Windows 7 host.
To download Windows 10 and Windows 2012/2019 server host images and a lot more you can subscribe to Lab4Work
Login to your Eve-ng via cli and follow the below steps to add Windows 7 host in Eve-ng
1. Create a folder for Windows 7 in Eve-ng using the following command.
mkdir /opt/unetlab/addons/qemu/win-7/
2. Download Windows 7 Host image.
This image is already prepared for eve-ng, so you do not have to convert this image.
you can download the image for eve-ng from the below link.
Download
3. Upload the Windows 7 image to the newly created folder in eve-ng.
Upload the downloaded image to the EVE using for example FileZilla or WinSCP to: /opt/unetlab/addons/qemu/win-7/
4. Fix the permission.
The next step is to fix the permission.
/opt/unetlab/wrappers/unl_wrapper -a fixpermissions
5. Test the Windows 7 image in Eve-ng
Open the Eve-ng in the browser. Create a new lab, right-click on lab, and select Win 7.
It will work like a charm as in shown in the screenshot, enjoy.
This window has preinstalled features that will help you to troubleshoot access multi-vendor devices. You can connect this host directly to the internet and download all the required software for your lab.
This Windows 7 image is a converted image for eve-ng. You just have to download the Windows 7 image for eve-ng and upload it to the eve-ng win7 folder. After that just fix the permission and you are ready to go.
some of the preinstalled software in Windows 7 hosts for eve-ng so you do not have to worry about the tools,
- Cisco ASDM
- Cisco Anyconnect
- Wireshark
- FileZilla
- TFTP
- WinSCP
and a lot more enjoyable.
Сегодня мы с вами поговорим о том, как добавляются образы устройств в эмулятор Eve-NG, рассмотрим это на примере Cisco L2, L3 и mikrotik. Напомню, что в предыдущей статья я рассказывал, как установить эмулятор eve.
Содержание
- Добавление образов Cisco
- Добавление CHR MikroTik
- Ну и на вкусное, windows в eve-ng
Первым делом подключаемся через WinSCP к нашей VM c eve, вводим ip логин и пароль. Далее переходим в каталог /opt/unetlab/addons/qemu/.
В нем создаем две папки с названием:
- viosl2-15 – это для L2 образа 15 версии;
- vios-15 – это для L3 образа 15 версии.

Сами образы внутри папок нужно назвать virtioa.qcow2 – как на рисунке ниже.

Далее для удобной работы можно также скачать и установить утилиты (если они еще у вас не стоят) которые предлагают разработчики там, putty, vnc, wireshark и тд.

После заходим по ssh на нашу виртуальную машину и вводим команду «/opt/unetlab/wrappers/unl_wrapper -a fixpermissions» для того чтобы система увидела наши добавленные образа.

Теперь можно идти в web-интерфейс EVE-NG и в нодах выбирать cisco роутер и свитч.

Соединять между собой устройства можно только выключенными, при наведении появляется маленькая вилочка, которую нужно дотянуть до другого устройства, выбрать порт которому будет подсоединено.


Зайти на устройство можно кликнув на него мышкой. Проверим командой «show cdp neighbor» видят ли устройства друг друга.

Как видим все отлично работает, образ cisco успешно добавлены в эмулятор eve.
Добавление CHR MikroTik
Добавления микротика происходит почти аналогичным образом. Заходим также на виртуалку через winscp, переходим в каталог /opt/unetlab/addons/qemu/ и создаем там папку с именем mikrotik-X где X можно писать что угодно, главное, чтобы все что до него было так.

Далее идем на mikrotik.com/download и качаем образ mikrotik CHR (Cloud Hosted Router). Скаченный файл переименовываем в «hda.qcow2» и закидываем в созданную папку.

Не забываем в консоли выполнить команду «/opt/unetlab/wrappers/unl_wrapper -a fixpermissions». Добавляем нашу виртуальную os микротика в эмулятор соединяем с реальной сетью (перед этим назначив ip интерфейсу CHR). Теперь можем зайти на него через winbox и проверить.

Ну и на вкусное, windows в eve-ng
Также в eve-ng можно добавить ос windows для этого нужно провести несколько манипуляций таких как установка, конвертация виртуалки и тд. Я это уже все сделал и предоставлю вам готовый образ windows 7×32 который нужно:
- Скачать здесь (ссылка удалена по авторским правам) и переименовать в hda.qcow2
- Создать и скопировать в папку /opt/unetlab/addons/qemu/win-7
- В терминале выполнить команду «/opt/unetlab/wrappers/unl_wrapper -a fixpermissions».
Все, спокойно добавляйте win7 как обычную ноду и стройте топологии.

Всем спасибо за внимание! Если есть вопросы пишите в комментариях.
Вы хорошо разбираетесь в Микротиках? Или впервые недавно столкнулись с этим оборудованием и не знаете, с какой стороны к нему подступиться? В обоих случаях вы найдете для себя полезную информацию в углубленном курсе «Администрирование сетевых устройств MikroTik». В курсе много практических лабораторных работ по результату выполнения которых вы получите обратную связь. После окончания обучения вы получите диплом гос. образца РФ. Подробности и доступ к началу курса бесплатно тут.
It’s a mistake if your EVE-NG doesn’t have a Windows virtual machine. In this article, I will show you how to install Windows 10 in an EVE virtual environment.
Windows 10 iso file
First you need to prepare a Windows 10 iso file.
Next you copy and paste the iso file into eve using WinSCP.
File directory: opt/unetlab/addons/qemu
You create a new folder according to eve’s naming convention, here I name it «win-10«. Note that you must not name the wrong convention. Next, drag and drop the iso file into the newly created folder. You rename the iso file to «cdrom.iso«.

Next you open a command window access EVE with SSH.
cd /opt/unetlab/addons/qemu/win-10/
/opt/unetlab/addons/qemu/win-10# ls

You create a new hard drive for the Windows 10 virtual machine.
You can completely perform the previous steps using the command line according to the instructions.
Here you are instructed to create a hard drive of size 30G, because I installed Windows 10 so I increased the size to 40G.
/opt/unetlab/addons/qemu/win-10# qemu-img create -f qcow2 virtioa.qcow2 40G
Next, you create a new lab and name it as you like. I created a new lab named «win10». In the device list, I go to the Windows category and add a new computer.
Next, you connect the virtual computer to the internet to update, install software or check the network connection.

Installing the Windows 10 operating system
You start the computer and start installing the Windows 10 operating system. You won’t find the hard drive like when you install Windows 10 on a real machine.
To find the hard drive, click «Load Driver» > «Browse» > «Floppy disk drive» > «storage» > «2003R2» > «AMD64».

Wait a while you will see the hard drive appear and you install Windows 10 on it. The next installation steps will be the same as on a physical computer so I will fast forward the steps so you don’t have to wait too long.
At this point, you have installed Windows 10 for the virtual machine, but you still have an important step to take.

Please follow the next steps.
So the virtual machine works fine, has an internet connection, next you turn off the virtual machine and move on to the next step.
You go to Lab details and write down the UUID information.

Next, Find out the POD ID of your used and the Node ID of your newly installed node.
As in this article, POD ID is 0.

Here is a sample command with the information you need to find.

You right click on the newly created virtual machine to find the node id, and as you can see the node id is 1.

Next you create the image from the Windows virtual machine created in the previous step.
You notice the change in the size of the file virtioa.qcow2, which will increase in size after completion.
And here is the image file you obtained.

It will take you about 5 minutes to complete this step, so please wait patiently.
Now you can remove Windows 10 ISO file from Eve.
Facebook: https://www.facebook.com/routerbest
Twitter: https://twitter.com/routerbestcom
Tags: EVE-NG Windows 10