
Все способы:
- Способ 1: Папка автозапуска
- Способ 2: «Редактор реестра»
- Способ 3: Планировщик заданий
- Способ 4: Локальные групповые политики
- Вопросы и ответы: 4
Способ 1: Папка автозапуска
Методы добавления в автозагрузку скрипта BAT ничем не отличаются от методов добавления в автозагрузку ярлыков и других файлов. Самым простым и очевидным является копирование файла батника в папку автозапуска.
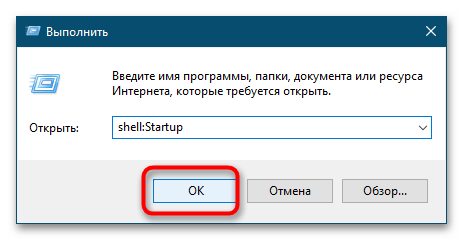
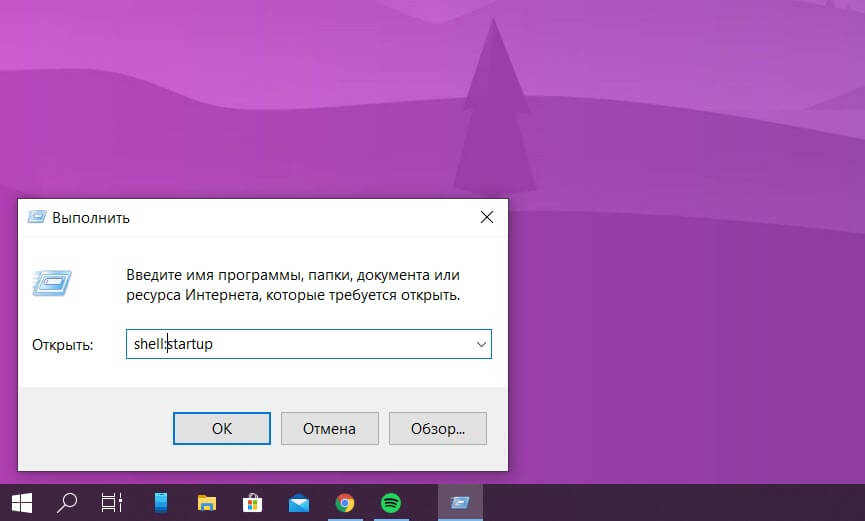
- Откройте папку автозапуска, для чего выполните в вызванном клавишами Win + R окошке команду
shell:Startup. - Скопируйте в открывшийся каталог файл BAT.
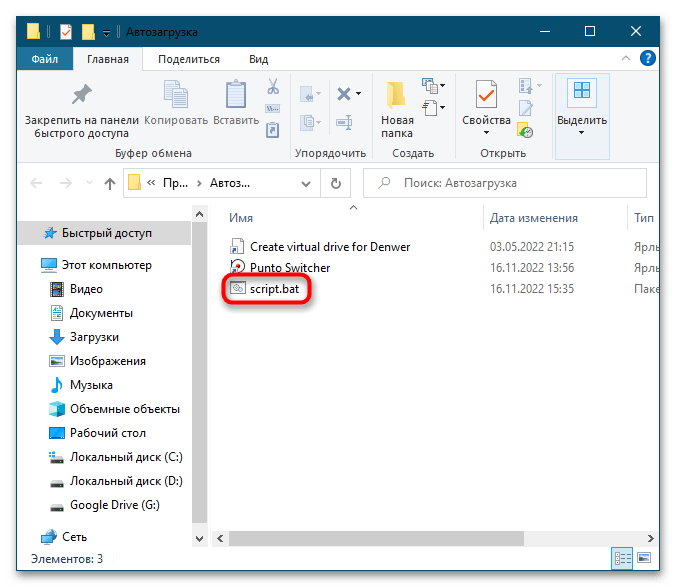
Это добавит командный файл в автозагрузку текущего пользователя. Если необходимо, чтобы скрипт выполнялся при входе в систему всех пользователей, скопируйте его в системную папку C:\ProgramData\Microsoft\Windows\Start Menu\Programs\Startup.
Способ 2: «Редактор реестра»
Добавить батник в автозагрузку можно также путем применения несложного твика реестра, прописав во встроенном «Редакторе реестра» путь к командному файлу.
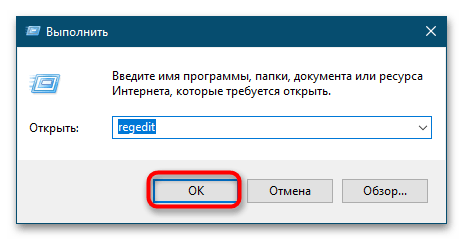
- Запустите «Редактор реестра» командой
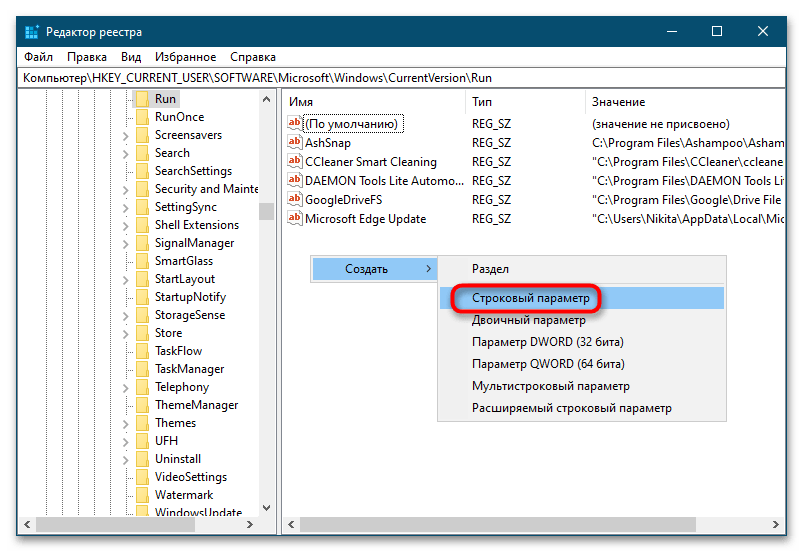
regedit, выполненной в диалоговом окошке Win + R. - Разверните ветку
HKEY_CURRENT_USER\SOFTWARE\Microsoft\Windows\CurrentVersion\RunилиHKEY_LOCAL_MACHINE\SOFTWARE\Microsoft\Windows\CurrentVersion\Run, если хотите, чтобы добавленный в автозапуск батник запускался для всех пользователей. - Создайте в правой колонке новый строковый параметр с именем файла BAT или произвольным названием.
- Откройте двойным кликом по созданному параметру окошко редактирования его значения и вставьте в поле «Значение» полный путь к BAT-файлу. Если в пути присутствуют пробелы, заключите путь в двойные прямые кавычки.

Скопировать полный путь к файлу можно в его «Свойствах» либо из его контекстного меню, вызванного с зажатой клавишей Shift.
Способ 3: Планировщик заданий
Следующий метод добавления командного файла в автозагрузку Windows 10 заключается в создании задачи в системном «Планировщике заданий».
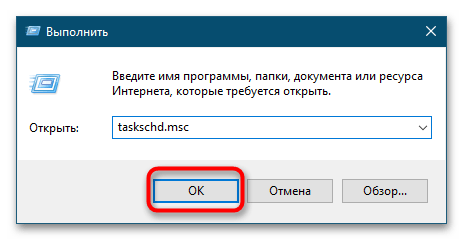
- Запустите «Планировщик заданий» командой
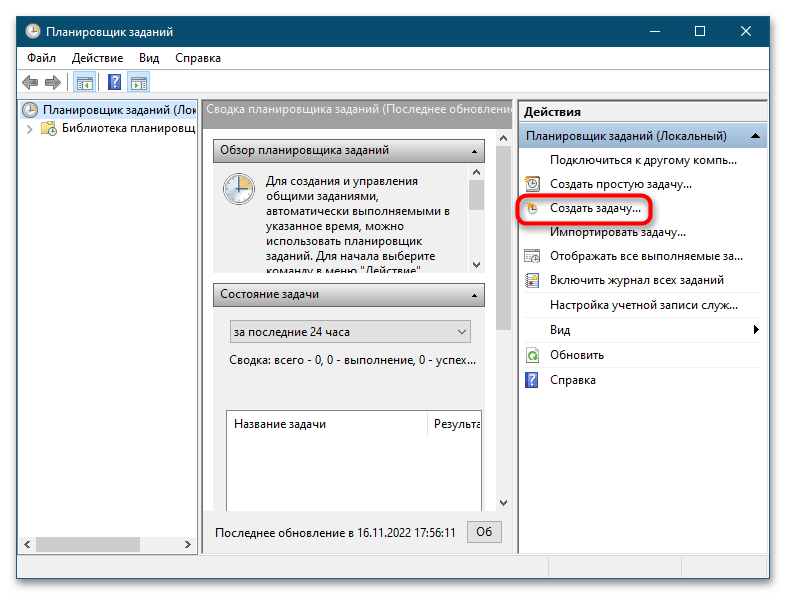
taskschd.msc, выполненной в диалоговом окошке Win + R. - Нажмите в правой колонке по «Создать задачу».
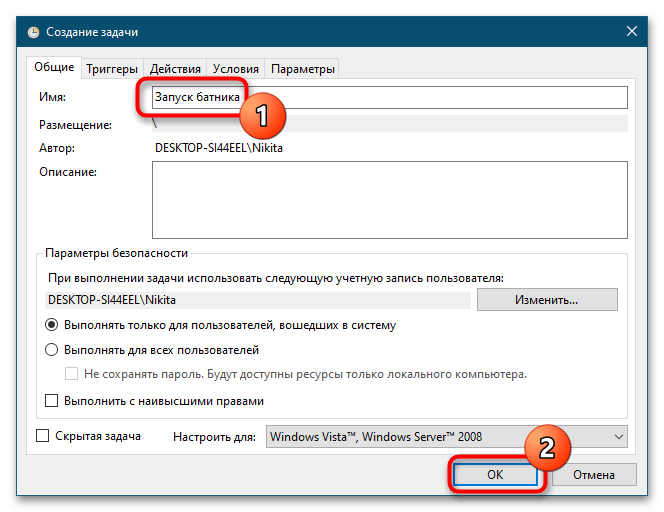
- В окне мастера создания задачи дайте новому заданию произвольное имя, активируйте, если нужно, запуск скрипта с наивысшими правами.
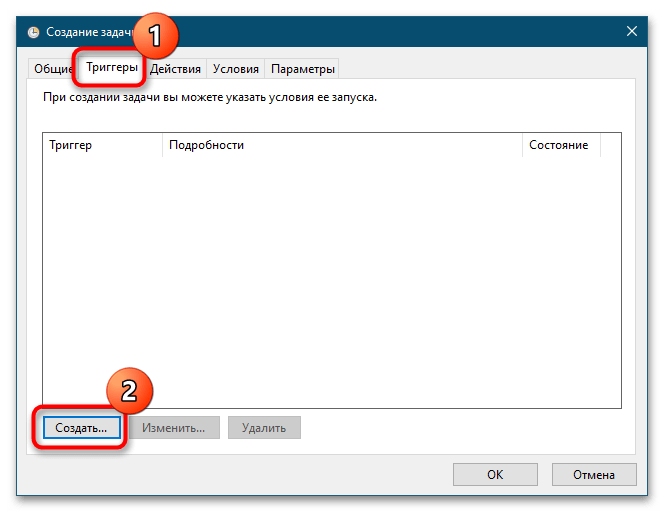
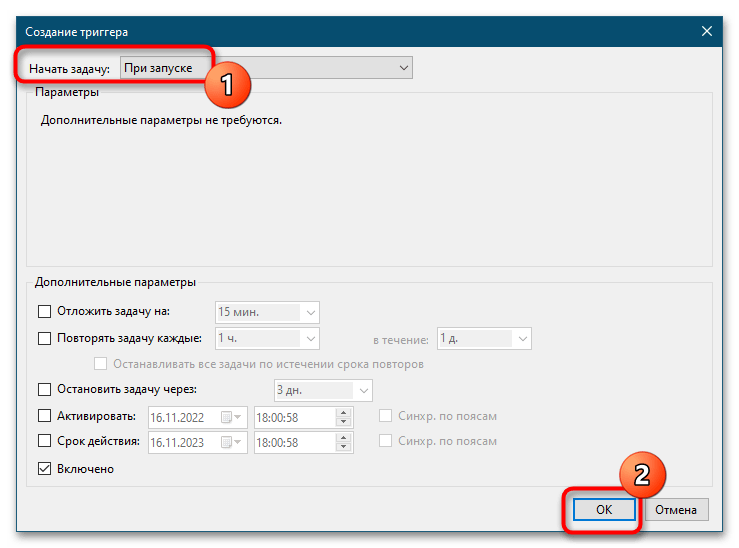
- Перейдите на вкладку «Триггеры» и нажмите кнопку «Создать».
- В выпадающем списке «Начать задачу» выберите «При запуске» или «При входе в систему». Нажмите «OK».
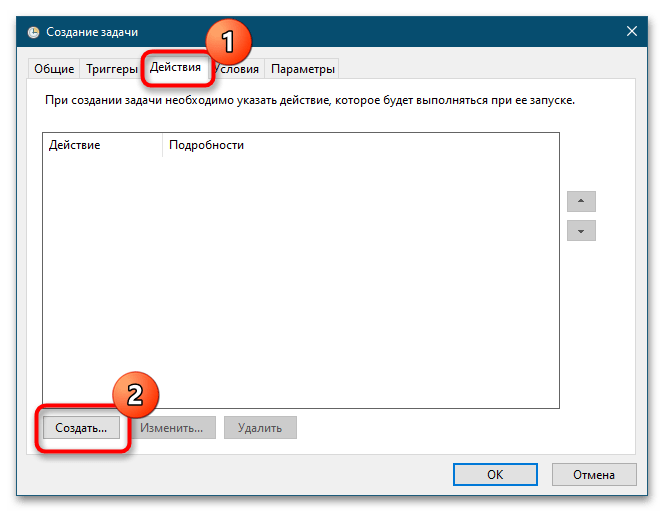
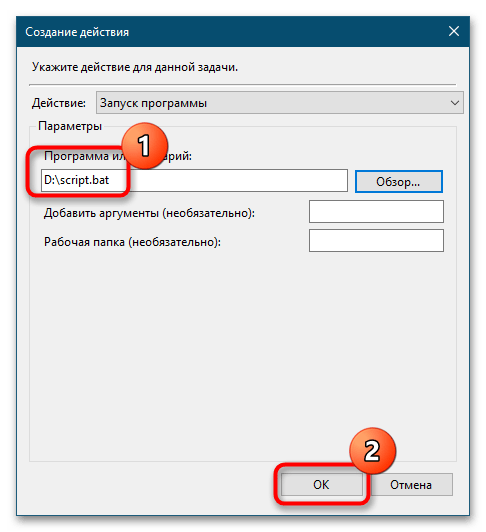
- Перейдите на вкладку «Действия» и нажмите «Создать».
- Нажав кнопку «Обзор», выберите добавляемый в автозапуск файл BAT. Остальные настройки можно не менять, убедитесь только, что в качестве действия выбран «Запуск программы» и последовательно сохраните настройки.
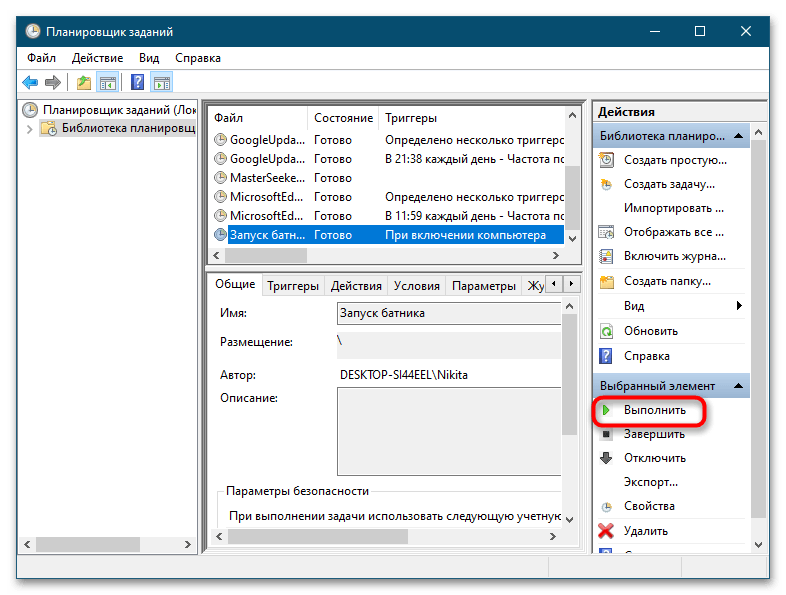
Созданная задача появится в разделе «Библиотека планировщика заданий». При желании ее можно будет испытать, выделив мышкой и нажав ссылку «Выполнить» в правой колонке «Планировщика заданий».
Способ 4: Локальные групповые политики
Этот способ добавления батника в автозагрузку подходит только для Windows 10 редакции Pro и выше.
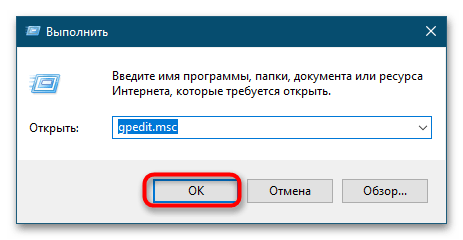
- Запустите «Редактор локальных групповых политик» командой
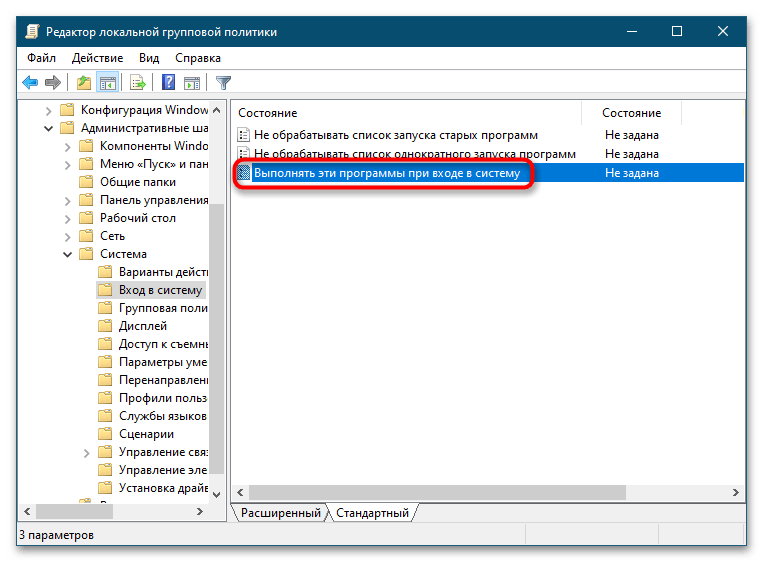
gpedit.mscчерез диалоговое окошко «Выполнить» (Win + R). - Разверните ветку «Конфигурация пользователя» → «Административные шаблоны» → «Система» → «Вход в систему» и откройте двойным кликом настройки политики «Выполнять эти программы при входе в систему».
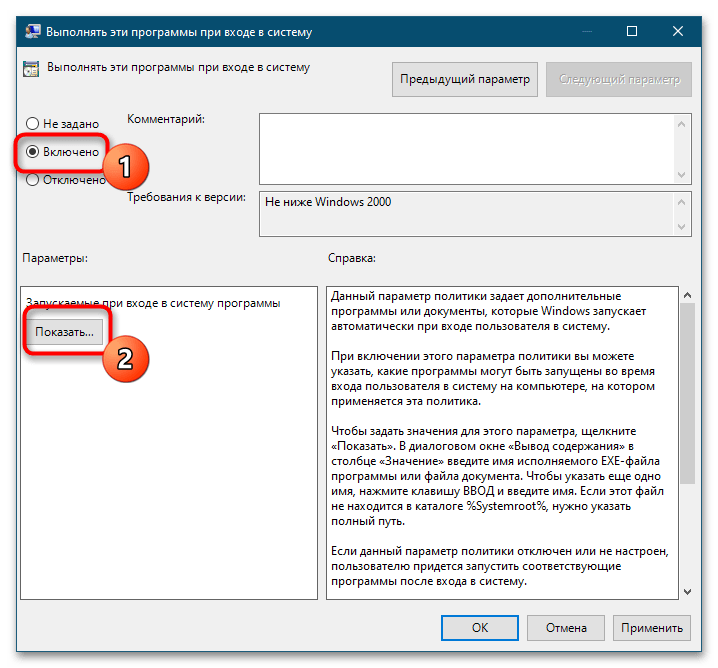
- Активируйте радиокнопку «Включено» и нажмите кнопку «Показать».
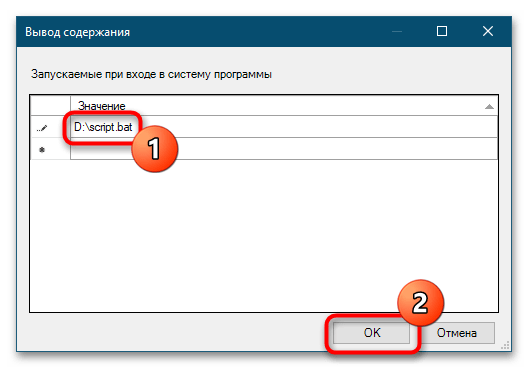
- В поле «Значение» открывшегося диалогового окошка вставьте полный путь к файлу-батнику, нажмите «OK» и сохраните настройки.
Если необходимо, чтобы батник запускался при входе в систему всех пользователей, нужно изменить одноименную политику в разделе «Конфигурация компьютера», а не «Конфигурация пользователя».
Наша группа в TelegramПолезные советы и помощь
106
106 people found this article helpful
Launch your favorite apps every time you boot up
What to Know
- Open the Run dialog box, enter shell:startup, then right-click inside the Startup folder and select New > Shortcut to add a program.
- If you can’t find the app, enter shell:appsfolder in the Run dialog box, then drag apps from that folder into the Startup folder.
- Some apps offer a ‘run at startup’ option, which is an easier way to add a program to startup in Windows 10.
This article explains how to add a program to startup in Windows 10. Applications that are designated as startup programs are launched as Windows 10 boots.
How to Add Programs to Startup in Windows 11
How to Add Programs to Startup in Windows 10
You can enable or disable apps from running on startup in the App Startup Control Panel and the taskbar, but the only place you can add new startup programs is through the Windows startup folder.
Some modern apps have a ‘run at startup’ capability built into their options. If your app has that option, then turning it on is a lot easier than the following method, which is designed to work with all programs.
-
Press the Windows key+R to open the run dialog box.
-
Type shell:startup in the run dialog box and press Enter on your keyboard.
-
Right click in the startup folder and click New.
-
Click Shortcut.
-
Type the location of the program if you know it, or click Browse to locate the program on your computer.
If you can’t find your app, try opening the run dialog box back up and typing shell:appsfolder. You can drag any app from that folder into the startup folder to instantly create a shortcut.
-
Click Next.
-
Type a name for the shortcut, and click Finish.
-
Create additional links for any other programs you want to run automatically when Windows starts.
-
Restart your computer, and the new programs will launch automatically.
What Is the Windows Startup Folder?
The Windows startup folder is a folder that Windows looks in for programs to run every time it starts. This was the only way to manage startup programs in older versions of Windows. Adding a program shortcut causes that program to launch when Windows starts, and removing a program shortcut stops it from launching when Windows starts.
While Windows 10 has moved to the newer app startup control panel as the primary way to manage which apps, the startup folder remains the best way for users to add their own startup programs.
Drawbacks to Adding Programs to the Startup Folder in Windows 10
The benefits of adding programs you use every day to the Windows 10 startup folder are obvious. Instead of waiting for Windows to start up and then manually clicking on everything you launch every day, all you have to do is turn your computer on and wait for everything to load.
The issue is that it takes time for programs to load along with Windows, and every program you load takes up resources like memory and processor power. Load too many unnecessary programs, and you’ll find that Windows 10 starts slow and may even remain sluggish after loading everything.
If you change your mind about programs you’ve added to the startup folder, you can simply delete the shortcuts to prevent those programs from launching whenever you turn on your computer. You can also change startup programs in Windows 10 using the task manager or the startup app control panel.
What to Do If You Have Too Many Windows 10 Startup Programs
If you have some essential programs that you use for work every day, or you mainly use your computer to play a specific game, try adding the programs that are important to you and then removing programs you don’t ever use.
Your computer probably came with bloatware you never actually use, and applications are often set to run when Windows starts up even if you don’t want them to. Disable those startup programs, add the ones you want, and you’ll enjoy both convenience and faster startup times.
FAQ
-
To improve startup time in Windows 10, disable startup programs, run an anti-virus scan, disable hardware you don’t use, upgrade your RAM, or switch to an SSD.
-
To change your home page in Microsoft Edge, go to the three-dot menu > Settings > On startup > Open a Specific page or pages > Add a new page. In Chrome, go to the three-dot menu > Settings > Show home button > Enter custom web address.
-
To access Windows Advanced Startup Options, hold down the Shift key and restart your computer. Keep holding Shift until you see the Advanced Startup Options menu. Alternatively, go to the Recovery options in Windows Settings.
-
To add desktop shortcuts, right-click anywhere on the desktop, then select New > Shortcut > Browse. You can use desktop shortcuts to access applications, navigate to a website, or open a file.
Thanks for letting us know!
Get the Latest Tech News Delivered Every Day
Subscribe
Чтобы добавить или удалить приложения в автозагрузку ОС Windows 10:
- Откройте диалоговое окно Выполнить, нажав Win + R введите shell:startup и нажмите «OK», чтобы открыть папку «Автозагрузка».
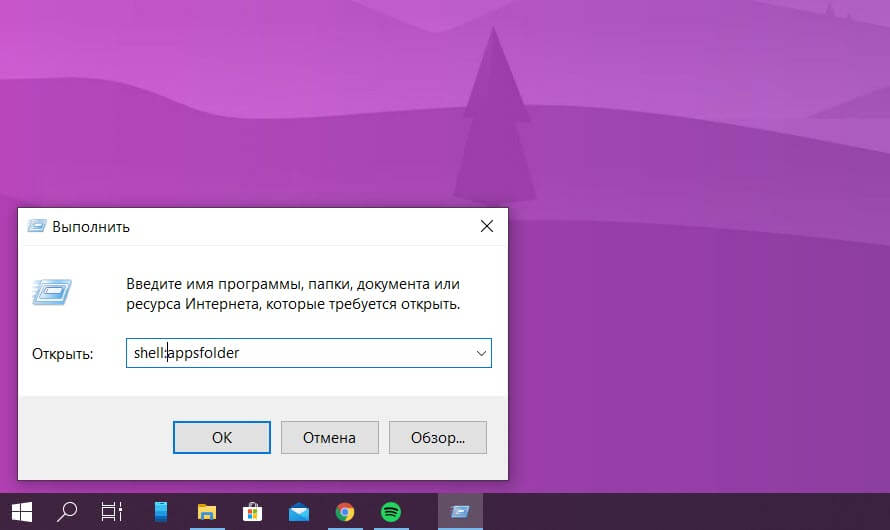
- Снова используйте команду Win + R , введите shell:appsfolder и нажмите «OK», чтобы открыть папку «Приложения».
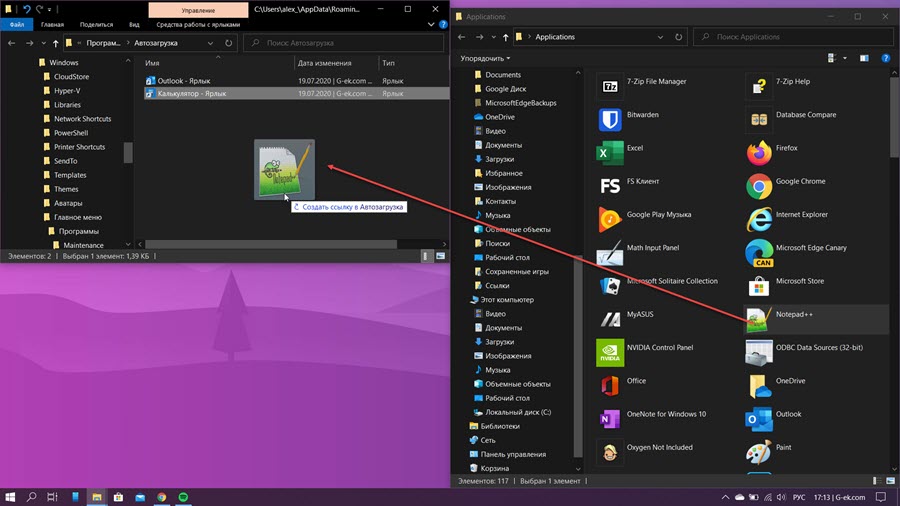
- Перетащите нужные приложения из папки «Приложения» в папку «Автозагрузка», которые вы хотите запускать автоматически при следующем входе в систему Windows 10.
Windows 10 имеет удобную функцию, которая позволяет добавлять и удалять приложения (программы), которые запускаются автоматически каждый раз, когда вы включаете свой ПК.
Имейте в виду, что добавление приложений в автозагрузку может увеличить время загрузки вашего ПК. Однако, если вы хотите, чтобы приложение запускалось при каждом включении компьютера, это руководство покажет вам, это делать.
Шаг 1: Откройте диалоговое окно «Выполнить», нажав Win + R . После запуска введите команду ниже и нажмите «OK».
shell:startup
Шаг 2: Снова введите команду Win + R и введите:
shell:appsfolder
чтобы открыть папку «Приложения». Папка содержит все приложения, установленные на вашем ПК, включая приложения из Microsoft Store.
Шаг 3: Прикрепите папку «Автозагрузка» и папку «Приложения» к любой стороне рабочего стола, чтобы легко было работать с двумя папками.
Шаг 4: Перетащите нужные приложения, которые вы хотите запустить автоматически при следующем входе в систему на компьютере с Windows 10 из папки «Приложения» в папку «Автозагрузка».
Вот и все! Имейте в виду, что вы не ограничены только приложениями, которые открываются при запуске; Вы также можете поместить в автозагрузку файлы, папки и даже веб-сайты для автоматического запуска. Все, что вам нужно сделать, это создать ярлык для элемента в папке «Автозагрузка» на ПК с Windows 10.
Если вы хотите убедиться, что программа успешно добавлена в автозапуск, вы можете открыть диспетчер задач, нажав сочетание клавиш Ctrl + Shift + Esc и перейти на вкладку «Автозагрузка». Здесь вы увидите список приложений, которые включены (или отключены) для автоматического запуска при каждом входе в систему.
Если вы хотите полностью удалить ярлык программы из списка, все, что вам нужно сделать, это снова открыть папку «Автозагрузка», повторив шаг 1 в данном руководстве и удалить приложение, файл, папку или веб-сайт из папки «Автозагрузка».
Статьи по теме: Все о Автозагрузке Windows 10.
Как управлять Автозагрузкой приложений с помощью параметров Windows 10.
Как сразу открыть вкладку Автозагрузка в диспетчере задач Windows 10.
Applies ToWindows 11 Windows 10
Support for Windows 10 will end in October 2025
After October 14, 2025, Microsoft will no longer provide free software updates from Windows Update, technical assistance, or security fixes for Windows 10. Your PC will still work, but we recommend moving to Windows 11.
Learn more
When it comes to optimizing your Windows device, one of the key optimization areas is the startup process. The applications that run automatically when your device boots up can impact both the speed of your startup and the overall performance of your system. By customizing which applications launch on startup, you can streamline your routine, ensuring that only the tools you need for your daily tasks are ready and waiting for you.
Depending on how the applications are installed and registered in Windows, there are different ways to configure their startup behavior:
-
Any applications that are registered in Windows with a startup task can be configured from Settings or from Task Manager
-
Other applications can be configured using File Explorer
Expand each section to learn more.
-
In the Settings app on your Windows device, Apps > Startup or use the following shortcut:
Startup
-
For any of the applications in the list
-
set the toggle to On to start the app automatically when you sign in
-
set the toggle to Off to prevent the app from starting automatically
-
-
If you want to change the advanced settings for that app, select the chevron and make changes as desired
If the app that you want to configure isn’t listed in the startup list, you can configure its startup from File Explorer.
The Task Manager provides the same list of startup applications offered by Settings. You can configure the applications that run at startup with both tools, but they present the information slightly differently.
The Task Manager provides a more detailed view, including the impact each app has on the startup process. This can be particularly useful for troubleshooting performance issues during system startup.
-
Right-click on Start and select Task Manager
-
Select the Startup apps tab
-
Select the app that you want to configure
-
Select Enable to start the app automatically when you sign in
-
Select Disable to prevent the app from starting automatically
-
Task Manager shows the impact of each of the apps have on your startup experience:
-
None : Startup app is disabled
-
Not Measured : No data available to measure the startup app, startup app is enabled
-
Low Impact : Total CPU usage takes less than 300 milliseconds and total disk usage is less than 292 kilobytes
-
Medium Impact : Total CPU usage takes less than 1 second but more than 300 milliseconds or total disk usage is less than 3 megabytes but more than 292 kilobytes
-
High Impact : Total CPU usage takes more than 1 second or total disk usage is more than 3 megabytes
If the app that you want to configure isn’t listed in the startup list, you can configure its startup from File Explorer.
For applications that aren’t registered in Windows with a startup task, you can use File Explorer. The process consists of copying or creating a shortcut to the app’s executable to either one of these folders:
-
shell:startup if you are configuring the startup behavior for the current user
Note: the path corresponds to %userprofile%\AppData\Roaming\Microsoft\Windows\Start Menu\Programs\Startup
-
shell:common startup if you are configuring the startup behavior for all users using the device
Note: the path corresponds to %ProgramData%\Microsoft\Windows\Start Menu\Programs\Startup
Here are the steps:
-
Right-click on Start and select Run
-
In the Run dialog box, type shell:appsfolder and select Enter
A File Explorer window opens, containing a list of all applications installed on the device. Keep this first window open
-
Right-click on Start and select Run
-
In the Run dialog box, type either shell:startup or shell:common startup and select Enter
A second File Explorer window opens, containing a list of applications that start automatically when a user signs in
-
Drag and drop the applications that you want to start automatically from the first window to the second one
If you want to remove applications from the startup folder, delete the links from the second window.
Fix the error: We couldn’t find this app
If you see the massage We couldn’t find this app as an app title in Settings, the app could be on a removable drive, a network drive, or the path to the app might not exist. This could also happen if an app was uninstalled, therefore you can try to reinstall the app to try to fix it.
To find more information about the missing app, select the icon next to the On / Off toggle of the app.
When there isn’t a valid path, a window lists the registry location or the file path that contains the broken path. If the path points to a registry location, you can use the Registry Editor and find the broken path.
Startup apps in the registry
The startup applications in Windows can be stored in specific registry locations.
-
For applications that run at startup for all users, the registry paths are:
-
HKLM\Software\Wow6432Node\Microsoft\Windows\CurrentVersion\Run
-
HKLM\Software\Microsoft\Windows\CurrentVersion\Run
-
-
For applications that run at startup for the current user, the registry path is:
-
HKCU\Software\Microsoft\Windows\CurrentVersion\Run
-
Caution: modifying the registry can have unintended consequences. It’s important to be careful and back up the registry before making changes.
Need more help?
Want more options?
Explore subscription benefits, browse training courses, learn how to secure your device, and more.