
Сначала в локальной политике безопасности необходимо включить возможность запуска не подписанных скриптов. Для этого запускаем cmd от имени администратора, оттуда запускаем gpedit (или сразу запускаем gpedit.msc через «Выполнить»). Затем идем сюда:
Конфигурация компьютера — Административные шаблоны — Компоненты Windows — Windows Powershell. Нажимаем два раза на «Включить выполнение скриптов». Выбираем «Включить», и ниже «Разрешить все».
Затем создаем cmd файл в любой папке, например C:\script\ics.cmd, такого содержания:
PowerShell C:\SCRIPT\ics_reenable.ps1
Где ics_reenable.ps1 — сам powershell скрипт.
И создаем в планировщике задачу, с триггером «включение компьютера» или «вход в систему».
Также при необходимости ставим галочки «запускать с наивысшими правами» и «запускать независимо от входа пользователя в систему».
В этой статье мы рассмотрим особенности управления автозагрузкой программ в современных версиях Window 10 и 11. Покажем какие встроенные инструменты или сторонние утилиты можно использовать, чтобы разобраться какие программы автоматически запускаются при запуске Windows или входе пользователя, как вручную добавить или удалить программу в автозапуск, и как управлять автозапуском приложений.
Содержание:
- Просмотр программ в автозагрузке Windows с помощью диспетчера задач
- Как добавить программу в автозагрузку Windows?
- Настройка автозагрузки приложений Windows через реестр
- Вывести программы в автозагрузке Windows с помощью PowerShell
- Автозапуск приложений с помощью планировщика задач
- Управление автозапуском в Windows с помощью утилиты Autoruns
Просмотр программ в автозагрузке Windows с помощью диспетчера задач
Основной пользовательский инструмент для управления автозапуска приложений в Windows – диспетчер задач (Task Manager). Он заменяет утилиту msconfig, которая позволяла настроить автозагрузку программ в предыдущих версиях Windows.
- Запустите
taskmgr.exe
(можно вызвать его комбинацией
Ctrl + Shift + Esc
). - Список программ, которые Window запускает при входе данного пользователя содержится на вкладке Startup apps в Task Manager. Здесь же указана активна ли автозагрузка для каждого приложения и степень влияния каждого приложения на общую скорость загрузки системы.
- С помощью кнопок Enable и Disable в верхней панели задач пользователь может включить или отключить автозагрузку конкретного приложения.
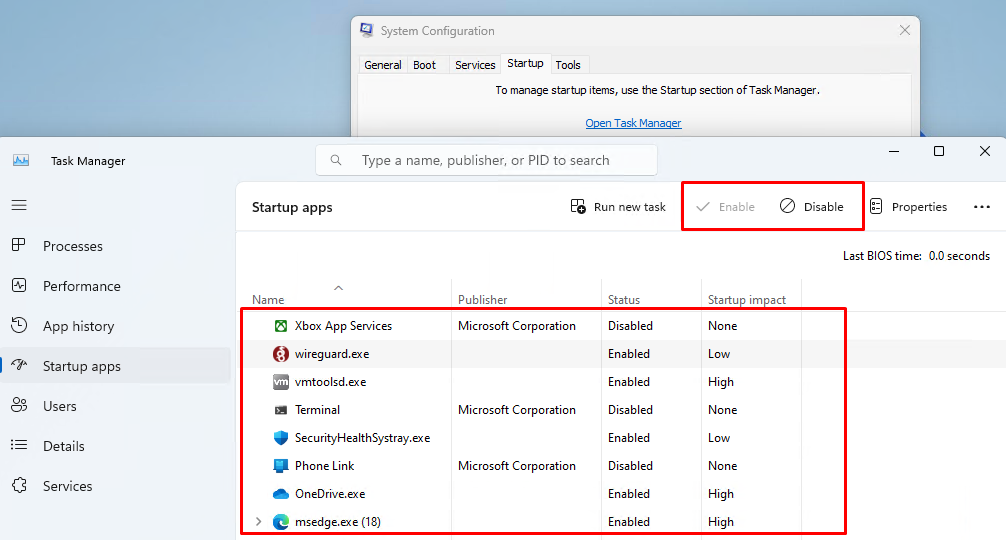
Однако со вкладки Startup Apps диспетчера задач нельзя добавить в автозагрузку Windows новую программу. Как же строится этот список приложений автозапуска?
Как добавить программу в автозагрузку Windows?
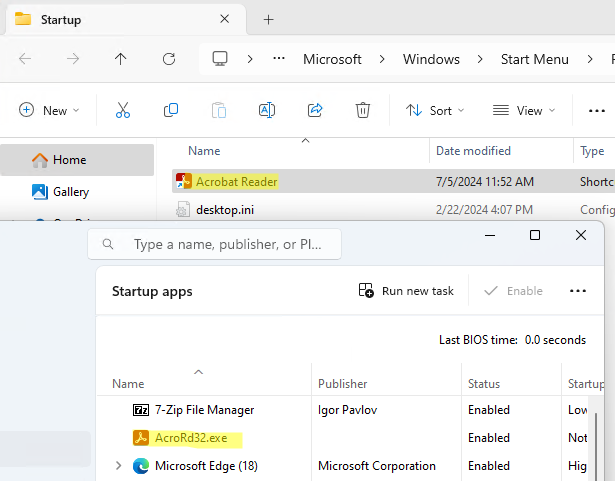
Диспетчер задач стоит список программ автозагрузки из нескольких мест.
- Папка автозагрузки текущего пользователя (
%userprofile%\AppData\Roaming\Microsoft\Windows\Start Menu\Programs\Startup
). Для быстрого перехода в папку можно использовать shell-команду проводника
shell:Startup
- Папка автозагрузки для всех пользователей (
%PROGRAMDATA%\Microsoft\Windows\Start Menu\Programs\StartUp
). Команда
shell:Common Startup
Чтобы добавить программу в автозагрузку, достаточно скопировать ярлык на приложение или исполнимый файл в любой из этих каталогов. После этого приложение появится в списке автозапуска в Task Manager.
Если нужно добавить в автозагрузку приложение Microsoft Store (UWP/APPX приложение), ярлык такого приложения можно скопировать из папки
shell:AppsFolder
в папку автозагрузки.
Настройка автозагрузки приложений Windows через реестр
Также при загрузке Windows автоматически запускает приложения, добавленные в следующие ветки реестра:
Ветки автозапуска для текущего пользователя:
- HKEY_CURRENT_USER\SOFTWARE\Microsoft\Windows\CurrentVersion\Run
- HKEY_CURRENT_USER\SOFTWARE\Wow6432Node\Microsoft\Windows\CurrentVersion\Run
- HKEY_CURRENT_USER\SOFTWARE\Microsoft\Windows\CurrentVersion\Policies\Explorer\Run
Автозапуск приложений для всех пользователей компьютера:
- HKEY_LOCAL_MACHINE\SOFTWARE\Microsoft\Windows\CurrentVersion\Run
- HKEY_LOCAL_MACHINE\SOFTWARE\Wow6432Node\Microsoft\Windows\CurrentVersion\Run
- HKEY_LOCAL_MACHINE\SOFTWARE\Microsoft\Windows\CurrentVersion\Policies\Explorer\Run
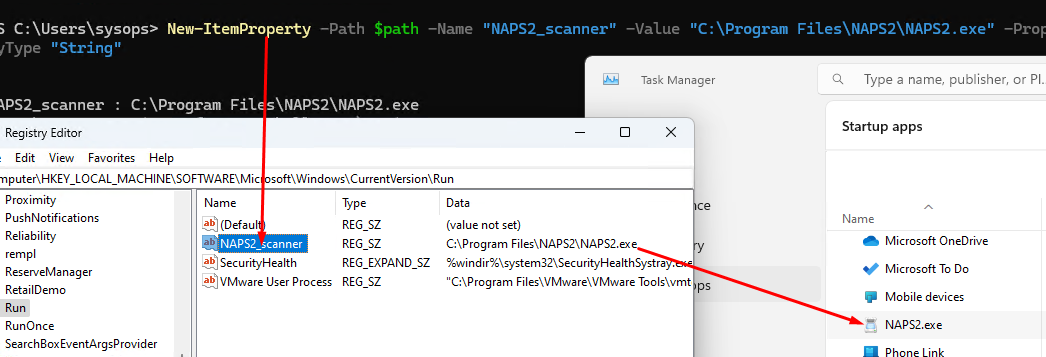
Все записи их этих веток реестра также отображаются в списке автозагрузки Task Manager. Вы можете вручную создать строковый REG_SZ параметр в реестре или воспользуйтесь такими командами PowerShell для создания параметра реестра для автозапуска указанного приложения:
$path = "HKLM:\SOFTWARE\Microsoft\Windows\CurrentVersion\run"
New-ItemProperty -Path $path -Name "NAPS2_scanner" -Value '"C:\Program Files\NAPS2\NAPS2.exe"' -PropertyType "String"
Запись для автозапуска этой программы из реестра появится в диспетчере задач.
Таким образом, чтобы удалить или добавить программу в автозагрузку, нужно создать или удалить соответствующий строковый параметр в одной из указанных веток реестра.
Кроме указанных веток реестра Run, для автозапуска программ могут использоваться соседние ветки с RunOnce. Отличие записей автозагрузки в RunOnce в том, что программы запускаются только один раз, после чего параметры автозапуска автоматически удаляются из этого раздела.
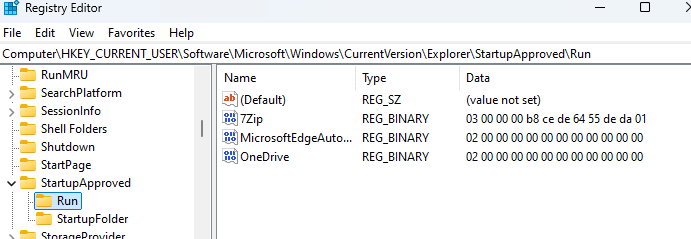
Когда пользователь включает или отключает автозапуск приложения в Task Manager, это изменяет значение параметра в ветках:
- (Текущий пользователь):
HKEY_CURRENT_USER\SOFTWARE\Microsoft\Windows\CurrentVersion\Explorer\StartupApproved\Run - (Все пользователи):
HKEY_LOCAL_MACHINE\SOFTWARE\Microsoft\Windows\CurrentVersion\Explorer\StartupApproved\Run
Вывести программы в автозагрузке Windows с помощью PowerShell
Если нужно вывести все источники автозагрузки программ для всех пользователей, как из папки Startup, так и из разделов реестра, можно воспользоваться PowerShell. Выполните команду:
Get-CimInstance Win32_StartupCommand | Select-Object user,command,Location

Команда вернет полный список программ (с командами) в автозагрузки для каждого пользователя. Здесь указывается через какую ветку реестра или shell папку Startup программа добавлена в автозапуск.
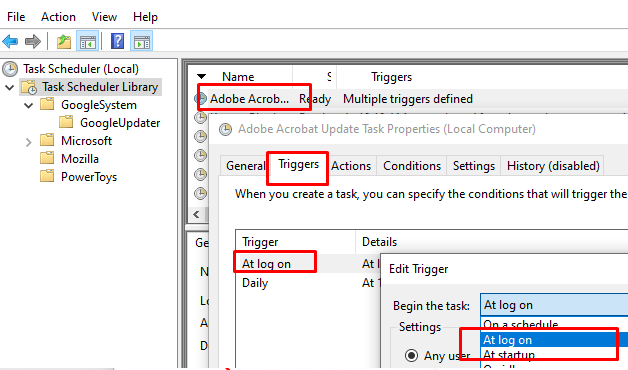
Автозапуск приложений с помощью планировщика задач
Для автоматического запуска приложений при входе пользователя можно использовать задания планировщика Windows. Для этого в свойствах задания в планировщике задач на вкладке Triggers нужно использовать событие At log on или At startup.
Для управления заданиями планировщика можно использовать графическую консоль
taskschd.msc
. Здесь вы можете создать задание автоматического запуска программы, включить или отключить эти триггеры.
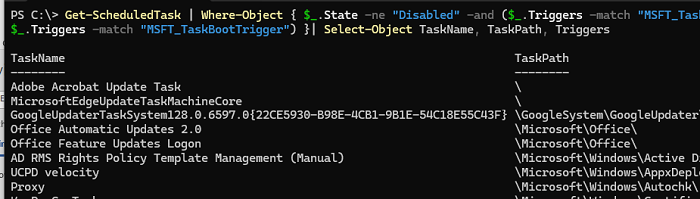
Чтобы вывести список всех заданий, которые запускаются автоматически планировщиком при загрузке, выполните PowerShell команду:
Get-ScheduledTask | Where-Object { $_.State -ne "Disabled" -and ($_.Triggers -match "MSFT_TaskLogonTrigger" -or $_.Triggers -match "MSFT_TaskBootTrigger") }| Select-Object TaskName, TaskPath, Triggers
Управление автозапуском в Windows с помощью утилиты Autoruns
Для более детального исследования программ, драйверов, служб, которые запускаются при загрузке Windows можно использовать утилиту Autoruns. Это официальная утилита Microsoft, доступная к загрузке по адресу https://learn.microsoft.com/en-us/sysinternals/downloads/autoruns.
При запуске утилита Autoruns вывод все возможные источники автозагрузки программ (вкладка Everything). Либо вы можете исследовать конкретный источники автозапуска на соответствующих вкладках.
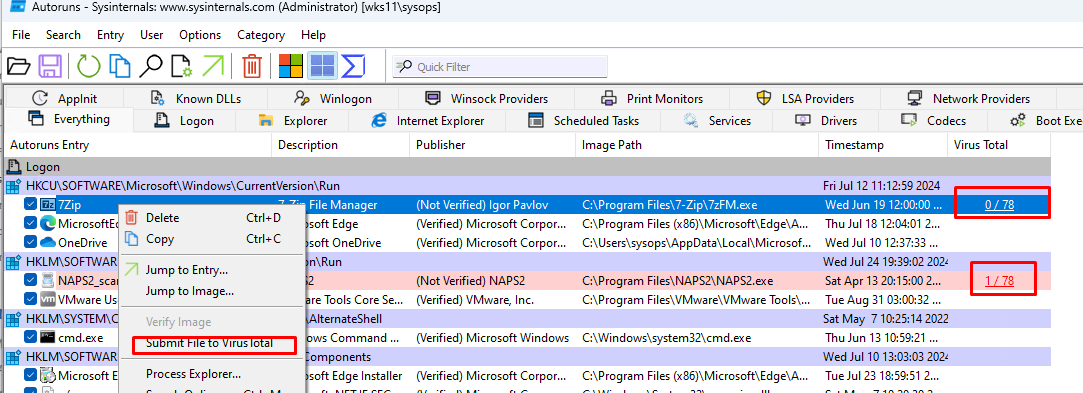
Утилита Autoruns позволяет:
- Включить/отключить ил удалить запись для автоматического запуск определенной программы, сервиса, задания, службы
- Проверить исполняемый файл в онлайн сервис Virus Total
- Перейти к исполняемому файлу или записи автозагрузки (в реестре, папке Startup и другим источникам)
- В меню Options можно скрыть все стандартные записи автозагрузки Windows и вывести только сторонние элементы.
- Можно проанализировать автозагрузку каждого пользователя и SYSTEM
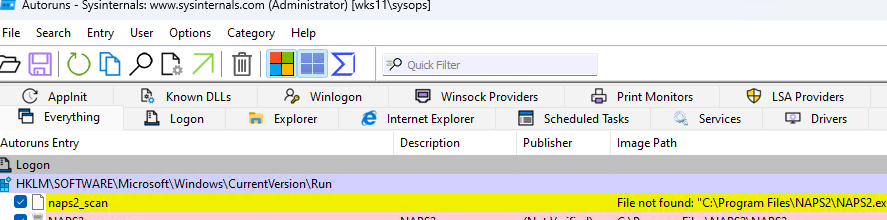
- Если запись автозагрузки ссылается на исполняемый файл, которые удален (недоступен) в Autoruns такая запись будет подсвечена и указан код File not found/
В общем, Autoruns это отличный инструмент, если вы хотите понять почему автоматически запускается определенное приложение.

This is useful when you want to run any automation created using PowerShell on Windows Startup. To run PowerShell script on startup.
Create a Windows Command Script (.cmd file) i.e. create a file and save it with .cmd extension.

Write the below command in .cmd file.
powerShell path\to\powershell_script.ps1 >> “path\to\log_file.log”

If you want to run the script in background. Add -windowstyle hidden after powershell.

Place the file or its shortcut file at below path.
C:\Users\<user_name>\AppData\Roaming\Microsoft\Windows\Start Menu\Programs\Startup

Restart the computer and you can track its execution in log file.
Our script will open the Windows Calculator application at Windows startup and login based on the solution you will choose from. To meet your requirements, you can replace the script in
file.ps1with your script.
Using Startup Folder
Use the Startup folder to run the PowerShell script at startup. To do this, we must follow this section’s step-by-step instructions.
Create .ps1 File
Open Notepad, write the following command, and save the file with any name of your choice but with the .ps1 extension. You can store this PowerShell script file at any location on your local machine; we saved this file with the file.ps1 name at the E:\Test location.
|
powerShell «c:\windows\system32\calc.exe» |
This command would open the calculator on the local computer.
Create .cmd File
Launch Notepad, write the following commands, and save the file with a name but with the extension .cmd at %AppData%\Microsoft\Windows\Start Menu\Programs\Startup path. We named this file Startup.cmd and placed it in the Startup Folder.
While saving the .cmd file, don’t forget to select All Files for the Save as type: option and ANSI for the Encoding option; see the screenshot after the following script for clear understanding.
|
PowerShell —Command «Set-ExecutionPolicy Unrestricted» —Scope CurrentUser >> «%TEMP%\StartupLog.txt» 2>&1 PowerShell E:\Test\file.ps1 >> «%TEMP%\StartupLog.txt» 2>&1 |

The above script did two things. First, it sets the execution policy to Unrestricted, and the second is to use PowerShell to run the .ps1 script file in the given path. Let’s break down the above commands to learn them in detail.
The first command:
- Runs the PowerShell with the
-Commandparameter to execute theSet-ExecutionPolicy Unrestrictedcommand, which modifies the PowerShell execution policy to let us run unsigned scripts. - The
-Scopparameter applies changes to the current user instead of the entire system. - The redirection operator represented by
>>redirects the command output (if any) to theStartupLog.txtfile in the user’s%TEMP%directory. The>>operator appends the output to the end of theStartupLog.txtfile if it already exists; otherwise, it creates it. - The
2>&1operator redirects the command’s error output (2) to the exact file as the standard output (&1).
The second command:
- Runs PowerShell with the E:\Test\file.ps1 script as an argument. You might have a different path if you have stored your
.ps1file in a different location on your PC. - The redirection operator (
>>) does the same as in the first command. - The
2>&1operator also does the same thing as in the first command.
Overall, both commands use the >> and 2>&1 operators to capture the errors and output of the PowerShell command or script and write them to a StartupLog.txt file in the user’s %TEMP% directory.
Restart Your PC
Now, you have the .ps1 file and .cmd file at the required locations, so it’s time to restart your computer. Once the computer is on, the script will be executed and open the Calculator app for you.
Using Task Scheduler
Use Task Scheduler to run PowerShell script at startup. Following the below steps to do it.
Open Task Scheduler
Press Windows+R key from the keyboard, type taskschd.msc in the Run prompt and hit OK. It will open the Task Scheduler window for you. See the following screenshot.
Otherwise, you can use the Windows search menu to open Task Scheduler.
Create a Task
-
In the
Task Schedulerwindow, clickCreate Taskas demonstrated below.
-
Ensure you are on the
Generaltab in theCreate Taskwindow. Then, write the name of the task (step-1), select theRun only when the user is logged onradio button (step-2), check theRun with highest privilegescheckbox (step-3), and click on theActionstab (step-4).
-
Once you are on the
Actionstab, click on theNewbutton (step-2), make sure theStart a programoption is selected forActions:option (step-3), writepowershell.exeforProgram/scriptoption (step-4), addE:\Test\file.ps1as the value ofAdd arguments (optional)option (step-5) and clickOKbutton (step-6). Remember, you can specify your arguments for step-5.
-
Now, click on the
Triggerstab (step-1), click on theNewbutton (step-2), selectAt log onforBegin the task:option (step-3), choose theAny userorSpecific userbased on your requirements (step-4), clickOK(step-5), and clickOKagain (step-6).
Your task must be listed in the
Task Schedulerwindow (see the following); if it is there, you have done everything right, close this window.


Log Out and Login Your PC
Log out and log in again to your computer. You don’t need to reboot the computer to run this script. This script will open the Windows Calculator application.
Using Registry Editor
Use Task Scheduler to run PowerShell script at startup. Following the below steps to do it.
Open Registry Editor
Press Windows+R key from the keyboard, type regedit.msc in the Run prompt and hit OK. It will open the registry editor window.
Add Entry to the Windows Registry Editor
-
Navigate to the HKEY_LOCAL_MACHINE\SOFTWARE\Microsoft\Windows\CurrentVersion\Run in the registry editor (step-1).
-
Right-click the
Runkey and chooseNew->String Value(step-2). -
Give a new entry a meaningful name as we named it
PSfile. Note that this name must be unique; otherwise, you will get an error.
-
Double-click on the new entry (
PSfile) to open theEdit Stringwindow. -
In the
Edit Stringwindow, you can confirm the new entry’s name (step-3). For theValue datafield, enter thepowershell "E:\Test\file.ps1"command (step-4); you can replace the path to point your PowerShell script file. Remember to surround the path with double quotes. -
Click
OKto exit theEdit Stringwindow (step-5). -
Close the Registry Editor.

Restart Your PC
Restart your computer to run the script automatically every time Windows starts up. This script will open the Windows Calculator application for you.
PowerShell has lot of different layers of security that prevent malicious scripts and commands from being executed. For example, by default you cannot run a script that you’ve downloaded from the internet unless you change the PowerShell execution policy. Another security measures prevents you from executing a script by double-clicking it. You can’t associate PS1 scripts with PowerShell and the only way to run a script is to right-click it and select the run option. Double-clicking it will open it in Notepad. This is great for a security measure but annoying if you want a PowerShell script to execute when a scheduled task is run. The work around is simple. You can use a batch script to auto-run PowerShell scripts.
Batch Script
The following is the batch script you need in order to auto-run PowerShell scripts on Windows 10. Each PowerShell script will need its own Batch Script.
Syntax
@ECHO OFF
PowerShell.exe -Command "Path to script"
PAUSE
Replace “Path to script” with the actual path to the PowerShell script you want to execute. Consider the following example;
Example
@ECHO OFF
PowerShell.exe -Command "C:\Reminder-Scripts\Milk\Buy-Milk.ps1"
PAUSE
Open Notepad and paste the script in it. Save the file with the .bat extension.
What this batch files does is that it opens PowerShell and then runs the script that you’ve pointed it to. You still cannot double-click a PowerShell script on your desktop and have it automatically run in PowerShell. The current file will open a Command Prompt window and it will show a ‘Press any key to continue’ message. When you press a key, only then will the PowerShell script run. If you prefer the script run without you having to intervene, edit the above script and remove the ‘PAUSE’ line. It should look like this;
@ECHO OFF
PowerShell.exe -Command "Path to script"
Task Scheduler & PowerShell Scripts
We’re assuming you want to automatically run a PowerShell script as an action to a scheduled task. To accomplish this, you need to first create a corresponding Batch script, as shown above, to run the PowerShell script. Next, when you create a scheduled task, select the Batch script under the Action it should take in response to a trigger. This will, in effect, run the PowerShell script.
We’ve used Task Scheduler as an example here but if you’re using any other automation app, you will still need to call the Batch script. The only exception is if the automation app you’re using can open PowerShell and then point it to the PowerShell script.

Fatima Wahab
Fatima has been writing for AddictiveTips for six years. She began as a junior writer and has been working as the Editor in Chief since 2014.
Fatima gets an adrenaline rush from figuring out how technology works, and how to manipulate it. A well-designed app, something that solves a common everyday problem and looks