
Tutorial: How to Install Samba on Windows 10
Samba is a free, open-source software suite that enables file and print sharing between Unix, Linux, and Windows systems. In this tutorial, we will show you how to install Samba on Windows 10.
Prerequisites
Before you start, make sure you have administrative access on your Windows 10 system.
Step 1: Download Samba
To download Samba, go to https://www.samba.org/ and click the Download link. Then, select the version of Samba that is compatible with your Windows 10 architecture (32-bit or 64-bit).
Step 2: Install Samba
- Double-click the Samba executable file that you downloaded in Step 1.
- In the Samba installation wizard, click Next to proceed.
- Accept the license agreement and click Next.
- Choose the destination folder where you want to install Samba and click Next.
- Choose the components that you want to install (we recommend selecting all components) and click Next.
- Configure the Samba Server settings (e.g., global workgroup, security mode, etc.) as per your requirements and click Next.
- Choose a password for the administrative account that you will use to manage the Samba server and click Next.
- Review the installation summary and click Next to start the installation process.
- After the installation is complete, click Finish to close the installer.
Step 3: Configure Samba
- Open the Samba configuration file (smb.conf) located in the installation directory.
- Edit the smb.conf file to configure the necessary settings (e.g., share directories, users and groups, etc.). You can refer to the Samba documentation for more information on configuring smb.conf.
- Save the changes to the smb.conf file.
Step 4: Start Samba
- Press the Windows key + R to open the Run dialog box.
- Type services.msc and click OK to open the Services Manager window.
- Find the Samba service (named «SMB» or «Samba») in the list of services.
- Right-click the Samba service and choose Start.
- Wait for a few seconds until the Samba service starts.
Step 5: Access Samba Shares
- Open the File Explorer on your Windows 10 system.
- In the address bar, type \localhost or \[your-computer-name] and press Enter.
- You will be prompted to enter your Samba username and password. Enter the credentials that you specified in Step 2.
- You should now see a list of shared directories on your Samba server. Double-click the directories to access their contents.
Congratulations! You have successfully installed and configured Samba on Windows 10.
If you want to self-host in an easy, hands free way, need an external IP address, or simply want your data in your own hands, give IPv6.rs a try!
Alternatively, for the best virtual desktop, try Shells!

If you want to share files across different operating systems on Meetboard®, you need to set up Samba service both on Meetboard and your personal devices.
However, you may encounter connecting issues with Windows 10 version.
This short guide is to help you solve the setting issue on your Windows devices.
1. Firstly, go to the System Settings menu on Meetboard, and open the “SAMBA Service” setting.

2. Check “SAMBA” to start the service.

3. Then, go to your Windows device and open the “Control Panel” setting.

4. Click “Programs and Features.”

5. Click the “Turn Windows features on or off” link.

6. Expand “SMB1.0/CIFS File Sharing Support” and check “SMB1.0/CIFS Client.”

Once following the above steps, your SAMBA Server will be working.
If you want to know more settings and functionality of Meetboard, visit Meetboard User Guide.
Here is a step guideline to install Samba in Ubuntu 20.04, Focal Fossa, to enable sharing with Windows 10 as the client. I write this article to help people solving problem around:
1. Windows 10 not connecting properly with Samba 4.7.6 on Ubuntu 18.04
2. Ubuntu 16 Samba server with Windows 10 client – Tutorial/Howto
3. I can’t get Win10 PC to Access Ubuntu 18.10 Samba Shares
4. Cannot access smb share from Windows 10
5. Fixing broken Samba File Share access for Linux hosts after installing the latest version of Windows 10
In this case, I didn’t change Windows features for Samba v1 or change regedit configuration. This is works on pure Windows 10 and Ubuntu 20.04 without additional changes

Here are the steps on “How to install Samba on Ubuntu 20.04 and Fix Sharing with Windows 10”
1. Install Samba server
First, we need to install Samba by running this command
sudo apt-get install samba -y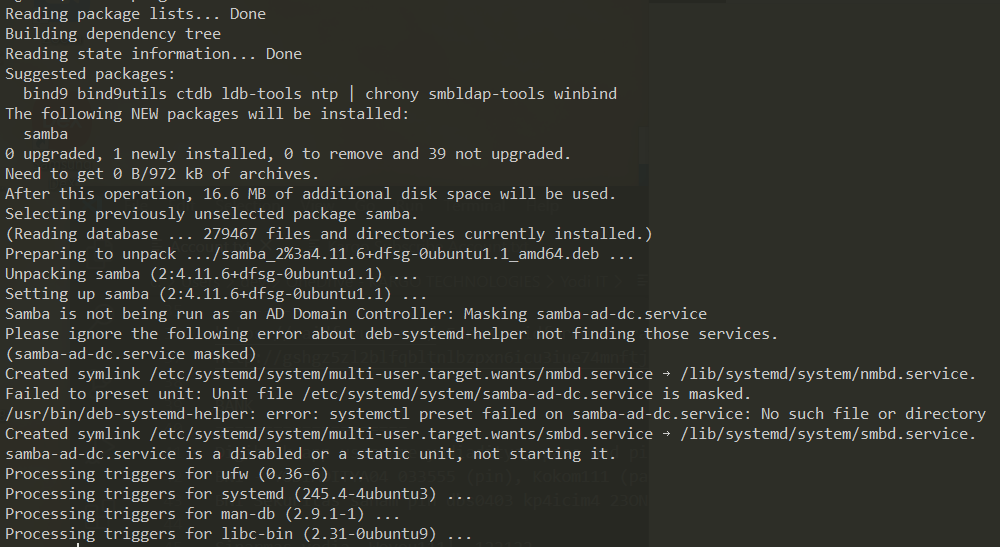
2. Adding user to samba group
Now our Samba is running under smbd service. Next step, we need to add users to samba group
sudo smbpasswd -a username3. Change samba configuration to works with Windows 10
Go edit file “/etc/samba/smb.conf” and edit this part to enable succesfull sharing with Windows 10 Network.
Add this in Global part
   passdb backend = tdbsam
   security = user
Enable interfaces by binding it with device IP address or eth0 or wlan0 (check with sudo ifconfig)
#### Networking ####

# The specific set of interfaces / networks to bind to
# This can be either the interface name or an IP address/netmask;
# interface names are normally preferred
interfaces = 192.168.100.63 wlp1s0

bind interfaces only = yes
For user part, we need to disable bad_user map and force user with our added user previously
#map to guest = bad user
force user = username
The last part, we can add folder to shared
[Users]
  path = put your path here
  browseable = yes
  read only = no
  force create mode = 0660
  force directory mode = 2770
  valid users = @username_here
Just in case you have messy samba configuration, as long as your are using the latest Ubuntu 20.04, this configuration will work like a charm.
This configuration will help to avoid problem to connect to Windows 10 SMB share or Samba file sharing not working
#
# Sample configuration file for the Samba suite for Debian GNU/Linux.
#
#
# This is the main Samba configuration file. You should read the
# smb.conf(5) manual page in order to understand the options listed
# here. Samba has a huge number of configurable options most of which
# are not shown in this example
#
# Some options that are often worth tuning have been included as
# commented-out examples in this file.
#  - When such options are commented with ";", the proposed setting
#    differs from the default Samba behaviour
#  - When commented with "#", the proposed setting is the default
#    behaviour of Samba but the option is considered important
#    enough to be mentioned here
#
# NOTE: Whenever you modify this file you should run the command
# "testparm" to check that you have not made any basic syntactic
# errors.

#======================= Global Settings =======================

[global]

## Browsing/Identification ###

# Change this to the workgroup/NT-domain name your Samba server will part of
   workgroup = WORKGROUP
   passdb backend = tdbsam
   security = user

# server string is the equivalent of the NT Description field
   server string = %h server (Samba, Ubuntu)

#### Networking ####

# The specific set of interfaces / networks to bind to
# This can be either the interface name or an IP address/netmask;
# interface names are normally preferred
interfaces = 192.168.100.63 wlp1s0

# Only bind to the named interfaces and/or networks; you must use the
# 'interfaces' option above to use this.
# It is recommended that you enable this feature if your Samba machine is
# not protected by a firewall or is a firewall itself.  However, this
# option cannot handle dynamic or non-broadcast interfaces correctly.
bind interfaces only = yes

#### Debugging/Accounting ####

# This tells Samba to use a separate log file for each machine
# that connects
   log file = /var/log/samba/log.%m

# Cap the size of the individual log files (in KiB).
   max log size = 1000

# We want Samba to only log to /var/log/samba/log.{smbd,nmbd}.
# Append syslog@1 if you want important messages to be sent to syslog too.
   logging = file

# Do something sensible when Samba crashes: mail the admin a backtrace
   panic action = /usr/share/samba/panic-action %d

####### Authentication #######

# Server role. Defines in which mode Samba will operate. Possible
# values are "standalone server", "member server", "classic primary
# domain controller", "classic backup domain controller", "active
# directory domain controller".
#
# Most people will want "standalone server" or "member server".
# Running as "active directory domain controller" will require first
# running "samba-tool domain provision" to wipe databases and create a
# new domain.
   server role = standalone server

   obey pam restrictions = yes

# This boolean parameter controls whether Samba attempts to sync the Unix
# password with the SMB password when the encrypted SMB password in the
# passdb is changed.
   unix password sync = yes

# For Unix password sync to work on a Debian GNU/Linux system, the following
# parameters must be set (thanks to Ian Kahan <<kahan@informatik.tu-muenchen.de> for
# sending the correct chat script for the passwd program in Debian Sarge).
   passwd program = /usr/bin/passwd %u
   passwd chat = *Enter\snew\s*\spassword:* %n\n *Retype\snew\s*\spassword:* %n\n *password\supdated\ssuccessfully* .

# This boolean controls whether PAM will be used for password changes
# when requested by an SMB client instead of the program listed in
# 'passwd program'. The default is 'no'.
   pam password change = yes

# This option controls how unsuccessful authentication attempts are mapped
# to anonymous connections
#   map to guest = bad user
force user = dev

# It specifies the location of the user's
# profile directory from the client point of view) The following
# required a [profiles] share to be setup on the samba server (see
# below)
;   logon path = \\%N\profiles\%U
# Another common choice is storing the profile in the user's home directory
# (this is Samba's default)
#   logon path = \\%N\%U\profile

# The following setting only takes effect if 'domain logons' is set
# It specifies the location of a user's home directory (from the client
# point of view)
;   logon drive = H:
#   logon home = \\%N\%U

# The following setting only takes effect if 'domain logons' is set
# It specifies the script to run during logon. The script must be stored
# in the [netlogon] share
# NOTE: Must be store in 'DOS' file format convention
;   logon script = logon.cmd

# This allows Unix users to be created on the domain controller via the SAMR
# RPC pipe.  The example command creates a user account with a disabled Unix
# password; please adapt to your needs
; add user script = /usr/sbin/adduser --quiet --disabled-password --gecos "" %u

# This allows machine accounts to be created on the domain controller via the
# SAMR RPC pipe.
# The following assumes a "machines" group exists on the system
; add machine script  = /usr/sbin/useradd -g machines -c "%u machine account" -d /var/lib/samba -s /bin/false %u

# This allows Unix groups to be created on the domain controller via the SAMR
# RPC pipe.
; add group script = /usr/sbin/addgroup --force-badname %g

############ Misc ############

# Using the following line enables you to customise your configuration
# on a per machine basis. The %m gets replaced with the netbios name
# of the machine that is connecting
;   include = /home/samba/etc/smb.conf.%m

# Some defaults for winbind (make sure you're not using the ranges
# for something else.)
;   idmap config * :              backend = tdb
;   idmap config * :              range   = 3000-7999
;   idmap config YOURDOMAINHERE : backend = tdb
;   idmap config YOURDOMAINHERE : range   = 100000-999999
;   template shell = /bin/bash

# Setup usershare options to enable non-root users to share folders
# with the net usershare command.

# Maximum number of usershare. 0 means that usershare is disabled.
#   usershare max shares = 100

# Allow users who've been granted usershare privileges to create
# public shares, not just authenticated ones
   usershare allow guests = yes

#======================= Share Definitions =======================

# Un-comment the following (and tweak the other settings below to suit)
# to enable the default home directory shares. This will share each
# user's home directory as \\server\username
;[homes]
;   comment = Home Directories
;   browseable = no

# By default, the home directories are exported read-only. Change the
# next parameter to 'no' if you want to be able to write to them.
;   read only = yes

# File creation mask is set to 0700 for security reasons. If you want to
# create files with group=rw permissions, set next parameter to 0775.
;   create mask = 0700

# Directory creation mask is set to 0700 for security reasons. If you want to
# create dirs. with group=rw permissions, set next parameter to 0775.
;   directory mask = 0700

# By default, \\server\username shares can be connected to by anyone
# with access to the samba server.
# Un-comment the following parameter to make sure that only "username"
# can connect to \\server\username
# This might need tweaking when using external authentication schemes
;   valid users = %S

# Un-comment the following and create the netlogon directory for Domain Logons
# (you need to configure Samba to act as a domain controller too.)
;[netlogon]
;   comment = Network Logon Service
;   path = /home/samba/netlogon
;   guest ok = yes
;   read only = yes

# Un-comment the following and create the profiles directory to store
# users profiles (see the "logon path" option above)
# (you need to configure Samba to act as a domain controller too.)
# The path below should be writable by all users so that their
# profile directory may be created the first time they log on
;[profiles]
;   comment = Users profiles
;   path = /home/samba/profiles
;   guest ok = no
;   browseable = no
;   create mask = 0600
;   directory mask = 0700

[printers]
   comment = All Printers
   browseable = no
   path = /var/spool/samba
   printable = yes
   guest ok = no
   read only = yes
   create mask = 0700

# Windows clients look for this share name as a source of downloadable
# printer drivers
[print$]
   comment = Printer Drivers
   path = /var/lib/samba/printers
   browseable = yes
   read only = yes
   guest ok = no
# Uncomment to allow remote administration of Windows print drivers.
# You may need to replace 'lpadmin' with the name of the group your
# admin users are members of.
# Please note that you also need to set appropriate Unix permissions
# to the drivers directory for these users to have write rights in it
;   write list = root, @lpadmin

[Users]
  path = put your path here
  browseable = yes
  read only = no
  force create mode = 0660
  force directory mode = 2770
  valid users = @username_here
4. Restart samba service
sudo service smbd restart
sudo service nmbd restart
5. Open Ubuntu Samba folder from Windows 10
Go to your network and access to your IP from path \

6. BONUS: Enable follow symlinks in samba folder
To enable symbolic link path or shortcut in Samba, you can add these configuration
[global]
allow insecure wide links = yes

[YouShareFolder]
follow symlinks = yes
wide links = yesI like the idea of having a shared drive attached to my always-on Linux system, so that all my computers (Windows and Mac) can access those in a central place. It’s like a NAS without having a NAS box if you know what I mean. The easiest way to accomplish this is by using the Samba Protocol.
Essentially we’ll declare a part of our Linux system as a Samba Share, setup credentials in Samba, then let users from other systems access these files. It’s a little complex to get going, but I’ll show you all the relevant steps here. This works on CentOS 7 and Fedora.
Installing Samba
Let’s get the packages installed first:
yum install samba
This should bring up samba and install samba-common-tools as well. Let’s also start and enable Samba on system start while we’re at it.
systemctl enable smb
systemctl start smb
Setting up Samba Credentials
I already have a regular Linux user on my system, let’s call him “shareuser”. Samba needs its own password for a user, which can be a different one from the system password. We can set this up with the following command (as root), which will prompt for a new password.
smbpasswd -a username
You can run the same command as the system user too without specifying a user. man smbpasswd has more details. Once confirmed, the current (or specified) system user will be added to the Samba user group.
Setting up the Shared Folder
We need to pick a folder we’d like to use. It can live anywhere on the system, even on mounted drives. All we need is the full path to it and set it up in the Samba configuration file. We can find it here: /etc/samba/smb.conf
Use your favourite text editor and add the following to the bottom of the file:
# My Samba Share
[supershare]
path = /home/shareuser/Desktop/supershare
available = yes
valid users = shareuser
read only = no
browsable = yes
public = yes
writable = yes
I’m calling my share “supershare” here, but that’s arbitrary. The idea is that you could have various locations for different users on one system. My system (and Samba) user is called “shareuser”, and my folder location is on his Desktop. It could be anywhere else of course.
Setting the Samba Protocol
With the above configuration, macOS and other Linux systems can already access the shared folder. Windows 10 however will throw an error (or rather not connect without any clue as to what’s wrong), because the SMBv1 protocol is no longer supported for security reasons. Something about a the WannaCrypt/WannaCry exploit and ransom demands.
To keep us safe, let’s ask Samba to use a newer protocol by default instead. SMBv2 will work, and depending on your Linux (or rather Samba) version you can go up to 3 or 4. Find the [global] section in your Samba config file and add the following as the last line before the next block (leave all other lines intact).
[global]
min protocol = SMB2
After any change to the config file, we need to restart the Samba service:
systemctl restart smb
Firewalld and SELinux
By default Samba connections are blocked by the firewalld service. We can fix this by adding the following rule:
firewall-cmd --add-service samba --permanent
systemctl restart firewalld
If SELinux is enabled on the system, you can optionally add the following value to allow the Samba service write access (not necessary if SELinux is disabled or permissive):
setsebool smbd_anon_write=1
Restart the system after setting this, otherwise the changes won’t take effect.
Accessing Files from Windows 10
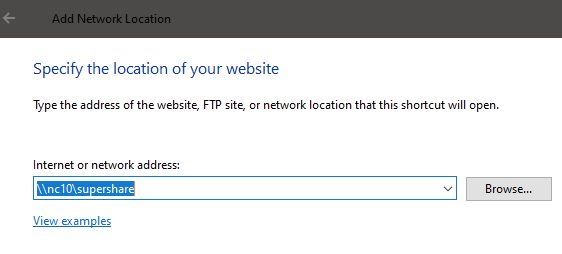
Now comes the moment of truth: can we connect from Windows? There’s various ways of doing this, but the easiest one is to setup a permanent connect so we don’t have to type in our credentials every time we want to access those files. Open Windows Explorer and choose Add a Network Location.
This lets you specify the location on the network, either via IP address or name. Start with two backslashes, like so
- \\10.1.2.3\supershare
- or
- \\yourserver\supershare
If the connection is successful, Windows will prompt you for credentials.
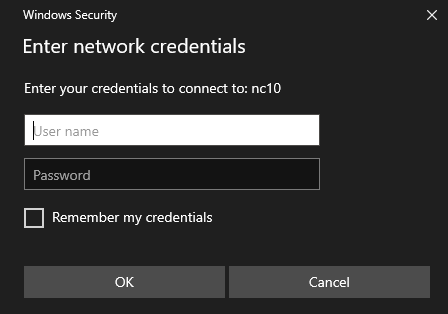
And that’s it! Now you can navigate to your shared Linux folder and copy files to it or remove them.
Accessing files from macOS
On the Mac it’s equally easy. Head over to the Go menu in your Finder and select Connect to Server.
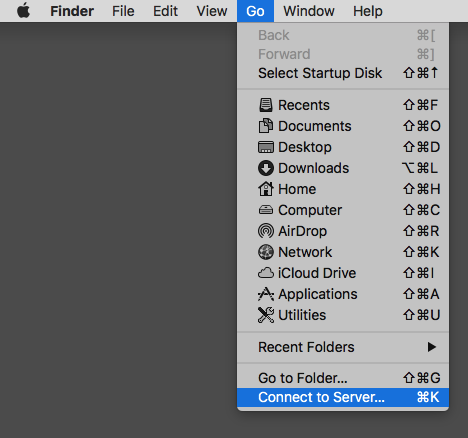
Mac likes us to specify the protocol with which we’re connecting and accepts IP addresses and server names alike:
- smb://10.2.3.4/supershare
- or
- smb://yourserver/supershare
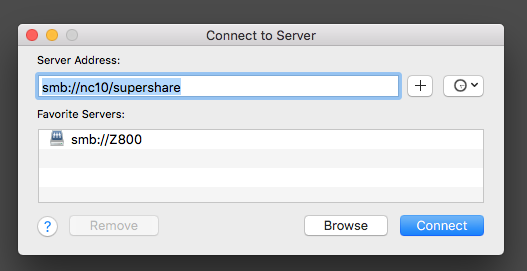
It will ask for credentials when you connect and offer to store them for next time.
Troubleshooting
The number one cause of trouble is – as always – SELinux. I don’t recall the amount of times that it has ruined my day. The easiest way to switch it into permissive mode and “just let things happen for now” is to use this:
setenforce permissiveThis will use permissive mode until you restart the Linux system. To make it permanent, take a look at this article. Remember to add Samba to the SELinux permissions as explained earlier in this article.
Another point of confusion is the duality between what a share is called in the settings (in square brackets) and what your folder is called. While your actual folder may be called “stuff”, your share can be called something else and then present the contents of the “stuff” folder. In the heat of the moment, our brains can play tricks with us.
Lastly, don’t confuse your local Linux user credentials with that of the Samba user. Those are (or can be) two different ones.
Further Reading
- https://www.prajwaldesai.com/cant-connect-to-file-share-obsolete-smb1-protocol/
- https://www.cyberciti.biz/faq/how-to-configure-samba-to-use-smbv2-and-disable-smbv1-on-linux-or-unix/
A samba guide to share files between Windows 10 and Linux
Introduction
Using samba is way easier than you might think. However, it won’t work out of the box if you want to share files between
newer versions of Windows 10 and Linux.
The guide is written for Arch Linux, but you probably can install these packages on your distro too.
Setting up Samba
First, you need to install samba. sudo pacman -S samba. After that, you need to write a config file in
etc/samba/smb.conf, you can either use example one from Arch Wiki, or copy this one.
#============================ Global definition ================================
[global]
# Workgroup name. Default for Windows is WORKGROUP.
workgroup = WORKGROUP

# An additional name of the PC, that will be displayed when browsing shares, and also will
# be accessible through \\NETBIOS-NAME
# This is SHOULD NOT be the same as your hostname, as it will be in conflict. If you
# Want to use the same NETBIOS name as your hostname, just leave it commented.
# netbios name = NETBIOS-NAME

# A type of verification. User = ask for username and password.
security = user

# Makes sure, you can browse shares.
browseable = yes

# When wrong username is entered, it will automatically log you as guest user.
map to guest = bad user

# This just has to be here.
name resolve order = bcast lmhosts host wins


#============================ Share Definitions ==============================
# Shares that will be made here will be displayed when entered \\NETBIOS-NAME
# share name is defined in []

[PublicArchShare]
    path = /home/cisu/.smbpubshare
    browseable = yes
    writable = yes
    guest ok = yes
    # if you want to use folder inside user's home folder, you need to add
    # this, otherwise you will see "permission denied" error.
    force user = cisu
    write list = cisu
After that, you will need to create user for samba. Either you can use one that already exists, or make a new one.
To make user available to samba, you need to type smbpasswd user and provide a new password.
NOTE: Samba password is different to your system password, and should be different!
Now enable smb.service and nmb.service. If you use systemd, you should type:
NOTE: It’s not always necessary to enable
nmb, but because this guide
sudo systemctl enable --now smb.service
sudo systemctl enable --now nmb.service
NOTE:
Remember: You need to restart the service in order to apply changes made in smb.service.
Now you should be able to access your share by entering \\NETBIOS-NAME in Windows Explorer path par.
Making sure your PC will be visible in Windows share
By default, newer builds of Windows 10 can’t discover samba shares. In order to fix that install wsdd:
https://github.com/christgau/wsdd.
If you use arch, you can use your favorite AUR helper to install it from aur: yay -S wsdd
After that sudo systemctl enable --now wsdd.service, and your share should be visible in «Network» in Windows File
Explorer.
Discovering Windows shares in Thunar
And now we will do it the other way around. Accessing files from Windows 10 in Linux.
Install gvfs, gvfs-smb and sshfs.
Using thunar, you should already
be able to access Network Share by typing in path smb://WINDOWS-PC-NAME/share-name. It should ask you for username and
password and let you in.
In order to browse Windows Shares in Thunar, just like you did the other way around you need to do one more thing:
- On your Windows machine press
win+rand type in:optionalfeatures. - Find SMB1.0/CIFS File Sharing Support and tick it.
- Restart your PC.
After that, your PC should be visible in Thunar Network:
