
Adding a static route in Microsoft Windows 10 or Server is done by using the route add command.
The following is the general syntax of the route add command we need to follow to add a permanent static route in Windows:
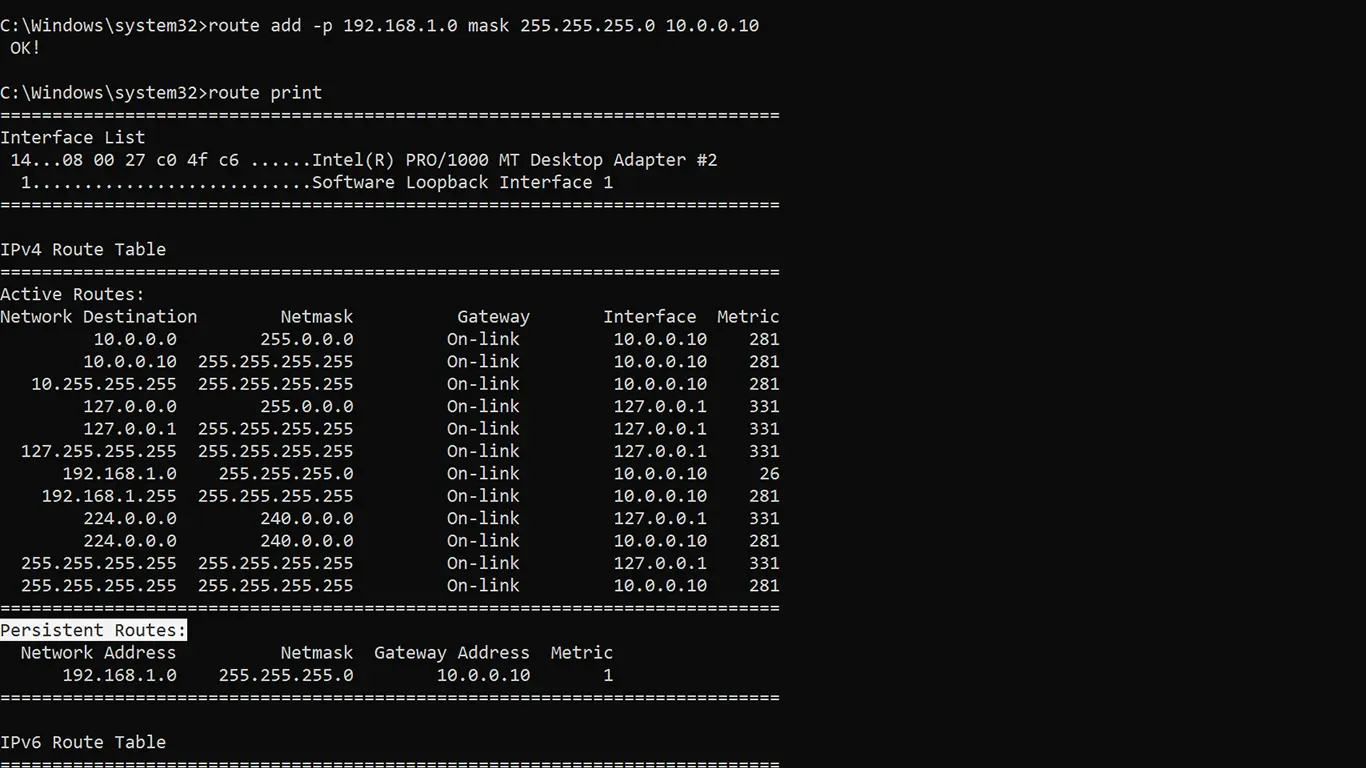
route add -p <destination> mask <subnet-mask> <gateway>For example, the following route command tells the windows to add a new persistent route to the 192.168.1.0/24 network, using 10.0.0.1 as the gateway to reach the network.
route add -p 192.168.1.0 mask 255.255.255.0 10.0.0.1When you want to add a static route to a single host, use the netmask 255.255.255.255.
For example, the following command adds a static route to the destination host 192.168.1.100 with the gateway address 10.0.0.1.
route add -p 192.168.1.100 mask 255.255.255.255 10.0.0.1The most important part of the route add command is the -p option. Without the -p switch, our new route would not be persistent. It will disappear the next time you reboot your Windows PC/Server.
We can print the windows routing table using the route print command. Under the Persistent Routes header, you will see the list of permanent static routes.
Following is another static route example with a metric value:
route add -p 192.168.1.0 mask 255.255.255.0 10.0.0.1 metric 5In case if you have more than one network interface, you could also specify the interface ID using the if command option.
route add -p 192.168.1.0 mask 255.255.255.0 10.0.0.1 if 1When specifying the network interface, you have to provide the interface ID which you can find using the route print command.

Windows hold permanent static routes in the following registry
location: HKEY_LOCAL_MACHINE\SYSTEM\CurrentControlSet\Servi.
ces\Tcpip\Parameters\PersistentRoutes
У некоторых Интернет-провайдеров иногда возникает необходимость дополнительно прописать статический маршрут. Например, для работы файлообменных сетей DC++ и torrent. Если Вы подключены через роутер, то все настройки маршрутизации делаются на нём, а на компьютере ничего дополнительно указывать не нужно.
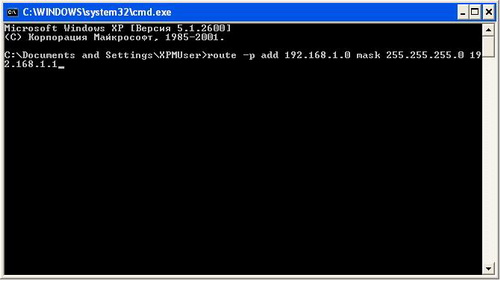
А вот если кабель провайдера подключен напрямую в компьютер или через модем в режиме «мост»(Bridge), тогда может возникнуть необходимость прописать статический маршрут, добавив его в таблицу маршрутизации Windows. Чтобы это сделать, Вы должны запустить командную строку с правами Администратора. Для этого надо нажать кнопку «Пуск» и выбрать пункт меню «Программы» -> «Стандартные» -> «Командная строка», либо нажать комбинацию клавиш Win+R и ввести команду «cmd».
В открывшемся черном окне консоли нужно прописать маршруты используя команду route.
Параметры команды:
-f Очистка таблиц маршрутов от записей всех шлюзов. При указании одной из команд таблицы очищаются до выполнения команды.
-p При использовании с командой ADD задает сохранение маршрута при перезагрузке системы. По умолчанию маршруты не сохраняются при перезагрузке. Пропускается для остальных команд, изменяющих соответствующие постоянные маршруты.
-4 Обязательное использование протокола IPv4.
-6 Обязательное использование протокола IPv6.
<command> Одна из следующих команд:
PRINT Печать маршрута
ADD Добавление маршрута
DELETE Удаление маршрута
CHANGE Изменение существующего маршрута
destination Адресуемый узел.
MASK Указывает, что следующий параметр интерпретируется как маска сети.
netmask Значение маски подсети для записи данного маршрута. Если этот параметр не задан, по умолчанию используется значение 255.255.255.255.
gateway Шлюз.
interface Номер интерфейса для указанного маршрута.
METRIC Определение метрики, т.е. цены для адресуемого узла.
Для примера рассмотрим три основных подсети, используемые как локальные:
192.168.0.0/16
10.0.0.0/8
172.16.0.0/16
Соответственно, Вам надо будет прописать 3 вот такие строки:
route -p add 192.168.0.0 mask 255.255.0.0 <ваш_шлюз>
route -p add 10.0.0.0 mask 255.0.0.0 <ваш_шлюз>
route -p add 172.16.0.0 mask 255.240.0.0 <ваш_шлюз>
Например, Ваш шлюз 192.168.50.1, тогда команды будут выглядеть так:
route -p add 192.168.0.0 mask 255.255.0.0 192.168.50.1
route -p add 10.0.0.0 mask 255.0.0.0 192.168.50.1
route -p add 172.16.0.0 mask 255.240.0.0 192.168.50.1
Если возникнет необходимость удалить статические маршруты — просто введите следующие команды:
route delete 192.168.0.0
route delete 10.0.0.0
route delete 172.16.0.0
Sometimes you need to create static route entries to make communication with different networks that are connected via a different gateway. A gateway is simply a network router that routes the network traffic between different networks. When you have more than one gateway (router) on your network, then you may need to implement static route technique on Windows 10/Windows 11 or Windows servers/any Operating system.
A static route will tell the Operating System to send network packets to the appropriate router instead of sending them to the default router. This simple guide shows how to add, delete and modify a static route to the routing table on Windows 11/10 and Microsoft Server Operating Systems.
There are a few useful commands you must know. Route delete, add and print. These commands will be handy to any user who has administrative access and know which router/gateway should be used for which network.
Why Add Static Route?
It mostly depends on the network setup. Usually, you can add these static routes on your default router (if it can support) or core switch. When you have this kind of proper network setup, you do not need to add a static route to each computer separately on the network. But in a few exceptional cases, you may need to implement static routes on individual computers. Here are a few examples.
- You have more than one internet router on the network and you need to send traffic to certain websites (based on their IP addresses) via a different router than the default gateway. Let’s say, for example, all traffic to Netflix can be sent via the 2nd internet router where other website traffic can go through the 1st internet router.
- There are several VLANs or subnets available on the network. Before building the proper routing table on the router or core switch, adding a static route on your Windows computer will help you to test the connectivity see the traffic flow.
- For network security or isolation purpose, certain routes can’t be added to the default gateway device. In this case, as a network administrator, you can add the static route on a local computer to make network communication.
Route Add on Windows 11/10 and Windows Servers
Though there are major changes and interface upgrades in the latest Windows 11, the below steps remain the same.
Make sure you run the below commands on command prompt (or PowerShell) which is opened as Administrator.
Here is the command to add a static route to the routing table.
route ADD destination_network MASK subnet_mask gateway_ip metric_cost
route add 10.10.10.0 mask 255.255.255.0 10.10.29.1
It indicates that any packets to 10.10.10.0 (in class C – 255.255.255.0) network should be forwarded to the 10.10.29.1 router (gateway).
Obviously, the PC/server in which we run this command is in the 10.10.29.0/24 network because it should communicate to the gateway from the same network.
The issue with the above command is when you shut down or restart the computer, these route entries will be removed. To make it permanent and add to the Windows OS routing table, we should use the –p key with the add command. So, adding a persistent (or permanent) static route on Windows 10 command will be like this;
route add –p 10.10.10.0 mask 255.255.255.0 10.10.29.1
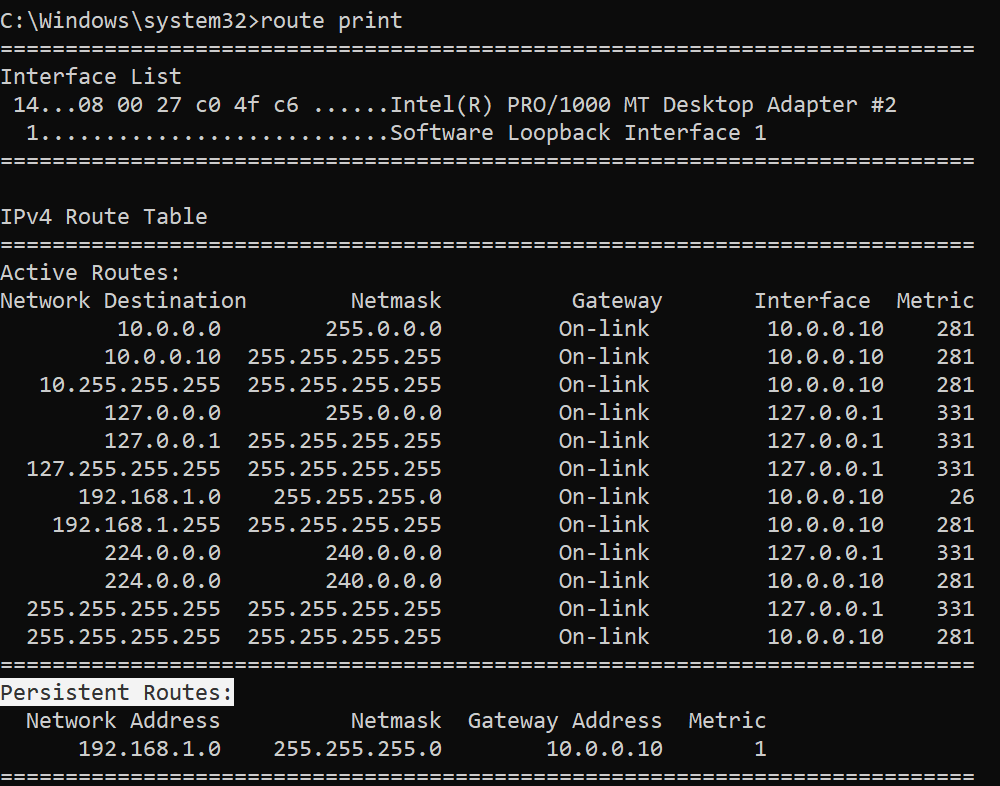
Route Print
Route print command is another useful command to view the entries on the routing table and which routes are active at the moment. If you need to modify an entry that is already in the routing table, better to confirm the entries before changing. To do it, use the route print command.
Route print

Also, we can view the persistent routes in a Windows OS by checking the following registry path. Look for the entries in this area before or after modifying any routing table entries.
HKEY_LOCAL_MACHINE->SYSTEM->CurrentControlSet-> Services->Tcpip->Parameters->PersistentRoutes
Route Delete on Windows 11/10 & Windows 2022/2019/2016 Servers
The below command is to delete an existing persistent route from a computer. Even though we added a route entry with the network, network mask and gateway, but to delete, we need to mention the network only. So, it goes like this;
route delete 10.10.10.0
That will delete the 10.10.10.0 route entry from the computer. You do not need to restart the computer to take effect. Adding and deleteting route entries take effect instantly.
Let’s say that after the recent network change, now the network 10.10.10.0 should be routed through the 10.10.29.200 gateway. Obviously, you have to modify the existing route for this network and change the gateway to 10.10.29.200.
So, how to modify the existing route entry? You can’t modify an existing entry.
The simple method is to delete it and add the new entry. So, in this case, you would perform the below commands.
Route delete 10.10.10.0

Route add –p 10.10.10.0 mask 255.255.255.0 10.10.29.200
We hope this simple guide is helpful in understanding the route add, delete and print commands in Windows 10/Windows 11 client PC and other server Operating Systems. Make sure you open the command prompt or PowerShell as Administrator to perform these commands. If you want to use cosmetic variables to identify the fast hops to reach a network, you can use the metric key as described at the Microsoft site here.
Last Updated :
01 Nov, 2022
A routing table is a part of a computer’s operating system. It contains the details of the best way to reach different networks, such as your home or office network. The table helps your computer send data to different networks and devices. Windows uses a routing table to determine the best way to send data to a specific destination. A routing table is used in every operating system. It contains the details of the best way to reach different networks, such as your home or office network. The table helps your computer send data to different networks and devices. Windows uses a routing table to determine the best way to send data to a specific destination. You can add a static route to the routing table to save time if your home or business is frequently visited. You can also add alternate routes to your home or business if you have trouble reaching the original location via the routing table.
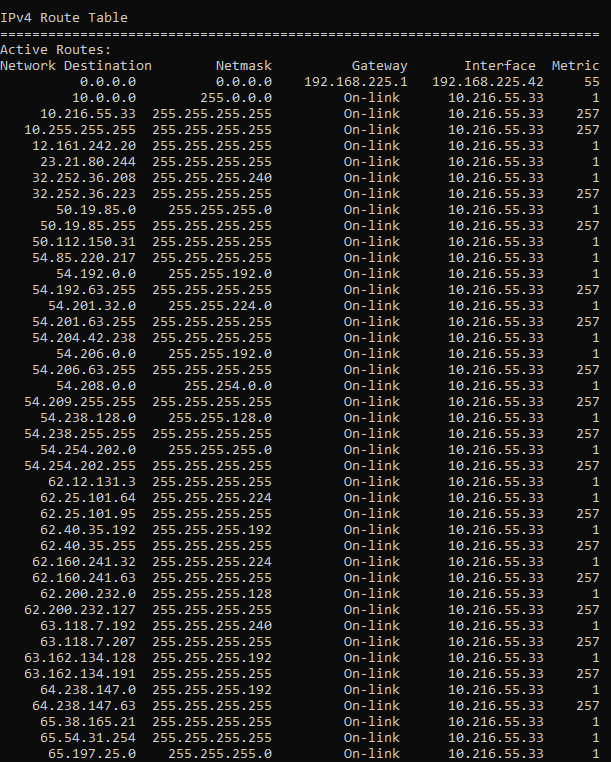
Interfaces and Route Table on Windows:
The Command route print prints the list of All Interfaces and the IPv4/v6 Routing Table. It is followed by a comma-delimited argument, which describes the command to run (e: -f). If there are no arguments then it reports all installed ports for each configured interface; if not supplied this would report only the ones present on that port range. The format uses spaces as normal in names. Below is the Snapshot after running route print on Windows.


Adding Static Route to the Routing Table:
To add a static route, press and hold the Windows key and the R key, then press Enter on your keyboard; this opens the Run dialog box. Type route print and press Enter on your keyboard. This opens Windows’ Routing and IP Configuration dialog box. In this dialog box, click on Add → Next → Next; this opens the Add Default Route window. In this window, enter the details for your new default route, then click on Add → Close → OK → Apply → Close→ OK → OK; Now you are now finished adding a static route to the Windows Routing Table.
The command to add an entry from cmd is as below
route add Destination_Address
MASK Subnet_Mask Gateway_IP Metric
Example: route add 192.168.39.0
MASK 255.255.255.0 192.148.0.2

Below is the output of the route print after adding the static route.

Alternate routes can be useful for travelers or for businesses with multiple locations throughout town or regionally. For example, if you live far from work you may want an alternate route, so you don’t have to constantly drive back and forth all day long between home and work each day; alternatively, if you’re a business owner with several locations throughout town or regionally, alternate routes can be useful for customers who need several locations open for business each day they can easily reach their location by traveling along different roads through town or regionally instead of having to travel back-and-forth on one road each day between their locations. Adding an alternate route to your home or business is easy with a properly functioning routing table; however, many users neglect to add them until they experience problems reaching their location via that main route. Adding a static route can also be effective when adding an alternate route for quick access for frequent use by family members or friends; either way, adding a static route or alternate route is easy with just a few steps.
В данной статье мы рассмотрим, что такое статический маршрут и зачем его вообще прописывать. Мы будем использовать так называемые «руты» или другими словами будем прописывать маршруты с помощью команды route add в командной строке Windows.
Прежде чем приступать к практике хотелось бы поговорить немного о теории, что бы Вы понимали, что Вы делаете, и в каких случаях это Вам может пригодиться.
Для начала пару определений:
Статическая маршрутизация — вид маршрутизации, при котором маршруты указываются в явном виде при конфигурации маршрутизатора. Вся маршрутизация при этом происходит без участия каких-либо протоколов маршрутизации.
Статический маршрут — представляет собой заданный администратором маршрут, который заставляет пакеты, перемещающиеся между источником и адресатом, отправляться по указанному пути. Другими словами — это явно указанный путь, по которому должен пройти пакет из пункта А в пункт Б.
В этой статье мы с Вами говорим, о статическом маршруте на обыкновенном компьютере с операционной системой Windows. Для чего же нам нужно уметь прописывать статические маршруты? спросите Вы, сейчас попробую объяснить, где это знание Вам может пригодиться.
Сейчас очень распространено для безопасности использовать «Виртуальные частные сети» (VPN). VPN используют как в организациях, для организации своей защищенной сети, так и провайдеры, для предоставления доступа, к глобальной сети Интернет, простым пользователям. Но, так или иначе, это иногда вызывает небольшие неудобства, как в организациях, так и у обычных пользователей.
Например, у Вас дома два компьютера, один из которых имеет доступ в Интернет по средствам VPN, также он соединен со вторым компьютером локальной сетью, и каждый раз, когда он подключается к Интернету, то связь между двумя компьютерами теряется, так как первый компьютер (который подключился к VPN) уже находится в другой сети, и поэтому недоступен со второго компа.
Это можно исправить как раз с помощью статического маршрута. Или другой случай, пригодится сисадминам, (пример из жизни) есть организация, у которой имеются небольшие удаленные офисы, связь с которыми идет по средствам OpenVPN. Был случай, когда мне пришлось узнать внешние ip адреса у этих удаленных офисов, я подключался к компьютеру по VPN сети и соответственно не мог узнать внешний ip, так как он мне бы показал внешний ip нашего VPN соединения. В итоге я просто на всего прописал один статический маршрут на удаленном компьютере, с помощью которого и попал на нужный мне сайт (который показывал внешний ip) и все. Есть, конечно, и другой вариант, съездить туда и узнать ip без подключения к VPN сети, но Вы сами понимаете, что на это нет времени и попросту неохота. Теперь Вы немного представляете, где и для чего Вам может пригодиться знание того, как прописываются статические маршруты.
Примеры использования утилиты route
Хватит теории, переходим к практике. Сейчас мы с Вами пропишем маршрут, который разрешит нам получить доступ к локальной сети при включенном VPN соединении, пригодится обычным пользователям, у которых дома более одного компьютера, а в Интернет выходят по средствам VPN.
Имеем локальную сеть: 192.168.1.0/24
Локальный IP первого компьютера (пусть он будет компьютер — A) – 192.168.1.2 (на котором присутствует VPN соединение)
Локальный IP второго компьютера (а этот компьютер — B) – 192.168.1.3
IP адрес шлюза т.е. модема – 192.168.1.1
Нам нужно прописать маршрут на компьютере A, чтобы он смог видеть компьютер B при включенном VPN соединении. Делается это следующем образом: запускаем командную строку Пуск->Выполнить->cmd и набираем следующую команду:
route –p add 192.168.1.0 mask 255.255.255.0 192.168.1.1
где:
- route – сама программа, которая работает с таблицей маршрутизации;
- -p – ключ, который говорит, что маршрут будет постоянный, так как (Важное замечание!) без этого ключа все маршруты, которые Вы добавите удалятся после перезагрузке, поэтому если Вы хотите использовать маршрут всегда, то пропишите этот ключ, если только один раз, то его можно не писать;
- add – команда, добавляющая запись в таблицу маршрутизации;
- 192.168.1.0 – сеть, с которой Вы хотите иметь связь;
- mask 255.255.255.0 – маска подсети;
- 192.168.1.1 – адрес шлюза, обычно это адрес модема.
Добавив всего один маршрут, Вы получаете доступ к своей сети при подключенном Интернете, т.е. VPN соединении.
Вот еще один небольшой пример, у Вас дома подключение к Интернету через модем ADSL и Вам иногда (ну или постоянно) требуется подключение к VPN сети, и соответственно выхода в Интернет через свой канал у Вас уже не будет. Но с помощью статического маршрута Вы можете получить доступ к определенным сайтам (узнав предварительно их ip адреса, с помощью команды ping в командной строке, например ping yandex.ru), к которым Вам бы хотелось иметь постоянный доступ (и при подключенном VPN соединении и неподключенном). Например, сайт имеет ip адрес 172.18.24.13, а шлюз (маршрутизатор, модем) имеет IP адрес 192.168.0.1, Вам необходимо прописать следующее:
route –p add 172.18.24.13 mask 255.255.255.255 192.168.0.1
Синтаксис и основные ключи утилиты route
Теперь поговорим поподробней о команде route.
Общий синтаксис:
route [-f] [-p] [destination] [mask ] [gateway] [metric ] [if ]
Основные ключи:
- -f — удаляет из таблицы маршрутизации все маршруты;
- -p – сохраняет маршрут на постоянную основу;
- add – добавляет новый маршрут;
- change — меняет текущий маршрут в таблице маршрутизации;
- delete — удаляет маршрут из таблицы маршрутизации;
- print — отображает содержимое таблицы маршрутизации;
- destination — при добавлении или изменении маршрута этот параметр используется для указания идентификатора сети назначения;
- mask — при добавлении или изменении маршрута этот параметр используется для указания маски подсети для сети назначения;
- gateway — при добавлении или изменении нового маршрута этот параметр используется для указания шлюза (маршрутизатора или модема);
- metric — используется для указания целого числа в диапазоне от 1 до 9999, являющегося метрикой стоимости для маршрута. Если для определенной сети назначения существует несколько возможных маршрутов, будет использован маршрут с наименьшим значением метрики;
- if — используется для указания номера индекса интерфейса, который подключен к сети назначения.
Для того чтобы просто посмотреть таблицу маршрутизации у себя на компьютере введите в командную строку следующие:
route print
Вот в принципе и все что я хотел Вам рассказать, но следует помнить что, проводя все выше указанные манипуляции нужно быть внимательным, так как ошибка всего в одной цифре приведет к нежелательным результатам, не критичным, но нежелательным. В особенности это относится к корпоративным сетям, где маршрутизация уже настроена, и Вы можете легко изменить, удалить нужные маршруты.