
Для предоставления прав локального администратора на компьютерах домена сотрудникам техподдержки, службе HelpDesk, определенным пользователям и другим привилегированным аккаунтам, вам нужно добавить необходимых пользователей или группы Active Directory в локальную группу администраторов на серверах или рабочих станциях. В этой статье мы покажем несколько способов управления членами локальной группы администраторов на компьютерах домена вручную и через GPO.
Содержание:
- Добавляем пользователя в локальные администраторы компьютера вручную
- Добавляем пользователей в локальную группу администраторов через Group Policy Preferences
- Предоставление прав администратора на конкретном компьютере
- Управление локальными администраторами через Restricted Groups
Добавляем пользователя в локальные администраторы компьютера вручную
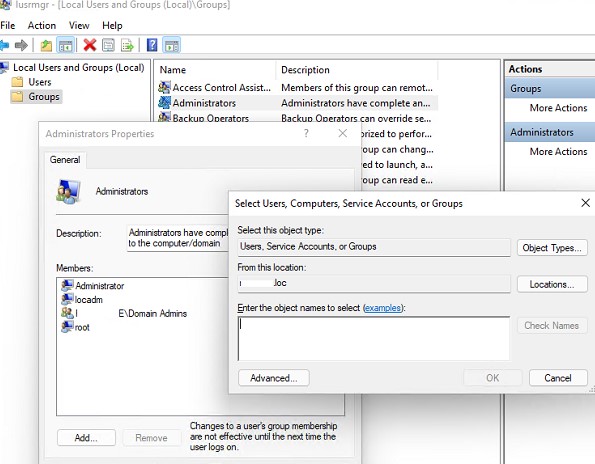
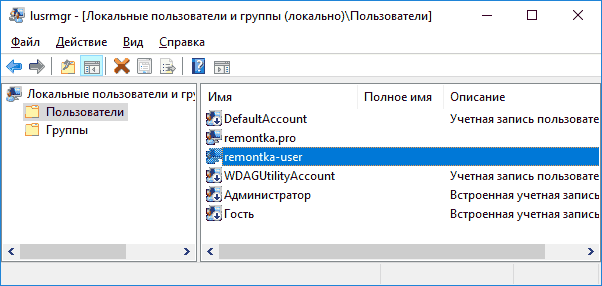
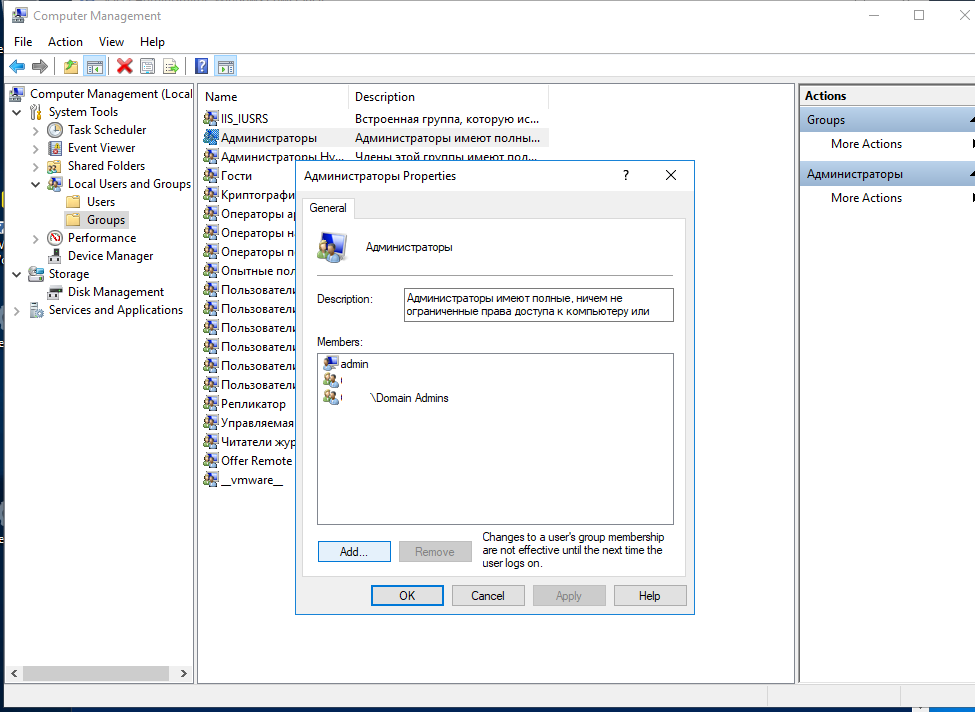
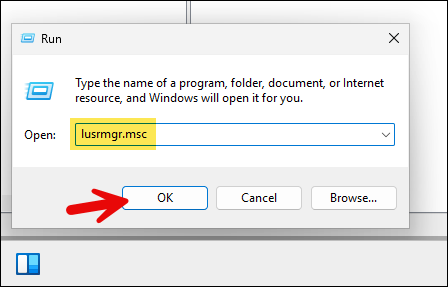
Самый простой способ предоставить пользователю или группе права локального администратора на конкретном компьютере — добавить его в локальную группу Administrators с помощью оснастки “Локальные пользователи и группы” (Local users and groups — lusrmgr.msc).
После того, как вы добавили компьютер в домен AD, в локальную группу Administrators компьютера автоматически добавляется группы Domain Admins, а группа Domain User добавляется в локальную Users. Остальных пользователей вы можете добавить в группу администраторов вручную или с помощью GPO.
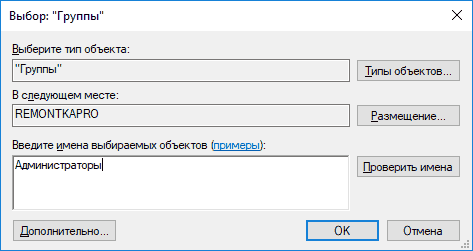
Нажмите кнопку Add и укажите имя пользователя, группы, компьютера или сервисного аккаунта (gMSA), которому вы хотите предоставить права локального администратора. С помощью кнопки Location вы можете переключать между поиском принципалов в домене или на локальном компьютере.
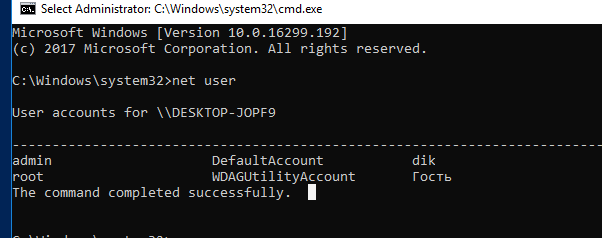
Также вы можете вывести список пользователей с правами локального администратора компьютера из командной строки:
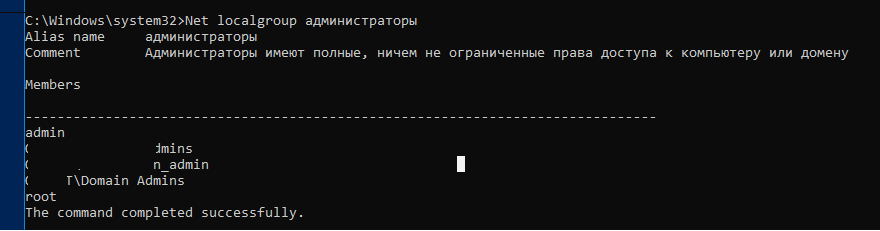
net localgroup administrators
Или для русской версии Windows:
net localgroup администраторы
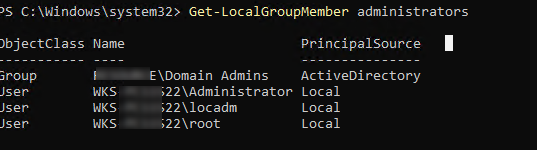
Для получения списка пользователей в локальной группе можно использовать следующую команду PowerShell (используется встроенный модуль LocalAccounts для управления локальными пользователями и группами):
Get-LocalGroupMember administrators
Данная команда показывает класс объекта, которому предоставлены права администратора (ObjectClass = User, Group или Computer) и источник учетной записи или группы (ActiveDirectory, Azure AD или локальные пользователи/группы).
Чтобы добавить доменную группу (или пользователя) spbWksAdmins в локальные администраторы, выполните команду
net localgroup administrators /add spbWksAdmins /domain
Через PowerShell можно добавить пользователя в администраторы так:
Add-LocalGroupMember -Group Administrators -Member ('winitpro\a.novak', 'winitpro\spbWksAdmins','wks-pc11s22\user1') –Verbose

В этом примере мы добавили в администраторы компьютеры пользователя и группу из домена winitpro и локального пользователя wks-pc11s22\user1.
Можно добавить пользователей в группу администраторов на нескольких компьютерах сразу. В этом случая для доступа к удаленного компьютерам можно использовать командлет Invoke-Command из PowerShell Remoting:
$WKSs = @("wks1","wks2","wks3")
Invoke-Command -ComputerName $WKSs –ScriptBlock { Add-LocalGroupMember -Group Administrators -Member 'winitpro\spbWksAdmins'}
Также вы можете полностью отказаться от предоставления прав администратора для доменных пользователей и групп. Для выполнения разовых задач администрирования на компьютерах (установка программ, настройка системных параметров Windows можно использовать встроенного локального администратора с паролем, хранящимся в AD (реализуется с помощью Local Administrator Password Solution (LAPS)).
В доменной среде Active Directory предоставления прав локального администратора на компьютерах домена лучше использовать возможности групповых политик. Это намного проще, удобнее и безопаснее, чем ручное добавление пользователей в локальную группу администраторов на каждом компьютере. В групповых политиках AD есть два способа управления группой администраторов на компьютерах домена:
- Ограниченные группы (Restricted Groups)
- Управление локальным группами через предпочтения групповых политик (Group Policy Preferences)
Добавляем пользователей в локальную группу администраторов через Group Policy Preferences
Допустим, вам нужно предоставить группе сотрудников техподдержки и HelpDesk права локального админа на компьютерах в конкретном OU Active Directory. Создайте в домене новую группу безопасности с помощью PowerShell и добавьте в нее учетные записи сотрудников техподдержки:
New-ADGroup "mskWKSAdmins" -path 'OU=Groups,OU=Moscow,DC=winitpro,DC=ru' -GroupScope Global –PassThru
Add-AdGroupMember -Identity mskWKSAdmins -Members user1, user2, user3
Откройте консоль редактирования доменных групповых политик (GPMC.msc), cоздайте новую политику AddLocaAdmins и назначьте ее на OU с компьютерами (в моем примере это ‘OU=Computers,OU=Moscow,dc=winitpro,DC=ru’).
Предпочтения групповых политик (Group Policy Preferences, GPP) предоставляют наиболее гибкий и удобный способ предоставления прав локальных администраторов на компьютерах домена через GPO.
- ткройте созданную ранее политику AddLocaAdmins в режиме редактирования;
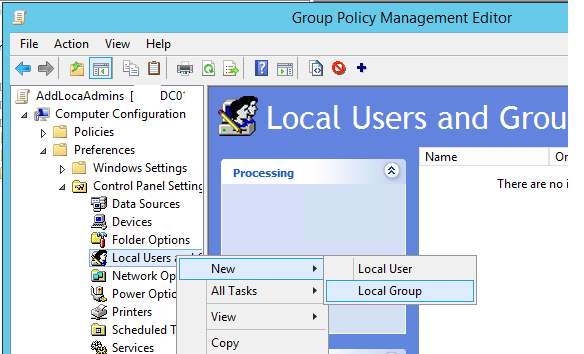
- Перейдите в секцию GPO: Computer Configuration –> Preferences –> Control Panel Settings –> Local Users and Groups;
- Щелкните ПКМ по правому окну и добавите новое правило (New -> Local Group);

- В поле Action выберите Update (это важная опция!);
- В выпадающем списке Group Name выберите Administrators (Built-in). Даже если эта группа была переименована на компьютере, настройки будут применены к группе локальных администраторов по ее SID —
S-1-5-32-544
; - Нажмите кнопку Add и укажите группы, которые нужно добавить в локальную группу администраторов (в нашем случае это mskWKSAdmins).
Вы можете удалить из группы администраторов компьютера всех пользователей и группы, добавленных вручную. Для этого включите опции опции “Delete all member users” и “Delete all member groups”. В большинстве случае это целесообразно, т.к. вы гарантируете, что на всех компьютерах права администратора будут только у назначенной доменной группы. Теперь если на компьютере вручную добавить пользователя в группу администраторов, при следующем применении политики он будет автоматически удален.
- Сохраните политику и дождитесь ее применения на клиентах. Чтобы немедленно обновить параметры групповой политики, выполните команду
gpupdate /force - Откройте оснастку lusrmgr.msc на любом компьютере и проверьте членов локальной группы Adminstrators. В группу должна быть добавлена только группа mskWKSAdmins, все остальные пользователи и группы (кроме встроенного администратора Windows) будут удалены.
Если политика не применилась на клиенте, для диагностики воспользуйтесь командой gpresult. Также убедитесь что компьютер находится в OU, на которое нацелена политика, а также проверьте рекомендации из статьи “Почему не применяются политики в домене AD?”.
.
Предоставление прав администратора на конкретном компьютере
Иногда нужно предоставить определенному пользователю права администратора на конкретном компьютере. Например, у вас есть несколько разработчиков, которым периодически необходимы повышенные привилегии для тестирования драйверов, отладки, установки на своих компьютерах. Нецелесообразно добавлять их в группу администраторов рабочих станций с правами на всех компьютерах.
Чтобы предоставить права лок. админа на одном конкретном компьютере можно использовать WMI фильтры GPO или Item-level Targeting.
Прямо в созданной ранее политике AddLocalAdmins в секции предпочтений (Computer Configuration –> Preferences –> Control Panel Settings –> Local Users and Groups) создайте новую запись для группы Administrators со следующими настройками:
- Action: Update
- Group Name: Administrators (Built-in)
- Description: “Добавление apivanov в лок. администраторы на компьютере msk-ws24”
- Members: Add -> apivanov

- На вкладке Common -> Targeting указать правило: “the NETBIOS computer name is msk-ws24”. Т.е. данная политика будет применяться только на указанном здесь компьютере.


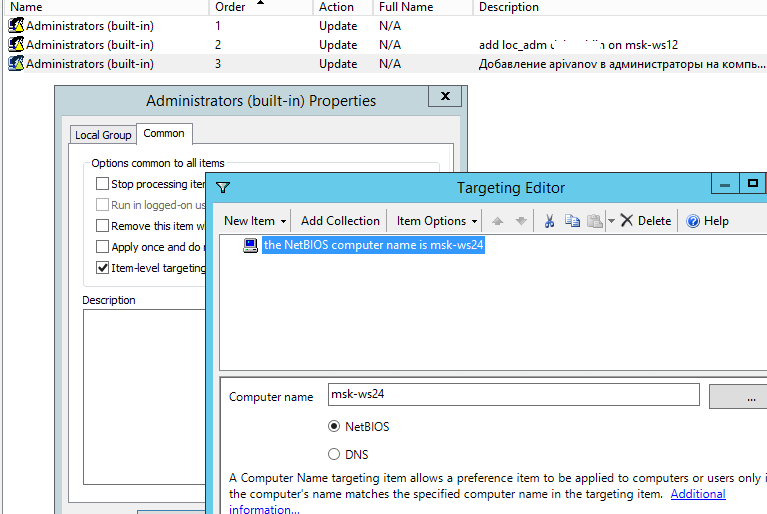
Также обратите внимание на порядок применения групп на компьютере – Order. Настройки локальных групп применяются сверху вниз (начиная с политики с Order 1).
Первая политика GPP (с настройками “Delete all member users” и “Delete all member groups” как описано выше), удаляет всех пользователей/группы из группы локальных администраторов и добавляет указанную доменную группу. Затем применится дополнительная политика для конкретного компьютера и добавит в группу вашего пользователя. Если нужно изменить порядок применения членства в группе Администраторы, воспользуйтесь кнопками вверху консоли редактора GPO.
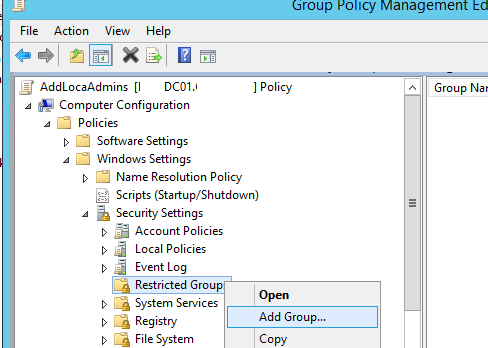
Управление локальными администраторами через Restricted Groups
Политика групп с ограниченным доступом (Restricted Groups) также позволяет добавить доменные группы/пользователей в локальные группы безопасности на компьютерах. Это более старый способ предоставления прав локального администратора и сейчас используется реже (способ менее гибкий, чем способ с Group Policy Preferences).
- Перейдите в режим редактирования политики;
- Разверните секцию Computer Configuration -> Policies -> Security Settings -> Restrictred Groups (Конфигурация компьютера -> Политики -> Параметры безопасности -> Ограниченные группы);
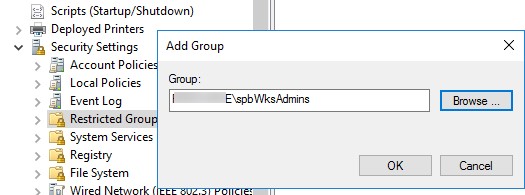
- В контекстном меню выберите Add Group;

- В открывшемся окне укажите Administrators -> Ok;
- В секции “Members of this group” нажмите Add и укажите группу, которую вы хотите добавить в локальные админы;
- Сохраните изменения, примените политику на компьютеры пользователей и проверьте локальную групп Administrators. В ней должна остаться только указанная в политике группа.
Данная политика всегда (!) удаляет всех имеющихся членов в группе локальных администраторов (добавленных вручную, другими политиками или скриптами).
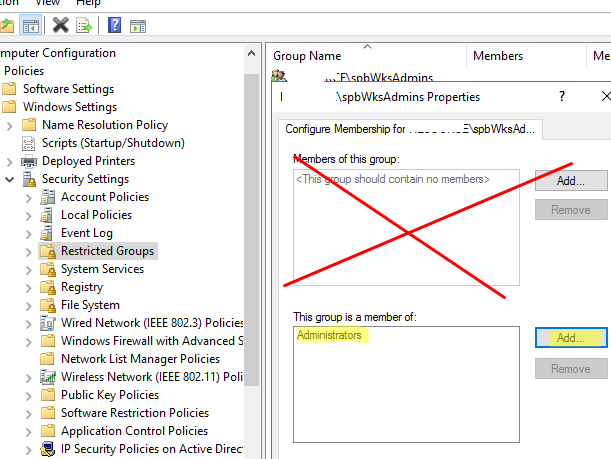
Если вам нужно оставить текущий список группы Administrators и добавить в нее дополнительную группу нужно:
- Создать новый элемент в Restricted Groups и указать в качестве имени группу безопасности AD, которую вы хотите добавить в локальные админы;

- Затем в разделе This group is a member of нужно добавить группу Administrators;

- Обновите настройки GPO на клиенте и убедитесь, что ваша группа была добавлена в локальную группу Administrator. При этом текущие принципалы в локальной группе остаются неторонутыми (не удаляются из группы).
В конце статьи оставлю базовые рекомендации по управлению правами администраторов на компьютерах пользователей AD:
В классических рекомендациях по безопасности Microsoft рекомендуется использовать следующие группы для разделения полномочиями администраторов в домене:
- Domain Admins – администраторы домена, используются только на контроллерах домена;
С точки зрения безопасности привилегированных аккаунтов администраторов не рекомендуется выполнять повседневные задачи администрирования рабочих станций и серверов под учетной записью с правами администратора домена. Такие учётные записи нужно использовать только для задач администрирования AD (добавление новых контроллеров домена, управление репликацией, модификация схемы и т.д.). Большинство задач управления пользователями, компьютерами и политиками в домене можно делегировать для обычных учетных записей администраторов. Не используйте аккаунты из группы Domain Admins для входа на любые рабочие станции и сервера хроме контроллеров домена.
- Server Admins – группа для управления на рядовыми Windows Server домена. Не должна состоять в группе Domain Admins и не должна включаться в группу локальных администраторов на рабочих станциях;
- Workstation Admins – группа только для администрирования компьютеров. Не должна входить или содержать группы Domain Admins и Server Admins;
- Domain Users – обычные учетные записи пользователей для выполнения типовых офисных операций. Не должны иметь прав администратора на серверах или рабочих станциях;
- Не рекомендуется добавлять в администраторы индивидуальные аккаунты пользователей, лучше использовать доменные группы безопасности. В этом случае, чтобы предоставить права администраторов очередному сотруднику тех. поддержки, вам достаточно добавить его в доменную группу (не придется редактировать GPO).
По умолчанию, учетная запись первого созданного пользователя в Windows 10 (например, при установке) имеет права администратора, однако последующие создаваемые учетные записи — права обычного пользователя.
В этой инструкции для начинающих пошагово о том, как дать права администратора создаваемым пользователям несколькими способами, а также о том, как стать администратором Windows 10, если у вас нет доступа к администраторской учетной записи, плюс видео, где весь процесс показан наглядно. См. также: Как создать пользователя Windows 10, Встроенная учетная запись Администратор в Windows 10.
Как включить права администратора для пользователя в параметрах Windows 10
В Windows 10 появился новый интерфейс для управления учетными записями пользователей — в соответствующем разделе «Параметров».
Чтобы сделать пользователя администратором в параметрах достаточно выполнить следующие простые шаги (эти действия должны выполняться из учетной записи, которая уже имеет права администратора)
- Зайдите в Параметры (клавиши Win+I) — Учетные записи — Семья и другие люди.
- В разделе «Другие люди» нажмите по учетной записи пользователя, которого требуется сделать администратором и нажмите кнопку «Изменить тип учетной записи».

- В следующем окне в поле «Тип учетной записи» выберите «Администратор» и нажмите «Ок».


Готово, теперь пользователь при следующем входе в систему будет иметь необходимые права.
С использованием панели управления
Чтобы изменить права учетной записи с простого пользователя на администратора в панели управления выполните следующие шаги:
- Откройте панель управления (для этого можно использовать поиск в панели задач).
- Откройте пункт «Учетные записи пользователей».
- Нажмите «Управление другой учетной записью».
- Выберите пользователя, права которого нужно изменить и нажмите «Изменение типа учетной записи».
- Выберите «Администратор» и нажмите кнопку «Изменение типа учетной записи».
Готово, теперь пользователь является администратором Windows 10.
С помощью утилиты «Локальные пользователи и группы»
Ещё один способ сделать пользователя администратором — использовать встроенное средство «Локальные пользователи и группы»:
- Нажмите клавиши Win+R на клавиатуре, введите lusrmgr.msc и нажмите Enter.
- В открывшемся окне откройте папку «Пользователи», затем дважды кликните по пользователю, которого требуется сделать администратором.

- На вкладке «Членство в группах» нажмите «Добавить».

- Введите «Администраторы» (без кавычек) и нажмите «Ок».

- В списке групп выберите «Пользователи» и нажмите «Удалить».
- Нажмите «Ок».

При следующем входе в систему пользователь, который был добавлен в группу «Администраторы», будет иметь соответствующие права в Windows 10.
Как сделать пользователя администратором с помощью командной строки
Существует и способ дать права администратора пользователю используя командную строку. Порядок действий будет следующим.
- Запустите командную строку от имени Администратора (см. Как запустить командную строку в Windows 10).
- Введите команду net users и нажмите Enter. В результате вы увидите список учетных записей пользователей и системные учетные записи. Запомните точное имя учетной записи, права которой нужно изменить.
- Введите команду net localgroup Администраторы имя_пользователя /add и нажмите Enter.
- Введите команду net localgroup Пользователи имя_пользователя /delete и нажмите Enter.

- Пользователь будет добавлен в список администраторов системы и удален из списка обычных пользователей.

Примечания по команде: на некоторых системах, созданных на базе англоязычных версий Windows 10 следует использовать «Administrators» вместо «Администраторы» и «Users» вместо «Пользователи». Также, если имя пользователя состоит из нескольких слов, возьмите его в кавычки.
Как сделать своего пользователя администратором, не имея доступа к учетным записям с правами администратора
Ну и последний возможный сценарий: вы хотите дать себе права администратора, при этом отсутствует доступ к уже имеющейся учетной записи с этими правами, из-под которой можно было бы выполнить описанные выше действия.
Даже в этой ситуации существуют некоторые возможности. Один из самых простых подходов будет таким:
- Используйте первые шаги в инструкции Как сбросить пароль Windows 10 до того момента, как будет запущена командная строка на экране блокировки (она как раз открывается с нужными правами), сбрасывать какой-либо пароль не потребуется.
- Используйте в этой командной строке способ «с помощью командной строки», описанный выше, чтобы сделать себя администратором.
Видео инструкция
На этом завершаю инструкцию, уверен, что у вас всё получится. Если же остаются вопросы — задавайте в комментариях, а я постараюсь ответить.
Рассмотрим два простых способа предоставления учетной записи прав локального администратора.
После того, как вы создали учетную запись на сервере Windows Server, часто возникает вопрос, как добавить пользователя в группу локальных администраторов?
В этом статье мы покажем, как добавить пользователя в локальные админы на примере операционной системы Windows Server 2012 R2. Вся информация применима к любым другим поддерживаемым операционным системам Windows. Естественно, для выполнения этих операций учетная запись, выполняющая данные изменения должна обладать административными полномочиями.
- Добавление в группу администраторов при помощи консоли Сomputer Management
- Добавление пользователя в администраторы с помощью команды net user
Содержание:
Добавление в группу администраторов при помощи консоли Сomputer Management
- Нажмите кнопки Win + X, чтобы открыть консоль управления компьютером — «Сomputer Management»
- В списке с левой стороны разверните секцию Computer Management -> System Tools -> Local Users and Groups и выберите пункт Groups.
- Щелкните правой кнопкой мыши по группе Administrators , выберите пункт Add to Group , а затем нажмите кнопку Add.

- В диалоговом окне «Select Users» в поле «Enter the object names to select» введите имя учетной записи пользователя или группы, которую вы хотите добавить в группу Administrators и нажмите OK.
- Если в группу локальных администраторов нужно добавить учетную запись другого компьютера, выберите «Object Types», установите флажок «Computers» и нажмите «ОК». В поле «Enter the object names to select» и укажите имя компьютера.
Добавление пользователя в администраторы с помощью команды net user
Войдите в операционную систему Windows под учетной записью, обладающей правами администратора и запустите командную строку с повышенными привилегиями.
Для того, чтобы вывести список всех локальных учетных записей пользователей в системе введите команду
net user
Как вы видите, в системе имеется 6 учетных записей.
Чтобы добавить учетную запись пользователя root в группу локальных администраторов, выполните следующую команду и нажмите Enter:
net localgroup administrators root /add
В русской версии Windows локальная группа администраторов называется по-другому, поэтому если предыдущая команда вернула ошибку «Указанная локальная группа не существует», воспользуйтесь другой командной:
net localgroup "Администраторы" root /add
Если нужно добавить в администраторы системы учетную запись пользователя домена Active Directory, формат команды будет такой:
net localgroup administrators yourdomain\root /add
Проверить состав группы локальных администраторов можно с помощью команды:
Net localgroup administrators
Как вы видите, учетная запись пользователя root теперь является администратором сервера.
In this blog post, we will explore different methods to add domain users or Active Directory (AD) security groups to the local Administrators group on Windows devices. You can add users or groups to the Administrators group manually (if you have direct access to the device) or remotely using tools like Group Policy or device management solutions such as Intune.
Contents
1. Add Users to Local Administrator Group Manually
First option is to log in on a Windows computer and add users to local administrator group manually. When you join a computer to Active directory domain, the Domain Admins group is automatically added to the Administrators group and Domain Users are added to the Users group. To add users to local administrator group manually, follow below steps:
- Press Windows + R keys to open the Run dialog box.
- Type
lusrmgr.mscand press Enter to open Local Users and Groups management console.
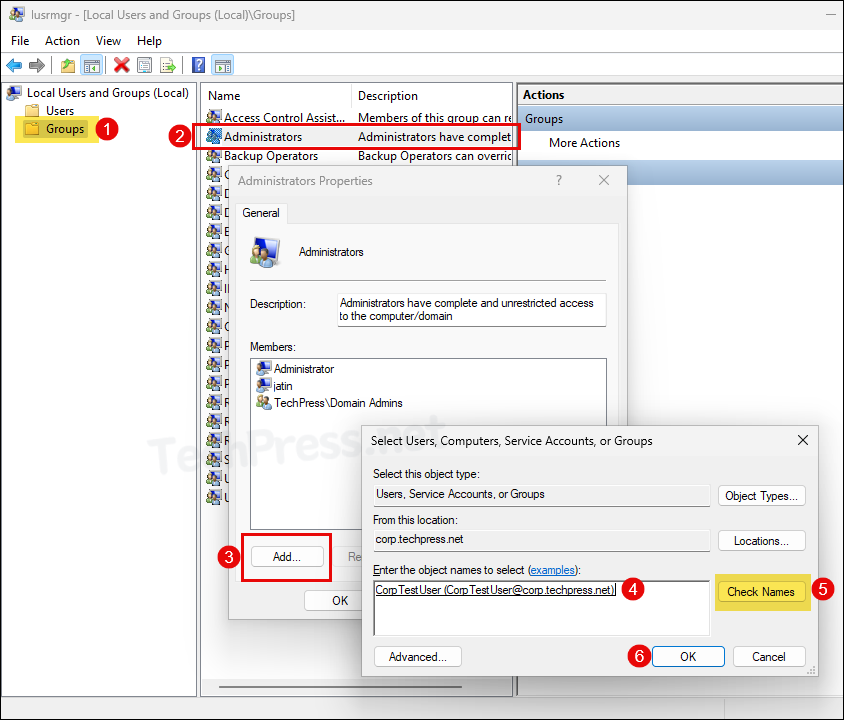
- Under Groups folder, double-click on Administrators > Click on Add. Search for the Active directory user account you want to add > Click on Check Names > Click on OK to add the user to local Administrators group.
2. Add Users to Local Admin Group using PowerShell
Instead of using Local Users and Groups management console to add users to local Administrators group, you can also use PowerShell commands. Let’s take a look:
List members of Local Administrators group (Using Get-Localgroupmember)
PS C:\Users\Administrator> Get-localgroupmember -group "Administrators"ObjectClass Name                        PrincipalSource
----------- ----                        ---------------
User        TechPress\CorpTestUser      ActiveDirectory
Group       TechPress\Domain Admins     ActiveDirectory
User        TECHPRESS-W-2\Administrator Local
User        TECHPRESS-W-2\jatin         Local
List members of Local Administrators group (Using ADSI and WinNT namespace)
([ADSI]"WinNT://$env:COMPUTERNAME/Administrators").Members() | ForEach-Object { $_.GetType().InvokeMember("Name", 'GetProperty', $null, $_, $null) }List members of Local Administrators group (Using net localgroup)
net localgroup administratorsAdd one domain user to Administrators group
Add-LocalGroupMember -Group "Administrators" -Member "Techpress\CorpTestUser"Add multiple domain users to Administrators group
Add-LocalGroupMember -Group "Administrators" -Member ("Techpress\CorpTestUser", "Techpress\Tpadmin01")Add one domain user to Administrators group (Using NET LocalGroup)
net localgroup Administrators "Techpress\CorpTestUser" /addAdd one domain user to Administrators group (Using ADSI and WINNT namespace)
([ADSI]"WinNT://$env:COMPUTERNAME/Administrators").Add("WinNT://TechPress/CorpTestUser")


# To Add a Local User acccount to Administrators group instead of domain user, Use below command:
([ADSI]"WinNT://$env:COMPUTERNAME/Administrators").Add("WinNT://$env:COMPUTERNAME/Username")
Group Policy Preferences (GPP) is a part of Active Directory Group Policy Objects (GPO) that allows you to add Active Directory domain users to the local Administrators group on target Windows devices.
For demonstration purposes, I will add an AD security group named Techpress\TP-WSAdmins to the local Administrators group on Active Directory-joined computers using Group Policy.
This AD security group contains all administrators in my team, adding a security group to local administrators group makes it easier to manage the local administrator membership. You easily add or remove users from this group to control the access. Let’s check the steps:
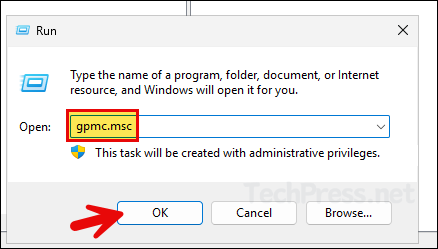
- Login to a Domain controller and Open Group Policy management console (
gpmc.msc).
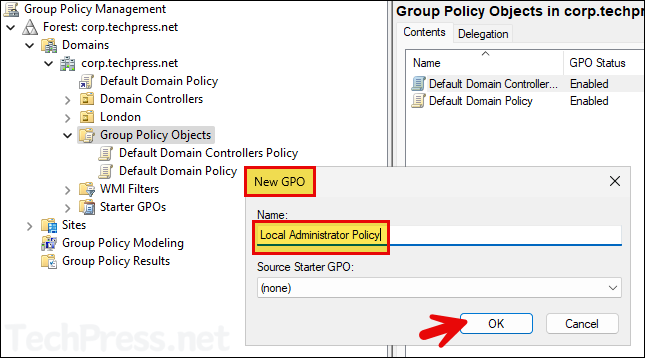
- Right-click on the Group Policy Objects and Select New.
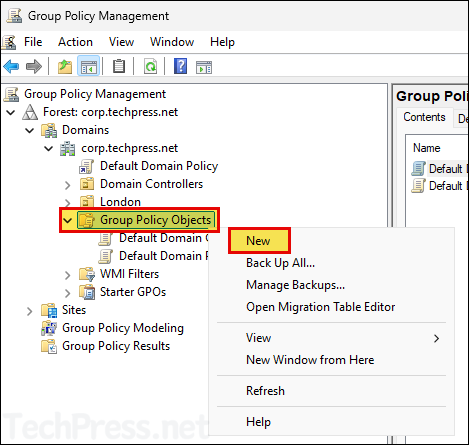
- Provide a Name of the GPO and click OK.
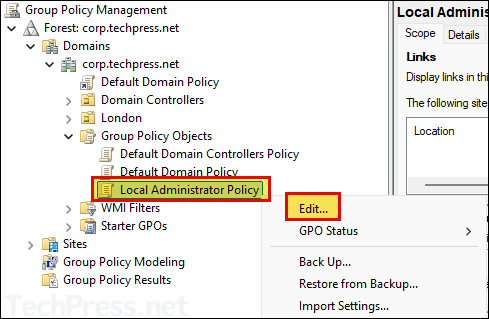
- Right-click on the GPO and click Edit.
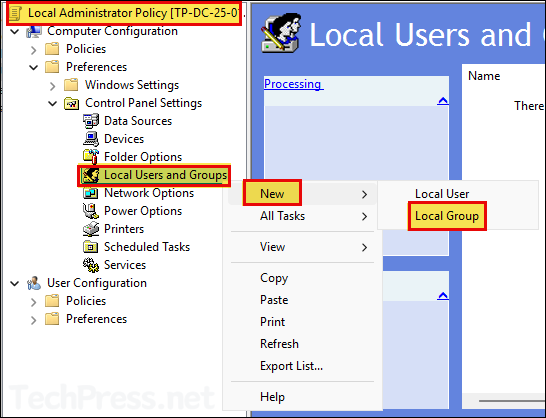
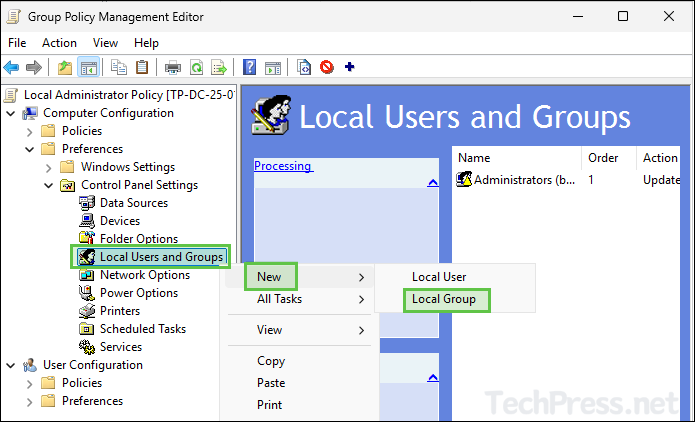
- Navigate to Computer Configuration > Preferences > Control Panel Settings > Local Users and Groups. Right-click on it > Select New > Local Group.
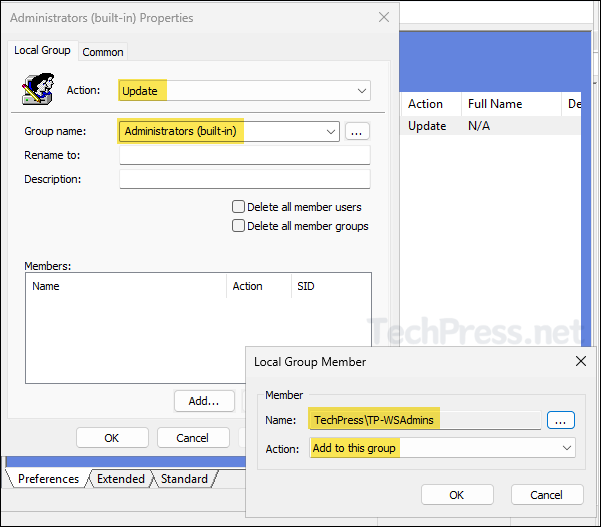
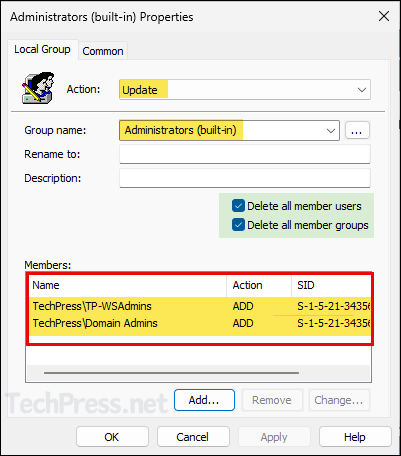
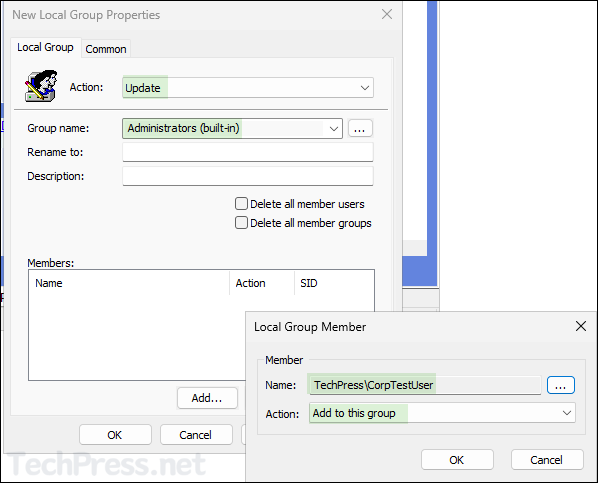
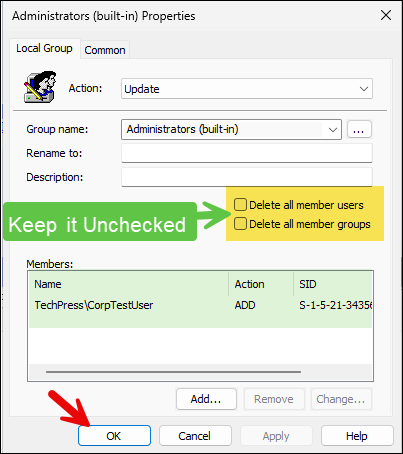
- Select Action as Update and Group name to Administrators (built-in).
- Click on Add and select the security group you want to add, and click on OK.
If you have renamed the built-in Administrators group on target Windows computers, you can still select the group as Administrators (built-in) from the drop-down menu. When this policy adds a user to the built-in Administrators group, it references the group’s SID (Security Identifier), which is S-1-5-domain-500. This SID remains unchanged, even if the account is renamed.
Note
- Repeat the step to add TechPress\Domain Admins group, as we are going to also select Delete all member users and Delete all member group settings. These settings will remove Domain Admins group along with other existing users and groups. Therefore, we are making sure that its added back as we want to keep TechPress\Domain Admins group in the Local Administrators group.
If you do not want to remove any existing users or groups from Local administrators group, then do not select Delete all member users and Delete all member group checkboxes in the policy.
In that case, you can just provide the name of the user or group to add to Local administrators group. Existing membership of Administrators group will remain unchanged.
- If you want to add another domain user or security group, you can add them at this stage. Click OK to save the policy. You can edit the policy later to add or remove users and groups as needed.
You can optionally check Delete all member users and Delete all member groups check boxes to remove any users and groups that are added to the local Administrators group except built-in Administrators account.
This ensures that the Administrators group is entirely controlled by Group Policy. Any users or groups manually added using
lusrmgr.mscor PowerShell, will be removed the next time the GPO is applied.Please note, if you select Delete all member groups option, Domain Admins group (which is by default added to the local Administrators group) will also be removed from Administrators group. Therefore, ensure that it’s added back using the GPO, else all domain admins will lose local administrator access on all target computers where this policy will be applied.
If you do not select these checkboxes, there is no need to re-add the Domain Admins group or any other existing users or groups you want to retain. Users or groups already existing in the local Administrators group will remain unchanged and will not be removed.
Note
- Now, link the GPO with an OU containing Windows computers. I would be linking this to Workstations OU. Right-click on the OU > Select Link an Existing GPO…
- Select the newly created GPO and click on OK to link it.
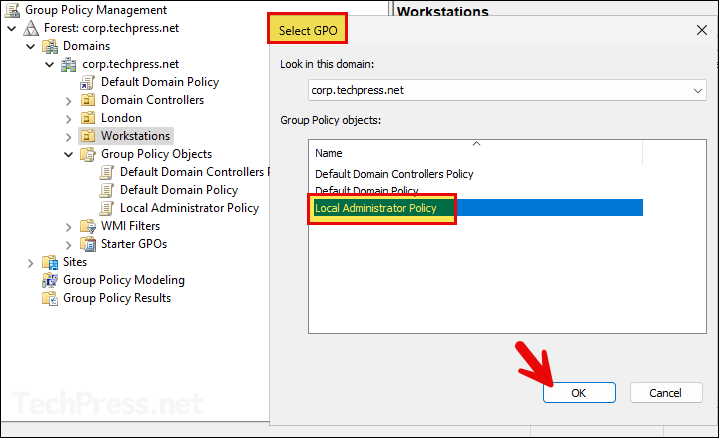
- Verify if the GPO has been linked to the correct OU.
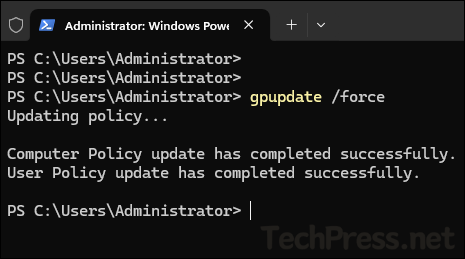
- By default, group policy refreshes/updates every 90 minutes. To speed up the process, you can open command prompt or PowerShell console in Admin mode and execute
gpupdate /forcecommand.
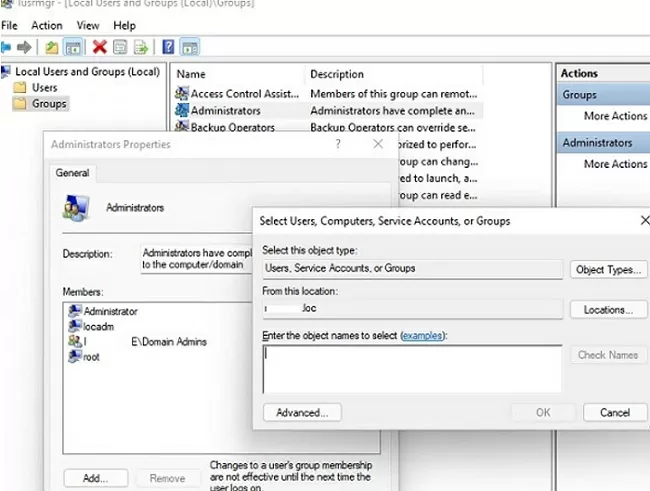
- Verify if the security groups have been added to local Administrator group by opening
lusrmgr.mscand checking the Administrators group.
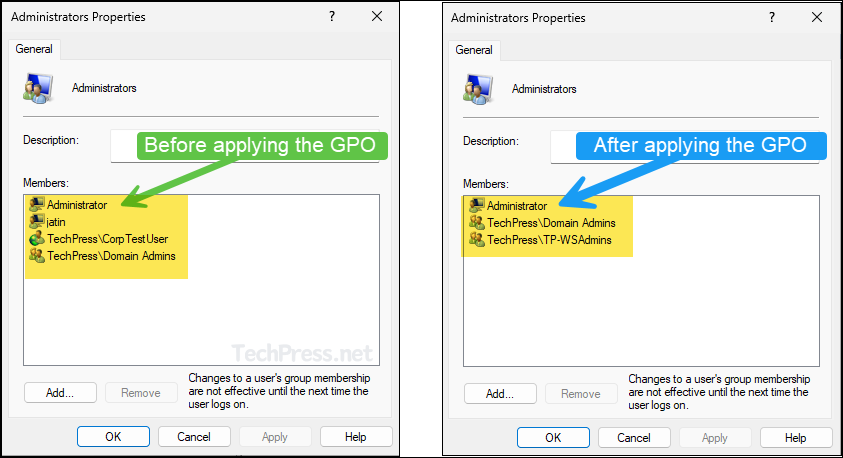
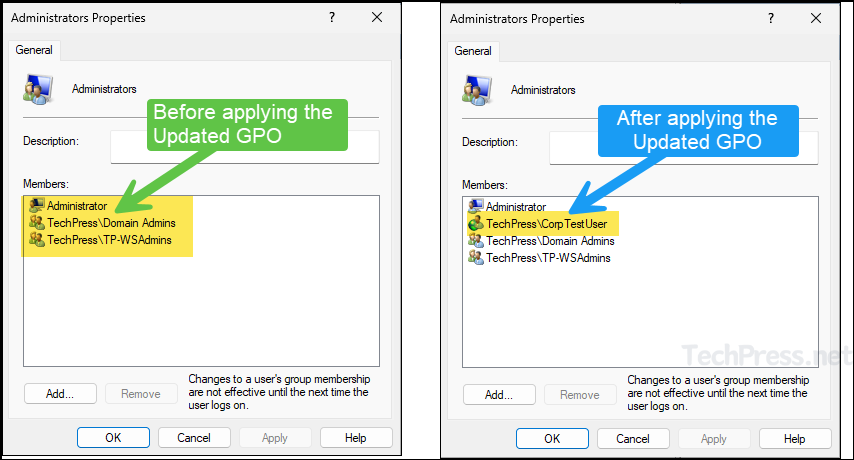
- Below screenshot shows the members of Administrators group before and after applying the GPO. You can notice that a local user account called jatin and domain user account CorpTestUser have been removed and replaced by what is configured in the GPO.
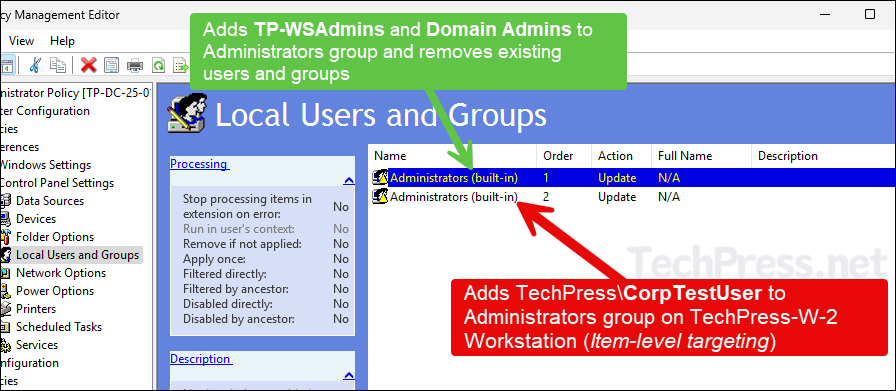
4. Add Domain Users to Administrators Group On a Specific Computer using GPP
Now that we have added an AD security group in Local Administrators group on all workstations. You can also add a domain user account to the Administrators group using Group policy preferences (GPP).
You can use the same Group Policy Object (GPO) that was used to add security groups to the Administrators group. We will be using Item-level targeting for adding the domain users only to specific computers within the Workstations OU. Let’s check the steps:
- Edit the same Local Administrator Policy we created in the previous step.
- Navigate to Computer Configuration > Preferences > Control Panel Settings > Local Users and Groups. Right click on it > Select New > Local Group.
- Select Action as Update and Group name to Administrators (built-in).
- Click on Add and provide the domain user you want to add to this group.
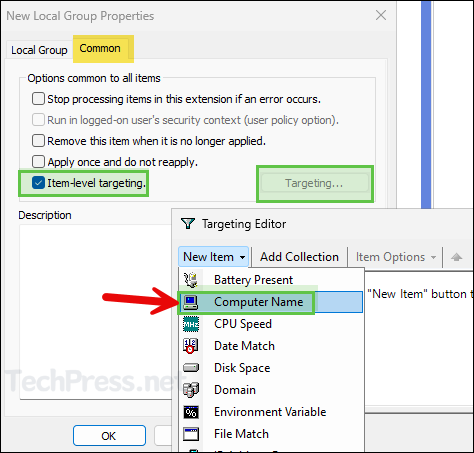
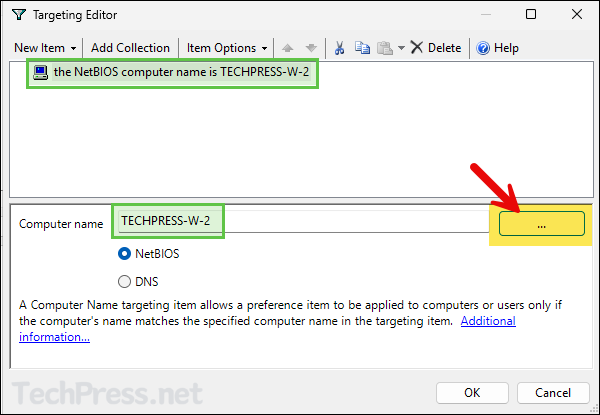
- Go to the Common tab and select the check-box for Item-level targeting. Click on Targeting button to launch Targeting Editor. Click on New Item drop-down and select Computer Name.
- Provide the name of the computer on which you want to provide administrator rights to the user. You can click on three dots button and search for the computer account in AD.
- Click on Apply to save changes.
- Do not select Delete all member users and Delete all member groups checkbox. As we have already selected this when adding an AD security groups into the Administrators group via the same policy. Click on OK to save and exit.
- Below screenshot shows the order of two configurations for Administrators group. Please note that GPP settings will be applied in top to bottom order. Policy setting with Order 1 will be applied first and then Order 2 and so on.
- First Policy (Order 1) setting adds TechPress\TP-WSAdmins and TechPress\Domain Admins to local Administrators group and removes all existing user and group membership (Except built-in Administrator account).
- Second Policy (Order 2) will just add TechPress\CorpTestUser user account to Administrators group only on TechPress-W-2 computer. This Policy does not remove any users or groups from Administrators group.
5. Managing Local Admins Using Restricted Groups
There is another option to add users or groups to local Administrators group. You can use Restricted Groups which allows local groups management on Windows computers.
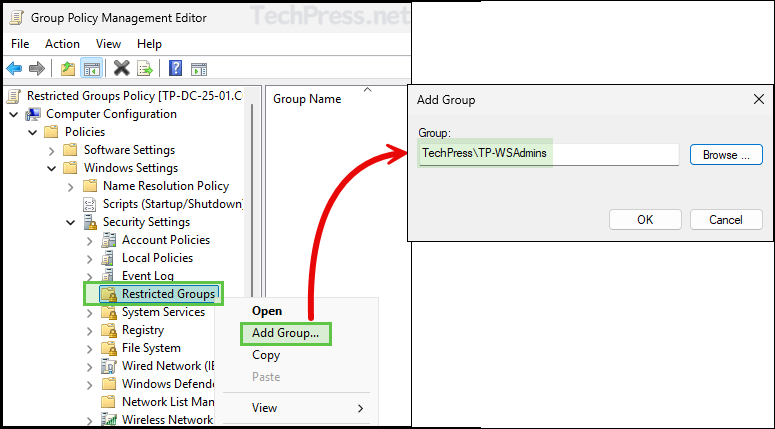
- Create or Edit a Group Policy and Navigate to Computer Configuration > Policies > Windows Settings > Security Settings > Restricted Groups.
- Right-click on Restricted Groups and select Add Group. Provide the name of the group you want to manage, e.g., Administrators.
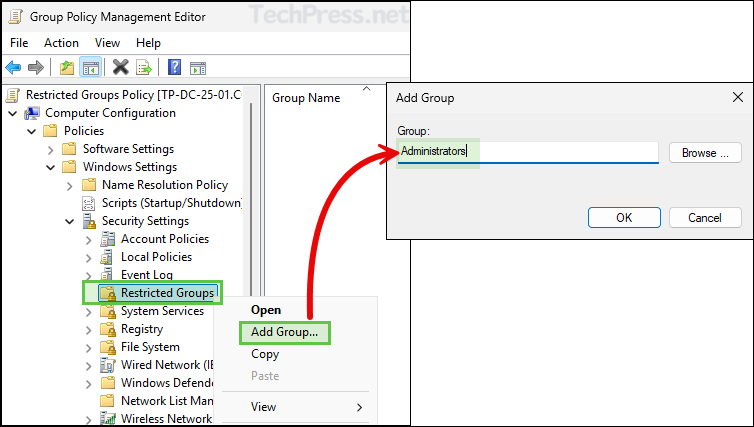
- Click on Add button to Configure Membership for Administrators. Add the domain users and groups here. Click on OK to save the changes. Please note this will replace local Administrators group membership on the target computer with what has been specified in the GPO.
- Link this Policy to Workstations OU. Once the policy is applied on the target devices, Administrator group membership will contain TechPress\Domain Admins and TechPress\TP-WSAdmins, rest of the users and groups will be removed/replaced.
To ensure the existing membership of the Administrators group remains unchanged and only the specified domain user or security group is added, follow these steps:
- Right-click on Restricted Groups > Add Group.
- Provide the name of the user or group (In format <domain\<username> or <domain>\<groupname>) you want to add into the Administrators group. Click on OK button.
- Click Add next to This group is a member of, and specify the Administrators group. Then, click Apply to save the changes.
- This configuration will add TechPress\TP-WSAdmins to the Administrators group without removing or replacing any existing users or groups already added to it.
6. Add Users or Groups to Local Admin Using Intune
If you manage Windows devices using Intune, you can add users or groups to the local Administrators group by creating an Account Protection policy in the Intune admin center.
For a step-by-step guide on how to add users or groups to the local Administrators group using Intune, refer to the link below:
Troubleshooting
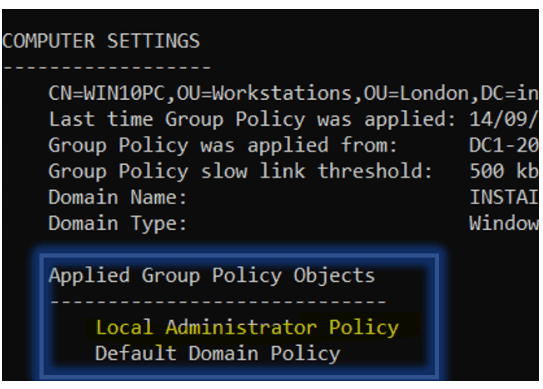
If the group policy has not been applied on to your device yet, you can use gpupdate /force command on command prompt or PowerShell console opened as administrator.
As we have applied policies from Computer configuration node, you can use below command to check if the GPO with Computer settings has been applied on the computer.
gpresult /r /v /scope computer | more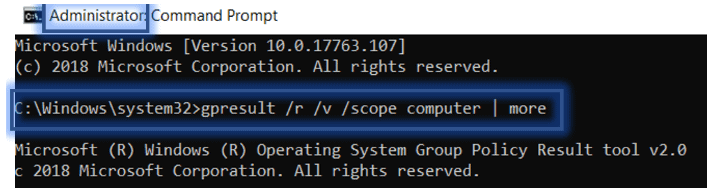
Read Next
To grant local administrator permissions on domain computers to technical support personnel, the HelpDesk team, certain users, and other privileged accounts, you must add the necessary Active Directory users or groups to the local Administrators group on servers or workstations. In this article, we’ll show you how to manage members of the local Administrators group on domain computers manually and through GPO.
Contents:
- Add a User to the Local Admins Group Manually
- How to Add Domain Users to Local Administrators via Group Policy Preferences?
- Adding a Single User to the Local Admins Group on a Specific Computer with GPO
- Managing Local Admins with Restricted Groups GPO
Add a User to the Local Admins Group Manually
The easiest way to grant local administrator rights on a specific computer for a user or group is to add it to the local Administrators group using the graphical Local Users and Groups snap-in (lusrmgr.msc).
When you join a computer to an AD domain, the Domain Admins group is automatically added to the computer’s local Administrators group and the Domain User group is added to the local Users group.
Click the Add button and specify the name of the user, group, computer, or service account (gMSA) that you want to grant local administrator rights. With the Location button, you can switch between searching for principals in the domain or on the local computer.
You can also display a list of users with local computer administrator permissions with the command prompt:
net localgroup administrators
You can use the following PowerShell command to get a list of users in a local group:
Get-LocalGroupMember administrators
This command shows the object class that has been granted administrator permissions (ObjectClass = User, Group, or Computer) and the source of the account or group (ActiveDirectory, Azure AD, Microsoft, or Local).
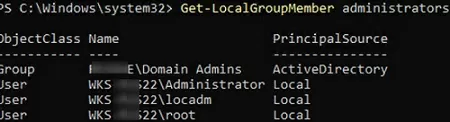
To add a domain group munWksAdmins (or user) to the local administrators, run the command:
net localgroup administrators /add munWksAdmins /domain
Using PowerShell, you can add a user to administrators as follows:
Add-LocalGroupMember -Group Administrators -Member ('woshub\j.smith', 'woshub\munWksAdmins','wks1122\user1') –Verbose

In this example, we added a user and groups from the woshub domain and a local user wks1122\user1 to the computer administrators.
You can add users to the Administrators group on multiple computers at once. In this case, you can use the Invoke-Command cmdlet from PowerShell Remoting to access the remote computers over a network:
$WKSs = @("PC001","PC002","PC003")
 Invoke-Command -ComputerName $WKSs –ScriptBlock {Add-LocalGroupMember -Group Administrators -Member woshub\munWksAdmins'}
You can also completely refuse to provide any administrator privileges to domain users or groups. In this case, you can use the built-in local administrator with a password stored in Active Directory (implemented using the Local Administrator Password Solution/LAPS) to perform one-time administrative tasks on user computers.
In an Active Directory domain environment, it is better to use Group Policy to grant local administrator rights on domain computers. This is much easier, more convenient, and safer than manually adding users to the local Administrators group on each computer. You can use two Group Policy options to manage the Administrators group on domain computers:
- Manage local group membership with Group Policy Preferences;
- Adding users to local groups using the Restricted Groups GPO feature.
How to Add Domain Users to Local Administrators via Group Policy Preferences?
Group Policy Preferences (GPP) provide the most flexible and convenient way to grant local administrator privileges on domain computers through a GPO.
Let’s say your task is to grant local administrator privileges on computers in a specific Active Directory OU (Organizational Unit) to a HelpDesk team group. Create a new security group in your domain using PowerShell and add the Helpdesk team accounts to it:
New-ADGroup munWKSAdmins -path 'OU=Groups,OU=Munich,OU=DE,DC=woshub,DC=com' -GroupScope Global –PassThru
 Add-AdGroupMember -Identity munWKSAdmins -Members amuller, dbecker, kfisher
Open the domain Group Policy Management console (GPMC.msc), create a new policy (GPO) AddLocaAdmins and link it to the OU containing computers (in my example, it is ‘OU=Computers,OU=Munich,OU=DE,DC=woshub,DC=com’).
- Edit the AddLocaAdmins GPO you created earlier;
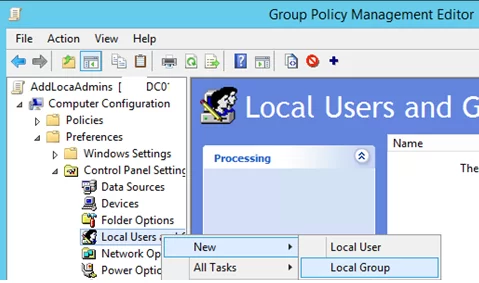
- Go to the following GPO section: Computer Configuration –> Preferences –> Control Panel Settings –> Local Users and Groups;
- Add a new rule (New -> Local Group);

- Select Update in the Action field (it is an important option!);
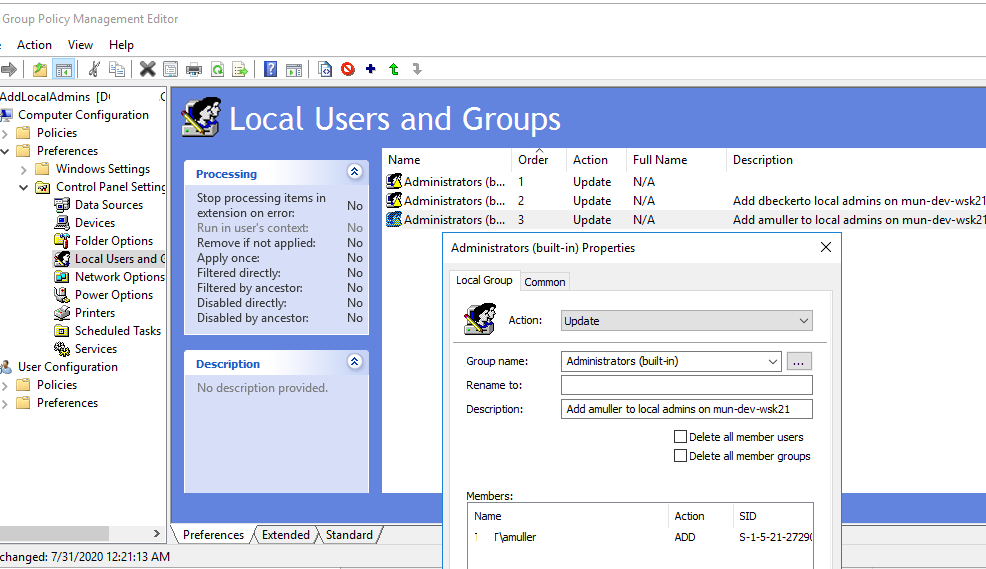
- Select Administrators (Built-in) in the Group Name dropdown list. Even if this group has been renamed on the computer, the settings will be applied to the local Administrators group by its SID (
S-1-5-32-544); - Click the Add button and select the groups you want to add to the local Administrators group (in our case, this is munWKSAdmins);
You can remove all manually added users and groups from the local Administrators on all computers. Check the “Delete all member users” and “Delete all member groups” options. In most cases, it is reasonable because you guarantee that only the approved domain groups will have administrator permissions on your domain computers. If you add a user to the Administrators group manually using the “Local users and groups” snap-in, it will be automatically removed next time when the policy is applied.
- Save the policy and wait for it to be applied to the client workstations. To apply the Group Policy settings immediately, run this command
gpupdate /forceon a user’s computer; - Open the
lusrmgr.mscsnap-in on any domain computer and check the local Administrators group members. Only the munWKSAdmins group should be added to this group, while other users and groups will be removed (except for the built-in Windows Administrator account).
If the policy is not applied on a domain computer, use the gpresult command to troubleshoot the resulting GPO settings. Also, make sure that the computer is located in the OU the GPO is linked to, and check the recommendations from the article “Why Group Policies not applied to computers?”.
Adding a Single User to the Local Admins Group on a Specific Computer with GPO
Sometimes you may need to grant a single user the administrator privileges on a specific computer. For example, you have several developers who need elevated privileges from time to time to test drivers, debug or install them on their computers. It is not reasonable to add them to the group of workstation admins with privileges on all domain computers.
You can use GPO WMI filters or Item-level Targeting to grant local admin permission on a specific computer.
Create a new entry in the GPO preference section (Computer Configuration –> Preferences –> Control Panel Settings –> Local Users and Groups) of AddLocalAdmins policy created earlier:
- Action:
Update - Group Name:
Administrators (Built-in) - Description: “
Add amuller to the local administrators on the mun-dev-wsk21 computer” - Members: Add ->
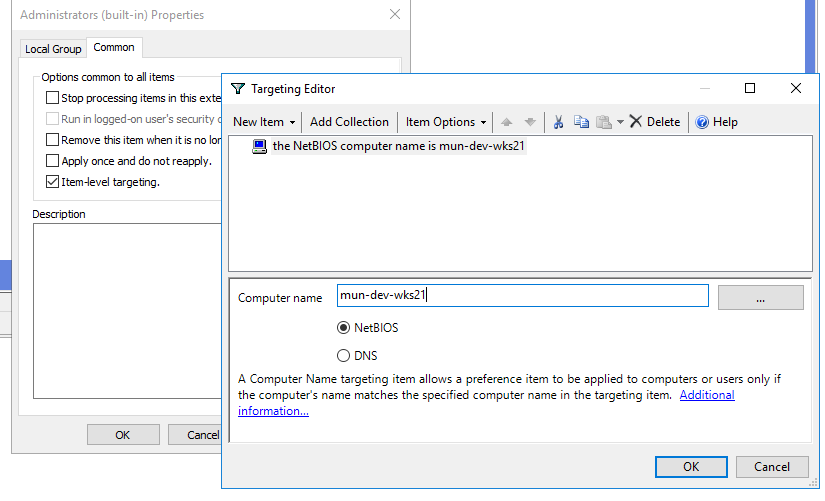
amuller
- In the Common -> Targeting tab, specify this rule: “
the NETBIOS computer name is mun—dev-wks24.” It means that this Group Policy item will be applied only to the computer specified here.
Also, note the order in which group membership is applied on the computer (the Order GPP column). Local group membership is applied from top to bottom (starting from the Order 1 policy).
The first GPP policy option (with the “Delete all member users” and “Delete all member groups” settings as described above) removes all users/groups from the local Administrators group and adds the specified domain group. Then the additional computer-specific policies are applied that add the specified user to the local admins. If you want to change the membership order in your Administrators group, use the buttons on top of your GPO Editor console.
Managing Local Admins with Restricted Groups GPO
The Restricted Groups policy also allows adding domain groups/users to the local security group on computers. This is an older method of granting local administrator privileges and is used less often now (it is less flexible than the Group Policy Preferences method described above).
- Open your GPO;
- Expand the section Computer Configuration -> Policies -> Security Settings -> Restricted Groups;
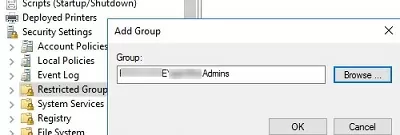
- Select Add Group in the context menu;
- In the next window, type Administrators and then click OK;
- Click Add in the Members of this group section and specify the group you want to add to the local admins;
- Save the changes, apply the policy to users’ computers, and check the local Administrators group. It must contain only the group you have specified in the policy.
These Group Policy settings always (!) remove all existing members of the local Administrators group (which are added manually, by other policies or scripts).
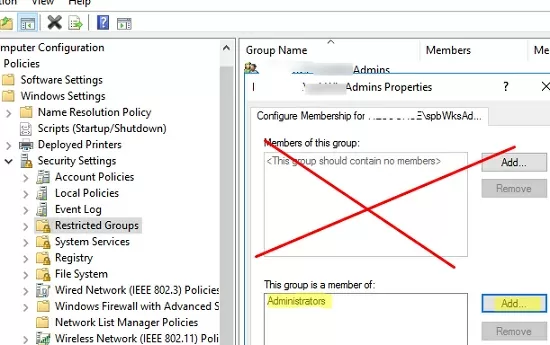
If you need to keep the current membership of the Administrators group and add an additional group (user) to it using Restricted Groups GPO, you need to:
- Create a new entry in Restricted Groups and select the AD security group (!!!) that you want to add to the local admins;

- Then add the Administrators in the This group is a member of section;

- Update the GPO settings on the client and make sure your domain group has been added to the local Administrators group. In this case, the current principals in the local group stay untouched (not removed from the group).
At the end of the article, I will leave some recommendations for managing administrator permission on Active Directory computers and servers.
Microsoft’s classic security best practices recommend using the following groups to separate administrator permissions in an AD domain:
- Domain Admins are used only on domain controllers;
From the security point of view for privileged administrator accounts, it is not recommended to perform daily administration tasks on workstations and servers under an account with the Domain Admin privileges. These accounts must be used only for AD management tasks (adding new domain controllers, replication management, Active Directory schema modification, etc.). Most user, computer, or GPO management tasks must be delegated to regular administrator accounts (without Domain Admin permissions). Do not use Domain Admin accounts to log on to any workstations or servers other than domain controllers.
- Server Admins is a group that allows managing the Windows Server hosts in an AD domain. Must not be a member of the Domain Admins group or local Administrators group on workstations;
- Workstation Admins is a group for performing administrative tasks on workstations only. Must not be a member of the Domain Admins and Server Admins groups;
- Domain Users are common user accounts to perform typical office operations. They must not have administrator privileges on servers or workstations;
- It is not recommended to add individual user accounts to the local Administrators group. It is better to use the domain security groups. In this case, to grant administrator privileges to the next tech support employee, it is enough to add him to the domain group (without the need to edit the GPO).