
Lots of people don’t like the idea of ‘stopping/delaying’ Windows updates. I won’t get in to that. Here is a way to prevent Windows Update installing any drivers. This does not effect the security, quality, patch, or any other type update…they are presented as normal.
In short…you don’t have to worry about WU installing (changing) AMD graphics drivers.
This is done through group policy:
Type gpedit in the search bar…follow > Computer Configuration > Administrative Templates > Windows Components > Windows Update

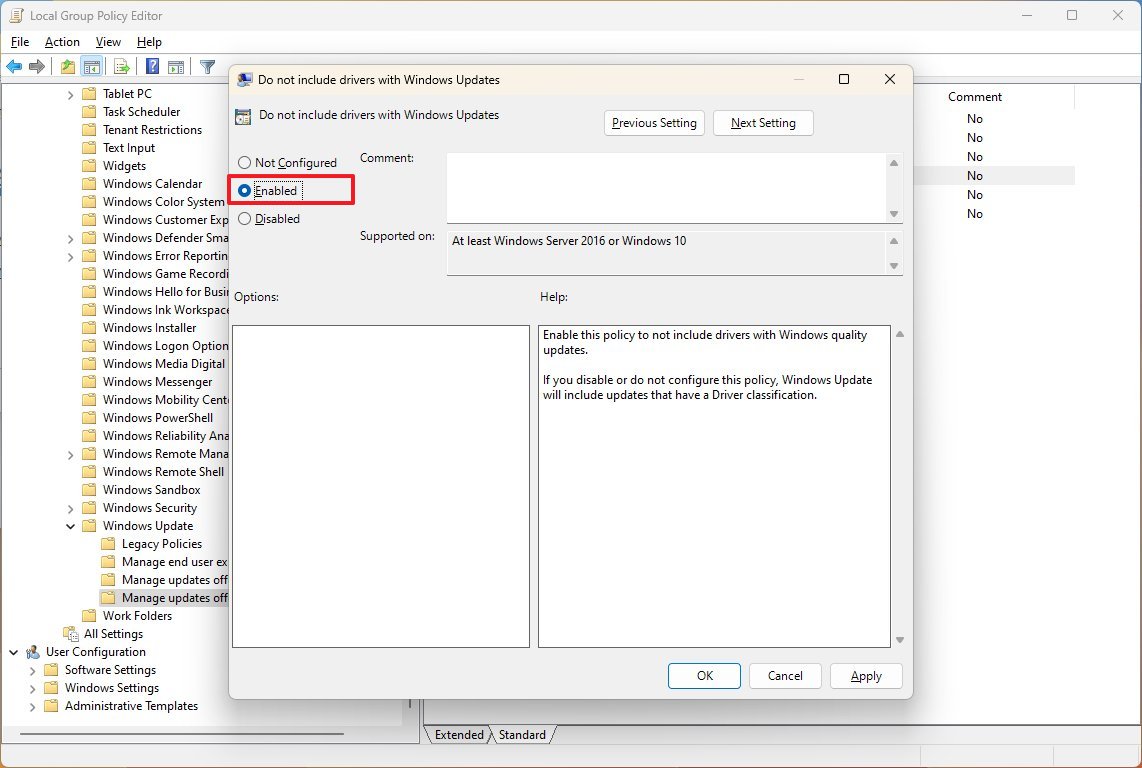
On the right side scroll to Do not include drivers with Windows Update policy and double click it. Select the ENABLED option.

Click ‘Apply’ then OK.
Reboot your computer.

This tutorial will show you how to enable or disable including drivers with Windows Updates in Windows 10 and Windows 11.
Windows Update will include drivers when available in Windows 11 by default.
You can enable the Do not include drivers with Windows Updates policy to not include drivers with Windows quality updates.
Reference:
You must be signed in as an administrator to enable or disable including drivers with Windows Updates.
This will still not always prevent drivers for existing devices from getting updated via Windows Update.
Contents
- Option One: Enable or Disable Include Drivers with Windows Updates in Local Group Policy Editor
- Option Two: Enable or Disable Include Drivers with Windows Updates using REG file
Option One
Enable or Disable Include Drivers with Windows Updates in Local Group Policy Editor
The Local Group Policy Editor is only available in the Windows 11 Pro, Enterprise, and Education editions.
All editions can use Option Two.
1 Open the Local Group Policy Editor (gpedit.msc).
2 Navigate to the policy location below in the left pane of the Local Group Policy Editor. (see screenshot below)
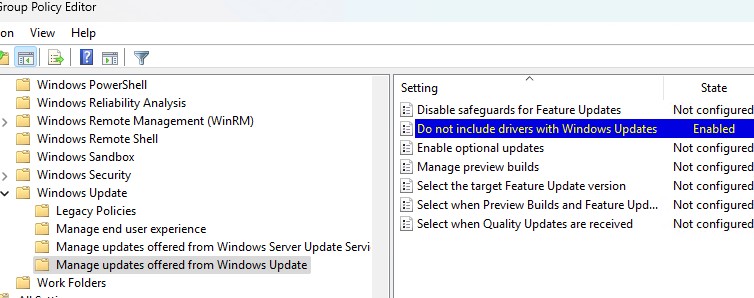
Computer Configuration>Administrative Templates>Windows Components>Windows Update>Manage updates offered from Windows Updates

3 In the right pane of Manage updates offered from Windows Updates in the Local Group Policy Editor, double click/tap on the Do not include drivers with Windows Updates policy to edit it. (see screenshot above)
4 Do step 5 (enable) or step 6 (disable) below for what you would like to do.
5 To Enable Include Drivers with Windows Updates
This is the default setting.
A) Select (dot) Not Configured, click/tap on OK, and go to step 7 below. (see screenshot below)

6 To Disable Include Drivers with Windows Updates
A) Select (dot) Enabled, click/tap on OK, and go to step 7 below. (see screenshot below)
7 You can now close the Local Group Policy Editor if you like.
Option Two
Enable or Disable Include Drivers with Windows Updates using REG file
This option is more thorough than option one.
1 Do step 2 (enable) or step 3 (disable) below for what you would like to do.
2 To Enable Include Drivers with Windows Updates
This is the default setting.
A) Click/tap on the Download button below to download the file below, and go to step 4 below.
Enable_include_drivers_with_Windows_Updates.reg
(Contents of REG file for reference)
Code:
Windows Registry Editor Version 5.00

[HKEY_LOCAL_MACHINE\SOFTWARE\Policies\Microsoft\Windows\WindowsUpdate]
"ExcludeWUDriversInQualityUpdate"=-

[HKEY_LOCAL_MACHINE\SOFTWARE\Microsoft\Windows\CurrentVersion\DriverSearching]
"SearchOrderConfig"=dword:00000001

[HKEY_LOCAL_MACHINE\SOFTWARE\Microsoft\WindowsUpdate\UpdatePolicy\PolicyState]
"ExcludeWUDrivers"=dword:00000000
3 To Disable Include Drivers with Windows Updates
A) Click/tap on the Download button below to download the file below, and go to step 4 below.
Disable_include_drivers_with_Windows_Updates.reg
(Contents of REG file for reference)
Code:
Windows Registry Editor Version 5.00

[HKEY_LOCAL_MACHINE\SOFTWARE\Policies\Microsoft\Windows\WindowsUpdate]
"ExcludeWUDriversInQualityUpdate"=dword:00000001

[HKEY_LOCAL_MACHINE\SOFTWARE\Microsoft\Windows\CurrentVersion\DriverSearching]
"SearchOrderConfig"=dword:00000000

[HKEY_LOCAL_MACHINE\SOFTWARE\Microsoft\WindowsUpdate\UpdatePolicy\PolicyState]
"ExcludeWUDrivers"=dword:00000001
4 Save the .reg file to your desktop.
5 Double click/tap on the downloaded .reg file to merge it.
6 When prompted, click/tap on Run, Yes (UAC), Yes, and OK to approve the merge.
7 Restart the computer to apply.
8 You could now delete the downloaded .reg file if you like.
That’s it,
Shawn Brink
-
Disable_include_drivers_with_Windows_Updates.reg
Disable_include_drivers_with_Windows_Updates.reg
1.2 KB
· Views: 5,137
-
Enable_include_drivers_with_Windows_Updates.reg
Enable_include_drivers_with_Windows_Updates.reg
1.2 KB
· Views: 3,578
Помимо обновлений безопасности и патчей для операционной системы, на серверах обновлений Windows Update доступны обновления драйверов для большинства сертифицированных устройств. Если служба Windows Update при сканировании компьютера обнаружит, что для какого-то устройства в каталоге Microsoft Update доступна более новая версия драйвера, она автоматически скачает и установит обновленный драйвер. В этой статье мы рассмотрим, как отключить автоматическое обновлений драйверов устройств в Windows 10 и 11.
Содержание:
- Отключить установку обновления драйвера для конкретного устройства
- Отключить обновление драйверов через GPO
- Отключаем автоматическое обновление драйверов с помощью PowerShell
- Запретить обновление драйверов в настройках оборудования Windows
Отключить установку обновления драйвера для конкретного устройства
Например, вы используете какой-то старый (но стабильный) драйвер видеокарты, который перестает корректно работать после каждого автоматического обновления драйвера. После каждого обновления вам приходится вручную откатываться на предыдущую стабильную версию драйвера. Вы хотите, чтобы все драйвера компьютера обновлялись автоматически, кроме этого драйвера видеоадаптера.
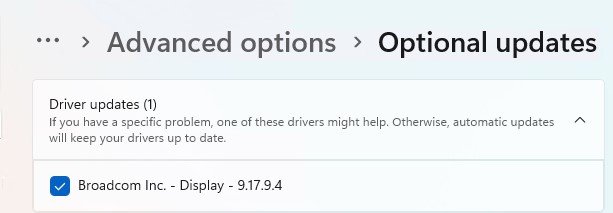
Если пакет обновления драйвера доступен к установке через Windows Update, вы можете скрыть это обновление с помощью официальной Microsoft утилиты Show or hide updates.
- Скачайте wushowhide.diagcab из центра загрузок Microsoft
- Запустите утилиту и выберите опцию Hide Updates;
- В списке доступных обновлений отметьте драйвера, которые нужно игнорировать при установке и нажмите Next;
- Теперь указанные драйвера не будут обновляться автоматически.
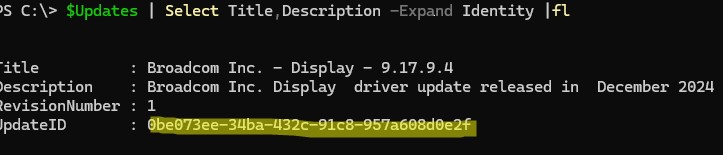
Также можно скрыть обновления драйвера с помощью PowerShell модуля PSWindowsUpdate. Выведите список доступных обновлений драйверов, и скопируйте ID драйвера:
$Updates = Get-WindowsUpdate -WindowsUpdate -UpdateType Driver
$Updates | Select Title,Description -Expand Identity |fl
Скройте обновления для драйвера по его ID:
Hide-WindowsUpdate -UpdateID "0be073ee-34ba-432c-91c8-957a608d0e2f"
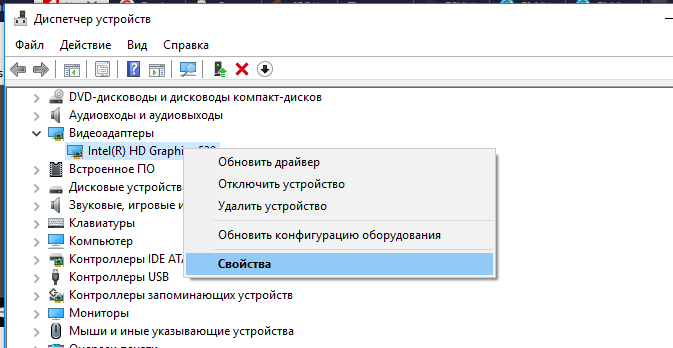
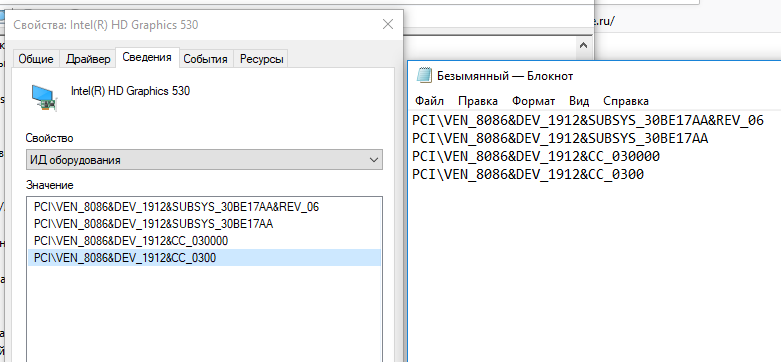
Также можно заблокировать обновление конкретного драйвера через локальную политику безопасности. Для этого нужно получить идентификатор этого устройства
- Запустите консоль диспетчера устройств (
devmgmt.msc
) и откройте свойства необходимого устройства;
- Перейдите на вкладку «Сведения» и в выпадающем списке выберите пункт ИД оборудования;
- Скопируйте значения идентификаторов оборудования, связанных с устройством (в формате
PCI\VEN_8086&DEV_ ….
) в блокнот (
notepad.exe
);
Также можно получить Harware ID устройства с помощью PowerShell:
Get-PnpDevice|where FriendlyName -like "*HD Graphics*"|select class, FriendlyName, HardwareID|fl

Затем откройте редактор локальной групповой политики (
gpedit.msc
) и перейдите в раздел Конфигурация компьютера -> Административные шаблоны -> Система -> Установка устройства -> Ограничения на установку устройств. Включите политику Запретить установку устройств с указанными кодами устройств (Prevent installation of devices that match any of these device IDs). Включите опцию Also apply to matching devices that are already installed.
В политике нажмите кнопку “Показать” и скопируйте в таблицу значений ID вашей видеокарты, полученные ранее;
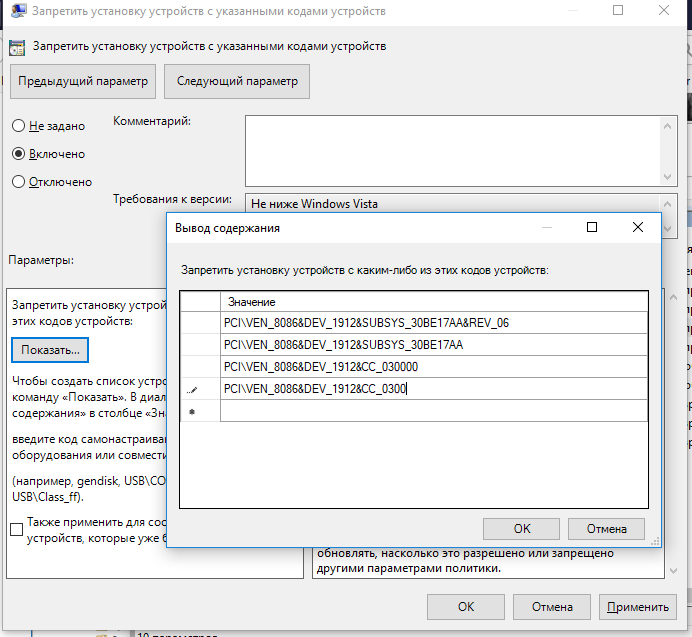
С помощью этого параметра GPO можете запретить обновление драйверов для конкретных типов (классов) устройств (принтеров, звуковых карты, USB контроллеров и т.д). Для этого нужно указать GUID класса устройства в параметрах политики. Например{
4d36e972-e325-11ce-bfc1-08002be10318}
– класс сетевых адаптеров,
{4d36e979-e325-11ce-bfc1-08002be10318}
и
{4658ee7e-f050-11d1-b6bd-00c04fa372a7}
– принтеры и т.д. Полный список GUID классов оборудования перечислен здесь: https://docs.microsoft.com/en-us/windows-hardware/drivers/install/system-defined-device-setup-classes-available-to-vendors
Сохраните изменения и обновите настройки групповых политик на клиенте командой:
gpupdate /force
Теперь, если компьютер получит и загрузит обновления драйверов для этих устройств через Windows Update, при их автоматической установке появится сообщение об ошибке:
Установка этого устройства запрещена на основании системной политики. Обратитесь к системному администратору
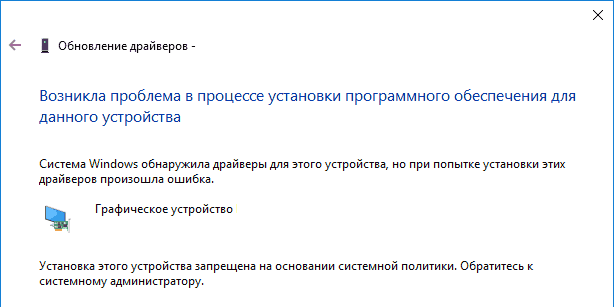
Вы также не сможете обновить драйвер для этого устройства вручную. Для обновления драйвера вам придется удалить идентификатор оборудования из настроек групповых политик.
Также можно включить эту настройку напрямую через реестр. Для этого запустите редактор
regedit.exe
, перейдите в ветку
HKLM\SOFTWARE\Policies\Microsoft\Windows\DeviceInstall\Restrictions\DenyDeviceIDs
. Создайте в REG_SZ значения с именами по порядку, начиная с 1 и значением ИД оборудования в каждом параметре.

Также создайте параметр DenyDeviceIDsRetroactive со значением 1:
reg add "HKLM\SOFTWARE\Policies\Microsoft\Windows\DeviceInstall\Restrictions" /v "DenyDeviceIDsRetroactive" /t "REG_DWORD" /d "1" /f
Отключить обновление драйверов через GPO
Выше мы показали, как с помощью групповых политик запретить автоматическое обновление драйвера для определенного устройства. Через GPO можно полностью отключить обновление любых драйверов.
- Нажмите сочетание клавиш
Win + R
и наберите в появившемся окне
gpedit.msc
(в домашних редакциях Windows можно запустить редактор локальных групповых политик так); - Включите параметр Do not include drivers with Windows Update (Не включать драйверы в обновления Windows) в разделе Computer Configuration -> Administrative Templates -> Windows Components -> Manage Updates offered from Windows Update.

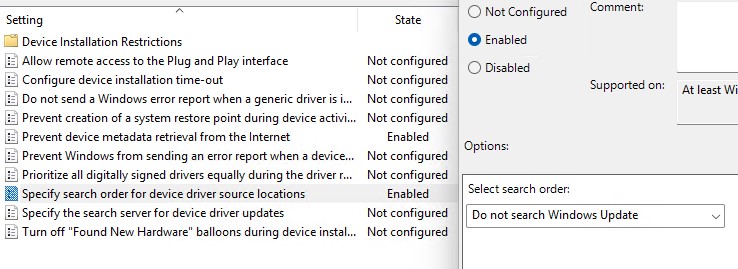
- Затем перейдите в раздел Computer Configuration -> Administrative Templates -> System -> Device Installation
- Настройте следующие политики
- Prevent device metadata retrieval from the Internet (Отключить запрос на использование Центра обновления Windows при поиске драйверов)=
Enabled - Specify search order for device driver source locations (Задать порядок поиска в исходных расположениях драйверов устройств) =
Do not search Windows Update
(Не искать на веб сайте центра обновления Windows)
С помощью доменных GPO (настраиваются с помощью консоли Group Policy Management Console
gpmc.msc
) вы можете применить эти настройки на нескольких компьютерах в домене AD. В рабочей группе можно скопировать настройки локальной GPO на другие компьютеры с помощью LGPO.exe. После применения этих политик к компьютерам, они перестанут пытаться обновлять драйвера через Windows Update.
Отключаем автоматическое обновление драйверов с помощью PowerShell
Для отключения автоматического обновления драйверов в Windows можно воспользоваться командами PowerShell, которые изменят настройки в реестре (аналогичные изменениям, вносимым описанным выше политикам).
Нужно изменить значения следующих параметров реестра:
-
SearchOrderConfig
=3 (не устанавливать драйвера через Windows Update -
PreventDeviceMetadataFromNetwork
= 1 - Параметр
ExcludeWUDriversInQualityUpdate
= 1 (находится в нескольких ветках) -
ExcludeWUDrivers
= 1
PowerShell скрипт для изменения этих параметров реестра:
Set-ItemProperty -Path HKLM:\SOFTWARE\Microsoft\Windows\CurrentVersion\DriverSearching\ -Name SearchOrderConfig -Value 3
Set-ItemProperty -Path 'HKLM:\SOFTWARE\Microsoft\Windows\CurrentVersion\Device Metadata\' -Name PreventDeviceMetadataFromNetwork -Value 1
New-ItemProperty -Path "HKLM:\SOFTWARE\Microsoft\WindowsUpdate\UpdatePolicy\PolicyState\" -Name ExcludeWUDrivers -PropertyType DWord -Value 1
$regkeys =
'HKLM:\SOFTWARE\Policies\Microsoft\Windows\WindowsUpdate',
'HKLM:\SOFTWARE\Microsoft\PolicyManager\default\Update',
'HKLM:\SOFTWARE\Microsoft\WindowsUpdate\UX\Settings',
'HKLM:\SOFTWARE\Microsoft\PolicyManager\current\device\Update'
foreach ($regkey in $regkeys){
# Проверить что ветка реестра существует и создать ее, если нужно
$test = test-path -path $regkey
if(-not($test)){
New-Item -Path $regKey
}
Set-ItemProperty -Path $regkey -Name ExcludeWUDriversInQualityUpdate -Value 1
}
foreach ($regkey in $regkeys){write-host $regkey}
После перезагрузки автоматическое обновление драйверов в Windows будет заблокировано.
Запретить обновление драйверов в настройках оборудования Windows
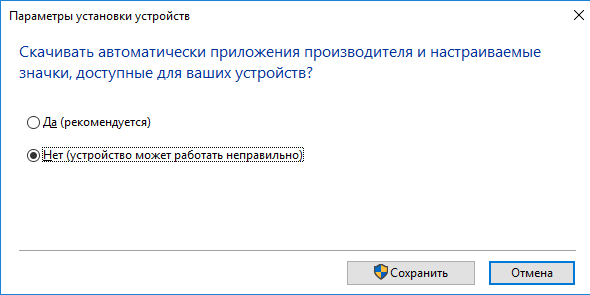
В версиях ОС до Windows 10 и 11 можно было запретить обновление драйвера в настройках системы на вкладке Оборудование. Для этого:
- Нажмите сочетание клавиш Win+R и выполните команду
sysdm.cpl
; - Откроется вкладка Оборудование (Hardware) в окне Дополнительных параметров системы (Advanced System Settings);
- Нажмите на кнопку Параметры установки устройств (Device Installation Settings);

- В окне «Скачивать автоматически приложения производителя и настраиваемые значки, доступные для ваших устройства» измените значение на Нет (устройство может работать неправильно);

- Сохраните изменения и перезагрузите компьютер.

(Image credit: Future)
On Windows 11, the system uses an automatic mechanism to download and install security and maintenance updates, Microsoft products, and drivers for hardware components and peripherals.
Although it’s a convenient way to detect and install virtually any kind of hardware, the updates available through Windows Update are not always the latest, and sometimes they may also include buggy drivers.
If your device is experiencing issues with a driver update or you prefer to install drivers manually, Windows 11 includes at least a couple of ways to disable automatic driver updates through the Settings app and Group Policy.
This how-to guide will teach you the different ways to stop the system from using Windows Update to install device drivers automatically on Windows 11.
How to stop drivers installation from Group Policy
To disable updates for drivers automatically on Windows 11 through the Group Policy Editor, use these steps:
- Open Start.
- Search for gpedit and click the top result to open the app.
- Open to this path: Computer Configuration > Administrative Templates > Windows Components > Windows Update > Manage updates offered from Windows Update
- Right-click the «Do not include driver with Windows Update» policy from the right side and choose the Edit option.
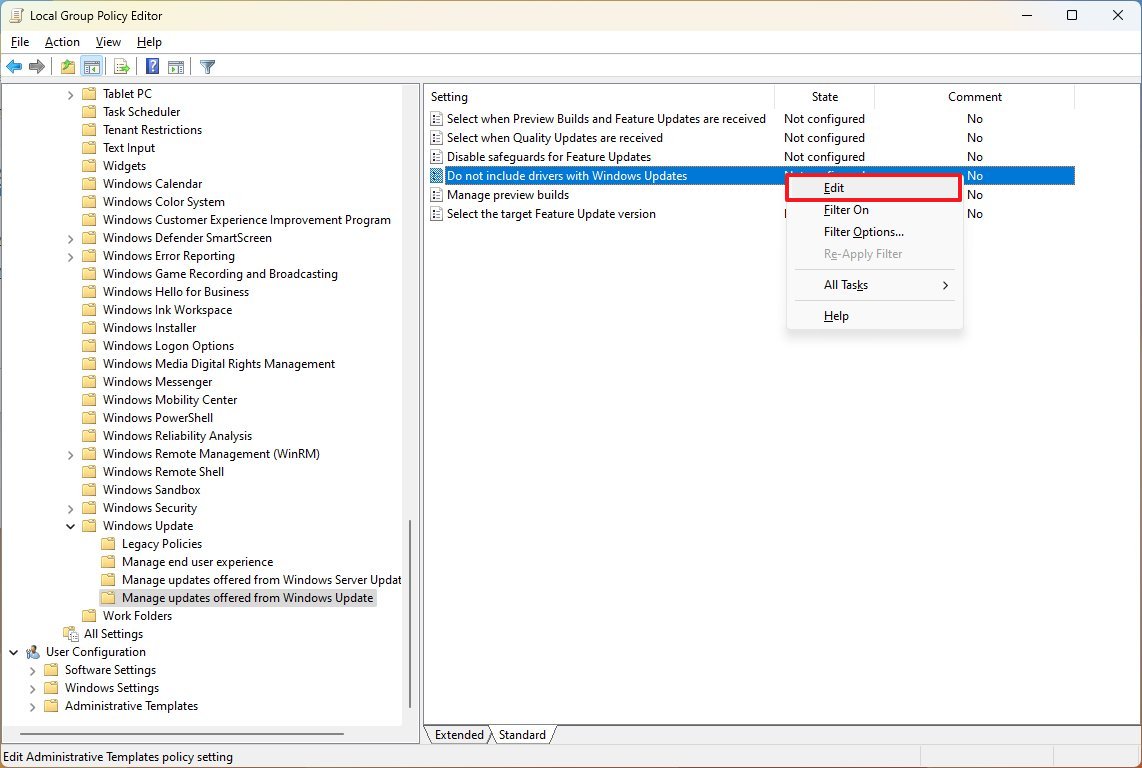
- Select the Enabled option to disable the feature.
- Click the Apply button.
- Click the OK button.
Once you complete the steps, Windows Update will no longer try to download updates for device drivers.
If you change your mind, you can always undo the changes using the same instructions, but on step 5, make sure to choose the «Not configured» option.
All the latest news, reviews, and guides for Windows and Xbox diehards.
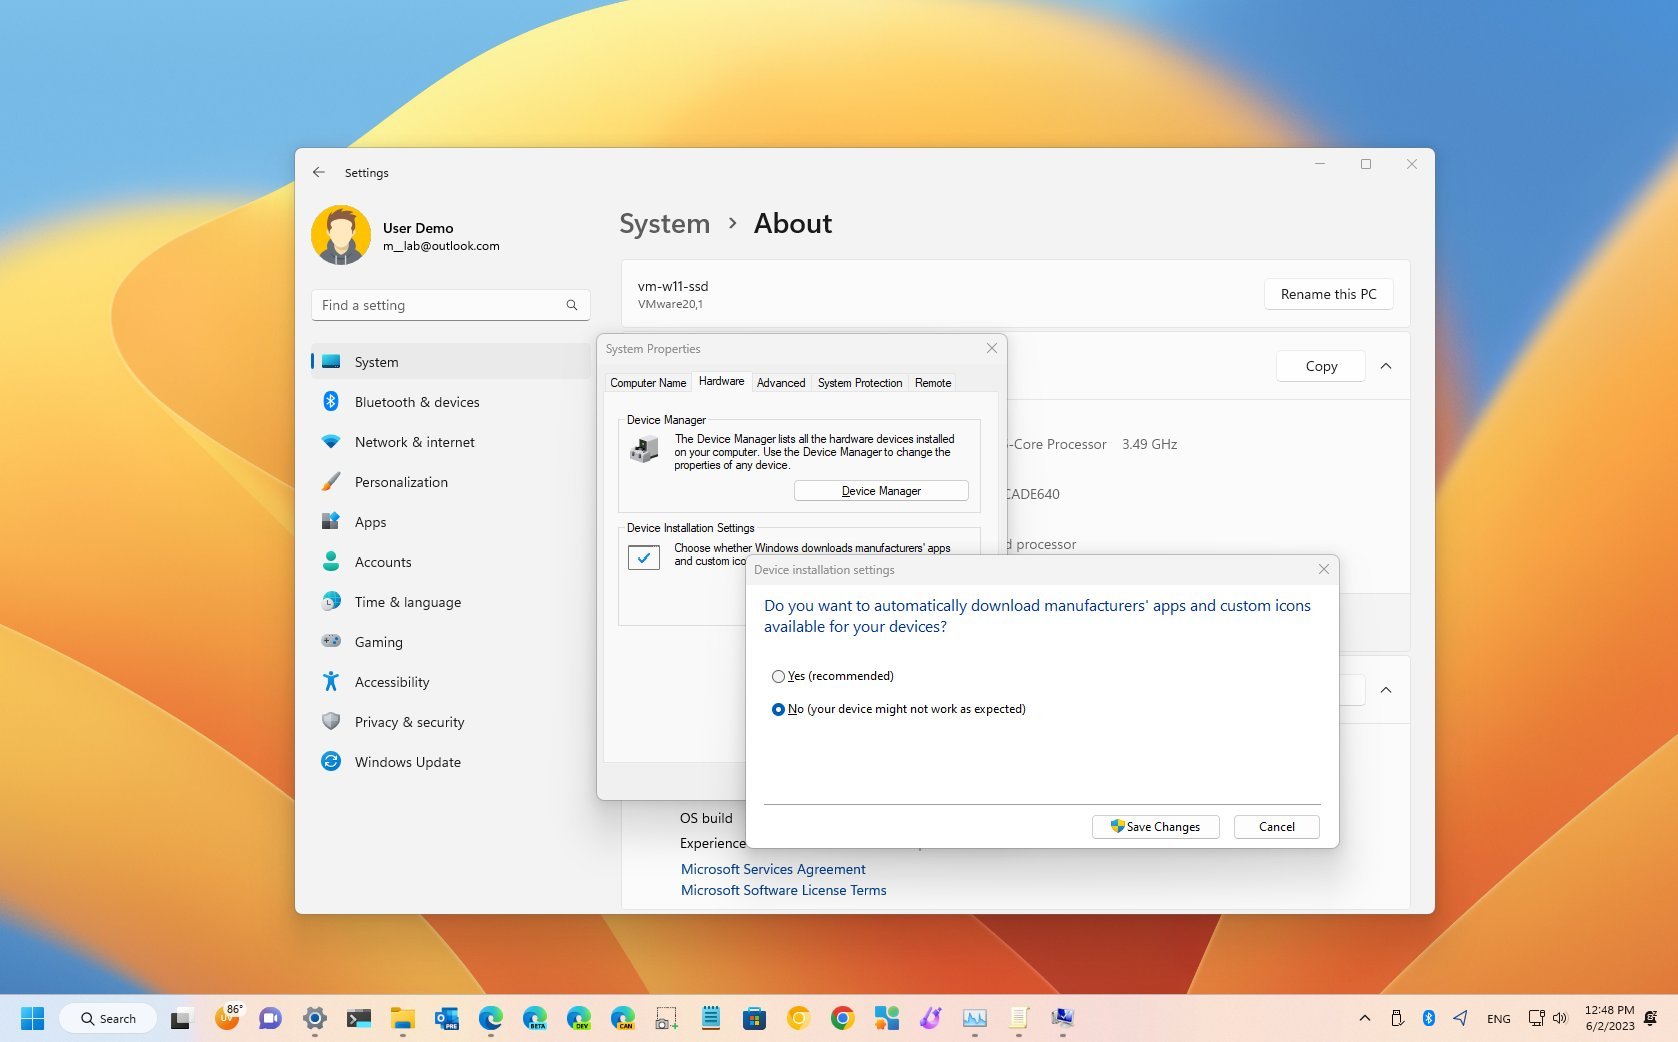
How to stop drivers installation from Settings
To prevent Windows 11 from downloading updates for drivers automatically, use these steps:
- Open Settings.
- Click on System.
- Click the About page on the right side.
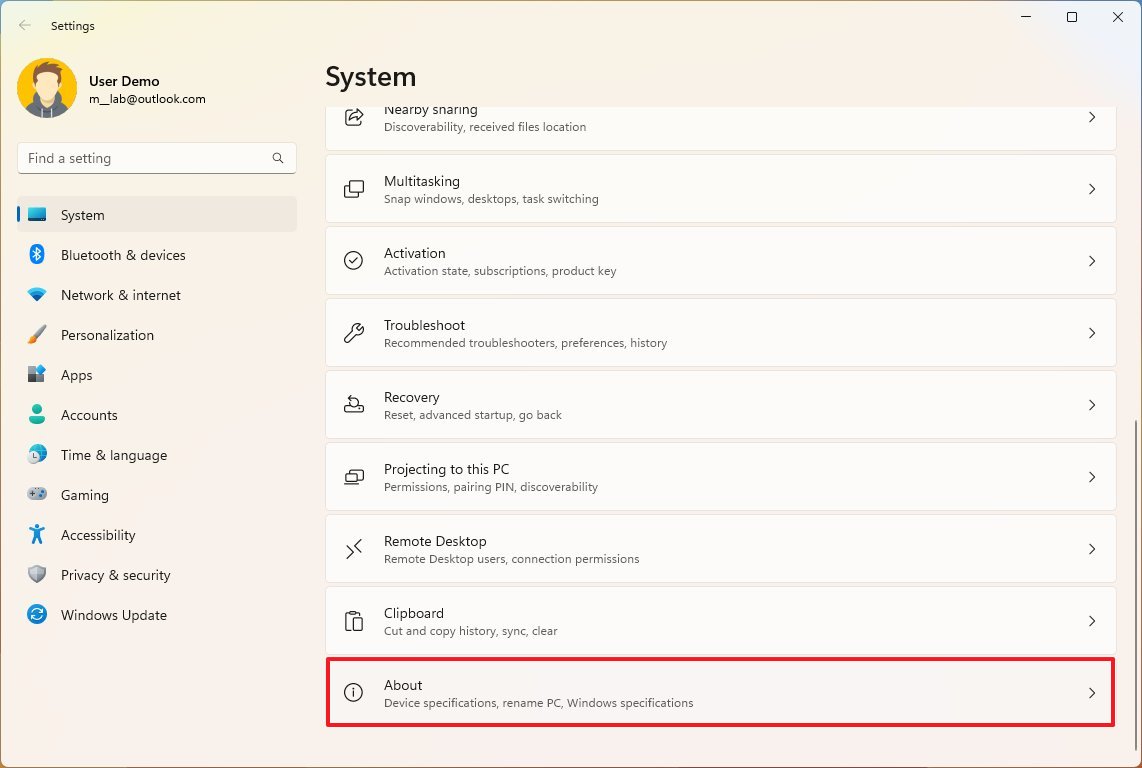
- Click the «Advanced system settings» option.
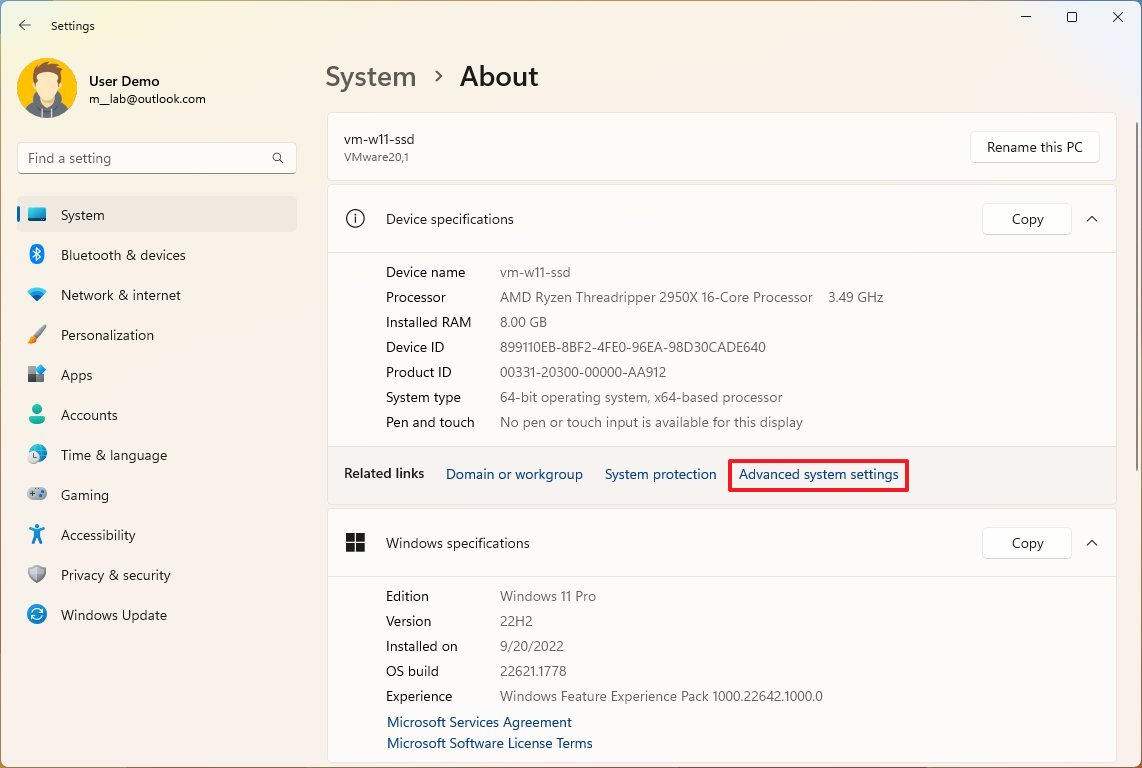
- Click the Hardware tab.
- Click the «Device Installation Settings» button.
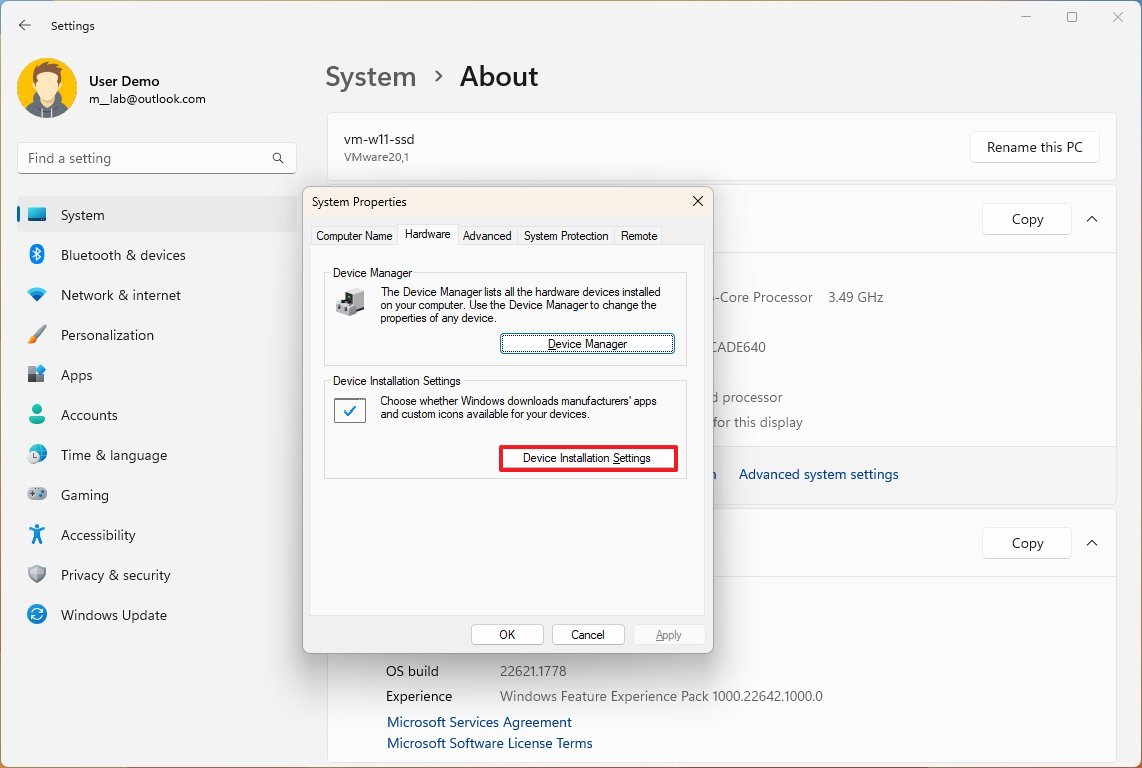
- Choose the «No (your device might not work as expected)» option.

- Click the Save Changes button.
- Click the OK button.
After you complete the steps, the system will stop installing driver updates on your computer.
If an update is required for a component or peripheral, you will have to install it manually. Or you can undo the changes using the same instructions mentioned above, but on step 7, choose the «Yes» option.
When using this approach, you will only disable the hardware installation with drivers from Windows Update. The system will continue to be able to detect specific generic drivers from the local driver library.
More resources
For more helpful articles, coverage, and answers to common questions about Windows 10 and Windows 11, visit the following resources:
- Windows 11 on Windows Central — All you need to know
- Windows 10 on Windows Central — All you need to know
Mauro Huculak has been a Windows How-To Expert contributor for WindowsCentral.com for nearly a decade and has over 15 years of experience writing comprehensive guides. He also has an IT background and has achieved different professional certifications from Microsoft, Cisco, VMware, and CompTIA. He has been recognized as a Microsoft MVP for many years.
To resolve this issue, you must first enable the feature called “Do not include drivers with Windows Updates”. This setting will disable automatic driver updates for your operating system. After enabling this option, Windows Update will never install drivers for your system. To enable the feature, first go to the Control Panel and click on the System tab. Next, navigate to the Advanced system settings and select the Hardware tab. Double-click the “Do not include drivers with Windows Updates” preference.
The problem may be caused by a driver that is not incompatible with your operating system. To resolve this, you must disable the option “Automatically download drivers” in the Hardware and Devices control panel. Then, try enabling “Do not check for driver updates” in Windows Update. After doing this, Windows Update will check for driver updates and install the appropriate drivers. Alternatively, you can download high-resolution icons of your hardware devices and detailed information about them. This information will help you differentiate similar devices.
If you’ve been wondering how to force Windows to install drivers when Windows updates were set to never install them, read this. You can manually disable driver updates from Windows Update using the Windows Registry. To open the Registry, click the Start button and then type “regedit”. On the Hardware tab, change the value data to disable driver updates. Reboot your PC to take effect.
First, uninstall the driver you want to install. You can either download the desired driver version from the OEM or a third-party supplier. If you’re installing an outdated driver, uninstalling it will remove all of its files from Windows Update. To remove a driver from Windows Update, right-click the Start button and click “Delete driver software”. To block the driver from getting updated again, uncheck the box next to the “Automatically” tab.
Secondly, you can manually set the active hours in the Windows update. The Active hours setting is located in the Update Settings menu. Click “Change Active Hours” and modify the time windows will not automatically restart. To force Windows to install drivers on your PC, you must be logged in to your Microsoft account. Then, open the Local Group Policy Editor and choose a new value for the Active Hours setting.
How Do I Fix Drivers Not Installing?
If your computer isn’t updating its drivers properly, you might be wondering how to fix the problem. Driver updates are classified as optional by Microsoft and are therefore categorized as such. When you click on an update notification, you should check all of the available updates and select them. In addition, you should always check the option to install updates if they’re offered. Once you’ve done that, the next step is to update your Windows. To do so, go to Windows Update and select any available updates.
You can also try uninstalling the current driver and installing the desired version of the same. You can get the latest driver from the manufacturer or a third-party supplier. In addition to that, some manufacturers have utilities that uninstall outdated drivers from your PC. However, if you’d prefer not to download the latest version of the driver, you can always manually uninstall it from Windows Update. Uninstalling the driver will remove all its files, including the one associated with it.
How Do I Bypass Windows Update Drivers?
There are a couple ways to avoid the automatic driver update process. One way is to manually install the drivers for your endpoints. Some system administrators prefer to manually install the drivers for all endpoints. In such a scenario, you can edit the DWORD ExcludeWUDriversInQualityUpdate and change it to 1.
To bypass this process, open the Group Policy Editor and click Edit to make changes. You should now see a message saying that you cannot install the device. Click OK to save the changes. Next, try to install the updates. The next time you do this, you should get an error message. Your tweaks have worked. If this didn’t work, try reinstalling Windows and see what happens. If the installation of drivers is slowing down your PC, try uninstalling the driver.
You can try to disable Windows Update driver updates by disabling the policy. This will hide the drivers that Windows updates. However, it will prevent other automatic updates from happening. Alternatively, you can disable the policy in the same way as above. However, this method will only allow you to install the driver updates that you’ve downloaded. You can use it temporarily for the time being. So, how do you bypass Windows Update drivers?
How Do I Turn Off Driver Updates in Windows 11?
If your computer is being bombarded with driver updates, you may be wondering how to turn them off. Thankfully, there’s an easy solution that will help you get rid of the problem. One such solution is to disable automatic driver updates through System Properties. To find this option, right-click the Windows Start button and choose System Properties. On the Advanced system settings, click the Hardware tab. Scroll down to the Device Installation Settings section, and untick the box next to “Automatically download manufacturer apps, custom icons, or other updates.” Once you’ve completed this step, the automatic driver update feature will be disabled.
Disabling automatic driver updates in Windows 11 is a simple procedure that will ensure your PC doesn’t receive critical updates, such as new versions of drivers. By disabling the updates, Windows will stop downloading and installing new versions of driver updates and will instead install only necessary updates. Although disabling automatic updates is a helpful feature, it can leave your computer vulnerable to attack. This article will outline a few of the main reasons why you should disable automatic updates for driver installations.
How Do I Enable Drivers in Windows 10?
While Windows 10 will automatically enable device drivers for your devices, sometimes the operating system fails to install them. If you’ve encountered a blue screen of death on your PC, the device drivers might not be properly installed. To resolve this, you can manually enable them. In the following article, you’ll learn how to disable driver updates in Windows 10.
To enable device drivers, first go to the Device Manager in the Control Panel. Right-click on the device name to reveal a pop-up menu. Select Update driver to let Windows 10 look for the right driver for your device. You can also uninstall it and install the driver from the device’s manufacturer’s website. Once installed, the driver will provide additional information in Device Manager. Once installed, you can explore all device settings.
If you disable driver signature enforcement, your PC will be unable to install some devices. To disable this, open the elevated command prompt. Once opened, click OK. To return to the normal driver installation mode, type the same command, but change the parameter to ‘-‘. Then click OK. In the command prompt, type ‘disabled’ to remove the driver signature enforcement. If the issue persists, follow these steps.
Does Windows 10 Update Drivers Automatically?
In order to find out if Windows 10 will update drivers automatically, you can open the device manager from the Start menu. From the Start menu search bar, type “device manager”. From here, select the category of the device. Then, click the Update Drivers button. You may also have to manually type the name of the driver to see the update options. Depending on which type of driver you have installed on your PC, updating it automatically may not be possible.
When you install new versions of Windows 10, Windows will automatically scan and install driver updates for most of the devices you connect to your computer. However, sometimes drivers are missing or incorrect. If this happens, you may have to manually install them. Windows 10 has an option to uninstall and re-install drivers. This option is also available in the Control Panel. If you encounter this error, open Device Manager and click on the Update Drivers tab.
How Do I Fix a Missing Driver in Windows 10?
To determine if your system needs a new driver, you must first find out if your current version is outdated or faulty. There are several ways to update your driver, including launching the Device Manager and looking for the required driver version. This option may be time-consuming, since you will have to check all the relevant devices one by one. However, there is an alternative that automatically updates your drivers. The software called Driver Easy will do this for you.
If you’re experiencing driver issues on your Windows 10 system, you can download and install the latest version manually. Using the DISM scan and the Windows Troubleshooter is also effective in fixing missing driver issues. Performing a resetting of your computer is also a good option to minimize confusion. If the problem persists, you can also try DriverFix. This software scans for problematic drivers and updates them automatically to prevent malfunctions. This software has been downloaded by 526,275 readers in the past month alone.
Learn More Here:
1.) Windows Help Center
2.) Windows – Wikipedia
3.) Windows Blog
4.) Windows Central