
Современные версии Windows поддерживают протокол DNS over HTTPS (DoH), который позволяет выполнять разрешение имен (DNS запросы) через шифрованное HTTPS соединение. В этой статье мы рассмотрим, для чего нужен протокол DNS over HTTPS, как его включить и использовать в Windows.
Содержание:
- Как включить DNS over HTTPS из графического интерфейса Windows?
- Настройка DNS over HTTPS в Windows 11 из командной строки
- Как убедиться, что для разрешения имен в Windows используется DNS over HTTPS?
По умолчанию DNS трафик не шифруется. Это означает, что все запросы с вашего компьютера на разрешение имен к DNS-серверу передаются по сети в открытом виде. Сторонние лица могут подслушать ваш DNS трафик, определить какие ресурсы вы посещали, или манипулировать DNS трафиком по типу main-in-the-middle. Протокол DoH позволяет инкапсулировать DNS запросы в шифрованное HTTPS соединение и отправить их DNS серверу (нужен специальный DNS сервер с поддержкой DoH).
Как включить DNS over HTTPS из графического интерфейса Windows?
Встроенная поддержка протокола DNS-over-HTTPS (DoH) в DNS клиенте доступна в Windows 11 и Windows Server 2022. Чтобы ваш клиент использовал DoH для шифрования DNS трафика, нужно в настройках сетевого подключения указать IP адрес сервера с поддержкой DoH.
Список IP адресов публичных DNS серверов с поддержкой DoH можно вывести PowerShell командой:
Get-DNSClientDohServerAddress
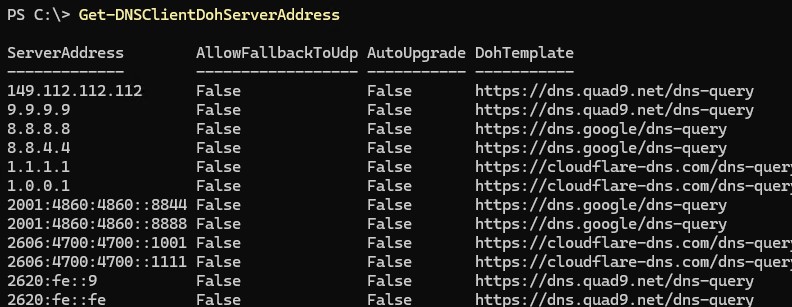
| Провайдер | IPv4 адреса DNS серверов с поддержкой DNS over HTTPS |
| Cloudflare | 1.1.1.1, 1.0.0.1 |
| 8.8.8.8, 8.8.4.4 | |
| Quad9 | 9.9.9.9, 149.112.112.112 |
Нужно указать IPv4 и IPv6 адрес одного из этих DNS сервера (или адрес любого альтернативного DNS сервера с поддержкой DoH, предварительно добавив его, о чем ниже) в настройках сетевого интерфейса.
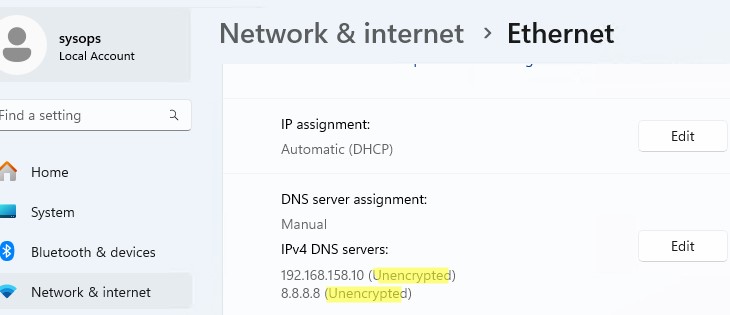
- Перейдите в Settings -> Network & Internet -> Ethernet (или Wi-Fi)
- В данном случае видно, что DNS трафик не зашифрован.

- Нажмите кнопку Edit
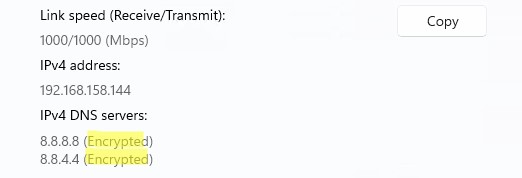
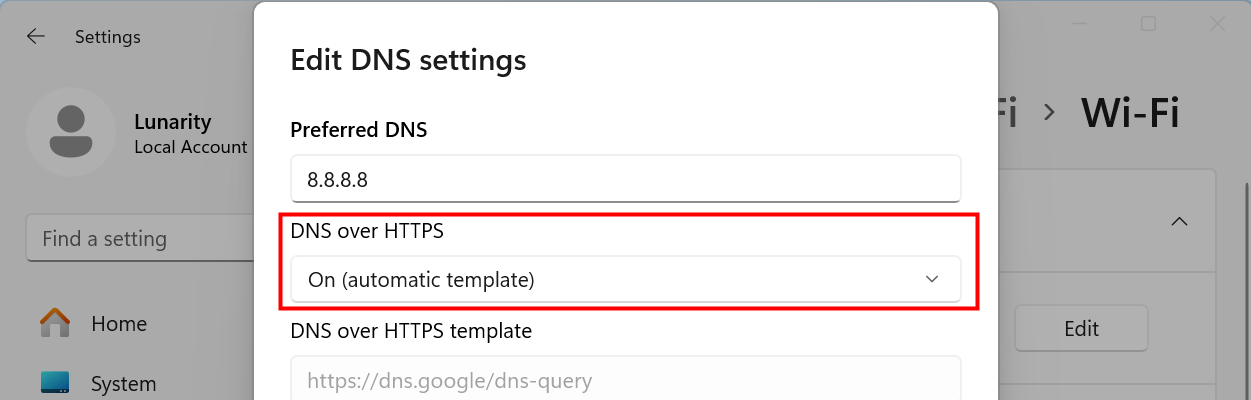
- Укажите IP адрес DNS сервера, и для параметра DNS over HTTPS выберите -> On (automatic template)
- Сохраните изменения. Теперь DNS запросы будут отправляться в шифрованном виде.

В DNS клиенте Windows Server 2022 также поддерживается DoH (но служба DNS Server в этой версии Windows Server пока не поддерживает DoH).
Укажите IP адрес DNS сервера в настройках сетевого интерфейса и включите режим обязательного использования шифрования: Encrypted only (DNS over HTTPS).
Ни один из релизов Windows 10 сейчас не поддерживает протокол DoH. В одной из инсайдерской версии (Insider Preview OS Build 19628) этот протокол можно было включить через реестр. Для включения поддержки DoH, нужно было создайть параметр реестра с помощью командлета New-ItemProperty:
$AutoDohPath = 'HKLM:\SYSTEM\CurrentControlSet\Services\Dnscache\Parameters'
$AutoDohKey = 'EnableAutoDoh'
New-ItemProperty -Path $AutoDohPath -Name $AutoDohKey -Value 2 -PropertyType DWord -Force
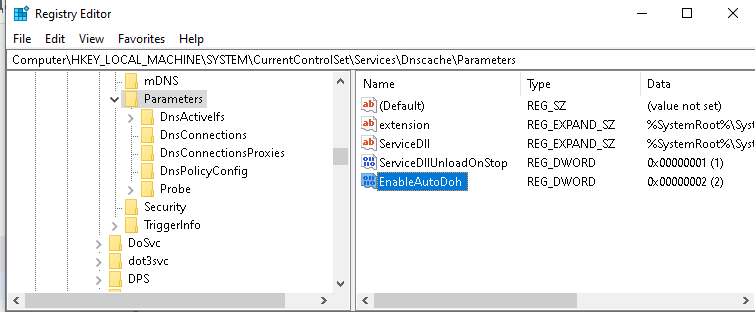
Но в финальный релиз Windows 10 этот функционал не внедрен!
Настройка DNS over HTTPS в Windows 11 из командной строки
В Windows можно включить и настроить использование DNS over HTTPS из командной строки.
Сначала нужно добавить IP адрес сервера DoH в список известных серверов. Например, чтобы добавить альтернативные DNS сервера Cloudflare Family
1.1.1.3
и
1.0.0.3
(фильтруют вредоносный и взрослый контент), выполните PowerShell команду:
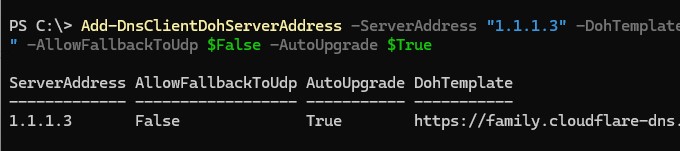
$DNSServer="1.1.1.3"
Add-DnsClientDohServerAddress -ServerAddress $DNSServer -DohTemplate "https://family.cloudflare-dns.com/dns-query" -AllowFallbackToUdp $False -AutoUpgrade $True
После того, как вы зарегистрировали шаблон для DNS сервера DoH нужно назначить этот IP в качестве предпочтительного DNS сервера в настройках сетевого интерфейса с помощью PowerShell команды:
Set-DnsClientServerAddress Ethernet0 -ServerAddresses ($DNSServer)
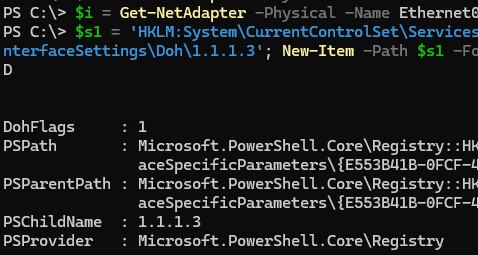
Затем включить обязательное использование DNS over HTTPS для сетевого интерфейса:
$i = Get-NetAdapter -Physical -Name Ethernet0
 $s1 = "HKLM:System\CurrentControlSet\Services\Dnscache\InterfaceSpecificParameters\" + $i.InterfaceGuid + "\DohInterfaceSettings\Doh\$DNSServer"
New-Item -Path $s1 -Force | New-ItemProperty -Name "DohFlags" -Value 1 -PropertyType QWORD
Clear-DnsClientCache
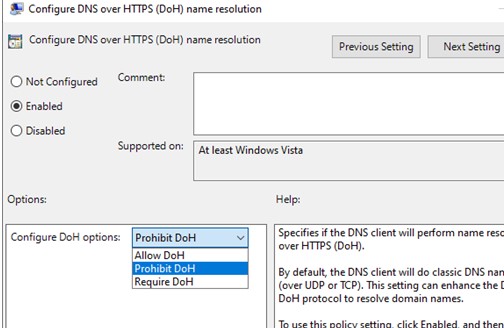
С помощью отдельного параметра GPO можно включить обязательное использование DoH:
- Запустите редактор локальной GPO (
gpedit.msc
) - Перейдите в Computer Configuration -> Policies -> Administrative Templates -> Network -> DNS Client section
- Включите политику «Configure DNS over HTTPS (DoH) name resolution» и задайте значение Require DoH.

Как убедиться, что для разрешения имен в Windows используется DNS over HTTPS?
Чтобы проверить, что клиент DNS использует для разрешения имен протокол HTTPS по порту 443 вместо обычного 53 порта, используете встроенную утилита захвата сетевого трафика PktMon.exe (о которой мы говорили ранее).
Удалите все текущие фильтры Packet Monitor:
pktmon filter remove
Создайте новый фильтр для стандартного DNS порта 53:
pktmon filter add -p 53
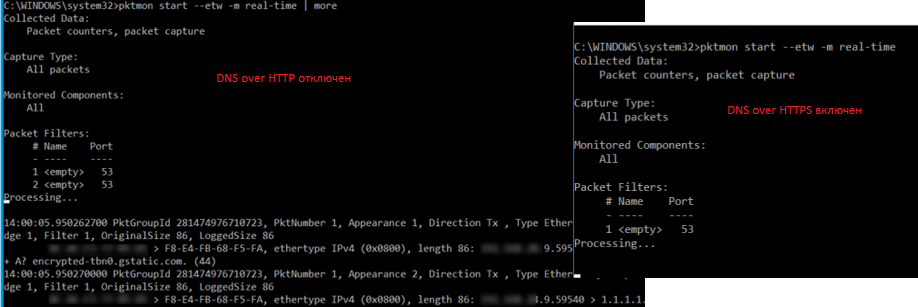
Запустите мониторинг трафика в реальном времени (трафик выводится в консоль):
pktmon start --etw -m real-time
Если вы правильно настроили DNS over HTTPS, то трафик по порту 53 должен отсутствовать. Это ожначает, что все DNS запросы отправляются в шифрованной HTTPS сессии (на скриншоте ниже показан вывод в консоль при отключённом DoH и при включенном).
DNS over HTTPS реализован во всех популярных браузерах (Google Chrome, Mozilla Firefox, Microsoft Edge, Opera). В каждом из этих браузеров вы можете включить поддержку DoH. Таком образом все DNS запросы от браузера будут шифроваться (DNS трафик других приложений по-прежнему будет идти в открытом текстовом виде).
Больше все проблем технологии DNS over HTTPS и DNS over TLS создадут администраторам корпоративных сетей, которым станет сложнее блокировать доступ к внешним ресурсам из внутренних сетей. Также не понятно, что планирует делать Роскомнадзор, чья методика глубокой проверки и управления сетевым трафиком Deep Packet Inspection (DPI) перестанет работать при переходе протокола DNS на рельсы шифрованного https.
Время на прочтение3 мин
Количество просмотров9.1K
Microsoft добавила в Windows 11 функцию DNS-over-HTTPS, позволяющую пользователям выполнять DNS-запросы через зашифрованное HTTPS-соединение, а не через обычный текстовый поиск, который можно отследить. DoH позволит пользователям обходить цензуру, предотвращать атаки спуфинга и повысить конфиденциальность.

Браузеры на основе Chromium, такие как Google Chrome и Microsoft Edge, а также Mozilla Firefox, уже добавили поддержку DoH. Тем не менее, такое шифрование используется пока только в браузерах, но не в других приложениях, запущенных на компьютере.
Microsoft впервые выпустила DNS-over-HTTPS для инсайдеров в предварительной сборке Windows 10 20185, но отключила функцию позже.
В Windows 11 DoH можно протестировать, выбрав «Настройки»> «Сеть и Интернет»> «Ethernet/беспроводная связь»> «Изменить назначение DNS-сервера».
Если устройство использует DNS-сервер, который поддерживает DNS-over-HTTPS, то всплывет соответствующее окно «Предпочтительное шифрование DNS», где можно включить DoH, как показано ниже:

При этом можно выбрать несколько опций:
-
только незашифрованный — используйте стандартный незашифрованный DNS,
-
только зашифрованные (DNS через HTTPS) — используйте только серверы DoH,
-
предпочтительно зашифрованный — попробуйте использовать серверы DoH, но если они недоступны, вернитесь к стандартному незашифрованному DNS.
Microsoft заявляет, что следующие DNS-серверы поддерживают DoH и могут автоматически пользоваться функцией Windows 11 DNS-over-HTTPS:
-
Cloudflare: DNS-серверы 1.1.1.1 и 1.0.0.1,
-
Google: DNS-серверы 8.8.8.8 и 8.8.8.4,
-
Quad9: DNS-серверы 9.9.9.9 и 149.112.112.112.
Чтобы увидеть настроенные определения DNS-over-HTTPS, можно использовать следующие команды:
Using netsh:
netsh dns show encryption

Using PowerShell:
Get-DnsClientDohServerAddress
Microsoft также позволяет администраторам создавать свои собственные определения DoH-серверов, используя следующие команды:
Using netsh:
netsh dns add encryption server=[resolver-IP-address] dohtemplate=[resolver-DoH-template] autoupgrade=yes udpfallback=no

Using PowerShell:
Add-DnsClientDohServerAddress -ServerAddress '[resolver-IP-address]' -DohTemplate '[resolver-DoH-template]' -AllowFallbackToUdp $False -AutoUpgrade $True
«Для пользователей и администраторов было бы проще, если бы мы разрешили серверу DoH определять свой IP-адрес путем разрешения его доменного имени. Однако мы решили не допускать этого. Поддержка этого будет означать, что до того, как мы сможем установить DoH-соединение, мы должны сначала отправить простой текстовый DNS-запрос для его начальной загрузки», — говорит Томми Дженсен, менеджер программ подразделения Windows Core Networking.
Microsoft также добавила возможность управлять настройками Windows 11 DNS-over-HTTPS с помощью групповых политик.

В Windows 11 представлена политика «Настроить DNS через HTTPS (DoH)» в разделе «Конфигурация компьютера»> «Административные шаблоны»> «Сеть»> «DNS-клиент».
24 июня Microsoft представила Windows 11, а 28 июня выпустила первую официальную предварительную версию Insider Preview build 22000.51 в рамках программы предварительной оценки.
Microsoft объяснила, зачем Windows 11 нужен модуль TPM 2.0. С помощью этой технологии компания собирается защищать пользователей от растущего уровня киберпреступности в мире, включая распространение фишинговых рассылок и внедрение программ-вымогателей. Однако компания может разрешить поставку некоторых систем без включенной функции, в том числе, в Россию.
DNS over HTTPS (DoH) is an important feature in Windows 11 that enhances the security and privacy of your internet browsing. By encrypting DNS requests, it prevents unauthorized parties from monitoring or tampering with your online activities. But how do you enable DNS over HTTPS in Windows 11? Let’s dive in and explore the steps to ensure your online interactions are better protected.
To enable DNS over HTTPS in Windows 11, you need to access the network settings on your device. By configuring the DNS over HTTPS feature, you can enjoy the added layer of security and privacy it provides. This feature allows your device to utilize encrypted DNS connections, ensuring that your DNS queries are shielded from potential eavesdropping. By enabling DNS over HTTPS, you can enhance your online safety while browsing the web in Windows 11.
Looking to enable DNS over HTTPS in Windows 11? Follow these instructions to ensure secure and encrypted DNS communication.
1. Open the Windows Start menu.
2. Click on the «Settings» option.
3. Go to «Network & Internet».
4. Select «Advanced network settings».
5. Scroll down and click on «Private DNS».
6. Choose the «Automatic» option.
7. Enter the DNS server address you want to use.
8. Click «Save» to apply the changes.
Now your Windows 11 system will use DNS over HTTPS for enhanced privacy and security.

Understanding DNS Over HTTPS (DoH)
DNS Over HTTPS (DoH) is a security feature that encrypts DNS queries and responses, offering enhanced privacy and protection against potential eavesdropping or manipulation. By default, DNS queries are sent in clear text, which means that anyone monitoring the network traffic can intercept and view the requests and responses. With DoH, your DNS traffic is encrypted, preventing unauthorized access to your browsing activities and ensuring that your online privacy is safeguarded.
Enabling DNS Over HTTPS in Windows 11
Enabling DNS over HTTPS in Windows 11 involves configuring the operating system to use a DNS resolver that supports DoH. Here’s a step-by-step guide on how to enable DNS over HTTPS in Windows 11:
- Open the «Settings» app by clicking on the «Start» button and selecting the gear icon in the left-hand side panel.
- In the «Settings» window, click on the «Network & internet» category.
- From the left-hand side panel, select «Ethernet» or «Wi-Fi» depending on your network connection.
- Scroll down and click on the «Advanced network settings» link.
- Under the «Network profile» section, click on the «Edit» button.
- In the «Edit network profile» window, toggle on the «Use DNS over HTTPS» option.
- Click on the «Save» button to apply the changes.
- Your Windows 11 device will now use DNS over HTTPS for secure DNS resolution.
Note that DNS over HTTPS may require the use of a DoH-compatible DNS resolver. If your current DNS resolver does not support DoH, you may need to switch to a different DNS resolver that offers this feature.
Configuring DNS Over HTTPS with Cloudflare Resolver
If you’re looking for a DNS resolver that supports DNS over HTTPS, Cloudflare is a popular option. Here’s how you can configure Cloudflare as your DNS resolver in Windows 11:
- Open the «Settings» app and navigate to the «Network & internet» settings as mentioned earlier.
- Select your network connection (Ethernet or Wi-Fi).
- Scroll down and click on the «Advanced network settings» link.
- In the Network profile section, click on the «Edit» button.
- In the «Edit network profile» window, enter the following DNS server addresses:
| Preferred DNS server: | 1.1.1.1 |
| Alternate DNS server: | 1.0.0.1 |
- Check the «Use DNS over HTTPS» option.
- Click on the «Save» button to apply the changes.
- Your Windows 11 device will now use Cloudflare’s DNS resolver with DNS over HTTPS.
Benefits of DNS Over HTTPS
DNS over HTTPS provides several benefits for Windows 11 users:
- Enhanced Privacy: With DNS over HTTPS, your DNS queries and responses are encrypted, protecting your browsing activities from potential eavesdropping or surveillance.
- Improved Security: DNS over HTTPS prevents DNS hijacking and manipulation, ensuring that you are connected to the intended websites and services without being redirected to malicious or phishing sites.
- Faster DNS Resolution: DoH can potentially result in faster DNS resolution as it bypasses any network or ISP-level DNS filtering or interference, allowing your device to directly communicate with the DNS resolver.
- Compatibility: DNS over HTTPS is supported by popular DNS resolvers, including Cloudflare, Google, and Mozilla, making it accessible to a wide range of users.
Configuring DNS Over HTTPS in Browser Settings
In addition to enabling DNS over HTTPS at the operating system level, you can also configure DNS over HTTPS in your web browser settings. This allows your browser to use encrypted DNS connections independently of your operating system settings.
Enabling DNS Over HTTPS in Chrome
If you use Chrome as your browser, you can enable DNS over HTTPS using the following steps:
- Open Google Chrome and type «chrome://flags» in the address bar.
- Search for «Secure DNS Lookups» in the flags page.
- When you find the «Secure DNS Lookups» flag, click on the drop-down menu next to it and select «Enabled.»
- Relaunch Chrome for the changes to take effect.
- Once Chrome restarts, it will use DNS over HTTPS for secure DNS resolution.
Enabling DNS Over HTTPS in Firefox
To enable DNS over HTTPS in Firefox, follow these steps:
- Open Firefox and type «about:config» in the address bar.
- Click on the «Accept the Risk and Continue» button if a warning message appears.
- In the «Search preference name» field, type «network.trr» and press Enter.
- Double-click on the «network.trr.mode» preference to modify its value.
- Set the value of «network.trr.mode» to «2» (which enables DNS over HTTPS).
- Close the about:config tab.
- Firefox will now use DNS over HTTPS for secure DNS resolution.
By enabling DNS over HTTPS both at the operating system level and browser level, you can ensure that your DNS traffic is encrypted and your online activities are better protected.

Enabling DNS Over HTTPS in Windows 11
Enabling DNS Over HTTPS (DoH) in Windows 11 can help enhance your online privacy and security by encrypting your DNS queries. Here’s how you can enable DoH in Windows 11:
1. Open the Settings app in Windows 11 and navigate to «Network & Internet.»
2. Click on «Advanced Network Settings» and select your active network connection.
3. Scroll down and click on «Properties.»
4. From the list of properties, locate «Internet Protocol Version 4 (TCP/IPv4)» and click on «Properties.»
5. In the new window, click on «Advanced» and go to the «DNS» tab.
6. Check the box that says «Use encrypted DNS» and select the desired provider from the drop-down menu.
7. Click «OK» to save the changes.
By enabling DoH in Windows 11, your DNS queries will be protected and encrypted, adding an extra layer of privacy and security to your internet browsing.
Key Takeaways — How to Enable DNS Over HTTPS in Windows 11
- DNS over HTTPS (DoH) is a security feature that encrypts DNS traffic on Windows 11.
- Enabling DoH can help protect your online privacy and prevent DNS hijacking.
- Windows 11 has built-in support for DoH, making it easy to enable.
- To enable DoH in Windows 11, you need to update to the latest version of Windows and use a compatible DNS server.
- Once enabled, DoH will encrypt your DNS queries and make them more secure.
Frequently Asked Questions
Here are some common questions about enabling DNS over HTTPS in Windows 11:
1. What is DNS over HTTPS (DoH)?
DNS over HTTPS (DoH) is a protocol that encrypts DNS requests and responses using the HTTPS protocol. It provides an additional layer of security and privacy by preventing unauthorized parties from intercepting or modifying DNS traffic.
Enabling DoH allows your Windows 11 system to securely communicate with DNS servers using the HTTPS protocol, ensuring that your DNS queries are protected from eavesdropping and tampering.
2. How do I check if DNS over HTTPS is enabled on my Windows 11 system?
To check if DNS over HTTPS is enabled, follow these steps:
1. Go to the Start menu and click on the Settings icon.
2. In the Settings window, click on «Network & internet».
3. In the left sidebar, click on «Advanced network settings».
4. Scroll down and click on «Manage networks».
5. Under the section «DNS over HTTPS», check if the toggle switch is turned on. If it is, DNS over HTTPS is enabled on your Windows 11 system.
3. How do I enable DNS over HTTPS in Windows 11?
To enable DNS over HTTPS in Windows 11, follow these steps:
1. Go to the Start menu and click on the Settings icon.
2. In the Settings window, click on «Network & internet».
3. In the left sidebar, click on «Advanced network settings».
4. Scroll down and click on «Manage networks».
5. Under the section «DNS over HTTPS», toggle the switch to enable it.
4. How do I configure the DNS over HTTPS server in Windows 11?
To configure the DNS over HTTPS server in Windows 11, follow these steps:
1. Go to the Start menu and click on the Settings icon.
2. In the Settings window, click on «Network & internet».
3. In the left sidebar, click on «Advanced network settings».
4. Scroll down and click on «Manage networks».
5. Under the section «DNS over HTTPS», click on «Configure DNS over HTTPS server».
6. Enter the DNS server address and port number provided by your DNS over HTTPS provider.
5. Can I disable DNS over HTTPS in Windows 11?
Yes, you can disable DNS over HTTPS in Windows 11 by following these steps:
1. Go to the Start menu and click on the Settings icon.
2. In the Settings window, click on «Network & internet».
3. In the left sidebar, click on «Advanced network settings».
4. Scroll down and click on «Manage networks».
5. Under the section «DNS over HTTPS», toggle the switch to disable it.
In conclusion, enabling DNS over HTTPS (DoH) in Windows 11 is a simple and effective way to enhance your online privacy and security. By encrypting the DNS queries you send from your device, DoH prevents unauthorized parties from accessing your browsing history and tracking your online activities. With the steps outlined in this article, you can easily enable DoH in your Windows 11 settings and enjoy a safer online experience.
Remember, enabling DoH may also improve your internet connection speed and bypass certain restrictions set by your internet service provider. It’s important to keep in mind that while DoH provides additional security and privacy, it may not be compatible with all network configurations or devices. If you encounter any issues or have concerns, consult your network administrator or service provider for further guidance. Stay safe and enjoy the benefits of DNS over HTTPS!
Quick Links
-
Encrypted DNS Is More Private and Secure
-
First, Choose a Supported Free DNS Service
-
Next, Enable DNS over HTTPS in Windows 11
Summary
- Windows 11 allows you to encrypt your DNS requests through DNS over HTTPS (DoH), providing enhanced online privacy and security.
- To enable DoH on Windows 11, go to Settings > Network & Internet > Wi-Fi Properties > Hardware Properties and click the «Edit» button next to DNS Server.
- Enter a DNS server of your choice for IPv4 and IPv6, then make sure that «DNS Over HTTPs» is set to «On.»
For improved online privacy and security, Windows 11 lets you use DNS over HTTPS (DoH) to encrypt the DNS requests your computer makes while you browse or do anything else online. Here’s how to set it up.
Encrypted DNS Is More Private and Secure
Every time you visit a website using a domain name (such as «google.com,» for example), your computer sends a request to a Domain Name System (DNS) server. The DNS server takes the domain name and looks up the matching IP address from a list. It sends the IP address back to your computer, which your computer then uses to connect to the site.
This domain name fetching process traditionally happened unencrypted on the network. Any point in between could intercept the domain names of the sites you are visiting. With DNS over HTTPS, also known as DoH, the communications between your computer and a DoH-enabled DNS server are encrypted. No one can intercept your DNS requests to snoop on the addresses you’re visiting or tamper with the responses from the DNS server.
First, Choose a Supported Free DNS Service
As of Windows 11’s release, DNS over HTTPS in Windows 11 only works with a certain hard-coded list of free DNS services (you can see the list yourself by running netsh dns show encryption in a Terminal window).
Here’s the current list of supported IPv4 DNS service addresses as of November 2023:
- Google DNS Primary: 8.8.8.8
- Google DNS Secondary: 8.8.4.4
- Cloudflare DNS Primary: 1.1.1.1
- Cloudflare DNS Secondary: 1.0.0.1
- Quad9 DNS Primary: 9.9.9.9
- Quad9 DNS Secondary: 149.112.112.112
For IPv6, here is the list of supported DNS service addresses:
- Google DNS Primary: 2001:4860:4860::8888
- Google DNS Secondary: 2001:4860:4860::8844
- Cloudflare DNS Primary: 2606:4700:4700::1111
- Cloudflare DNS Secondary: 2606:4700:4700::1001
- Quad9 DNS Primary: 2620:fe::fe
- Quad9 DNS Secondary: 2620:fe::fe:9
When it comes time to enable DoH in the section below, you’ll need to choose two pairs of these DNS servers—primary and secondary for IPv4 and IPv6—to use with your Windows 11 PC. As a bonus, using these will very likely speed up your internet browsing experience.
Next, Enable DNS over HTTPS in Windows 11
To get started setting up DNS over HTTPS, open the Settings app by pressing Windows+i on your keyboard. Or you can right-click the Start button and select «Settings» in the special menu that appears.
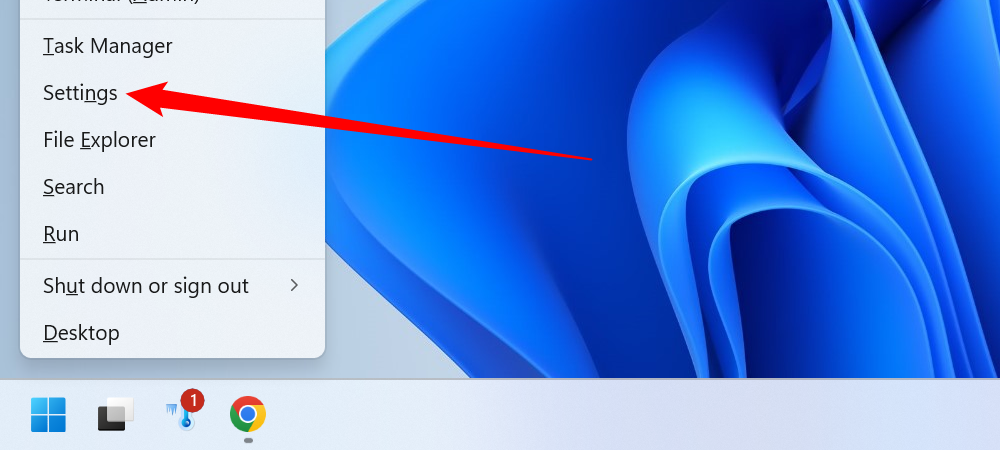
In Settings, click «Network & Internet» in the sidebar. In Network & Internet settings, click the name of your primary internet connection in the list, such as «Wi-Fi» or «Ethernet.» (Don’t click «Properties» near the top of the window—that won’t let you encrypt your DNS connections.)

On the network connection’s properties page, select «Hardware Properties.»
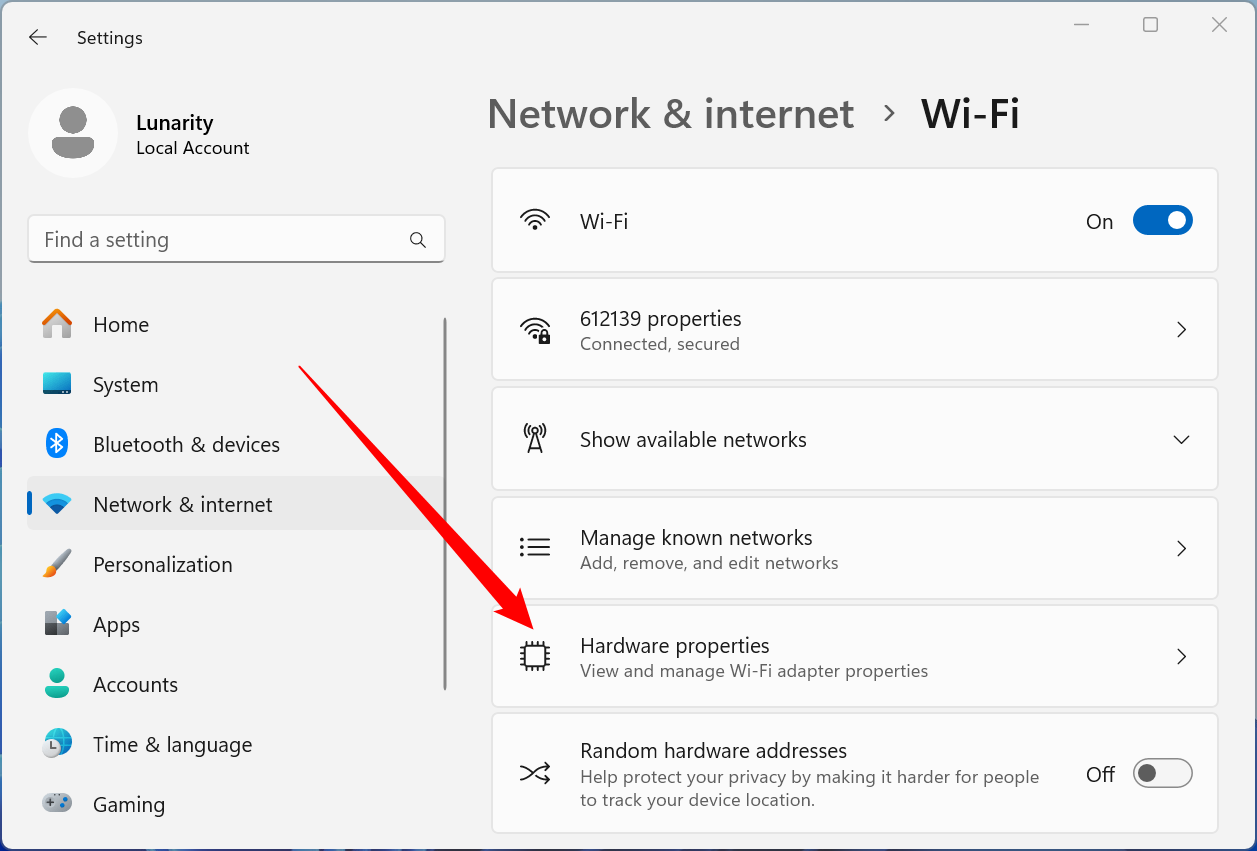
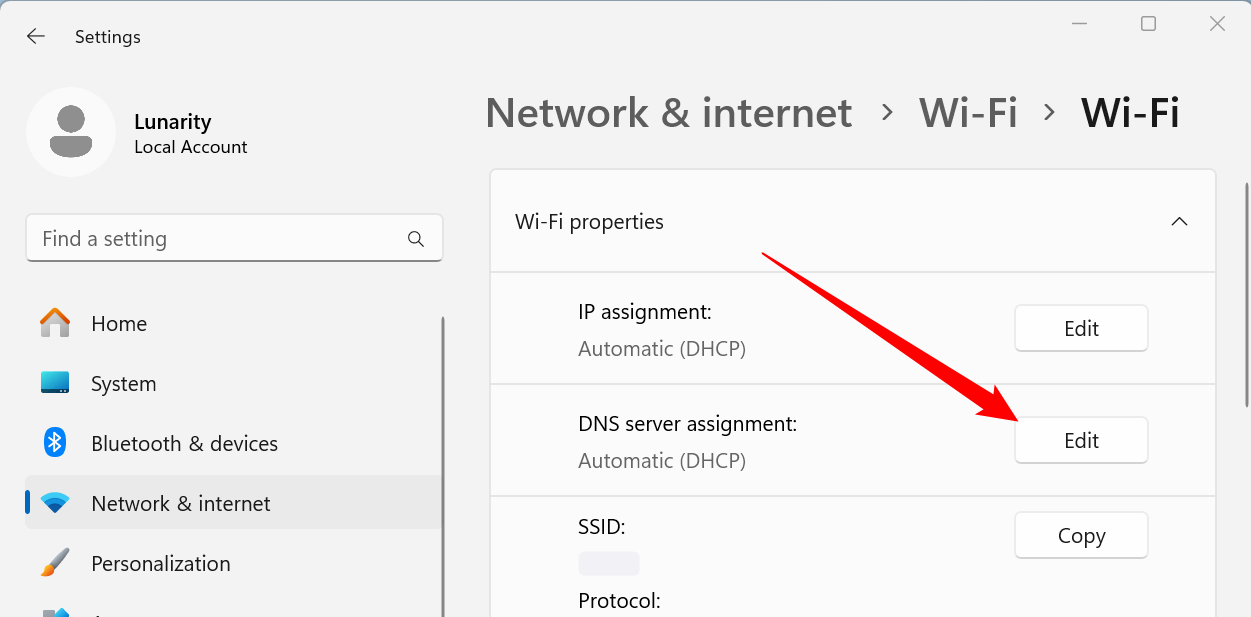
On the Wi-Fi or Ethernet hardware properties page, locate the «DNS Server Assignment» option and click the «Edit» button beside it.
In the window that pops up, use the drop-down menu to select «Manual» DNS settings. Then flip the «IPv4» switch to the «On» position.
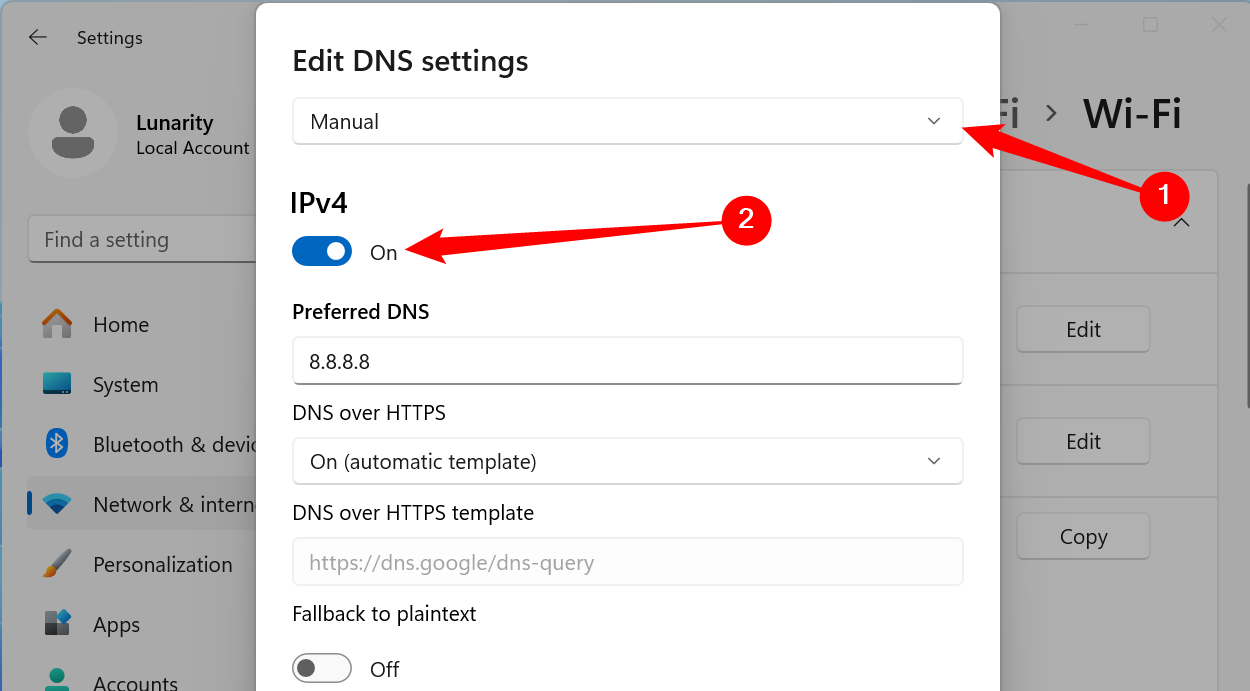
In the IPv4 section, enter the primary DNS server address you chose from the section above in the «Preferred DNS» box (such as «8.8.8.8»). Similarly, enter the secondary DNS server address in the «Alternate DNS» box (such as «8.8.4.4»).
If you don’t see the DNS encryption options, then you’re editing the DNS settings for your Wi-Fi SSID. Make sure you select the connection type in Settings > Network & Internet, then click «Hardware Properties» first.
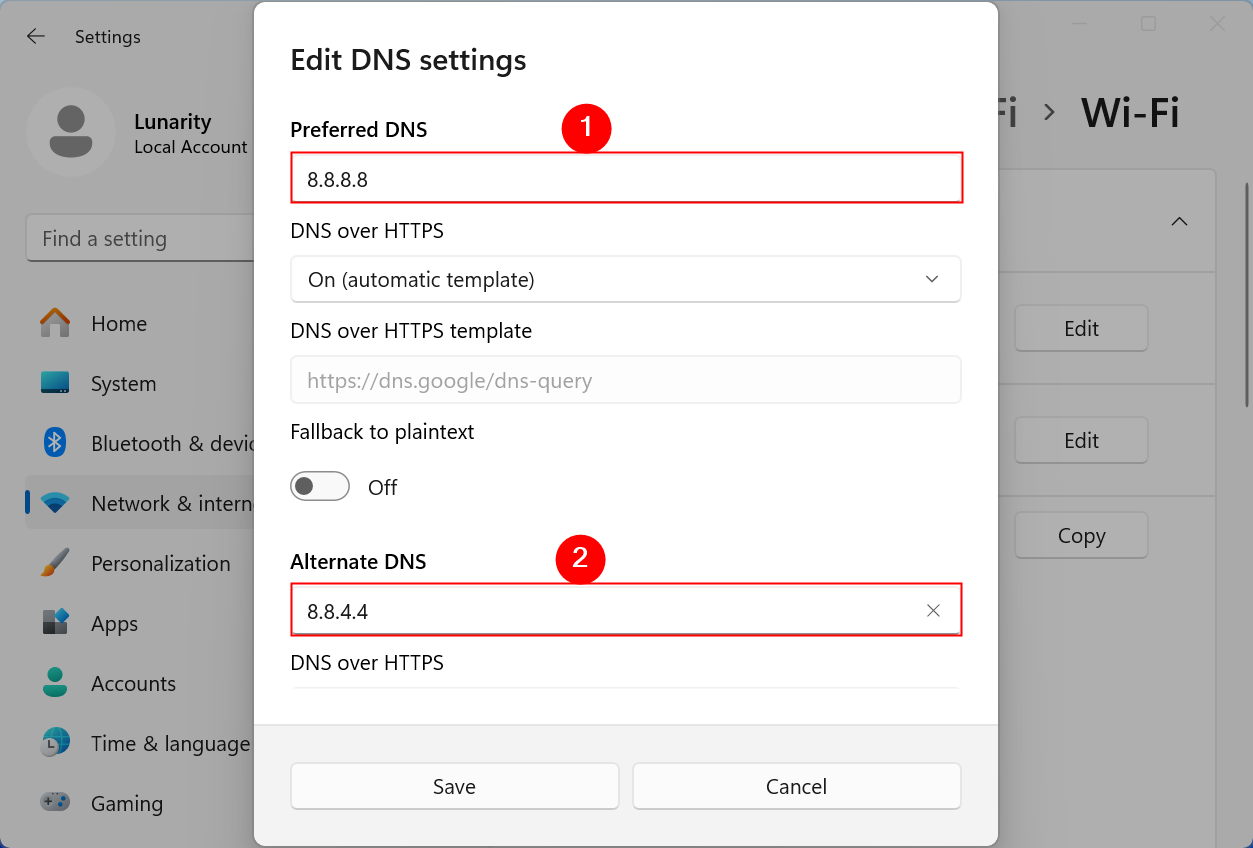
In the same window, set «DNS Over HTTPs» to the «On» position.
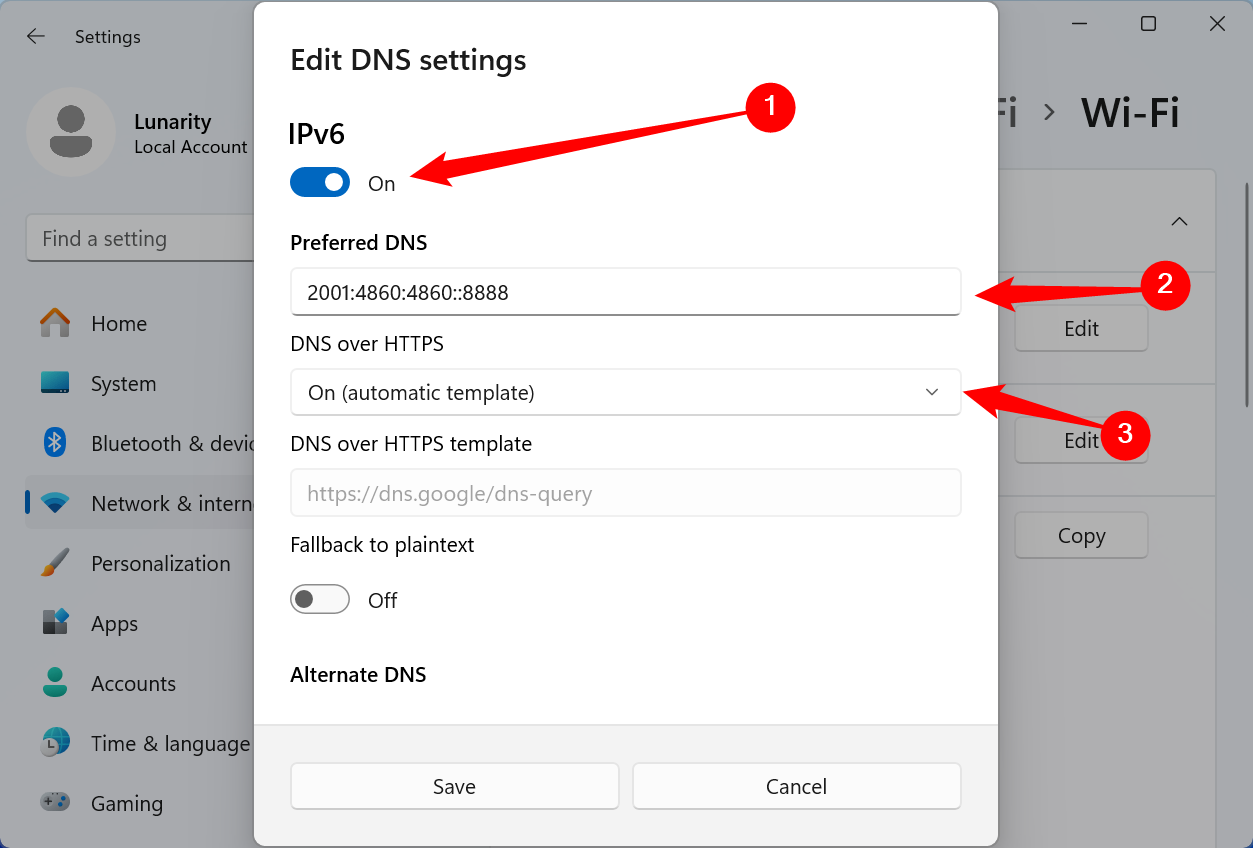
After that, repeat this process with IPv6.
Flip the IPv6 switch to the «On» position, and then copy a primary IPv6 address in the section above and paste it into the «Preferred DNS» box. Next, copy a matching secondary IPv6 address and paste it into the «Alternate DNS» box. Make sure you have enabled DNS Over HTTPs, then click «Save.»
Back on the Wi-Fi or Ethernet hardware properties page, you’ll see your DNS servers listed with an «(Encrypted)» beside each one of them.
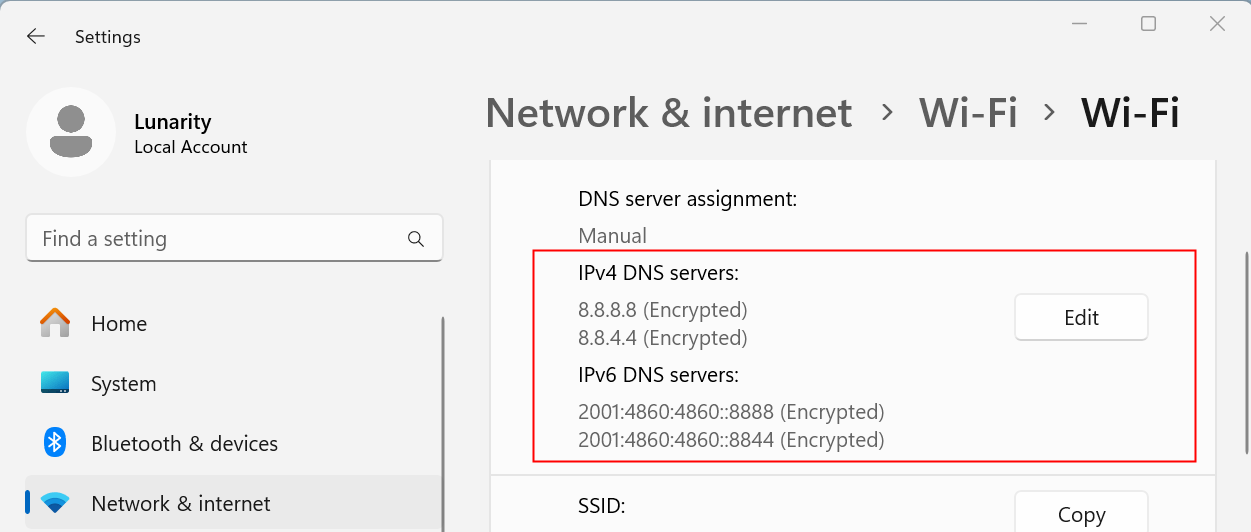
That’s all you need to do. Close the Settings app, and you’re ready to go. From now on, all of your DNS requests will be private and secure. Happy browsing!
If you experience network problems after changing these settings, be sure to check that you entered the IP addresses correctly. A mistyped IP address would result in the DNS servers being unreachable. If the addresses appear to be typed correctly, try disabling the «IPv6» switch in the DNS servers list. If you configure IPv6 DNS servers on a computer without IPv6 connectivity, this could cause connectivity issues.
Online protection minimizes the risk of hackers, malware attacks, and other threats to your Internet accounts and online activities. DNS over HTTPS or DoH is one example of reliable security and privacy features that offer encrypted privacy support on Windows 11 computers.
Back on Windows 10, DNS over HTTPS is not easily accessible to users, but Microsoft made it possible with the new Windows 11 operating system. This new connectivity feature is now fully supported in the upcoming versions of Windows OS. You can change and enable DNS-over-HTTPS to use a more safe and private protocol to encrypt and keep your online activity secured on your web browser or other apps.
DNS over HTTPS works by encrypting the route that your data requests go through to reach the DNS server when you want to access a website. It will make sure that no attacks or threats will be able to disrupt the flow. It will also avoid redirecting your requests to dangerous websites, a common problem experienced by users with regular DNS connection protocols.
How to Change and Enable DNS over HTTPS for All Apps in Windows 11 PC
There are several ways to turn on the DNS over HTTPS feature and enable it for use on all your apps and software on a Windows 11 PC. Check each method below and see which procedure is better for you to use.
#1 – Turn On DNS over HTTPS via Registry Editor

- Run the Registry Editor. You can use the search box or open the Run dialog box and enter regedit.
- Go to HKEY_LOCAL_MACHINE\SYSTEM\CurrentControlSet\Services\Dnscache\Parameters.
- Go to the right side and right-click on an empty space.
- Click New.
- Select DWORD (32-bit) Value.
- Rename it EnableAutoDoh.
- Double click the EnableAutoDoh entry to open it.
- Set the Value Data to 2.
- Restart your Windows 11 PC.
#2 – Enable DNS over HTTPS via Network Settings

- Navigate to the Settings menu.
- Go to Network & Internet.
- On the right side, select Properties.
- Look for DNS server assignment and click the Edit button.
- You will see a drop-down menu on the top. Click the down arrow to open the menu and select Manual.
- Go to Preferred DNS encryption and choose Encrypted only (DNS over HTTPS).
- Go down to Alternate DNS encryption and select Encrypted only (DNS over HTTPS).
- Click the Save button.
How to Check If DNS over HTTPS is Working
You can verify if the DNS over HTTPS is on or not by doing these steps.
- Launch the Settings menu.
- Navigate to Network & Internet.
- Select Properties.
Look for the DNS value and check if there is the word Encrypted next to the address.
Was the article helpful? We would love to know your thoughts. You can write to us in the comments below.
Windows Dispatch is a website supported by its readers & community. Some pages may contain affiliate links which may allow us to earn a little money when you buy through them.
Eddie Mendoza Jr
Eddie has a degree in Information Technology with a natural inclination towards troubleshooting devices. With more than 10 years of blogging experience in different niches, he has found it most satisfying when writing easy-to-follow guides and simplified articles related to computers, smart TVs, mobile devices and Internet-based services.