

Littledot
A simplified DNS over TLS ( DoT ) tool for Windows 10.
DNS over TLS
DNS over TLS ( DoT ) is a security protocol that encrypts and authenticates all DNS traffic
to prevent hijacking, eavesdropping and manipulation of its data via man-in-the-middle attacks.
It also offers as an alternative solution to other available protocol such as DNS over HTTP (DoH), DNSSEC, DNSCurve, DNSCrypt, and IPSEC
Resources
- Specification for DNS over Transport Layer Security from IETF
- Stubby — A local DNS Privacy stub resolver (using DNS-over-TLS)
Donation
If you find this project to be useful, you can help me by either share this app to others who need it, buy the paid version in the store, or give me a cup of tea 
Enable DNS over HTTPS in Windows 10
- Open the Settings app. …
- Navigate to Network & internet > Status.
- Click on Properties.
- On the next page, click on the Edit button under DNS settings.
- Select Manual.
- Specify DNS servers that support DoH (see the list in the next chapter).
- Does Windows 10 support DNS over TLS?
- Should you DNS over TLS?
- How do I setup a secure DNS server in Windows 10?
- Who supports DNS over TLS?
- Which is better DNS over HTTPS or DNS over TLS?
- Does Google DNS support DNS over TLS?
- Does OpenDNS support DNS TLS?
- Is DNS over HTTPS faster?
- Is DNS over HTTPS safe?
- Does Quad9 support DNS over TLS?
- Does Windows support DNS over https?
- How do I enable my secure DNS?
- What is the difference between DoT and DoH?
Does Windows 10 support DNS over TLS?
The addition of support for the DoH protocol in a future Windows 10 release was announced by Microsoft in November 2018, the inclusion of DNS over TLS (DoT) support also being left on the table.
Should you DNS over TLS?
DNS-over-TLS improves privacy and security between clients and resolvers. This complements DNSSEC and protects DNSSEC-validated results from modification or spoofing on the way to the client.
How do I setup a secure DNS server in Windows 10?
Head to the Privacy, search, and services tab. Under «Security», locate «Use secure DNS to specify how to lookup the network address for websites» option. Enable it and use either your current service provider or alternate DNS providers, such as Cloudflare and Google.
Who supports DNS over TLS?
In April 2018, Google announced that Android Pie will include support for DNS over TLS, allowing users to set a DNS server phone-wide on both Wi-Fi and mobile connections, an option that was historically only possible on rooted devices. DNSDist, from PowerDNS, also announced support for DNS over TLS in version 1.3.
Which is better DNS over HTTPS or DNS over TLS?
While DNS over HTTPS requests can hide in the rest of the encrypted traffic, DNS over TLS requests all use a distinct port where anyone at the network level can easily see them and even block them. Granted, the request itself – its content or response – is encrypted.
Does Google DNS support DNS over TLS?
And in 2019, we added support for the DNS over TLS (DoT) standard used by the Android Private DNS feature. DoH and DoT enhance privacy and security between clients and resolvers, complementing Google Public DNS validation of DNSSEC to provide end-to-end authenticated DNS for DNSSEC-signed domains.
Does OpenDNS support DNS TLS?
Programmers, such as those working on the DNS Privacy Project, are also building DNS over TLS implementations. There is already another protocol, DNSCrypt, which provides some of DNS over TLS protections. It’s supported by Cisco on its OpenDNS servers.
Is DNS over HTTPS faster?
A variation of encrypted DNS is DoT, which stands for DNS over TLS, or Transport Layer Security, a modern variation of SSL. … The main difference is that DoT performs faster than DNS in median response time for some clients, even though there was a slight increase in latency.
Is DNS over HTTPS safe?
In a nutshell, DNS over HTTPS is more secure than the traditional DNS because it’s using a secure, encrypted connection. Using DNS over HTTPS means that your ISP — and any of the other “hands” that we mentioned earlier — won’t be able to see certain aspects of the DNS lookup process because they’ll be encrypted.
Does Quad9 support DNS over TLS?
Does Quad9 support DNS over TLS? We do support DNS over TLS on port 853 (the standard) using an auth name of dns.quad9.net.
Does Windows support DNS over https?
Starting with Windows Server 2022, the DNS client supports DNS-over-HTTPS (DoH). When DoH is enabled, DNS queries between Windows Server’s DNS client and the DNS server pass across a secure HTTPS connection rather than in plain text.
How do I enable my secure DNS?
Type “chrome://flags/#dns-over-https” into Chrome’s address bar. Under the “Secure DNS lookups” menu, click the “Default” drop-down menu and select “Enabled.” Click the “Relaunch” button to relaunch Chrome.
What is the difference between DoT and DoH?
Each standard was developed separately and has its own RFC* documentation, but the most important difference between DoT and DoH is what port they use. DoT only uses port 853, while DoH uses port 443, which is the port that all other HTTPS traffic uses as well.
Post Views: 1,636
Introduction
In today’s digital landscape, ensuring the security and privacy of DNS (Domain Name System) queries has become increasingly critical. Traditional DNS queries over the internet are transmitted in plaintext, making them vulnerable to various types of attacks, such as DNS spoofing, man-in-the-middle attacks, and DNS cache poisoning. These vulnerabilities can lead to data breaches, privacy violations, and system compromises. To mitigate these risks, implementing DNS over TLS (DoT) as a forwarder for DNS Server can provide a secure and encrypted channel for DNS queries, safeguarding them from prying eyes.
Use DNS over TLS Forwarders in Active Directory DNS Environment
In this blog post, I will outline a solution for using DNS over TLS in a Windows Active Directory (AD) environment. Since the AD DNS Server does not natively support DoH (DNS over HTTPS) or DoT, we will employ a workaround by setting up Stubby DNS on a standalone Linux machine. Stubby will act as an intermediary, forwarding DNS queries securely over TLS to trusted DNS providers such as DNS by Google and Cloudflare. Let’s dive into the setup process.
Redundancy: You may also use 2 VMs or Docker containers to get redundancy.
PS: Though Windows client machines like Windows 11 support DNS over HTTPS (DoH), we can use secure public DNS. However, in the Active Directory Environment, we must use the corporate LAN Network AD DNS server for domain-joined machines (which work in a private trusted office network). Then AD DNS servers have to forward the request to public DNS (here we need security).
Prerequisites
- A standalone Linux machine to install Stubby DNS
- Windows Server running Active Directory with DNS role installed
- Basic knowledge of DNS configuration in Active Directory
Step-by-Step Setup
Step 1: Installing Stubby DNS on Linux
First, we need to install Stubby DNS on our standalone Linux machine. Stubby is an open-source DNS Privacy Daemon that supports DNS over TLS.
- Install Dependencies:
sudo apt update
sudo apt install -y stubby
2. Verify Installation:
stubby -hThis command should display the help message for Stubby, confirming that it is installed correctly.
Step 2: Configuring Stubby DNS
Next, we need to configure Stubby to use DNS over TLS with Google and Cloudflare as our DNS providers.
- Edit the Stubby Configuration File: Open the Stubby configuration file in your preferred text editor:
sudo nano /etc/stubby/stubby.yml2. Add DNS Providers Configuration: Add the following configuration to use Google and Cloudflare as DNS providers
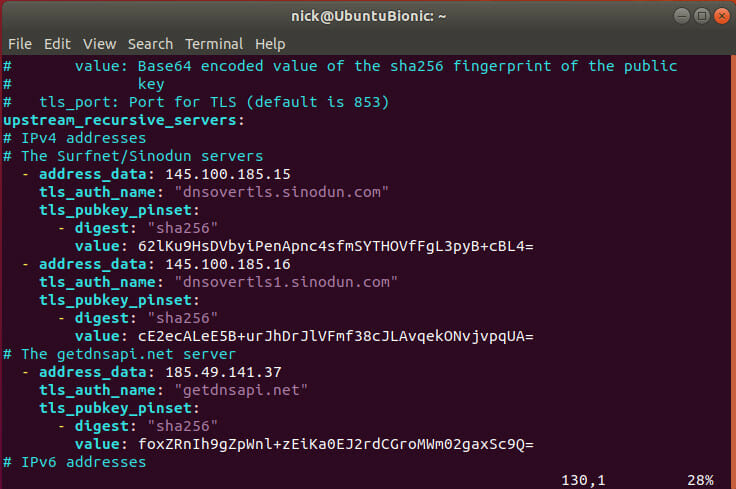
upstream_recursive_servers:
  - address_data: 8.8.8.8
    tls_auth_name: "dns.google"
  - address_data: 8.8.4.4
    tls_auth_name: "dns.google"
  - address_data: 1.1.1.1
    tls_auth_name: "cloudflare-dns.com"
  - address_data: 1.0.0.1
    tls_auth_name: "cloudflare-dns.com"
In the default stubby.yml file the above-mentioned DNS servers along with many others are already added, you just need to uncomment your desired providers
3. Change Stubby DNS Port to 53: By default, Stubby listens on port 8053. We need to change this to port 53 to ensure compatibility with the AD DNS server
listen_addresses:
  - 127.0.0.1@53
4. Round Robin DNS setting: I have used 2 DNS providers so it has been set up in a round-robin scenario, if you need to disable it use it in an order list, please change it to 0.
5. Save and Close the Configuration File: Save the changes and close the text editor.
6. Restart Stubby DNS Service
sudo systemctl restart stubby
sudo systemctl enable stubby
Step 3: Configuring Active Directory DNS Server
Now that Stubby is configured to use DNS over TLS, we need to set up the AD DNS server to forward DNS queries to Stubby.
- Open DNS Manager: On your Windows Server, open DNS Manager.
- Configure Forwarders:
- Right-click on the DNS server and select “Properties”.
- Go to the “Forwarders” tab.
- Click on “Edit” and add the IP address of your Stubby DNS server (e.g.,
172.16.1.10). - Click “OK” to save the changes.
- Uncheck the “use root hints if no forwarders are available”.
- Click “Apply” & “OK”.
Step 4: Verifying the Setup
To ensure that the setup is working correctly, you can perform the following tests:
- Check DNS Query Resolution: On a client machine joined to the AD domain, perform a DNS query using
nslookup:
nslookup example.comVerify that the query is resolved correctly.
2. Verify Secure DNS Resolution: On the Linux machine running Stubby, you can use tools like tcpdump to capture and inspect DNS traffic, ensuring that it is being transmitted securely over TLS.
Complete Flow of DNS Queries
The complete flow of DNS queries in this setup is as follows:
- Client Machine: A domain-joined client machine makes a DNS query.
- AD DNS Server: The query is sent to the AD DNS Server.
- Stubby DNS: The AD DNS Server forwards the query to the Stubby DNS server on port 53.
- DNS Providers: Stubby DNS forwards the query over a secure TLS connection (port 853) to the configured DNS providers (Google and Cloudflare).
- Response: The DNS response is received by Stubby over TLS, which then sends it back to the AD DNS Server.
- Client Machine: The AD DNS Server forwards the response back to the client machine.
DNS Security Threats and Vulnerabilities
By implementing DNS over TLS, we mitigate various DNS-related threats and vulnerabilities, including:
- DNS Spoofing: Attackers can forge DNS responses to redirect users to malicious websites.
- Man-in-the-Middle Attacks: Interceptors can alter DNS queries and responses during transmission.
- DNS Poisoning: Malicious data can be injected into the DNS cache, causing users to be directed to incorrect sites.
- Data Privacy Violations: Unencrypted DNS queries can be monitored, revealing user activity and patterns.
Conclusion
Securing DNS queries in a Windows Active Directory environment is crucial for protecting against various DNS vulnerabilities. By setting up Stubby DNS on a standalone Linux machine and configuring it to use DNS over TLS with trusted providers like Google and Cloudflare, we can ensure that our DNS queries are encrypted and secure. This solution provides an effective workaround for environments where the AD DNS server does not natively support DoH or DoT, enhancing the overall security posture of your network.
For more information on Stubby DNS and DNS privacy, refer to the Stubby DNS Documentation, Google Public DNS, Cloudflare DNS
Further Reads:
20 Essential PowerShell Commands for Active Directory Management
How to Secure Active Directory: Best Practices and Pro Tips
Essential Network Ports for Active Directory, DNS, DHCP, and ADFS
DNS Error | A new record cannot be created
- About
- Latest Posts
With 19 years of hands-on experience in the IT industry, I’m passionate about sharing the knowledge I’ve gained across a wide range of technologies. Specializing in Active Directory, Azure, VMware, Windows, and Linux, I am dedicated to empowering IT professionals and enthusiasts with practical insights and solutions.
Whether you’re looking for troubleshooting tips, deep dives into systems architecture, or the latest in cloud computing, I’m here to help you navigate the evolving tech landscape. Let’s connect, learn, and grow together!
📧 ravi.chopra1709@gmail.com
What is DNS Over TLS?
You already know that there’s been a lot of buzz in the last few years around encrypting web traffic. Even if you haven’t payed much attention, you have to have noticed the influx of green locks near URLs and HTTPS popping up everywhere. That’s because more sites than ever are encrypting traffic.
Encrypting web traffic protects both the site and the people visiting it. Attackers can’t easily spy on encrypted traffic as it passes between your computer and a website, keeping your login information and anything else you submit safe.
There’s one piece that doesn’t get encrypted by using HTTPS, the DNS query. If you’re not familiar, websites actually exist at an IP address. When you punch in the URL of a site, you make another request to a DNS server asking which IP address that URL belongs to. More often than not, that DNS server belongs to your ISP. So, they, and anyone else that might be listening in, can see which sites you’re going to and log them. Because DNS isn’t encrypted by default, it’s fairly easy for any sort of third party to be monitoring DNS queries.
DNS Over TLS brings the same type of encryption that you expect with HTTPS to DNS queries. So, the only person that receives your query and the data about which site you’re visiting is the DNS server that you choose, and you can choose. You don’t need to use your ISP’s DNS, and you shouldn’t.
What Can You Do?
Support for DNS over TLS isn’t as mature as HTTPS yet, but it’s still easy enough to get set up and use. There are a number of options that you can use to protect your DNS traffic. First, it’s worth noting that using a properly configured VPN will already protect you. Your DNS traffic will be tunneled over the VPN to the provider’s DNS servers. If you’re already using a VPN, don’t worry, though you can set up additional protection if you like.
If you aren’t using a VPN, you can still encrypt your DNS traffic with DNS over TLS. There’s an excellent open source project, called Stubby, that automatically encrypts your DNS queries and routes them to a DNS server that can handle DNS over TLS. Because the project is open source, it’s freely available for Windows, Mac, and Linux.
Set Up Stubby
Windows
Stubby has a convenient Windows .msi installer that will install Stubby along with a default configuration file. Head over to the installer page and download the Windows .msi installer.
Once you have it, run the installer. There isn’t a graphical setup wizard or anything. You only need to confirm that you’re giving the installer access. It’ll take care of the rest.
Everything for Stubby on Windows is located at:
C:Program FilesStubby
That includes the YAML configuration file.
Open up a command prompt. You can use Run and type cmd. Change into the Stubby directory. Then, run the .exe and pass it the configuration to get Stubby started.
C:UsersUserNamecd C:Program FilesStubby
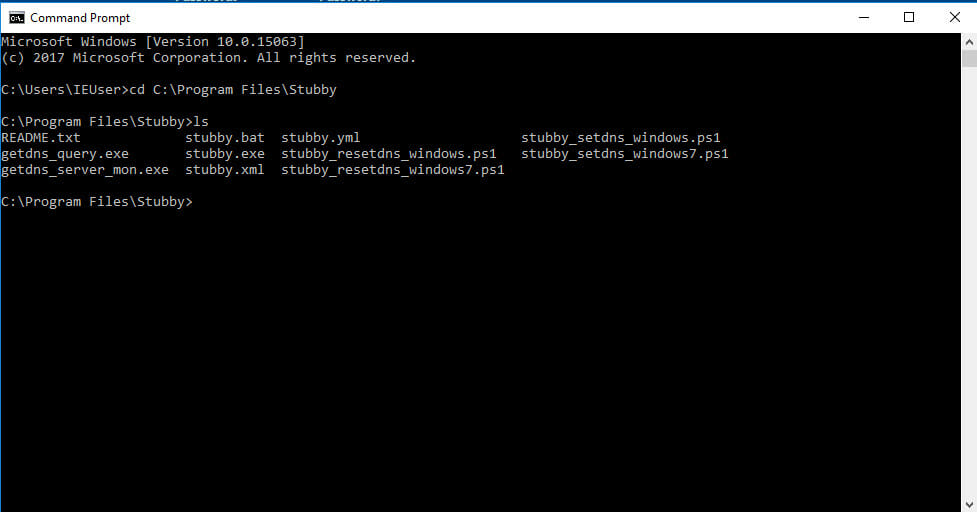
C:Program FilesStubbystubby.exe -C stubby.yml
Stubby will now be running on your system. If you want to test it out, run the following command to see if it’s running correctly.
C:Program FilesStubbygetdns_query -s @127.0.0.1 www.google.com
If that works, Stubby is set up correctly. Now, if you want to change the DNS servers that Stubby uses, open up stubby.yml, and modify the DNS server entries to match the servers of your choosing. Make sure that the servers that you pick support DNS over TLS.
Before you can use Stubby system wide, you’re going to need to modify Windows’ upstream resolvers(DNS servers). To do that, you’re going to need to execute a command with admin privileges. Close your existing command prompt window. Then, go back to your start menu and search for ‘cmd.’ Right click on it and select “Run as Administrator.” In the resulting window, run the following:
PowerShell -ExecutionPolicy bypass -file "C:Program FilesStubbystubby_setdns_windows.ps1"
None of this is very good if you can’t make the changes permanent. To do that, you’re going to need to create a scheduled task that runs on startup. Thankfully, the Stubby developers provided a template for that. In the running command prompt window you have, make your changes permanent.
schtasks /create /tn Stubby /XML "C:Program FilesStubbystubby.xml" /RU <you_user_name>
That’s all! Your Windows PC is now configured to use Stubby to send your DNS over TLS.
Linux
On Linux, this process is very simple. Both Ubuntu and Debian based distributions have Stubby already available in their repositories. You just need to install it and change your DNS to use Stubby. Start by installing Stubby
$ sudo apt install stubby
Next, edit the Stubby configuration file, if you choose. It’s available at /etc/stubby/stubby.yml. Open it in your favorite text editor with sudo.
If you’ve made any changes to the DNS servers, restart Stubby.
$ sudo systemctl restart stubby
You’re also going to need to change the nameserver entries in /etc/resolv.conf. Open that up with your text editor and sudo as well. Create a single entry like the one below.
nameserver 127.0.0.1
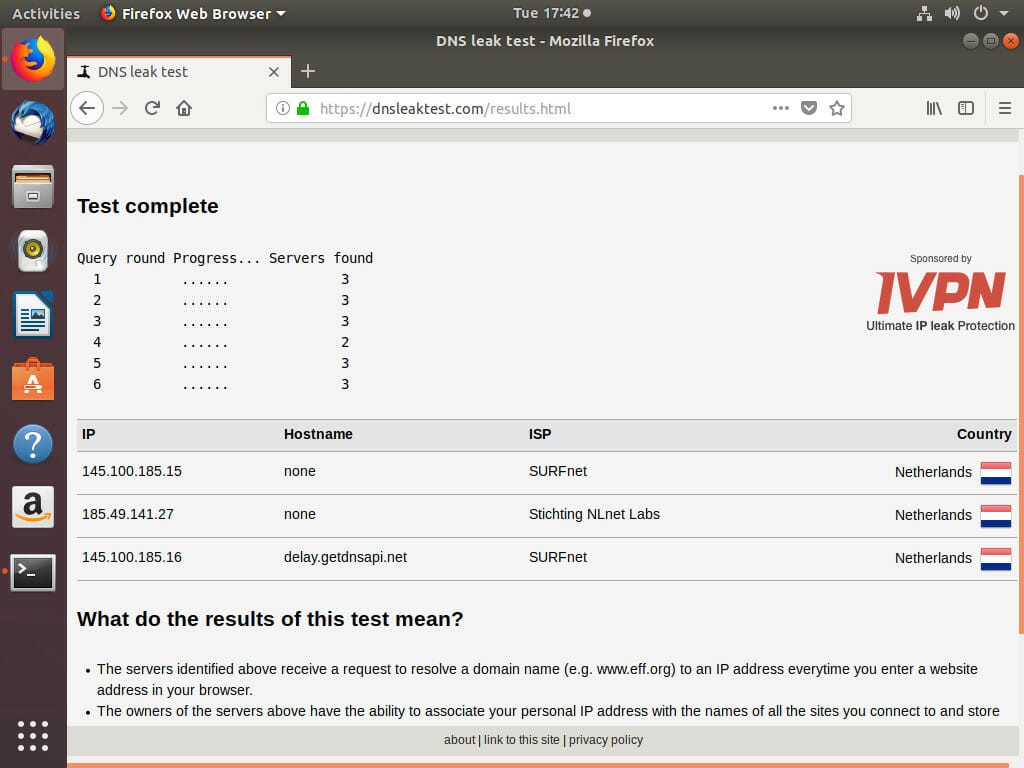
Now, test that Stubby is working. Go to dnsleaktest.com and run the test. If the servers that you configured Stubby to use appear, your computer is successfully running Stubby.
OSX
Setting up Stubby on OSX is also fairly simple. If you have Homebrew, the process is dead simple, but it’s also fairly easy otherwise.
With Hombrew, you can install the Stubby package.
$ brew install stubby
Before you start Stubby up as a service, you can modify the YAML configuration at /usr/local/etc/stubby/stubby.yml.
Once you’re happy with things, you can start up Stubby as a service.
$ sudo brew services start stubby
If you don’t have Homebrew, you can install the Stubby GUI. It’s available here.
Closing Thoughts
DNS over TLS is beginning to gain traction. Soon, it will be commonplace. Until then, setup and programs like Stubby are necessary. Clearly, though, it’s not too difficult to get set up.
In the near future, support for DNS over TLS will see a huge push forward when Google includes support by default with Android. As a result, it should only be a matter of time before Apple follows with iOS support. The desktop platforms probably won’t lag too far behind. Then again, they already do have support, and you just enabled it.

How To Enable Dns Over Https In Firefox First things first: install the latest windows insider build (25158 or higher). dot support is not yet available to non insider builds of windows. next, configure a dot providing dns resolver as the primary and only resolver (this will ensure no accidental fallback covers up dot failures). this can be done by following these steps:. This tutorial will show you how to change your dns server address and enable dns over tls (dot) in windows 11. a dns (domain name system) server is the service that makes it possible for you to open a web browser, type a domain name and load your favorite websites.

Firefox Dns Over Ssl 02 Windy Weather Configure the dns server. to enable dot, you must (manually) specify a dns server that supports this protocol. this can be done via the settings app under network in a connection’s properties, for example, ethernet or wifi. Enable dns over tls in windows 11. enabling dns over tls in windows 11 is a two step process: set dot providing dns resolver as the main and the sole resolver. run cmd commands to enable. Application level config will trump the os level config for that application. windows config will apply to everything while the firefox config obviously only applies to firefox. if you have both set, firefox will use the firefox doh while everything else will use the windows doh. 1.1.1.1 supports dns over tls (dot) and dns over https (doh), two standards developed for encrypting plaintext dns traffic. this prevents untrustworthy entities from interpreting and manipulating your queries.

How To Enable Dns Over Https In Firefox Pureinfotech Application level config will trump the os level config for that application. windows config will apply to everything while the firefox config obviously only applies to firefox. if you have both set, firefox will use the firefox doh while everything else will use the windows doh. 1.1.1.1 supports dns over tls (dot) and dns over https (doh), two standards developed for encrypting plaintext dns traffic. this prevents untrustworthy entities from interpreting and manipulating your queries. The latest versions of windows support the dns over https (doh) protocol, which allows domain name resolution (dns queries) to be performed over an encrypted https connection. in this article, we’ll look at what the dns over https protocol is used for, and how to use it in windows. In this article, you will read how to enable dns over tls (dot) in windows 11. dot uses the same security protocol, tls, that https websites use to encrypt and authenticate communications. dot adds tls encryption on top of the user datagram protocol (udp), which is used for dns queries. Currently, dns over tls is only available in the latest windows preview version, and other versions of windows cannot use this feature. this may be the reason why you cannot enable it. if you want to join the windows preview version, check out the following article:. Tld dns server: the tld server directs the resolver to the authoritative dns server for the specific domain. authoritative dns server: the authoritative server keeps the actual dns records for the domain, provides the ip address for the requested domain.

How To Enable Dns Over Https In Firefox Pureinfotech The latest versions of windows support the dns over https (doh) protocol, which allows domain name resolution (dns queries) to be performed over an encrypted https connection. in this article, we’ll look at what the dns over https protocol is used for, and how to use it in windows. In this article, you will read how to enable dns over tls (dot) in windows 11. dot uses the same security protocol, tls, that https websites use to encrypt and authenticate communications. dot adds tls encryption on top of the user datagram protocol (udp), which is used for dns queries. Currently, dns over tls is only available in the latest windows preview version, and other versions of windows cannot use this feature. this may be the reason why you cannot enable it. if you want to join the windows preview version, check out the following article:. Tld dns server: the tld server directs the resolver to the authoritative dns server for the specific domain. authoritative dns server: the authoritative server keeps the actual dns records for the domain, provides the ip address for the requested domain.