
Did you know that Windows DHCP server can update records dynamically for its clients on DNS server? Having DHCP server updating DNS records for client machines is very useful if you have a network application that relies so much on the name resolution for its communication. However, the default configuration of Windows DHCP server is to update A and PTR records for the clients only when requested. In most case, it doesn’t work very consistent. In this post, we’ll guide you to Configure DNS Dynamic Update in Windows DHCP Server and ensure it is fully working.
In our post about the concept of refresh and update in DNS server, we have briefly explained the DHCP server can take the ownership of DNS record for its clients. Owner of a record is given the right to modify/delete the record. Now our goal here is to make sure that DHCP server can consistently update the DNS records for all its clients.
Step 1 – Set DHCP server to always dynamically update records
You can start configure DNS dynamic update in Windows DHCP server by opening the DHCP console. Expand the server name > right-click on IPv4 > select Properties > DNS tab.

You’ll see by default on Windows Server 2012 R2 the option to “Enable DNS dynamic updates according to the settings below” is enabled by default and you have two selection options as follow:
- Dynamically update DNS A and PTR records only if requested by the DHCP clients – This is the default selection. This setting means that your DHCP server will only update DNS records for the clients only if the clients for some reason unable to perform the update. As stated below, this may not work correctly, especially if the clients are non-Windows machine.
- Always dynamically update DNS A and PTR records – Now you must change the selection to this option. What will happen is the DHCP server will perform the update regardless the client is able to do it or not.
Now you may also notice there are several other options in the same tab in DHCP server properties. The explanation below will tell you the function of each option and what you need to do with them:
- Discard A and PTR records when lease is deleted — As the name implies, it will delete the previously registered A and PTR record when the DHCP lease for the corresponding client is deleted. Tick the box to enable this option as it will help clean-up unused records in the DNS Server.
- Dynamically update DNS records for DHCP clients that do not request for updates — This option is present just in case you have a very old machine or non-Windows machine as DHCP client that do not perform dynamic update of its own record in the DNS server. Tick the box to enable this option and force the DHCP server to perform DNS update for them.
- Disable dynamic updates for PTR records — When you active this option, your DHCP server will only perform the dynamic update for A records. It’s up to you on what to do with this option, but in this example we don’t tick the box for this option and let the DHCP server to also manage the PTR records.
With all the things configured here, we actually have set the DHCP server to take ownership of all its client records in the DNS server. However, we’re still far from done as there are few additional steps that we must do.
Step 2 — Add the DHCP server to DnsUpdateProxy security group
If the DHCP server is on a different machine than the Domain Controller, make sure to include the DHCP server in the DnsUpdateProxy group in Active Directory (see figure below). Otherwise, the DHCP server will not be able to update the records on DNS server.

Step 3 – Provide credential to secure the DNS dynamic update
This applies if the DNS zone where your DHCP server will register/update records is an Active Directory-integrated zone which allows only secure dynamic updates.

You need to provide a user account in the DHCP server properties. Open the Advanced tab of the DHCP server properties and click the Credentials button.

Fill in the username, domain, and password in the available field.
Note that the account can be a regular user account without any special privilege but it must exist in the same forest as the DNS server. You can also use user account from different forest, as long as its forest has established a forest trust with the forest where the DNS server resides.
Step 4 — Configure name protection
Since we’re enabling the “Dynamically update DNS records for DHCP clients that do not request for updates” option, means that we’re allowing non-domain machine or non-Windows machine to have their records as well in the DNS server. There is a chance such machine has the same host name with other existing machine in the network. If this happen, this could cause confusion in the name resolution.
To prevent such issue, we can activate the DHCP name protection. Back to the DNS tab in DHCP server option, under Name Protection > click Configure.

Tick the box to Enable Name Protection.
With this way, DHCP server will still lease the IP address normally but will not create the DNS record if a record with the same name already exists.
Well, that’s pretty much all the stuffs you need to configure DNS dynamic update in Windows DHCP server. From now, your DHCP server will take care of DNS records for its clients. DHCP server will register and update records for its clients, and will also delete the record for expired leases. This will ensure that DNS server will not be filled up with records for inactive clients. Additionally, you can also configure aging and scavenging in the DNS zone to match the DHCP lease time and this will help clean up the unused records.
The following two tabs change content below.
- Bio
- Latest Posts
I am IT practitioner in real life with specialization in network and server infrastructure. I have years of experience in design, analysis, operation, and optimization of infrastructure solutions for enterprise-scaled network. You can send me a message on LinkedIn or email to arranda.saputra@outlook.com for further inquiry regarding stuffs that I wrote or opportunity to collaborate in a project.
Today I want to show how we can configure DNS dynamic updates in Windows.
The DNS update functionality enables DNS client computers to register and to dynamically update their resource records with a DNS server whenever changes occur. If you use this functionality, you can reduce the requirement for manual administration of zone records, especially for clients that frequently move and use Dynamic Host Configuration Protocol (DHCP) to obtain an IP address.
Windows provides support for the dynamic update functionality as described in Request for Comments (RFC) 2136. For DNS servers, the DNS service permits you to enable or to disable the DNS update functionality on a per-zone basis at each server that is configured to load either a standard primary or directory-integrated zone.
Source: https://learn.microsoft.com/en-us/troubleshoot/windows-server/networking/configure-dns-dynamic-updates-windows-server-2003
- Introduction
- Create a new DNS Zone (Primary Forward Lookup Zone)
- Enable DNS dynamic Updates
- Disable DNS dynamic Updates
- DNS dynamic Updates through Conditional Forwarders
- Links
By default, Windows computers that are statically configured for TCP/IP try to dynamically register host address (A) and pointer (PTR) resource records for IP addresses that are configured and used by their installed network connections. By default, all computer register records are based on the full computer name.
The primary full computer name is a fully qualified domain name (FQDN). Additionally, the primary full computer name is the primary DNS suffix of the computer that is appended to the computer name. To determine the primary DNS suffix of the computer and the computer name, right-click My Computer, click Properties, and then click Computer Name.
DNS updates can be sent for any one of the following reasons or events:
When one of these events triggers a DNS update, the DHCP Client service, not the DNS Client service, sends updates. If a change to the IP address information occurs because of DHCP, corresponding updates in DNS are performed to synchronize name-to-address mappings for the computer. The DHCP Client service performs this function for all network connections on the system. This includes connections that are not configured to use DHCP.
By default, Windows registers A and PTR resource records every 24 hours regardless of the computer’s role. To change this time, add the DefaultRegistrationRefreshInterval registry entry under the following registry subkey:
HKEY_LOCAL_MACHINESYSTEMCurrentControlSetServicesTcpIpParameters
The interval is set in seconds.
To disable dynamic updates for all network interfaces, add the following registry DWORD value:
HKEY_LOCAL_MACHINESYSTEMCurrentControlSetServicesTcpipParametersDisableDynamicUpdate = 1
Source: https://learn.microsoft.com/en-us/troubleshoot/windows-server/networking/configure-dns-dynamic-updates-windows-server-2003
In order to show how this will work I will first create a new DNS Zone in the next section below.
To create a new DNS zone on a Windows DNS server, right click on the Forward Lookup Zone folder and select New Zone …
I will create a new primary zone which can directly updated on the server.
More about the different types of zones you will find in the following Microsoft article https://learn.microsoft.com/en-us/windows-server/networking/dns/zone-types#dns-zone-types.
I will create a new Forward lookup zone which will translate DNS names into IP addresses and further will provide information about available network services by providing so called service records (SRV).
Enter a zone name which is the DNS namespace for which this server is authoritative.
Here you can select to allow or not allow dynamic updates, I will first select here to not allow in order to show you later where you can change this.
Finally the new zone is created.
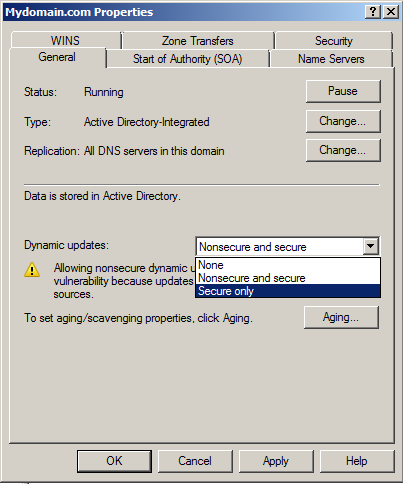
As mentioned we can anytime change to allow or not allow dynamic DNS updates by right clicking on the DNS zone, selecting properties and here within the General tab we can switch for Dynamic updates from None to Nonsecure and secure.
Because this DNS zone is not stored in Active Directory (just available if DNS server is a writeable domain controller), we can’t use Secure only dynamic updates here.
Below for example the domain controller from my lab environment where the DNS zone is stored in Active Directory we can select Secure only dynamic updates.
Secure dynamic updates
https://learn.microsoft.com/en-us/troubleshoot/windows-server/networking/configure-dns-dynamic-updates-windows-server-2003#secure-dynamic-updates
Below to show dynamic updates from a Windows Server 2022 which is not domain joined in my lab environment, I will first enable dynamic updates on the DNS server.
Here you will see the configuration of a Window Server 2022 which have configured the DNS server in its IP configuration. The server is not domain joined but have configured the DNS suffix from the above braintesting.local zone.
As shown previously in the introduction, default, Windows registers A and PTR resource records every 24 hours regardless of the computer’s role. To change this time, add the DefaultRegistrationRefreshInterval registry entry under the following registry subkey:
HKEY_LOCAL_MACHINESYSTEMCurrentControlSetServicesTcpIpParameters
The interval is in second.
To disable dynamic updates for all network interfaces, add the following registry DWORD value:
HKEY_LOCAL_MACHINESYSTEMCurrentControlSetServicesTcpipParametersDisableDynamicUpdate = 1
We can also uncheck below on the NIC to register or not the IP address in DNS.
So far within the DNS zone for braintesting.local there are no A records shown up from computers.
I will now execute the ipconfig /registerdns command on the Windows Server 2022 (brainSRV01).
The new A record is shown up immediately on the DNS server.
As already mentioned and showed, you can disable DNS dynamic updates in general on the DNS server or just on dedicated client computer.
On the DNS server you can disable DNS dynamic updates for DNS zones. On the properties dialog of the DNS zone switch to None within the General tab for dynamic updates as shown below.
By default, Windows registers A and PTR resource records every 24 hours regardless of the computer’s role. To change this time, add the DefaultRegistrationRefreshInterval registry entry under the following registry subkey:
HKEY_LOCAL_MACHINESYSTEMCurrentControlSetServicesTcpIpParameters
The interval is set in seconds.
To disable dynamic updates for all network interfaces, add the following registry DWORD value:
HKEY_LOCAL_MACHINESYSTEMCurrentControlSetServicesTcpipParametersDisableDynamicUpdate = 1
Source: https://learn.microsoft.com/en-us/troubleshoot/windows-server/networking/configure-dns-dynamic-updates-windows-server-2003
To disable dynamic DNS updates on a client just for a specific network interface, you can either use the advanced TIP/IP settings of a specific NIC or you can also use a registry setting.
To disable dynamic updates for a specific interface by using the registry,
HKEY_LOCAL_MACHINESYSTEMCurrentControlSetServicesTcpipParametersInterfacesinterface
Add a new DWORD value named DisableDynamicUpdate with the value 1.
interface is the device ID of the network adapter for the interface that you want to disable dynamic update for.
Source: https://learn.microsoft.com/en-us/troubleshoot/windows-server/networking/configure-dns-dynamic-updates-windows-server-2003#disable-dns-dynamic-updates
In case you have disabled DNS dynamic updates on a computer and nevertheless execute the ipconfig /registerdns command on that computer, you will encounter the following error message.
Registration of DNS records failed: Not enough memory resources are available to complete this operation.
The DNS dynamic updates by the way are also working when using a conditional forwarder on the DNS server.
Below for example I have a DNS server just for non domain computers on which the braintesting.local domain is configured as primary DNS suffix.
When I will now change the primary DNS suffix into braintesting.de on this computer, the computer will register its computer name on the DNS server for the braintesting.de domain which is configured below as conditional forwarder.
Because the DNS server for braintesting.de will store its DNS zone in Active Directory, I first have to allow Nonsecure dynamic updates on.
How to configure DNS dynamic updates in Windows
https://learn.microsoft.com/en-us/troubleshoot/windows-server/networking/configure-dns-dynamic-updates-windows-server-2003
Время на прочтение3 мин
Количество просмотров18K
Необходимость в таком обновлении возникла у меня в такой ситуации: на линуксе поднят openvpn сервер, к нему коннектятся удаленные клиенты. Openvpn сервер сам динамически выдает адреса клиентам и, хотелось бы, чтобы он и создавал dns записи с common name сертификата на DNS сервере, который интегрирован в Active Directory. Тут можно пойти простым путем, и поставить в свойстве зоны «Динамическое обновление» опцию «Небезопасные и безопасные», но тогда любой, кто имеет доступ к DNS серверу, сможет менять записи зоны – не комильфо. Если поставить «Только безопасные», то DNS сервер обязательно будет требовать аутентификацию по протоколу GSS-TSIG. Дальше пойдет речь о том, как это все настроить.
Для начала, создаём пользователя домена с минимальными правами, например ddns и задаём ему сложный пароль и опцию «Срок действия пароля не ограничен». У этого пользователя должно быть достаточно прав на изменение записей dns-зоны. В свойставх dns-зоны должна быть выбрана опция «Только безопасные обновления».
Устанавливаем Kerberos клиент:
sudo apt-get install krb5-user
Отредактируем /etc/krb5.conf:
[libdefaults]
        default_realm = DOMAIN.LOCAL
[realms]
DOMAIN.LOCAL = {
                kdc = 192.168.2.200
                kdc = 192.168.2.202
                default_domain = domain.local
                admin_server = 192.168.2.200
        }

[domain_realm]
.domain.local = DOMAIN.LOCAL
domain.local = DOMAIN.LOCAL
Хотя клиент будет работать даже в такой конфигурации:
[libdefaults]
        default_realm = DOMAIN.LOCAL
Для Kerberos важным моментом является синхронность часов севера и клиента. Можно установить службу ntpd – она будет поддерживать корректное время:
sudo apt-get install ntp
С помощью ktutil создадим keytab файл, в котором будут храниться данные для аутентификации пользователя ddns:
sudo ktutil
ktutil:  addent -password -p ddns@DOMAIN.LOCAL -k 1 -e rc4-hmac
ktutil:  write_kt krb5.keytab
ktutil:  quit
Теперь можно проверить, насколько всё сделано правильно:
kinit -k -t krb5.keytab ddns
Никакого вывода быть не должно. Можно посмотреть полученные билеты:
klist
Ticket cache: FILE:/tmp/krb5cc_1000
Default principal: ddns@DOMAIN.LOCAL

Valid starting       Expires              Service principal
29.04.2014 14:50:39  30.04.2014 00:50:39  krbtgt/DOMAIN.LOCAL@DOMAIN.LOCAL
        renew until 30.04.2014 14:50:39
Если keytab поместить по умолчанию (etc/krb5.keytab), то можно сократить команду:
kinit -k ddns
Теперь остается только настроить openvpn. Для этого в конфигурационном файле сервера openvpn должна быть опция:
learn-address /etc/openvpn/learn-address.sh
Сам скрипт learn-address.sh:
#!/bin/bash

dnsserver=192.168.2.200
fwdzone=domain.local
revzone=7.168.192.in-addr.arpa
ttl=300
op=$1
addr=$2
revaddr=`echo $addr | sed -re 's:([0-9]+)\.([0-9]+)\.([0-9]+)\.([0-9]+):\4.\3.\2.\1.in-addr.arpa:'`
cn=$3
fqdn=$cn.$fwdzone
dir=/etc/openvpn/dns
addfile=$dir/add_$addr
delfile=$dir/del_$addr
keytab_file=/etc/openvpn/krb5.keytab
user=ddns

addRecord() {
        kinit -k -t $keytab_file $user
        cat > $addfile << EOF
gsstsig
server $dnsserver
zone $fwdzone
update delete $fqdn a
update add $fqdn $ttl a $addr
send
zone $revzone
update delete $revaddr ptr
update add $revaddr $ttl ptr $fqdn
send
EOF

        cat > $delfile << EOF
gsstsig
server $dnsserver
zone $fwdzone
update delete $fqdn a
send
zone $revzone
update delete $revaddr ptr
send
EOF

        nsupdate -v $addfile
        rm -f $addfile
}

delRecord() {
        kinit -k -t $keytab_file $user
        nsupdate -v $delfile
        rm -f $delfile
}

case $op in
        add|update)
                addRecord
                ;;
        delete)
                delRecord
                ;;
        *)
                echo "Unable to handle operation $op.  Exiting" exit 1
esac
Подытожу: Ключевым моментом является опция gsstsig в файле, который передается утилите nsupdate. При этом должен быть получен билет (ticket) от контроллера домена с помощью kinit <user>.
To totally unlock this section you need to Log-in
Login
During the installation of Active Directory Domain Services on Windows Server 2008 R2, the installation process automatically installs the DNS server on the computer, in case it does not already exist in the network. After the successful installation of Active Directory Domain Services, the DNS server is by default configured to automatically update the records of only the domain client computers as soon as it receives the registration request from them. This automatic update of DNS records in the DNS database is technically known as Dynamic Updates.
Types of DNS Updates
Dynamic updates that DNS server in Windows Server 2008 R2 supports include:
- Nonsecure and Secure – When this type of dynamic update is selected, any computer can send registration request to the DNS server. The DNS server in return automatically adds the record of the requesting computer in the DNS database, even if the computer does not belong to the same DNS domain. Although this configuration remarkably reduces administrative overhead, this setting is not recommended for the organizations that have highly sensitive information available in the computers.
- Secure only – When this type of dynamic update is selected, only the computers that are members of the DNS domain can register themselves with the DNS server. The DNS server automatically rejects the requests from the computers that do not belong to the domain. This protects the DNS server from getting automatically populated with records of unwanted, suspicious and/or fake computers.
- None – When this option is selected, the DNS server does not accept any registration request from any computers whatsoever. In such cases, DNS administrators must manually add the IP addresses and the Fully Qualified Domain Names (FQDNs) of the client computers to the DNS database.
In most production environments, systems administrators configure Secure Only dynamic updates for DNS. This remarkably reduces the security risks by allowing only the authentic domain client computers to register themselves with the DNS server automatically, and decreases the administrative overhead at the same time.
However in some scenarios, administrators choose to have non-Active Directory integrated zone to stay compliant with the policies of the organization. This configuration is not at all recommended because it does not allow administrators to configure DNS server for Secure only updates, and it does not allow the DNS database to get replicated automatically to the other DNS servers along with the Active Directory replication process. When DNS zone is not Active Directory integrated, DNS database replication process must be performed manually by the administrators.
Configure Secure Only Dynamic Updates in Windows Server 2008 R2 DNS Server
To configure Secure Only dynamic DNS updates in Windows Server 2008 R2, administrators must follow the steps given as below:
- Log on to Windows Server 2008 R2 DNS server computer with the domain admin or enterprise admin account on which Secure only dynamic updates are to be configured.
- On the desktop screen, click Start.
- From the Start menu, go to Administrator Tools > DNS.
- On DNS Manager snap-in, from the console tree in the left, double-click to expand the DNS server name.
- From the expanded list, double-click Forward Lookup Zones.
- From the displayed zones list, right-click the DNS zone on which secure only dynamic updates are to be configured.
- From the displayed context menu, click Properties.
On the zone’s Properties box, make sure that the General tab is selected. On the selected tab, choose Secure only option from the Dynamic updates drop-down list.
Note: Secure only option is available only if the DNS zone is Active Directory integrated.
Click OK to apply the modified changes and then close DNS Manager snap-in when done.
A long long time ago, in a galaxy far far……. wait, that’s a different universe! But today I do want to talk about something very ancient, RFC2136 that was released in April 1997. This specific RFC describes the process of “Dynamic Updates in the Domain Name System (DNS UPDATE)“.
While very common these days, it was a big thing back in the day. I can vividly remember our DNS admins talking about this and saying something along the lines “only when hell freezes over”. Apparently that happened 3 years later when Windows 2000 was released and introduced Active Directory with DNS Integrated zones and you guessed it, Dynamic updates.
What is Dynamic DNS?
Dynamic DNS (DDNS) extends the standard DNS functionality to allow networked devices, such as computers and printers, to update their own DNS records automatically. This is a significant improvement over traditional DNS, where changes often required manual updates by network administrators, a process that could be slow and error-prone.
How Dynamic DNS works in Windows Active Directory
In a Windows Active Directory environment, DDNS is particularly integrated with DHCP (Dynamic Host Configuration Protocol) services when a Windows based DHCP server is used. Here’s a step-by-step breakdown of the process:
- IP address assignment:
- A DHCP server assigns an IP address to a Endpoint (such as a workstation or server within the Active Directory domain). This assignment is typically based on a lease system, where the IP address is valid for a specific period, default values are typically 7 days.
- DNS record update request:
- Once the Endpoint receives its IP address, it sends a request to the DNS server to update its corresponding DNS record. By default, Windows machines will initially attempt unsecured updates. If an error occurs, they will then attempt a secure update (Controllable by Group Policy). This update mechanism, per default, updates it’s own resource records every 24 hours (Domain Controllers do it every hour), during reboot or manually using “ipconfig /registerdns” and becomes the record owner. When Windows DHCP is involved the machine account of the DHCP server can become the owner of the record. Who eventually registers the resource record depends on the content of the DHCP request from the Endpoint, the configuration of the Endpoint and the configuration of the DHCP server.
- DNS server processes update:
- The DNS server, upon receiving a valid update request, modifies the DNS record of the Endpoint. This update adjusts the record to reflect the new IP address, ensuring that any queries for the domain name of that Endpoint resolve to the correct, current IP address.
- Record aging and scavenging:
- To manage the lifecycle of DNS records, Windows DNS servers use a mechanism of aging and scavenging. This process helps remove outdated records automatically, maintaining the DNS database’s accuracy and efficiency. Dynamic updates set timestamps on DNS records, which are later used to determine when a record is stale and eligible for scavenging.
But now as more seasoned professionals retire or move on to other endeavors, there’s a noticeable gap in Active Directory knowledge among those left to manage network systems. This often leads to challenges in maintaining and optimizing critical aspects like DNS. If you’ve ever wondered why your DNS remembers servers that haven’t been used in years, then you’ll appreciate what DNS scavenging can do for you. It’s like a digital spring cleaning for your network’s DNS records, but there are a few things you need to know to make sure it goes smoothly. Let’s dive into what DNS scavenging is, why it’s important, and how to set it up without causing issues.
Cleaning up, what is DNS scavenging?
Simply put, DNS scavenging is a way to automatically clean up old and outdated records from your DNS server. Think about an old test server that you set up a long time ago and then forgot about—your DNS might still be keeping track of it even if it’s no longer in use. Scavenging helps keep the DNS database clean by getting rid of these records.
Setting up DNS scavenging
To make DNS scavenging work, you need to set it up in three places:
- On each record: You have to tell each DNS record that it can be cleaned up. This is like putting a tag on items in your house that says, “Okay to throw away.”
- On the DNS zone: The zone is like a section of your house. You need to decide which sections you’re going to clean up. The terminology on a zone is aging, which is used by the scavenging process to clean up the records.
- On the server: Finally, you need to enable the cleaning process on the server itself, which is like deciding who in your house is responsible for the actual cleaning.
How to configure aging and scavenging settings
- For individual records: Go to the DNS management console, turn on the advanced view, and check the box that says, “Delete this record when it becomes stale” on each record you want to clean up.
Note! Do the opposite when you want to make a dynamic record a static one.
- For the DNS zone: Right-click on the DNS zone, click properties, and then click the “Aging” button. This lets you set when and how the cleaning should happen for that zone.
- For the server: Choose a server that will do the cleaning. Right-click on it, select properties, go to the advanced tab, and check “Enable automatic scavenging of stale records.”
Detailed aging settings for resource records
Aging settings on individual resource records can be configured in one of two specific ways:
- Manual configuration: Administrators can manually select the “Delete this record when it becomes stale” option in the properties of a DNS record. When you apply this setting, the system rounds the time of day down to the nearest hour and sets this as the timestamp on the record. This option is often used when you want explicit control over which records are eligible for scavenging.
- Automatic by Dynamic DNS updates: Windows machines are programmed to automatically register their DNS records every 24 hours using dynamic DNS (DDNS) (Every 1 hour for Domain Controllers). This helps keep the DNS records up to date without manual intervention. When a new record is created by an endpoint machine that didn’t previously have a record, it is marked for scavenging, and a timestamp is set. If the record is updated — meaning the IP address changes — this is also treated as an update, and a new timestamp is applied. However, if the IP address remains the same and the record is just being refreshed, the timestamp may or may not be updated depending on the zone’s configuration.
Manually initiating the scavenging process
While DNS scavenging is typically set to run automatically according to the schedules you’ve configured, there may be occasions when you need to initiate the process manually. This might be necessary after making significant changes to your DNS or when you want to immediately clear out stale records without waiting for the next scheduled run. You can initiate scavenging manually using either the DNS Manager graphical user interface (UI) or PowerShell, depending on your preference for graphical or command-line interfaces. Here’s how you can do both:
Using the DNS Manager (UI)
- Open DNS Manager:
- Click “Start“, point to “Administrative Tools“, and then click “DNS” to open the DNS Manager.
- Select the server:
- In the DNS Manager console, expand the server you want to configure, ensuring it’s the server designated for scavenging if you’ve followed best practices.
- Initiate scavenging:
- Right-click the server and select “Scavenge stale resource records“, click “Yes“.
This will trigger the server to begin scavenging based on the aging parameters set for each zone. The server will log events in the DNS server logs corresponding to the start and end of the scavenging process, which you can review for verification.
Using PowerShell
For those who prefer using command-line tools or need to script the process for automation, PowerShell provides a powerful way to manage DNS scavenging:
- Open PowerShell:
- Launch PowerShell with administrative privileges.
- Execute Scavenging Command:
- Use the Invoke-DnsServerScavenging cmdlet to start the scavenging process immediately on the specified DNS server.
Invoke-DnsServerScavenging -ComputerName "YourDNSServerName"To refresh or not to refresh, that’s the question
Scavenging isn’t something that happens right away. It’s designed to be safe and slow to prevent accidentally deleting something important. Here are some built-in safety features:
- No-Refresh interval: This is a set amount of time when the timestamp of records are left alone (meta data like the IP address changes do update). This prevents the server from being overloaded with unnecessary checks and updates.
- Refresh interval: After the no-refresh period, this interval allows records to be updated if needed. If a record doesn’t get updated in this time, it can be cleaned up during the next scavenging run.
Extended example calculation for No-Refresh and Refresh intervals with server aging setting
For this example, let’s assume both the No-Refresh and Refresh (aging) intervals are set to 3 days each, and the scavenging setting on the server (the period between scavenging operations) is set to 4 days. Here’s how it all connects:
- No-Refresh: 3 days.
- Refresh: 3 days.
- Scavenging: 4 days.

Here’s what happens:
- Day -1: The scavenging process runs. Nothing happens as no records is eligible for deletion.
- Day 1: DNS Record is created – timestamp set.
- Day 1 to 3: During this period, any update to the timestamp of the record is not allowed. Changes to the meta data, like the IP address, are however granted. This helps to minimize replication traffic and reduces the load on your DNS servers..
- Day 4: The scavenging process runs. Nothing happens as no records is eligible for deletion.
- Day 4 to 6: Now the record enters the Refresh interval. If the record is actively updated during this time (e.g., by a dynamic update from an Endpoint), the timestamp is reset. If there are no updates, the record’s timestamp remains unchanged.
- Day 7: if there have been no changes, record is marked stale. Note! If the record is updated after it’s been marked stale, but updated before scavenging the timestamp is reset.
- Day 8: Server performs a scavenging operation. If the record is still unchanged and marked stale, it will be scavenged and deleted.
This expanded calculation shows how each setting interacts and the importance of syncing these intervals to avoid premature data deletion while ensuring your DNS remains clutter-free. By managing these settings thoughtfully, you can maintain an efficient and effective DNS infrastructure.
Recommendations for DNS aging with DHCP
When integrating DNS aging with Dynamic Host Configuration Protocol (DHCP), coordinating the No-Refresh and Refresh intervals with the DHCP lease time is crucial. This alignment ensures that DNS records are updated in tandem with DHCP lease renewals, preventing discrepancies that could lead to DNS inconsistencies or connectivity issues. Here’s how you can optimize these settings.
Understanding DHCP lease time
DHCP lease time is the duration for which a DHCP server grants an IP address to an Endpoint before the Endpoint must request a new lease. Typical DHCP lease times can vary based on network requirements, but a common setting might be 8 days. This lease time impacts when an Endpoint will renew its IP address and, consequently, when it might update its corresponding DNS record.
Coordinating DNS aging with DHCP
To ensure DNS aging works effectively with DHCP, it’s advisable to set the combined total of the No-Refresh and Refresh intervals to at least match the DHCP lease time. This setup helps prevent DNS records from being scavenged while they are still potentially in use.
Example Scenario:
DHCP lease time: 6 days
This is the duration for which an IP address is valid before an Endpoint must renew it.
- No-Refresh interval: 3 days
For the first four days after a DNS record is updated, any attempts to refresh the record do not update the timestamp. - Refresh interval: 3 days
Following the No-Refresh period, the record can be updated for an additional four days, during which time the timestamp will be reset if the record is updated.
Detailed calculation:
- Day 0: Endpoint obtains an IP address and registers a DNS record; timestamp is set.
- Day 0 to Day 3: No-Refresh interval; the record’s timestamp is not updated despite any refresh attempts.
- Day 4 to Day 6: Refresh interval; if the Endpoint renews its DHCP lease and updates its DNS record, the timestamp is reset.
- Day 7 and beyond: DHCP lease expires. If the Endpoint renews the lease, the DNS record and timestamp are updated and the cycle restarts.
Recommendations:
- Match aging intervals with DHCP lease: Set the total duration of the No-Refresh and Refresh intervals to equal or exceed the DHCP lease time. This ensures that DNS records are not prematurely scavenged, maintaining network stability and connectivity.
- Monitor and adjust based on network dynamics: Regularly review and adjust the DHCP lease time and DNS aging settings based on actual network usage and dynamics. This may involve shortening or extending these intervals based on factors such as Endpoint mobility, network load, and typical duration of connected sessions.
- Automate DNS decord updates: Where possible, automate DNS updates from DHCP to DNS to reduce the likelihood of outdated records. This can be done through dynamic DNS updates, where DHCP servers are configured to update DNS records when IP addresses are leased or renewed.
By following these guidelines, you can ensure that DNS complements DHCP management, enhancing both DNS integrity and network efficiency. This alignment is particularly important in dynamic environments where IP addresses frequently change due to Endpoint movement or network reconfiguration.
Side note: The DNS Client service (dnscache) is responsible for updating the computer’s DNS records. This service ensures that DNS names and IP addresses are properly registered and maintained. It’s important to note that you cannot restart the DNS Client service using command-line tools, as these actions are not permitted for this critical system service. To manually initiate a dynamic DNS update, use the “ipconfig /registerdns” command. This command refreshes all DHCP leases and re-registers DNS names, ensuring your DNS records are up to date without needing to restart the machine.
ACLs for DNS records
Access Control Lists (ACLs) are automatically set for DNS records to manage permissions and ensure secure dynamic updates. When dynamic updates are enabled, ACLs help control who can create, modify, or delete DNS records. This is crucial for maintaining the integrity and security of DNS information in an Active Directory environment.
Default ACL settings
By default, Windows dynamically registers its own DNS record, the computer account is granted full control over its own DNS record. This ensures that the computer can update its own DNS record as needed, allowing for accurate name resolution and IP address mapping.
DHCP server and dynamic updates
In scenarios where the DHCP server is made responsible for updating DNS records on behalf of clients, the endpoint must explicitly request this service. When the DHCP server updates the DNS record, it becomes the owner of the record. This means the DHCP server’s account is granted full control over the DNS record, allowing it to manage updates as necessary. Albeit I say full control, the record gets read/write and special permissions on the record, but since it’s defined as the owner it can always take full control.
Note! Contrary to popular believe, introducing a Windows based DHCP server will not magically change the ownership of a DNS resource record. You must enable the option “Always dynamically update DNS records” on the DNS Server or zone.
Note! When this setting is enabled, the DNS record is only updated by the DHCP server when the IP address is assigned to the Endpoint. Manually using “ipconfig /registerdns” results in a denied message in the event viewer. Changing the IP address to static, changes the owner back to the machine account.
When a DNS record exists where the owner is the machine account and the machine is set to DHCP, the ownership is NOT changed to the DHCP server. Only when the DHCP lease is expired and a new request is send, will the record be deleted and a new one, with the ownership of the DHCP server, is set. Something to remember.
Understanding replication in AD integrated zones
AD integrated zones store their DNS records in the Active Directory database, which allows for seamless replication of data across all domain controllers in the environment. This setup enhances both the security and reliability of DNS data management. When changes are made to DNS settings on one server, such as updates to aging configurations (No-Refresh and Refresh intervals) , these changes are automatically propagated to all other DNS servers in the AD forest.
Note! The scavenging settings are a server side setting and do not replicate throughout other DNS servers.
Locating DNS data in Active Directory
When managing an Active Directory (AD) environment, sometimes you need to dive deeper into the configuration details that aren’t readily visible through standard tools like the DNS Management console. “ADSIEdit” is a powerful utility that allows administrators to access and modify low-level directory services data. It is particularly useful for examining intricate settings within Active Directory Integrated DNS zones, offering insights that can be crucial for advanced troubleshooting and configuration verification. In the following section, I’ll explain what the difference in DNS zones and guide you through the step-by-step process of using ADSI Edit to view these zones, ensuring you have the detailed visibility required to manage your DNS infrastructure effectively.
Understanding DomainDNSZones and ForestDNSZones in Active Directory
In Active Directory (AD), DNS data is stored within specific directory partitions, each serving different scopes and purposes. These partitions help organize and manage DNS information effectively within the AD infrastructure. By separating DNS data into different partitions, AD ensures that DNS records are replicated and stored according to the needs of the organization. This separation also enhances performance and scalability, as it allows for more granular control over DNS data replication. Additionally, it improves security by limiting access to DNS records based on their partition. Each partition is tailored to meet specific replication and accessibility requirements. For example, DomainDNSZones focus on domain-specific data, ensuring efficient replication within the domain. On the other hand, ForestDNSZones cater to forest-wide data, facilitating access across all domains in the forest. Understanding these partitions is crucial for optimizing DNS infrastructure and ensuring reliable name resolution within an Active Directory environment.
DomainDNSZones
- Scope: DomainDNSZones partition stores DNS records that are specific to a single domain. Each domain in the forest has its own DomainDNSZones partition.
- Replication: The data in DomainDNSZones is replicated only among the domain controllers within the same domain. This ensures that DNS information specific to a domain is not propagated unnecessarily across the entire forest.
- Use Case: Ideal for domain-specific DNS data, such as host (A) records, service (SRV) records, and other DNS resource records that are relevant only to a particular domain.
ForestDNSZones
- Scope: ForestDNSZones partition, on the other hand, stores DNS records that are intended to be available across the entire AD forest. There is a single ForestDNSZones partition for the entire forest.
- Replication: This partition’s data is replicated to all domain controllers in the forest, making the DNS information available universally across all domains within the forest.
- Use Case: Best suited for forest-wide DNS data, such as global service records that need to be accessible from any domain within the forest.
Key differences
- Replication Scope: DomainDNSZones replicates data within a single domain, whereas ForestDNSZones replicates data across the entire forest.
- Purpose: DomainDNSZones is used for domain-specific DNS records, while ForestDNSZones is used for DNS records that need to be accessible across all domains in the forest.
Note! In Active Directory-integrated DNS zones, timestamps on DNS records are not replicated unless aging is enabled for the zone. Aging allows DNS records to have timestamps that indicate when they were last updated. This can be crucial for identifying and cleaning up stale DNS records. Without aging enabled, the timestamps won’t be updated or replicated, making it difficult to track how many old or potentially obsolete records you have in your DNS zones.
Check the replication scope of a DNS Zone
To determine if a DNS zone is domain-wide or forest-wide in Active Directory, you can check its replication scope using the DNS management console. Follow these steps to view the properties of the DNS zone:
- Open “DNS” management.
- Browse to the “Forward Lookup Zones“.
- Select the properties of your zone.
- Click on “Change“, right behind the “Replication:…“

The top option determines that the zone is replicated throughout the entire forest, while the second option marks it as a domain zone.
DNS zone information as a partition using ADSIedit
To view DNS zone information as a partition in Active Directory, you can use tools like ADSIEdit to delve into the details of your DNS infrastructure. Use the following steps to open the partition that holds the Domain Zone information.
- Open “AdsiEdit.msc“.
- Right click on “Adsi Edit“, select “Connect to…“.
- In “Select a well-known naming context”, select “Configuration” click “OK”.
- Browse to “CN=Partitions,CN=Configuration,DC=<DomainName>,DC=<Suffix>”.
- Underneath “Directory Partition Name” right click, “DC=DomainDNSZones…”, select “New Connection to Naming Context”.
- Browse to “CN=MicrosoftDNS,DC=DomainDnsZones, DC=<DomainName>,DC=<Suffix>”, Click on your DNS zone.
when you view Active Directory Integrated DNS zones, you’re looking at the DNS zone partitions within the Active Directory database. These partitions are representations of DNS namespaces that are stored directly in Active Directory.

The dNSTombstoned attribute
While we are discussing Active Directory cleanup, specifically DNS, it’s important to understand that DNS cleanup and DNS data management in Active Directory follow different cleanup cycles. Even after a DNS record is removed from the active DNS zone, it can remain within Active Directory for a period due to the way Active Directory handles tombstoned data. This delayed cleanup is crucial for ensuring data consistency and preventing premature data loss, especially in distributed environments.
When a DNS record is deleted or scavenged in an Active Directory-integrated DNS zone, it is not immediately purged from the database. Instead, it is marked with the dNSTombstoned attribute. This attribute plays a critical role in the DNS cleanup process by indicating that the record is no longer active but has not yet been completely removed from the directory. Here’s why this is significant:
- Prevents premature deletion: The dNSTombstoned attribute ensures that deleted records go through a proper aging process before they are permanently purged. This prevents scenarios where a record might be needed briefly after its deletion due to replication delays or backup restorations.
- Consistency across replicas: Active Directory replicates data across multiple domain controllers. The dNSTombstoned attribute ensures that once a DNS record is marked for deletion, this status is consistently replicated across all controllers, preventing an old record from reappearing in the DNS zone.
- Facilitates safe replication: During the replication process, it is vital to ensure that deleted records are not treated as new by other domain controllers. The dNSTombstoned attribute flags these records appropriately, ensuring they are recognized as deleted throughout the network.
- Grace period for recovery: In case of accidental deletions or system errors, the presence of the dNSTombstoned attribute provides a grace period during which the deletion can be reversed, offering an additional layer of safety against data loss.
Understanding the role of the dNSTombstoned attribute and how it manages the lifecycle of DNS records within Active Directory is essential for maintaining a clean, consistent, and reliable DNS infrastructure.
Viewing or setting the dNSTombstoned attribute
- Open “AdsiEdit.msc“.
- Right click on “Adsi Edit“, select “Connect to...”.
- In “Select a well-known naming context”, select “Configuration” click “OK”.
- Browse to “CN=Partitions,CN=Configuration,DC=<DomainName>,DC=<Suffix>”.
- Underneath “Directory Partition Name” right click, “DC=DomainDNSZones…”, select “New Connection to Naming Context”.
- Browse to “CN=MicrosoftDNS,DC=DomainDnsZones, DC=<DomainName>,DC=<Suffix>”, Click on your DNS zone.
- Open an object that represents the record you wish to view or edit.
- Double click on the dNSTombstoned attribute. Set it to one of the following values:
- True: The object is set to be tombstoned and can be scavenged from the DNS database at the next cycle.
- False: The object must not be scavenged at the next cycle.
- Not Set: The dNSTombstoned attribute is not set and will be manged by the system.
Note! As a best practice, make sure that all your servers with static IP addresses have the attribute dNSTombstoned set to FALSE.
Active Directory database cleanup of DNS records
Although not related to cleaning up DNS specifically, Active Directory (AD) itself requires regular cleanup to maintain operational efficiency and system integrity. This happens through a process known as the garbage collection process. Active Directory garbage collection is an automated maintenance task that is crucial for the management of stale or obsolete data within the directory environment. This process is particularly vital as it helps manage and clean up data entries that are no longer needed, such as old user accounts, computer objects, and the DNS record objects.
Garbage collection in Active Directory runs periodically—by default, every 12 hours—to search for and clean up objects that have been marked as deleted. When objects are deleted in AD, they are not immediately removed from the database. Instead, they are initially marked for deletion and moved into a state known as “tombstoned.” The objects remain in this tombstoned state for a period determined by the tombstone lifetime (TSL), which is typically set to 180 days in current versions of Windows Server.
Please note! The garbage collection will process only 5000 objects at a time. The next interval, 12 hours later, will process the remaining objects, again 5000 max.
Use this PowerShell command to view your Active Directory configuration:
Get-ADObject "CN=Directory Service,CN=Windows NT,CN=Services,CN=Configuration,DC=yourdomain,DC=com" -Property tombstoneLifetimeThe Role of garbage collection in DNS Cleanup
While garbage collection does not directly interact with DNS cleanup processes such as scavenging, it plays a complementary role by ensuring that the underlying directory infrastructure is optimized and free from obsolete data. By maintaining a clean and efficient Active Directory environment, DNS operations can run more smoothly, reflecting the most current and accurate state of network resources.
Understanding and monitoring the garbage collection process in Active Directory is essential for administrators to ensure that the directory remains clean, efficient, and capable of supporting the organization’s IT needs.
Manually initiating garbage collection
While Active Directory’s garbage collection process is typically automated, there are scenarios where you might need to manually initiate this process to immediately clear out stale or obsolete data, or for troubleshooting purposes. The LDP tool, a lightweight directory access protocol (LDAP) utility included with Windows Server, provides a hands-on approach to managing Active Directory objects directly. In this section, I’ll show how to use LDP to manually trigger the garbage collection process.
- Open “ldp.exe“.
- Click “Connection“, “Bind“, accept the default, click “OK“.
- Click “Browse“, “Modify“.
- Use these values:
- DN: <Empty>
- Attribute: DoGarbageCollection
- Values: 1
- Operations: Add
- Click “Enter“, Click “Run“.
Designating a single scavenging server
Now that we have established that Active Directory integrated DNS is managed within AD and replicated across all domain controllers hosting the DNS zones, it becomes clear why centralizing the management of DNS scavenging is crucial. Given this replication model, having multiple domain controllers independently managing the scavenging process could lead to inconsistencies and conflicts. Therefore, it is prudent to designate a single domain controller to handle the scavenging of DNS zones. This approach not only simplifies management but also enhances the consistency and reliability of DNS operations across the network. In the following section, I’ll delve into the benefits of this strategy and outline the steps to effectively designate a single scavenging server.
- Select a primary scavenging server:
- Choose one DNS server to act as the primary scavenging server. This server will be responsible for initiating the scavenging process, thereby controlling when and how DNS records are purged based on their staleness.
- Configure aging and scavenging settings:
- On the designated scavenging server, configure the appropriate aging and scavenging settings. This includes setting the No-Refresh and Refresh intervals according to your network’s specific needs. the aging settings are replicated to other DNS servers, scavenging is machine bound.
- Enable scavenging:
- Enable the scavenging feature on this server. Ensure that scavenging is either disabled or not configured to initiate on other servers to prevent multiple servers from attempting to scavenge simultaneously, which could lead to inconsistencies.
Best Practices for managing the lifecycle of DNS records
I’ve discussed a lot on Dynamic DNS and housekeeping regarding DNS infrastructure management in environments using Active Directory Integrated zones, here’s a summary of the key best practices to optimize and streamline your network. These guidelines will help you manage DNS records more effectively, reducing clutter and minimizing the risk of issues arising from outdated or unnecessary records:
- Set a single server for scavenging:
- Designate a single DNS server to handle the scavenging process. This centralized approach minimizes the risk of conflicts or errors that could arise from having multiple servers performing simultaneous scavenging operations. This server will be the primary point of control for initiating and monitoring the scavenging process.
- Configure aging for all Active Directory integrated zones:
- On the designated scavenging server, enable and configure aging for all Active Directory Integrated zones. This ensures that all zones within your network are consistently applying the same aging policies, which helps in maintaining uniformity and reducing administrative overhead.
- Configure the No-Refresh/Refresh intervals to total to the maximum of the DHCP lease time:
- Set the combined duration of the No-Refresh and Refresh intervals to at least match the longest DHCP lease time configured within your network. This alignment is crucial to prevent DNS records from being scavenged while they may still be actively used by DHCP clients. For example, if the longest DHCP lease is 8 days, ensure that the sum of the No-Refresh and Refresh intervals is 8 days or more.
- Configure servers to have static IP addresses:
- Ensure that all DNS servers, especially those handling critical roles, are configured with static IP addresses. This practice prevents potential issues related to IP address changes, such as disruptions in DNS service availability or accessibility problems from Endpoint machines and other servers. Static IP addresses provide stability and reliability for servers, making them consistently reachable within the network.
- Set the dNSTombstoned:
- For servers that have a static IP address set the dNSTombstoned attribute to FALSE. This ensures that their DNS records remain active and are not marked for deletion.
- Monitor scavenging activity:
- Keep an eye on the scavenging process through event logs and DNS server logs. This monitoring will help you understand the impact of scavenging on your DNS environment and identify any potential issues early. DNS event 2501 logs how many records have been scavenged, DNS event 2502 is logged when no records are removed.
- Set minimum scavenging intervals:
- Never set the scavenging period on the server to be less than one day. Windows machines register their DNS records approximately every 24 hours. Setting the scavenging interval too short could lead to the premature deletion of dynamic records that are still in use.
By adhering to these best practices, you can maintain an optimized and clean DNS infrastructure that supports the dynamic nature of modern network environments. These practices not only enhance the efficiency of DNS management but also contribute to overall network reliability and security.
As always I really hope that this blog posts adds to your knowledge of Active Directory DNS maintenance. Please let me know if you have any questions or remarks on this post.