
Setting Nginx Django App with Postgres and Gunicorn on Ubuntu and Windows
Setting up a Nginx Django web application with a powerful stack like Postgres, and Gunicorn can greatly enhance its performance and scalability. In this guide, we will walk you through the process of configuring Nginx Django with Postgres as the database, Nginx as the web server, and Gunicorn as the application server on both Ubuntu and Windows operating systems.
Nginx and Django Integration
Nginx and Django are two powerful tools commonly used in web development. Nginx is a high-performance web server and reverse proxy, while Django is a popular Python web framework. Integrating Nginx with Django can greatly enhance the performance, scalability, and security of your web application.
Nginx acts as a middle layer between the client and Django, handling various tasks such as load balancing, caching, serving static files, and proxying requests to the Django application server. This integration allows Nginx to efficiently handle incoming web traffic, offload resource-intensive tasks from Django, and provide additional functionalities to optimize the overall performance of your application.
Prerequisites:
- A working Django project
- A running Postgres database
- Ubuntu or Windows operating system
Nginx Django :Installing and Configuring
Before we get into installing and configuring Nginx Django app you must understand the Role of Nginx in Django Deployment.
In a typical Django deployment, Nginx plays a crucial role in managing the flow of incoming requests. When a client makes a request to your application, it first goes through Nginx, which acts as a reverse proxy. Nginx can then perform various tasks before forwarding the request to the Django application server.
One of the primary functions of Nginx is load balancing. With Nginx, you can distribute incoming requests across multiple instances of your Django application, ensuring optimal utilization of server resources and improving the overall responsiveness of your application.
Nginx also excels at serving static files efficiently. By configuring Nginx to handle static files directly, you can reduce the load on Django, allowing it to focus on processing dynamic requests. This approach significantly improves the performance of your application, especially when dealing with large volumes of static files. Let’s get started!
Install Postgres On Ubuntu
- Open the terminal and run the following commands:
sudo apt update
sudo apt install postgresql postgresql-contrib
- Configure Postgres: Create a new database and user for your Django project. Replace your_database_name, your_username, and your_password with your desired values:
sudo -u postgres psql
CREATE DATABASE your_database_name;
CREATE USER your_username WITH PASSWORD 'your_password';
GRANT ALL PRIVILEGES ON DATABASE your_database_name TO your_username;
\q
Download and Install Postgres On Windows
- Visit the official PostgreSQL website and download the installer suitable for your Windows version. Follow the installation wizard to complete the setup.
- Launch the pgAdmin application and create a new database and user for your Django project. Take note of the database name, username, and password for later use.
Install and Configure Django
- Open the terminal or command prompt and run the following command:
- In your Django project’s settings.py file, update the database settings with the Postgres details:
DATABASES = {
'default': {
'ENGINE': 'django.db.backends.postgresql',
'NAME': 'your_database_name',
'USER': 'your_username',
'PASSWORD': 'your_password',
'HOST': 'localhost',
'PORT': '',
}
}
Installing and Configuring Nginx on Ubuntu
- Open the terminal and run the following command:
- Create a new server block configuration file:
sudo nano /etc/nginx/sites-available/your_project_name
- Inside the file, add the following configuration:
server {
listen 80;
server_name your_domain_or_ip;

location / {
proxy_pass http://localhost:8000;
proxy_set_header Host $host;
proxy_set_header X-Real-IP $remote_addr;
}
}
- Save the file and exit the editor. Then, enable the new server block and restart Nginx:
sudo ln -s /etc/nginx/sites-available/your_project_name /etc/nginx/sites-enabled/
sudo nginx -t
sudo systemctl restart nginx
Please note above steps are just a basic steps to configure Nginx Django, For complete and deep Nginx config please read our article on Install Nginx and Nginx Config.
Installing and Configuring Nginx on Windows
- Download and Install Nginx: Visit the official Nginx website and download the Windows version. Extract the downloaded package and place it in a desired location.
- Configure Nginx: Open the nginx.conf file located in the extracted Nginx directory. Inside the http block, add the following configuration:
server {
listen 80;
server_name your_domain_or_ip;

location / {
proxy_pass http://localhost:8000;
proxy_set_header Host $host;
proxy_set_header X-Real-IP $remote_addr;
}
}
Please replace your_domain_or_ip with your actual domain name or IP address.
- Save the changes to the nginx.conf file and start Nginx by running the following command in the command prompt:
Installing and Configuring Gunicorn
- Open the terminal or command prompt and run the following command:
- Navigate to the root directory of your Django project where the “manage.py” file is located. Run the following command to start Gunicorn:
gunicorn your_project_name.wsgi:application --bind localhost:8000
Testing Your App
- Open your web browser and visit
http://your_domain_or_ip. You should see your Django application running successfully.
Congratulations! You have successfully set up Django with Postgres, Nginx, and Gunicorn on both Ubuntu and Windows operating systems. This powerful stack will provide a robust foundation for your web application, ensuring efficient handling of requests and reliable database management. Happy coding!
Nginx Django Benefits
- Nginx’s efficient handling of requests, load balancing capabilities, and optimized serving of static files contribute to improved performance and reduced response times for your Django application. It allows you to handle higher traffic loads and delivers a smoother user experience.
- Nginx’s load balancing feature enables easy scalability by distributing requests across multiple Django application instances. This horizontal scaling approach ensures that your application can handle increased traffic and provides high availability by preventing any single point of failure.
- Nginx acts as a reverse proxy and can implement security measures such as request filtering, rate limiting, and SSL/TLS encryption. These features protect your Django application from various types of attacks, ensuring the security and integrity of user data.
- By offloading the serving of static files to Nginx, you reduce the workload on Django, enabling it to focus on dynamic content generation. Nginx’s efficient file-serving capabilities enhance the overall performance and responsiveness of your application.
- Nginx provides a flexible and powerful configuration system that allows you to customize various aspects of your Django application’s deployment. You can fine-tune Nginx settings to optimize performance, caching, and security based on your application’s specific requirements.
Зачем нам Django, Gunicorn и Nginx
- Django — веб-фреймворк на Python, который упрощает создание сложных веб-приложений. Он включает ORM для работы с базами данных и систему маршрутизации запросов.
- Gunicorn — WSGI-сервер, который запускает Django-приложение и обрабатывает входящие HTTP-запросы, распределяя их между процессами.
- Nginx — веб-сервер, который мы будем использовать как реверс-прокси перед Gunicorn. Nginx балансирует нагрузку и обрабатывает статические файлы.
Вместе они помогут нам развернуть проект на сервере.
Мы создадим в панели управления виртуальную машину (ВМ). Этот вариант удобен, например, когда у вас нет своего сервера или мощности вашего ПК не соответствуют требованиям разработанного приложения. Вместо входа по паролю настроим на ВМ аутентификацию по SSH-ключу.
В нашем руководстве мы используем Ubuntu 22.04, однако большинство команд подойдут и для других дистрибутивов Linux.
Обновление пакетов apt
Перед установкой сервисов убедимся, что все пакеты на нашем сервере обновлены. Это поможет избежать возможных проблем с нарушенными зависимостями из-за старых версий пакетов. Для этого выполняем команду:
sudo apt update && sudo apt upgrade -y
Когда система обновится, перейдем к развертыванию проекта.
Установка Python
Django и Python не могут быть отделены друг от друга, поэтому теперь нам нужно установить Python и сопутствующие пакеты, такие как система управления пакетами pip и модуль venv для создания виртуальных окружений:
sudo apt install python3 python3-pip python3-venv -y
После окончания установки проверим, что Python установлен успешно:
python3 --version
Если в выводе вы увидели версию установленного Python, значит, установка удалась.
Что еще посмотреть про Python
Создание аккаунта PostgreSQL и базы данных
Django включает в себя ORM — технологию, которая позволяет связать написанный код и базу данных. По умолчанию фреймворк использует легкую и быструю базу данных SQLite. Однако в продакшн-средах и условиях высоких нагрузок рекомендуется использовать базы данных вроде PostgreSQL. Именно ее мы и рассмотрим в нашей инструкции.
Установим БД командой:
sudo apt install postgresql postgresql-contrib -y
Перейдем к созданию базы данных и ее пользователя:
sudo -u postgres psql
В PostgreSQL выполняем:
    CREATE DATABASE mydb;
CREATE USER myuser WITH PASSWORD 'mypassword’;
ALTER ROLE myuser SET client_encoding TO 'utf8’;
ALTER ROLE myuser SET default_transaction_isolation TO 'read committed’;
GRANT ALL PRIVILEGES ON DATABASE mydb TO myuser;
После выполнения выходим из PostgreSQL:
\q
Настройка виртуальной среды Python для Django
Даже несмотря на то, что мы разворачиваем проект на специальной виртуальной машине, рекомендуется работать в виртуальной изолированной среде. Это помогает создать повторяемое и предсказуемое окружение для выполнения проекта. А еще — позволяет избежать проблемы несовместимости различных библиотек в проекте.
Создадим виртуальное окружение следующими командами:
    mkdir ~/testproject && cd ~/testproject
python3 -m venv venv
source venv/bin/activate
Убедимся в активации виртуального окружения: проверим, что после выполнения последней команды в терминале слева от имени пользователя появилась надпись (venv).


Выйти из окружения можно при помощи команды deactivate.
Установка Django, Gunicorn и psycopg2
После активации виртуальной среды установим в ней необходимые пакеты и зависимости:
pip install django gunicorn psycopg2-binary
Здесь psycopg2 — это специальный адаптер для связи Django c PostgreSQL, который включает API-спецификацию баз данных для Python.
Создание проекта на Django
Пришло время создать Django-проект. Для этого вводим команду, которая создаст внутри папки testproject всю базовую структуру проекта, включая основные файлы и каталоги.
django-admin startproject testproject .
Настройка проекта
За настройки проекта отвечает файл settings.py. Он содержит конфигурацию базы данных, статических файлов, безопасности и локализации. В файле мы укажем ранее созданные параметры для подключения к PostgreSQL, настроим разрешения по подключению и укажем порт для соединения с БД.
Открываем файл settings.py и приводим блок DATABASES к следующему виду:
    DATABASES = {

    'default': {

        'ENGINE': 'django.db.backends.postgresql',

        'NAME': 'mydb',

        'USER': 'myuser',

        'PASSWORD': 'mypassword',

        'HOST': 'localhost',

        'PORT': '5432',

    }

}
Также не забываем в settings.py прописать STATIC_ROOT для указания места, куда Django сложит статические файлы:
STATIC_ROOT = os.path.join(BASE_DIR, 'static')
В поле ALLOWED_HOSTS указываем адреса или домены, которым разрешено устанавливать соединение с Django-приложением:
ALLOWED_HOSTS = [ ‘first_address_or_domain_name’, ‘second_address_or_domain_name’ ]
После редактирования файла настроек применяем изменения в базе данных через миграции и создаем суперпользователя для входа в админ-панель Django:
    python manage.py migrate
python manage.py createsuperuser
Из этой панели мы можем решить большинство задач, которые могут появиться при администрировании сайта или приложения. Например, создать пользователя, изменить отображение разделов или поменять права.
Создание файлов сокета и systemd
Теперь можем перейти к сокету Gunicorn и systemd-юниту. Сначала создадим сокет. Он понадобится для передачи данных между процессами внутри нашей системы.
Например, мы бы могли передавать HTTP-запросы на конкретный порт для связи Gunicorn и Nginx. Однако сокет позволит уменьшить затрату ресурсов на обработку запросов и вместе с тем упростит конфигурацию нашего проекта.
В директории /etc/systemd/system/ создадим файл gunicorn.socket:
    [Unit]

Description=Gunicorn socket

[Socket]

ListenStream=/run/gunicorn.sock

[Install]

WantedBy=sockets.target
Теперь перейдем к созданию systemd-юнита — конфигурационного файла, в котором мы описываем имя, зависимости, выполняемые команды и все остальные сопутствующие параметры для запуска процесса в менеджере системы современных дистрибутивов Linux.
Для этого в директории /etc/systemd/system/ создаем файл gunicorn.service:
    [Unit]

Description=Gunicorn daemon

Requires=gunicorn.socket

After=network.target

[Service]

User=user

Group=www-data

WorkingDirectory=/home/user/testproject

ExecStart=/home/user/testproject/venv/bin/gunicorn \

          --access-logfile - \

          --workers 3 \

          --bind unix:/run/gunicorn.sock \

          testproject.wsgi:application

[Install]

WantedBy=multi-user.target
Не забудьте указать правильный путь к своему проекту и имя пользователя.
Активация сокета и проверка systemd
Мы создали необходимые конфигурационные файлы для systemd, теперь пришло время активации юнитов:
systemctl enable {gunicorn.socket,gunicorn.service}
systemctl start {gunicorn.socket,gunicorn.service}
Первой командой мы задаем системе директиву активировать сервис при загрузке системы, второй — запускаем сервис. Проверить, что сервис успешно запущен, можно командой:
systemctl status gunicorn
Если в выводе видно, что сервис в состоянии active (running), то все сделано верно.

Настройка Nginx
Приступим к настройке другого ключевого игрока нашего приложения — Nginx. Он может выполнять разные роли: от почтового сервера до балансировщика нагрузки. В рамках статьи Nginx будет выступать в качестве прокси-сервера.
Устанавливаем Nginx:
apt install nginx
Теперь переходим к его настройке. Создадим конфигурационный файл командой
vim /etc/nginx/sites-available/testproject
Внутри файла укажем настройки прокси-сервера:
    server {

    listen 80;                                                                                        # порт, который сервер прослушивает для входящих соединений

    server_name server_address_or_domain_name;                         # адрес или домен, по которому будет доступен сервер

  location = /favicon.ico { access_log off; log_not_found off; }  # указываем серверу игнорировать проблемы, связанные со значком веб-страницы

    location /static/ {           # определяем расположение статичных файлов нашего проекта

root /home/user/testproject;

    }

    location / {           # задаем параметр перенаправления всех запросов на созданный gunicorn socket

        include proxy_params;

        proxy_pass http://unix:/run/gunicorn.sock;

    }

}
После создания конфигурации мы, наконец, можем запустить прокси-сервер. Для начала создадим символическую ссылку на файл с нашей конфигурацией в директории /etc/nginx/sites-enabled:
ln -s /etc/nginx/sites-available/testproject /etc/nginx/sites-enabled
Теперь проверим, правильно ли сконфигурирован Nginx:
nginx -t
После выполнения команды в терминале должно отобразиться следующее:
    nginx: the configuration file /etc/nginx/nginx.conf syntax is ok

nginx: configuration file /etc/nginx/nginx.conf test is successful
Если что-то пошло не так, перепроверьте конфиг на ошибки в синтаксисе. Если с конфигурацией все в порядке, запускаем наш прокси-сервер:
systemctl restart nginx
Запуск проекта
Следующим шагом перезапускаем Gunicorn-сервис. При повторном запуске он применит все изменения и запустит Django-проект. Как вы уже, наверное, запомнили, делается это через systemctl:
systemctl restart gunicorn
Открываем браузер и заходим по адресу или домену нашего сервера. В случае правильной настройки вы увидите приветственную страницу Django.

Ранее мы создавали superuser для входа в административную панель Django. Теперь у вас появился доступ к панели по адресу http://server_address_or_domain_name/admin/.
Получение SSL/TLS-сертификата
Перед публикацией приложения в сеть рекомендуется получить и установить SSL/TLS-сертификат. Уже давно работа веб-сайтов и приложений по HTTPS является актуальным стандартом — это помогает обеспечить шифрование трафика и защиту данных.
Самый простой способ получения сертификата — установить утилиту Certbot от Let’s Encrypt. Если вы решили завернуть весь свой проект в контейнеры, можете воспользоваться Docker-образом для Certbot. Но мы пойдем классическим путем:
apt install certbot python3-certbot-nginx -y
Запустим получение сертификата и автоматически обновим конфигурацию Nginx.
    certbot --nginx -d example.com -d www.example.com

certbot install –nginx
Вместо example.com укажите доменное имя вашего сервера.
Let’s Encrypt выдает сертификаты сроком действия 90 дней, по истечении этого периода сертификат нужно обновить. Этот механизм направлен на повышение безопасности, чтобы с заданной периодичностью обновлялись ключи сертификата.
Проверим автоматическое обновление сертификата командой:
certbot renew --dry-run
Заключение
Теперь вы знаете, как развернуть Django-проект при помощи Nginx и Gunicorn. Если у вас еще нет готового проекта, но уже хочется научиться пользоваться фреймворком Django, можете обратить внимание на курс от Selectel «Разработка на Django для новичков».
И не останавливайтесь на обучении. Дальше — больше: тюнинг веб-сервера, масштабирование приложения и повышение отказоустойчивости при помощи нескольких инстансов и балансировщика. Но об этом мы расскажем в другой раз.
Время на прочтение4 мин
Количество просмотров61K
Предисловие
Для написания этой статьи ушло очень много сил и времени. Я натыкался на множество инструкций, как на английском, так и на русском языках, но как я понял, — они все были клонами оригинальной статьи на Digital Ocean. Спросите вы, почему я так считаю, а все потому, что все ошибки и неточности передаются с одного ресурса на другой без всяких изменений.
Подготовка
У нас есть обычный VPS c ОС Ubuntu, и мы уже написали в PyCharm или в блокноте свой сайт на Django и его осталось всего лишь опубликовать, привязать домен, установить сертификат и в путь.
Первым делом необходимо обновить список репозиториев и установить сразу же пакет nginx:
apt-get update
apt-get install nginx
Я решил хранить файлы сайта в каталоге: /var/www/. В данном случае перемещаемся в каталог cd /var/www/ и создаем новый каталог mkdir geekhero и получаем такой путь: /var/www/geekhero/
Переходим в новый каталог geekhero: cd geekhero и создаем виртуальное окружение: python3 -m venv geekhero_env
Активируем виртуальное окружение: source geekhero_env/bin/activate и устанавливаем в него Django: pip install Django и сразу же ставим pip install gunicorn
Создаем проект: django-admin startproject ghproj
Далее нужно произвести все первичные миграции; для этого прописываем: python manage.py makemigrations , затем python manage.py migrate .
После этого создаем административную учетную запись: python manage.py createsuperuser и следуем инструкции.
Далее уже создаем applications, но так как вы читаете данную статью, то вы уже умеете все это делать.
Заходим в Settings.py и прописываем, если отсутствует:import os – в заголовке, остальное в самом низу текстового файла:
STATIC_URL = '/static/'
STATIC_ROOT = os.path.join(BASE_DIR, 'static/')
Настройка Gunicorn
Идем в каталог /etc/systemd/system/ и создаем два файла: gunicorn.service и gunicorn.socket (вместо имени «gunicorn», можно использовать любое другое):
Содержимое файла gunicorn.service:
[Unit]
Description=gunicorn daemon
Requires=gunicorn.socket
After=network.target

[Service]
User=root
WorkingDirectory=/var/www/geekhero #путь до каталога с файлом manage.py
ExecStart=/var/www/geekhero/geekhero_env/bin/gunicorn --workers 5 --bind unix:/run/gunicorn.sock ghproj.wsgi:application
#путь до файла gunicorn в виртуальном окружении

[Install]
WantedBy=multi-user.target
Содержимое файла gunicorn.socket:
[Unit]
Description=gunicorn socket

[Socket]
ListenStream=/run/gunicorn.sock

[Install]
WantedBy=sockets.target
Для проверки файла gunicorn.service на наличие ошибок:
systemd-analyze verify gunicorn.serviceНастройка NGINX
Далее идем в каталог: /etc/nginx/sites-available/ и создаем файл geekhero (название вашего сайта) без расширения:
server {
    listen 80;
    server_name example.com;

    location = /favicon.ico { access_log off; log_not_found off; }
    location /static/ {
        root /var/www/geekhero;           #путь до static каталога
    }

    location /media/ {
        root /var/www/geekhero;           #путь до media каталога
    }

    location / {
        include proxy_params;
        proxy_pass http://unix:/run/gunicorn.sock;
    }
}
Для того, чтобы создать символическую ссылку на файл в каталоге /etc/nginx/site-enabled/ необходимо ввести следующую команду:
sudo ln -s /etc/nginx/sites-available/geekhero /etc/nginx/sites-enabled/При любых изменениях оригинального файла, ярлык из sites-enabled нужно удалять и пересоздавать заново командой выше или выполнять команду: sudo systemctl restart nginx
Финальный этап
Для проверки конфигурации nginx нужно ввести команду:
sudo nginx -tsudo nginx -tДалее запускаем службу gunicorn и создаем socket:
sudo systemctl enable gunicorn
sudo systemctl start gunicorn
Для отключения выполняем команды:
sudo systemctl disable gunicorn
sudo systemctl stop gunicorn
Также, при изменении любых данных в HTML-шаблонах, просто перезапускайте сервис gunicorn так:
service gunicorn restartПомните, что, если вносите изменения в модели, то обязательно нужно сделать python manage.py makemigrations <app> и migrate <app> из каталога с проектом.
Для первичного запуска / полной остановки сервиса Gunicorn: service gunicorn start / service gunicorn stop
Чтобы посмотреть статус запущенного сервиса нужно ввести:
sudo systemctl status gunicorn
или
sudo journalctl -u gunicorn.socket
(с последней командой правильный вывод такой: мар 05 16:40:19 byfe systemd[1]: Listening on gunicorn socket. )
Для проверки создания сокета, необходимо ввести команду:
file /run/gunicorn.sockТакой вывод считается правильным: /run/gunicorn.sock: socket
Если внес какие-либо изменения в файл gunicorn.service или .socket, необходимо выполнить команду:
systemctl daemon-reloadЕсли все нормально сработало, то можем запустить nginx:
sudo service nginx startПолучаем сертификат SSL для домена
Установим certbot от Let’s Encrypt: sudo apt-get install certbot python-certbot-nginx
Произведем первичную настройку certbot: sudo certbot certonly --nginx
И наконец-то автоматически поправим конфигурацию nginx: sudo certbot install --nginx
Осталось только перезапустить сервис nginx: sudo systemctl restart nginx
Подключение дополнительных сайтов
Для установки дополнительных проектов Django, необходимо повторить весь процесс от создания venv и до установки SSL-сертификата для вашего нового домена, только название сервиса и сокета нужно изменять с gunicorn на что-то другое, например:
Сайт1: site1.service и site1.socket
Сайт2: site2.service и site2.socket
Сайт3: site3.service и site3.socket
Итог
В рамках этой статьи мы разобрали как вывести наш сайт в production, установив Django, Gunicorn, nginx и даже certbot от Let’s Encrypt.
Watch Now This tutorial has a related video course created by the Real Python team. Watch it together with the written tutorial to deepen your understanding: Deploy a Django App With Gunicorn and Nginx
Taking a Django app from development to production is a demanding but rewarding process. This tutorial will take you through that process step by step, providing an in-depth guide that starts at square one with a no-frills Django application and adds in Gunicorn, Nginx, domain registration, and security-focused HTTP headers. After going over this tutorial, you’ll be better equipped to take your Django app into production and serve it to the world.
In this tutorial, you’ll learn:
- How you can take your Django app from development to production
- How you can host your app on a real-world public domain
- How to introduce Gunicorn and Nginx into the request and response chain
- How HTTP headers can fortify your site’s HTTPS security
To make the most out of this tutorial, you should have an introductory-level understanding of Python, Django, and the high-level mechanics of HTTP requests.
You can download the Django project used in this tutorial by following the link below:
Starting With Django and WSGIServer
You’ll use Django as the framework at the core of your web app, using it for URL routing, HTML rendering, authentication, administration, and backend logic. In this tutorial, you’ll supplement the Django component with two other layers, Gunicorn and Nginx, in order to serve the application scalably. But before you do that, you’ll need to set up your environment and get the Django application itself up and running.
Setting Up a Cloud Virtual Machine (VM)
First, you’ll need to launch and set up a virtual machine (VM) on which the web application will run. You should familiarize yourself with at least one infrastructure as a service (IaaS) cloud service provider to provision a VM. This section will walk you through the process at a high level but won’t cover every step in detail.
Using a VM to serve a web app is an example of IaaS, where you have full control over the server software. Other options besides IaaS do exist:
- A serverless architecture allows you to compose the Django app only and let a separate framework or cloud provider handle the infrastructure side.
- A containerized approach allows multiple apps to run independently on the same host operating system.
For this tutorial, though, you’ll use the tried-and-true route of serving Nginx and Django directly on IaaS.
Two popular options for virtual machines are Azure VMs and Amazon EC2. To get more help with launching the instance, you should refer to the documentation for your cloud provider:
- For Azure VMs, follow their quickstart guide for creating a Linux virtual machine in the Azure portal.
- For Amazon EC2, learn how to get set up.
The Django project and everything else involved in this tutorial sit on a t2.micro Amazon EC2 instance running Ubuntu Server 20.04.
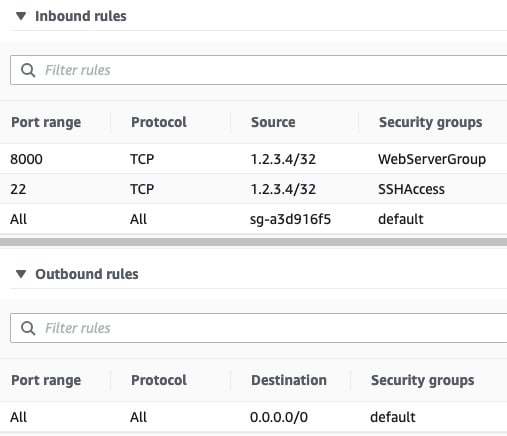
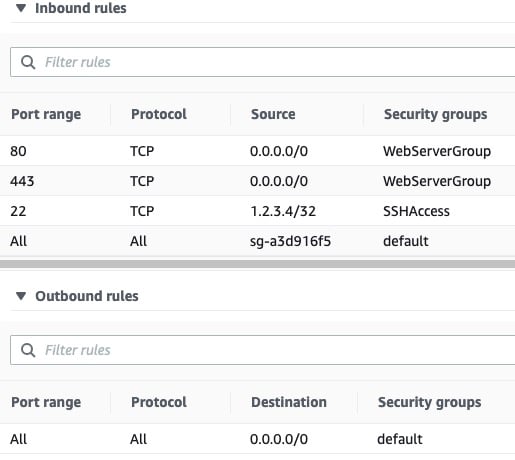
One important component of VM setup is inbound security rules. These are fine-grained rules that control the inbound traffic to your instance. Create the following inbound security rules for initial development, which you’ll modify in production:
| Reference | Type | Protocol | Port Range | Source |
|---|---|---|---|---|
| 1 | Custom | TCP | 8000 | my-laptop-ip-address/32 |
| 2 | Custom | All | All | security-group-id |
| 3 | SSH | TCP | 22 | my-laptop-ip-address/32 |
Now you’ll walk through these one at a time:
- Rule 1 allows TCP over port 8000 from your personal computer’s IPv4 address, allowing you to send requests to your Django app when you serve it in development over port 8000.
- Rule 2 allows inbound traffic from network interfaces and instances that are assigned to the same security group, using the security group ID as the source. This is a rule included in the default AWS security group that you should tie to your instance.
- Rule 3 allows you to access your VM via SSH from your personal computer.
You’ll also want to add an outbound rule to allow outbound traffic to do things such as install packages:
| Type | Protocol | Port Range | Source |
|---|---|---|---|
| Custom | All | All | 0.0.0.0/0 |
Tying that all together, your initial AWS security rule set can consist of three inbound rules and one outbound rule. These, in turn, come from three separate security groups—the default group, a group for HTTP access, and a group for SSH access:
From your local computer, you can then SSH into the instance:
This command logs you in to your VM as the user ubuntu. Here, ~/.ssh/<privkey>.pem is the path to the private key that’s part of the set of security credentials that you tied to the VM. The VM is where the Django application code will sit.
With that, you should be all ready to move forward with building your application.
Creating a Cookie-Cutter Django App
You’re not concerned with making a fancy Django project with complex URL routing or advanced database features for this tutorial. Instead, you want something that’s plain, small, and understandable, allowing you to test quickly whether your infrastructure is working.
To that end, you can take the following steps to set up your app.
First, SSH into your VM and make sure that you have the latest patch versions of Python 3.8 and SQLite3 installed:
Here, Python 3.8 is the system Python, or the python3 version that ships with Ubuntu 20.04 (Focal). Upgrading the distribution ensures you receive bug and security fixes from the latest Python 3.8.x release. Optionally, you could install another Python version entirely—such as python3.9—alongside the system-wide interpreter, which you would need to invoke explicitly as python3.9.
Next, create and activate a virtual environment:
Now, install Django 3.2:
You can now bootstrap the Django project and app using Django’s management commands:
This creates the Django app myapp alongside the project named project:
Using a terminal editor such as Vim or GNU nano, open project/settings.py and append your app to INSTALLED_APPS:
Next, open myapp/templates/myapp/home.html and create a short and sweet HTML page:
After that, edit myapp/views.py to render that HTML page:
Now create and open myapp/urls.py to associate your view with a URL pattern:
After that, edit project/urls.py accordingly:
You can do one more thing while you’re at it, which is to make sure the Django secret key used for cryptographic signing isn’t hard-coded in settings.py, which Git will likely track. Remove the following line from project/settings.py:
Replace it with the following:
This tells Django to look in your environment for SECRET_KEY rather than including it in your application source code.
Finally, set the key in your environment. Here’s how you could do that on Ubuntu Linux using OpenSSL to set the key to an eighty-character string:
You can cat the contents of .DJANGO_SECRET_KEY to see that openssl has generated a cryptographically secure hex string key:
Alright, you’re all set. That’s all you need to have a minimally functioning Django app.
Using Django’s WSGIServer in Development
In this section, you’ll test Django’s development web server using httpie, an awesome command-line HTTP client for testing requests to your web app from the console:
You can create an alias that will let you send a GET request using httpie to your application:
This aliases GET to an http call with some default flags. You can now use GET docs.python.org to see the response headers and body from the Python documentation’s homepage.
Before starting the Django development server, you can check your Django project for potential problems:
If your check doesn’t identify any issues, then tell Django’s built-in application server to start listening on localhost, using the default port of 8000:
Using nohup <command> & executes command in the background so that you can continue to use your shell. You can use jobs -l to see the process identifier (PID), which will let you bring the process to the foreground or terminate it. nohup will redirect standard output (stdout) and standard error (stderr) to the file nohup.out.
Django’s runserver command, in turn, uses the following syntax:
If you leave the address:port argument unspecified as done above, Django will default to listening on localhost:8000. You can also use the lsof command to verify more directly that a python command was invoked to listen on port 8000:
At this point in the tutorial, your app is only listening on localhost, which is the address 127.0.0.1. It’s not yet accessible from a browser, but you can still give it its first visitor by sending it a GET request from the command line within the VM itself:
The header Server: WSGIServer/0.2 CPython/3.8.10 describes the software that generated the response. In this case, it’s version 0.2 of WSGIServer alongside CPython 3.8.10.
WSGIServer is nothing more than a Python class defined by Django that implements the Python WSGI protocol. What this means is that it adheres to the Web Server Gateway Interface (WSGI), which is a standard that defines a way for web server software and web applications to interact.
In our example so far, the django-gunicorn-nginx/ project is the web application. Since you’re serving the app in development, there’s actually no separate web server. Django uses the simple_server module, which implements a lightweight HTTP server, and fuses the concept of web server versus application server into one command, runserver.
Next, you’ll see how to begin introducing your app to the big time by associating it with a real-world domain.
Putting Your Site Online With Django, Gunicorn, and Nginx
At this point, your site is accessible locally on your VM. If you want your site to be accessible at a real-looking URL, you’ll need to claim a domain name and tie it to the web server. This is also necessary to enable HTTPS, since some certificate authorities won’t issue a certificate for a bare IP address or a subdomain that you don’t own. In this section, you’ll see how to register and configure a domain.
Setting a Static Public IP Address
It’s ideal if you can point your domain’s configuration to a public IP address that’s guaranteed not to change. One sub-optimal property of cloud VMs is that their public IP address may change if the instance is put into a stopped state. Alternatively, if you need to replace your existing VM with a new instance for some reason, the resulting change in IP address would be problematic.
The solution to this dilemma is to tie a static IP address to the instance:
- AWS calls this an Elastic IP address.
- Azure calls this a Reserved IP.
Follow your cloud provider’s documentation to associate a static IP address with your cloud VM. In the AWS environment used for the example in this tutorial, the Elastic IP address 50.19.125.152 was associated to the EC2 instance.
With a more stable public IP in front of your VM, you’re ready to link to a domain.
Linking to a Domain
In this section, you’ll walk through how to purchase, set up, and link a domain name to your existing application.
These examples use Namecheap, but please don’t take that as an unequivocal endorsement. There are more than a handful of other options, such as domain.com, GoDaddy, and Google Domains. As far as partiality is concerned, Namecheap has paid exactly $0 for being featured as the domain registrar of choice in this tutorial.
Here’s how you can get started:
- Create an account on Namecheap, making sure to set up two-factor authentication (2FA).
- From the homepage, start searching for a domain name that suits your budget. You’ll find that prices can vary drastically with both the top-level domain (TLD) and hostname.
- Purchase the domain when you’re happy with a choice.
This tutorial uses the domain supersecure.codes, but you’ll have your own.
Once you have your domain, you’ll want to turn on WithheldForPrivacy protection, formally called WhoisGuard. This will mask your personal information when someone runs a whois search on your domain. Here’s how to do this:
- Select Account → Domain List.
- Select Manage next to your domain.
- Enable WithheldForPrivacy protection.
Next, it’s time to set up the DNS record table for your site. Each DNS record will become a row in a database that tells a browser what underlying IP address a fully qualified domain name (FQDN) points to. In this case, we want supersecure.codes to route to 50.19.125.152, the public IPv4 address at which the VM can be reached:
- Select Account → Domain List.
- Select Manage next to your domain.
- Select Advanced DNS.
- Under Host Records, add two A Records for your domain.
Add the A Records as follows, replacing 50.19.125.152 with your instance’s public IPv4 address:
| Type | Host | Value | TTL |
|---|---|---|---|
| A Record | @ |
50.19.125.152 | Automatic |
| A Record | www |
50.19.125.152 | Automatic |
An A record allows you to associate a domain name or subdomain with the IPv4 address of the web server where you serve your application. Above, the Value field should use the public IPv4 address of your VM instance.
You can see that there are two variations for the Host field:
- Using
@points to the root domain,supersecure.codesin this case. - Using
wwwmeans thatwww.supersecure.codeswill point to the same place as justsupersecure.codes. Thewwwis technically a subdomain that can send users to the same place as the shortersupersecure.codes.
Once you’ve set the DNS host record table, you’ll need to wait for up to thirty minutes for the routes to take effect. You can now kill the existing runserver process:
You can confirm that the process is gone with pgrep or by checking active jobs again:
With these things in place, you also need to tweak a Django setting, ALLOWED_HOSTS, which is the set of domain names that you let your Django app serve:
The leading dot (.) is a subdomain wildcard, allowing both www.supersecure.codes and supersecure.codes. Keep this list tight to prevent HTTP host header attacks.
Now you can restart the WSGIServer with one slight change:
Notice the address:port argument is now 0.0.0.0:8000, while none was previously specified:
-
Specifying no
address:portimplies serving the app onlocalhost:8000. This means that the application was only accessible from within the VM itself. You could talk to it by callinghttpiefrom the same IP address, but you couldn’t reach your application from the outside world. -
Specifying an
address:portof'0.0.0.0:8000'makes your server viewable to the outside world, though still on port 8000 by default. The0.0.0.0is shorthand for “bind to all IP addresses this computer supports.” In the case of an out-of-the-box cloud VM with one network interface controller (NIC) namedeth0, using0.0.0.0acts as a stand-in for the public IPv4 address of the machine.
Next, turn on output from nohup.out to view any incoming logs from Django’s WSGIServer:
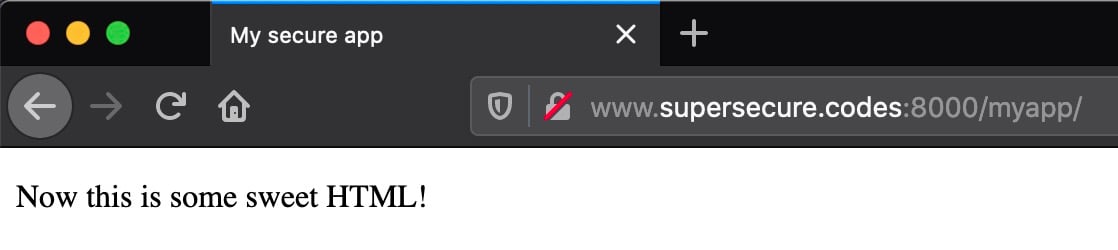
Now for the moment of truth. It’s time to give your site its first visitor. From your personal machine, enter the following URL in a web browser:
Replace the domain name above with your own. You should see the page respond quickly in all its glory:
This URL is accessible to you—but not to others—because of the inbound security rule that you created previously.
If you can’t reach your site, there can be a few common culprits:
- If the connection hangs up, check that you’ve opened up an inbound security rule to allow
TCP:8000formy-laptop-ip-address/32. - If the connection shows as refused or unable to connect, check that you’ve invoked
manage.py runserver 0.0.0.0:8000rather than127.0.0.1:8000.
Now return to the shell of your VM. In the continuous output of tail -f nohup.out, you should see something like this line:
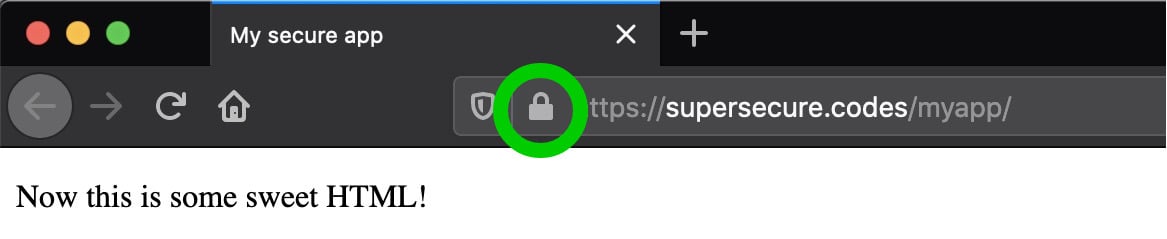
Congratulations, you’ve just taken the first monumental step towards hosting your own website! However, pause here and take note of a couple of big gotchas embedded in the URL http://www.supersecure.codes:8000/myapp/:
-
The site is served only over HTTP. Without enabling HTTPS, your site is fundamentally insecure if you want to transmit any sensitive data from client to server or vice versa. Using HTTP means that requests and responses are sent in plain text. You’ll fix that soon.
-
The URL uses the non-standard port 8000 versus the standard default HTTP port number 80. It’s unconventional and a bit of an eyesore, but you can’t use 80 yet. That’s because port 80 is privileged, and a non-root user can’t—and shouldn’t—bind to it. Later on, you’ll introduce a tool into the mix that allows your app to be available on port 80.
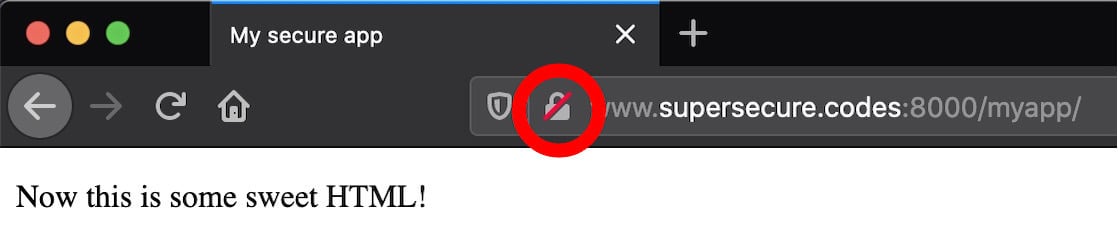
If you check in your browser, you’ll see your browser URL bar hinting at this. If you’re using Firefox, a red lock icon will appear indicating that the connection is over HTTP rather than HTTPS:
Going forward, you want to legitimize the operation. You could start serving over standard port 80 for HTTP. Better yet, start serving HTTPS (443) and redirect HTTP requests there. You’ll see how to progress through these steps soon.
Replacing WSGIServer With Gunicorn
Do you want to start moving your app towards a state where it’s ready for the outside world? If so, then you should replace Django’s built-in WSGIServer, which is the application server used by manage.py runserver, with a separate dedicated application server. But wait a minute: WSGIServer seemed to be working just fine. Why replace it?
To answer this question, you can read what the Django documentation has to say:
DO NOT USE THIS SERVER IN A PRODUCTION SETTING. It has not gone through security audits or performance tests. (And that’s how it’s gonna stay. We’re in the business of making Web frameworks, not Web servers, so improving this server to be able to handle a production environment is outside the scope of Django.) (Source)
Django is a web framework, not a web server, and its maintainers want to make that distinction clear. In this section, you’ll replace Django’s runserver command with Gunicorn. Gunicorn is first and foremost a Python WSGI app server, and a battle-tested one at that:
- It’s fast, optimized, and designed for production.
- It gives you more fine-grained control over the application server itself.
- It has more complete and configurable logging.
- It’s well-tested, specifically for its functionality as an application server.
You can install Gunicorn through pip into your virtual environment:
Next, you need to do some level of configuration. The cool thing about a Gunicorn config file is that it just needs to be valid Python code, with variable names corresponding to arguments. You can store multiple Gunicorn configuration files within a project subdirectory:
Next, open a development configuration file, config/gunicorn/dev.py, and add the following:
Before starting Gunicorn, you should halt the runserver process. Use jobs to find it and kill to stop it:
Next, make sure that log and PID directories exist for the values set in the Gunicorn configuration file above:
With these commands, you’ve ensured that the necessary PID and log directories exist for Gunicorn and that they are writable by the ubuntu user.
With that out of the way, you can start Gunicorn using the -c flag to point to a configuration file from your project root:
This runs gunicorn in the background with the development configuration file dev.py that you specified above. Just as before, you can now monitor the output file to see the output logged by Gunicorn:
Now visit your site’s URL again in a browser. You will still need the 8000 port:
Check your VM terminal again. You should see one or more lines like the following from Gunicorn’s log file:
These lines are access logs that tell you about incoming requests:
| Component | Meaning |
|---|---|
67.xx.xx.xx |
User IP address |
27/Sep/2021:01:30:46 +0000 |
Timestamp of request |
GET |
Request method |
/myapp/ |
URL path |
HTTP/1.1 |
Protocol |
200 |
Response status code |
182 |
Response content length |
Excluded above for brevity is the user agent, which may also show up in your log. Here’s an example from a Firefox browser on macOS:
With Gunicorn up and listening, it’s time to introduce a legitimate web server into the equation as well.
Incorporating Nginx
At this point, you’ve swapped out Django’s runserver command in favor of gunicorn as the application server. There’s one more player to add to the request chain: a web server like Nginx.
Hold up—you’ve already added Gunicorn! Why do you need to add something new into the picture? The reason for this is that Nginx and Gunicorn are two different things, and they coexist and work as a team.
Nginx defines itself as a high-performance web server and a reverse proxy server. It’s worth breaking this down because it helps explain Nginx’s relation to Gunicorn and Django.
Firstly, Nginx is a web server in that it can serve files to a web user or client. Files are literal documents: HTML, CSS, PNG, PDF—you name it. In the old days, before the advent of frameworks such as Django, it was common for a website to function essentially as a direct view into a file system. In the URL path, slashes represented directories on a limited part of the server’s file system that you could request to view.
Note the subtle difference in terminology:
-
Django is a web framework. It lets you build the core web application that powers the actual content on the site. It handles HTML rendering, authentication, administration, and backend logic.
-
Gunicorn is an application server. It translates HTTP requests into something Python can understand. Gunicorn implements the Web Server Gateway Interface (WSGI), which is a standard interface between web server software and web applications.
-
Nginx is a web server. It’s the public handler, more formally called the reverse proxy, for incoming requests and scales to thousands of simultaneous connections.
Part of Nginx’s role as a web server is that it can more efficiently serve static files. This means that, for requests for static content such as images, you can cut out the middleman that is Django and have Nginx render the files directly. We’ll get to this important step later in the tutorial.
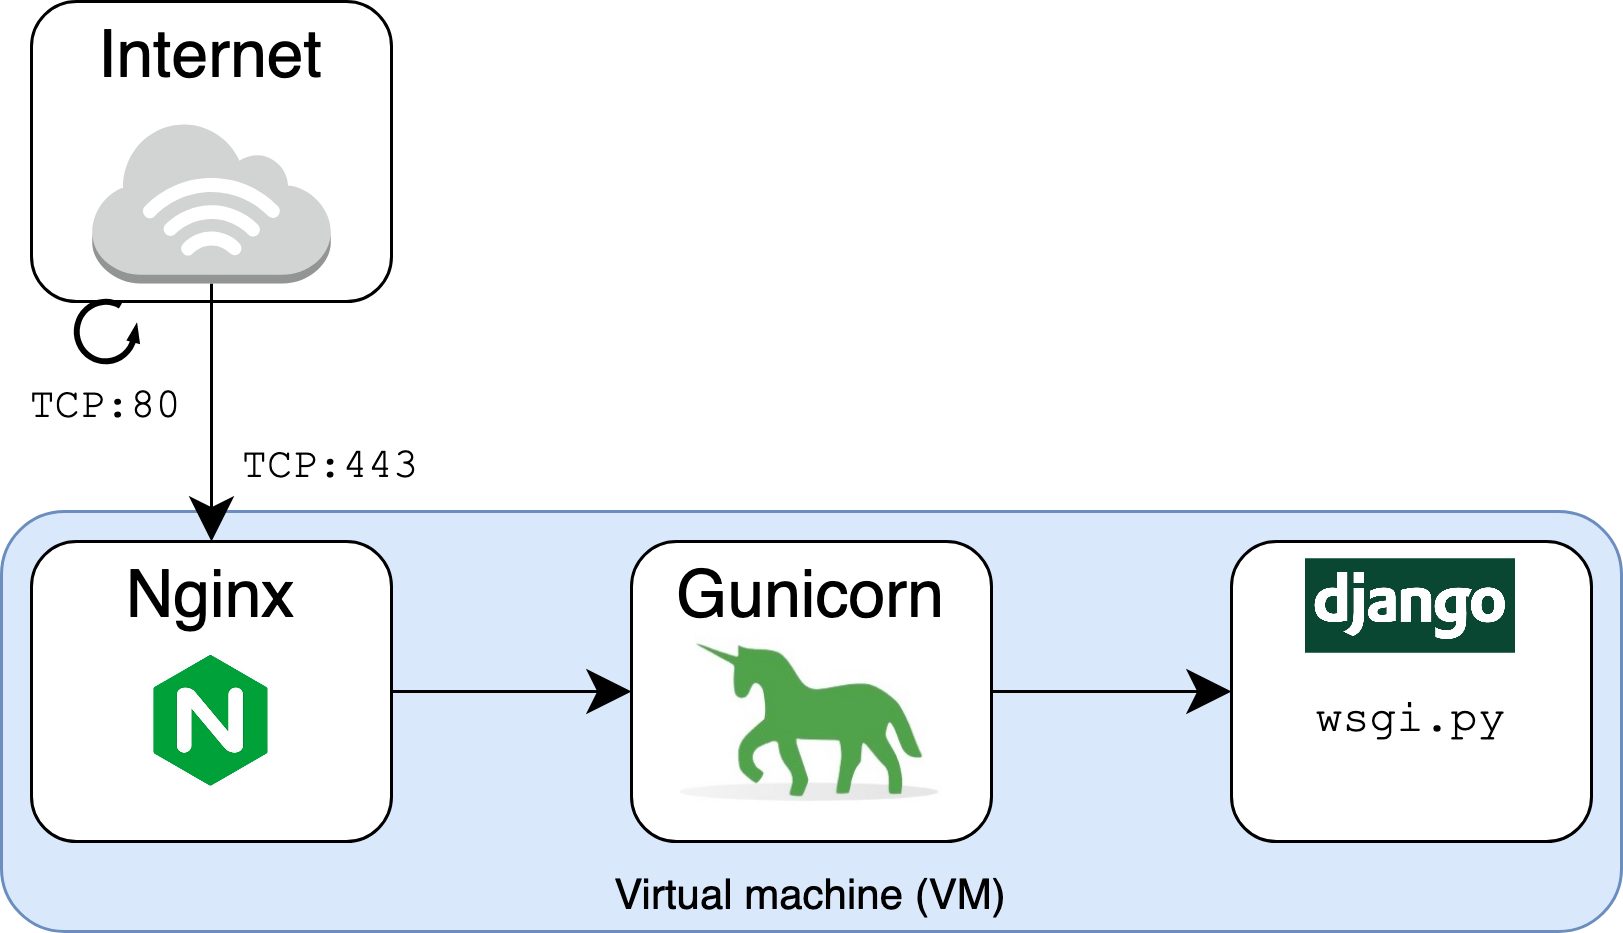
Nginx is also a reverse proxy server in that it stands in between the outside world and your Gunicorn/Django application. In the same way that you might use a proxy to make outbound requests, you can use a proxy such as Nginx to receive them:
To get started using Nginx, install it and verify its version:
You should then change the inbound-allow rules that you’ve set for port 8000 to port 80. Replace the inbound rule for TCP:8000 with the following:
| Type | Protocol | Port Range | Source |
|---|---|---|---|
| HTTP | TCP | 80 | my-laptop-ip-address/32 |
Other rules, such as that for SSH access, should remain unchanged.
Now, start the nginx service and confirm that its status is running:
Now you can make a request to a familiar-looking URL:
That’s a big difference compared to what you had previously. You no longer need port 8000 in the URL. Instead, the port defaults to port 80, which looks a lot more normal:
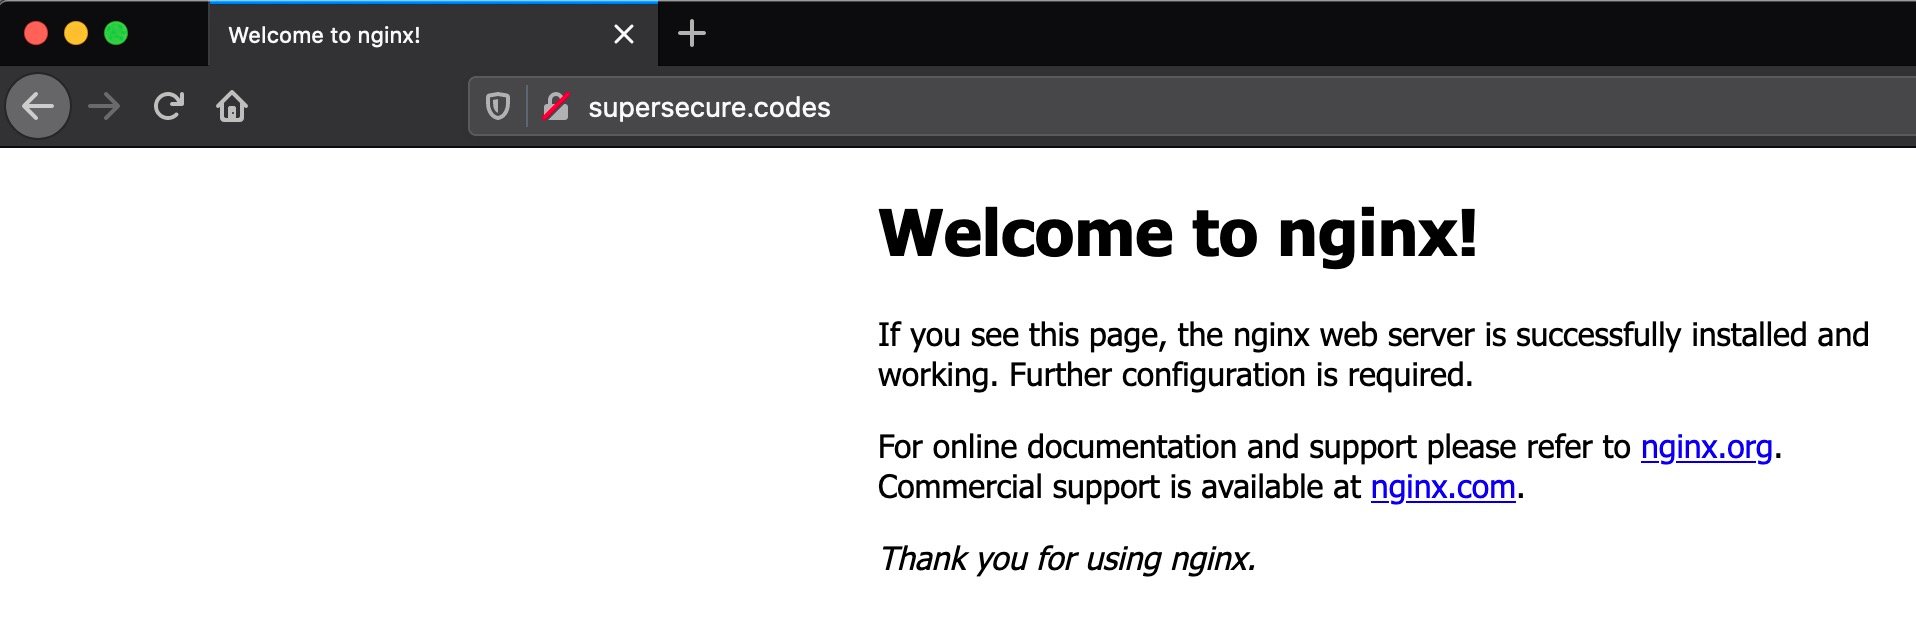
This is a friendly feature of Nginx. If you start Nginx with zero configuration, it serves a page to you indicating that it’s listening. Now try the /myapp page at the following URL:
Remember to replace supersecure.codes with your own domain name.
You should see a 404 response, and that’s okay:
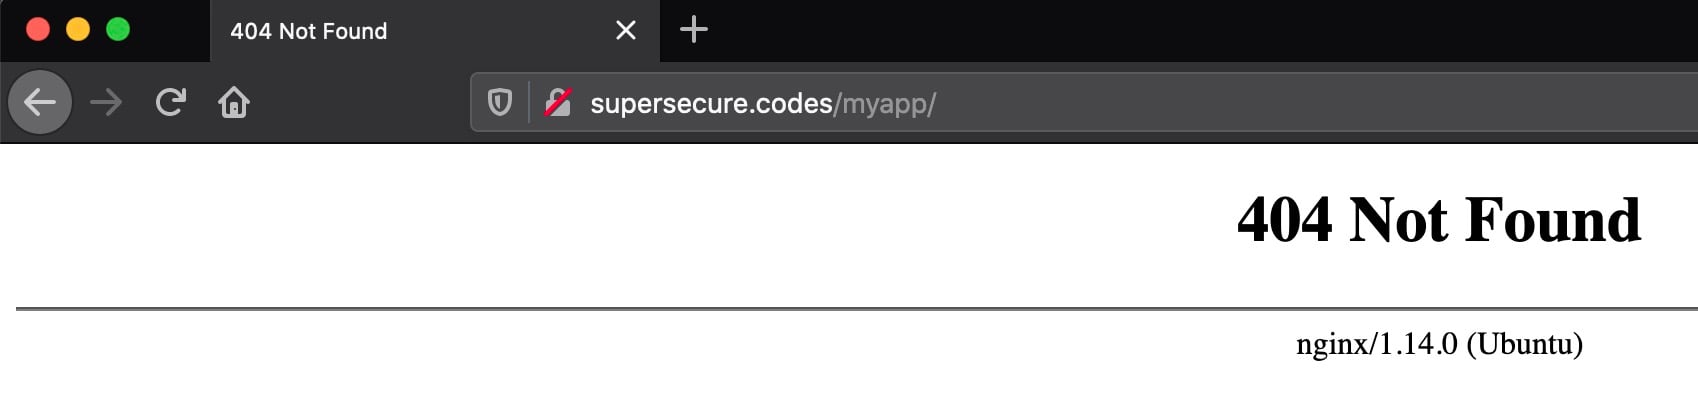
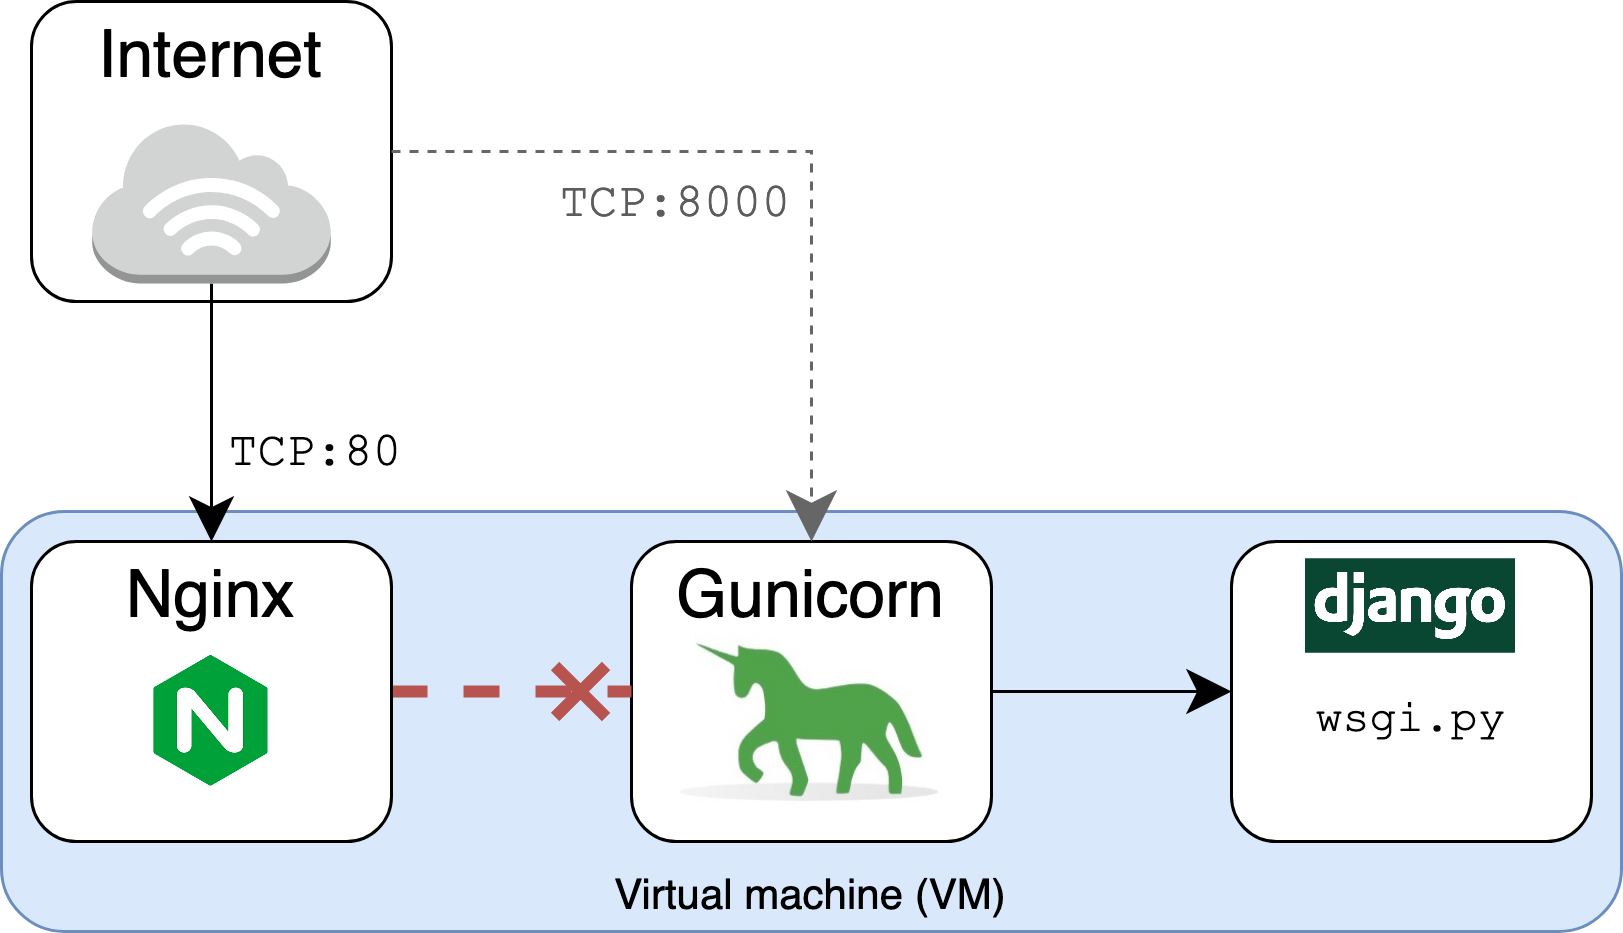
This is because you’re requesting the /myapp path over port 80, which is where Nginx, rather than Gunicorn, is listening. At this point, you have the following setup:
- Nginx is listening on port 80.
- Gunicorn is listening, separately, on port 8000.
There’s no connection or tie between the two until you specify it. Nginx doesn’t know that Gunicorn and Django have some sweet HTML that they want the world to see. That’s why it returns a 404 Not Found response. You haven’t yet set it up to proxy requests to Gunicorn and Django:
You need to give Nginx some bare-bones configuration to tell it to route requests to Gunicorn, which will then feed them to Django. Open /etc/nginx/sites-available/supersecure and add the following content:
Remember that you need to replace supersecure in the file name with your site’s hostname, and make sure to replace the server_name value of .supersecure.codes with your own domain, prefixed by a dot.
This file is the “Hello World” of Nginx reverse proxy configuration. It tells Nginx how to behave:
- Listen on port 80 for requests that use a host for
supersecure.codesand its subdomains. - Pass those requests on to
http://localhost:8000, which is where Gunicorn is listening.
The proxy_set_header field is important. It ensures that Nginx passes through the Host HTTP request header sent by the end user on to Gunicorn and Django. Nginx would otherwise use Host: localhost by default, ignoring the Host header field sent by the end user’s browser.
You can validate your configuration file using nginx configtest:
The [ OK ] output indicates that the configuration file is valid and can be parsed.
Now you need to symlink this file to the sites-enabled directory, replacing supersecure with your site domain:
Before making a request to your site with httpie, you’ll need to add one more inbound security rule. Add the following inbound rule:
| Type | Protocol | Port Range | Source |
|---|---|---|---|
| HTTP | TCP | 80 | vm-static-ip-address/32 |
This security rule allows inbound HTTP traffic from the public (elastic) IP address of the VM itself. That might seem like overkill at first, but you need to do it because requests will now be routed over the public Internet, meaning that the self-referential rule using the security group ID will no longer be enough.
Now that it’s using Nginx as a web server frontend, re-send a request to the site:
Now that Nginx is sitting in front of Django and Gunicorn, there are a few interesting outputs here:
- Nginx now returns the
Serverheader asServer: nginx, indicating that Nginx is the new front-end web server. Settingserver_tokensto a value ofofftells Nginx not to emit its exact version, such asnginx/x.y.z (Ubuntu). From a security perspective, that would be disclosing unnecessary information. - Nginx uses
chunkedfor theTransfer-Encodingheader instead of advertisingContent-Length. - Nginx also asks to keep open the network connection with
Connection: keep-alive.
Next, you’ll leverage Nginx for one of its core features: the ability to serve static files quickly and efficiently.
Serving Static Files Directly With Nginx
You now have Nginx proxying requests on to your Django app. Importantly, you can also use Nginx to serve static files directly. If you have DEBUG = True in project/settings.py, then Django will render the files, but this is grossly inefficient and probably insecure. Instead, you can have your web server render them directly.
Common examples of static files include local JavaScript, images, and CSS—anything where Django isn’t really needed as part of the equation in order to dynamically render the response content.
To begin, from within your project’s directory, create a place to hold and track JavaScript static files in development:
Now open a new file static/js/greenlight.js and add the following JavaScript:
This JavaScript will make a block of text blow up in big green font if it’s hovered over. Yes, it’s some cutting-edge front-end work!
Next, add the following configuration to project/settings.py, updating STATIC_ROOT with your domain name:
You’re telling Django’s collectstatic command where to search for and place the resulting static files that are aggregated from multiple Django apps, including Django’s own built-in apps, such as admin.
Last but not least, modify the HTML in myapp/templates/myapp/home.html to include the JavaScript that you just created:
By including the /static/js/greenlight.js script, the <span id="changeme"> element will have an event listener attached to it.
The next step is to create a directory path that will house your project’s static content for Nginx to serve:
Now run collectstatic as your non-root user from within your project’s directory:
Finally, add a location variable for /static in /etc/nginx/sites-available/supersecure, your site configuration file for Nginx:
Remember that your domain probably isn’t supersecure.codes, so you’ll need to customize these steps to work for your own project.
You should now turn off DEBUG mode in your project in project/settings.py:
Gunicorn will pick up this change since you specified reload = True in config/gunicorn/dev.py.
Then restart Nginx:
Now, refresh your site page again, and hover over the page text:
This is clear evidence that the JavaScript function enlarge() has kicked in. To get this result, the browser had to request /static/js/greenlight.js. The key here is that the browser got that file directly from Nginx without Nginx needing to ask Django for it.
Notice something different about the process above: nowhere did you add a new Django URL route or view for delivering the JavaScript file. That’s because, after running collectstatic, Django is no longer responsible for determining how to map the URL to a complex view and render that view. Nginx can just hand the file off directly to the browser.
In fact, if you navigate to your domain’s equivalent of https://supersecure.codes/static/js/, you’ll see a traditional file-system tree view of /static created by Nginx. This means faster and more efficient delivery of static files.
At this point, you’ve got a great foundation for a scalable site using Django, Gunicorn, and Nginx. One more giant leap forward is to enable HTTPS for your site, which you’ll do next.
Making Your Site Production-Ready With HTTPS
You can take your site’s security from good to great with a few more steps, including enabling HTTPS and adding a set of headers that help web browsers work with your site in a more secure fashion. Enabling HTTPS increases the trustworthiness of your site, and it’s a necessity if your site uses authentication or exchanges sensitive data with users.
Turning on HTTPS
To allow visitors to access your site over HTTPS, you’ll need an SSL/TLS certificate that sits on your web server. Certificates are issued by a Certificate Authority (CA). In this tutorial, you’ll use a free CA called Let’s Encrypt. To actually install the certificate, you can use the Certbot client, which gives you an utterly painless step-by-step series of prompts.
Before starting with Certbot, you can tell Nginx up front to disable TLS version 1.0 and 1.1 in favor of versions 1.2 and 1.3. TLS 1.0 is end-of-life (EOL), while TLS 1.1 contained several vulnerabilities that were fixed by TLS 1.2. To do this, open the file /etc/nginx/nginx.conf. Find the following line:
Replace it with the more recent implementations:
You can use nginx -t to confirm that your Nginx supports version 1.3:
Now you’re ready to install and use Certbot. On Ubuntu Focal (20.04), you can use snap to install Certbot:
Consult Certbot’s instructions guide to see installation steps for different operating systems and web servers.
Before you can obtain and install HTTPS certificates with certbot, there’s another change you need to make to your VM’s security group rules. Because Let’s Encrypt requires an Internet connection for validation purposes, you’ll need to take the important step of opening up your site to the public Internet.
Modify your inbound security rules to align with the following:
| Reference | Type | Protocol | Port Range | Source |
|---|---|---|---|---|
| 1 | HTTP | TCP | 80 | 0.0.0.0/0 |
| 2 | Custom | All | All | security-group-id |
| 3 | SSH | TCP | 22 | my-laptop-ip-address/32 |
The key change here is the first rule, which allows HTTP traffic over port 80 from all sources. You can remove the inbound rule for TCP:80 that whitelisted your VM’s public IP address since that’s now redundant. The other two rules remain unchanged.
You can then issue one more command, certbot, to install the certificate:
This creates a certificate with an RSA key size of 4096 bytes. The --no-redirect option tells certbot to not automatically apply configuration related to an automatic HTTP to HTTPS redirect. For illustration purposes, you’ll see how to add this yourself soon.
You’ll go through a series of setup steps, most of which should be self-explanatory, such as entering your email address. When prompted to enter your domain names, enter the domain and the www subdomain separated by a comma:
Once you’ve walked through the steps, you should see a success message like the following:
If you cat out the configuration file at your equivalent of /etc/nginx/sites-available/supersecure, you’ll see that certbot has automatically added a group of lines related to SSL:
Make sure that Nginx picks up those changes:
To access your site over HTTPS, you’ll need one final security rule addition. You need to allow traffic over TCP:443, where 443 is the default port for HTTPS. Modify your inbound security rules to align with the following:
| Reference | Type | Protocol | Port Range | Source |
|---|---|---|---|---|
| 1 | HTTPS | TCP | 443 | 0.0.0.0/0 |
| 2 | HTTP | TCP | 80 | 0.0.0.0/0 |
| 2 | Custom | All | All | security-group-id |
| 3 | SSH | TCP | 22 | my-laptop-ip-address/32 |
Each of these rules has a specific purpose:
- Rule 1 allows HTTPS traffic over port 443 from all sources.
- Rule 2 allows HTTP traffic over port 80 from all sources.
- Rule 3 allows inbound traffic from network interfaces and instances that are assigned to the same security group, using the security group ID as the source. This is a rule included in the default AWS security group that you should tie to your instance.
- Rule 4 allows you to access your VM via SSH from your personal computer.
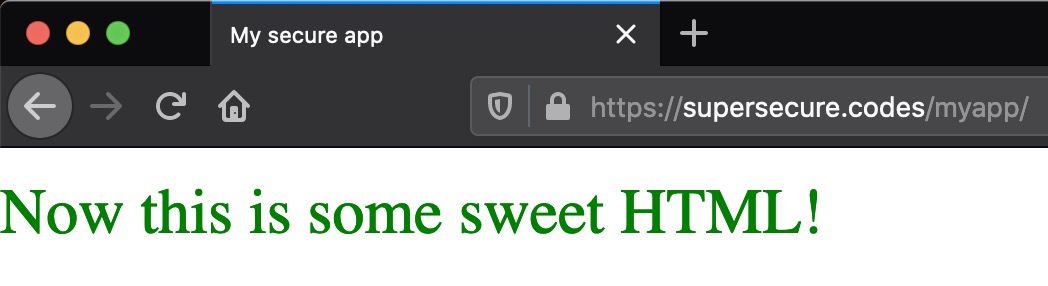
Now, re-navigate to your site in a browser, but with one key difference. Rather than http, specify https as the protocol:
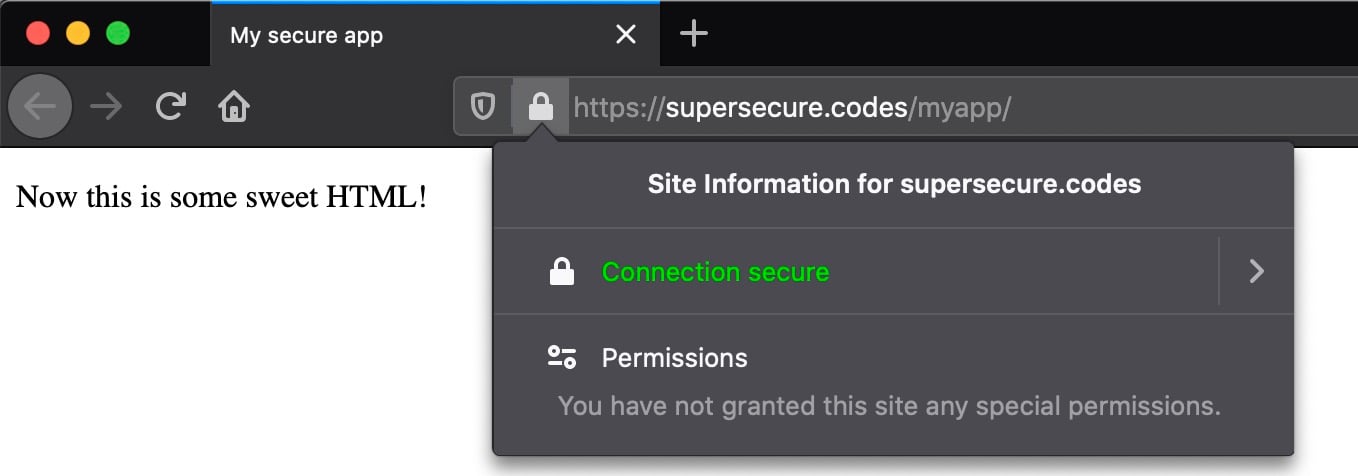
If all is well, you should see one of life’s beautiful treasures, which is your site being delivered over HTTPS:
If you’re using Firefox and you click on the lock icon, you can view more detailed information about the certificate involved in securing the connection:
You’re one step closer to a secure website. At this point, the site is still accessible over HTTP as well as HTTPS. That’s better than before, but still not ideal.
Redirecting HTTP to HTTPS
Your site is now accessible over both HTTP and HTTPS. With HTTPS working, you can just about turn off HTTP—or at least come close to it in practice. You can add several features to automatically route any visitors attempting to access your site over HTTP to the HTTPS version. Edit your equivalent of /etc/nginx/sites-available/supersecure:
The added block tells the server to redirect the browser or client to the HTTPS version of any HTTP URL. You can verify that this configuration is valid:
Then, tell nginx to reload the configuration:
Then send a GET request with the --all flag to your app’s HTTP URL to display any redirect chains:
You can see that there are actually two responses here:
- The initial request receives a 307 status code response redirecting to the HTTPS version.
- The second request is made to the same URI but with an HTTPS scheme rather than HTTP. This time, it receives the page content that it was looking for with a
200 OKresponse.
Next, you’ll see how to go one step beyond the redirect configuration by helping browsers remember that choice.
Taking It One Step Further With HSTS
There’s a small vulnerability in this redirect setup when used in isolation:
When a user enters a web domain manually (providing the domain name without the http:// or https:// prefix) or follows a plain http:// link, the first request to the website is sent unencrypted, using plain HTTP.
Most secured websites immediately send back a redirect to upgrade the user to an HTTPS connection, but a well‑placed attacker can mount a man‑in‑the‑middle (MITM) attack to intercept the initial HTTP request and can control the user’s session from then on. (Source)
To alleviate this, you can add an HSTS policy to tell browsers to prefer HTTPS even if the user tries to use HTTP. Here’s the subtle difference between using a redirect only in comparison with adding an HSTS header alongside it:
-
With a plain redirect from HTTP to HTTPS, the server is answering the browser by saying, “Try that again, but with HTTPS.” If the browser makes 1,000 HTTP requests, it will be told 1,000 times to retry with HTTPS.
-
With the HSTS header, the browser does the up-front work of effectively replacing HTTP with HTTPS after the first request. There is no redirect. In this second scenario, you can think of the browser as upgrading the connection. When a user asks their browser to visit the HTTP version of your site, their browser will respond curtly, “Nope, I’m taking you to the HTTPS version.”
To remedy this, you can tell Django to set the Strict-Transport-Security header. Add these lines to your project’s settings.py:
Take note that the SECURE_HSTS_SECONDS value is short-lived at 30 seconds. That is deliberate in this example. When you move to real production, you should increase this value. The Security Headers website recommends a minimum value of 2,592,000, equal to 30 days.
When you’re ready to take the plunge, you’ll need to add one more line of Nginx configuration. Edit your equivalent of /etc/nginx/sites-available/supersecure to add a proxy_set_header directive:
Then tell Nginx to reload the updated configuration:
The effect of this added proxy_set_header is for Nginx to send Django the following header included in intermediary requests that are originally sent to the web server through HTTPS on port 443:
This directly hooks in to the SECURE_PROXY_SSL_HEADER value that you added above in project/settings.py. This is needed because Nginx actually sends plain HTTP requests to Gunicorn/Django, so Django has no other way of knowing if the original request was HTTPS. Since the location block from the Nginx configuration file above is for port 443 (HTTPS), all requests coming through this port should let Django know that they are indeed HTTPS.
The Django documentation explains this quite well:
If your Django app is behind a proxy, though, the proxy may be “swallowing” whether the original request uses HTTPS or not. If there is a non-HTTPS connection between the proxy and Django then
is_secure()would always returnFalse—even for requests that were made via HTTPS by the end user. In contrast, if there is an HTTPS connection between the proxy and Django thenis_secure()would always returnTrue—even for requests that were made originally via HTTP. (Source)
How can you test that this header is working? Here’s an elegant way that lets you stay within your browser:
-
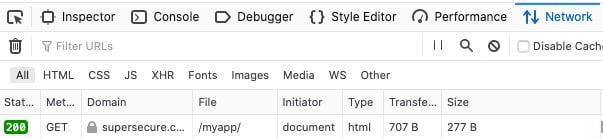
In your browser, open the developer tools. Navigate to the tab that shows network activity. In Firefox, this is Right Click → Inspect Element → Network.
-
Refresh the page. You should at first see a
307 Temporary Redirectresponse as part of the response chain. This is the first time that your browser is seeing theStrict-Transport-Securityheader. -
Change the URL in your browser back to the HTTP version, and request the page again. If you’re in Chrome, you should now see a
307 Internal Redirect. In Firefox, you should see a200 OKresponse because your browser automatically went straight to an HTTPS request even when you tried to tell it to use HTTP. While browsers display them differently, both of these responses show that the browser has performed an automatic redirect.
If you’re following along with Firefox, you should see something like the following:
Lastly, you can also verify the header’s presence with a request from the console:
This is evidence that you’ve effectively set the Strict-Transport-Security header using the corresponding values in project/settings.py. Once you’re ready, you can increase the max-age value, but remember that this will irreversibly tell a browser to upgrade HTTP for that length of time.
Django 3.x also added the ability to control the Referrer-Policy header. You can specify SECURE_REFERRER_POLICY in project/settings.py:
How does this setting work? When you follow a link from page A to page B, your request to page B contains the URL of page A under the header Referer. A server that sets the Referrer-Policy header, which you can set in Django through SECURE_REFERRER_POLICY, controls when and how much information is forwarded on to the target site. SECURE_REFERRER_POLICY can take a number of recognized values, which you can read about in detail in the Mozilla docs.
As an example, if you use "strict-origin-when-cross-origin" and a user’s current page is https://example.com/page, the Referer header is constrained in the following ways:
| Target Site | Referer Header |
|---|---|
| https://example.com/otherpage | https://example.com/page |
| https://mozilla.org | https://example.com/ |
| http://example.org (HTTP target) | [None] |
Here’s what happens case by case, assuming the current user’s page is https://example.com/page:
- If the user follows a link to
https://example.com/otherpage,Refererwill include the full path of the current page. - If the user follows a link to the separate domain of
https://mozilla.org,Refererwill exclude the path of the current page. - If the user follows a link to
http://example.orgwith anhttp://protocol,Refererwill be blank.
If you add this line to project/settings.py and re-request your app’s homepage, then you’ll see a new entrant:
In this section, you’ve taken yet another step towards protecting the privacy of your users. Next, you’ll see how to lock down your site’s vulnerability to cross-site scripting (XSS) and data injection attacks.
Adding a Content-Security-Policy (CSP) Header
One more crucial HTTP response header that you can add to your site is the Content-Security-Policy (CSP) header, which helps to prevent cross-site scripting (XSS) and data injection attacks. Django does not support this natively, but you can install django-csp, a small middleware extension developed by Mozilla:
To turn on the header with its default value, add this single line to project/settings.py under the existing MIDDLEWARE definition:
How can you put this to the test? Well, you can include a link in one of your HTML pages and see if the browser will allow it to load with the rest of the page.
Edit the template at myapp/templates/myapp/home.html to include a link to a Normalize.css file, which is a CSS file that helps browsers render all elements more consistently and in line with modern standards:
Now, request the page in a browser with the developer tools enabled. You’ll see an error like the following in the console:
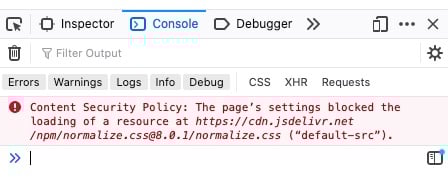
Uh-oh. You’re missing out on the power of normalization because your browser won’t load normalize.css. Here’s why it won’t load:
- Your
project/settings.pyincludesCSPMiddlewarein Django’sMIDDLEWARE. IncludingCSPMiddlewaresets the header to the defaultContent-Security-Policyvalue, which isdefault-src 'self', where'self'means your site’s own domain. In this tutorial, that’ssupersecure.codes. - Your browser obeys this rule and forbids
cdn.jsdelivr.netfrom loading. CSP is a default deny policy.
You must opt in and explicitly allow the client’s browser to load certain links embedded in responses from your site. To fix this, add the following setting to project/settings.py:
Next, try requesting your site’s page again:
Note that style-src specifies 'self' cdn.jsdelivr.net as part of the value for the Content-Security-Policy header. This means that the browser should permit style sheets from only two domains:
supersecure.codes('self')cdn.jsdelivr.net
The style-src directive is one of many directives that can be part of Content-Security-Policy. There are many others, such as img-src, which specifies valid sources of images and favicons, and script-src, which defines valid sources for JavaScript.
Each of these has a corresponding setting for django-csp. For example, img-src and script-src are set by CSP_IMG_SRC and CSP_SCRIPT_SRC, respectively. You can check out the django-csp docs for the complete list.
Here’s a final tip on the CSP header: Set it early! When things break later on, it’s easier to pinpoint why, as you can more readily isolate the feature or link you’ve added that isn’t loading because you don’t have the corresponding CSP directive up to date.
Final Steps for Production Deployments
Now you’ll go through a few last steps that you can take as you get set to deploy your app.
First, make sure that you’ve set DEBUG = False in your project’s settings.py if you haven’t done so already. This ensures that server-side debugging information isn’t leaked in the case of a 5xx server-side error.
Second, edit SECURE_HSTS_SECONDS in your project’s settings.py to increase the expiration time for the Strict-Transport-Security header from 30 seconds to the recommended 30 days, which is equivalent to 2,592,000 seconds:
Next, restart Gunicorn with a production configuration file. Add the following contents to config/gunicorn/prod.py:
Here, you’ve made a few changes:
- You turned off the
reloadfeature used in development. - You made the number of workers a function of the VM’s CPU count instead of hard-coding it.
- You allowed
loglevelto default to"info"rather than the more verbose"debug".
Now you can stop the current Gunicorn process and start a new one, replacing the development configuration file with its production counterpart:
After making this change, you don’t need to restart Nginx since it’s just passing off requests to the same address:host and there shouldn’t be any visible changes. However, running Gunicorn with production-oriented settings is healthier in the long run as the app scales up.
Finally, make sure that you’ve fully built out your Nginx file. Here’s the file in full, including all the components you’ve added so far, as well as a few extra values:
As a refresher, the inbound security rules tied to your VM should have a certain setup:
| Type | Protocol | Port Range | Source |
|---|---|---|---|
| HTTPS | TCP | 443 | 0.0.0.0/0 |
| HTTP | TCP | 80 | 0.0.0.0/0 |
| Custom | All | All | security-group-id |
| SSH | TCP | 22 | my-laptop-ip-address/32 |
Bringing that all together, your final AWS security rule set consists of four inbound rules and one outbound rule:
Compare the above to your initial security rule set. Take note that you’ve dropped access over TCP:8000, where the development version of the Django app was served, and opened up access to the Internet over HTTP and HTTPS on ports 80 and 443, respectively.
Your site is now ready for showtime:
Now that you’ve put all of the components together, your application is accessible through Nginx over HTTPS on port 443. HTTP requests on port 80 are redirected to HTTPS. The Django and Gunicorn components themselves are not exposed to the public Internet but rather sit behind the Nginx reverse proxy.
Testing Your Site’s HTTPS Security
Your site is now significantly more secure than when you started this tutorial, but don’t take my word for it. There are several tools that will give you an objective rating of security-related features of your site, focusing on response headers and HTTPS.
The first is the Security Headers app, which gives a grade rating to the quality of HTTP response headers coming back from your site. If you’ve been following along, your site should be ready to score an A rating or better there.
The second is SSL Labs, which will perform a deep analysis of your web server’s configuration as it relates to SSL/TLS. Enter the domain of your site, and SSL Labs will return a grade based on the strength of a variety of factors related to SSL/TLS. If you called certbot with --rsa-key-size 4096 and turned off TLS 1.0 and 1.1 in favor of 1.2 and 1.3, you should be set up nicely to receive an A+ rating from SSL Labs.
As a check, you can also request your site’s HTTPS URL from the command line to see a full overview of changes that you’ve added throughout this tutorial:
That’s some sweet HTML, indeed.
Conclusion
If you’ve followed along with this tutorial, your site has made bounds of progress from its previous self as a fledging standalone development Django application. You’ve seen how Django, Gunicorn, and Nginx can come together to help you securely serve your site.
In this tutorial, you’ve learned how to:
- Take your Django app from development to production
- Host your app on a real-world public domain
- Introduce Gunicorn and Nginx into the request and response chain
- Work with HTTP headers to increase your site’s HTTPS security
You now have a reproducible set of steps for deploying your production-ready Django web application.
You can download the Django project used in this tutorial by following the link below:
Further Reading
With site security, it’s a reality that you’re never 100% of the way there. There are always more features that you can add to secure your site further and produce better logging info.
Check out the following links for additional steps that you can take on your own:
- Django: Deployment Checklist
- Mozilla: Web Security
- Gunicorn: Deploying Gunicorn
- Nginx: Using the
Forwardedheader - Adam Johnson: How to Score A+ for Security Headers on Your Django Website
Watch Now This tutorial has a related video course created by the Real Python team. Watch it together with the written tutorial to deepen your understanding: Deploy a Django App With Gunicorn and Nginx
Перевод статьи Michael Herman: Dockerizing Django with Postgres, Gunicorn, and Nginx (opens new window).
Это пошаговое руководство, в котором подробно описано, как настроить Django в связке с PostgreSQL для работы в контейнере Docker. Для производственных сред мы добавим Nginx и Gunicorn. Мы также рассмотрим, как обслуживать статические и мультимедийные файлы Django через Nginx.
Серия статей о Django на Docker:
- Dockerizing Django with Postgres, Gunicorn, and Nginx (opens new window)
- Securing a Containerized Django Application with Let’s Encrypt (opens new window)
- Deploying Django to AWS with Docker and Let’s encrypt (opens new window)
# Настройка проекта
Создадим новый каталог с проектом Django:
Перейдите в браузере по адресу http://localhost:8000/, чтобы просмотреть проверить работоспособность Django. Завершите работу сервера и выйдите из виртуальной среды после завершения. Теперь у нас есть простой проект Django, с которым можно работать.
Создайте файл requirements.txt в каталоге app и добавьте Django в зависимости:
Поскольку мы перейдем к Postgres, удалите файл db.sqlite3 из каталога «app».
Каталог вашего проекта должен выглядеть так:
# Docker
Установите Docker (opens new window), если он еще не установлен у вас, затем добавьте файл Dockerfile в директорию "app" со следующим содержимым:
Итак, мы начали с образа Docker (opens new window) на базе Alpine (opens new window) для Python 3.8.3. Затем мы устанавливаем рабочий каталог (opens new window) вместе с двумя переменными среды:
PYTHONDONTWRITEBYTECODE: запрещает Python записьpycфайлов на диск (эквивалент опции (opens new window) `python -B’)PYTHONUNBUFFERED: запрещает Python выполнять вывод stdout и stderr (эквивалент опции (opens new window)python -u)
Наконец, мы обновили Pip, скопировали файл requirements.txt, установили зависимости и скопировали сам проект Django.
Просмотрите Docker для разработчиков Python (opens new window), чтобы узнать больше о структурировании файлов Docker, а также о некоторых передовых методах настройки Docker для разработки на основе Python.
Затем добавьте файл docker-compose.yml в корень проекта:
Информация о Compose файле и том как это работает можно почитать здесь (opens new window).
Обновите переменные SECRET_KEY, DEBUG и ALLOWED_HOSTS в settings.py:
Затем создайте файл .env.dev в корне проекта для хранения переменных среды для разработки:
Создайте образ:
Как только образ будет создан запустите контейнер:
Снова перейдите в браузере по адресу http://localhost:8000/, чтобы проверить работоспособность созданного образа (должен быть отображен экран приветствия).
Если что-то пошло не так и экран приветствия не отображен, проверьте лог-файлы на наличие ошибок:
docker-compose logs -f
# PostgreSQL
Чтобы настроить PostgreSQL, нам нужно добавить новый сервис в файл docker-compose.yml, обновить настройки Django и установить Psycopg2 (opens new window).
Для начала добавим новый сервис с именем db в файл docker-compose.yml:
Чтобы сохранить данные по завершению работы контейнера, мы настроили volume. Эта конфигурация привяжет postgres_data к каталогу «/var/lib/postgresql/data/» в контейнере.
Мы также добавили переменную окружения, чтобы задать имя для базы данных по умолчанию и установить имя пользователя и пароль.
Для получения дополнительной информации просмотрите раздел «Переменные среды» на странице Postgres Docker Hub (opens new window).
Нам также понадобятся некоторые новые переменные окружения для веб-службы, поэтому отредактируйте .env.dev следующим образом:
Update the DATABASES dict in settings.py:
Теперь база данных настроена с помощью переменных окружения которые мы определили в файле .env.dev, обратите внимание на значения по умолчанию.
Обновите Dockerfile, чтобы установить соответствующие пакеты, необходимые для Psycopg2:
Добавьте Psycopg2 в requirements.txt:
Ознакомьтесь с GitHub Issue (opens new window) для получения дополнительной информации об установке Psycopg2 в образ Docker на базе Alpine.
Создайте новый образ и запустите два контейнера:
Запустите миграцию:
Получили следующую ошибку?
django.db.utils.OperationalError: FATAL: database "hello_django_dev" does not existЗапустите команду
docker-compose down -v, чтобы удалить тома вместе с контейнерами. Затем заново соберите образы, запустите контейнеры и примените миграции.
Убедитесь, что таблицы Django по умолчанию созданы:
Вы можете проверить, что том был создан, запустив:
Вы должны увидеть что-то похожее на:
Затем добавьте файл entrypoint.sh в каталог «app», чтобы проверить работоспособность Postgres перед применением миграции и запуском сервера разработки Django:
Обновите права доступа к файлу локально:
Затем обновите файл Dockerfile, чтобы скопировать файл entrypoint.sh и запустить его как команду entrypoint (opens new window) Docker:
Добавьте переменную окружения DATABASE в .env.dev:
Проверьте сборку снова:
- Пересобирите образы.
- Запустите контейнеры
- Проверьте вывод в браузере http://localhost:8000/
Примечание
Во-первых, несмотря на добавление Postgres, мы все еще можем создать независимый образ Docker для Django, если для переменной среды DATABASE не задано значение postgres. Для тестирования создайте новый образ, а затем запустите новый контейнер:
Вы должны увидеть страницу приветствия по адресу http://localhost:8006.
Во-вторых, вы можете закомментировать команды очистки базы данных и миграции в сценарии entrypoint.sh, чтобы они не запускались при каждом запуске или перезапуске контейнера:
Вместо этого вы можете запускать их вручную после того, как контейнеры запустятся, например:
# Gunicorn
Двигаясь дальше, для создания production окружения давайте добавим Gunicorn, сервер WSGI production уровня, в файл requirements.txt:
Хотите узнать о WSGI и Gunicorn? Прочтите главу WSGI (opens new window) из курса Создание собственной веб-инфраструктуры Python (opens new window).
Поскольку мы по-прежнему хотим использовать встроенный сервер Django в разработке, создайте новый файл набора с именем docker-compose.prod.yml для продакшн:
Если у вас несколько сред, вы можете использовать файл конфигурации docker-compose.override.yml (opens new window). При таком подходе вы должны добавить свою базовую конфигурацию в файл docker-compose.yml, а затем использовать файл docker-compose.override.yml для переопределения этих параметров конфигурации в зависимости от среды.
Обратите внимание на значение по умолчанию для сommand. Мы используем Gunicorn, а не сервер разработки Django. Мы также удалили том из сервиса web, поскольку он нам не нужен в рабочей среде. Наконец, мы используем отдельные файлы переменных окружения для обеих служб, которые будут передаваться в контейнер во время выполнения.
.env.prod
.env.prod.db
Добавьте два файла в корень проекта. Вероятно, вы захотите сохранить их вне системы контроля версий, поэтому добавьте их в файл .gitignore.
Удалите контейнеры разработки и связанные тома (флаг -v):
Затем создайте рабочие образы и запустите контейнеры:
Убедитесь, что база данных hello_django_prod была создана вместе с таблицами Django по умолчанию. Протестируйте страницу администратора по адресу http://localhost:8000/admin. Статические файлы больше не загружаются. Это ожидаемо, поскольку режим отладки (Debug) отключен. Скоро мы это исправим.
И снова, если что-то пошло не так и экран приветствия не отображен, проверьте лог-файлы на наличие ошибок:
docker-compose -f docker-compose.prod.yml logs -f
# Production Dockerfile
Вы заметили, что мы все еще запускаем команду flush (opens new window) (которая очищает базу данных) и переносим команды при каждом запуске контейнера? Это нормально при разработке, но давайте создадим новый файл точки входа для продакшн.
entrypoint.prod.sh
Обновите права доступа к файлу локально:
Чтобы использовать этот файл, создайте новый Dockerfile с именем Dockerfile.prod для использования с продакшн сборками:
Здесь мы использовали многоступенчатую сборку Docker, чтобы уменьшить размер окончательного образа. По сути, builder — это временный образ, который используется для создания wheel пакетов Python. Затем wheel пакеты копируются в продакшн образ, а образ builder удаляется.
Вы можете пойти дальше в многоэтапном подходе к сборке (opens new window) и использовать один Dockerfile вместо создания двух Dockerfile. Подумайте о плюсах и минусах использования этого подхода для двух разных файлов.
Вы заметили, что мы создали пользователя без полномочий root? По умолчанию Docker запускает контейнерные процессы как root внутри контейнера. Это плохая практика, поскольку злоумышленники могут получить root-доступ к хосту Docker, если им удастся выйти за пределы контейнера. Если вы являетесь пользователем root в контейнере, вы будете меть права root и на хосте.
Обновите сервис web в файле docker-compose.prod.yml для сборки с помощью Dockerfile.prod:
Опробуте изменения:
# Nginx
Следующим этапом, давайте добавим в этот микс Nginx, который будет действовать как реверс прокси-сервер (opens new window) для Gunicorn с целью обработки клиентских запросов, а также обслуживания статических файлов.
Добавьте сервис nginx в файл docker-compose.prod.yml
Затем в корне локального проекта создайте следующие файлы и папки:
Dockerfile
nginx.conf
Ознакомьтесь с разделом Использование NGINX и NGINX Plus в качестве шлюза приложений с uWSGI и Django (opens new window) для получения дополнительной информации о настройке Nginx для работы с Django.
Затем обновите сервис web в docker-compose.prod.yml, заменив ports на expose:
Теперь порт 8000 доступен для других служб Docker только изнутри. Порт больше не будет публиковаться на хост-машине.
Чтобы узнать больше о
portsиexpose, просмотрите этот вопрос на Stack Overflow (opens new window).
Протестируйте обновленную сборку:
Убедитесь, что приложение запущено и работает по адресу http://localhost:1337.
Структура вашего проекта должна теперь выглядеть следующим образом:
Когда закончите остановите контенеры:
Поскольку Gunicorn является сервером приложений, он не отвечает за публикацию статических файлов. Итак, каким образом опубликовать статические и мультимедийные файлы в текущей конфигурации?
# Статические файлы
Обновите settings.py
# Режим разработки (development)
Теперь любой запрос к http://localhost:8000/staticfiles/* загружать статику из каталога «staticfiles».
Чтобы проверить, сначала заново соберите образы и запустите новые контейнеры в обычном порядке. Убедитесь, что статические файлы загружаются при обращении по адресу http://localhost:8000/admin.
# Продакшн (production)
Для продакшн сборки добавьте том в сервисы web и nginx в docker-compose.prod.yml, чтобы каждый контейнер имел общий каталог с именем «staticfiles»:
Нам также потребуется создать директорию «/home/app/web/staticfiles» в Dockerfile.prod
Зачем это нужно?
Docker Compose обычно монтирует именованные тома как root. И поскольку мы используем пользователя без полномочий root, мы получим ошибку отказа доступа при запуске команды collectstatic, если каталог еще не существует.
Чтобы обойти это, вы можете:
- Создать папку в Dockerfile (источник (opens new window))
- Изменить права доступа к каталогу после его монтирования (источник (opens new window))
Мы использовали первое.
Затем обновите конфигурацию Nginx для маршрутизации и обработки запросов статических файловов по пути «staticfiles»:
Сверните контейнеры:
Протестируйте:
Опять же, запросы к http://localhost:1337/staticfiles/* будут возвращать файлы из каталога «staticfiles».
Перейдите по адресу http://localhost:1337/admin и убедитесь, что статические ресурсы загружаются правильно.
Вы также можете проверить в журналах — через docker-compose -f docker-compose.prod.yml logs -f — что запросы к статическим файлам успешно обслуживаются через Nginx:
Когда закончите остановите контейнеры:
# Медиа файлы
Чтобы проверить работу с медиафайлами, начните с создания нового приложения Django:
Добавьте новое приложение в список INSTALLED_APPS в settings.py:
app/upload/views.py:
Добавьте каталог «templates» в каталог «app/upload», а затем добавьте новый шаблон с именем upload.html:
app/hello_django/urls.py:
app/hello_django/settings.py:
# Режим разработки (development)
Протестируйте:
Вы должны иметь возможность загрузить изображение по адресу http://localhost:8000/, а затем просмотреть изображение по адресу http://localhost:8000/mediafiles/IMAGE_FILE_NAME.
# Продакшн (production)
Для продакшн добавтье другие тома в службы web и nginx:
Создайте папку «/home/app/web/mediafiles» в Dockerfile.prod:
Снова обновите конфигурацию Nginx:
Пересобреите контейнеры:
Проверьте работоспособность еще раз:
- Загрузите изображение по адресу http://localhost:1337/.
- Затем просмотрите изображение по адресу http://localhost:1337/mediafiles/IMAGE_FILE_NAME.
Если вы видите ошибку
413 Request Entity Too Large, вам необходимо увеличить максимально разрешенный размер тела запроса клиента (opens new window) в секцииserverилиlocationконфигурации Nginx.Пример:
# Заключение
В этом руководстве мы рассмотрели, как поместить веб-приложение Django в контейнер с помощью Postgres для разработки. Мы также создали готовый к работе файл Docker Compose, который добавляет Gunicorn и Nginx в микс для обработки статических и мультимедийных файлов. Теперь вы можете протестировать продакшн сборку локально.
Что касается фактического развертывания в производственной среде, вы, вероятно, захотите использовать:
- Полностью управляемую службу базы данных, такую как RDS (opens new window) или Cloud SQL (opens new window), вместо управления собственным экземпляром Postgres внутри контейнера.
- Пользователь без полномочий root для служб
dbиnginx
Вы можете найти код в репозитории django-on-docker (opens new window).
Здесь (opens new window) также доступна более старая версия кода Pipenv.
Спасибо за чтение!