
The setup is incredibly simple, and in this django CMS tutorial, we’ll take you through
the first five steps to help get you started.
What you need to get started
First of all, you don’t need to be a senior developer or have prior experience as a
developer with Django or Python to create your first django CMS demo website. In fact,
one of the added benefits of django CMS is that it offers a powerful yet easy to use
interface for most common tasks of setting up a web site. You can focus on any specific
needs of your project.
Before we begin the django CMS tutorial, you will need to know that there are several
ways to install django CMS for free.
-
You can either set up a project on Divio Cloud, which is
fast and useful for people without a technical background and a good starting point
to experience the CMS User Interface. -
As another option, you can set up the project using docker.
It is a good way for a developer locally without an external vendor and we use this
option in this django CMS demo. -
The last option to install is creating a django CMS project manually into a local
virtual environment by running thedjangocmscommand. This will create a new
Django project set up for running django CMS based on a django CMS-specific project
template. See Installing django CMS by hand for
details. This option is a good way for developers that want to install everything by
hand to understand better, have full control, or want to add to an existing Django
project.
In this tutorial we will cover both options 2 and 3, including the explanation what
exactly needs to happen when you add django CMS to a Django project.
Production-ready: django CMS quickstart
The django CMS quickstart project is a template for a Docker-based production-ready
setup. Especially if you know your way around Docker, you will be able to quickly set up
a project that is ready for deployment.
If you just want to test a project locally without Docker, you can install django
CMS by hand in a few steps.
Setup Docker (Step 1)
Install docker from here. If you have not used
docker in the past, please read this introduction on docker.
Run the demo project in docker (Step 2)
Info: The demo project is a
minimal Django project with some additional requirements in the requirements.txt.
For more details see its Open the terminal application on your computer and go to a safe
folder (i.e. cd ~/Projects), then
git clone git@github.com:django-cms/django-cms-quickstart.git

cd django-cms-quickstart
docker compose build web
docker compose up -d database_default
docker compose run web python manage.py migrate
docker compose run web python manage.py createsuperuser
docker compose up -d
During the installation process, you will be prompted to enter your email address and
set a username and password. Open your browser and insert
http://localhost:8000/admin there you should be invited to login and continue with
Step 3: create your first page
Create your first page (Step 3)
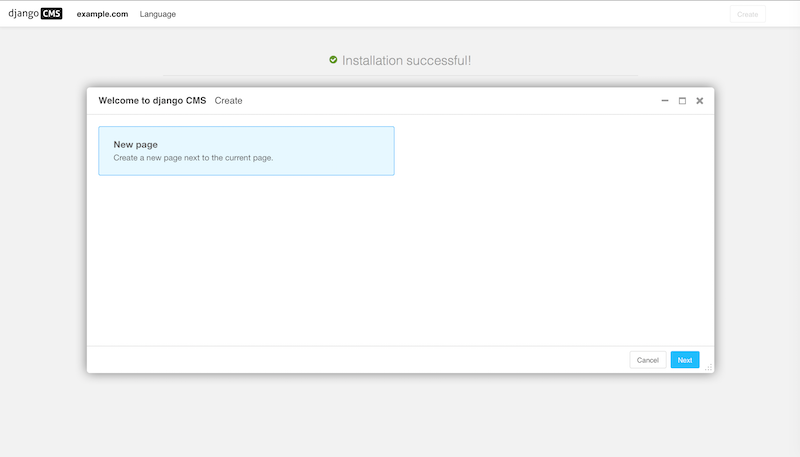
-
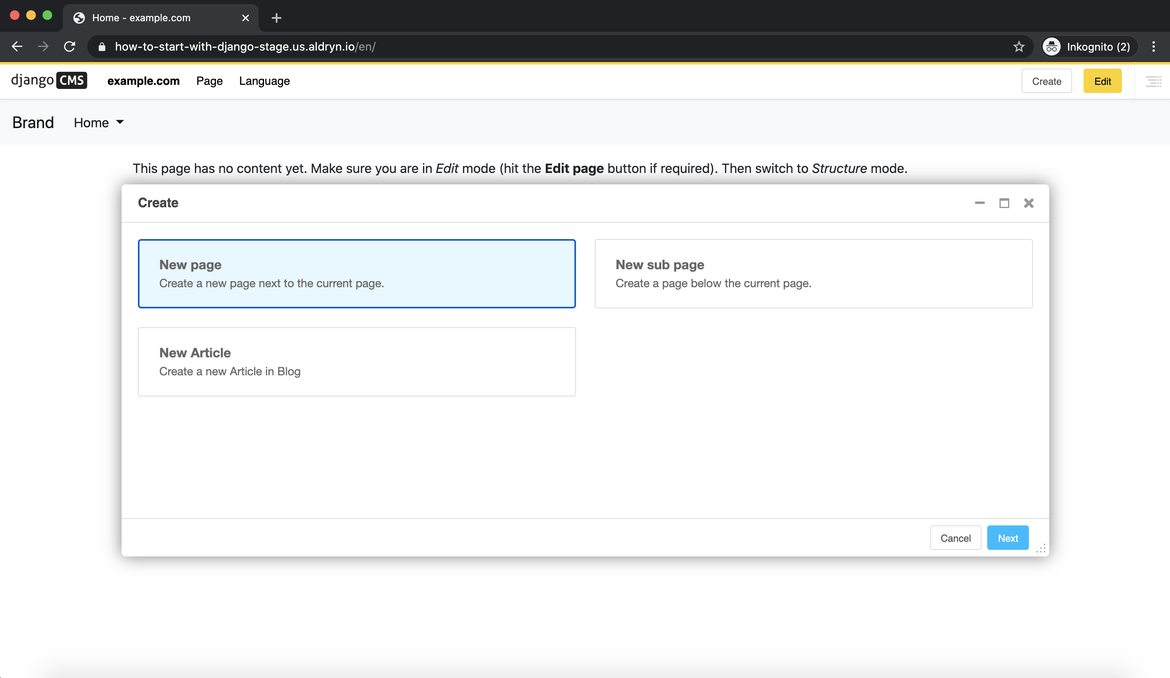
Once you login you can press Create on the top right.
-
Then you will see a pop-up window where the “New page” is marked blue.
-
Press New Page and select Next.
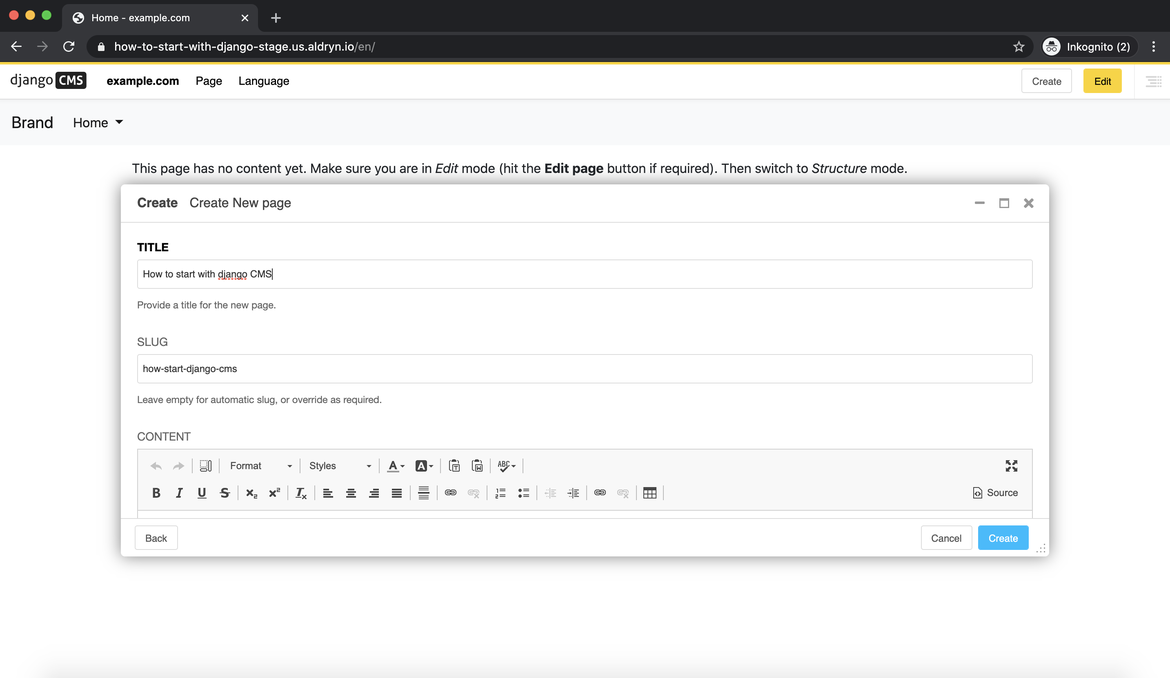
After selecting Next, you will add in your title and some basic text content for the new
page, click Create.
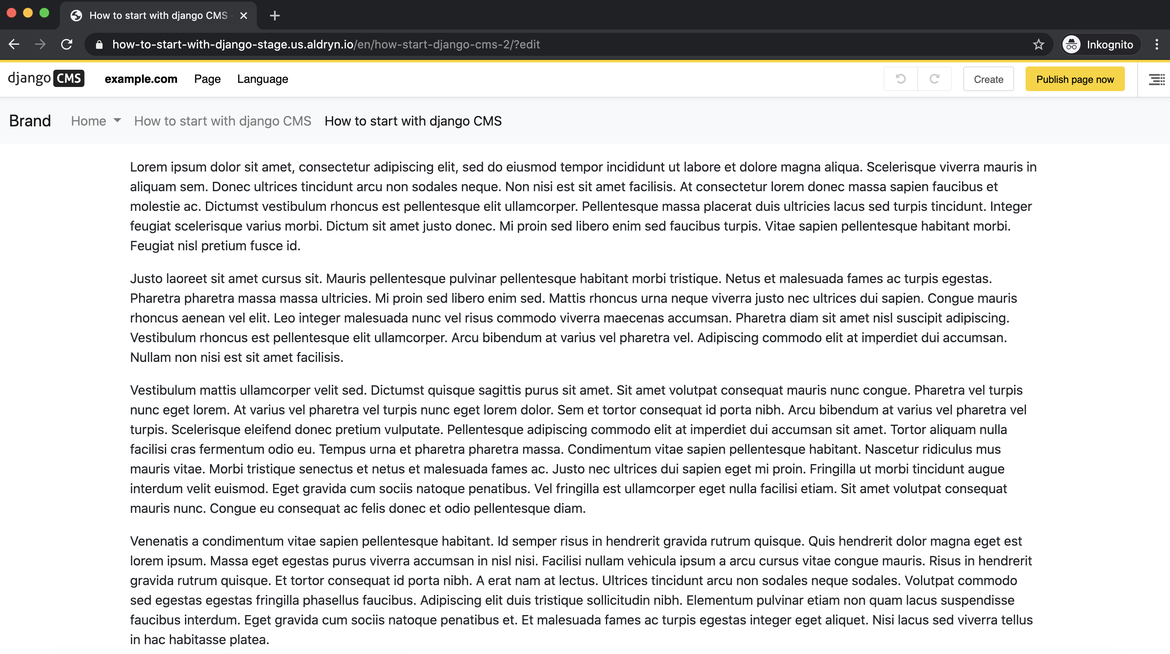
Here is your newly created page.
Publish your first page (Step 4)
The page we just created is just a draft and needs to be published once you finish. As
an editor, only you can see and edit your drafts, other visitors to your site will only
see your published pages.
Press “Publish”
To edit the page, you can switch back into editing mode using the “Edit” button, and
return to the published version of the page using the “view published” button.
In the editing mode, you can double-click on the paragraph of the text to change it, add
formatting, and save it again. Any changes that are made after publishing are saved to a
draft and will not be visible until you re-publish.
Congratulations, you now have installed django CMS and created your first page.
If you need to log in at any time, append ?toolbar_on to the URL and hit Return.
This will enable the toolbar, from where you can log in and manage your website.
Installing django CMS by hand
If you are looking for a typical installation using Docker look at the
quickstarter section of this documentation.
If you prefer to do things manually, this how-to guide will take you through the
process. It is simple, quick, and transparent. If you know Django, you will recognize
how django CMS is set up like a typical Django project.
Note
You can also use this guide to help you install django CMS as part of an existing
project. However, the guide assumes that you are starting with a blank project, so
you will need to adapt the steps below appropriately as required.
This document assumes you have some basic familiarity with Python and Django. After
you’ve integrated django CMS into your project, you should be able to follow the
Tutorials for an introduction to developing with django CMS.
Install the django CMS package (Step 1)
Check the Python/Django requirements for this version of django
CMS.
django CMS also has other requirements, which it lists as dependencies in its
setup.py.
Important
We strongly recommend doing all of the following steps in a virtual environment. You ought to know how to create,
activate and dispose of virtual environments. If you don’t, you can use the steps
below to get started, but you are advised to take a few minutes to learn the basics
of using virtual environments before proceeding further.
python3 -m venv .venv  # create a virtualenv
source .venv/bin/activate  # activate it
pip install --upgrade pip  # Upgrade pip
Then:
to install the release candidate version of django CMS. It will also install its
dependencies including Django.
Create a new django CMS project (Step 2)
Create a new django CMS project:
This is a shortcut command for creating a new Django project with the right project
template. It performs the following five steps in one simple go:
-
It creates a new Django project:
django-admin startproject myproject --template https://github.com/django-cms/cms-template/archive/4.1.tar.gz
If
django-admin startprojectis new to you, you ought to read the official
Django tutorial, which
covers starting a new project. -
It installs additional optional packages which are used in the template project.
Those are-
djangocms-text-ckeditor
for rich text input. -
djangocms-frontend for
Bootstrap5 support. -
django-filer for managing media
files like images. -
djangocms-versioning for
publishing and version management, -
djangocms-alias for managing
common content parts such as footers. -
djangocms_admin_style for
a consistent user experience with django CMS and Django admin.
-
-
It changes into the project directory and runs the
migratecommand to create the
database: -
It prompts for creating a superuser by invoking:
python -m manage createsuperuser
-
It runs the django CMS check command to verify the installation is consistent:
python -m manage cms check
Your new project will look like this:
myproject/
    LICENSE
    README.md
    db.sqlite3
    myproject/
        static/
        templates/
            base.html
        __init__.py
        asgi.py
        settings.py
        urls.py
        wsgi.py
    manage.py
    requirements.in
The LICENSE and README.md files are not needed and can be deleted or replaced by
appropriate files for your project.
requirements.in contains dependencies for the project. Add your dependencies here.
We suggest to use pip-compile to freeze your requirements as, for example, discussed in
this blog post.
Spin up your Django development server (Step 3)
Now you are ready to spin up Django’s development server by first changing directory into
the project folder and then spinning up the development server:
cd myproject
python -m manage runserver
You can visit your project’s web site by pointing your browser to localhost:8000.
Use the newly created superuser’s credentials to authenticate and create your first
page!
Adding django CMS to an existing Django project
django CMS is nothing more than a powerful set of Django apps. Hence you can add django
CMS to any Django project. It will require some settings to be modified, however.
Minimally-required applications and settings
To run django CMS you will only need to modify the settings.py and urls.py
files.
Open the new project’s settings.py file in your text editor.
INSTALLED_APPS
You will need to add the following to its list of INSTALLED_APPS:
"django.contrib.sites",
"cms",
"menus",
"treebeard",
-
django CMS needs to use Django’s
django.contrib.sitesframework. You’ll
need to set aSITE_IDin the settings —SITE_ID = 1will suffice. -
cmsandmenusare the core django CMS modules. -
django-treebeard is used to manage django
CMS’s page tree structures.
django CMS also installs django CMS admin style. This provides some styling that
helps make django CMS administration components easier to work with. Technically it’s an
optional component and does not need to be enabled in your project, but it’s strongly
recommended for a more consistent user experience.
In the INSTALLED_APPS, before django.contrib.admin, add:
Language settings
django CMS requires you to set the LANGUAGES setting. This should list all
the languages you want your project to serve, and must include the language in
LANGUAGE_CODE.
For example:
LANGUAGES = [
    ("en", "English"),
    ("de", "German"),
    ("it", "Italian"),
]
LANGUAGE_CODE = "en"
(For simplicity’s sake, at this stage it is worth changing the default en-us in that
you’ll find in the LANGUAGE_CODE setting to en.)
Database
django CMS like most Django projects requires a relational database backend. Each django
CMS installation should have its own database.
You can use SQLite, which is included in Python and doesn’t need to be installed
separately or configured further. You are unlikely to be using that for a project in
production, but it’s ideal for development and exploration, especially as it is
configured by default in a new Django project’s DATABASES.
Note
For deployment, you’ll need to use a production-ready database with Django. We recommend using PostgreSQL, MySQL or MariaDB.
Installing and maintaining database systems is far beyond the scope of this
documentation, but is very well documented on the systems’ respective websites.
Whichever database you use, it will also require the appropriate Python adaptor to
be installed:
pip install psycopg2     # for Postgres
pip install mysqlclient  # for MySQL or MariaDB
Refer to Django's DATABASES setting documentation for the
appropriate configuration for your chosen database backend.
Confirming that you are not migrating a version 3 project
Add to settings.py:
CMS_CONFIRM_VERSION4 = True
This is to ensure that you do not accidentally run migrations on a django CMS version 3
database. This can lead to corruption since the data structures for the CMSPlugin
models are different.
Warning
Do not add CMS_CONFIRM_VERSION4 = True to your django CMS version 3 project
unless you know what you are doing. Just running migrations can lead to data loss.
Warning
To migrate a django CMS version 3 project to version 4 you can have a look at
django CMS 4 migration. This is
a third party project supposed to assist the migration from v3 to v4. It is not
(yet) officially supported.
Database tables
Now run migrations to create database tables for the new applications:
Sekizai
Django Sekizai is required by the CMS for
static files management. You need to have:
listed in INSTALLED_APPS, and:
"sekizai.context_processors.sekizai"
in the TEMPLATES['OPTIONS']['context_processors']:
TEMPLATES = [
    {
        ...
        "OPTIONS": {
            "context_processors": [
                ...
                "django.template.context_processors.i18n",
                "sekizai.context_processors.sekizai",
            ],
        },
    },
]
Middleware
in your MIDDLEWARE you’ll need
django.middleware.locale.LocaleMiddleware — it’s not installed in
Django projects by default.
Also add:
"django.middleware.locale.LocaleMiddleware",  # not installed by default

"cms.middleware.user.CurrentUserMiddleware",
"cms.middleware.page.CurrentPageMiddleware",
"cms.middleware.toolbar.ToolbarMiddleware",
"cms.middleware.language.LanguageCookieMiddleware",
to the list.
You can also add 'cms.middleware.utils.ApphookReloadMiddleware'. It’s not absolutely
necessary, but it’s useful. If included, should be at the
start of the list.
add the following configuration to your settings.py:
X_FRAME_OPTIONS = "SAMEORIGIN"
Context processors
Add "cms.context_processors.cms_settings" to
TEMPLATES['OPTIONS']['context_processors'].
Also add 'django.template.context_processors.i18n' if it’s not already present.
cms check should now be unable to identify any further issues with your project.
Some additional configuration is required however.
Further required configuration
URLs
In the project’s urls.py, add path("", include("cms.urls")) to the
urlpatterns list, preferably as i18n_patterns. It should come after other
patterns, so that specific URLs for other applications can be detected first.
You’ll also need to have an import for django.urls.include. For example:
from django.conf.urls.i18n import i18n_patterns
from django.urls import include, path

urlpatterns = i18n_patterns(
    path("admin/", admin.site.urls),
    path("", include("cms.urls")),
)
The django CMS project will now run, as you’ll see if you launch it with python. You’ll be able to reach it at http://localhost:8000/, and the
manage.py runserver
admin at http://localhost:8000/admin/. You won’t yet actually be able to do anything
very useful with it though.
Versioning and Aliases
Compared to previous versions of django CMS, the core django CMS since version 4 has
been stripped of some functionality to allow for better implementations. The two most
important examples are the now separate apps django CMS versioning and django CMS alias.
We highly recommend installing them both:
pip install djangocms-versioning
pip install djangocms-alias
Also add them to INSTALLED_APPS:
"djangocms_versioning",
"djangocms_alias",
Templates
django CMS requires at least one template for its pages, so you’ll need to add
CMS_TEMPLATES to your settings. The first template in the CMS_TEMPLATES
list will be the project’s default template.
CMS_TEMPLATES = [
    ('home.html', 'Home page template'),
]
In the root of the project, create a templates directory, and in that,
home.html, a minimal django CMS template:
{% load cms_tags sekizai_tags %}
<html>
    <head>
        <title>{% page_attribute "page_title" %}</title>
        {% render_block "css" %}
    </head>
    <body>
        {% cms_toolbar %}
        {% placeholder "content" %}
        {% render_block "js" %}
    </body>
</html>
This is worth explaining in a little detail:
-
{% load cms_tags sekizai_tags %}loads the template tag libraries we use in the
template. -
{% page_attribute "page_title" %}extracts the page’spage_title
attribute. -
{% render_block "css" %}and{% render_block "js" %}are Sekizai template tags
that load blocks of HTML defined by Django applications. django CMS defines blocks for
CSS and JavaScript, and requires these two tags. We recommended placing{%just before the
render_block "css" %}</head>tag, and and{% render_blocktag just before the
"js" %}</body>. -
{% cms_toolbar %}renders thedjango CMS toolbar. -
{% placeholder "content" %}defines aplaceholder, where plugins can be
inserted. A template needs at least one{% placeholder %}template tag to be
useful for django CMS. The name of the placeholder is simply a descriptive one, for
your reference.
Django needs to be know where to look for its templates, so add templates to the
TEMPLATES['DIRS'] list:
TEMPLATES = [
    {
        ...
        'DIRS': ['templates'],
        ...
    },
]
Note
The way we have set up the template here is just for illustration. In a real
project, we’d recommend creating a base.html template, shared by all the
applications in the project, that your django CMS templates can extend.
See Django’s template language documentation
for more on how template inheritance works.
Media and static file handling
A django CMS site will need to handle:
-
static files, that are a core part of an application or project, such as its
necessary images, CSS or JavaScript -
media files, that are uploaded by the site’s users or applications.
STATIC_URL is defined (as "/static/") in a new project’s settings by
default. STATIC_ROOT, the location that static files will be copied to and
served from, is not required for development — only for production.
For now, using the runserver and with DEBUG = True in your settings, you don’t need
to worry about either of these.
However, MEDIA_URL (where media files will be served) and
MEDIA_ROOT (where they will be stored) need to be added to your settings:
MEDIA_URL = "/media/"
MEDIA_ROOT = os.path.join(BASE_DIR, "media")
For deployment, you need to configure suitable media file serving. For development
purposes only, the following will work in your urls.py:
from django.conf import settings
from django.conf.urls.static import static

urlpatterns = [...] + static(settings.MEDIA_URL, document_root=settings.MEDIA_ROOT)
(See the Django documentation for guidance on serving media files in production.)
Using cms check for configuration
Once you have completed the minimum required set-up described above, you can use django
CMS’s built-in cms check command to help you identify and install other components.
Run:
python manage.py cms check
This will check your configuration, your applications and your database, and report on
any problems.
Note
If key components are be missing, django CMS will be unable to run the cms check and will simply raise an error instead.
command
After each of the steps below run cms check to verify that you have resolved that
item in its checklist.
Adding content-handling functionality
You now have the basics set up for a django CMS site, which is able to manage and serve
up pages. However the project so far has no plugins installed, which means it has no way
of handling content in those pages. All content in django CMS is managed via plugins.
So, we now need to install some additional addon applications to provide plugins and
other functionality.
You don’t actually need to install any of these. django CMS doesn’t commit you to
any particular applications for content handling. The ones listed here however provide
key functionality and are strongly recommended.
Django Filer
Django Filer provides file and image management. Many other applications also rely on
Django Filer — it’s very unusual to have a django CMS site that does not run Django
Filer. The configuration in this section will get you started, but you should refer to
the Django Filer documentation for more
comprehensive configuration information.
To install:
pip install django-filer\>=3.0
A number of applications will be installed as dependencies. Easy Thumbnails is required to create new versions of
images in different sizes; Django MPTT
manages the tree structure of the folders in Django Filer.
Pillow, the Python imaging library, will be installed. Pillow needs some system-level libraries — the
Pillow documentation describes in detail what is
required to get this running on various operating systems.
Add:
'filer',
'easy_thumbnails',
to INSTALLED_APPS.
You also need to add:
THUMBNAIL_HIGH_RESOLUTION = True

THUMBNAIL_PROCESSORS = (
    'easy_thumbnails.processors.colorspace',
    'easy_thumbnails.processors.autocrop',
    'filer.thumbnail_processors.scale_and_crop_with_subject_location',
    'easy_thumbnails.processors.filters'
)
New database tables will need to be created for Django Filer and Easy Thumbnails, so run
migrations:
python manage.py migrate filer
python manage.py migrate easy_thumbnails
(or simply, python manage.py migrate).
Django CMS CKEditor
Django CMS CKEditor is the default rich text editor for django CMS.
Install: pip install djangocms-text-ckeditor.
Add djangocms_text_ckeditor to your INSTALLED_APPS.
Run migrations:
python manage.py migrate djangocms_text_ckeditor
Django CMS Frontend
Djangto CMS Frontend adds support for css frameworks to django CMS. By default, it
comes with support of the Bootstrap 5 framework. However, you can use it to create your
own theme using your own framework.
Install: pip install djangocms-frontend and it and its subpackages to
INSTALLED_APPS:
INSTALLED_APPS = [
    ...,
    "easy_thumbnails",
    "djangocms_frontend",
    "djangocms_link",
    "djangocms_frontend.contrib.accordion",
    "djangocms_frontend.contrib.alert",
    "djangocms_frontend.contrib.badge",
    "djangocms_frontend.contrib.card",
    "djangocms_frontend.contrib.carousel",
    "djangocms_frontend.contrib.collapse",
    "djangocms_frontend.contrib.content",
    "djangocms_frontend.contrib.grid",
    "djangocms_frontend.contrib.image",
    "djangocms_frontend.contrib.jumbotron",
    "djangocms_frontend.contrib.link",
    "djangocms_frontend.contrib.listgroup",
    "djangocms_frontend.contrib.media",
    "djangocms_frontend.contrib.tabs",
    "djangocms_frontend.contrib.utilities",
    ...,
]
Miscellaneous plugins
There are plugins for django CMS that cover a vast range of functionality. To get
started, it’s useful to be able to rely on a set of well-maintained plugins that cover
some general content management needs.
-
djangocms-file
-
djangocms-picture
-
djangocms-video
-
djangocms-googlemap
-
djangocms-snippet
-
djangocms-style
To install:
pip install djangocms-file djangocms-picture djangocms-video djangocms-googlemap djangocms-snippet djangocms-style
and add:
"djangocms_file",
"djangocms_picture",
"djangocms_video",
"djangocms_googlemap",
"djangocms_snippet",
"djangocms_style",
to INSTALLED_APPS.
Then run migrations:
These and other plugins are described in more detail in Some commonly-used plugins.
Next steps
If this is your first django CMS project, read through the
user guide for a walk-through of some basics.
The tutorials for developers will help you understand how to approach
django CMS as a developer. Note that the tutorials assume you have installed the CMS
using the django CMS quickstart project, but with a little adaptation you’ll be able to
use it as a basis.
To deploy your django CMS project on a production web server, please refer to the
Django deployment documentation.
-
en
- Language: ru
-
3.7.x
-
Documentation version:
3.9
Мы начнем с настройки нашего окружения.
1.1. Требования
django CMS требует Django 1.11 или новее, и Python 2.7 или 3.3 или новее. В этом руководстве предполагается, что вы используете Python 3.
Вы можете найти таблицу совместимости для конкретной версии python here.
1.2. Ваша рабочая среда
Мы будем считать, что у вас установлена достаточно свежая версия virtualenv и что вы знакомы с ней на базовом уровне.
1.2.1. Создание и активация виртуальной среды
Linux:
python3.6 -m venv env   # Python 2 usage: virtualenv env
source env/bin/activate
Windows:
py -m venv env
env\Scripts\activate
1.2.2. Обновление pip внутри виртуальной среды
pip — это программа установки Python. Убедитесь, что ваша версия актуальна, так как более ранние версии могут быть менее надежными:
pip install --upgrade pip
1.2.3. Используйте программу установки django CMS
django CMS installer — это полезный скрипт, который позаботится о создании нового проекта.
Установите его:
pip install djangocms-installer
Это позволит вам получить новую команду djangocms.
Создайте новый каталог для работы и cd в него:
mkdir tutorial-project
cd tutorial-project
Запустите его, чтобы создать новый проект Django под названием mysite:
Это означает:
-
запустите программу установки django CMS
-
вызвать новый каталог проекта
mysite
Предупреждение
djangocms-installer ожидает, что текущий каталог будет пустым на этом этапе, и будет проверять это, и предупреждать, если это не так. Вы можете заставить его пропустить проверку и продолжить в любом случае, используя флаг -s; заметьте, что это может привести к перезаписи существующих файлов.
Пользователям Windows может потребоваться выполнить дополнительные действия, чтобы убедиться, что файлы Python связаны правильно, если это не сработает сразу:
assoc .py=Python.file
ftype Python.File="C:\Users\Username\workspace\demo\env\Scripts\python.exe" "%1" %*
По умолчанию программа установки запускается в Batch mode и устанавливает ваш новый проект с некоторыми значениями по умолчанию.
Позже вы, возможно, захотите управлять некоторыми из них самостоятельно, в этом случае вам нужно будет запустить его в режиме Wizard mode. По умолчанию в режиме Batch mode создается проект только для английского языка, что будет достаточно для целей данного руководства. Конечно, вы можете просто отредактировать файл settings.py нового проекта в любое время, чтобы изменить или добавить языки сайта или изменить другие настройки.
Программа установки создаст для вас пользователя admin с именем пользователя/паролем admin/admin.
1.2.4. Запустите сервер запуска
Перейдите в каталог mysite
Запустите сервер с помощью следующей команды
cd mysite
python manage.py runserver
Откройте http://localhost:8000/ в браузере, где вам будет предложено войти в систему, а затем создайте новую страницу.
Поздравляем, теперь вы установили полностью функциональную CMS.
Если вам нужно войти в систему в любое время, добавьте ?edit к URL и нажмите Return. Это включит панель инструментов, с помощью которой вы сможете войти в систему и управлять своим сайтом.
Если вы еще не знакомы с django CMS, вы можете потратить несколько минут, чтобы пробежаться по основам django CMS tutorial for users.
К списку категорий
Описание
В этом курсе мы с вами установим DjangoCMS, настроим его для работы в PyCharm.
Будьте внимательны, мы будем работать и с командной срокой и с PyCharm.
Рекомендуется сначала один вечер просто посмотреть курс, а потом проделать.
Так не будет ошибок и будет чёткое понимание, что нужно сделать.
Установка на Ubuntu здесь.
Статья
Смотреть курс (бесплатно).
скачать курс с Яндекс диск (97,5 мб)
— распакуйте, зайдите в распакованную папку и нажмите на файл story.html, просмотрите курс в браузере.
Далее дублируются команды, которые использовались в курсе.
активация виртуального окружения.
(обратите внимание, что бы понять что окружение активировано, должно быть имя окружения в скобках перед путём (MyEnv1) C:\Users………)
MyEnv1\scripts\activate
Установка DjangoCms
pip install djangocms-installer
После установки создаём папку
mkdir myCMS1
Переходим в созданную папку myCMS1
cd myCMS1
Создаём проект ДжангоСМС
djangocms –p . mysite
/////////////////////////////////////////////////////////////////////////////////////////////////////////////////
В уроке 7 мы предварительно рассматривали, что делать будем, при создании проекта,
посмотрите урок, скопируйте и переведите в переводчике Гугл, осознайте, перед тем как делать на практике в уроке 8.
//////////////////////////////////////////////////////////////////////////////////////////////////////////////////
Database configuration (in URL format) [default sqlite://localhost/project.db]:
django CMS version (choices: 2.4, 3.0, 3.1, stable, develop) [default stable]:
Django version (choices: 1.4, 1.5, 1.6, 1.7, 1.8, stable) [default stable]:
Activate Django I18N / L10N setting (choices: yes, no) [default yes]:
Install and configure reversion support (choices: yes, no) [default yes]:
Languages to enable. Option can be provided multiple times, or as a comma
separated list. Only language codes supported by Django can be used here: en
Optional default time zone [default <your timezone>]:
Activate Django timezone support (choices: yes, no) [default yes]:
Activate CMS permission management (choices: yes, no) [default yes]:
Use Twitter Bootstrap Theme (choices: yes, no) [default no]: yes
Use custom template set [default no]:
Load a starting page with examples after installation (english language
only). Choose «no» if you use a custom template set. (choices: yes, no)
[default no]: yes
Creating the project
Please wait while I install dependencies
##lots more messages…
Creating admin user
Username (leave blank to use ‘<yourusername>’):
Email address: enter email address
Password: enter a password
Password (again):
Superuser created successfully.
All done!
Код
нет кода
Рекомендации
Узнать больше в ленте
Twitter
и подписаться на
Ютуб, получать новые видео.
Купите доступ занимайтесь в школе.
////////////////////////////////////////////////////////////////////////////////////
Хоть Джанго смс начала работать корректно в PyCharm (сама пайчарм не содержит стандартные настройки на это Движок)
Но так как основа Джанго, работает корректно.
Однако пока не придумал, как отображать базу именно в Пайчарм, кто придумает пишите.
Поэтому прибегнул к отдельным движкам бесплатным для баз.
По рекомендации Володи Семеновича, sqlite/
Валентина судио, показывал на spb (sqlite бесплатно, нужно зарегистрировать бесплатно а то задолбит напоминалка)
Проблема с открытием базы SQLITE решил участник школы Владимир Семенович,
вот его видео:
и там я ещё дописал короткое видео как можно сделать.
2016-05-11 12:15:02+00:00
К списку категорий
django CMS Installer
Command to easily bootstrap django CMS projects
- Free software: BSD license
Features
djangocms-installer is a console wizard to help bootstrapping a django CMS
project.
Refer to django CMS Tutorial on how to properly setup your first django CMS project.
Warning
Version 2.0 dropped support for Python 2.7, 3.5, django CMS < 3.7 and Django < 2.2.
More 1.2.x versions may be released after 1.2 is out in case important bugfixes will be needed.
Usage
To create your first django CMS project run:
djangocms my_project
That’s all!
This command will:
- Create a Django project
- Install django CMS and its core plugins
- Create and populate the database
- Install default templates
Just run manage.py runserver, go to http://localhost:8000 , login with user admin (same password)
and enjoy your first django CMS project.
More at django CMS Tutorial and installer usage page
Documentation
For detailed information see https://djangocms-installer.readthedocs.io
Preliminary checks and system libraries
While this wizard try to handle most of the things for you, it doesn’t check for
all the proper native (non python) libraries to be installed.
Before running this, please check you have the proper header and libraries
installed and available for packages to be installed.
Libraries you would want to check:
- libjpeg (for JPEG support in
Pillow) - zlib (for PNG support in
Pillow) - postgresql (for
psycopg2) - libmysqlclient (for
Mysql) - python-dev (for compilation and linking)
For additional information, check https://djangocms-installer.readthedocs.io/en/latest/libraries.html
Supported versions
The current supported version matrix is the following:
| Django 2.2 | Django 3.0 | Django 3.1 | |
| django CMS 3.7 | Supported | Supported | Not supported |
| django CMS 3.8 | Supported | Supported | Supported |
See version 1.2 for older Django / django CMS versions support
Any beta and develop version of Django and django CMS, by its very nature,
it’s not supported, while it still may work.
djangocms-installer tries to support beta versions of django CMS when they
are be considered sufficiently stable by the upstream project.
Warning
djangocms-installer assumes that django-admin.py is installed in the same directory
as python executable, which is the standard virtualenv layout. Other installation layouts
might work, but are not officially supported.
Windows support
The installer is tested on Windows 10 with Python version 3.8.6 installed using
official MSI packages available at http://python.org.
Please check that the .py extension is associated correctly with Python interpreter:
c:\> assoc .py
.py=Python.File

c:\>ftype Python.File
Python.File="C:\Windows\py.exe" "%1" %*
Чтобы установить django-cms в Windows, достаточно сделать 6 простых шагов.
- Установить Python 2.x, где x ≥ 5.
- Убедиться, что в переменной среды PATH есть путь к директории, в которую вы только что установили Python и к поддиректории Scripts в ней.
В моём случае значение переменной%PATH%;c:\Documents and Settings\django-cms\python27;c:\Documents and Settings\django-cms\python27\Scripts


- Установить setuptools. Загрузите установщик ez_setup.py и выполните из директории, где находится файл ez_setup.py, команду
python ez_setup.py

- Установить pip. Загрузите установщик get-pip.py и выполните из директории, где находится файл get-pip.py, команду
python get-pip.py
- Уставновить PIL для вашей версии Python.
- Установить django-cms. Выполнить команду
pip install django-cms

Готово.
Можно приступить к настройке учебного проекта.