
(Send feedback to Microsoft so we can help.)
What affected your experience?
Resolved my issue
Clear instructions
Easy to follow
No jargon
Pictures helped
Other
Didn’t match my screen
Incorrect instructions
Too technical
Not enough information
Not enough pictures
Other
Any additional feedback? (Optional)
By pressing submit, your feedback will be used to improve Microsoft products and services.
Your IT admin will be able to collect this data.
Privacy Statement.
-
Home
-
News
- 10 Ways to Open Device Manager Windows 10
By Alisa |
Last Updated
Windows Device Manager allows users to view and control the hardware connected to the computer. Check the 10 ways in this post for how to open Device Manager in Windows 10 computer. To help you manage hard drive partition, recover lost/deleted files, MiniTool software is the top choice.
What Is Device Manager?
Windows Device Manager is an applet in Control Panel in OS. It allows you to check the devices that are currently connected to your Windows system, repair Windows 10 hardware problems if a piece of hardware is not working, enable or disable devices, reinstall/update device drivers, and more. The connected devices in Windows Device Manager are listed into different categories.
If you need to open Device Manager in Windows 10 to view, control or adjust the hardware status, or fix the hardware not working properly, hardware not recognized issues, etc. you can check the 10 ways below to easily open Windows 10 Device Manager.
Video Guide:
#1. How to Open Device Manager in Windows 10 with Search Box
The easiest way to open Device Manager in Windows 10 is to use Search Box.
- Click the Search Box at the taskbar next to Start menu.
- Type device manager in the Search Box, and click the best-matched result to open Device Manager in Windows 10.
- You can click Start menu at the lower-left corner on Windows 10 computer desktop.
- Then type device manager, Windows Device Manager app will display, click Device Manager to open it.
#3. Open Device Manager Windows 10 with Windows + X
- Press Windows + X keyboard shortcut keys simultaneously to open Quick Access menu.
- Click Device Manager from the list to open Device Manager app.
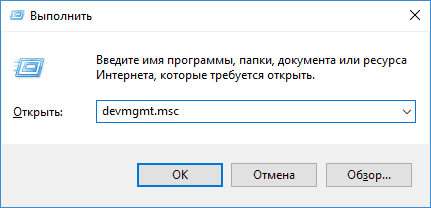
#4. Open Device Manager Windows 10 via Run
- You can press Windows + R keys together to open Run window.
- Type devmgmt.msc in the Run box, and hit Enter to open this app.

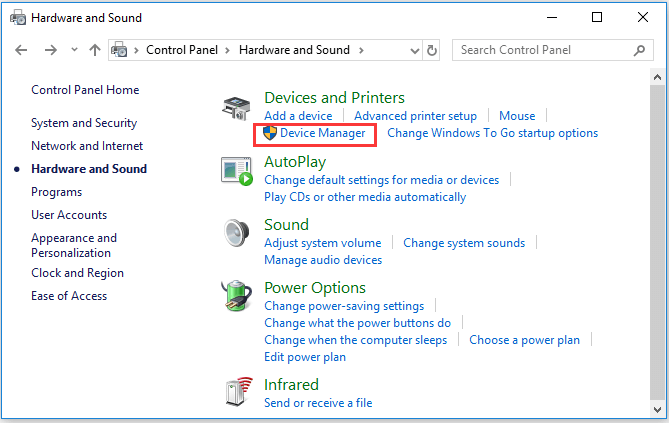
#5. How to Open Device Manager in Windows 10 from Control Panel
- Press Windows + R to open Run, and type control panel in Run dialog, hit Enter to open Control Panel. Check the 10 ways to open Control Panel in Windows 10.
- Click Hardware and Sound and click Device Manager under Device and Printers to open Device Manager.
#6. Use Cortana to Open Device Manager in Windows 10
You can click Cortana at the toolbar, and say “Launch Device Manager” to ask Cortana to open Windows 10 Device Manager for you.
#7. Use Device Manager CMD/Command
- You can press Windows + R to open Windows Run, type cmd and hit Enter to open Windows Command Prompt.
- Then you can type this command line devmgmt.msc in Command Prompt window, and hit Enter to open Windows 10 Device Manager.

#8. Enter into Device Manager with Windows PowerShell
- You can right-click Start and choose Windows PowerShell to open it.
- Then type devmgmt.msc, and hit Enter to open Device Manager.
#9. Access Windows 10 Device Manager from Computer Management
- You can open Computer Management in Windows 10.
- Then click Computer Management -> System Tools -> Device Manager to open Device Manager in Computer Management.
#10. Use Device Manager Shortcut
If you have created a desktop shortcut for Device Manager, you can double-click the Device Manager shortcut icon on computer desktop to open it.
As well, you can also create a keyboard short for Device Manager to quickly access it when you need. Check: how to create a keyboard shortcut in Windows 10 for Device Manager.
The End
This article provides you 10 ways to allow you to open Windows 10 Device Manager application quickly and easily. You can use either way to get to Windows Device Manager to enable, disable, update or reinstall devices drivers, or troubleshoot computer hardware issues, etc.
About The Author
Position: Columnist
Alisa is a professional English editor with 4-year experience. She loves writing and focuses on sharing detailed solutions and thoughts for computer problems, data recovery & backup, digital gadgets, tech news, etc. Through her articles, users can always easily get related problems solved and find what they want. In spare time, she likes basketball, badminton, tennis, cycling, running, and singing. She is very funny and energetic in life, and always brings friends lots of laughs.
From Wikipedia, the free encyclopedia
Device Manager
|
Microsoft Management Console in Windows 11 with Device Manager snap-in |
|
| Developer(s) | Microsoft |
|---|---|
| Initial release | August 24, 1995; 29 years ago |
| Operating system | Microsoft Windows |
| License | Proprietary commercial software |
Device Manager is a component of the Microsoft Windows operating system. It allows users to view and control the hardware attached to the computer. When a piece of hardware is not working, the offending hardware is highlighted for the user to deal with. The list of hardware can be sorted by various criteria.[1]
For each device, users can:
- Supply device drivers in accordance with the Windows Driver Model
- Enable or disable devices
- Tell Windows to ignore malfunctioning devices
- View other technical properties
Device Manager was introduced with Windows 95 and later added to Windows 2000. On Windows 9x, Device Manager is part of the System applet in Control Panel. On Windows 2000 and all other Windows NT-based versions of Windows, it is a snap-in for Microsoft Management Console.
The executable program behind the Device Manager is devmgmt.msc.
A disabled device has either been manually disabled by a user or by some way of error. In Windows 95 through XP, this is denoted by a red X. In Windows Vista and Windows 7, this was replaced by a grey downward pointing arrow in the lower right-hand corner of the device’s icon.
Hardware not working properly
[edit]
There are many reasons why hardware may not work properly. If Windows recognizes a problem with a device, it is denoted by a black exclamation point (!) on a yellow triangle in the lower right-hand corner of the device’s icon.
Hardware not recognized
[edit]
Hardware may not be recognized if it is not installed properly or not compatible with the system. This is denoted by a yellow question mark in place of the device’s icon.
Device manually selected
[edit]
A blue «i» on a white field in the lower right-hand corner of a Device’s icon indicates that the Use automatic settings feature is not selected for the device and that the resource was manually selected. Note that this does not indicate a problem or disabled state.
Device Manager error codes are numerical codes, each accompanied by an error message, which help users determine what kind of issue Windows is having with a piece of hardware.[2][3][4]
| Code | Meaning |
|---|---|
| 1 | This device has not been configured correctly. |
| 3 | The driver for this device may be corrupted, or the system may be running low on memory. |
| 10 | This device cannot start. |
| 12 | Not enough resources for the device. |
| 14 | The computer must be restarted for the device to work properly. |
| 16 | Windows can’t identify all the resources this device requires. |
| 18 | Drivers for this device must be reinstalled. |
| 19 | Configuration information in Windows registry is damaged or corrupted for this device. |
| 21 | Windows is removing this device. |
| 22 | This device is disabled. |
| 24 | This device is not present, does not have all its drivers installed, or is not working properly. |
| 28 | The drivers for this device are not installed. |
| 29 | The firmware of the device did not give it the required resources. |
| 31 | Windows cannot load the drivers required for this device. |
| 32 | A driver for this device has been disabled. |
| 33 | Windows cannot determine which resources are required for this device. |
| 34 | Windows cannot determine the settings for this device. |
| 35 | The computer’s firmware does not include enough information to properly configure and use this device. |
| 36 | This device is requesting a PCI interrupt but is configured for an ISA interrupt (or vice versa). |
| 37 | Windows failed to initialize the device driver for this hardware. |
| 38 | Windows cannot run the driver for this device because a previous instance of the driver exists. |
| 39 | Windows cannot load the driver for this device. The driver may be corrupted or missing. |
| 40 | Windows cannot access this hardware because its service key information in the registry is missing or corrupted. |
| 41 | Windows successfully loaded the device driver for this hardware but cannot find the hardware device. |
| 42 | Windows cannot run the driver for this device because there is a duplicate device already running in the system. |
| 43 | Windows has stopped this device because it has reported problems. |
| 44 | An application or service has shut down this hardware device. |
| 45 | This hardware device is not connected to the computer. |
| 46 | Windows cannot gain access to this hardware device because the operating system is in the process of shutting down. |
| 47 | Windows cannot use this device because it has been prepared for safe removal, but it has not been removed from the computer. |
| 48 | The driver for this device has been blocked from starting because it is known to have problems with Windows. |
| 49 | Windows cannot start new hardware devices because the system hive is too large and exceeds the Registry Size Limit. |
| 52 | Windows cannot verify the digital signature for the drivers required for this device. A recent hardware or software change might have installed a file that is signed incorrectly or damaged. |
Windows separates devices and their drivers by class types. Extra hidden and disconnected devices can be exposed through the devmgr_show_nonpresent_devices flag.
- USB Class devices: Peripherals that connect exclusively through the USB bus.
- Human Interface Devices: Devices used by the users to interface with the OS (eg. Touchpads, Pens, Mices and Keyboards)
- Printer devices: Drivers that contain printer information. Hidden category since Windows Vista.
- Imaging devices: Webcams and Scanners. A new webcam class driver was introduced in Windows 10 v1709.
- Biometric devices: Devices that read biometric data using Windows Biometric Framework. (eg. IR Webcams, Fingerprint sensor)
- PCI Class devices: Devices that connect to the PCI bus for high speed (eg. Graphics Card, Network card, Chipset)
- System devices: Peripherals that tie to the system, chipset or have no set category (eg. Intel Management Engine, Disk controller, ACPI events)
- Video and Audio Capture devices: Devices used to route audio/video streams (eg. Audio cards, TV Tuner cards, MIDI devices)
- Audio inputs and outputs: Since Windows 8, audio ports have their own category.
- Non-PnP devices: Mostly software that need a driver installed to interface with the core kernel components. Hidden category since Windows 10.
- DCH devices: A new type of driver introduced in Windows 10 v1709 that can interface with Universal Windows Platform apps or Hardware Support Apps (HSA). The goal was to separate the core driver from the interfacing app. They are grouped under «Software components» (eg. Audio and Video drivers released post-2018)
- Bluetooth Profiles: Those are listed under «Bluetooth Virtual Devices» and aren’t normally visible. Showing as «Bluetooth Peripheral Device» if no drivers are present.
- Other devices: This is not a category but a section where devices with missing drivers are grouped.
Driverquery command
[edit]
driverquery
| Developer(s) | Microsoft |
|---|---|
| Operating system | Microsoft Windows |
| Type | Command |
| License | Proprietary commercial software |
| Website | docs |
The driverquery[5] command-line program generates lists of installed devices and drivers, similar to the Device Manager’s output, which the user may view on-screen or redirect to a file. This is useful for note-taking and for reporting problems to remote third parties such as technical support personnel. The program has switches to control the output detail and format, including an /fo switch with csv parameter to generate output in comma-separated values format, suitable for importing into a spreadsheet application such as Microsoft Excel.[6]
- Device driver
- Microsoft Management Console
- Troubleshooting
- systeminfo
- VxD
- ^ «Where is Device Manager?». Windows. Microsoft. Archived from the original on January 25, 2014. Retrieved February 8, 2015.
- ^ «Error codes in Device Manager in Windows». Support. Microsoft. Retrieved February 8, 2015.
- ^ Fisher, Tim. «Device Manager Error Codes». About.com. Archived from the original on September 9, 2008. Retrieved February 8, 2015.
- ^ Hopkins, Mark; Graff, Eliot (December 15, 2021). «Device Manager Error Messages – Windows Drivers». Microsoft Learn. Retrieved April 27, 2025.
- ^ «Driverquery». TechNet. Microsoft. Retrieved March 12, 2015.
- ^ Bott, Ed; Siechert, Carl; Stinson, Craig (2007). Windows Vista Inside Out. Microsoft Press. p. 157. ISBN 978-0735622708.
isbn:0735622701.
- driverquery | Microsoft Docs
- The DevCon utility
Многие инструкции по исправлению проблем с работой устройств в Windows 10 содержат пункт «зайдите в диспетчер устройств» и, несмотря на то, что это элементарное действие, некоторые начинающие пользователи не знают, как это сделать.
В этой инструкции — 5 простых способов открыть диспетчер устройств в Windows 10, используйте любой. См. также: Встроенные системные утилиты Windows 10, о которых полезно знать.
Открытие диспетчера устройств с помощью поиска
В Windows 10 присутствует хорошо работающий поиск и, если вы не знаете, как что-то запустить или открыть, это первое что стоит попробовать: почти всегда нужный элемент или утилита найдутся.
Чтобы открыть диспетчер устройств, просто нажмите по иконке поиска (лупа) в панели задач и начните набирать «диспетчер устройств» в поле ввода, а после того, как нужный элемент будет найден, нажмите по нему мышкой для открытия.

Контекстное меню кнопки Пуск Windows 10
Если нажать правой кнопкой мыши по кнопке «Пуск» в Windows 10, откроется контекстное меню с некоторыми полезными пунктами для быстрого перехода к нужным параметрам системы.
Среди этих пунктов есть и «Диспетчер устройств», просто нажмите по нему (правда, в обновлениях Windows 10 пункты контекстного меню иногда меняются и, если вы не найдете там того, что требуется, вероятно, это произошло снова).
Запуск диспетчера устройств из диалогового окна «Выполнить»
Если вы нажмете клавиши Win+R на клавиатуре (где Win — клавиша с эмблемой Windows), откроется окно «Выполнить».
Введите в него devmgmt.msc и нажмите Enter: будет запущен диспетчер устройств.
Свойства системы или значок «Этот компьютер»
Если у вас на рабочем столе присутствует значок «Этот компьютер», то, нажав на него правой кнопкой мыши, вы можете открыть пункт «Свойства» и попасть в окно сведений о системе (если отсутствует — см. Как добавить значок «Этот компьютер» на рабочий стол Windows 10).
Еще один путь открыть это окно — зайти в панель управления, а там открыть пункт «Система». В окне свойств системы слева есть пункт «Диспетчер устройств», открывающий необходимый элемент управления.

Управление компьютером
Встроенная утилита «Управление компьютером» в Windows 10 также содержит диспетчер устройств в списке служебных программ.
Для запуска «Управление компьютером» используйте либо контекстное меню кнопки «Пуск», либо нажмите клавиши Win+R, введите compmgmt.msc и нажмите Enter.

Учтите, что для выполнения каких-либо действий (кроме просмотра подключенных устройств) в диспетчере устройств, вы должны иметь права администратора на компьютере, в противном случае вы увидите сообщение «Вы вошли с правами обычного пользователя. Вы можете просматривать параметры устройства в диспетчере устройств, но для внесения изменений необходимо войти в систему с правами администратора».
Device Manager is a Windows 10 and Windows 7 utility that allows you to update and reinstall drivers for individual devices (e.g. your video card, sound card or network card). It’s quite a limited tool, and difficult to use, but it can still be useful sometimes.
This article discusses:
- How to identify (some) problem drivers using Windows Device Manager
- How to update or uninstall drivers using Windows Device Manager
- What Windows Device Manager DOESN’T do
- Device Manager vs Driver Easy
- How to get Driver Easy
Note that the Windows Device Manager screenshots in these instructions are from Windows 10, but the instructions themselves will work in Windows 7 too.
How to identify (some) problem drivers using Windows Device Manager
Windows Device Manager shows you which devices have corrupt drivers. It may also show you which devices have outdated drivers.
IMPORTANT: Windows Device Manager doesn’t always detect outdated drivers. (Microsoft has actually said so.) So you can’t assume all your drivers are up to date, just because Device Manager says they are. See What Windows Device Manager DOESN’T do below for more information.
To identify corrupt drivers and maybe some outdated drivers:
1. On your keyboard, press the Windows logo key and R at the same time to invoke the run box.
2. Type devmgmt.msc and click OK.
(There are other ways to open Device Manager; it changes depending on your version of Windows. But the above method works for all versions of Windows, including Windows 7 and Windows 10.)
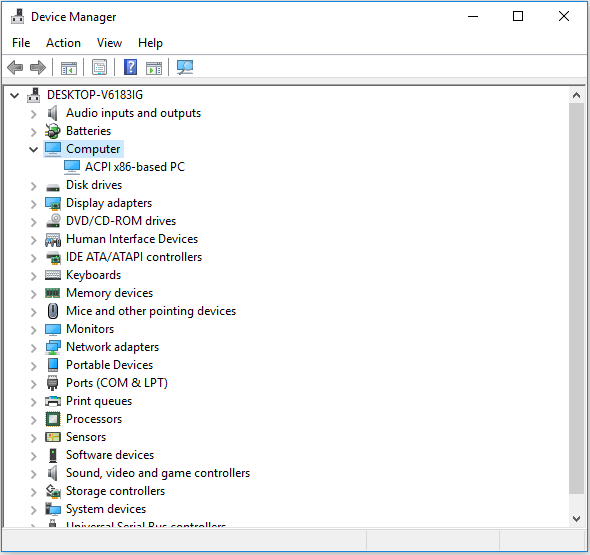
3. Select a category and expand it to see the devices in that category.
4. If you see a yellow triangle or question mark next to a device, that means Windows has detected that it has an outdated or corrupt driver. For example:

When you see this yellow mark, the device has a corrupt or outdated driver. You can try to update or reinstall the driver as described below.
How to update or reinstall drivers using Windows Device Manager
To update a device’s driver in Windows Device Manager:
1. On your keyboard, press the Windows logo key and R at the same time to invoke the run box.
2. Type devmgmt.msc and click OK.
(There are other ways to open Device Manager; it changes depending on your version of Windows. But the above method works for all versions of Windows, including Windows 7 and Windows 10.)
3. Select a category and expand it to see the devices in that category.
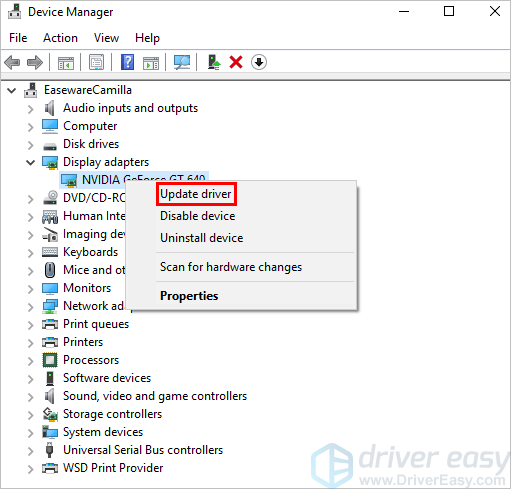
4. Right-click the device whose driver you’d like to update.
5. Select Update Driver.
6. Select Search automatically for updated driver software.
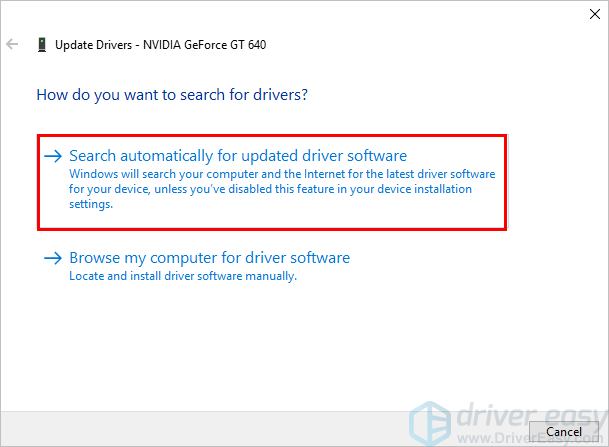
IMPORTANT: If Windows doesn’t find a new driver, that doesn’t necessarily mean the driver you already have installed is up to date. Windows Device Manager isn’t very good at detecting outdated drivers. See What Windows Device Manager DOESN’T do below for more information about this known problem.
To reinstall a device’s driver in Windows Device Manager:
1. On your keyboard, press the Windows logo key and R at the same time to invoke the run box.
2. Type devmgmt.msc and click OK.
(There are other ways to open Device Manager; it changes depending on your version of Windows. But the above method works for all versions of Windows, including Windows 7 and Windows 10.)
3. Select a category and expand it to see the devices in that category. Right-click the device whose driver you’d like to reinstall.
4. Select Uninstall device.
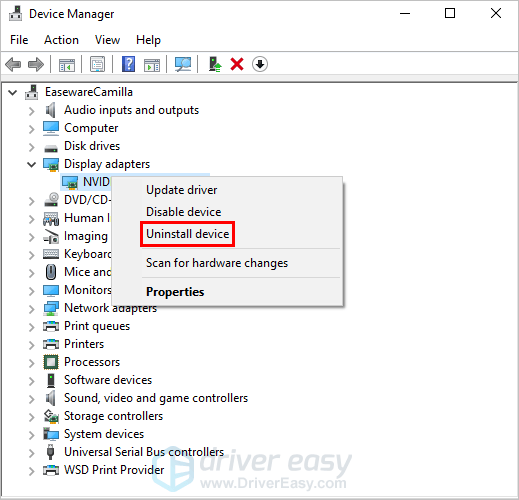
5. Restart your PC.
6. Windows will attempt to reinstall the driver.
What Windows Device Manager DOESN’T do
Windows Device Manager doesn’t always detect outdated drivers. Particularly in Windows 10. That’s because it categorizes driver updates as either ‘critical’, ‘automatic’ or ‘optional’, and it doesn’t usually concern itself with the ‘optional’ ones. So long as you have the necessary ‘critical’ and ‘automatic’ updates, it’s happy. It won’t, for example, install a new ‘optional’ update, if it already has an old ‘critical’ update installed. Here’s a quote from Microsoft itself:
“Windows ranks critical or automatic drivers highest. If a matching driver is not found, WU looks next for optional drivers. As a result, an older critical driver of otherwise equal rank takes precedence over a newer optional driver.”
But all driver updates are important, even when Windows calls them ‘optional’. If they weren’t, the hardware manufacturers wouldn’t go to all the trouble of coding and releasing them.
Sometimes these ‘optional’ updates include just a new, nice-to-have feature, and you can arguably do without that. But sometimes it’s an important bug fix – perhaps the old driver is causing your device to stop working or your computer to crash. Windows often categorizes these updates as ‘Critical’, but definitely not always.
Other times, it’s not Device Manager’s fault at all. It’s just that the device manufacturer has failed to include the drivers you need in the latest Windows Update.
Problems you’ll encounter when Windows Device Manager won’t update a device driver
Whether it’s a Microsoft problem or a device manufacturer problem, if Windows doesn’t detect that your device drivers are out of date:
1. Windows Device Manager will fail to flag the device (i.e. you won’t see the yellow mark described above), so you won’t know it needs a driver update;
2. If you try to update a device’s driver as described above, Windows Device Manager will tell you the driver is already up to date, even though it’s not; and
3. You could be missing out on important device functionality, and you may be suffering through completely unnecessary computer problems (e.g. computer crashes or very slow performance).
What to do when Windows Device Manager won’t update a device driver
If you’re unable to update a device driver in Windows Device Manager, Microsoft says:
“If Windows doesn’t find a new driver, you can try looking for one on the device manufacturer’s website and follow their instructions.”
But to do this, you’ll need to know the brand and model of the device, as well as your exact operating system and whether it’s 32 or 64 bit. Then you have to find the manufacturer’s driver download page, find the correct driver, and check that it’s newer than the one you already have installed.
Obviously this takes a lot of time, but it also requires quite a bit of technical expertise. If you do something wrong, your device – or even your entire computer – may just stop working.
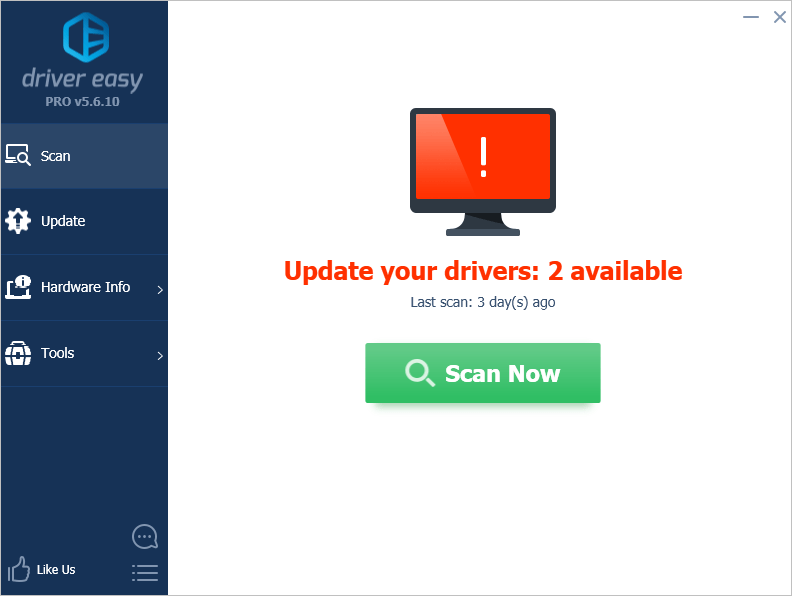
If you don’t have the time or technical expertise to manually install drivers, you can use Driver Easy to update your drivers automatically. It will automatically detect all devices on your computer that have outdated drivers, and you can then update them all with one click.
Watch Driver Easy in action:
Driver Easy will automatically recognize your system and find the correct drivers for it – direct from the device manufacturer. You don’t need to know exactly what system your computer is running, you don’t need to risk downloading and installing the wrong driver, and you don’t need to worry about making a mistake when installing.
You just click Scan, then Update All.
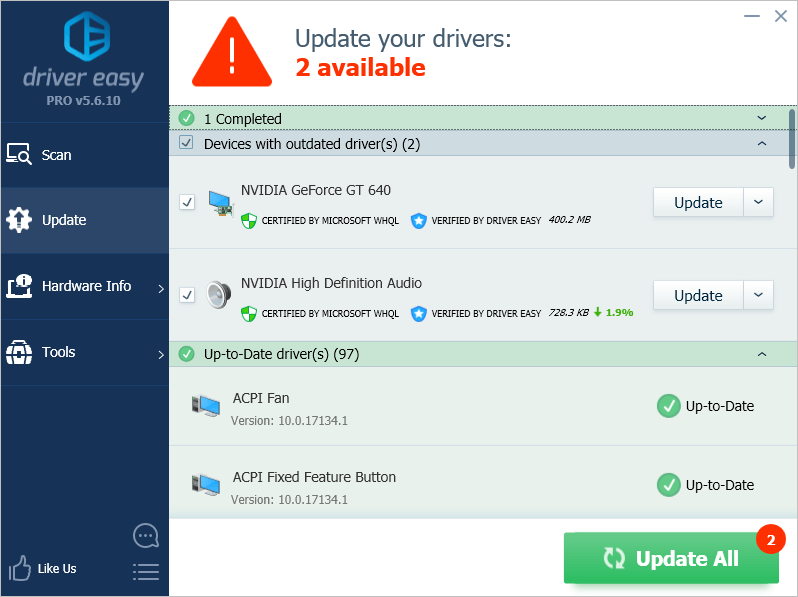
To automatically update all your drivers, you’ll need the PRO version of Driver Easy. You’ll be prompted to upgrade when you click Update All. (The FREE version will identify all your outdated drivers, and allow you to download them all. But only one at a time and, once they’re downloaded, you have to manually install them using the standard Windows process.)
Don’t worry; Driver Easy PRO comes with a 30-day money back guarantee – no questions asked – and you even get free PC tech support. So you can ask for help if Driver Easy doesn’t fix your computer problems!
Driver Easy works differently from Windows Device Manager:
| Windows Device Manager | Driver Easy | |
| Installs all ‘critical’, ‘automatic’ and ‘optional’ driver updates |
❌ | ✔ |
| Gets the latest drivers directly from the manufacturer as soon as they’re released |
❌ | ✔ |
| 1 click to identify all devices with outdated drivers |
❌ | ✔ |
| 1 click to automatically update all out of date drivers |
❌ | ✔ |
| Ensures all your drivers are always truly up to date |
❌ | ✔ |
| Automatically creates a Windows restore point in case the new driver causes problems |
❌ | ✔ |
| Includes free computer technical support |
❌ | ✔ |
How to get Driver Easy
If you want the certainty of knowing your device drivers are always up to date (and not just sometimes up to date, which is all you get from Windows Device Manager), and you don’t have the time, patience or computer skills to continually update them manually, give Driver Easy a try.