
(Send feedback to Microsoft so we can help.)
What affected your experience?
Resolved my issue
Clear instructions
Easy to follow
No jargon
Pictures helped
Other
Didn’t match my screen
Incorrect instructions
Too technical
Not enough information
Not enough pictures
Other
Any additional feedback? (Optional)
By pressing submit, your feedback will be used to improve Microsoft products and services.
Your IT admin will be able to collect this data.
Privacy Statement.
-
Home
-
News
- 10 Ways to Open Device Manager Windows 10
By Alisa |
Last Updated
Windows Device Manager allows users to view and control the hardware connected to the computer. Check the 10 ways in this post for how to open Device Manager in Windows 10 computer. To help you manage hard drive partition, recover lost/deleted files, MiniTool software is the top choice.
What Is Device Manager?
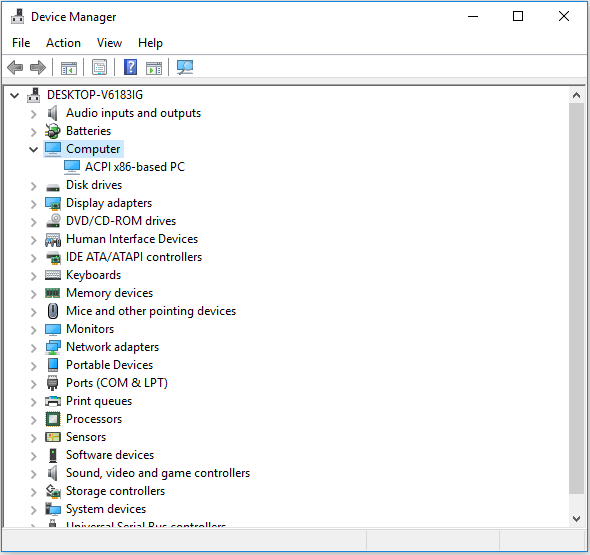
Windows Device Manager is an applet in Control Panel in OS. It allows you to check the devices that are currently connected to your Windows system, repair Windows 10 hardware problems if a piece of hardware is not working, enable or disable devices, reinstall/update device drivers, and more. The connected devices in Windows Device Manager are listed into different categories.
If you need to open Device Manager in Windows 10 to view, control or adjust the hardware status, or fix the hardware not working properly, hardware not recognized issues, etc. you can check the 10 ways below to easily open Windows 10 Device Manager.
Video Guide:
#1. How to Open Device Manager in Windows 10 with Search Box
The easiest way to open Device Manager in Windows 10 is to use Search Box.
- Click the Search Box at the taskbar next to Start menu.
- Type device manager in the Search Box, and click the best-matched result to open Device Manager in Windows 10.
- You can click Start menu at the lower-left corner on Windows 10 computer desktop.
- Then type device manager, Windows Device Manager app will display, click Device Manager to open it.
#3. Open Device Manager Windows 10 with Windows + X
- Press Windows + X keyboard shortcut keys simultaneously to open Quick Access menu.
- Click Device Manager from the list to open Device Manager app.
#4. Open Device Manager Windows 10 via Run
- You can press Windows + R keys together to open Run window.
- Type devmgmt.msc in the Run box, and hit Enter to open this app.

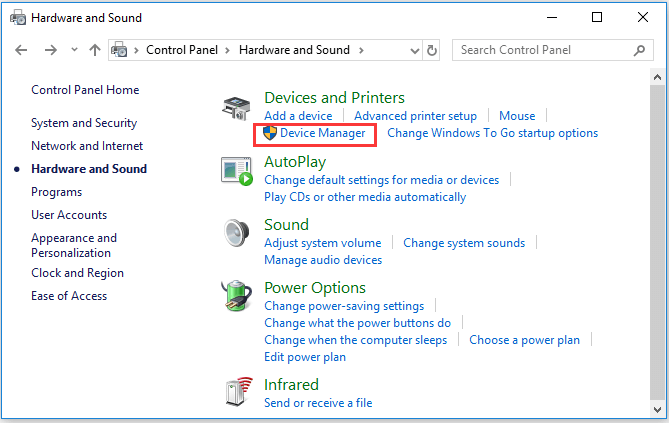
#5. How to Open Device Manager in Windows 10 from Control Panel
- Press Windows + R to open Run, and type control panel in Run dialog, hit Enter to open Control Panel. Check the 10 ways to open Control Panel in Windows 10.
- Click Hardware and Sound and click Device Manager under Device and Printers to open Device Manager.
#6. Use Cortana to Open Device Manager in Windows 10
You can click Cortana at the toolbar, and say “Launch Device Manager” to ask Cortana to open Windows 10 Device Manager for you.
#7. Use Device Manager CMD/Command
- You can press Windows + R to open Windows Run, type cmd and hit Enter to open Windows Command Prompt.
- Then you can type this command line devmgmt.msc in Command Prompt window, and hit Enter to open Windows 10 Device Manager.

#8. Enter into Device Manager with Windows PowerShell
- You can right-click Start and choose Windows PowerShell to open it.
- Then type devmgmt.msc, and hit Enter to open Device Manager.
#9. Access Windows 10 Device Manager from Computer Management
- You can open Computer Management in Windows 10.
- Then click Computer Management -> System Tools -> Device Manager to open Device Manager in Computer Management.
#10. Use Device Manager Shortcut
If you have created a desktop shortcut for Device Manager, you can double-click the Device Manager shortcut icon on computer desktop to open it.
As well, you can also create a keyboard short for Device Manager to quickly access it when you need. Check: how to create a keyboard shortcut in Windows 10 for Device Manager.
The End
This article provides you 10 ways to allow you to open Windows 10 Device Manager application quickly and easily. You can use either way to get to Windows Device Manager to enable, disable, update or reinstall devices drivers, or troubleshoot computer hardware issues, etc.
About The Author
Position: Columnist
Alisa is a professional English editor with 4-year experience. She loves writing and focuses on sharing detailed solutions and thoughts for computer problems, data recovery & backup, digital gadgets, tech news, etc. Through her articles, users can always easily get related problems solved and find what they want. In spare time, she likes basketball, badminton, tennis, cycling, running, and singing. She is very funny and energetic in life, and always brings friends lots of laughs.
Все способы:
- Запуск Диспетчера устройств в Виндовс 10
- Способ 1: Окно «Выполнить»
- Способ 2: «Панель управления» / «Параметры»
- Способ 3: Системная папка ОС
- Способ 4: Меню «Пуск»
- Способ 5: Дополнительные методы
- Вопросы и ответы: 3
Диспетчер устройств — стандартный инструмент Windows, отображающий все подсоединенные к ПК устройства и позволяющий управлять ими. Здесь пользователь может посмотреть не только названия аппаратных составляющих своего компьютера, но и узнать состояние их подключения, наличие драйверов и другие параметры. Попасть в это приложение можно несколькими вариантами, и далее мы о них расскажем.
Запуск Диспетчера устройств в Виндовс 10
Есть несколько путей того, как открыть данный инструмент. Вам предлагается выбрать наиболее подходящий для себя, чтобы в дальнейшем пользоваться только им либо гибко запускать Диспетчер, отталкиваясь от текущей ситуации.
Способ 1: Окно «Выполнить»
Еще один несложный метод — вызов приложения через окошко «Выполнить». Однако он может подойти не каждому пользователю, поскольку оригинальное имя Диспетчера устройств (то, под которым оно хранится в Windows) можно и не запомнить.
Итак, нажимаем на клавиатуре сочетание Win + R. В поле пишем devmgmt.msc и жмем Enter.
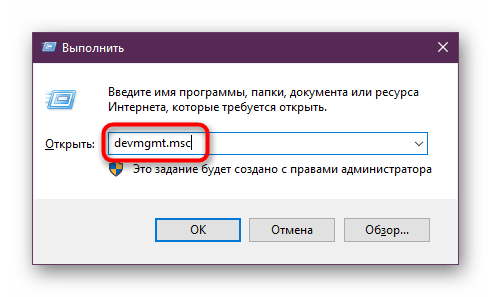
Именно под таким названием — devmgmt.msc — Диспетчер хранится в системной папке Windows. Запомнив его, можно использовать и следующий способ.
Способ 2: «Панель управления» / «Параметры»
В Win10 «Панель управления» уже не является важным и главным инструментом доступа к разного рода настройкам и утилитам. На передний план разработчики вынесли «Параметры», однако пока что тот же Диспетчер устройств доступен для открытия там и там.
«Панель управления»
- Открываем «Панель управления» — проще всего это сделать через «Пуск».
- Переключаем режим просмотра на «Крупные/мелкие значки» и находим «Диспетчер устройств».
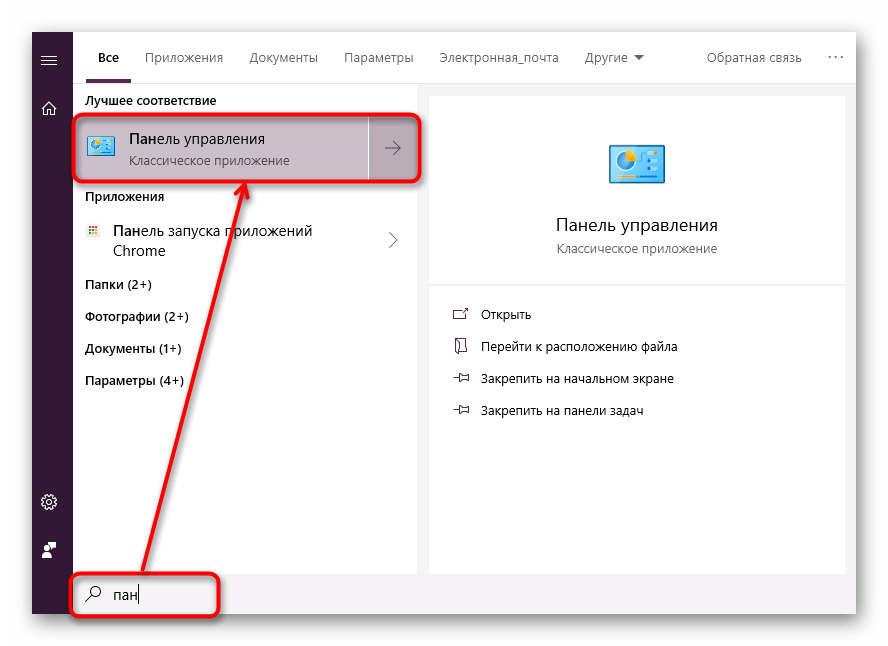

«Параметры»
- Запускаем «Параметры», например, через альтернативный «Пуск».
- В поисковое поле начинаем набирать «диспетчер устройств» без кавычек и кликаем ЛКМ по совпавшему результату.

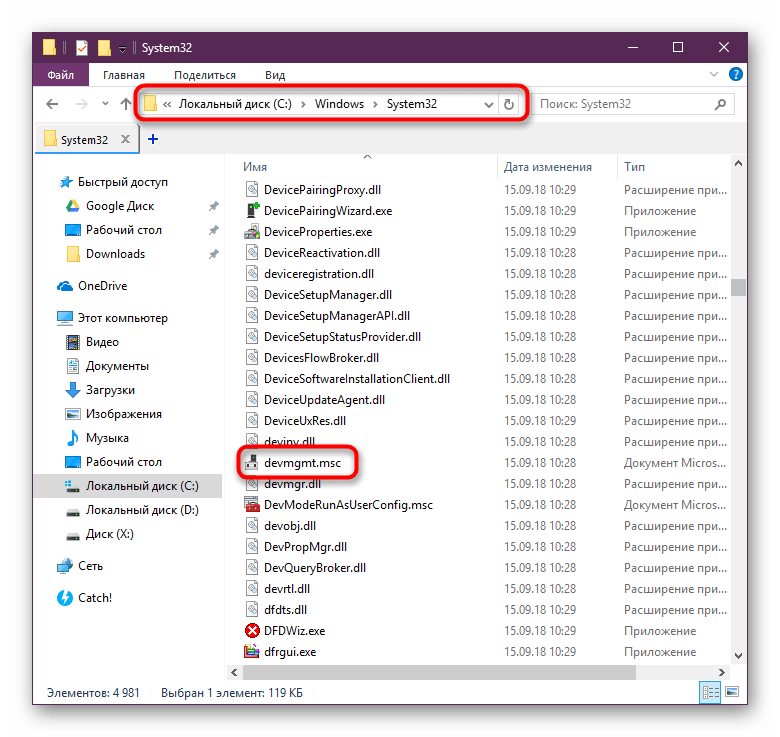
Способ 3: Системная папка ОС
На том разделе жесткого диска, куда установлена операционная система, есть несколько папок, обеспечивающих работу Windows. Как правило, это раздел С:, где можно отыскать файлы, отвечающие за запуск различных стандартных инструментов типа командной строки, инструментов диагностики и обслуживания ОС. Отсюда же пользователь может с легкостью вызывать Диспетчер устройств.
Откройте Проводник и перейдите по пути C:\Windows\System32. Среди файлов найдите «devmgmt.msc» и запустите его мышкой. Если вы не включили в системе отображение расширений файлов, то инструмент будет называться просто «devmgmt».
Способ 4: Меню «Пуск»
Проработанное стартовое меню «десятки» позволяет каждому пользователю открывать необходимый инструмент по-разному, в зависимости от удобства.
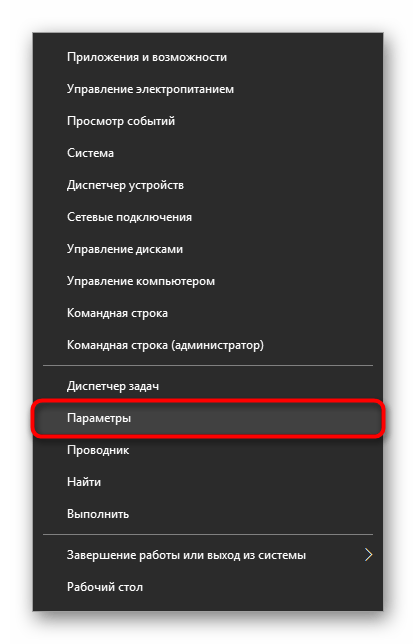
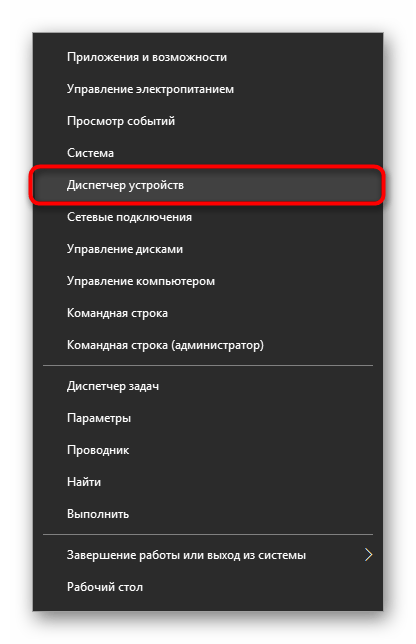
Альтернативное меню «Пуск»
В альтернативное меню были вынесены самые важные системные программы, к которым юзер может получить доступ. В нашем случае для этого достаточно нажать по «Пуск» правой кнопкой мыши и выбрать пункт «Диспетчер устройств».
Классическое меню «Пуск»
Тем, кто привык к обычному меню «Пуск», нужно вызвать его левой кнопкой мыши и начать набирать «диспетчер устройств» без кавычек. Как только совпадение будет найдено, следует кликнуть по нему. Такой вариант не очень удобен — все же альтернативный «Пуск» позволяет открыть необходимый компонент быстрее и без использования клавиатуры.

Способ 5: Дополнительные методы
Мы разобрали 4 популярных варианта того, как получить доступ к Диспетчеру устройств. При этом стоит отметить, что полный список на этом не заканчивается. Вы можете открыть его следующими действиями:
Остальные способы менее актуальны и пригодятся лишь в единичных случаях.
Наша группа в TelegramПолезные советы и помощь
From Wikipedia, the free encyclopedia
Device Manager
|
Microsoft Management Console in Windows 11 with Device Manager snap-in |
|
| Developer(s) | Microsoft |
|---|---|
| Initial release | August 24, 1995; 29 years ago |
| Operating system | Microsoft Windows |
| License | Proprietary commercial software |
Device Manager is a component of the Microsoft Windows operating system. It allows users to view and control the hardware attached to the computer. When a piece of hardware is not working, the offending hardware is highlighted for the user to deal with. The list of hardware can be sorted by various criteria.[1]
For each device, users can:
- Supply device drivers in accordance with the Windows Driver Model
- Enable or disable devices
- Tell Windows to ignore malfunctioning devices
- View other technical properties
Device Manager was introduced with Windows 95 and later added to Windows 2000. On Windows 9x, Device Manager is part of the System applet in Control Panel. On Windows 2000 and all other Windows NT-based versions of Windows, it is a snap-in for Microsoft Management Console.
The executable program behind the Device Manager is devmgmt.msc.
A disabled device has either been manually disabled by a user or by some way of error. In Windows 95 through XP, this is denoted by a red X. In Windows Vista and Windows 7, this was replaced by a grey downward pointing arrow in the lower right-hand corner of the device’s icon.
Hardware not working properly
[edit]
There are many reasons why hardware may not work properly. If Windows recognizes a problem with a device, it is denoted by a black exclamation point (!) on a yellow triangle in the lower right-hand corner of the device’s icon.
Hardware not recognized
[edit]
Hardware may not be recognized if it is not installed properly or not compatible with the system. This is denoted by a yellow question mark in place of the device’s icon.
Device manually selected
[edit]
A blue «i» on a white field in the lower right-hand corner of a Device’s icon indicates that the Use automatic settings feature is not selected for the device and that the resource was manually selected. Note that this does not indicate a problem or disabled state.
Device Manager error codes are numerical codes, each accompanied by an error message, which help users determine what kind of issue Windows is having with a piece of hardware.[2][3][4]
| Code | Meaning |
|---|---|
| 1 | This device has not been configured correctly. |
| 3 | The driver for this device may be corrupted, or the system may be running low on memory. |
| 10 | This device cannot start. |
| 12 | Not enough resources for the device. |
| 14 | The computer must be restarted for the device to work properly. |
| 16 | Windows can’t identify all the resources this device requires. |
| 18 | Drivers for this device must be reinstalled. |
| 19 | Configuration information in Windows registry is damaged or corrupted for this device. |
| 21 | Windows is removing this device. |
| 22 | This device is disabled. |
| 24 | This device is not present, does not have all its drivers installed, or is not working properly. |
| 28 | The drivers for this device are not installed. |
| 29 | The firmware of the device did not give it the required resources. |
| 31 | Windows cannot load the drivers required for this device. |
| 32 | A driver for this device has been disabled. |
| 33 | Windows cannot determine which resources are required for this device. |
| 34 | Windows cannot determine the settings for this device. |
| 35 | The computer’s firmware does not include enough information to properly configure and use this device. |
| 36 | This device is requesting a PCI interrupt but is configured for an ISA interrupt (or vice versa). |
| 37 | Windows failed to initialize the device driver for this hardware. |
| 38 | Windows cannot run the driver for this device because a previous instance of the driver exists. |
| 39 | Windows cannot load the driver for this device. The driver may be corrupted or missing. |
| 40 | Windows cannot access this hardware because its service key information in the registry is missing or corrupted. |
| 41 | Windows successfully loaded the device driver for this hardware but cannot find the hardware device. |
| 42 | Windows cannot run the driver for this device because there is a duplicate device already running in the system. |
| 43 | Windows has stopped this device because it has reported problems. |
| 44 | An application or service has shut down this hardware device. |
| 45 | This hardware device is not connected to the computer. |
| 46 | Windows cannot gain access to this hardware device because the operating system is in the process of shutting down. |
| 47 | Windows cannot use this device because it has been prepared for safe removal, but it has not been removed from the computer. |
| 48 | The driver for this device has been blocked from starting because it is known to have problems with Windows. |
| 49 | Windows cannot start new hardware devices because the system hive is too large and exceeds the Registry Size Limit. |
| 52 | Windows cannot verify the digital signature for the drivers required for this device. A recent hardware or software change might have installed a file that is signed incorrectly or damaged. |
Windows separates devices and their drivers by class types. Extra hidden and disconnected devices can be exposed through the devmgr_show_nonpresent_devices flag.
- USB Class devices: Peripherals that connect exclusively through the USB bus.
- Human Interface Devices: Devices used by the users to interface with the OS (eg. Touchpads, Pens, Mices and Keyboards)
- Printer devices: Drivers that contain printer information. Hidden category since Windows Vista.
- Imaging devices: Webcams and Scanners. A new webcam class driver was introduced in Windows 10 v1709.
- Biometric devices: Devices that read biometric data using Windows Biometric Framework. (eg. IR Webcams, Fingerprint sensor)
- PCI Class devices: Devices that connect to the PCI bus for high speed (eg. Graphics Card, Network card, Chipset)
- System devices: Peripherals that tie to the system, chipset or have no set category (eg. Intel Management Engine, Disk controller, ACPI events)
- Video and Audio Capture devices: Devices used to route audio/video streams (eg. Audio cards, TV Tuner cards, MIDI devices)
- Audio inputs and outputs: Since Windows 8, audio ports have their own category.
- Non-PnP devices: Mostly software that need a driver installed to interface with the core kernel components. Hidden category since Windows 10.
- DCH devices: A new type of driver introduced in Windows 10 v1709 that can interface with Universal Windows Platform apps or Hardware Support Apps (HSA). The goal was to separate the core driver from the interfacing app. They are grouped under «Software components» (eg. Audio and Video drivers released post-2018)
- Bluetooth Profiles: Those are listed under «Bluetooth Virtual Devices» and aren’t normally visible. Showing as «Bluetooth Peripheral Device» if no drivers are present.
- Other devices: This is not a category but a section where devices with missing drivers are grouped.
Driverquery command
[edit]
driverquery
| Developer(s) | Microsoft |
|---|---|
| Operating system | Microsoft Windows |
| Type | Command |
| License | Proprietary commercial software |
| Website | docs |
The driverquery[5] command-line program generates lists of installed devices and drivers, similar to the Device Manager’s output, which the user may view on-screen or redirect to a file. This is useful for note-taking and for reporting problems to remote third parties such as technical support personnel. The program has switches to control the output detail and format, including an /fo switch with csv parameter to generate output in comma-separated values format, suitable for importing into a spreadsheet application such as Microsoft Excel.[6]
- Device driver
- Microsoft Management Console
- Troubleshooting
- systeminfo
- VxD
- ^ «Where is Device Manager?». Windows. Microsoft. Archived from the original on January 25, 2014. Retrieved February 8, 2015.
- ^ «Error codes in Device Manager in Windows». Support. Microsoft. Retrieved February 8, 2015.
- ^ Fisher, Tim. «Device Manager Error Codes». About.com. Archived from the original on September 9, 2008. Retrieved February 8, 2015.
- ^ Hopkins, Mark; Graff, Eliot (December 15, 2021). «Device Manager Error Messages – Windows Drivers». Microsoft Learn. Retrieved April 27, 2025.
- ^ «Driverquery». TechNet. Microsoft. Retrieved March 12, 2015.
- ^ Bott, Ed; Siechert, Carl; Stinson, Craig (2007). Windows Vista Inside Out. Microsoft Press. p. 157. ISBN 978-0735622708.
isbn:0735622701.
- driverquery | Microsoft Docs
- The DevCon utility
Find Device Manager by searching for it, opening it through Control Panel, or executing the devmgmt.msc command
What to Know
- Search for Device Manager from the search bar.
- Locate it from the Hardware and Sound area of Control Panel in W11/10/8.
- Execute devmgmt.msc from the Run box or Command Prompt.
This article explains how to get to Device Manager in Windows 11, Windows 10, Windows 8, Windows 7, Windows Vista, and Windows XP, plus when you’d want to use it.
How to Open Device Manager via Control Panel
It isn’t listed next to your regular programs, so it can be difficult to find if you don’t already know where it is. The Control Panel method is probably the most straightforward way to get there, but we go over all your options below.
See Other Ways to Open Device Manager towards the bottom of the page for some other, arguably faster methods in at least some versions of Windows.
-
Open Control Panel. In newer Windows versions, you can search for it from the search utility on the taskbar.
Depending on your version of Windows, Control Panel is also available from the Start menu or Apps screen, sometimes within a submenu called Control Panel.
-
What you do next depends on what Windows operating system you’re using:
- In Windows 11, 10 and 8, select Hardware and Sound.
- In Windows 7, choose System and Security.
- In Windows Vista, select System and Maintenance.
- In Windows XP, pick Performance and Maintenance.
If you don’t see these options, your Control Panel view may be set to Large icons, Small icons, or Classic View, depending on your version of Windows. If so, find and choose Device Manager from the big collection of icons you see and then skip to Step 4 below.
-
From this Control Panel screen, look for and choose Device Manager:
In Windows 11, 10 and 8, check under the Devices and Printers heading. In Windows 7, look under System. In Windows Vista, you’ll find Device Manager towards the bottom of the window.
In Windows XP, you have a few extra steps since Device Manager isn’t as easily available in your version of Windows. From the open Control Panel window, select System, choose the Hardware tab, and then use the Device Manager button.
System Properties in Windows XP.
With Device Manager now open, you can view a device’s status, update the device drivers, enable devices, disable devices, or do whatever other hardware management you came here to do.
Other Ways to Open Device Manager
If you’re using a keyboard and mouse in Windows 8 or newer (in some versions), the fastest way to get to Device Manager is through the Power User Menu—just press the WIN (Windows) key and the X key together to see it listed in that menu.
If you’re comfortable with Command Prompt, one really quick way to start Device Manager in any version of Windows is via its command:
devmgmt.msc
How to Access Device Manager From the Command Prompt
The command-line method really comes in handy when you need to bring up Device Manager but your mouse won’t work or your computer is having a problem that prevents you from using it normally.
While you probably won’t ever need to open it this way, you should know that it’s also available in all versions of Windows via Computer Management, part of the suite of built-in utilities called Administrative Tools (Windows 11 calls it Windows Tools).
Device Manager takes on a slightly different look in Computer Management. Just select it from the left margin and then use it as an integrated feature of the utility on the right.
Another method that works in Windows 7 is through GodMode. This is a special folder that gives you access to tons of settings and controls found throughout the operating system. If you already use GodMode, opening Device Manager there might be your preferred way to access it.
What Device Manager Is Used For
There are plenty of reasons you might need to open Device Manager in Windows, but usually, it’s to troubleshoot some kind of problem with your computer’s hardware.
It doesn’t matter if you’re updating device drivers, adjusting system resources, finding Device Manager error codes, or even just checking in on a device’s status—you’ll need to open this utility before you can do any of it.
FAQ
-
The easiest way to run as an admin is to create a desktop shortcut by right-clicking empty space on your desktop and selecting New > Shortcut. Next, enter devmgmt.msc and select Next > name your shortcut > Finish. Now, right-click the shortcut and select Run as Administrator.
-
For an application like Device Manager, use System Information on macOS Lion or later. To get there, go to Go > Utilities > System Information. Alternatively, go to the Apple Menu > About This Mac > More Info > System Report.
Thanks for letting us know!
Get the Latest Tech News Delivered Every Day
Subscribe