
Используйте следующую процедуру для включения необходимых веб-расширений IIS и установки IIS, если не установлен.
Необходимое веб-расширение — ASP.
<Примечание> Необходимо вставить компакт-диск с Windows Server 2003 Enterprise x64 Edition CD-ROM для копирования файлов, необходимых для установки IIS.
Для установки IIS и необходимых веб-расширений на Windows Server 2003:
- Установите службы IIS.
- Перейдите к диалоговому окну Программы и функции (). Открывается диалоговое окно «Установка и удаление программ».
- На панели в левой части окна выберите . Открывается мастер компонентов Windows.
- Выберите .
<Примечание> Необходимо вставить компакт-диск с Windows Server 2003 Enterprise x64 Edition CD-ROM для копирования файлов, необходимых для установки IIS.
- Нажмите кнопку . Программа установки устанавливает IIS.
- Разрешите ASP в качестве расширений веб-службы.
- Перейдите к Диспетчеру служб IIS. (). Открывается Диспетчер служб IIS.
- Выберите в левой панели. В правой панели открывается диалоговое окно «Расширения веб-служб».
- Выберите , и нажмите . Расширения ASP разрешены.
- Закройте Диспетчер IIS. Теперь можно запускать программу установки WhatsUp Gold.
Windows Server 2003, although now considered outdated, was a significant release in the Windows Server line, particularly for hosting applications and websites using Internet Information Services (IIS). For beginners looking to configure a server environment using IIS on Windows Server 2003, this guide will provide essential steps and tips to ensure a smooth setup.
Understanding IIS and Its Role
Internet Information Services (IIS) is a web server software created by Microsoft. It is used to host websites and other content on the web. IIS provides a secure and manageable environment for hosting applications, making it a popular choice for many organizations. Windows Server 2003 includes IIS 6.0, which introduced several enhancements over its predecessor, including improved security and performance.
System Requirements
Before diving into the configuration, ensure that your system meets the following requirements:
- Windows Server 2003 Standard, Enterprise, or Web Edition
- Minimum of 512 MB RAM (1 GB recommended)
- At least 1 GB of available disk space
- Processor: 1 GHz or faster
Installing IIS on Windows Server 2003
To install IIS, follow these steps:
- Open the Control Panel.
- Select Add or Remove Programs.
- Click on Add/Remove Windows Components.
- In the Windows Components Wizard, check the box for Internet Information Services (IIS).
- Click Next and follow the prompts to complete the installation.
Configuring IIS
Once IIS is installed, you can begin configuring it to host your applications. Here are some key configuration steps:
1. Accessing IIS Manager
To access IIS Manager:
- Go to Start > Administrative Tools > Internet Information Services (IIS) Manager.
2. Creating a New Website
To create a new website:
- In IIS Manager, right-click on Web Sites and select New > Web Site.
- Follow the Web Site Creation Wizard, providing a name, IP address, and physical path to the website files.
- Configure the host header if necessary, and set permissions for the website.
3. Configuring Application Pools
Application pools allow you to isolate different web applications for better security and reliability. To configure an application pool:
- In IIS Manager, right-click on Application Pools and select Add New Application Pool.
- Name the application pool and configure its settings, such as .NET Framework version.
4. Setting Up Security
Security is crucial when configuring IIS. Here are some best practices:
- Use NTFS permissions to restrict access to the website files.
- Enable SSL for secure connections by obtaining an SSL certificate.
- Regularly update the server and IIS to patch vulnerabilities.
Testing Your Configuration
After configuring IIS, it’s essential to test your setup:
- Open a web browser and enter the server’s IP address or domain name.
- If configured correctly, you should see the default IIS welcome page.
Troubleshooting Common Issues
If you encounter issues, consider the following troubleshooting steps:
- Check the Event Viewer for error messages related to IIS.
- Ensure that the website is started in IIS Manager.
- Verify that the firewall settings allow traffic on port 80 (HTTP) and port 443 (HTTPS).
Conclusion
Configuring IIS on Windows Server 2003 can be a straightforward process if you follow the steps outlined in this guide. By understanding the basics of IIS, installing it correctly, and configuring your server environment with security in mind, you can create a reliable hosting platform for your applications. For those looking to explore modern hosting solutions, consider the benefits of USA VPS Hosting for enhanced performance and security.
There are three different options available in Windows Server 2003 to manage Web services provided by Internet Information Services remotely: using the Internet Information Services (IIS) Manager, using Terminal Services, and using the Remote Administration (HTML) tool. Choosing the correct option depends on the type of administration necessary, the network connection, and the type of client machine from which the administrator is working. This section describes the different remote administration options for Web server administrators and defines the scenarios in which each method is appropriate.
Using Internet Information Services Manager (IIS)
Internet Information Services Manager is the default tool by which Web services are administered on a Web server. In addition to managing the Web services on a local server, this administrative tool can be configured to connect to other servers running IIS. It is important to keep in mind that the IIS Manager should be used to remotely connect to Web servers available on the intranet, not on the Internet.
Windows Server 2003 provides a completely reworked version of IIS: version 6. Although there are many new features available in IIS 6.0, the manager tool installed with the Web service supports the management of down-level versions of IIS. So, in addition to providing remote administrative functionality to servers running IIS 6.0, the IIS Manager also can remotely connect to and manage Web servers running IIS 5.1 and 5.0.
To use the Internet Information Services Manager to manage a Web server remotely, follow these steps:
-
On the IIS 6.0-based server, click Start, point to Administrative Tools, and then click Internet Information Services Manager.
-
Click on the Action menu, and choose Connect.
-
In the Computer Name box, type the computer name of the remote Web server, and then click OK. It is also possible to enter the IP address of the Web server, as shown in Figure 8.8.
Figure 8.8. Remotely managing an IIS server.
-
The remote computer is displayed under Internet Information Services (IIS) in the tree pane.
It Might Not Be Possible to Connect to an IIS Computer
If TCP/IP and a name resolution server such as Windows Internet Naming Service (WINS) are not available, it might not be possible to connect to an IIS computer by using the computer name.
Using Terminal Services
If Remote Desktop for Administration is enabled on the Web server, you can connect to and administer IIS using the RDP client. Just as the previous method of connecting to a Web server with IIS Manager provided down-level support to Web servers that are not running IIS 6.0, the terminal service method of remote administration provides an up-level mode of administration. So, the client workstation from which the remote connection is made can administer IIS 6.0 from any operating system that supports the terminal service client. In addition to using Windows Server 2003, the client machine can be Windows 98, NT 4.0, XP, or 2000.
To remotely administer an IIS server with terminal services, simply follow these steps:
-
On a computer on which the Terminal Services client is installed, start the Terminal Services client.
-
Connect to the remote IIS-based computer.
-
From the Terminal Services Client window, administer IIS as if logged on to the computer locally. For example, click Start, point to Administrative Tools, and then click Internet Information Services Manager to start the Internet Information Services Manager.
Using the Remote Administration (HTML) Tool
To manage Web servers through a Web browser, you can configure and use the Remote Administration (HTML) tool. Though this tool does not offer the full feature set of the Internet Information Services Manager, you can perform most Web and FTP site management tasks with the added flexibility of accessing your servers from the Web.
The Remote Administration (HTML) Tool provided with Windows Server 2003 IIS is not backwards compatible. In other words, it cannot be used to manage IIS 5.0 or 5.1; it will only work with IIS 6.0.
The HTML tool is not enabled by default when IIS 6.0 is installed. Also, depending on how IIS was installed on the server, the HTML tool might need to be added before it can be used. To add the HTML tool to an existing IIS server, perform the following steps:
-
From the Control Panel, run Add or Remove Programs.
-
Choose Add/Remove Windows Components.
-
Navigate to Application Server\Internet Information Services\World Wide Web Services and then choose Remote HTML Administration. Click the OK button three times for dialog prompts and then click Next.
-
Insert the Windows Server 2003 installation media when prompted.
-
When the installation completes, click Finish.
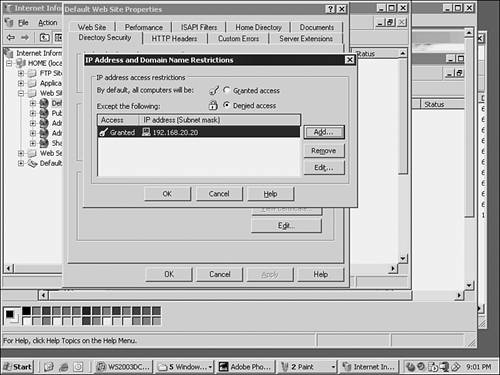
After the HTML tool is installed, the remote administration functionality must be enabled in Internet Information Services Manager. To maintain a high level of security for the Web server, it is important to restrict remote access to the server to a select IP address or group of IP addresses from which the server can be remotely administered. In the following example, a Web server will be enabled for remote administration, but will be configured so that only a computer with an IP address of 192.168.20.20 will be able to remotely administer IIS for that server. To enable the HTML remote administration tool, perform the following steps:
-
Click Start, point to Administrative Tools, and then click Internet Information Services Manager.
-
Expand ServerName , where ServerName is the name of the Web server, and then expand Web Sites.
-
Right-click Administration and then click Properties.
-
Under Web Site Identification, record the numbers that are displayed in the TCP Port box and SSL Port boxes. The defaults are 8099 and 8098.
-
Click the Directory Security tab, and then click the Edit button under IP address and domain name restrictions.
-
In the IP Address and Domain Name Restriction dialog box that appears, click Denied Access, and then click Add.
-
The Grant Access On dialog box appears. Under Type, click Single computer.
-
Type the IP address, in this example, 192.168.20.20 as shown in Figure 8.9, and then click OK.
Figure 8.9. Securing Remote Administration of IIS.

-
Click OK again to complete the configuration, and close Internet Information Services Manager.
Opening Remote Administration
Although it is possible to open remote administration of Web servers and Web sites to all computers, it is advisable for security purposes to grant access to only a select group of computers.
After the Remote Tool is installed, and the Web server is enabled for remote administration, perform the following steps to remotely administer the Web server:
-
Start Microsoft Internet Explorer, and then type the host name of the Web server, followed by the port number that was recorded earlier in the SSL Port box, and then click Go.
For example, if the Web server is on an intranet, and the SSL port number is 8098, type the following URL: https : // ServerName :8098 (where ServerName is the name of the Web server).
-
At the prompt, enter a username and password for the Web server. The Remote Administration Tool is then displayed in the browser window.
-
From this point, there are several links and options to choose from in administering the Web server. Choose one that is appropriate for the task at hand and continue to remotely manage the server.
После всяких Windows XP и Windows 7, сходу не смог найти, где лежит IIS (Internet Information Services) в Microsoft Windows Server 2003, еще более усложнило задачу поиска маленькое окошко Установки компонентов Windows =) Оказалось, IIS спрятан в разделе Сервер приложений. Собственно, вот подробный мануал на эту тему[cut]:
1. В меню Пуск выберите пункт Панель управления и запустите компонент Установка и удаление программ.
2. Нажмите кнопку Установка компонентов Windows.
3. В списке Компоненты выберите пункт Сервер приложений, затем — Службы IIS (но не меняйте состояния флажка) и нажмите кнопку Состав.
4. Установите следующие флажки (если они не установлены):
— Общие файлы
— Служба FTP
— Диспетчер служб IIS
5. Установите флажки других необходимых компонентов или служб и нажмите кнопку ОК.
6. Нажмите кнопку Далее.
7. В ответ на соответствующий запрос вставьте компакт-диск Windows Server 2003 или укажите путь к месту расположения файлов и нажмите кнопку ОК.
8. Нажмите кнопку Готово.
Постоянный адрес этой записи:
http://kbyte.ru/ru/Private/Notes.aspx?id=2&mode=show&uid=1
ServerWatch content and product recommendations are editorially independent. We may make money when you click on links to our partners. Learn More.
Welcome to the second installment of Internet Information Services 6.0 on Windows Server 2003. This series of articles is designed as both a refresher for the IT professional familiar with designing and administrating IIS 4 and IIS 5, and for newcomers looking to get their feet wet.
| SWatch Reader Favorite! Learn how to install IIS 6.0 using the ‘Manage Your Server’ wizard as well as how to set the Application Server role on the system. |
|
Unsure About an Acronym or Term? |
This installment continues our introduction to IIS 6.0 on Windows Server 2003 by providing an overview of how to install IIS 6.0 using the “Manage Your Server” wizard to install the Application Server role on the system, which configures the system with a base installation and deployment of IIS 6.0.
IIS 6.0 on Windows Server 2003 is not installed by default when the operating system is installed (a departure from the Windows 2000 Server era when IIS 5.0 was installed by default). Even when an administrator opts to install the application, the default installation sets IIS 6.0 as a static-content Web server only. ASP and ASP.NET must be explicitly installed by the administrator for dynamic content to be available for use on the particular system.
In situations in which a Windows 2000 Server with IIS 5.0 is installed and subsequently upgraded to Windows Server 2003, IIS 6.0 will be installed as a simple static content Web server unless an administrator installed and ran the IIS Lockdown Tool or configured the RetainW3SVCStatus registry key to secure the Windows 2000 Server operating system and the IIS 5.0 installation.
NOTES FROM THE FIELD — IIS Lockdown Tool version 2.1 turns off unnecessary features and services of IIS 4.0, 5.0, and 5.1 in an effort to reduce the available attack surface for would-be attackers.
The tool can be run to secure IIS 4.0 on Windows NT 4.0 Server systems when IIS 4.0 is installed from the NT4 Option Pack. The tool can also lock down IIS 5.0, which is installed by default on Windows 2000 Server installations. IIS 5.1, which is found under the Windows XP family of operating system (but not installed by default), can also be locked down via the tool.
Version 2.1 of IIS Lockdown Tool can use supplied templates for Microsoft Exchange 5.5 and 2000, Commerce Server, BizTalk, Small Business Server 4.5 and 2000, SharePoint Portal Server, FrontPage Server Extensions, and SharePoint Team Server in an effort to lock down these IIS-dependent applications when they are installed and using IIS.
URLscan 2.5 has been integrated with the IIS Lockdown tool as well.
UrlScan blocks specific HTTP requests in an effort to restrict the types of calls that can be made to the IIS server. It runs on IIS 4.0, 5.0, 5.1, and 6.0.
Future articles will cover both tools in greater depth.
Original date of publication, 07/31/2003