
Доброго времени суток!
Realtek HD — это, наверное, один из самых популярных аудио-драйверов, позволяющий тонко настраивать уровень и качество звука в Windows. Чтобы открыть его параметры — необходимо запустить диспетчер Realtek, ссылка на который должна быть либо в трее (рядом с часами), либо в панели управления* ОС Windows.
* К слову сказать, ссылка на диспетчер управления аудио-драйвером (в панели управления, либо в трее) — должна быть для любого звукового драйвера, если, конечно, у вас установлена его полная версия!
Но, в последнее время (из-за того, что Windows 10 «ставит» драйвера самостоятельно) — ссылки на диспетчер управления звуком Realtek нет! А впрочем, могут быть «виноваты» и сбойные версии ПО…
Собственно, ниже разберу последовательно, что и как сделать, чтобы заветная ссылка (ярлык, иконка) появилась…
В помощь!
Значок громкости не реагирует или вообще пропал… Что делать — https://ocomp.info/propal-znachok-gromkosti.html
*
Что делать, если нет значка Realtek HD
❶
«Ручная» проверка
И так, если в панели управления и в трее нет диспетчера Realtek (а вы помните, что вы его устанавливали) — попробуйте зайти на диск «C:\», и в папке «Program Files» найти каталог «Realtek». Если такой каталог есть: скорее всего в нем должен быть файл «RtkNGUI64.exe» — попробуйте запустить его, кликнув на нем ЛКМ (прим.: это и есть диспетчер).
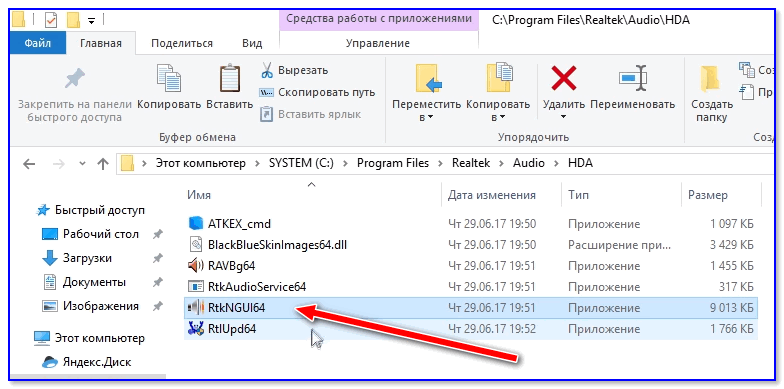
Пробуем вручную запустить диспетчер
Если диспетчер запустится, и вы сможете приступить к настройке звука — просто создайте ярлык для этой программы (кликнув на ней ПКМ), чтобы не искать ее каждый раз.
❷
Удаление «старой» версии драйвера
Далее, какая бы не была у вас версия драйвера, рекомендую ее полностью удалить. Это можно сделать из панели управления Windows. См. скриншот ниже.
Примечание: кстати, последняя версия драйвера Realtek 2.82 — сбойная. У меня на ПК при ее установке не появляется значок на диспетчер управления звуком!

Удаляем старый драйвер
Если драйвер попросит перезагрузить ПК — соглашайтесь!
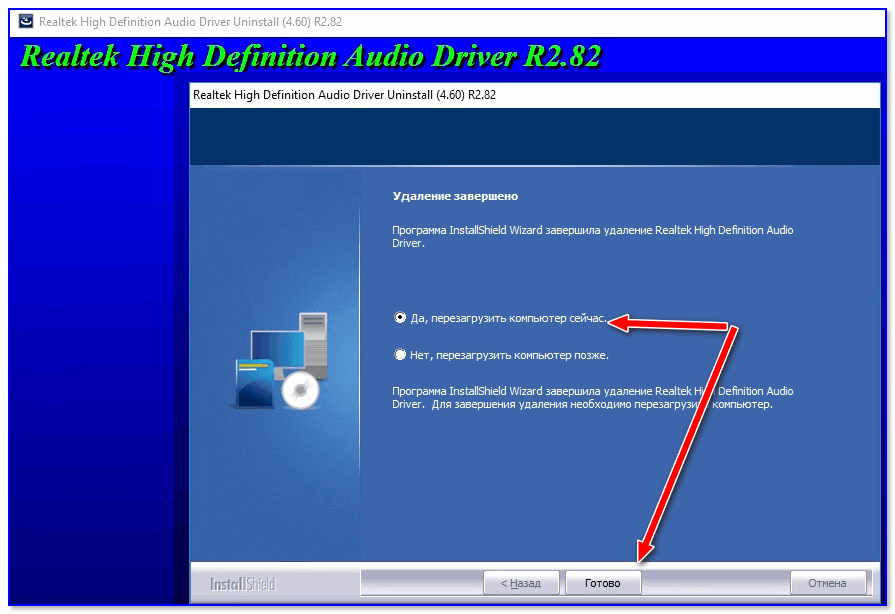
Готов
❸
Загрузка новой версии драйвера
Если у вас ПК
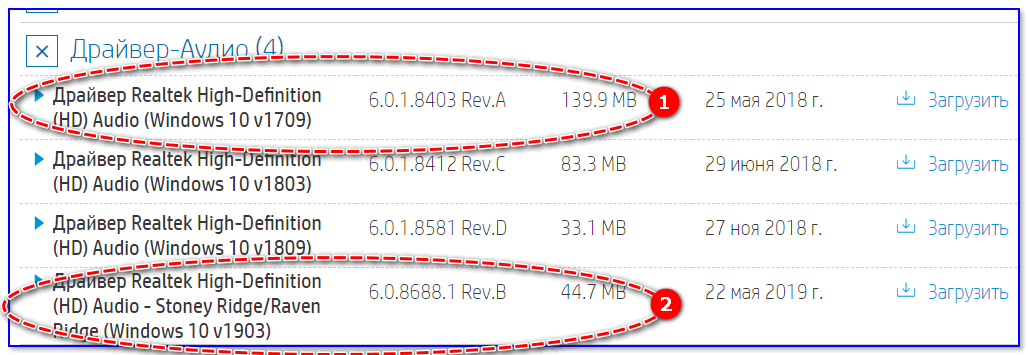
Протестировав несколько версий драйвера от Realtek — оказалось, что «сбойная» из них только одна, последняя 2.82 (и то, только на некоторых машинах!). Проверив несколько более старых версий аудио-драйверов, удалось определить, что 2.81 — вполне корректно-работающий выпуск. Ссылки на них привел ниже.
- Realtek HD 2.82 (ссылка на офиц. сайт). Сначала можно попробовать ее, если не заработает — удалите драйвер (см. шаг 1, 2 выше), и установите 2.81 версию.
- ⭐Realtek HD 2.81 ✔ (ссылка на techspot.com). Корректно-работающая версия аудио-драйвера. Рекомендую!
Если у вас ноутбук
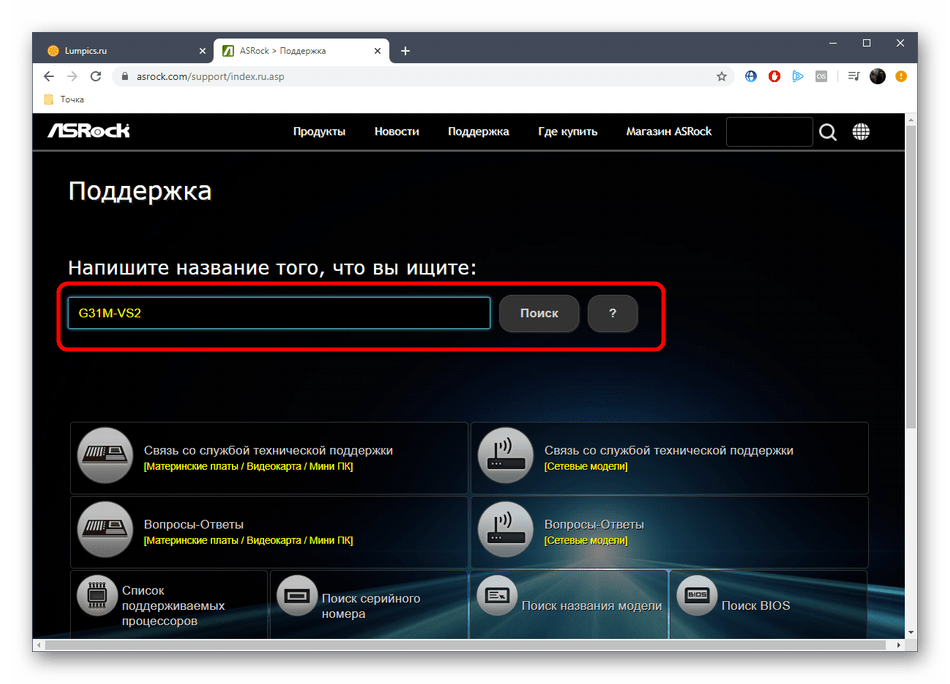
В этом случае рекомендую определить его точную модель, а затем на официальном сайте производителя найти для него аудио-драйвера. Загружать посоветовал бы сразу несколько версий (особенно тот пакет, который весит* больше остальных).
- *В моем случае их несколько: что интересно, если установить просто последнюю версию от 22 мая — то ссылка на диспетчер управления звуком не появится!
- Если же установить сначала самый первый выпуск (весит больше остальных), а затем до-обновить его самой последней версией — то все будет корректно работать!
Драйвер аудио для ноутбука HP
❹
Установка новой версии аудио-драйвера
Непосредственно сама установка аудио-драйвера не представляет ничего сложного — достаточно запустить исполняемый файл и дождаться завершения работы мастера. После, перезагрузить ПК/ноутбук.
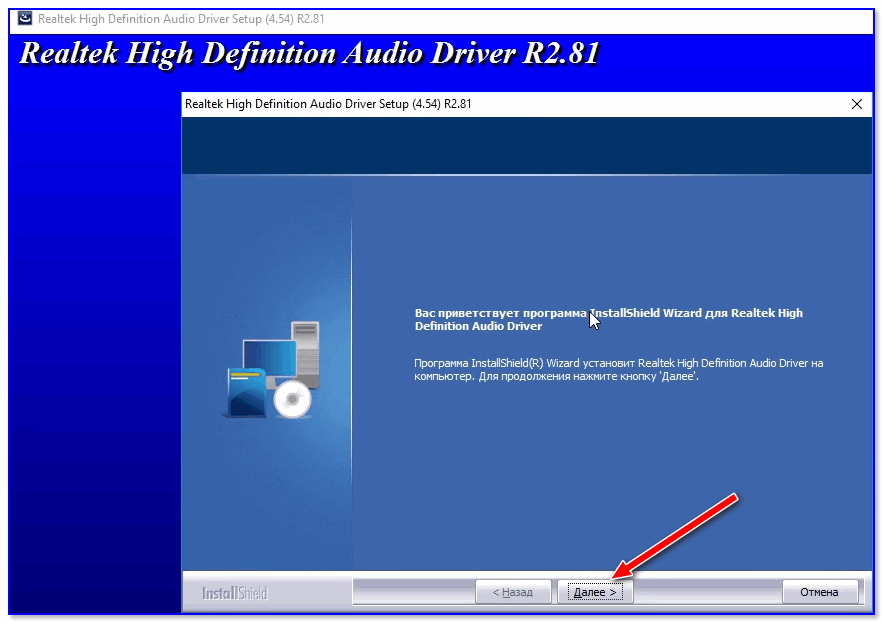
Установка другой версии Realtek HD 2.81
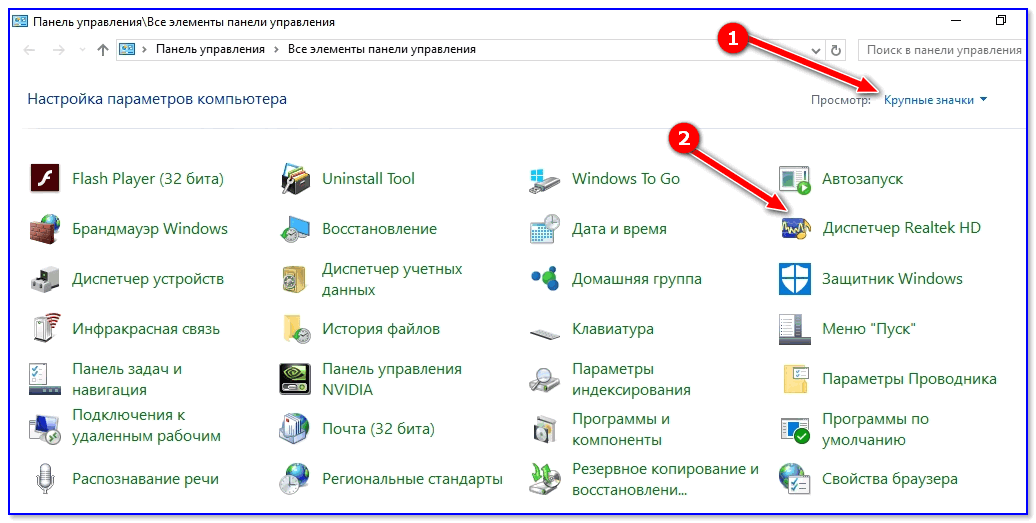
После перезагрузки, рекомендую сразу открыть панель управления, перевести режим отображения в «Крупные значки» и посмотреть, появилась ли ссылка на диспетчер Realtek (в моем случае, после установки версии 2.81 — все заработало!).
Примечание: если в панели управления значка не появилось — то откройте настройки драйвера, запустив файл RtkNGUI64.exe/RAVCpl64.exe из папки C:\Program Files\Realtek\Audio\HDA (как это мы делали в ШАГЕ 1).
Диспетчер Realtek HD появился!
Собственно, далее можно приступить к точечной настройке звука (задача решена?!).
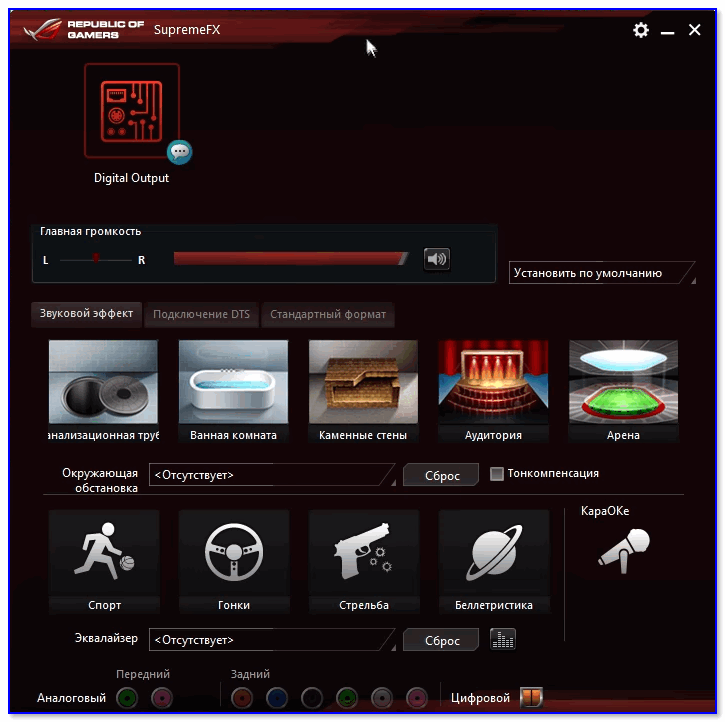
Точечная настройка звука — Realtek HD
*
PS (обновл. от 04.2022)
В последних версиях Windows 10/11 консоль для управления Realtek также появилась в магазине Microsoft Store* (📌ссылка на нее). После ее установки — в меню ПУСК и в ПОИСКЕ Windows появится ссылка на панель Realtek (в которой и будут все основные параметры звука). См. пример ниже.
📌 В помощь!
Как открыть магазин приложений Microsoft Store (и, если его нет, то установить) — см. инструкцию
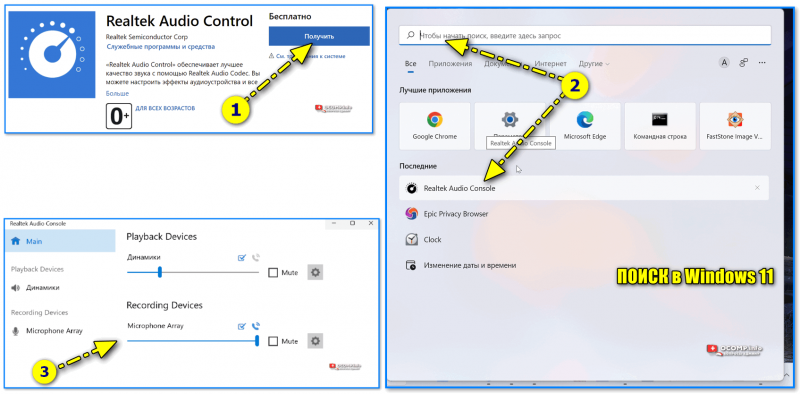
Realtek Audio Console — контрольная панель от Realtek
*
На сим сегодня всё… Дополнения по теме — лишними не будут!
Удачи!
👋
Первая публикация: 28.10.2019
Корректировка: 04.2022
Все способы:
- Способ 1: Повторный просмотр меню
- Способ 2: Вывод значка на панель задач
- Способ 3: Использование альтернативных методов запуска
- Способ 4: Переустановка звуковых драйверов
- Способ 5: Ручная инсталляция Диспетчера Realtek HD
- Вопросы и ответы: 0
Способ 1: Повторный просмотр меню
Суть первого метода крайне проста — посмотреть список значков в «Панели управления» повторно, поскольку далеко не всегда Realtek HD имеет такое же название в операционной системе. Это может зависеть от особенностей производителя материнской платы или ноутбука: например, у обладателей некоторых лэптопов от HP это меню называется «Audio Control» или «Bang & Olufsen Audio Control». Вам следует открыть «Панель управления» повторно и посмотреть на присутствующие там значки. Отыщите и откройте тот раздел, который может отвечать за настройку звука, и проверьте, действительно ли это приложение является подходящим.

Тогда при запуске приложения для управления звуком, даже если оно называется «Realtek HD» вы можете столкнуться с тем, что его внешний вид будет отличаться от привычного приложения Реалтек. Это связано с особенностями драйверов, но большинство привычных настроек остаются на своих местах, а чаще всего к ним добавляются уникальные решения от производителя, например, для усиления баса или улучшения разбора речи в фильмах.

Способ 2: Вывод значка на панель задач
Данный вариант не совсем связан с устранением проблемы отсутствия значка в «Панели управления», но помогает обойти ее, поскольку некоторые производители лэптопов и материнских плат предоставляют свою особенную версию драйвера звука, в которую не входит функция размещения иконки графического приложения в этом меню. Из-за этого будет проще вывести ее на панель задач, чтобы быстро запускать и настраивать звук.
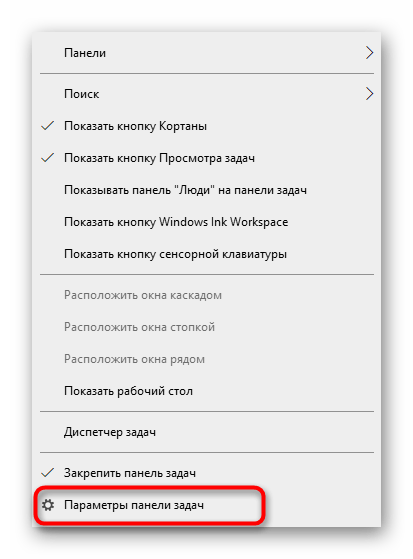
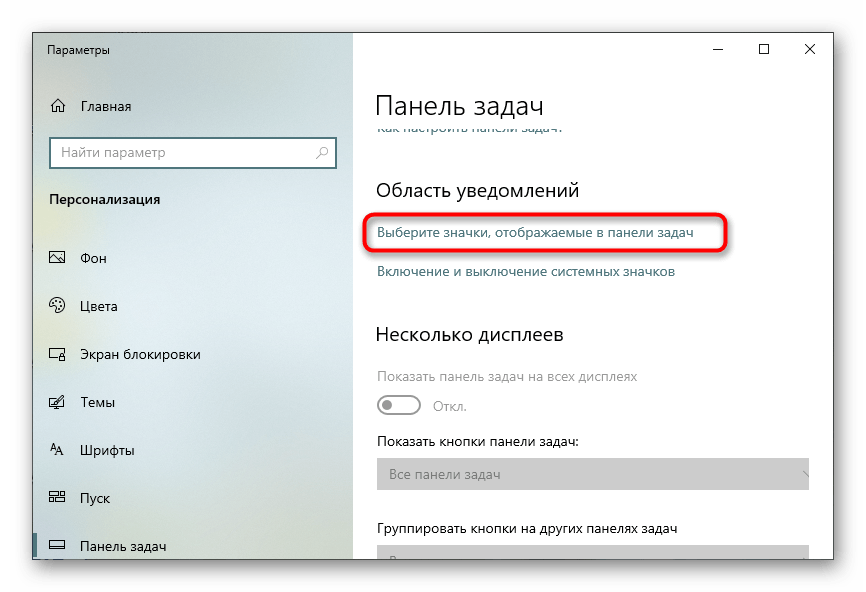
- Щелкните правой кнопкой мыши по пустому месту на панели задач и в появившемся контекстном меню выберите пункт «Параметры панели задач».
- Опуститесь вниз по списку, где найдите кликабельную строку «Выберите значки, отображаемые в панели задач».
- Найдите среди значков «Диспетчер Realtek HD» и переместите ползунок в активное состояние, чтобы включить отображение.
- Осталось только убедиться в том, что значок стал отображаться на панели задач. Теперь его можно использовать для запуска Диспетчера управления звуком.


Способ 3: Использование альтернативных методов запуска
Иногда добавить Диспетчер управления звуком Realtek HD в «Панель управления» или на панель задач не помогает даже переустановка драйверов или ручная инсталляция соответствующего ПО, что связано с особенностями работы определенных версий драйверов. Вы можете перейти к следующим методам и попробовать переустановить драйверы, а затем вернуться к этому, если они не принесут должного результата. В том случае, когда нет желания инсталлировать ПО, стоит попробовать использовать альтернативные варианты запуска Realtek HD, если он установлен на ПК, о чем более детально читайте в статье далее.
Подробнее: Методы открытия Диспетчера Realtek HD в Windows 10

Способ 4: Переустановка звуковых драйверов
Если на компьютере вовсе не установлены официальные драйверы или они были загружены ОС автоматически с серверов Microsoft, необходимое приложение попросту может отсутствовать в операционной системе. Добавить его можно, скачав официальные драйверы с сайта производителя ноутбука или материнской платы либо задействовав сторонние решения.
Однако для начала потребуется произвести проверку производителя звуковой карты, используя один из доступных способов. Если им не является Realtek, значит, Диспетчер управления звуком добавить просто не получится. Вместо этого стоит использовать аналоги от компании-производителя. Узнайте его, ознакомившись с рекомендациями по ссылке ниже.
Подробнее: Как узнать название звуковой карты на компьютере
Если производителем все же оказался Realtek, воспользуйтесь нашей инструкцией для загрузки совместимых драйверов.
Подробнее: Определение необходимых для звуковой карты драйверов
Иногда с инсталляцией драйверов возникают проблемы, которые могут быть связаны с неправильно подобранной версией или системными ошибками. Решаются они разными методами, которые описаны в руководстве по ссылке ниже.
Подробнее: Что делать, если не устанавливается Realtek HD в Windows 10
Способ 5: Ручная инсталляция Диспетчера Realtek HD
Последний вариант решения поставленной задачи — ручная установка Диспетчера Realtek HD. Это может понадобиться в тех случаях, когда в драйверы, скачанные с официального сайта производителя ПК или лэптопа, не входит это графическое ПО. Тогда потребуется пойти другим путем и воспользоваться страницей Realtek, о чем в развернутом виде читайте далее.
Подробнее: Скачиваем и устанавливаем звуковые драйвера для Realtek
Наша группа в TelegramПолезные советы и помощь
-
Home
-
News
- 5 Tips to Fix Realtek HD Audio Manager Missing Windows 10
By Alisa |
Last Updated
This tutorial digs out some ways to help you fix Realtek HD Audio Manager missing from Windows 10. If you can’t find Realtek HD Audio Manager from Windows Control Panel or taskbar, you can try the tips to get it back. MiniTool software also provides free data recovery software, hard drive partition manager, system backup and restore software, etc.
You can use Realtek HD Audio Manager to control volume in Windows 10 computer. If you find the Realtek HD Audio Manager is missing from Control Panel or taskbar, you can check the 5 tips below to fix Realtek HD Audio Manager missing Windows 10 error.
Tip: MiniTool Power Data Recovery – Easy and professional data recovery software lets you recover any deleted/lost files from Windows computer, memory card, USB, external HDD, SSD, etc. 100% clean program.
MiniTool Power Data Recovery TrialClick to Download100%Clean & Safe
Tip 1. Enable Realtek HD Audio Manager in Task Manager
- Try to bring back Realtek HD Audio Manager from Task Manager. Press Ctrl + Shift + Esc to open Task Manager in Windows 10.
- Click Startup tab, and right-click Realtek HD Audio Manager to choose Enable.
- Restart your computer to see if Realtek HD Audio Manager shows up in the system tray.
Tip 2. Fix Realtek HD Audio Manager Missing from Control Panel
- Open Control Panel in Windows 10. Click View by Small icons category.
- Click Realtek HD Audio Manager in Control Panel. And click i icon.
- Make sure the Display icon in notification area option is checked in Information window, and click OK.
Check if Realtek HD Audio Manager appears in Windows taskbar, if not, try other tips in this post.
Tip 3. Check If You Can Find Realtek HD Audio Manager in File Explorer
- If you can’t find Realtek HD Audio Manager in Control Panel, you can check if you can find it in File Explorer.
- Open File Explorer, and go to C:\Program Files\Realtek\Audio\HDA.
- Find RtkNGUI64 application file in File Explorer window, and double-click it to open Realtek HD Audio Manager.
Tip 4. Update Realtek HD Audio Driver in Windows 10
If Realtek HD Audio Manager is missing in Windows 10, you can try to update Realtek HD Audio Driver.
- Open Device Manager in Windows 10.
- Expand Sound, video and game controllers category, right-click Realtek High Definition Audio and click Update driver.
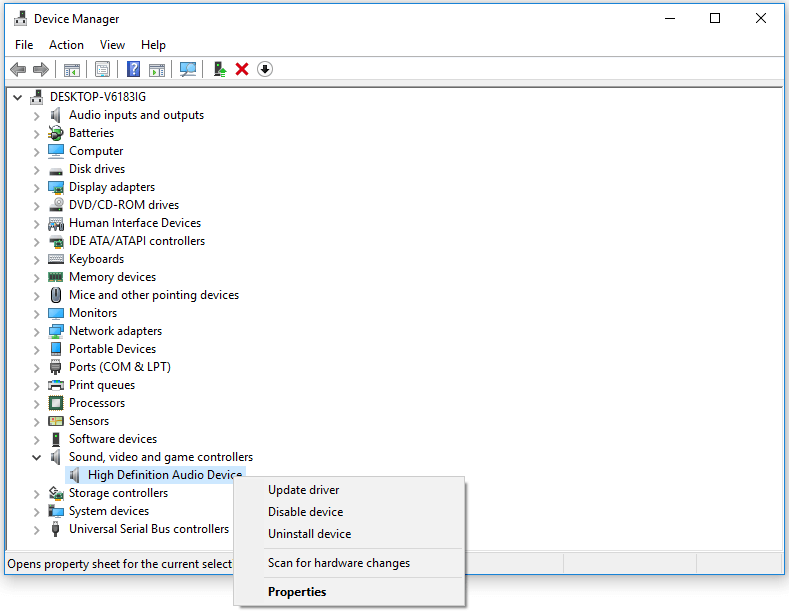
Tip 5. Reinstall Realtek HD Audio Driver in Windows 10
- Press Windows + X, and choose Device Manager to access it.
- Click Sound, video and game controllers, and right-click Realtek High Definition Audio to choose Uninstall device. Restart your computer to reinstall Realtek HD Audio Manager and audio driver.
Bottom Line
If you meet Realtek HD Audio Manager missing issue in Windows 10, you can try one of the 5 tips above to fix this error.
To recover lost data or mistakenly deleted files from Windows computer, external hard drive, SSD, USB flash drive, phone or camera SD card, etc. you can turn to MiniTool Power Data Recovery.
To manage hard drive partitions, you can recur to MiniTool Partition Wizard. This best free hard drive partition manager allows you to create/delete/resize/format/wipe/convert partition, copy disk, benchmark disk, check and fix disk errors, etc.
To back up and restore Windows system, back up files folders or partitions, you can use MiniTool ShadowMaker. It supports automatic backup, incremental backup and file sync. You can back up data to external hard drive, USB drive, network drive, etc. MiniTool software aims to help you keep your data safe.
About The Author
Position: Columnist
Alisa is a professional English editor with 4-year experience. She loves writing and focuses on sharing detailed solutions and thoughts for computer problems, data recovery & backup, digital gadgets, tech news, etc. Through her articles, users can always easily get related problems solved and find what they want. In spare time, she likes basketball, badminton, tennis, cycling, running, and singing. She is very funny and energetic in life, and always brings friends lots of laughs.
-
Home
-
Partition Manager
- [Solved] Realtek HD Audio Manager Not Opening
By Sherry |
Last Updated
Are you facing Realtek HD Audio Manager not opening in Windows 10? Usually, the problem is caused by faulty or outdated drivers and you can easily fix it by yourself. MiniTool offers you some step-by-step fixes which you can take a reference from.
About Realtek HD Audio Manager
Realtek HD Audio Manager is one of the most widely available sound card driver applications. It comes with the support for all the major sound codes, which Enables your pc to support process audio, playback multimedia, record audio and manage speakers.
If you have RealteK HD Audio drivers installed on your system, you will also get Realtek HD Audio Manager on your device.
Usually, you can open Realtek HD Audio Manager with the following steps:
Step 1: Press Win + E to open File Explorer.
Step 2: Navigate to C: > Program Files > Realtek > Audio > HDA.
Step 3: Locate and double-click the .exe file of Realtek HD Audio Manager.
To make it easier to run Realtek HD Audio Manager next time, you can right-click the .exe file and choose Create shortcut.
Tip: You can also go to Control Panel and view items by “Small icons” to find Realtek HD Audio Manager.
However, in some cases, you may encounter the error Realtek HD Audio Manager not opening in Windows 10 or even cannot find Realtek HD Audio Manager.
Since Realtek HD Audio Manager is a tool installed along with the Realtek audio driver, it’s probably due to the faulty or outdated audio driver when the Audio Manager is missing or not opening.
You can try the following solutions to fix it.
Fix 1: Update the Realtek HD Audio driver
There are two ways you can update your Realtek HD Audio driver.
Option 1: Download and Install the Driver Manually
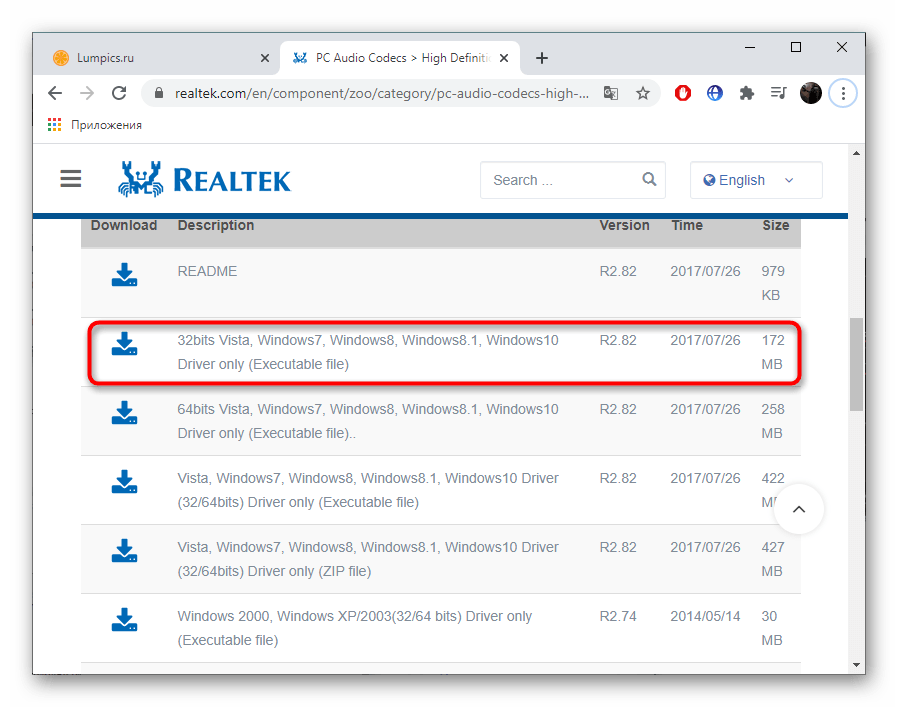
To get the latest Realtek HD Audio driver, you can go to the Realtek website. Then download the driver corresponding with your Windows version (for example, Windows 64 bit) manually.
Once it’s downloaded, double-click the installation file and follow the on-screen instructions to install the driver.
Option 2: Automatically Update Realtek HD Audio Drivers
If you want an easier way to update the driver, you can follow the steps bellow.
Step 1: Open Run window by pressing Win + R. Then type devmgmt.msc and hit Enter to access Device Manager.
Step 2: Double-click Sound, video and game controllers to expand it.
Step 3: Right-click Realtek High Definition Audio and choose Update driver.
Step 4: In the pop-up window, select Search automatically for updated driver software.
After searching your computer and the Internet for the latest driver software for your device, Windows will download and install it. Just wait patiently.
Once it’s done, you have to restart your computer for the changes to take effect.
Fix 2: Check for Windows Updates
If many users have reported the same issue, Microsoft may launch a system update to help solve the problem. So, you can try checking for Windows updates to fix Realtek HD Audio Manager not opening in Windows 10.
Step 1: Press Win + S to open Search. Type updates in the search box, and then click Check for updates from the results.
Step 2: In Windows Update pane, select Check for updates.
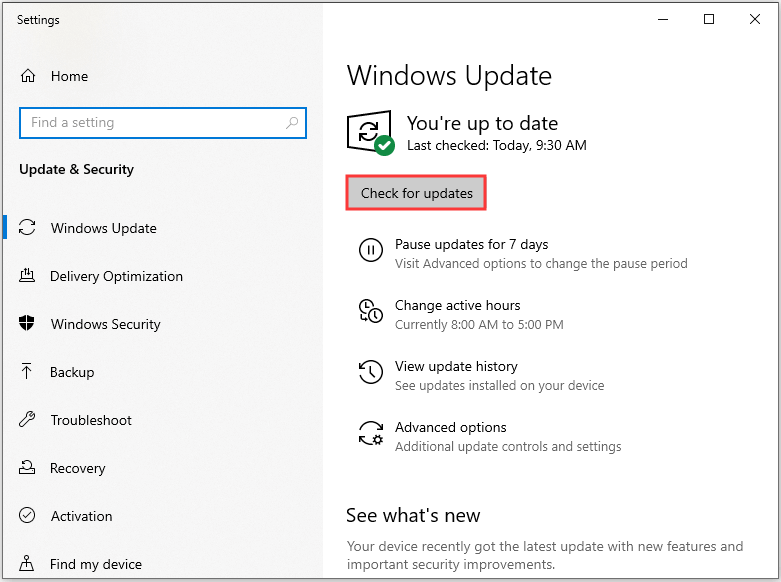
Step 3: Install all identified updates to troubleshoot the issue.
Then restart your computer to see if the problem has been solved.
Fix 3: Run Microsoft Troubleshooter
Microsoft provides troubleshooter to fix some issues. You can try it when you have problems related to Realtek HD Audio Manager not opening.
Step 1: Open Control Panel and select Large icons from View by.
Step 2: Go to Troubleshooting > Hardware and Sound > Hardware and Devices.
Step 3: Click Advanced in Hardware and Devices. Then check Apply repairs automatically and click Next.
Step 4: Follow the on-screen instructions to finish the rest steps.
Then check if the problem Realtek HD Audio Manager not opening has been fixed.
About The Author
Position: Columnist
Sherry has been a staff editor of MiniTool for a year. She has received rigorous training about computer and digital data in company. Her articles focus on solutions to various problems that many Windows users might encounter and she is excellent at disk partitioning. She has a wide range of hobbies, including listening to music, playing video games, roller skating, reading, and so on. By the way, she is patient and serious.
Where is Realtek Audio Manager and what is it used for? Well, the Realtek Audio Manager is used to alter the sound settings of the speakers in-built on your PC. However, you may face the Realtek Audio Manager not opening issue. The article has the methods to the question of how to find Realtek Audio Manager and fix the issues with the Audio Manager. You can use the article as the answer to the question of how to open Realtek HD Audio Manager Windows 10 and fix the issues related to the Audio Manager.

Table of Contents
The possible causes for the Realtek Audio Manager not working on your PC are listed here in this section.
- Missing Audio Manager icon- If the Realtek Audio Manager icon is missing on the Taskbar, you may not be able to use the Audio Manager.
- Conflicts with pre-installed audio drivers- If the audio drivers installed on your PC is not conflicting with the updated version of the audio driver, you may not be able to use the Audio Manager.
- Outdated Audio driver- If the Audio Driver on your PC is outdated, you may not be able to use the Audio Manager on your PC.
- Corrupted Audio Driver- If the Audio Driver is corrupted on your PC, you may not be able to use the Audio Manager and alter the settings.
- Outdated Windows- If you are using an outdated Windows, you may not be able to use the Audio Manager on your PC.
- Improper installation of the Realtek Audio Manager- If the audio drivers are not properly installed on your PC; you may not be able to use the Realtek Audio Manager.
Basic Troubleshooting Methods
The basic troubleshooting methods described in this section will help you fix the Realtek Audio Manager not opening issue on your PC.
1. Restart PC
If there are certain glitches on your PC that are not allowing you to open the Realtek Audio Manager, you can try restarting your PC. To restart your PC, press the Windows key, click on the Power button on the START menu, and click on the option Restart to restart your PC.

2. Repair Corrupt Files
You can check for the corrupted system files on your PC using the DISM and SFC scan tools to fix the issue with the Realtek Audio Manager. Read the article on how to repair system files on Windows 10 to check for the corrupted system files.

3. Update Windows
If you are using outdated Windows on your PC, you may not be able to use any of the functions on your PC. To fix the issue with the Realtek Audio Manager, you need to update the Windows to the latest version on your PC. Follow our guide to download and install latest Windows 10 updates to fix the issue.

4. Reset BIOS to Default Settings
If none of the methods work for you, you can try resetting the BIOS to default settings on your PC.
Note: The method explained in this section is based on Lenovo PC and may differ based on your manufacturer type.
1. Firstly, restart the PC and press the F1 key to enter into BIOS on your PC.

2. Press the F9 key to load the default BIOS settings on your PC and press the F10 key to save the settings.
Now, here are the advanced troubleshooting methods to fix the issue.
Method 1: Run Playing Audio Troubleshooter
You can try troubleshooting the problems in the Realtek Audio driver to fix the issue with the Realtek Audio Manager. Use the link provided here to troubleshoot the problems in the Audio Driver and fix the issue.
Note: You can also use the third-party tool or download the driver fix app using the Google Chrome app on your PC.

Also Read: Fix Zoom Audio Not Working Windows 10
Method 2: Locate Realtek Audio Manager
Sometimes, you may not have located the Realtek Audio Manager on your PC and the manager may not have functioned properly. You need to locate the application and then launch it to fix the Realtek Audio Manager not opening issue. There are 3 options to open the Audio Manager on your PC, as listed below in the section.
Option I: Through Taskbar
You can open the Audio Manager using the icons on the Taskbar which would be either located on the Taskbar or in the Show hidden icons pop-up menu. Click on the Realtek Audio Manager to launch the app window on your PC.
Option II: Through Windows Explorer
You can launch the Realtek Audio Manager using Windows Explorer on your PC by opening the source file location.
1. Press the Windows + E keys together at the same time to launch the File Explorer.
2. Go to This PC > Local Disk (C:) > Program Files > Realtek > Audio > HAD folder.

2. Double-click on the RAVCpl64 application file to open the Realtek Audio Manager.

Option III: Through Control Panel
Using the Control Panel app, you can launch the Realtek Audio Manager on your PC. Here is how to open Realtek HD Audio Manager in Windows 10.
1. Hit the Windows key, type Control Panel and click on Open.

2. Set View by > Small icons, then click on the Realtek HD Audio Manager.

Hence, this is how you can open Realtek HD Audio Manager on Windows 10.
Method 3: Enable Realtek Audio Manager Startup App
The Realtek Audio Manager may have been disabled in the Task Manager and you might not be able to open the app. You need to enable the app on the Task Manager to fix the Realtek Audio Manager not opening issue.
1. Press the Windows key, type Task Manager, and click on Open.

2. Navigate to the Startup tab, select the Realtek HD Audio Manager in the list, and click on the Enable button to enable the Realtek Audio Manager.

Also Read: How to Fix Audio Stuttering in Windows 10
Method 4: Update Realtek Audio Driver
You can try manually installing the latest version of the Realtek Audio Driver to fix the issue of the Realtek Audio Manager not opening on your PC. There are various options to install the Audio driver on your PC to fix the issue in this section.
Step I: Show Hidden Device Drivers
At most times, you may not be able to access the Realtek Audio Manager in the Device Manager if it is hidden. You can use the method described here to display the hidden devices in the Device Manager and make changes to them.
1. Hit the Windows key, type Device Manager, and click on Open.

2. Click on the View tab in the window and click on the Show hidden devices option on the menu to see all the devices in the Device Manager.
Step II: Update Driver
If your Realtek Audio Driver is outdated, you need to update it to the latest version to use the Audio Manager. Follow any one of the given methods to update driver.
Option I: Through Device Manager
Read the article provided here to know the method to update the Realtek Audio Driver on your PC.

Option II: Through Microsoft Update Catalog
You can install the Realtek Audio Drivers from the Microsoft Update Catalog to fix the Realtek Audio Manager not opening issue on your PC.
1. launch Google Chrome by typing in the Windows search bar. Click on Open.

2. Open the official website of the Microsoft Update Catalog and click on the Download button based on your Windows Specifications.

3. In the Download window, click on the link available to initiate the download process and save the file to your PC.
4. Right-click on the downloaded file and click on the option Extract files… to extract the files.
5. Finally, run the setup file and follow the on-screen instructions to install the updates.
Option III: Through OEM Manufacturers
You can install the Realtek Audio driver from the OEM Manufacturers directly on your PC and uninstall the existing drivers. Follow the steps provided in the method here to download the drivers from OEM Manufacturers on your PC.

Option IV: Install High Definition Audio Codecs
You can install the Realtek Audio Drivers by installing the High Definition Audio Codecs or the software on your PC.
1. Launch the Google Chrome browser.
2. Open the official website of the Realtek High Definition Codecs and click on the Download button in the Windows section according to your Windows specifications.

3. Run the downloaded file and follow the on-screen instructions to install the Realtek Audio driver on your PC.
Option V: Through Driver Support App
If you are not able to update or install the audio drivers frequently, you can try using an automatic recognition app to find the right driver or the Driver Support app.
1. Open Google Chrome browser.
2. Open the official website of the Driver Support app and click on the DOWNLOAD NOW button on the page.

3. Follow the on-screen instructions in the installation wizard and click on the OK button on the Install anyway window.
4. After the app scans your PC, click on the Realtek Audio Driver, and click on the Fix It! button to install the updated driver.
Also Read: Fix Windows 10 No Audio Devices are Installed
Method 5: Modify Realtek Audio Driver
You can use the methods explained in this section to modify the Realtek Audio driver and fix the Realtek Audio Manager not opening issue on your PC.
Option I: Rollback Driver Updates
If your Audio driver was functioning better in a previous version than in the updated version, you can try rolling back to the previous setting. Read the article on how to rollback drivers on Windows 10.

Option II: Add Legacy Hardware
If you cannot fix the issue with the Realtek Audio Driver, you can try adding Legacy hardware to the driver on the Device Manager. Follow these steps to add Legacy Hardware for the Realtek Audio Driver.
1. Open the Device Manager and select Sound, video and game controllers.
2. Then, click on Action > Add legacy hardware option.

3. Select Search for and install the hardware automatically (Recommended) and click on Next.

Also Read: How to Fix The Audio Service is Not Running Windows 10
Method 6: Reinstall Realtek Audio Driver
You can uninstall the Realtek Audio Driver and then the driver will get re-installed automatically. Read the article to fix audio problems Windows 10 creators Update.

Recommended:
- Fix Full Screen Not Working on Windows 10
- Fix Do Not Disturb Keeps Turning On By Itself on Android
- Fix NVIDIA Control Panel Missing in Windows 10
- Fix Windows 10 Audio Error 0xc00d4e86
The article discusses the methods to fix the issue of Realtek Audio Manager not opening in Windows 10. We hope that you got the answers to your queries like how to find Realtek Audio Manager or where is Realtek Audio Manager, and how to open Realtek HD Audio Manager in Windows 10. If you have any suggestions or queries on the topic discussed, you can leave them in the comments section below.