
Desktop Window Manager (DWM) is a crucial Windows process that renders items to display on your system’s desktop. Though, it uses a minimal system’s graphics resources to work properly. But sometimes, it suddenly starts using an extensive amount of GPU power, which hampers the system’s performance. Sadly, the same is happening with many Windows 11 users.
If you also notice that the DWM process is using so much of the system’s GPU resources and making it sluggish, try the fixes listed in this in-depth guide. Here in this guide, we’ve shared several fixes to eliminate the Desktop Window Manager high GPU usage issue.
Why Is Desktop Window Manager Using So Much GPU?
These are the most common reasons for the Desktop Window Manager high GPU usage issue in Windows 11:
- Outdated or Corrupt Graphics Driver
- Outdated Windows Firmware
- Enabled GPU Hardware Acceleration
- Misconfigured NVIDIA Control Panel Settings
- Corrupted System Files
- Malware & Viruses
- Third-Party Antivirus Program
- Enabled HDR
- Enabled Fast Startup
Fix the Desktop Window Manager High GPU Usage Issue in Windows 11
So, here are some solutions to fix the Desktop Window Manager high GPU usage issue in Windows 11:
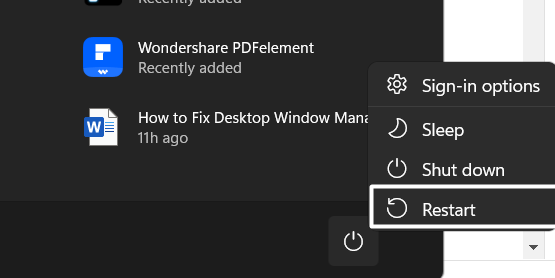
1. Restart Your Computer
The first and most common way to overcome the high GPU usage problem with Desktop Window Manager is to reboot the PC. Doing so will refresh the entire system and, most probably, fix the issue if it appears because of a third-party app. So, follow the listed steps to restart your PC:
1. Press the Windows key to open the Start Menu, and right-click on the Power icon in the bottom right corner.
2. Select the Restart option from the menu to restart your Windows 11 PC and check the issue’s status.
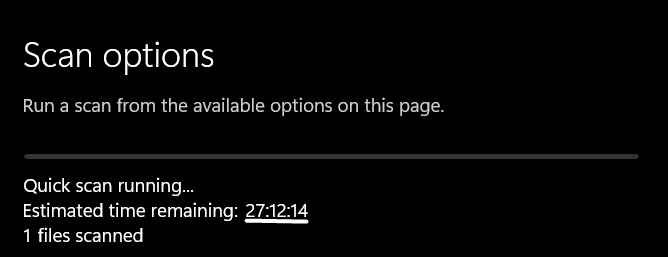
2. Scan for Malware & Viruses
One of the most prevalent causes of the Desktop Window Manager high GPU usage issue is the trojan or malicious files. You could have mistakenly gotten some malicious files on your PC, which raised the Desktop Window Manager’s GPU usage to this extreme level.
Due to this, we suggest you run a quick virus scan on your Windows 11 PC to remove all the malicious files. You can follow the below steps to execute a virus scan on your system:
1. Use the Windows + S shortcut to open the Windows Search Box and type Virus and threat protection in it.

2. Select Virus and threat protection from the Best match section and click the Scan now button to start the scan.

3. Now, wait for the estimated remaining time for the virus scan to complete and display the results.
3. Disable Third-Party Antivirus
If the malicious files aren’t the reason for this issue, then the third-party antivirus installed on your system could be. Considering this, we suggest you turn off all the security shields from your PC’s third-party antivirus and then check the Desktop Window Manager high memory issue status.
4. Run DISM, SFC, and CHKDSK Scans
One of the possible reasons behind this issue is the corrupted or damaged system files. To check whether it’s the same in your case, we suggest you run DISM, SFC, and CHKDSK scans. The DISM scan will restore your system’s image. Whereas the SFC scan will replace all the corrupted system files. And the CHKDSK scan will repair the bad physical sectors on your system’s secondary storage.
So, follow the below-mentioned instructions to run all three scans in the stated sequence:
1. Right-click on the Windows logo in your system’s taskbar and select Terminal (Admin) from it.

2. Copy-paste the below-listed command into the console and press the Enter key to run the DISM scan.
DISM/Online/Cleanup-Image/RestoreHealth
3. Once the DISM scan is completed, execute the below command in the same console to start the SFC scan.
sfc /scannow
4. Execute the below command in the console to run the CHKDSK scan to find and fix disk-related errors.
Chkdsk /F
5. Finally, press Y on your keyboard to schedule the CHKDSK scan the next time you reboot your PC.
So, restart your Windows 11 PC to start the CHKDSK scan and find & fix issues with your system’s disk.
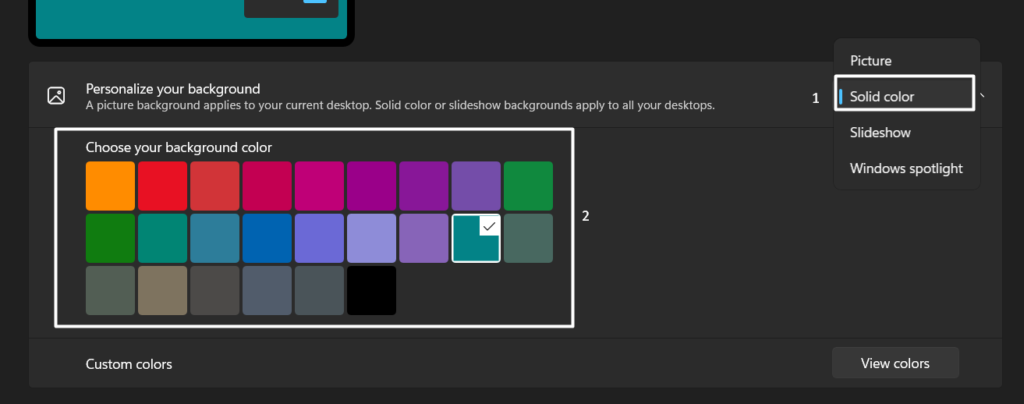
5. Change Personalization Settings
If you’ve set live wallpaper on Windows PC’s desktop, then it could be possible that it’s the main culprit. This is because live wallpaper requires high GPU resources to run properly.
Considering this, we suggest you change your Windows 11 PC’s desktop background to any solid color. Follow the below-mentioned steps to do the same:
1. Use the Windows + I keys combination to open the Settings app and move to the Personalization section.
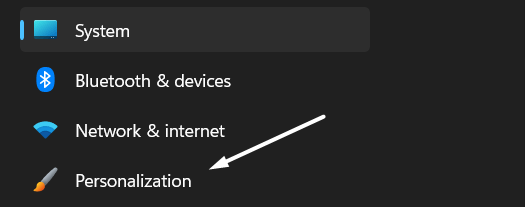
2. Click on Background on the next screen, and then set the Personalize your background option to Solid color.
6. Turn Off HDR in Windows’ Display Settings
If you have enabled High Dynamic Range (HDR) on your Windows 11 PC, it’s possible that it’s causing this issue. This is because HDR uses extensive GPU resources to play videos at high resolution.
Due to this, we suggest you disable HDR on your PC and then check the issue’s status. So, check the mentioned steps to turn off HDR on your PC:
1. Open the Settings app on your Windows PC with the Windows + I shortcut and expand the Display section.
2. Click on the HDR option under Brightness & color and turn off the HDR video streaming toggle.

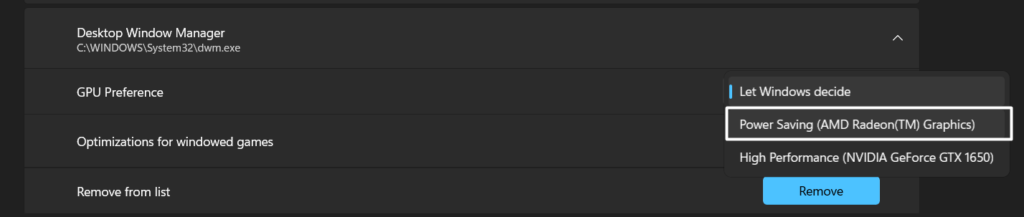
7. Set Desktop Window Manager to Power Saving
You may have permitted the Desktop Window Manager process to run to its full potential and use as many GPU resources as it wants. Hence, it’s causing this issue. In that case, we recommend you put the Desktop Window Manager process to Power Saving to get rid of the Desktop Window Manager high memory issue. Here’s how you can do so with ease:
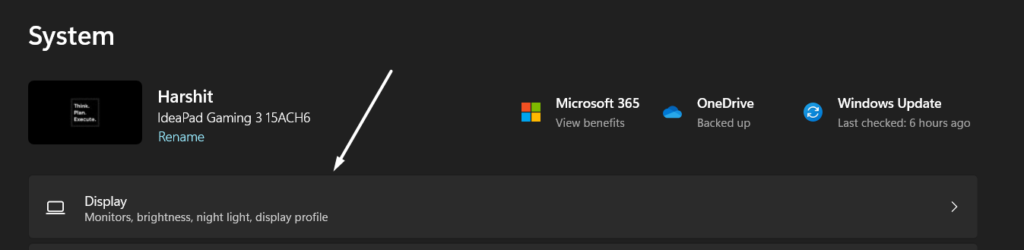
1. Launch the Settings app on your PC and head to the Display section from the System category.

2. Click on Graphics in the Related settings section and click the Add desktop app button.

3. Navigate to the below path in the File Explorer, search for dwm.exe, and then click Add to add it.
C:/Windows/System32
4. Click on Desktop Window Manager to expand the section and select the Power Saving option from the GPU Preference dropdown.
8. Disable Hardware Accelerated GPU Scheduling (HAGS)
Hardware Accelerated GPU Scheduling (HAGS) is a performance enhancement feature that enhances your graphic card’s performance and reduces latency. Some users said that the issue with DWM.exe got fixed after disabling the above function on their Windows 11 PC. We also suggest you do the same on your Windows PC by following the listed steps:
1. Right-click on the blank space on your desktop and select Display settings from the right-click menu.
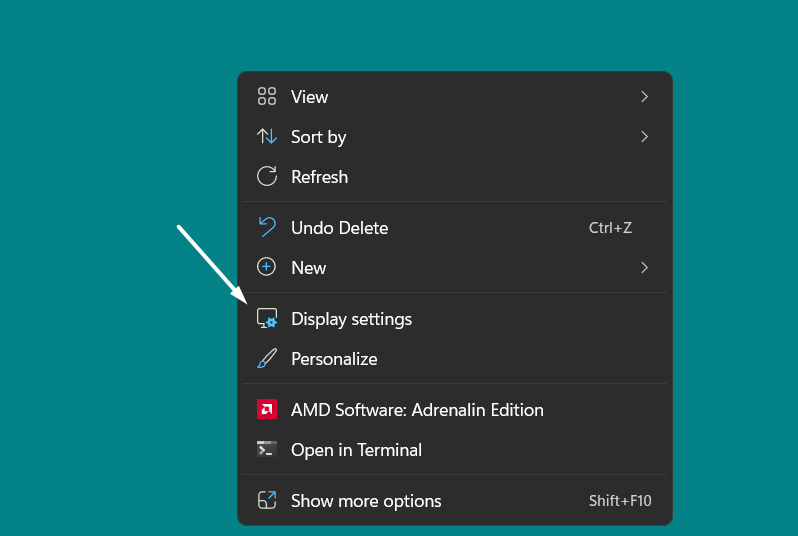
2. Click on Graphics under Related settings and expand the Hardware-accelerated GPU scheduling section.

3. Lastly, turn off the toggle next to Hardware-accelerated GPU scheduling to turn off the feature.

9. Use Recommended Display Resolution & Scaling Settings
Some users said that the incorrect system’s display resolution and scaling settings could also cause this issue. Keeping this in mind, we suggest you make sure that your Windows 11 PC’s display resolution and scaling settings are correct. Below are the steps to check the same:
1. Open the Settings app on your Windows 11 PC and head to the Display section from the System category.
2. Select the recommended option from the Scale and Display resolution dropdown in the Scale & layout section.

10. Correct Your System’s Visual Effects Settings
Another possible way to fix the Desktop Window Manager high memory issue is to modify the Windows system’s visual effects settings. It could be possible that the settings aren’t properly configured, which is causing this issue. You can check the below-mentioned steps to do the same:
1. Use the Windows + I shortcut to open the Settings app, scroll down to the end, and click on About.

2. Click the Advanced system settings option on the System window and then navigate to the Advanced tab.
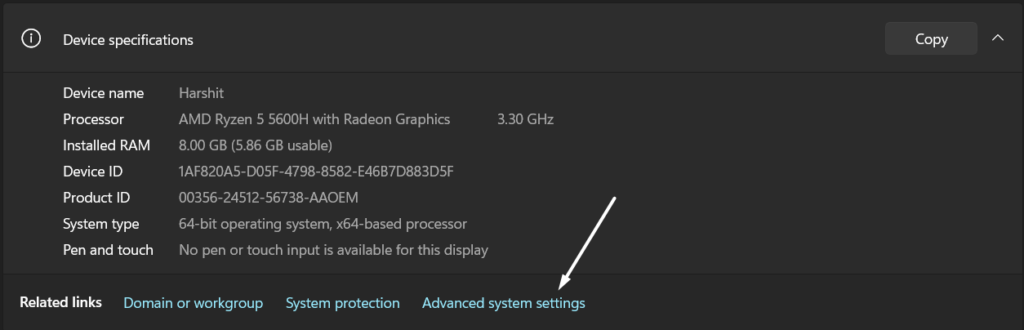
3. Click the Settings button in the Performance section and choose the Adjust for best performance option.
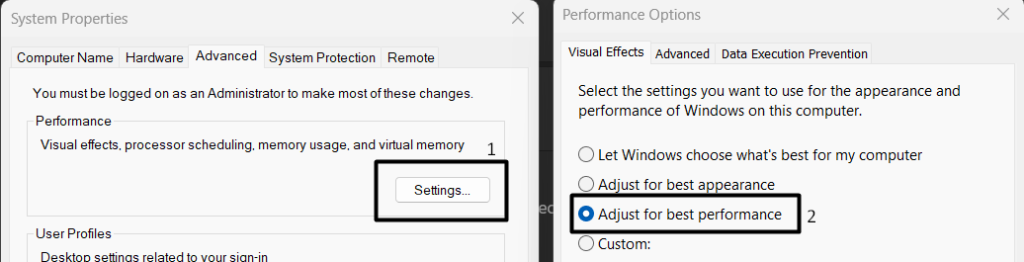
4. Lastly, click on the OK option to save all the recently made changes and reboot your Windows system.

11. Update, Re-enable, & Reinstall Your System’s GPU Driver
If you’re still experiencing Desktop Window Manager high GPU usage issues on your Windows 11 PC, it could be possible that your system’s GPU driver isn’t working properly due to some bugs.
Due to this, we suggest you update your Windows 11 PC’s GPU driver. So, check the below-mentioned instructions to know how to do the same on your system:
1. Press the Windows and R keys concurrently to open Run, type Devmgmt.msc in it, and press Enter.

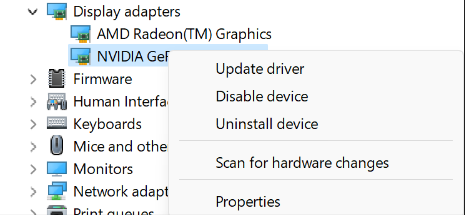
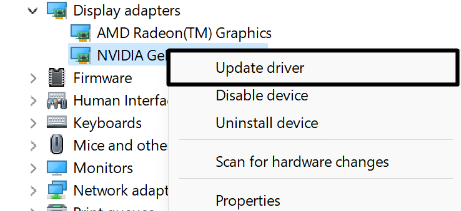
2. Expand the Display adapters section by clicking on the arrow next to it and right-click on the GPU driver.
3. Select the Update driver option from the menu and then choose the Search automatically for drivers option.
Re-enable the GPU Driver
If updating the system’s GPU driver doesn’t fix the issue, you can try re-enabling it following the below steps:
1. Right-click on the GPU driver in the Display adapters section and choose Disable device from it.
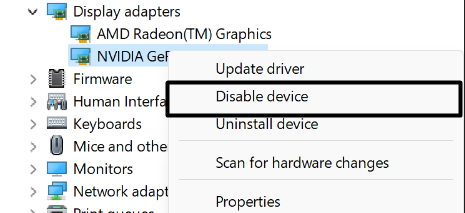
2. Once the GPU driver is disabled, select the Enable device option from the menu to re-enable it.
Reinstall the GPU Driver
If neither updating nor re-enabling the GPU driver fixes the issue, then you can consider reinstalling it:
1. Right-click on the GPU driver, and select the Uninstall device option from the right-click menu to uninstall it.
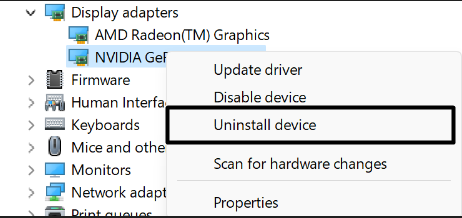
2. Click on the Action option in the top menu and select the Scan for hardware changes option from the dropdown.

Once the GPU driver is reinstalled, check if the Desktop Window Manager high GPU usage is fixed.
12. Change the Power Management Mode in the NVIDIA Control Panel
It could be possible that your Windows system’s graphic card settings aren’t properly configured, which is why this issue is appearing. Keeping this in mind, we recommend you follow the below steps to correct the improperly configured graphic card settings:
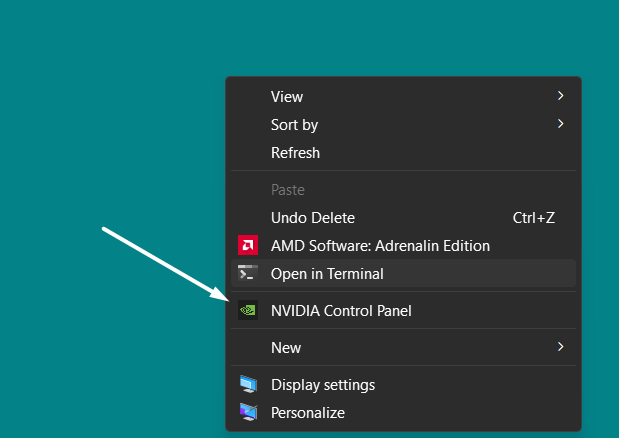
1. Right-click on your desktop in the blank space and select the NVIDIA Control Panel option from it.
2. Click on the Manage 3D settings option in the left sidebar and then move to the Global Settings section.
3. Search for Power management mode in the Settings: box and select the Prefer maximum performance option from the dropdown.
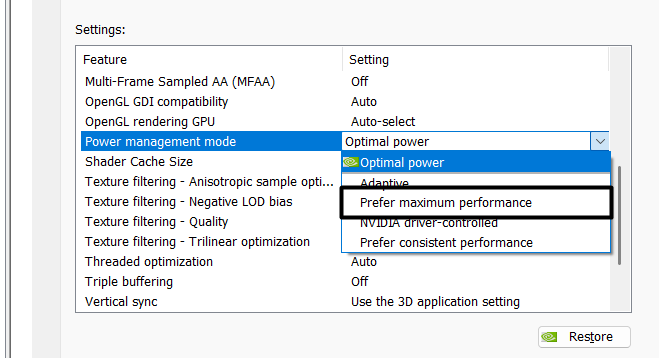
4. Close the NVIDIA Control Panel tab and restart your Windows PC to eliminate the issue.
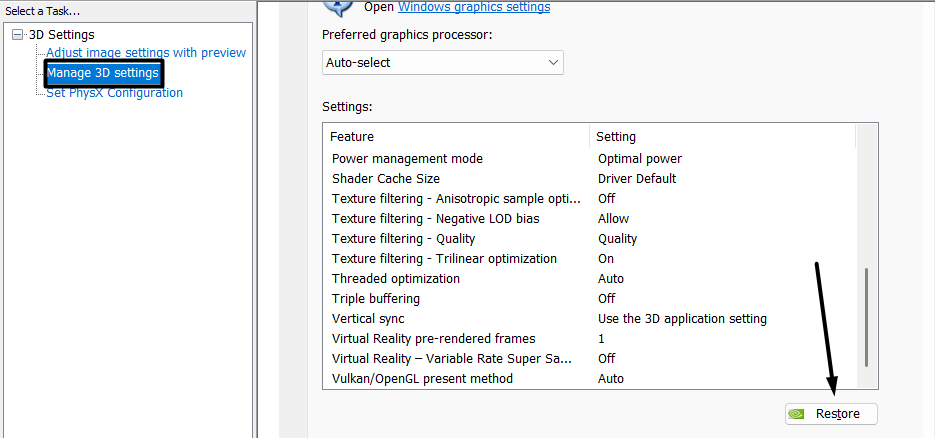
13. Restore NVIDIA Control Panel’s Global Settings
Some affected users mentioned that they fixed the issue with Desktop Window Manager by reverting the NVIDIA Control Panel’s Global Settings to default. We’ve mentioned the instructions below to reset the Global Settings of the NVIDIA Control Panel:
1. Right-click on your desktop in the blank space and select Show more options from the context menu.
2. Select NVIDIA Control Panel from the contextual menu to open the NVIDIA Control Panel on your system.
3. Navigate to the Manage 3D settings section from the left navigation pane and click the Restore button at the bottom.
14. Disable Fast Startup
Most Windows 11 PCs come with Fast Startup pre-enabled, which helps the system boot faster by preventing unnecessary apps and services from starting at the system’s boot. It could be possible that Fast Startup is preventing necessary apps and services from starting at the system’s startup, which could be the same in this case.
To check whether it’s true, we suggest you disable Fast Startup on your system. So, follow the below steps to turn off Fast Startup on your PC:
1. Open the Control Panel utility on your Windows 11 PC and navigate to the System and Security section.
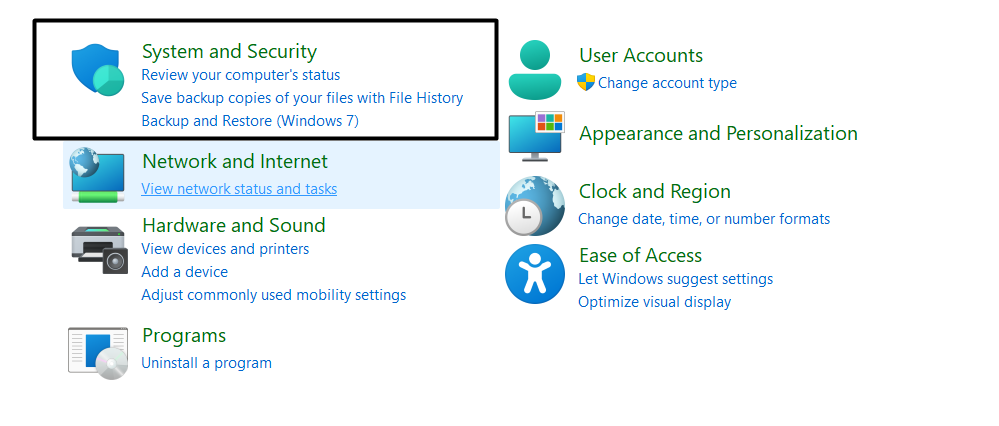
2. Click on Power Options on the next window and then select Choose what the power buttons do from the left sidebar.
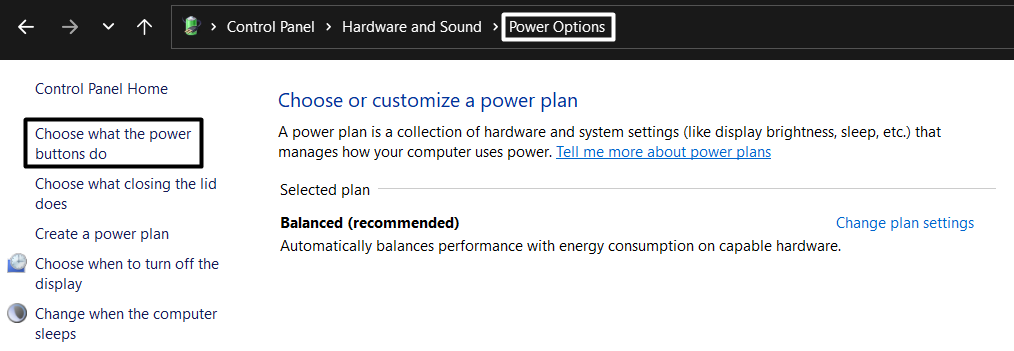
3. Click on Change settings that are currently unavailable at the top and then uncheck the Turn on fast startup (recommended) checkbox.
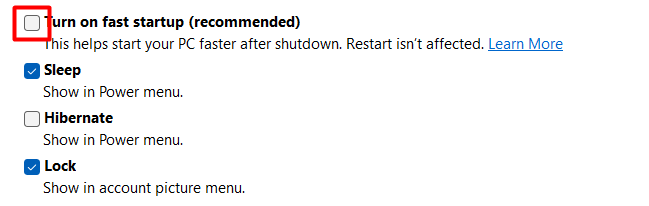
4. In the end, click the Save changes button to save all the changes and fix the issue.
15. Disable Unnecessary Startup Apps
One of the most common reasons for this issue is the unnecessary startup apps and non-Microsoft-related services. Considering this, we suggest you prevent all the irrelevant startup apps and services from starting at the system boot. You can follow the below steps to do the same:
1. Press the Windows key to open the Windows Search Box, type Startup Apps, and select the same from the search results.

2. Search for all the unnecessary programs and services on the next screen that are allowed to start at the system’s startup, and stopping them won’t affect the system’s functioning.
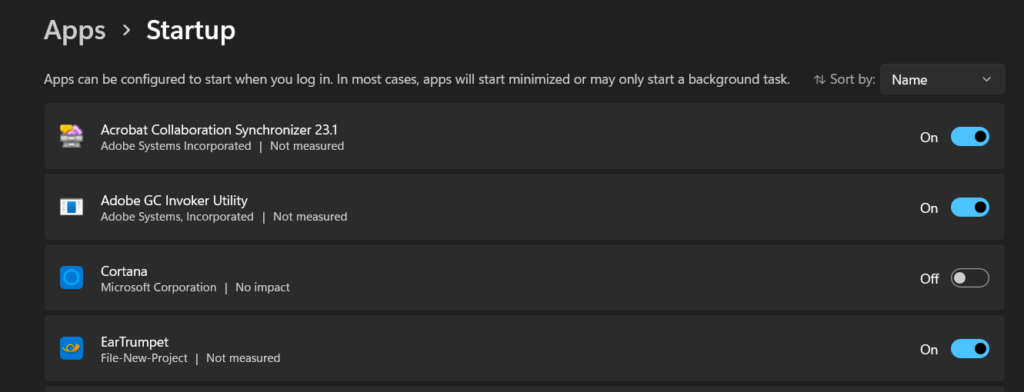
3. Finally, disable the switch next to all the unnecessary programs and services to prevent them from booting at your system’s startup.

16. Download the Latest Windows Updates
If you’re still facing the same issue, then it could be possible that your Windows 11 PC has some bugs and glitches which are causing this issue. In that case, we suggest you update your Windows 11 PC to the latest build to eliminate those bugs and glitches from the system.
You can follow the below-mentioned instructions to update your Windows 11 PC:
1. Press the Windows and I keys combination to open Settings and move to the Windows Update section.

2. Click on the Check for updates button at the top to search for new available Windows updates.

3. If the OS displays some new updates to install, click the Download & install all button next to the updates to install them.

17. Reset Your PC
If none of the above-mentioned workarounds fixes the Desktop Window Manager high GPU usage issue, then the last workaround is to factory reset your PC. Doing so will remove all the data, including all files and programs, from your Windows 11 system and revert all the settings to the default state.
As a result, the issue will get fixed automatically. So, reset your Windows 11 PC by following the below steps:
1. Open the Settings app on your Windows 11 system and navigate to the Recovery section from the System category.

2. Click on the Reset PC button next to Reset this PC in the Recovery options section.
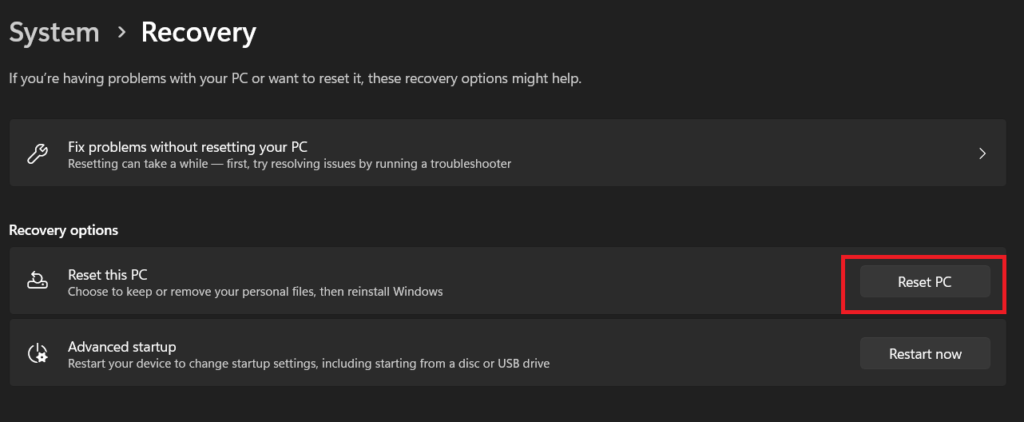
3. Select the Remove everything option on the next prompt and then choose the Cloud download option.

4. Finally, click on the Next button and then Reset to start the factory reset process.

FAQs
How Do I Fix High GPU Usage on Windows 11?
You can easily resolve the high GPU usage issue on Windows 11 by force closing all unnecessary apps and services running in the system’s background. If this doesn’t fix the issue, try restarting the PC.
How Do I Fix Desktop Window Manager in Windows 11?
If the Desktop Window Manager process uses a lot of your system’s resources while running, try upgrading your Windows 11 PC’s GPU driver. If this doesn’t fix the issue, consider disabling Hardware Accelerated GPU Scheduling (HAGS) on your PC.
Does Windows 11 Affect GPU?
Some users said their system’s GPU performance dropped a bit after upgrading to the latest Windows 11.
Can I Disable Desktop Window Manager Windows 11?
You can disable the Desktop Window Manager process on your Windows 11 PC without any issues.
How Do I Reduce Desktop Window Manager Usage?
If the Desktop Window Manager process is consuming an extensive amount of your system’s resources, we suggest you execute a detailed virus scan on your Windows 11 PC, as malware and viruses could also be the reason behind this instance.
Desktop Window Manager High GPU Usage Issue Is Fixed Now
Desktop Window Manager is a crucial Windows process that plays an important role in our system’s functioning. This process usually requires a minimal amount of our system’s graphic resources to function. But, for some users, it’s using a lot of their system’s GPU resources and ruining their experience with their Windows 11 PC.
If you were also facing the Desktop Window Manager high GPU usage issue on your Windows 11 PC, then we hope it got fixed after trying the workarounds we shared in this detailed guide. If yes, then do let us know which workaround fixed the issue for you.
If the Desktop Window Manager (dwm.exe) was constantly spiking your GPU usage up to 100% on your PC, you’ve come to the right place. The high GPU usage issue with Desktop Window Manager is not new, but there always have users who encounter this problem and we’ve collected all the working fixes for you.
Try these fixes:
There’re 4 fixes that have helped many gamers solve their problems. You don’t have to try them all; just work your way down the list until you find the one that works for you.
- Update your graphics drivers
- Turn off “Hardware-accelerated GPU scheduling”
- Update the Windows system
- Run a malware scan
Fix 1 – Update your graphics drivers
The dwm.exe composites the display of application windows and the graphics driver is an essential function of Desktop Window Manager. The corrupted or outdated graphics driver on your PC is likely to cause issues. You can update graphics drivers to fix the issue.
There are mainly two ways you can update the graphics driver:
Option 1 – Manually – Graphics card manufacturers will roll out graphics drivers optimized for the latest titles on a regular basis. You can download the most recent correct driver from their websites (AMD or NVIDIA) and install it manually.
Option 2 – Automatically (Recommended) – If you don’t have the time, patience or computer skills to update your video driver manually, you can, instead, do it automatically with Driver Easy. Driver Easy will automatically recognize your system and find the correct drivers for your exact GPU, and your Windows version, and it will download and install them correctly:
- Download and install Driver Easy.
- Run Driver Easy and click the Scan Now button. Driver Easy will then scan your computer and detect any problem drivers.

- Click the Update button next to the flagged graphics driver to automatically download the correct version of that driver, then you can manually install it (you can do this with the FREE version).
Or click Update All to automatically download and install the correct version of all the drivers that are missing or out of date on your system. (This requires the Pro version which comes with full support and a 30-day money back guarantee. You’ll be prompted to upgrade when you click Update All.)


The Pro version of Driver Easy comes with full technical support.
If you need assistance, please contact Driver Easy’s support team at support@drivereasy.com.
Fix 2 – Turn off “Hardware-accelerated GPU scheduling”
There are users who reported that turning off “Hardware-accelerated GPU scheduling” finally fixed the issue for them.
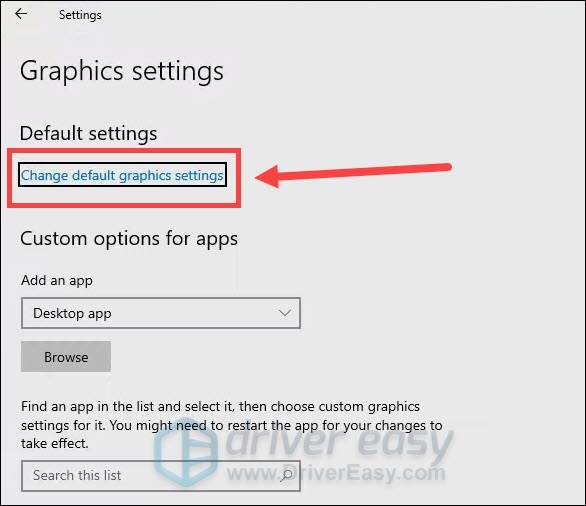
- On your keyboard, press Win+ I (the Windows logo key and the i key) to open the Windows Settings.
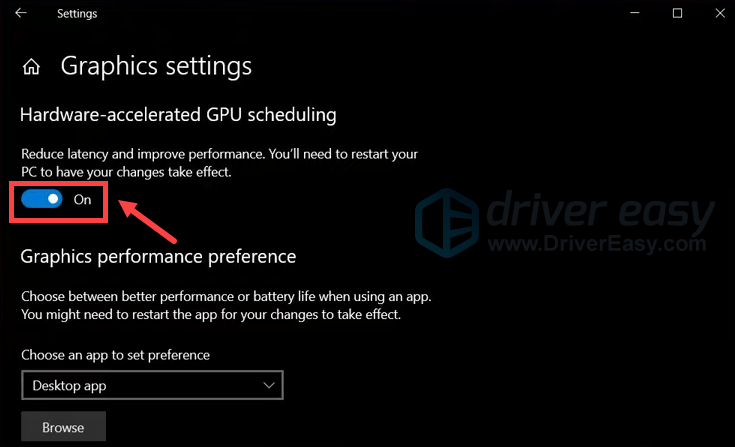
- Click System > Display > Graphics. Click Change default graphics settings.

- Disable Hardware-accelerated GPU scheduling, then restart your PC for changes to take effect.

Fix 3 – Update the Windows system
The Desktop Window Manager high GPU usage issue can be caused by the outdated operating system. Therefore, performing a Windows update may help you fix the issue.
- On your keyboard, press Win+I (the Windows logo key and the i key) to open the Windows Settings app. Click Update & Security.

- Click Check for updates. Windows will then download and install the available patches. It might take some time (up to 30 mins).

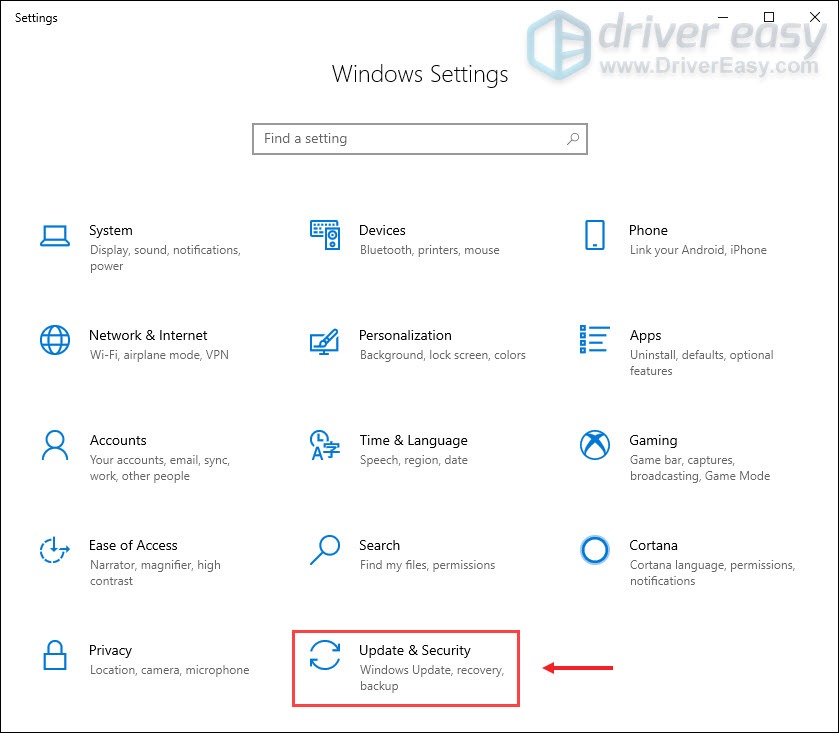
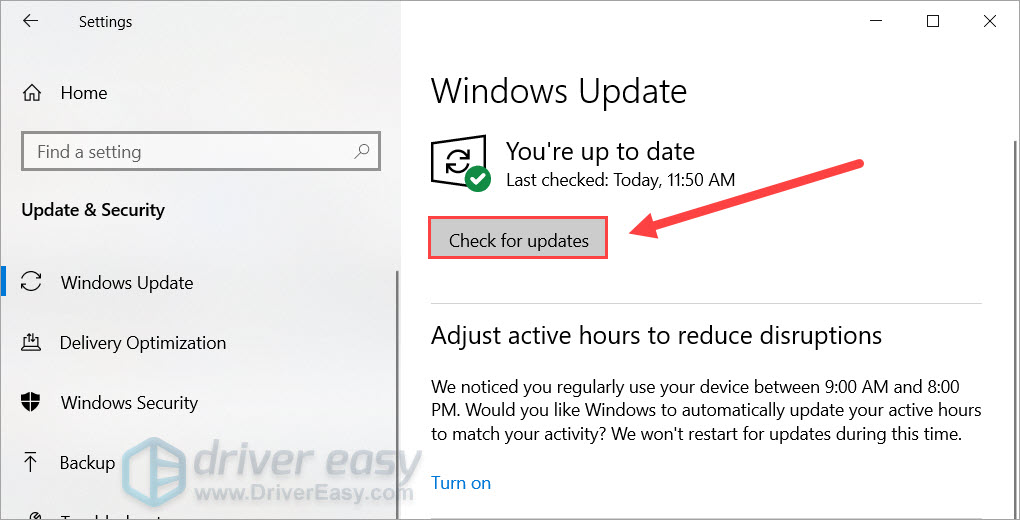
To confirm you’ve installed all the system updates, repeat these steps until it prompts “You’re up to date” when you click Check for updates.
Fix 4 – Run a malware scan
Malware is another well-known cause of the Desktop Window Manager high GPU usage issue. Malware can disguise its process as the dmw.exe and raise the utilization. Running a malware scan can fix the issue for you.
That’s all about the Desktop Window Manager high GPU usage issue on Windows 10 and 11. Hope this post would help. If you have other working fixes, suggestions, or ideas, you’re welcome to drop comments below.
1
1 people found this helpful
How to Fix Desktop Window Manager High GPU and Memory Usage in Windows 11
Sometimes Desktop Window Manager (dwm.exe) starts hogging Graphics Processing Unit (GPU) or memory (RAM) resources when it shouldn’t. This article will show you how to fix this problem.

Desktop Window Manager is responsible for rendering the Windows desktop environment, which is a significant part of the GUI. Usually, wdm.exe doesn’t use much of the GPU’s processing power, but it ends up causing high GPU usage due to some arbitrary reasons.
Many users reported that GPU usage by Desktop Window Manager spikes to 70% or even 100% when running an app and its main window is visible or a video game. This problem is known to occur in Windows 11 and Windows 10.
Why Is Desktop Window Manager Using So Much GPU?
The issue can be caused by outdated GPU drivers or overloading the Desktop Window Manager process with many desktop processes and activities that require more resources than normal.
Some have noticed that Desktop Window Manager started causing high GPU or memory (RAM) usage after a Windows update. It has been said that an update might contain bugs that cause dwm.exe to overuse GPU resources.
In some cases, the Xbox Game Bar causes Desktop Window Manager to use more GPU/Memory than normal. We suggest uninstalling the Xbox Game Bar and checking if that fixes the issue.
Video Guide on How to Fix Desktop Window Manager High GPU/Memory Usage
Table of Contents:
- Introduction
- Method 1. Update the Graphics Card Driver
- Method 2. Run the Hardware and Devices Troubleshooter
- Method 3. Set Desktop Window Manager Priority to Normal
- Method 4. Turn Off Visual Effects
- Video Guide on How to Fix Desktop Window Manager High GPU/Memory Usage
Download Computer Malware Repair Tool
It is recommended to run a free scan with Combo Cleaner — a tool to detect viruses and malware on your device. You will need to purchase the full version to remove infections. Free trial available. Combo Cleaner is owned and operated by Rcs Lt, the parent company of PCRisk.com read more.
Method 1. Update the Graphics Card Driver

1. Right-click the Start menu button and select Device Manager.

2. Expand the Display adapters list.
3. Select your display adapter (graphics card), right-click it, and click Update driver.

4. Select Search automatically for drivers.
5. Windows will download and install the drivers.
You can also manually download the graphics card drivers for Intel, Nvidia, and AMD from their respective websites.
[Back to Table of Contents]
Method 2. Run the Hardware and Devices Troubleshooter
1. Hold down Windows+R keys to open Run.
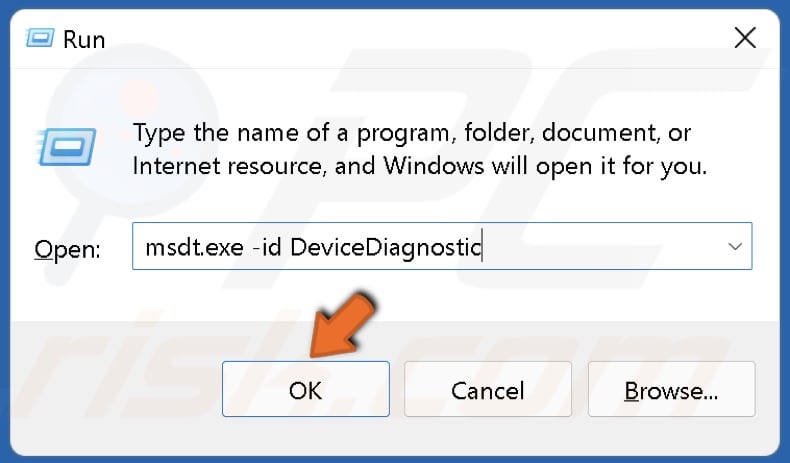
2. In the Run dialog box, type in msdt.exe -id DeviceDiagnostic and click OK.
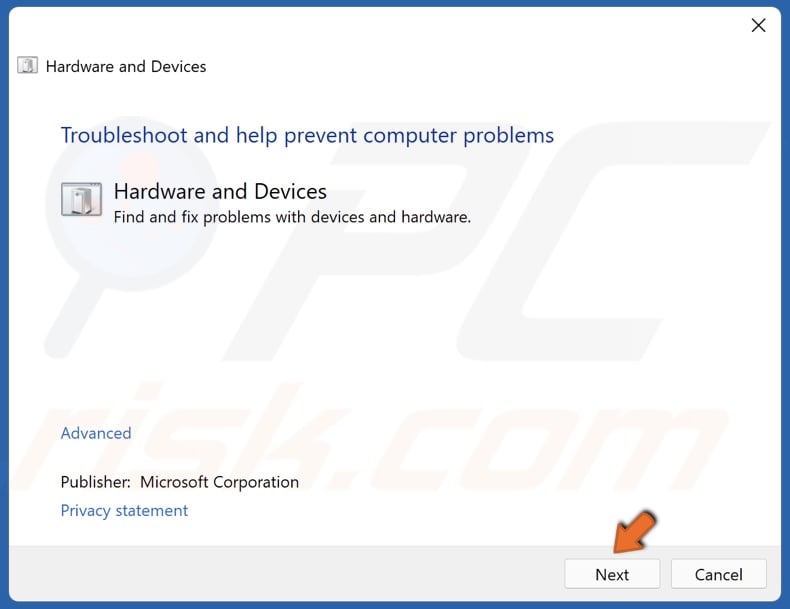
3. Click Next in the Hardware and Devices troubleshooter window.
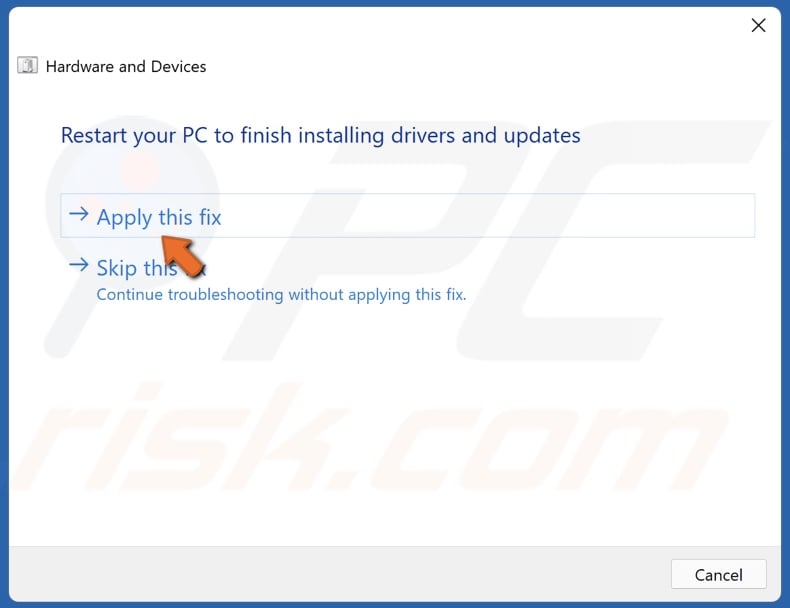
4. Apply the suggested fixes and close the troubleshooter.
[Back to Table of Contents]
Method 3. Set Desktop Window Manager Priority to Normal
1. Hold down Ctrl+Shift+Esc keys to open Task Manager.
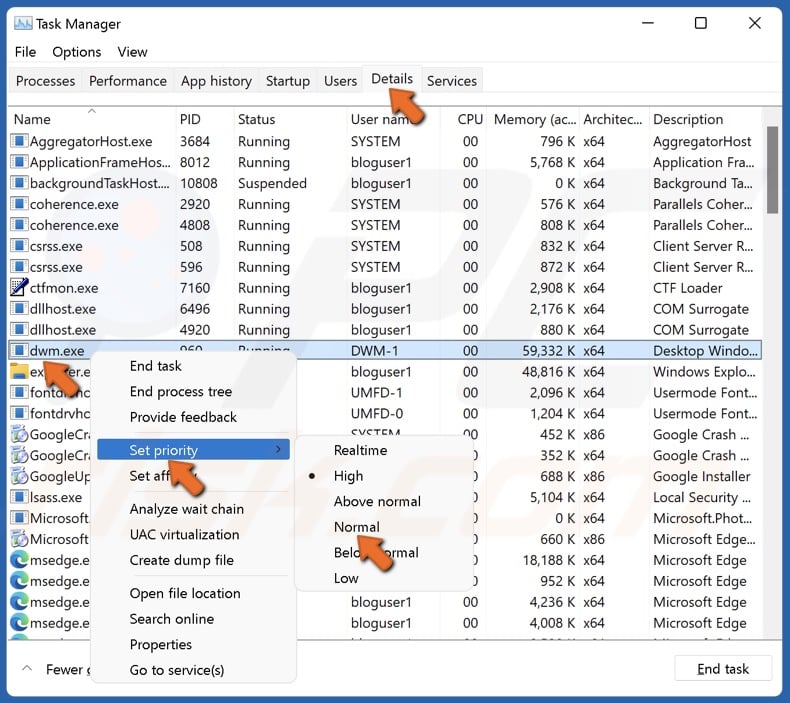
2. Select the Details tab.
3. Find dwm.exe, right-click it, select Set priority, and click Normal.
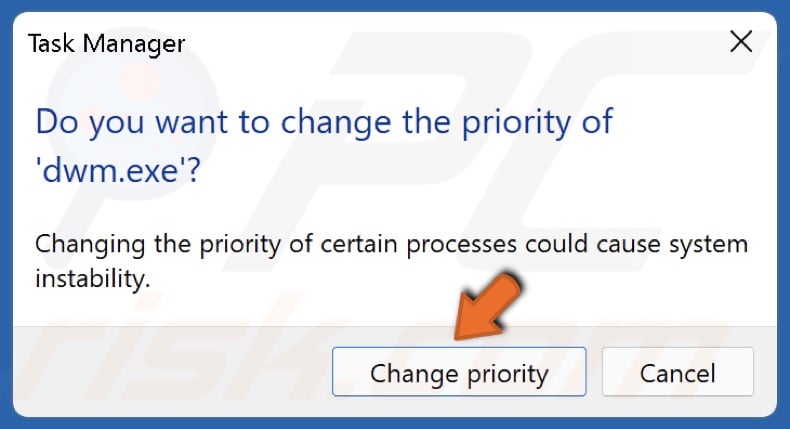
4. Click Change priority to confirm.
[Back to Table of Contents]
Method 4. Turn Off Visual Effects
1. Hold down Windows+R keys to open Run.
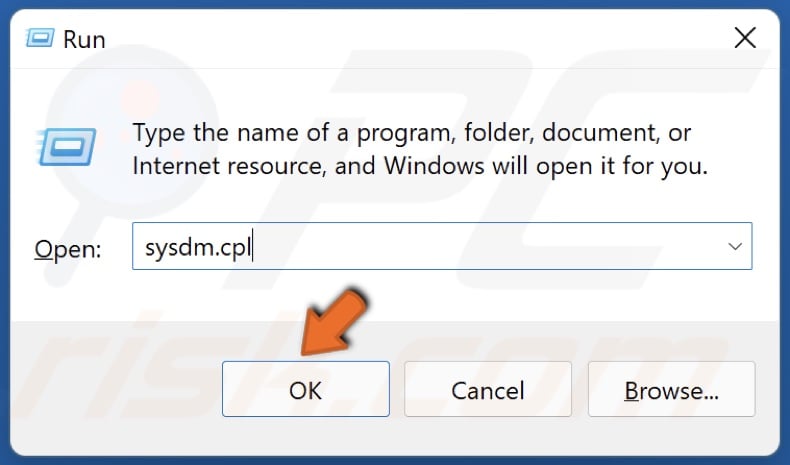
2. In the Run dialog box, type in sysdm.cpl and click OK.

3. In the resulting System Properties window, select the Advanced tab.
4. Under the Performance section, click Settings.
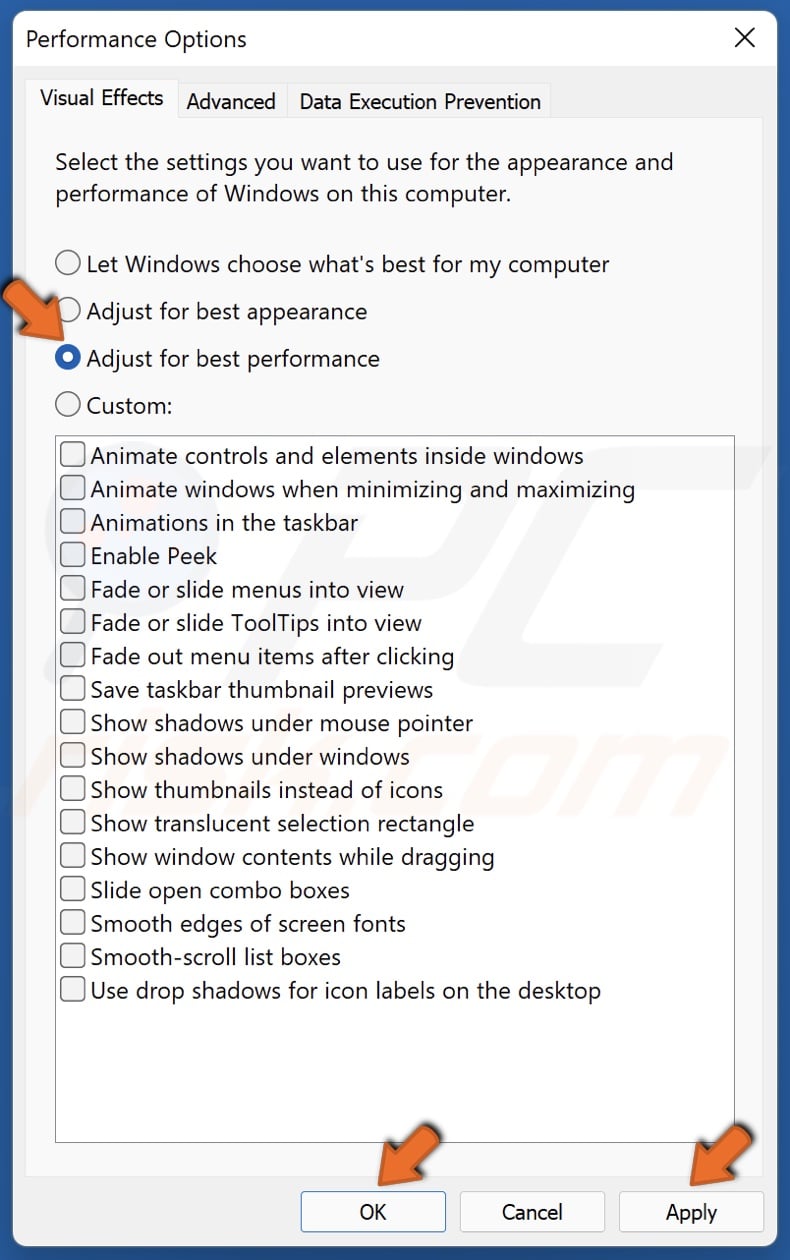
5. Tick the Adjust for best performance option.
6. Click Apply and click OK.
7. Alternatively, you can select Custom and only disable the options you want.
If none of the proposed methods work, try turning off Fast startup in Windows 11 Power Options and uninstalling the Xbox Game Bar. If you haven’t tried that already, try changing the background image to a solid color and disabling Transparency effects in Personalization settings.
[Back to Top]
Are you facing a ‘desktop Window manager high GPU’ issue on Windows 10, 11 PC? Don’t worry, we can help you! In this article, you will learn different simple and effective ways to fix this problem.
Desktop Windows Managers aka DWM.exe is the system manager that generates your PC’s user interface by using the graphics card onto your display screen or monitor. It stimulates all of the visual effects that display like animations, transparent windows, live thumbnails, wallpapers, and themes. Well, it is quite an old methodology that was originally introduced back on Windows Vista or XP and has since become an integral part of Windows PCs.
Recently, many users have reported desktop window manager high GPU usage issues on Windows 11 or 10 PC. Struggling with the same issue? Nothing to worry about, after reading this article, you will know exactly how to deal with this inconvenience.
Hassle-Free Way to Fix Desktop Window Manager High GPU in Windows 10/11
Updating graphics drivers from time to time helps you avoid issues like Desktop Window manager high GPU in Windows 10, 11 PCs. To do so with ease, you can use Bit Driver Updater. The tool automatically scans your device for outdated, problematic, or faulty drivers and provides you with the latest and compatible drivers for your system. Also, with this tool, you can also schedule the driver updates as per your requirements. You can give Bit Driver Updater a try from the button provided below.
How to Fix Desktop Window Manager High GPU in Windows 11, 10
Have a look at the solutions mentioned below to fix desktop Window manager high GPU in Windows 10 or 11 PC.
Fix 1: Modify Display Settings
Since desktop window manager is related to display effects, hence try to alter the display settings first whenever you run into a Windows desktop manager high GPU issue. Here is how to do that:
Step 1: Altogether press Windows and I keyboard keys to invoke Windows Settings.
Step 2: Click on System to proceed.

Step 3: Choose Display from the left menu, then under the Scale and Layout, click on Advanced scaling settings.
Step 4: After that, set the toggle button to off under the Let Windows try to fix apps so they’re not blurry.

Once done, close the window, and reboot your computer to apply the changes. Thereafter, check to see if the desktop window manager high GPU on Windows 10 is fixed. If not, then try other solutions mentioned below.
Also Read: Fix Windows 10 Computer Freezes Randomly Issue Easily
Fix 2: Perform System Maintenance
Running system maintenance can help you find and fix numerous computer issues. It may also help you bypass the desktop window manager high GPU usage in Windows 11, 10. Follow the steps below:
Step 1: Press Windows + R keys together to open the Run terminal. Then, type control in the run box and hit Enter key on your keyboard.
Step 2: This will launch the Control Panel, here you need to first set View by as Large icons.
Step 3: Then, click on Troubleshooting.
Step 4: On the left, click on View All.
Step 5: Navigate to System Maintenance and click on it.
Step 6: After that, click on Next and select Try Troubleshooting as an Administrator.

Step 7: Once the process is finished, click on Close and reboot your computer.
Now, check whether the desktop window manager high GPU is resolved or still persisting.
Fix 3: Update Outdated Graphics Drivers
Outdated, corrupted, or missing drivers are majorly responsible for numerous PC problems. Likewise, if you are using faulty or obsolete graphics drivers, then you may encounter high CPU usage issues in your Windows PC. Therefore, to avoid such issues, you need to ensure that you are using an updated version of graphics drivers.
If we talk about updating the graphics drivers, then you can do it either manually or automatically.
Manual Driver Update: You can search for the latest version of GPU drivers on the official website of the graphics card manufacturer like Intel, AMD, NVIDIA, and more. Then, you can download and manually install the compatible drivers on your own. But do keep in mind that this requires a lot of time, patience, and a good amount of technical knowledge.
Automatic Driver Update: Manual driver downloads can be tiring and error-prone, especially for newbies. Hence, we recommend you to use Bit Driver Updater in order to automatically update all your outdated PC drivers. Bit Driver Updater just takes 2-simple clicks of your mouse to install all the latest PC drivers on your system.
It automatically recognizes your system and finds the correct drivers for it. The best thing about this software is that it installs only WHQL tested and certified drivers. Apart from that, it speeds up PC performance by cleaning the system junks. The driver updater tool also creates a backup of older drivers before updating, so users can restore them if required. To use Bit Driver Updater, all you need to do is just follow the steps outlined below:
Step 1: Download and install Bit Driver Updater.
Step 2: Run the driver updating program on your computer and click Scan.

Step 3: Wait for the scanning to be 100% completed.
Step 4: Check the scan results and click on the Update Now button shown next to the outdated graphics drivers. Furthermore, you can also update all outdated drivers with one click by clicking on the Update All button.

But, when you click on the Update All button then you will be prompted to upgrade to the pro version of the Bit Driver Updater. With the paid version, you will also get round-the-clock technical support and a 60-days full money-back guarantee.
After installing the latest version of drivers, the desktop window manager high GPU issue should get resolved.
Frequently Asked Questions Related to Desktop Window Manager High GPU Issue
Below are some most commonly asked questions regarding the Desktop Window Manager high CPU usage that you should know.
What is a Desktop Window Manager?
Desktop Window Manager is an essential system process that generates all the effects in Windows like live taskbar thumbnails, transparent windows, Flip3D, and more. This process composites the display of program windows before drawing it to your computer screen.
Why is Desktop Window Manager Using So Much GPU?
There could be various reasons why Desktop Window Manager causes high memory usage issues including out-of-date graphics drivers, performance issues, too many programs running in the background, faulty display settings, and more. In addition to this, if you have recently updated your Windows OS version, then it’s likely to happen that there might be something wrong with the latest update. Possibly, the recent update contains some sort of bugs that cause the desktop windows manager to use GPU power excessively for no reason.
Also Read: Fix Flickering Screen Issues on Windows
Desktop Window Manager High GPU on Windows 11, 10: FIXED
The aforementioned were some of the most workable resolutions that you can consider to fix the ‘Desktop Window Manager High GPU’ issue on your Windows PC. We hope you find this article helpful.
If you have any questions or better suggestions then drop us a line in the box below. Additionally, if you want to read more useful articles related to technical issues then do subscribe to our Newsletter. Along with this, you can also follow us on our Social Media Channels: Facebook, Twitter, Instagram, and Pinterest.
Windows 11/10 PC users can often experience Desktop Window Manager high GPU issues. Desktop Window Manager or DWM.exe is the system manager that generates each element visible on your PC/Laptop. Additionally, it is in charge of stimulating all the visual effects in Windows’ menus, transparency components, wallpapers, themes, thumbnails, and system animations. The inbuilt graphics card is often used by Desktop Window Manager to meet all the needs.
In layman’s terms, “the system function DWM or Desktop Windo ws Manager uses the graphics hardware of your PC/Laptop to display each component of the User Interface you’re interacting with on your monitor/display.”
Also Read: How to fix NVIDIA Container high CPU usage on Windows
According to many users, lately, DWM is consuming a lot of GPU resources even when no resource-intensive applications are active…
Having said that, it can be beneficial to learn the causes of the problem before moving further.
Read Also: 10 Best Free GPU Benchmark Software for Windows
Causes Behind DWM High GPU Usage
Although DWM high GPU consumption is more software-related problem, your PC can experience the issue for a variety of different reasons. Following is a list of the most frequent reasons:
- Hardware-Accelerated GPU scheduling is On.
- The Windows version is outdated.
- The Graphics driver is corrupted or outdated.
- Damaged/Corrupt System files.
- Incorrect settings in the NVIDIAControl Panel.
Even when the PC/Laptop is inactive, users have reported seeing GPU consumption of more than 70%, which is abnormal. DWM typically uses the GPU between 1% and 3% of the total.
Now that you know what’s causing this continue reading to learn how to fix the Desktop Window Manager High GPU usage problem on your computer.
Read Also: How to Speed Up Windows 11 and Improve Performance (15 ways)
Fix Desktop Windows Manager High GPU Usage
No matter what is causing DWM’s high GPU consumption issue, there’re ways to fix it.
1. Keep Your Windows OS Updated
If you haven’t updated your computer in a while, there’s a good chance that a straightforward update may solve your issue.
- Press the Windows key with the key I to open Windows Settings.
- From the left side of the pane, look down and click on the Windows Update option.

- Now hit the Download & Install option for downloading any major or minor updates.

- Then check to see if the problem was solved.
Read Also: Microsoft’s PC Manager – Will It Help Boost PC Performance?
2. Disable Visual Effects
Turning off all visual effects is a useful cure for Desktop Windows Manager using a lot of GPU resources. As a result, your PC should operate more smoothly.
- Press the Search icon from the Taskbar and type Performance of Windows and click on the first option from the results.

- Under the Visual Effects tab, choose the option Adjust for best performance to lower the DWM high GPU usage.


- Then press the Apply button and choose ok.
3. Use Task Manager
The task level is set to “High Priority” which is one of the recognized reasons why DWM consumes all of the GPU memory. You only need to switch the task level to “Efficiency Mode.”
- Press the Ctrl + Shift + Esckeys together to open the Task Manager.
- Under the Processes tab, look for Desktop Window Manager and right-click on it.
- Now from the context menu choose Efficiency mode.

Image Credit: Allthingshow
- Restart your computer to see whether the problem has been fixed.
Read Also: Windows 11’s Task Manager is soon going to get a Search Bar feature
4. Turn Off GPU Hardware-Accelerated GPU scheduling
DWM uses the GPU heavily when GPU Hardware-Accelerated GPU scheduling is on your PC/Laptop. Simply turning off this via Windows Settings has helped many users fix the problem. To do so follow the steps below:
- Press the Windows key with the key I to open Windows Settings.
- From the left side of the pane, look down and click on the System button and then click on Display.

- Now hit the Graphics option under the Related settings options from the left side of the screen.

- To turn off Hardware-Accelerated GPU scheduling, click on the toggle button.

Image Credit: Technewstoday
- To apply the modifications, restart your PC.

Image Credit: Technewstoday
5. Update Your Graphics Driver
The high GPU consumption could be brought on by outdated or corrupted drivers. In this situation, updating the GPU driver will fix the issue. Follow the steps below:
- Press the Windows key with the key X to open the WinX Tap on Device Manager.
- Now double-click on the Display adapter option and right-click on your graphics card.

- Tap on Update driver and then choose Search automatically for drivers.

Read Also: Device Manager not Working on Windows 11? Here’s the Fix! (5 Solutions)
Using specialized software, such as Advanced Driver Updater, can help you avoid taking the steps listed above and maintain regular driver updates for your PC. Follow these steps to use it:
- Download & Install Advanced Driver Updater.
- Open the application and tap on Start Scan Now.

- Now choose your graphics driver and tap on the Update Driver button against it.

- Restart your computer to see whether the DWM high GPU usage has been fixed.
To Wrap This Up
So that’s it for today. You can quickly fix the Desktop Window Manager High GPU Usage problem on your Windows 11 PC by using the solutions listed above. Also, if you know o any other workarounds to resolve the discussed issue then do tell us in the comments below. And for more such troubleshooting guides and tips & tricks related to Windows, Android, iOS, and macOS, follow us on Facebook, Instagram, and YouTube.
Next Read: How to Fix Desktop Window Manager High CPU (DWM.exe)