
Dism Host Servicing Process — системный процесс, который что-то делает, но что — непонятно. Информации в интернете очень мало. Но кажется мне удалось узнать — если Dism Host Servicing Process грузит процессор, то все дело может быть в том.. что идет подготовка Windows для крупного или важного обновления. Эту информацию я нашел на официальном сайте Microsoft.
В общем все что я находил в интернете, указывает на связь Dism Host Servicing Process с обновлениями.
Также нашел информацию, что для решения проблемы нагрузки, можно попробовать выполнить эти команды:
dism /online /cleanup-image /restorehealth
dism /online/cleanup-image/CheckHealth
dism /online/cleanup-image/scanhealth
Команды нужно выполнять в командной строке, запущенной от администратора.
Запуск командной строки от администратора
Dism Host Servicing Process грузит — возможно на ПК есть вирусы?
Еще нашел информацию, что Dism Host Servicing Process может грузить ПК когда в системе произошла ошибка или когда присутствуют вирусы. Проверить ПК на вирусы никогда не будет лишним, уж поверьте. Проверить советую двумя утилитами:
- Dr.Web CureIt! — утилита для обнаружения опасных вирусов, таких как троян, черви всякие, ботнеты. Одна из лучших утилит. Работает быстро, скачивается уже вместе с актуальными антивирусными базами.
- AdwCleaner — утилита попроще, но зато ищет в прямом смысле вредные и надоедливые вирусы — рекламные. Они не крадут ваши личные данные, но зато могут показывать рекламу на рабочем столе, на сайтах, и все для этого делают. И в ярлыках прописывают вирусные сайты и создают левые задания в планировщике, устанавливаюсь странные расширения в браузерах. Со всем этим утилита прекрасно справляется.
Не знаю поможет или нет, но все же — попробуйте восстановить работу Windows до того времени, когда еще не было проблемы. Для этого зажмите Win + R, вставьте команду control sysdm.cpl, потом нажмите ОК. Перейдите на вкладку Защита системы, выберите системный диск и нажмите кнопку Восстановить. Попробуйте вернуть состояние ПК до возникновения проблемы.
На форуме Microsoft также нашел ссылку — Исправление ошибок в центре обновлений. Одному человеку данное руководство помогло, поэтому советую и вам глянуть:
https://support.microsoft.com/ru-ru/help/10164/fix-windows-update-errors
Один юзер написал, что нужно остановить службу центра обновлений.
На заметку:
- Чтобы зайти в список служб — зажмите Win + R, и укажите команду services.msc, далее нажмите ОК, в списке найдите Центр Обновления или Windows Update и попробуйте остановить.
- Сделайте перезагрузку.
- И посмотрите — будет ли снова грузить процессор?
Еще пользователи пишут — после обновления проблема с Dism Host Servicing Process исчезает.
Появилась мысль — а может просто стоит.. оставить ПК на ночь, пусть он подготавливается, может хватит столько времени виндовсу и она все сделает что ей там нужно?
Еще может быть и ошибка такая:

На этом все ребята. Информации в интернете почти нет, поэтому сори, что не особо то и помог вам информационно. Удачи.
На главную!
25.10.2018
Download Windows Speedup Tool to fix errors and make PC run faster
Some users are reporting that they are seeing DISM Host servicing process high CPU, disk, and memory usage which is impacting other processes. In this guide, we have a few fixes that can help you get rid of this.

What is Dism Host Servicing Process?
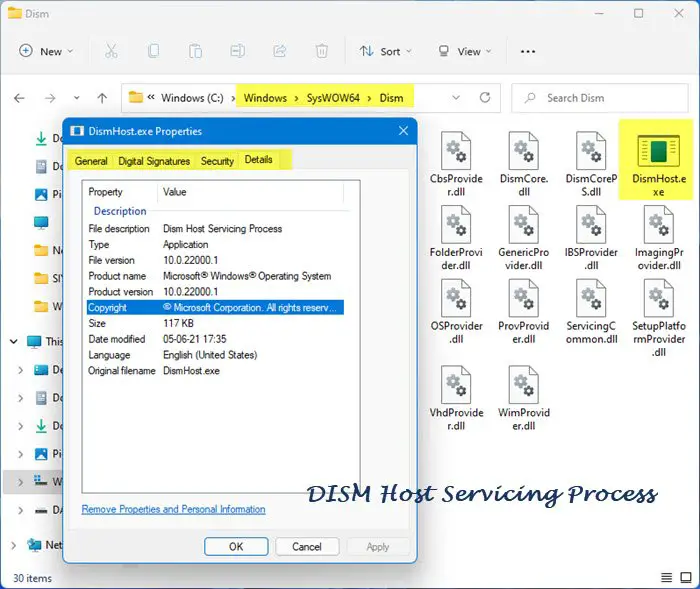
The Deployment Image Servicing and Management (DISM) process is a command-line tool that is used to service a Windows image and fix various errors related to the image files of Windows. It generally is located in C:\Windows\System32\dism or C:\Windows\SysWoW64\dism. If it is located anywhere other than any of those folders, you should be aware of it and scan with antivirus or antimalware tools and get rid of it.
Many Dynamic Link Libray (DLL) files run through the Dism Host Servicing Process (DismHost.exe) as it executes their command-line parameters. That is why we see it running in the background in the Task Manager.
If DismHost.exe is located in the System32 or SysWOW64 folder and its Properties show it copyrighted to Microsoft, then it is the legit system process – else it could be malware. Here are the ways to check if a file is a virus or not:
- Check Location and Properties
- Right-click the file and scan it with your security software
- Get it scanned with an Online Malware Scanner
- Check for Verified Publisher
- Verify File Integrity with Hash Value
- Use the Windows Sandbox feature.
If the DISM Host servicing process on your PC is using high CPU, disk, and memory, you can follow the following fixes to resolve it.
- Run SFC Scan
- Disable Superfetch Service
- Run Antivirus or Malware Scan
- Run DISM with a Repair Source
- Cloud Reset PC
Let’s see each detail in the method of these fixes.
1] Run SFC Scan
System File Checker (SFC) scan is run to restore missed or corrupted system files on Windows. There are chances that DismHost.exe is using a high CPU, disk, and memory due to a corrupted or missing system file. You need to run an SFC scan on your PC to fix it.
2] Disable Superfetch Service
Superfetch service is a built-in windows service that preloads the frequently used programs and files to speed up your PC. Sometimes, it may lead to high CPU usage by DismHost.exe. You need to disable it for the time being to free up some CPU usage. Disabling Superfetch service also stopped high CPU, disk, and memory usage by DismHost.exe for many users. Try this and see if it has fixed the issue.
3] Run Antivirus or Malware Scan
When you are seeing high CPU, disk, and memory usage by DismHost.exe, first run an antivirus or malware scan which would take care of the malware that is resulting in this. After the scan is done, restart your PC and check if the same problem persists.
4] Run DISM with a Repair Source
The other way to fix the issue is to run DISM using Windows installation as the repair source or use a Windows side-by-side folder from a network share, as the source of the files. To do this, run the following command:
DISM.exe /Online /Cleanup-Image /RestoreHealth /Source:C:\RepairSource\Windows /LimitAccess
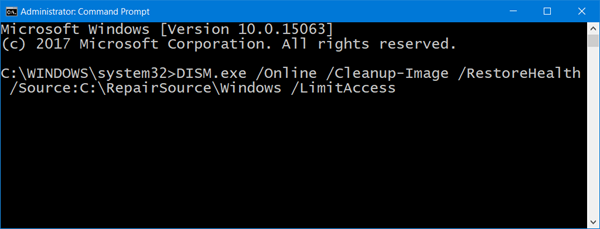
Here you have to replace the C:\RepairSource\Windows placeholder with the location of your repair source.
Once the process is complete, DISM will create a log file in %windir%/Logs/CBS/CBS.log and capture any issues that the tool finds or fixes.
5] Cloud Reset PC
The last option to fix the issue is to Cloud Reset your PC. It can be done from the Settings app. It downloads a fresh Windows version from the cloud onto your PC and uses it to reset or reinstall the PC. It should fix the issue as it uses new files downloaded from the cloud.
These are the ways using which you can resolve the issue with DismHost.exe.
Is it safe to end the DISM host servicing process?
No, it is not. DISM host servicing process is an important command-line tool that is used to make repairs and services to Windows Image files and also to prepare Windows Pre-Installation environment. It is a safe process which you can see in the Task Manager.
Can I delete DismHost?
No, you cannot. It has very important functions related to Windows image files and their repairs. You will break that chain if you delete DismHost and it might break the normal functioning of your PC.
Related Read: General tips to fix 100% Disk, High CPU, High Memory usage in Windows.
Guru is a Communications graduate with hands-on experience with computers, cameras, and editing tools. A tech enthusiast and a movie buff who loves writing about computers, he dreams of living a life devoid of all tech and modern-day advancements in a forest.
Reader Interactions
Windows 10 has several built-in tools that help to automatically analyze and repair corrupt files in your system. One such tool is DISM or Deployment Image Servicing and Management. It is a command-line tool that assists in servicing and preparing Windows images on Windows Recovery Environment, Windows Setup, and Windows PE. DISM works in those cases too, when the System File Checker is not working correctly. However, at times you may face DISM host servicing process high CPU Usage error. This article will discuss what is DISM host servicing process is and how to fix high CPU usage issues. Read till the end!

Table of Contents
What is DISM Host Servicing Process?
Despite the various advantages of the DISM host servicing process, there are many conflicts associated with DismHost.exe as well. Many users claim that it is an essential component of the Windows Operating system. However, some people do not agree with this claim as you cannot see its icon on the Taskbar. On the other hand, some antivirus applications consider it malware. Hence, the DISM host servicing process leads to various issues like:
- High CPU usage up to 90 to 100%
- Malware threat
- High bandwidth consumption
Read more about DISM here from the Microsoft website.
Read and implement the given solutions to fix DISM Host Servicing Process causing the High CPU Usage issue on Windows 10.
Method 1: Restart Your PC
Before trying out the rest of the methods, you are advised to reboot your system. In most cases, a simple restart fixes the issue, without much effort.
1. Press the Windows key and select the Power icon
Note: Power icon is found at the bottom in Windows 10 system, while in Windows 8 system, it is located at the top.
2. Several options like Sleep, Shut down, and Restart will be displayed. Here, click on Restart, as shown.
Restarting your system will refresh RAM and will lower CPU consumption.
Method 2: Disable SuperFetch (SysMain)
The startup time for applications and Windows is improved by a built-in feature called SysMain (formerly, SuperFetch). However, system programs do not benefit much from it. Instead, background activity is increased, leading to a reduction in the operational speed of the computer. These Windows services consume a lot of CPU resources, and hence, it is often, recommended to disable SuperFetch in your system.
1. Launch the Run dialog box by holding Windows + R keys together.
2. Type services.msc as shown and click OK to launch the Services window.

3. Now, scroll down and right-click on SysMain. Then, select Properties, as depicted.

4. Here, in the General tab, set the Startup type to Disabled from the drop-down menu, as highlighted below.

5. Finally, click Apply and then, OK to save the changes.
Also Read: Fix DISM Error 14098 Component Store has been corrupted
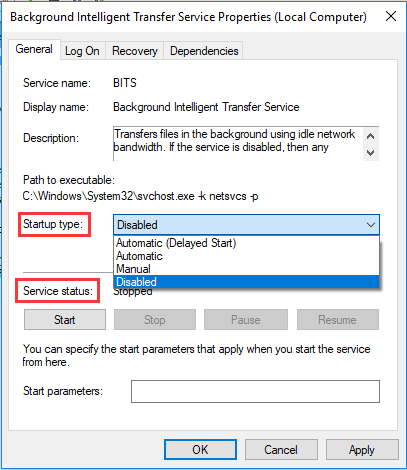
Method 3: Disable Background Intelligent Transfer Service
Similarly, disabling BITS will help fix DISM host servicing process high CPU usage error.
1. Navigate to the Services window using the steps mentioned in Method 2.
2. Scroll and right-click on Background Intelligent Transfer Service and select Properties.

3. Here, in the General tab, set the Startup type to Disabled, as depicted.

4. Finally, click Apply then, OK to save the changes.
Method 4: Disable Windows Search Service
Likewise, this process too takes up a lot of CPU resources and can be easily disabled to fix said problem, as explained below.
1. Again, launch the Services Window as mentioned in the above Method 2.
2. Now, right-click on Windows Search Service, and select Properties, as shown.

3. Here, in the General tab, set the Startup type to Disabled, as highlighted.

4. Click on Apply > OK and exit.
Also Read: Fix DISM Source Files Could not be Found Error
Method 5: Run Malware or Virus Scan
Windows Defender may not recognize the threat when a virus or malware uses the DismHost.exe file as camouflage. Thereby, hackers may easily intrude into your system. Few malicious software such as worms, bugs, bots, adware, etc. might also contribute to this problem.
However, you can identify if your system is under malicious threat through the unusual behavior of your Operating System.
- You will notice several unauthorized access.
- Your system will crash more frequently.
Few anti-malware programs can help you overcome malicious software. They routinely scan and safeguard your system. Therefore, to avoid DISM host servicing process high CPU usage error, run an antivirus scan in your system and check if the problem is solved. Follow the below-mentioned steps to do so:
1. Navigate to Windows Settings by pressing Windows + I keys together.
2. Here, click on Update & Security, as shown.

3. Click on Windows Security in the left pane.
4. Next, select the Virus & threat protection option under Protection areas, as depicted.

5A. Click on Start Actions under Current threats to take action against the listed threats.

5B. If you do not have any threats in your system, the system will display No actions needed alert.

6. Reboot your system and check if DISM high CPU usage error is fixed.
Method 6: Update/Reinstall Drivers
If the new drivers you have installed or updated in your system are incompatible or outdated in relevance to the operating system files, you will face the DISM host servicing process high CPU usage problem. Therefore, you are advised to update your device and drivers to prevent the said problem.
1. Launch Device Manager from the Windows 10 search as shown.

2. Double-click on System devices to expand it.

3. Now, right-click on your system driver and click on Update driver, as highlighted.

4. Click on Search automatically for drivers to let Windows locate and install the driver.

5A. Now, the drivers will update to the latest version, if they are not updated.
5B. If they are already in an updated stage, the screen displays: Windows has determined that the best driver for this device is already installed. There may be better drivers on Windows Update or on the device manufacturer’s website. Click on the Close button to exit the window.
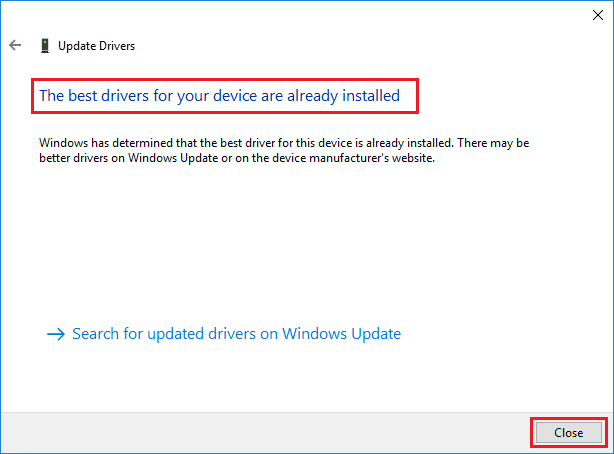
6. Restart the computer, and confirm that the high CPU usage issue is fixed.
In some cases, users could fix high CPU usage issue by reinstalling the drivers that were causing the said issue like Display or Audio or Network drivers.
1. Launch Device Manager and expand any section by double-clicking on it.
2. Now, right-click on the driver, e.g. Intel Display Adapter, and select Uninstall device, as shown.

3. Check the box titled Delete the driver software for this device and confirm the prompt by clicking Uninstall.
4. Now, visit the manufacture’s website and download the latest version of the said driver.
Note: You can download Intel, AMD, or NVIDIA display drivers from here.
5. Then, follow the on-screen instructions to run the executable and install the driver.
Note: When installing a new driver on your device, your system may reboot several times.
Also read: What is Device Manager? [EXPLAINED]
Method 7: Update Windows
If you did not obtain fix by the above methods, then installing the latest version of Windows should solve the DISM host servicing process high CPU usage issue.
1. Navigate to Settings > Update & Security as instructed in Method 5.
2. Now, select Check for Updates from the right panel.

3A. Follow the on-screen instructions to download and install the latest update, if available.

3B. If your system is already up-to-date, then it will show You’re up to date message.

4. Restart your PC to complete the installation.
Method 8: Reinstall DismHost.exe
Sometimes reinstalling DismHost.exe file can fix the DISM host servicing process high CPU usage issue.
1. Launch Control Panel through the Search Bar as shown below.

2. Set View by > Category and click on Uninstall a program, as depicted below.

3. Here, search for DismHost.exe and click on it. Then, select Uninstall.
Note: Here, we have used Google Chrome as an example.

4. Now, confirm the prompt by clicking on Uninstall.
5. In the Windows Search box, type %appdata% to open App Data Roaming folder.

6. Here, right-click on the DismHost.exe folder and click Delete.
Note: We have used Chrome as an example here.

7. Reinstall DismHost.exe from here and follow the on-screen instructions.
Also Read: Fix DISM Error 0x800f081f in Windows 10
Method 9: Perform System Restore
If you are still facing high CPU usage issue, then the last resort is to perform a system restore. Follow the steps below to do the same:
1. Launch Control Panel as mentioned above.
2. Set View by > Large icons and click on Recovery, as shown.

2. Click on Open System Restore option.

3. Now, click on Next.

4. Select the last update and click on Next, as shown highlighted below.

5. Finally, click on Finish to restore your Windows PC to the state where DISM Servicing Process wasn’t causing any issues.
Recommended:
- Fix DISM Error 87 in Windows 10
- How to Fix Git Merge Error
- Fix Device Not Migrated Error on Windows 10
- Fix There Are Currently No Power Options Available
We hope that this guide was helpful and you could fix DISM host servicing process high CPU usage issue. Let us know which method worked for you. Also, if you have any queries or suggestions, then feel free to drop them in the comment section.

Windows 10 is currently the most used operating system for computers. It offers various useful features and options to its user which makes this operating system highly flexible. But this is all possible with the help of several processes which keep running in the background in a Windows 10 PC at all times. All of these processes have a different use and benefit to the user. And one of these processes is the dismhost.exe which is quite important for proper functioning of Windows 10.
But sometimes you might face issues with these background processes in Windows 10. Today, we will be taking a look at such an issue where the user faces dismhost.exe dism Host Servicing Process High CPU Usage. In this article you will learn how to fix high CPU usage due to the dismhost.exe process. Apart from that you will also learn more about the importance of this process in Windows 10. Not only that but you will also find the possible reasons for high CPU usage caused due to this process.
Table of Contents
What is dismhost.exe DISM Host Servicing Process in Windows 10?
DISM Host Servicing Process is one of the most important processes found in Windows 10 that are running in your background. DISM Host stands for Deployment Image Servicing Management Host and it handles the process of mounting as well as unmounting the Windows Image File when your computer is installing updates. Due to this reason, the DISM Host process is always running in the background as without it Windows 10 might get corrupted while installing an update. This process handles the mounting and unmounting of Windows 10 on its own without needing user’s assistance.
Also DISM is life savior utility in Windows 10/8 & 7, when you have any problem with Windows 10 features or apps that stops working, and by using DISM you can restore corrupted or deleted system files easily and restore broken functionality. Lots of Windows 10 issues can be fixed by using DISM where SFC (System File Checker) fails to fix.
is dismhost.exe Malware or Virus?
dismhost.exe is found in temporary files and folder of Windows or the subfolders of user document’s folder. The usual location for dismhost.exe is C:\Users\USERNAME\AppData\Local\Temp\2E9B2DBD-13AA-4635-8A7F-2DF6476FCAEC\ or C:\Users\USERNAME\AppData\Local\Temp\69868891-5D94-42C8-BD85-3458784BB3DB\
The other locations where you may also find dismhost.exe are Windows/System32/DISM/ or C:/Users/Admin/local settings/temp
Although, the location of this executable file does make one suspicious as this file is related to Windows or not. But its 100% safe Windows executable process and not the virus or malware. Antivirus often ends up flagging dismhost.exe due to its behavior but its more like false positive and you can safely ignore it.
Learn how to fix Modern Setup Host high CPU Usage.
What Causes High CPU & Disk Usage by dismhost.exe
While this process works without any issues for the most part, sometimes the user might face issues in Windows 10 due to it. After Windows has installed an update, the dismhost.exe process might cause high CPU usage on your computer. This can be quite frustrating as it affect the performance of all other programs installed on your computer. Such an issue can be caused due to malware and other viruses present in your copmuter. Malware can use the dismhost.exe to carry out there operations which results in high CPU usage. Apart from that corrupted Windows updates or issues with the dismhost.exe process itself can also result in high CPU usage on Windows 10.
How to Fix dismhost.exe High CPU & Disk Usage
Now that you know that this issue can cause high CPU usage, fixing it becomes quite important. Because if you do not fix the dismhost.exe process right away, you will face a poor computing experience due to high CPU usage. But as this problem can be caused due to a number of reasons, there is no specific way to fix it. Instead, you have to try out different things to successfully fix the dismhoste.exe DISM Host Servicing Process High CPU Usage issue in Windows 10. You can do so on your Windows 10 PC by following the given steps one by one:
1. Disable Superfetch Service in Windows 10 via Services Utility
Superfetch is a very useful feature of Windows 10 as it pre-loads data into your memory. It simply instructs other processes on your computer to do so using CPU and memory of your computer. This means that if Superfetch instructs the DISM Host Servicing Process to do the same, it might result in high CPU usage. In such a case, the easiest fix for you is to simply disable the Superfetch process in Windows 10. And once it is disabled, DISM Host will stop using the CPU on your computer. So, if you are also facing the same issue on your computer, then you can disable Superfetch by following the given steps one by one:
Popular Stories Right now
2. Disable BITS in Windows 10 via Services Utility
As told earlier, the dismhost.exe is a process quite useful for Windows Updates. But there is another service in Windows 10 which is required for Windows Updates called BITS. BITS stands for Background Intelligent Transfer Service which essentially transfers the Windows Update files in the background. And this process also transfers the Windows Image which is mounted by the DISM Host Servicing Process. Therefore, any issue with the BITS service can cause high CPU Usage in dismhost.exe. So, if you are also facing the same issue on your computer, you can disable the Background Intelligent Transfer Service as shown in the given instructions:
-
Home
-
News
- Solved – DISM Host Servicing Process High CPU Usage
By Tina |
Last Updated
What is DISM host servicing process? How to fix the error DISM host servicing process high CPU? How to uninstall DismHost.exe? This post from MiniTool will demonstrate all solutions respectively.
What Is DISM Host Servicing Process?
DISM, whose full name is Deployment Image Servicing and Management, handles the process of mounting, unmounting the Windows Image files while installing the critical system updates. The DISM is a command line tool which can be used in the background to deploy and mount the Windows image safely.
However, as for the DISM Host Service process or DismHost.exe, there is some conflicting information. Some users claim that it is an important component of Windows operating system, while some antivirus programs regard it as the malware.
In my opinion, the DismHost.exe can’t be regarded as the component of the Windows operating system. You can’t see any window or can’t have an icon of this file on the Taskbar.
In addition, the DISM host servicing process may lead to several problems, such as:
- Be regarded as malware.
- Lead to the Service Host Local System network restricted problem.
- Lead to high disk /CPU usage, usually up to 90% – 100%.
- Consume Internet Bandwidth.
In general, the DISM host servicing process high CPU is the most common one. So, in the following section, we will show you how to solve the DISM Host Service Process high disk usage error.
How to Fix DISM Host Servicing Process High CPU
In this part, we will show you how to fix the error DISM host servicing process high CPU or high disk usage problem.
Method 1. Disable Superfetch Service
In order to fix the DismHost.exe DISM host servicing process high CPU problem, you can choose to disable Superfetch service.
Now, here is the tutorial.
- Press Windows key and R key together to open Run dialog.
- In the pop-up window, type services.msc in the box and click OK to continue.
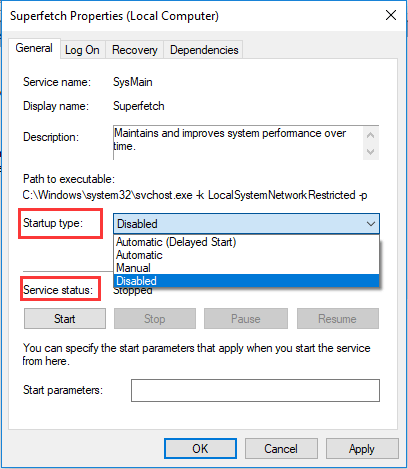
- In the Services window, find out the Superfetch and double-click it.
- In the Properties window, change the Startup type to Disabled and Service status to Stopped.
- Then click Apply and OK to save the changes.
When it is finished, reboot your computer and check whether the error DISM host servicing process high CPU is solved.
Method 2. Stop BIT Service
In order to fix the error DISM host servicing process Windows 10 high disk usage, you can choose to stop the BIT service.
Now, here is the tutorial.
- Press Windows key and R key together to open Run dialog.
- Then type services.msc in the box and click OK to continue.
- In the pop-up window, find out the Background Intelligent Transfer Service and double-click it.
- Then change the Startup type to Disabled and Service status to Stopped.
- Click Apply and OK to save the changes.
When it is finished, reboot your computer and check whether the error DISM host servicing process high disk usage is solved.
Method 3. Run Malware or Virus Scan
If virus or malware program uses the DismHose.exe file as its host, Windows Defender may not find it as a threat, and it will be used to steal and send information to the hackers. And it may give rise to the error DISM host servicing process high CPU.
So, in order to fix this DismHost.exe problem, you can choose to run malware or virus scan. Now, here is the tutorial.
- Press Windows key and I key together to open Settings.
- In the pop-up window, choose Update & Security.
- Go to Windows Defender tab, and click Open Windows Defender Security Center.
- Then choose Virus & threat protection.
- In the pop-up window, click Quick scan to continue.
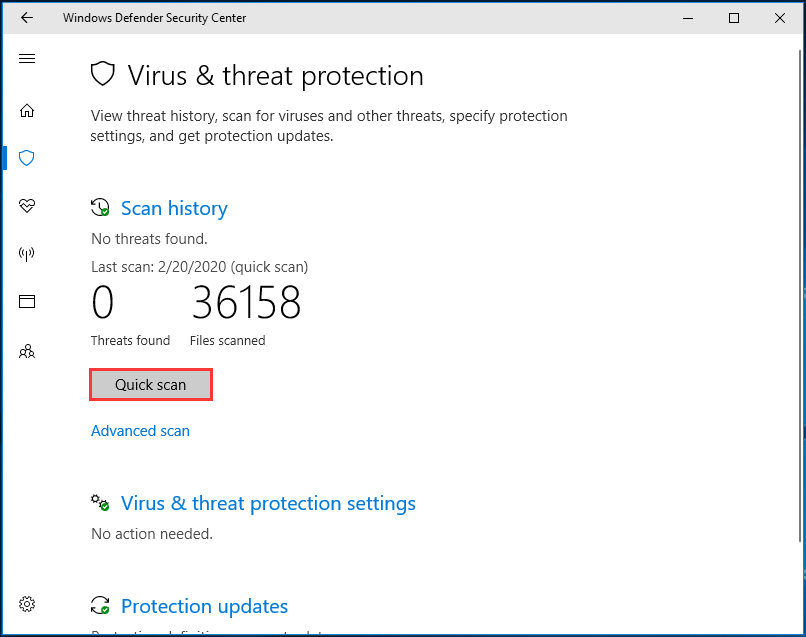
After the scanning process is finished, if there is any virus or malware on your computer, Windows Defender will remove it. After that, reboot your computer and check whether the DISM host servicing process high CPU error is solved.
Method 4. Uninstall DismHost.exe
As we have mentioned in the above part, the DismHost.exe is not a component of Windows operating system and it is often regarded as the virus or malware by the antivirus program. So, in order to fix the error DISM host servicing process high CPU, you can choose to uninstall DismHost.exe.
Now, here is the tutorial.
- Open Control Panel.
- Then choose Uninstall a program under Programs.
- Find out the program and right-click it to choose Uninstall.
- Then open C:/Program Files and find the folder with the name of DISM host servicing process. If you can’t find it, it means that the DismHost.exe has been removed.
- In addition, you can open Registry Editor window and navigate to HKEY_LOCAL_MACHINE> Software and see if the DISM host servicing process is here. If it is, remove it again.
After all steps are finished, reboot your computer and check whether the error DISM host servicing process high CPU is solved.
>> See what you can do if DISM /Online /Cleanup-image /Restorehealth is stuck.
Final Words
To sum up, this post introduced what the DISM host servicing process is and how to fix the DISM host servicing process high CPU error. If you have any different ideas to fix this problem, please share it in the comment zone.
About The Author
Position: Columnist
Tina is a technology enthusiast and joined MiniTool in 2018. As an editor of MiniTool, she is keeping on sharing computer tips and providing reliable solutions, especially specializing in Windows and files backup and restore. Besides, she is expanding her knowledge and skills in data recovery, disk space optimizations, etc. On her spare time, Tina likes to watch movies, go shopping or chat with friends and enjoy her life.