
Все способы:
- Причина 1: Проблемы с программным обеспечением
- Вариант 1: Обновление конфигурации оборудования
- Вариант 2: Переустановка драйвера
- Причина 2: Конфликт ПО
- Причина 3: Поврежденные ключи реестра
- Причина 4: Решение программных сбоев в работе привода
- Причина 5: Аппаратные неисправности
- Вопросы и ответы: 0
Причина 1: Проблемы с программным обеспечением
Чаще всего проблемы, из-за которых в дисководе не читается диск, тесно связаны с программным обеспечением первого. Например, вследствие какой-то системной ошибки драйвер повредился и возникли проблемы с чтением оптических носителей.
Вариант 1: Обновление конфигурации оборудования
Как правило, с CD/DVD-приводами (как встроенными, так и внешними) автоматически устанавливается программное обеспечение, которое взаимодействует с системой, обеспечивая стабильное и корректное функционирование компонента. Но, как уже говорилось, если произошел сбой и файлы ПО повредились, тогда стоит попробовать удалить драйвер, затем обновить конфигурацию оборудования для повторной установки программных компонентов в автономном режиме:
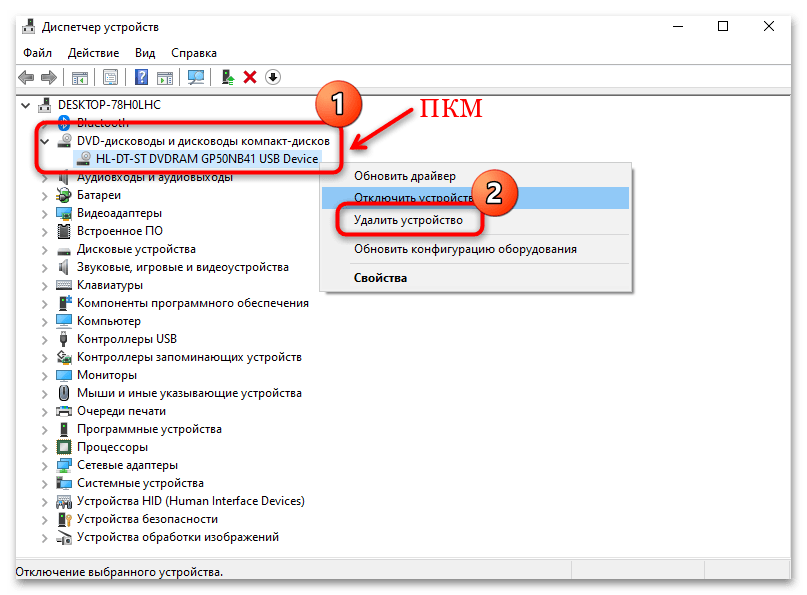
- Кликните правой кнопкой мыши по кнопке «Пуск» и запустите встроенное средство «Диспетчер устройств».
- Разверните меню «DVD-дисководы и дисководы компакт-дисков», затем нажмите правой кнопкой мыши по названию устройства и выберите пункт «Удалить устройство».
- Подтвердите действие.
- Далее нажмите по вкладке «Действие», расположенной на верхней панели интерфейса «Диспетчера устройств» и выберите «Обновить конфигурацию оборудования».
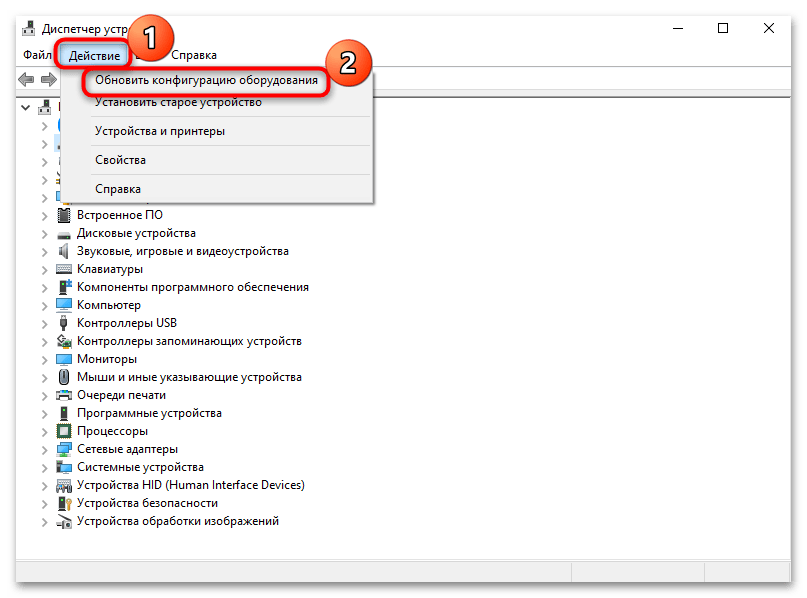
Также можно после удаления перезагрузить операционную систему – необходимый драйвер для привода (при условии, что он правильно подключен) будет инсталлирован автоматически.
Вариант 2: Переустановка драйвера
Редко, но случается так, что пользователю требуется вручную обновить или переустановить драйвер для дисковода. Тут также два варианта: обратиться к серверам компании для скачивания и установки актуального программного обеспечения или использовать базовый драйвер, который предустановлен в системе. Попробуйте выполнить их по очереди и проверить, в ПО ли проблема:
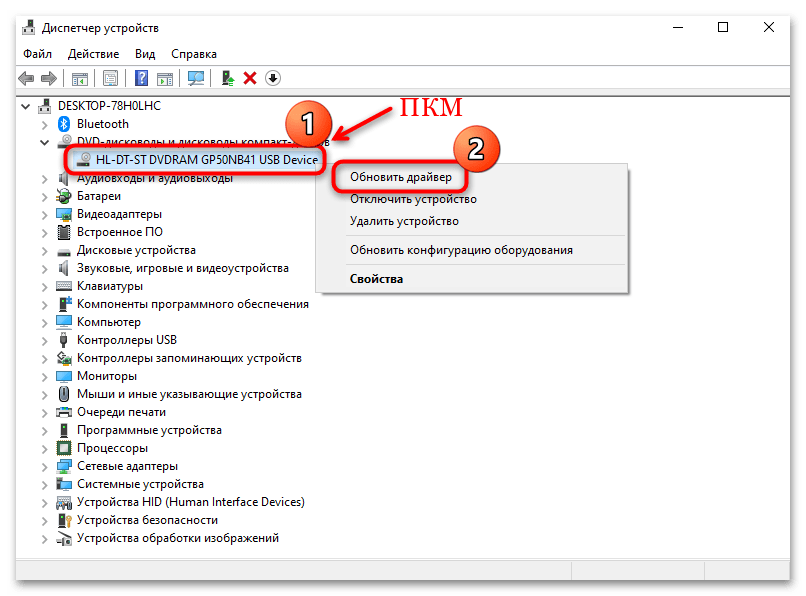
- Через «Диспетчер устройств» найдите дисковод (Вариант 1, Шаги 1 и 2), но из меню устройства выберите пункт «Обновить драйвер».
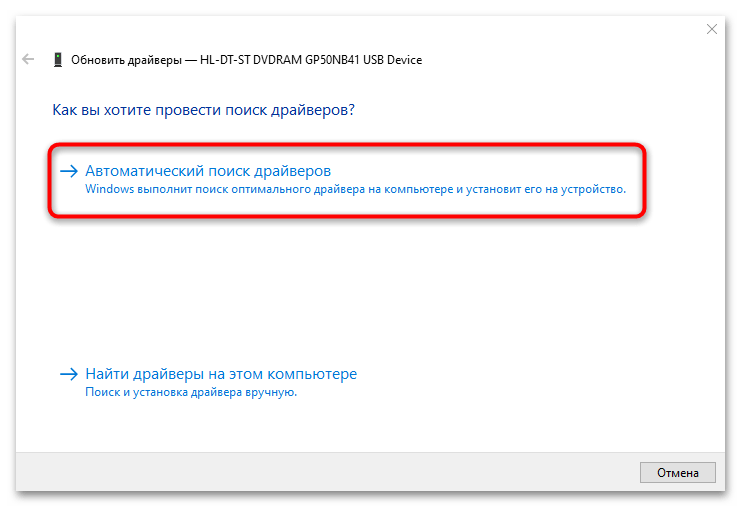
- Сначала выполните процедуру «Автоматического поиска драйверов». Если актуальное программное обеспечение будет найдено (для этого потребуется подключение к интернету), все необходимые компоненты будут инсталлированы самостоятельно.
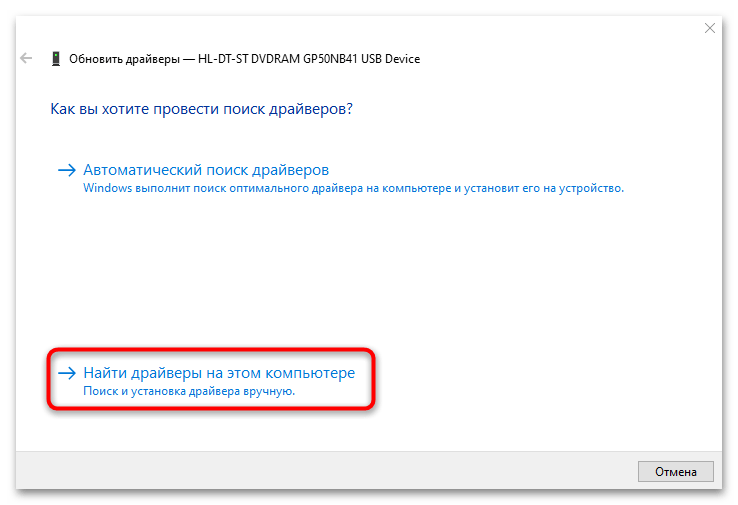
- Если предыдущий шаг никакого результата не принес, выполните ручной поиск драйверов. В окне с выбором поиска нажмите на строку «Найти драйверы на этом компьютере».
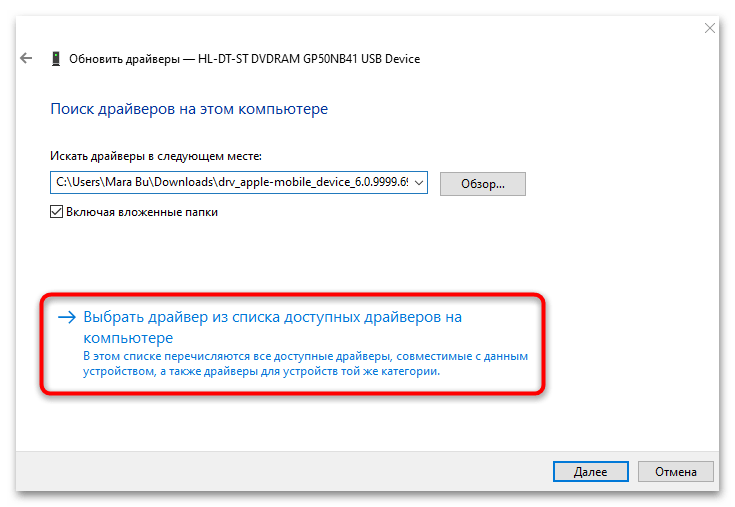
- Далее кликните по «Выбрать драйвер из списка доступных драйверов на компьютере».
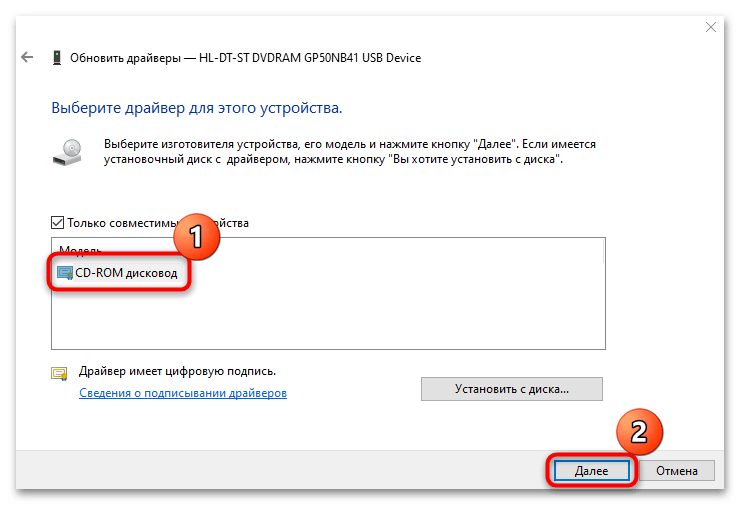
- Выберите подходящий драйвер (как правило, это базовый) и нажмите на кнопку «Далее».
После выполненных действий, вполне вероятно, программное обеспечение будет обновлено, и проблема с чтением компакт-дисков решится.
Также для обновления драйверов можно воспользоваться специализированным софтом, который позволяет быстро найти необходимые программные компоненты для всех устройств на компьютере и установить их в пакетном режиме или по отдельности. На нашем сайте есть обзор подобных инструментов с описанием и ссылками на скачивание.
Подробнее: Программы для обновления драйверов на ПК
Причина 2: Конфликт ПО
Если ранее вы устанавливали программы для работы с оптическими носителями или для создания виртуальных приводов (например, Daemon Tools, Nero или Alcohol 120%), тогда есть вероятность, что именно они создают подобную проблему из-за конфликта программного обеспечения. В этом случае поможет удаление такого софта:
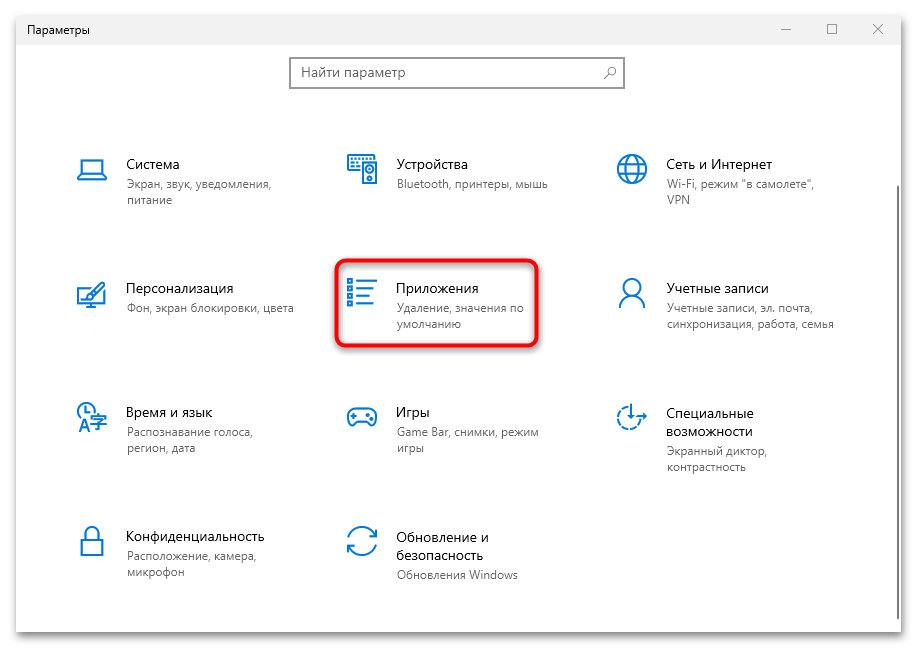
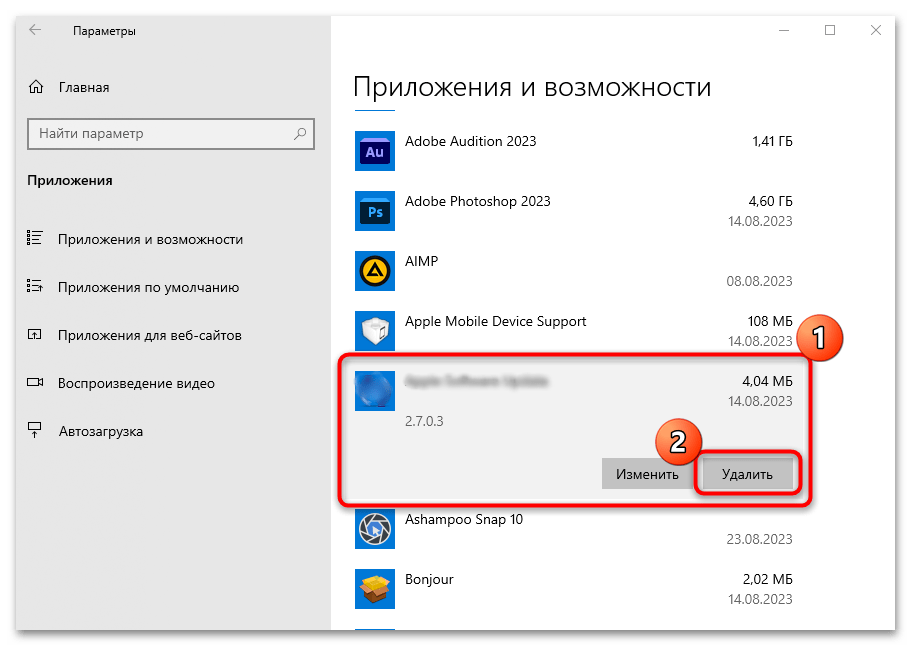
- Нажмите на кнопку «Пуск» и запустите штатные «Параметры».
- Выберите раздел «Приложения».
- В списке установленного софта найдите ту программу, которая вызывает подозрение, выделите ее, затем нажмите на кнопку «Удалить». Подтвердите действие.
Скорее всего, запустится мастер деинсталляции софта – следуйте шагам, которые будут предложены, затем перезагрузите компьютер, чтобы новые параметры вступили в силу, и можно проверить работу привода.
Причина 3: Поврежденные ключи реестра
Трудность с чтением или записью дисков также возникает, когда ключи системного реестра, отвечающие за работу ПО привода, оказываются повреждены. В такой ситуации следует вручную изменить его.
Поскольку способ предполагает удаление реестровых параметров, лучше заблаговременно создать точку восстановления системы, чтобы при непредвиденных последствиях иметь возможность откатить состояние операционки.
Подробнее: Инструкция по созданию точки восстановления Windows 10
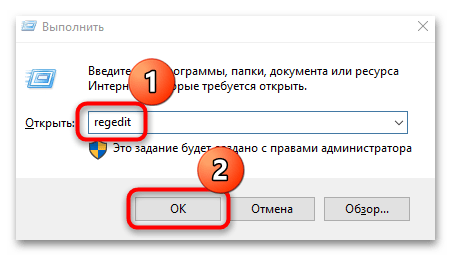
- Запустите встроенный «Редактор реестра». Для этого можно воспользоваться системным поиском или окном «Выполнить» (нажмите на клавиши «Win + R») и командой
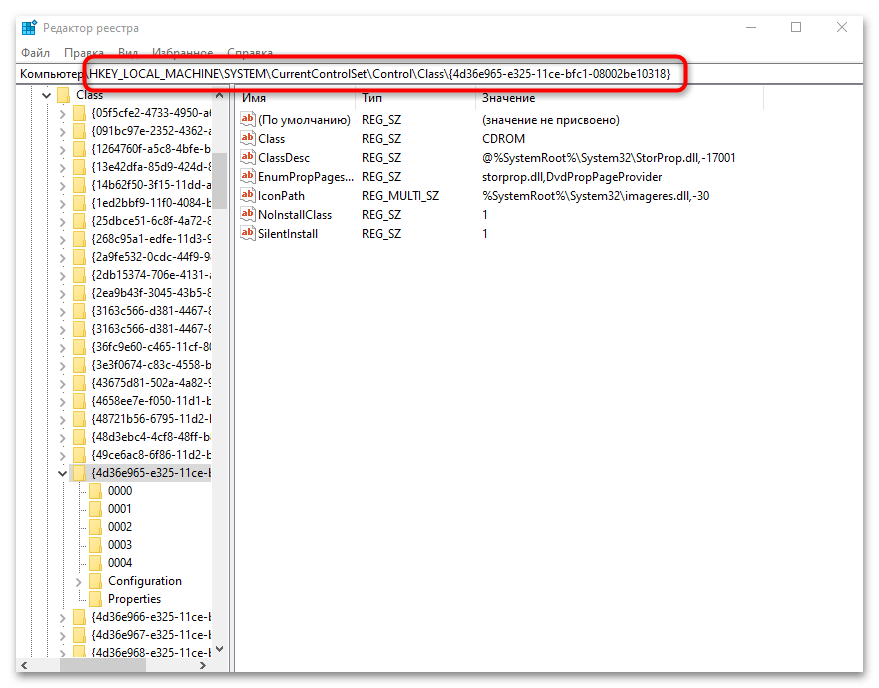
regedit, после ввода которой нужно нажать на кнопку «ОК» или клавишу «Enter». - Далее перейдите по такому пути:
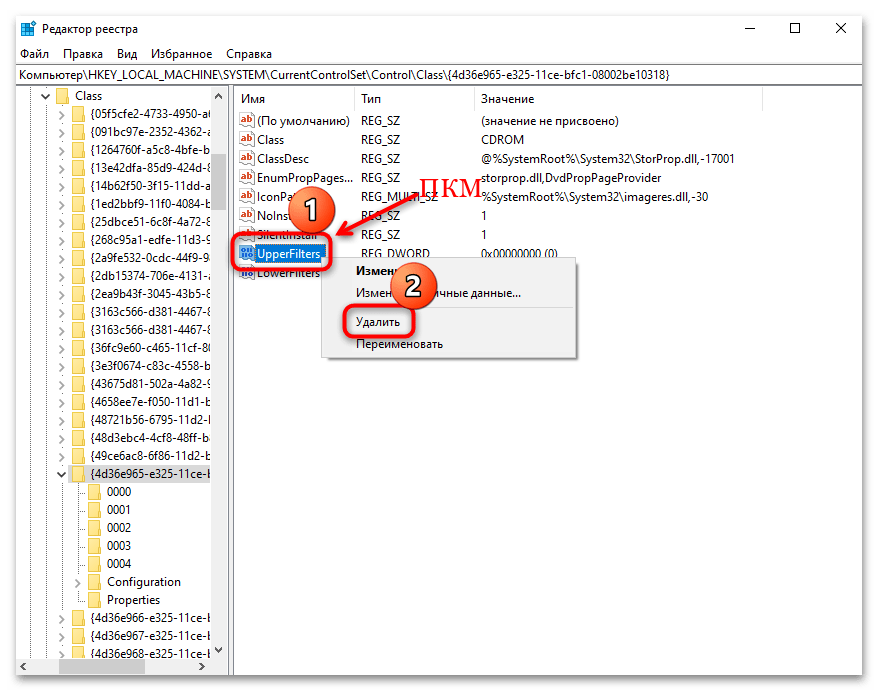
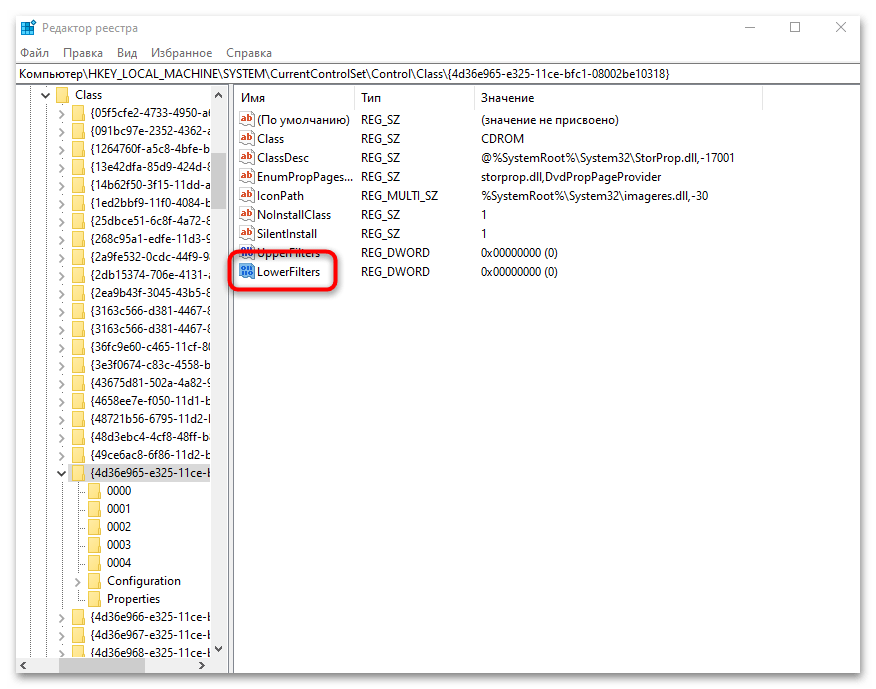
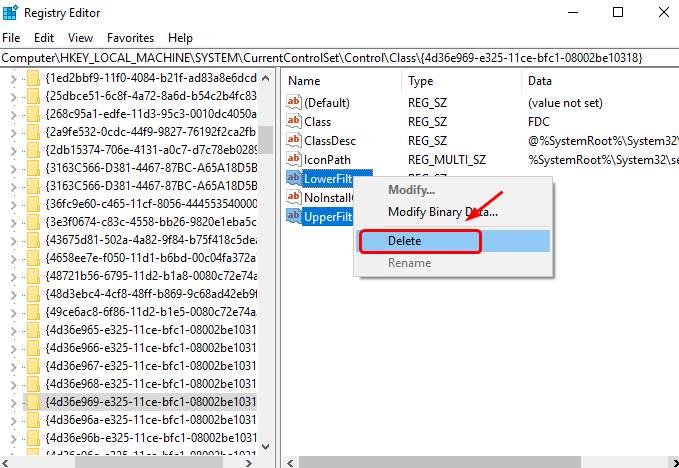
HKEY_LOCAL_MACHINE\SYSTEM\CurrentControlSet\Control\Class\{4D36E965-E325-11CE-BFC1-08002BE10318}(адрес можно скопировать и вставить в поле вверху). - Найдите параметр «UpperFilters» и удалите его, кликнув по нему правой кнопкой мыши и выбрав соответствующий пункт.
- То же самое следует проделать с параметром «LowerFilters» — сотрите его.
После удаления ключей в системном реестре обязательно нужно перезагрузить компьютер, чтобы новые настройки вступили в силу.
Причина 4: Решение программных сбоев в работе привода
В Windows реализованы средства диагностики и автоматического исправления проблем с некоторым оборудованием и программными компонентами. Если другие способы из статьи не помогли, воспользуйтесь таким инструментом для проверки и исправления работы привода для оптических дисков:
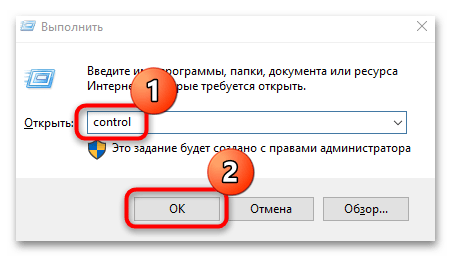
- Запустите «Панель управления» — ее можно найти его через строку системного поиска либо запросом
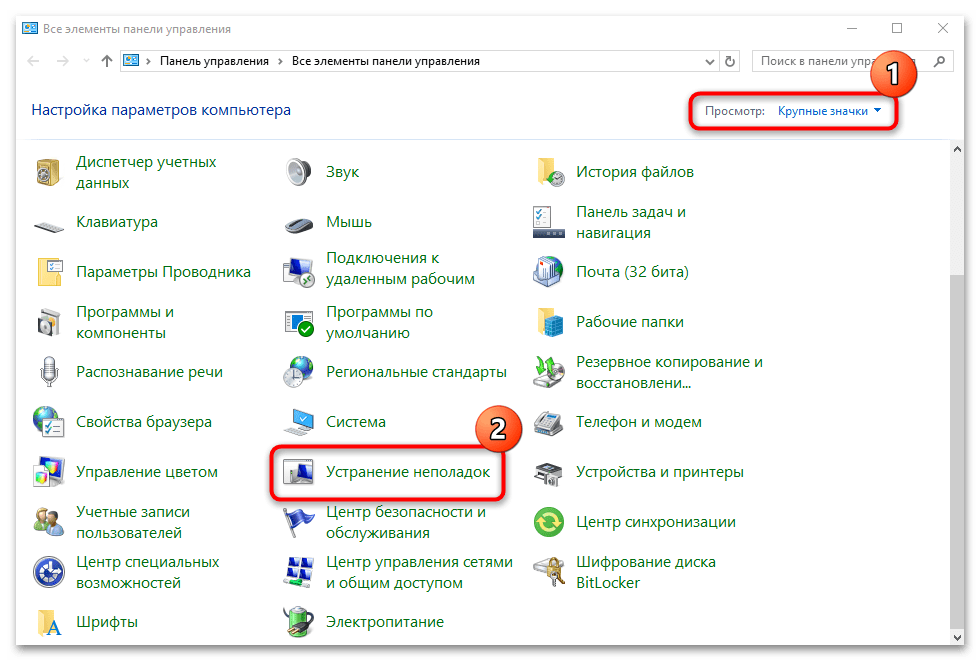
controlв окне «Выполнить». - Для удобства через меню «Просмотр» выставьте отображение разделов как значки и кликните по «Устранение неполадок».
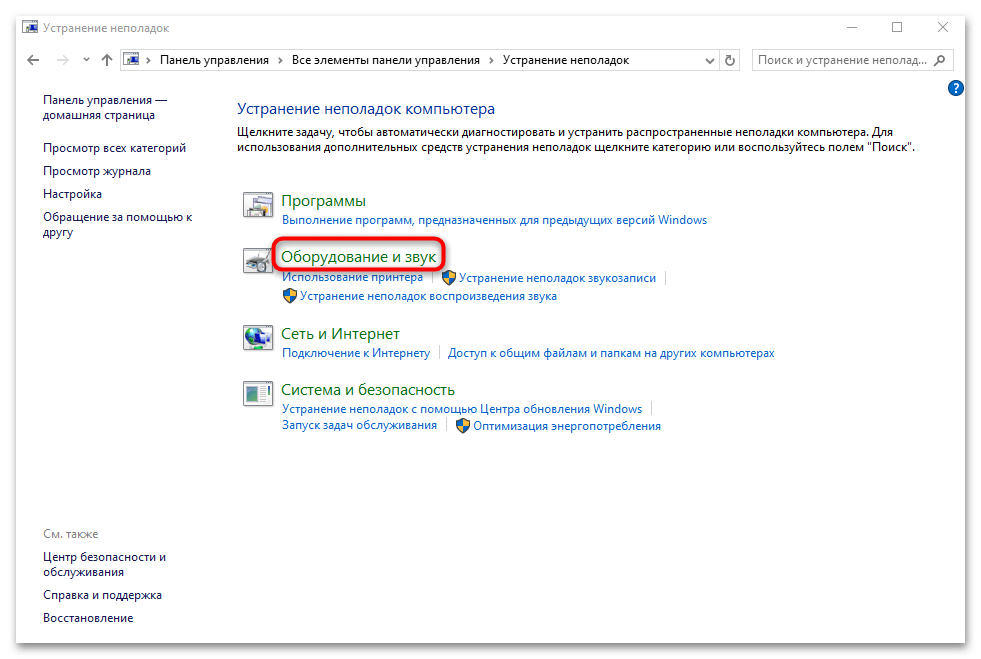
- Щелкните по названию подраздела «Оборудование и звук».
- Далее нужно выбрать строку «DVD-диск в проигрывателе Windows Media» — в этом случае средство проверит не только компакт-диск и встроенный проигрыватель, но и устройство чтения.
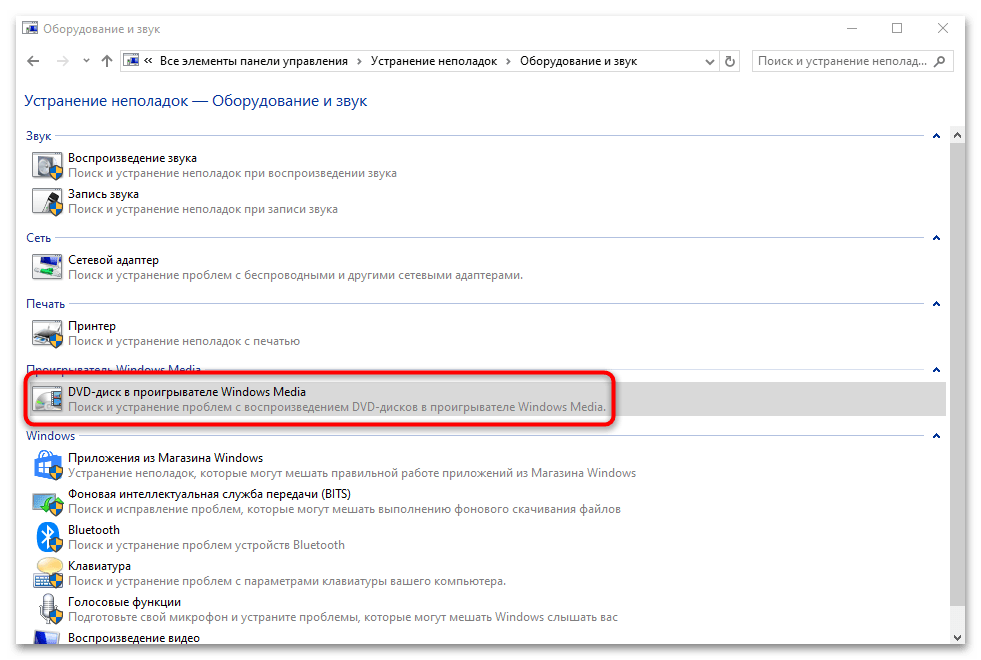
Если неполадки будут выявлены, средство исправит их или предложит рекомендации по самостоятельному устранению. Также с помощью данного инструмента можно выяснить, почему возникло рассматриваемое событие.
Причина 5: Аппаратные неисправности
Не исключены и аппаратные причины, из-за которых не читается диск в дисководе Windows 10. Повлиять мог износ при активном использовании, а также пыль или механические повреждения привода. Стоит обратить внимание на несколько моментов в работе компонента, которые, по сути, являются симптомами выхода привода из строя:
- Если читается только один тип оптического носителя, например CD, а DVD – нет, тогда речь, скорее всего, идет о лазере, который выходит из строя.
- Странные и несвойственные звуки, доносящиеся из привода (такие, как скрежет), или ситуация, когда диск то раскручивается, то останавливается, — могут свидетельствовать о физическом износе дисковода или пыли на линзе. Если же такое происходит только с одним диском, все дело именно в нем.
- Неисправность в основном происходит с дисками DVD/CD-R (RW), но с лицензионными оптическими носителями практически не возникает такой ситуации.
- Сложности с записью дисков: процесс прерывается или уже записанные диски нигде не читаются.
Если что-то из перечисленного – ваш случай, тогда почти наверняка дело в аппаратной неисправности дисковода. В системных блоках персональных компьютеров исправить ситуацию проще: можно разобрать его и проверить надежность соединения проводов между материнской платой, блоком питания и самим дисководом. Также убедитесь, что нет проблем со шлейфами питания и передачи данных. Если причина в износе или механическом повреждении, тогда можно без труда заменить устройство.
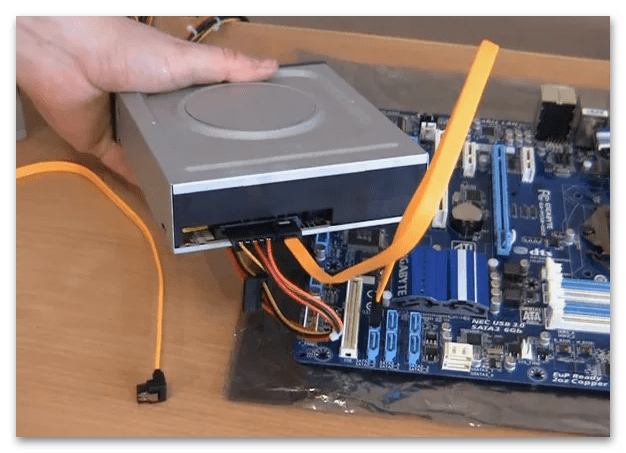
Читайте также: Подключение дисковода к компьютеру
Обладателям ноутбуков, где дисководы встроены, лучше обратиться за помощью к специалистам в сервисном центре, поскольку самостоятельно починить такую поломку довольно затруднительно. Но в качестве альтернативы есть возможность использовать для чтения/записи компакт-дисков внешний привод, который подключается через USB-разъем.
Наша группа в TelegramПолезные советы и помощь
Applies ToWindows 10 Windows 8.1 Windows 8 Windows 7
Symptoms
Your CD or DVD drive is not seen in File Explorer (called Windows Explorer in Windows 7 and earlier versions of Windows), and the device is marked with a yellow exclamation point in Device Manager. Additionally, after you open the device’s Properties dialog box, one of the following errors is listed in the Device status area:
-
Windows cannot start this hardware device because its configuration information (in the registry) is incomplete or damaged. (Code 19)
-
The device is not working properly because Windows cannot load the drivers required for this device. (Code 31)
-
A driver (service) for this device has been disabled. An alternate driver may be providing this functionality. (Code 32)
-
Windows cannot load the device driver for this hardware. The driver may be corrupted or missing. (Code 39)
-
Windows successfully loaded the device driver for this hardware but cannot find the hardware device. (Code 41)
This issue may have occurred after one of the following situations:
-
You upgrade the Windows operating system.
-
You install or uninstall CD or DVD recording programs.
-
You uninstall Microsoft Digital Image.
There are various reasons why a CD or DVD drive is not detected. The resolutions that are listed in this article may help solve some instances but not all instances of this problem. You may also need to contact your hardware manufacturer for assistance with your hardware.
Resolution
For each of the following methods, click on the header, and it will open to show you more info:
For Windows 10, skip to Method 2.
In Windows 7 and 8.1, to open the Hardware and Devices troubleshooter, follow these steps:
-
Press the Windows logo key + R to open the Run dialog box.
-
Type control in the Run dialog box, then press Enter.
-
In the Search box in Control Panel, type troubleshooter, and then click Troubleshooting.
-
Under the Hardware and Sound item, click Configure a device. If you are prompted to enter an administrator password or provide confirmation, type the password or provide confirmation.
If your problem is not solved, try the next method.
-
Verify the drive is activated in the BIOS. BIOS systems vary by device. If you are not sure how to verify the drive settings in your device’s BIOS, contact the manufacturer of your device.
-
Also, verify with the manufacturer of the computer if the drive came with it, or the manufacturer of the drive if it was purchased separately that the chipset drivers for the device are current.
If your problem is not solved, try the next method.
To update the driver, search for the driver on the device manufacturer’s website, and then follow the installation instructions on the website.
To reinstall the driver, follow these steps:
-
Press the Windows logo key + R to open the Run dialog box.
-
Type devmgmt.msc in the Run dialog box, then press Enter. If you are prompted for an administrator password or for a confirmation, type the password, or select Allow
-
In Device Manager, expand DVD/CD-ROM drives, right-click the CD and DVD devices, and then select Uninstall.
-
When you are prompted to confirm that you want to remove the device, select OK.
-
Restart the computer.
After the computer restarts, the drivers will be automatically installed.
If your problem is not solved, try the next method.
To remove and reinstall IDE/ATAPI driver, follow these steps:
-
From Start, search for Device Manager. Open Device Manager from the search results, and select the View menu. Choose Show Hidden Devices.
-
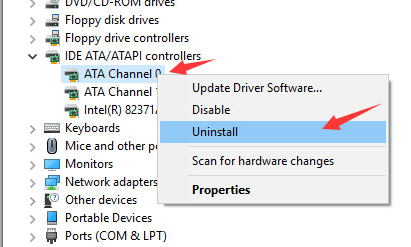
Expand IDE/ATAPI Controllers, and then:
-
Select and right-click ATA Channel 0, and then click Uninstall
-
Select and right-click ATA Channel 1, and then click Uninstall
-
Select and right-click Standard Dual Channel PCI IDE Controller, and then click Uninstall
-
If there are additional entries, right-click them and then choose Uninstall
-
-
Reboot the device.
After the computer restarts, the drivers will be automatically installed.
If your problem is not solved, try the next method.
This problem may be caused by two Windows registry entries that have become corrupted. To use Registry Editor to delete the corrupted Registry entries, follow these steps:
-
Press the Windows logo key + R to open the Run dialog box.
-
Type regedit in the Run dialog box, then press Enter. If you are prompted for an administrator password or for a confirmation, type the password, or select Allow
-
In the navigation pane, locate and then select the following registry subkey:
HKEY_LOCAL_MACHINE\SYSTEM\CurrentControlSet\Control\Class\{4D36E965-E325-11CE-BFC1-08002BE10318}
-
In the right pane, select UpperFilters.
Note You may also see an UpperFilters.bak registry entry. You do not have to remove that entry. Click UpperFilters only. If you do not see the UpperFilters registry entry, you still might have to remove the LowerFilters registry entry. To do this, go to step 7.
-
On the Edit menu, select Delete.
-
When you are prompted to confirm the deletion, select Yes.
-
In the right pane, select LowerFilters.
Note If you do not see the LowerFilters registry entry, go to the next method.
-
On the Edit menu, select Delete.
-
When you are prompted to confirm the deletion, select Yes.
-
Exit Registry Editor.
-
Restart the computer.
Note: To use this method, you must be logged on to Windows as an administrator. To verify that you are signed in as an administrator, bring up the Control Panel, select User Accounts, and then choose Manage User Accounts.
Important:
-
Follow the steps in this section carefully. Serious problems might occur if you modify the registry incorrectly. Before you modify it, back up the registry for restoration in case problems occur.
-
After trying this method, some apps, such as CD or DVD recording software, might not work correctly. If so, try uninstalling and reinstalling the affected app. Check with the creator of the app to see if there is an updated version.
If your problem is not solved, try the next method.
To create the registry subkey, follow these steps:
-
Press the Windows logo key + R to open the Run box.
-
Type regedit in the Run box, then press Enter. If you are prompted for an administrator password or for a confirmation, type the password, or select Allow.
-
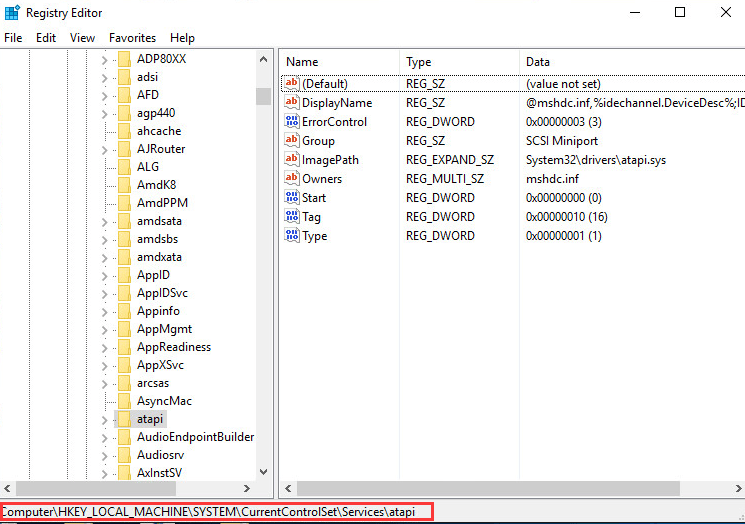
In the navigation pane, locate the following registry subkey:
HKEY_LOCAL_MACHINE\SYSTEM\CurrentControlSet\Services\atapi
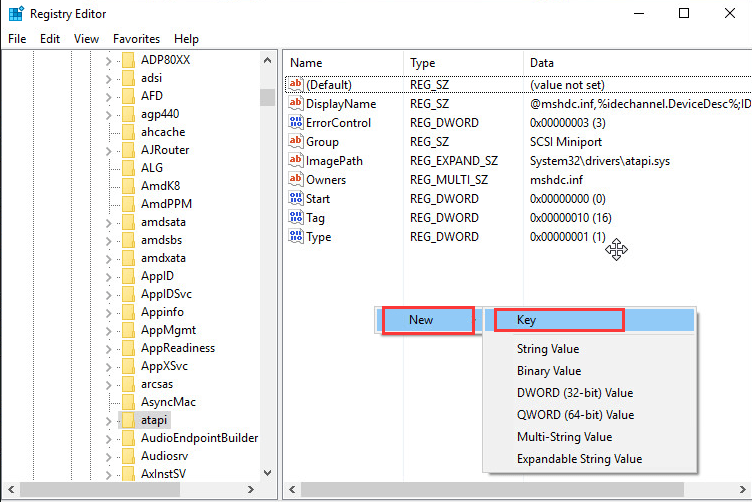
-
Right-click atapi, point to New, then select Key.
-
Type Controller0, and then press Enter.
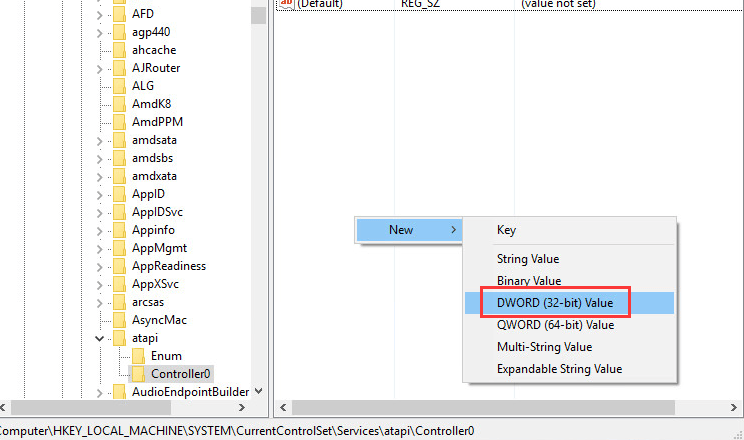
-
Right-click Controller0, point to New, and then select DWORD(32-bit) Value .
-
Type EnumDevice1, and then press Enter.
-
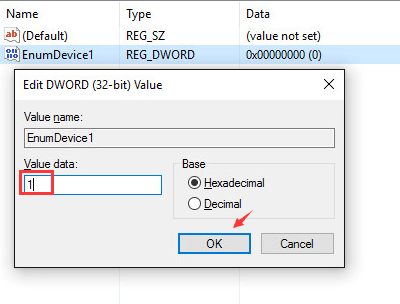
Right-click EnumDevice1, select Modify….
-
Type 1 in the Value data box, and then select OK.
-
Exit Registry Editor.
-
Restart the computer.
Notes
-
To use this method, you must be logged on to Windows as an administrator. To verify that you are signed in as an administrator, bring up the Control Panel, select User Accounts, and then choose Manage User Accounts.
-
This method should be used on Windows 7, Windows 8 or 8.1, or Windows 10 version 1507. The issues fixed by this method shouldn’t occur in Windows 10 1511 or later.
Important: Follow the steps in this method carefully. Serious problems might occur if you modify the registry incorrectly. Before you modify it, back up the registry for restoration in case problems occur.
Need more help?
Want more options?
Explore subscription benefits, browse training courses, learn how to secure your device, and more.
You’re not the only one in this; I also faced the same issue with my DVD drive on my Windows PC—it stopped working! But the only difference is I know how to fix the issue, but if you’re reading this, I’m sure you don’t know how to do it with your Windows 10 PC DVD drives.
That is why I thought I’d share the solutions I’ve found to fix DVD drives that are not working on Windows 10 PCs. Even if you’re using Windows 11 or 8 or older, you can still follow the below-mentioned solutions.
Continue reading for all the information!
Before We Start
It is quite hard to pinpoint what causes the DVD drives on Windows 10 to stop working, but there are a few definite reasons why it happens:
- Old/corrupted drivers
- Loose cables
- DVD broken
- Bugs in the OS
So before you start fixing Windows 10 DVD drives, we advise you to create a backup of your PC. If your PC crashes while fixing Windows 10 DVD drives or you install something incorrectly, you may lose your files. By backing up, you make sure your files are safe and protected.
EaseUS Todo Backup is a brilliant backup and recovery software that millions have trusted for the last 13 years. Using the EaseUS Todo Backup, you achieve partition backup, disk backup, boot partition, and more.
If your system crashes and you want to restore it immediately, you can do that with EaseUS Todo Backup, and you don’t need to wait around because it’s fast and quick.
So now, once you’ve backed up your computer, follow the below steps to fix Windows 10 DVD drives that are not working.
How to Fix Windows 10 DVD Drives Not Working
We know of the 6 best methods to try when a Windows 10 DVD drive is not working; follow them to fix the issue.
- Method 1. Update your Windows to the latest version
- Method 2. Reinstall or update the driver in the Device Manager
- Method 3. Fix corrupted registry entries
- Method 4. Create a registry subkey
- Method 5. Remove IDE/ATAPI drivers
- Method 6. Check Your BIOS/UEFI Settings and Update Chipset Firmware
Method 1. Update your Windows to the latest version
If there are issues with the operating system, the DVD drive on your Windows 10 computer can stop working. Update your Windows with the latest updates so that the bugs are removed, and any issues causing your DVD drive not to work are fixed and resume working again.
Method 2. Reinstall or update the driver in the Device Manager
Another proven method to fix DVD drives that don’t work is to reinstall or update the DVD drivers. Here’s how to do that:
Step 1. Click on the «Start» button and search for and open «Device Manager.»
Step 2. Expand «DVD/CD-ROM.»
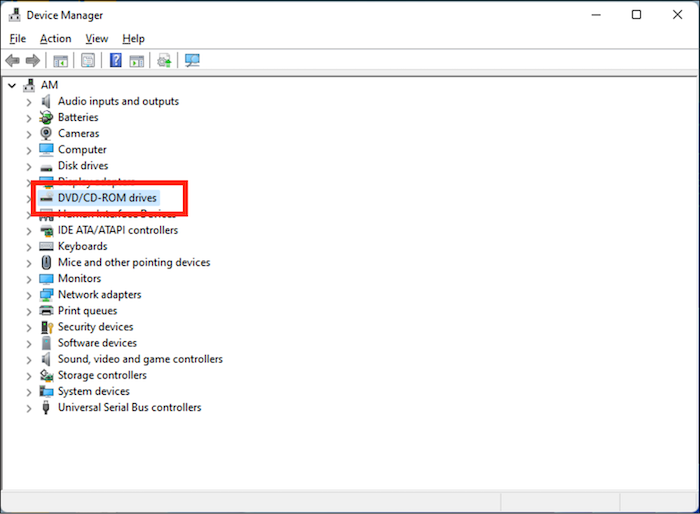
Step 3. Select the driver for your DVD and right-click on it.
Step 4. Select «Uninstall.»
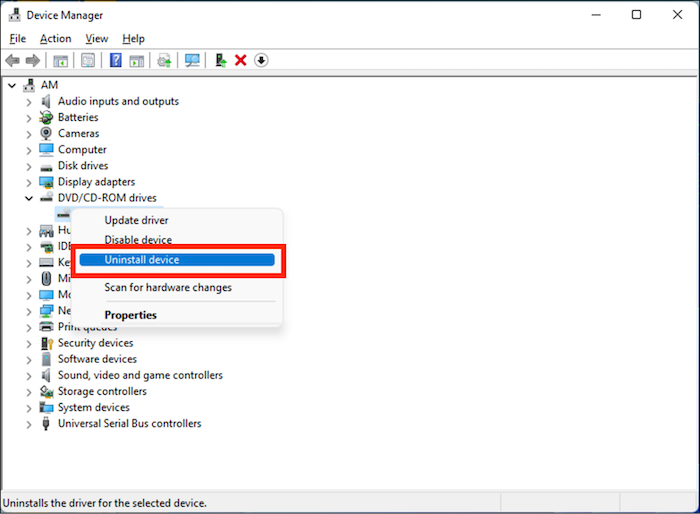
Step 5. Restart your computer.
Step 6. Log in to your account; now Windows will detect the latest drivers and automatically reinstall the drivers.
The DVD drive should work properly now.
Method 3. Fix corrupted registry entries
Corrupt registry entries can also result in the DVD drive not working. Fix the corrupted drivers to fix the issues.
Step 1. Press the «Windows+R» key.
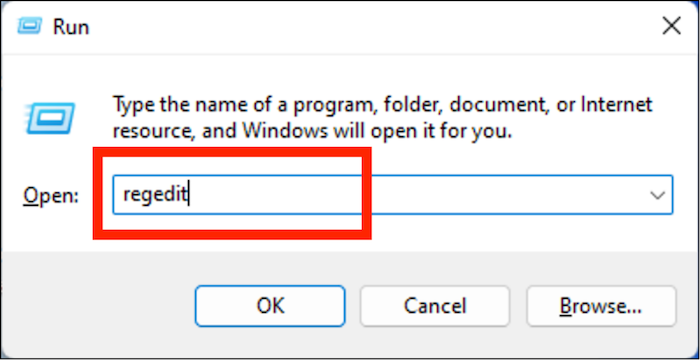
Step 2. Type «regedit» in the «Run» dialog box and click on «OK.»
Step 3. Copy-paste the location HKEY_LOCAL_MACHINE\SYSTEM\CurrentControlSet\Control\Class\{4D36E965-E325-11CE-BFC1-08002BE10318} in the navigation pane.

Step 4. On the right window, select «UpperFilters» and «LowerFilters» and delete them.
Step 5. After deleting, restart your PC.
If you didn’t find «UpperFilters» and «LowerFilters,» follow our next solution.
Method 4. Create a registry subkey
Here’s what you need to do if you didn’t find «UpperFilters» and «LowerFilters.»
Step 1. Copy-paste this location HKEY_LOCAL_MACHINE\SYSTEM\CurrentControlSet\Services\atapi in the Registry editor navigation pane.
Step 2. Select the «Aatapi» folder, right-click on the folder, and select «New,» followed by «Key.»
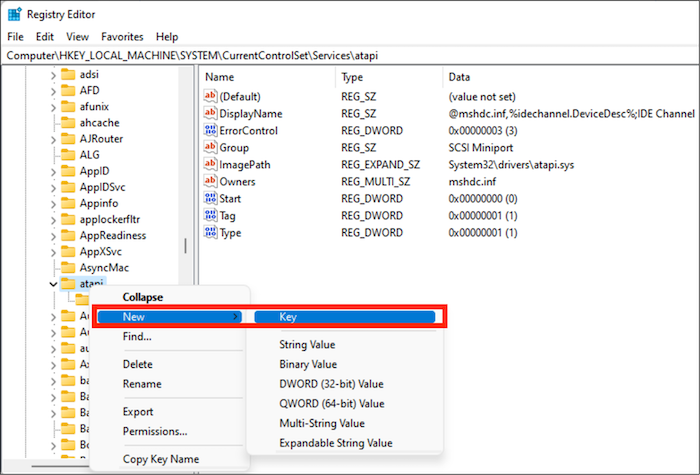
Step 3. Name the folder «Controller0.»
Step 4. Now on the right window, right-click and then select «New,» followed by «DWORD (32-bit) Value.»
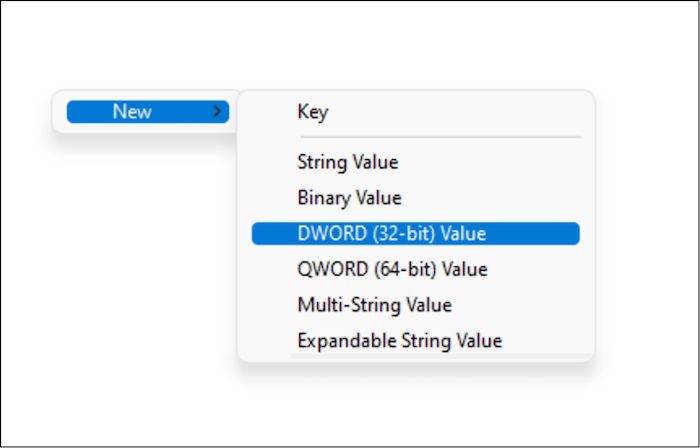
Step 5. Give it the name «EnumDevice1.»
Step 6. Right-click on «EnumDevice1» and select «Modify.»
Step 7. In the Value data box, type «1» and click on «OK.»
Step 8. Restart your PC.
Method 5. Remove IDE/ATAPI drivers
Removing IDE/ATAPI has been shown to fix the DVD drives that are not working on Windows 10 PC. Here’s how to remove IDE/ATAPI:
Step 1. Open «Device Manager.»
Step 2. Click on the «View» option and select «Show hidden devices.»
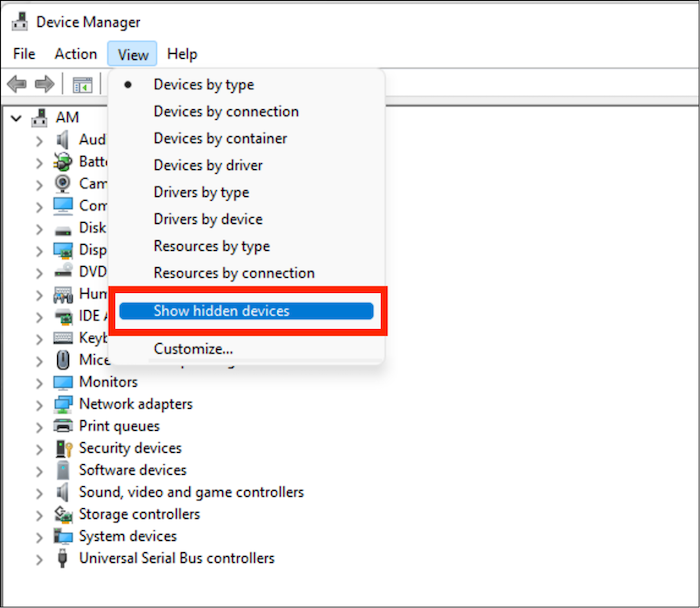
Step 3. Expand IDE/ATAPI Controllers, and now right-click and select «Uninstall» on «ATA Channel 0,» «ATA Channel 1,» and «Standard Dual Channel PCI IDE Controller.»
Step 4. Restart your PC for the changes to take effect.
Method 6. Check Your BIOS/UEFI Settings and Update Chipset Firmware
Another reason the DVD drive might not be working could be because of a misconfigured BIOS/UEFI or outdated chipset firmware. We advise resetting your BIOS/UEFI and updating the chipset firmware.
Conclusion
You are not the only one facing this issue. DVD-drive problems are common in Windows 10 and other Windows versions. By following the solutions above, you can quickly fix this issue.
If the DVD drive isn’t working on your Windows 10 computer, try the abovementioned solutions and fix them.
Frequently Asked FAQs
Here are some frequently asked questions about How to Fix Windows 10 DVD Drives That Aren’t Working.
1. What is the best DVD driver for Windows 10?
Here are the three best DVD drivers for Windows 10:
- ASUS DRW-24B1ST
- LG WH16NS40
- Plextor PX-891SAF
2. Does Windows 10 have a built-in DVD player?
Some Windows computers have a built-in DVD player, while others don’t. It depends on the manufacturer or model. If your PC doesn’t have a DVD player, you can install one or use an external one.
3. How do I copy a CD to my computer without a CD drive?
If your computer doesn’t have a CD drive, you can get an external one and connect it to the computer via a USB cable. You can then insert the CD in the external CD drive and copy all the contents of the CD to your computer.
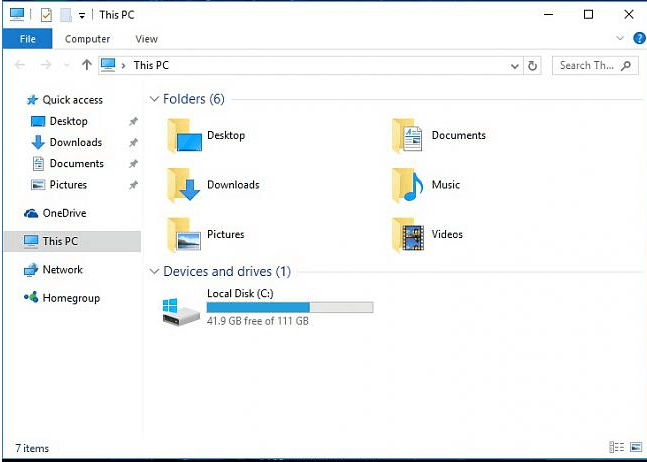
If you’ve recently upgraded to Windows 10, and you couldn’t find the DVD drive option in This PC (Windows 10 OS) window, you’re not alone. Some of you might not even see your DVD/CD ROM option in Device Manager. No need to worry too much about it, it’s possible to fix.
Here are 4 fixes for you to try. You may not have to try them all; just work your way down until you find the one works for you.
Method 1: Uninstall IDE ATA/ ATAPI controllers
Method 2: Update drivers
Method 3: Manually fix corrupted registry entries
Method 4: Create a registry subkey
1: Uninstall IDE ATA/ ATAPI controllers
One of the reasons why you can’t see DVD/CD-ROM in your Windows 10 PC could be faulty device drivers. You can reinstall the drivers to fix it. Here is how:
1) On your keyboard, press the Windows logo key and R at the same time, click Device Manager.
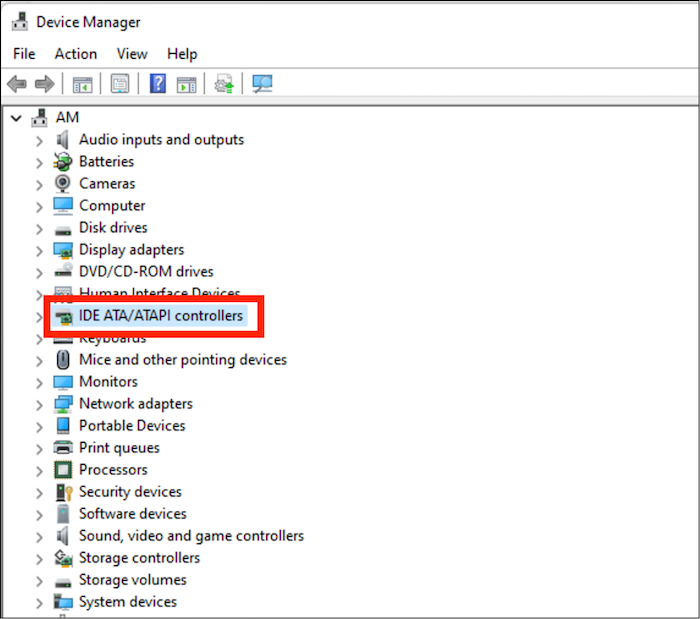
2) Locate IDE ATA/ ATAPI controllers.
3) Right-click ATA Channel 0 and click Uninstall.
4) Right-click ATA Channel 1 and click Uninstall.
5) If you have more options under IDE/ ATAPI controllers category, right-click them and click Uninstall as above procedures.
6) Reboot your computer after these changes.
7) Your computer will be able to help you with the detection of the DVD for Windows 10.
2: Update drivers
If uninstalling the IDE ATA/ ATAPI controller drivers doesn’t solve the problem for you, it’s likely that you’re using the wrong driver altogether.
There are two ways you can get the right drivers for your disc /DVD drive: manually or automatically.
Manual driver update – You can update your disc drive driver manually by going to the manufacturer’s website for your computer, and searching for the most recent correct driver for it. Be sure to choose only driver that is compatible with your variant of Windows 10.
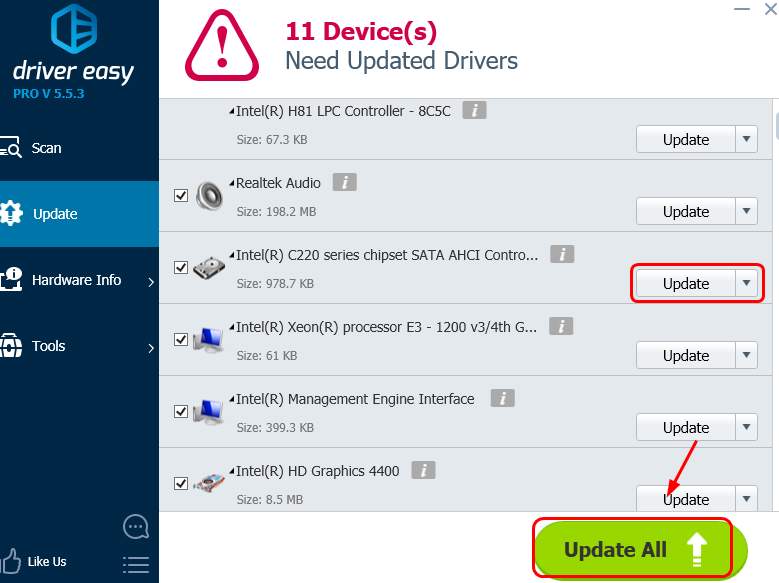
Automatic driver update – If you don’t have the time, patience or computer skills to update your drivers manually, you can do it automatically with Driver Easy. Driver Easy will automatically recognize your system and find the correct driver for your exact disc drive, and your variant of Windows 10, and it will download and install it correctly:
1) Download and install Driver Easy.
2) Run Driver Easy and click the Scan Now button. Driver Easy will then scan your computer and detect any problem drivers.
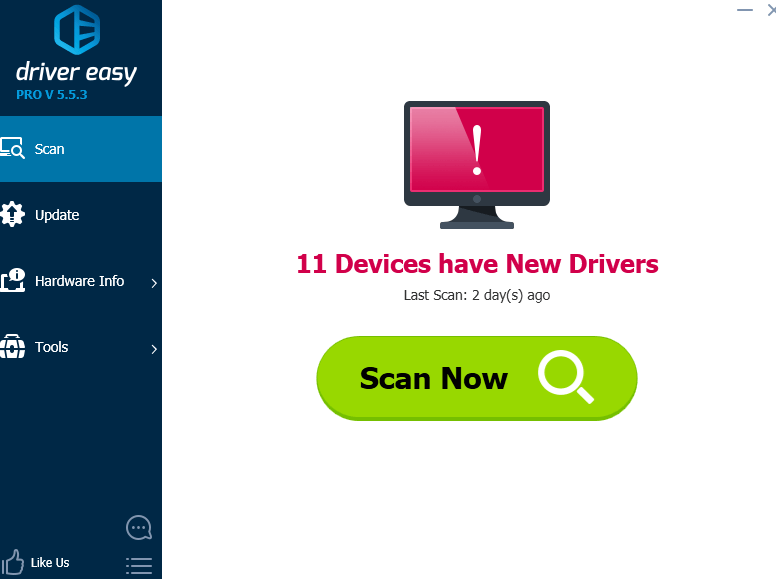
3) Click the Update button next to all flagged devices to automatically download and install the correct version of their drivers (you can do this with the FREE version).
Or click Update All to automatically download and install the correct version of all the drivers that are missing or out of date on your system (this requires the Pro version – you’ll be prompted to upgrade when you click Update All).
3: Manually fix corrupted registry entries
IMPORTANT: Before we move on, it’s strongly recommended that you back-up and restore your registry first.
If your registry entry is off, you’ll not be able to see certain device on your PC. To fix it:
1) On your keyboard, press the Windows logo key and R at the same time to invoke a Run command. Type regedit and press Enter.
2) Follow the path:
HKEY_LOCAL_MACHINE\SYSTEM\CurrentControlSet\Control\Class\ {4D36E965-E325-11CE-BFC1-08002BE10318}
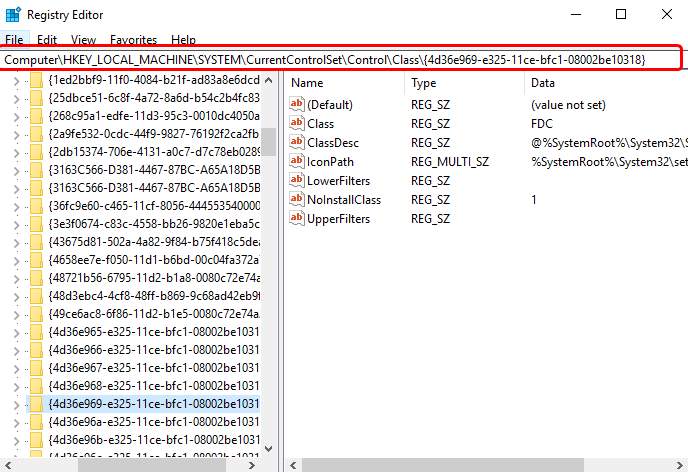
3) Look for UpperFilters and LowerFilters strings on the right side panel. If you can’t see these two items, move on to Method 2.
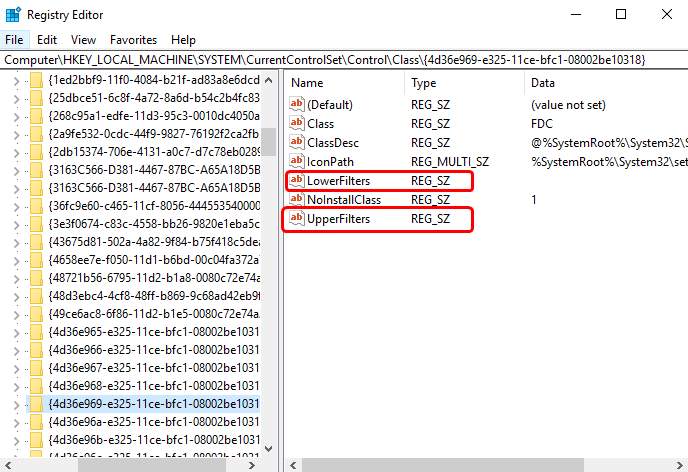
4) Delete them.
4: Create a registry subkey
If you can’t see UpperFilters and LowerFilters in the Registry pane, please follow the steps below.
1) On your keyboard, press the Windows logo key and R at the same time to invoke a Run command. Type regedit and press Enter.
2) Follow the path:
HKEY_LOCAL_MACHINE\SYSTEM\CurrentControlSet\Services\atapi\
3) Right-click the blank space on the right panel, when the New option pops up, click Key.
4) Create a new Controller0 key under atapi key.
5) Go to the new Controller0 key. On the right side of the pane, right-click the blank space and click DWORD(32-bit) Value.
6) Set the name as EnumDevice1 and press Enter. Double-click to set the Value data as 1. Press OK to save.
7) Exit Registry Editor.
 Restart your computer.
47
47 people found this helpful
Fix CD or DVD Drive Not Reading Discs in Windows 10: If you have recently upgraded to Windows 10 then you may face this issue where your CD or DVD cannot read the disk and you may need to repair or replace your DVD drive. Well, it’s not necessary to replace it as there are a lot of fixes which can solve this error easily and today we are going to discuss how to fix this issue. There is no particular cause for this issue but it may be caused due to incompatible drivers, corrupted or outdated drivers etc. So without wasting any time let’s see how to Fix CD or DVD Drive Not Reading Discs in Windows 10 with the help of below-listed troubleshooting guide.
Table of Contents
Make sure to create a restore point just in case something goes wrong.
Method 1: Rollback CD or DVD drive drivers
1.Press Windows Key + R then type devmgmt.msc and hit Enter.

2.Expand DVD/CD-ROM drives then right-click on your CD/DVD drive and select Properties.
3.Switch to driver tab and click Roll Back Driver.

4.Wait for the driver to be rolled back then close Device Manager.
5.Reboot your PC to save changes.
Method 2: Uninstall CD/DVD drive
1.Press the Windows key + R button to open the Run dialogue box.
2.Type devmgmt.msc and then press Enter.
3.In Device Manager, expand DVD/CD-ROM drives, right-click the CD and DVD devices and then click Uninstall.

4.Restart the computer. After the computer restarts, the drivers will be automatically installed.
Method 3: Run Hardware and Devices Troubleshooter
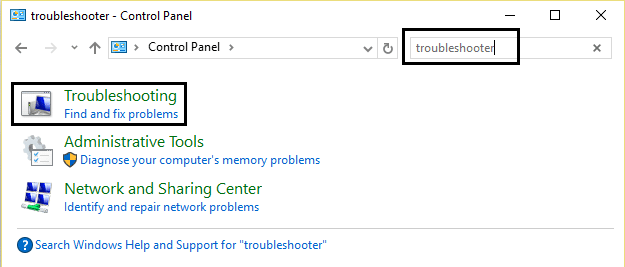
1.Type control in Windows Search then click on Control Panel from the search result.
2.Search Troubleshoot and click on Troubleshooting.
3.Next, click on View all in the left pane.
4.Click and run the Troubleshooter for Hardware and Device.
5.The above Troubleshooter may be able to Fix CD or DVD Drive Not Reading Discs in Windows 10.
Method 4: Disable and then enable the DVD or CD drive
1.Press Windows Key + R then type devmgmt.msc and hit Enter.
2.Expand DVD/CD-ROM then right -click on your device and select disable.

3.Now again right-click on your CD/DVD drive and select Enable device.

8.Reboot your PC to save changes and see if you’re able to Fix CD or DVD Drive Not Reading Discs in Windows 10.
Method 5: Registry Fix
1.Press the Windows key + R button to open the Run dialogue box.
2.Type regedit in the Run dialogue box, then press Enter.
3.Now go to the following registry key:
HKEY_LOCAL_MACHINE\SYSTEM\CurrentControlSet\Control\Class\{4D36E965-E325-11CE-BFC1-08002BE10318}

4.In the right pane search for UpperFilters and LowerFilters.
Note: if you can’t find these entries then try the next method.
5.Delete both of these entries. Make sure you are not deleting UpperFilters.bak or LowerFilters.bak only delete the specified entries.
6.Exit Registry Editor and restart the computer.
Method 6: Create a Registry Subkey
1.Press the Windows key + R to open the Run dialogue box.
2.Type regedit and then press Enter.
3.Locate the following registry key:
HKEY_LOCAL_MACHINE\SYSTEM\CurrentControlSet\Services\atapi
4.Create a new key Controller0 under atapi key.

4.Select the Controller0 key and create new DWORD EnumDevice1.
5.Change the value from 0(default) to 1 and then click OK.
6.Restart your PC to save changes.
Recommended:
- Fix Windows Defender Update fails with error 0x80070643
- Fix If playback doesn’t begin shortly try restarting your device
- How to Schedule Windows 10 Automatic Shutdown
- Fix Favorites missing in Internet Explorer on Windows 10
That’s it you have successfully Fix CD or DVD Drive Not Reading Discs in Windows 10 but if you still have any questions regarding this post then feel free to ask them in the comment’s section.