
Все способы:
- Что это за процесс
- Вариант 1: Снижаем нагрузку на диск
- Способ 1: Принудительная установка обновлений
- Способ 2: «Диспетчер задач»
- Способ 3: Отключение службы
- Вариант 2: Исправление ошибок в работе «Центра обновления»
- Способ 1: Ручная очистка папки с кешем
- Способ 2: Приостановка работы стороннего антивируса
- Способ 3: Использование диагностических утилит
- Способ 4: Проверка целостности системных файлов
- Способ 5: Чистая загрузка ОС
- Вопросы и ответы: 0
Что это за процесс
Нередко пользователи Windows 10 сталкиваются с проблемой, когда процесс «Windows Module Installer Worker» грузит жесткий диск и память, что затрудняет работу с системой. Этот процесс активируется специальным системным файлом – «Ti.Worker.exe», который запускает установщика модулей. Но если копнуть глубже, то все эти действия напрямую связаны со службой «TrustedInstaller», предназначенной для поиска обновлений для «десятки», а также автоматического выполнения обслуживания, например фоновой дефрагментации и других действий.
Когда службы работает, то, соответственно, рассматриваемый модуль начинает сильно грузить компоненты компьютера или ноутбука, и особенно это заметно на слабом «железе».
Следует отметить, что «Ti.Worker.exe» — важный программный компонент Виндовс. Без него необходимые обновления безопасности не будут найдены и установлены, что приводит к снижению защиты системы. Также он нужен для автоматического устранения проблемы, если какой-либо апдейт содержит в себе ошибки.
Если «Windows Module Installer Worker» грузит систему, то обычно достаточно немного подождать, пока установщик модулей завершит свою работу, – загруженность пройдет, когда все необходимые операции будут выполнены. К сожалению, это может занимать довольно долгое время – вплоть до нескольких часов, что зависит от вычислительных мощностей вашего ПК. Также долгое ожидание может быть связано и с тем, что ОС давно не обновлялась. Если выходит так, что работать за компьютером становится практически невозможно, а сделать что-либо необходимо прямо сейчас, можно вручную снизить нагрузку на диск, о чем мы и поговорим ниже.
Забегая наперед, добавим, что бывают ситуации, когда всему виной не деятельность компонента, а проблемы с «Центром обновления Windows». В этом случае может потребоваться исправления ошибок в его работе, и про это рассказано во второй части статьи.
Вариант 1: Снижаем нагрузку на диск
Поскольку процесс «Windows Module Installer Worker» является критически важным элементом для функционирования системы, то удалить его нельзя. Но есть несколько альтернативных методов, которые помогут снизить нагрузку на диск, что позволит более комфортно пользоваться ОС.
Способ 1: Принудительная установка обновлений
Попробуйте принудительно установить обновления, что также иногда занимает немало времени, но иногда даже такой процесс завершается намного быстрее, чем работа установщика модулей.
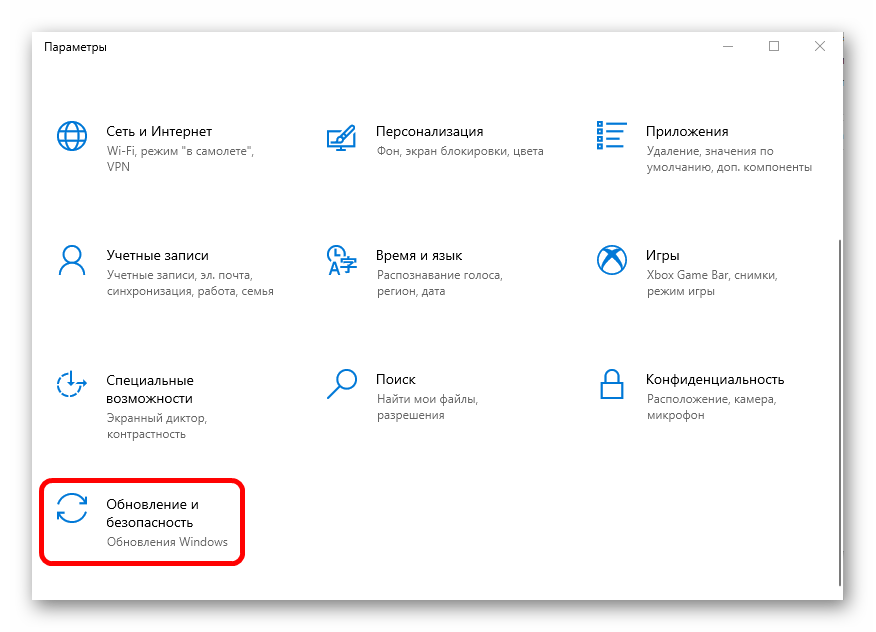
- Нажмите на кнопку «Пуск» и выберите запуск «Параметров».
- В появившемся окне перейдите в раздел «Обновление и безопасность».
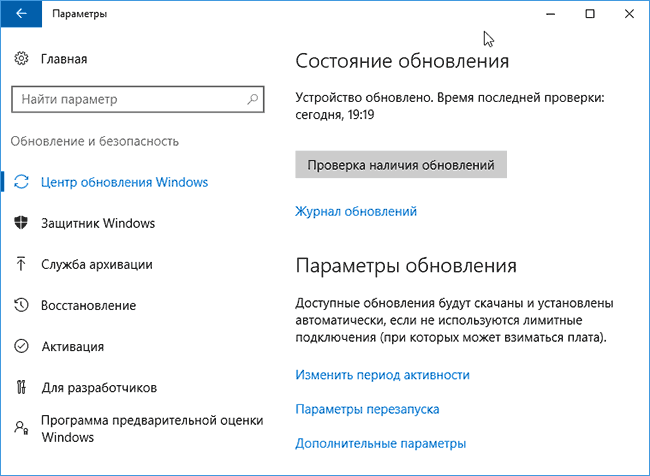
- Оставаясь на вкладке «Центр обновления Windows», в центральной части окна кликните по кнопке «Проверить наличие обновлений».
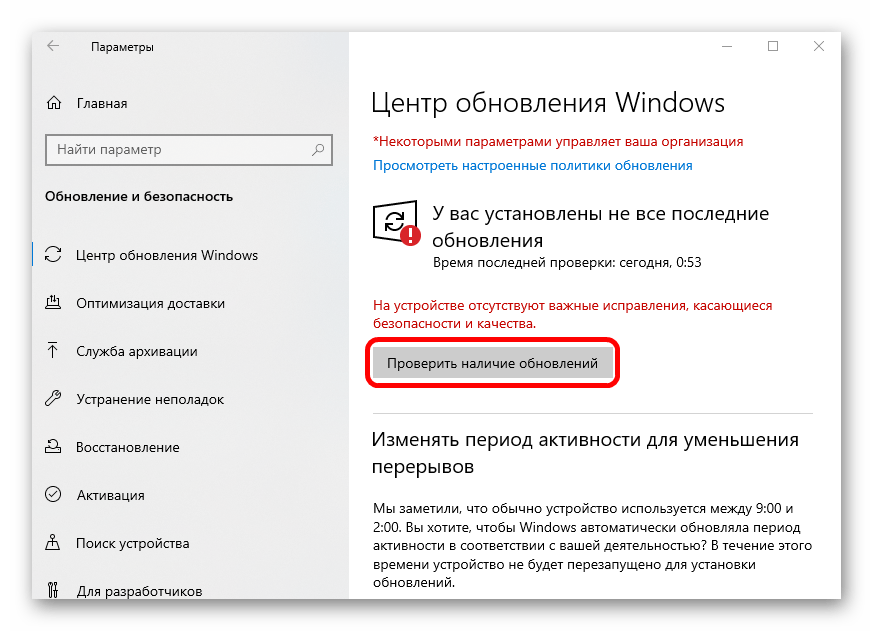
После этого начнется принудительный поиск апдейтов для системы. Когда они будут найдены, нажмите на кнопку установки. По завершении перезагрузите компьютер, после чего процесс «Windows Module Installer Worker» перестанет беспокоить.
Способ 2: «Диспетчер задач»
По умолчанию установщик модулей запускается с высоким приоритетом, потребляя как можно больше ресурсов. Это позволяет достаточно оперативно установить обновления, но при этом оставшаяся мощность комплектующих распределяется на остальные задачи, что порой и приводит к зависаниям. Если процесс перестает нагружать диск через некоторое время, то это вряд ли является проблемой, поэтому можно изменить его приоритет через «Диспетчер задач»:
- Кликните правой кнопкой мыши по нижней панели и из меню выберите запуск «Диспетчера задач».
- На вкладке «Подробности» отыщите компонент «TiWorker.exe», нагружающий диск, и щелкните по его названию ПКМ, а из контекстного меню выберите опцию «Задать приоритет», затем отметьте «Низкий».

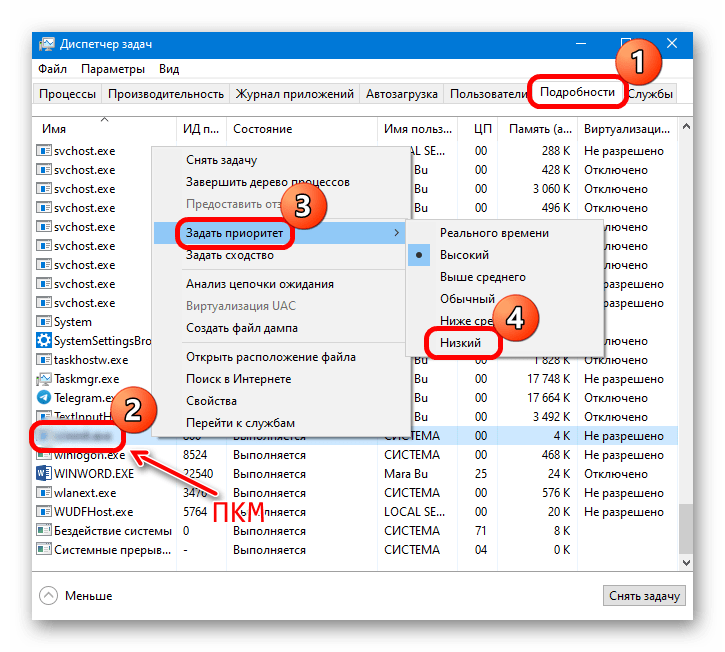
После настройки процесса он будет выполнять свою задачу медленнее, поскольку ресурсы для него будут несколько ограничены, но при этом он станет меньше грузить компоненты и не будет мешать работать.
Также можете приостановить работу процесса «Windows Module Installer Worker». Делается это через «Диспетчер задач» на вкладке «Процессы». Достаточно отыскать компонент и через контекстное меню завершить процесс. Но учтите — после перезагрузки системы служба продолжит свою работу, пока не найдет и не установит апдейты.
Способ 3: Отключение службы
Если в предыдущем способе после отключения установщик модулей Виндовс возобновит работу после перезапуска ПК, то этот метод предполагает деактивацию службы, связанной с компонентом, а также изменение типа запуска.
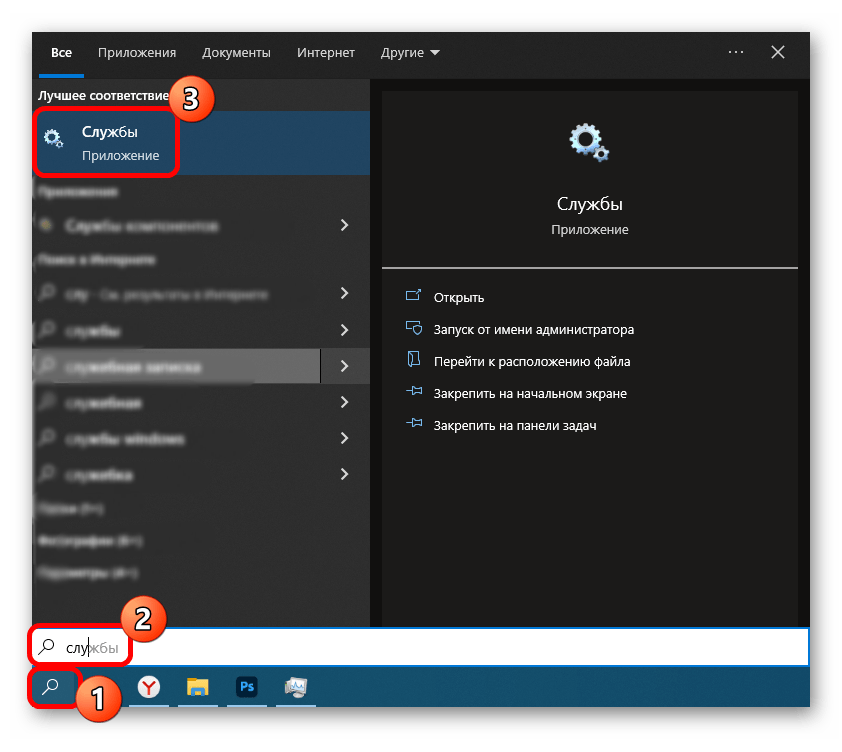
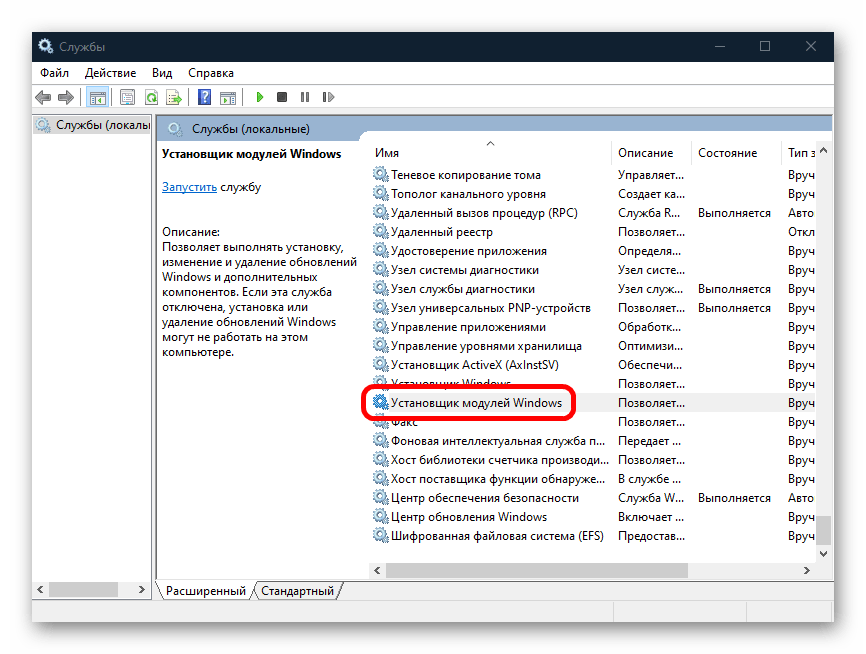
- Запустите оснастку «Службы», отыскав ее через поисковую строку «Пуска».
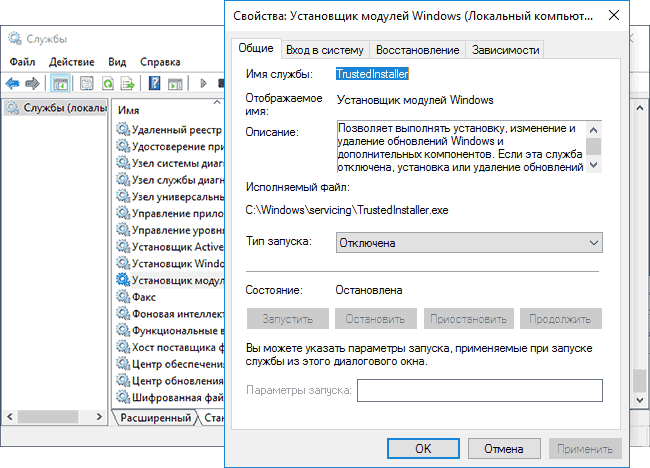
- В списке служб отыщите «Установщик модулей Windows» и дважды кликните по нему левой кнопкой мыши, чтобы перейти в окно с параметрами.
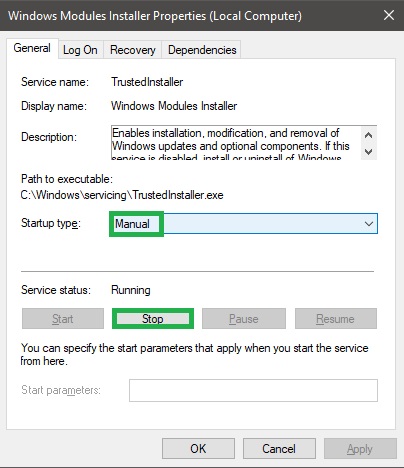
- В выпадающем меню «Тип запуска» выберите «Отключено», затем нажмите на кнопку «Остановить» ниже и сохраните настройку.

В этом случае поиск и инсталляция апдейтов будет насовсем отключены, но имейте в виду, что это ставит под угрозу безопасность компьютера.
Вариант 2: Исправление ошибок в работе «Центра обновления»
Также чрезвычайная нагрузка на диск установщиком модулей может быть причиной некорректной работы «Центра обновления Windows» и его компонентов. В этом случае может потребоваться исправить ситуацию вручную, но для большинства ситуаций в ОС предусмотрены автоматические инструменты.
Способ 1: Ручная очистка папки с кешем
Очистка папки с кешем обновлений, которая хранится на локальном диске, может помочь в тех случаях, когда установщик модулей конфликтует с предыдущими апдейтами. Чтобы исправить ситуацию, попытайтесь вручную удалить старые данные:
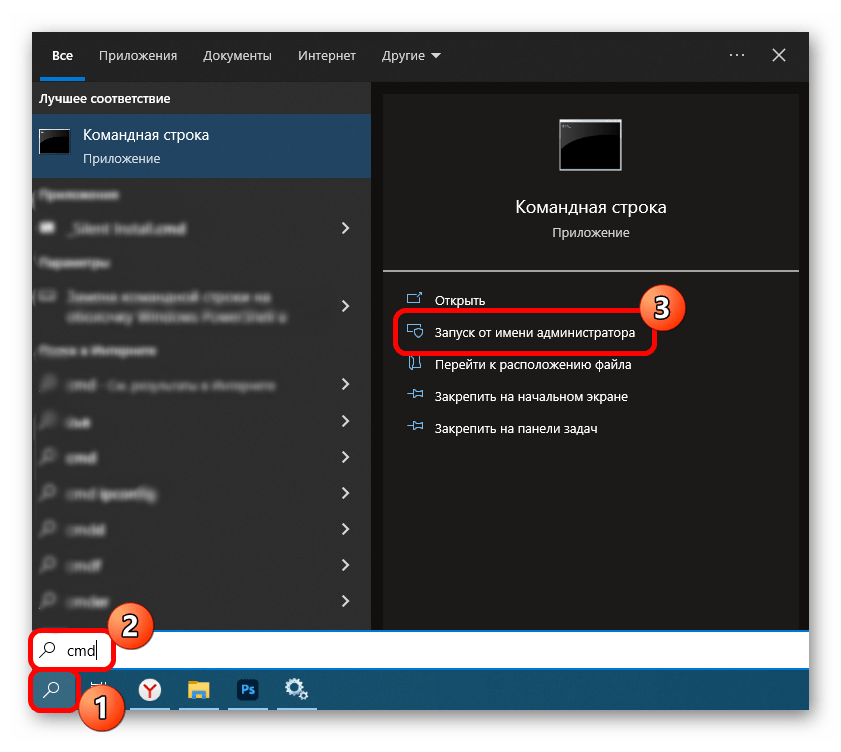
- Отключите интернет, затем запустите «Командную строку» от имени администратора. Чтобы открыть консоль, можете воспользоваться строкой системного поиска.
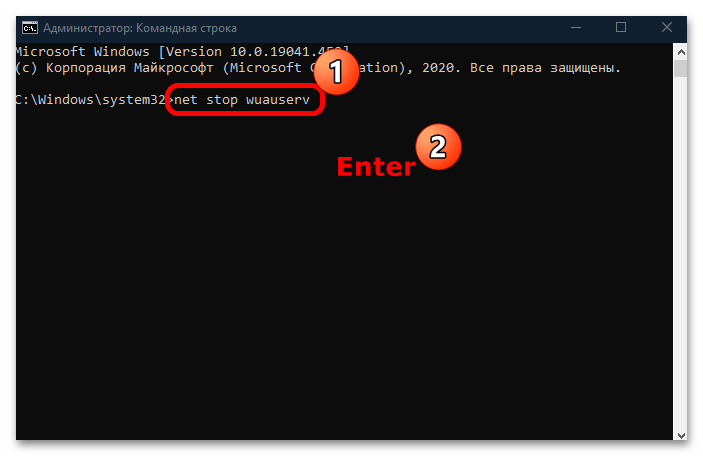
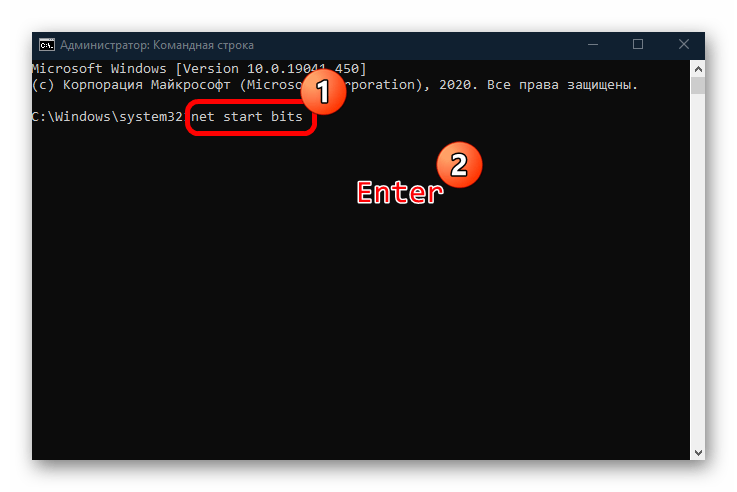
- Чтобы приостановить работу «Центра обновлений Windows», поочередно введите несколько команд, выполнив каждую из них нажатием на клавишу «Enter»:
net stop wuauserv
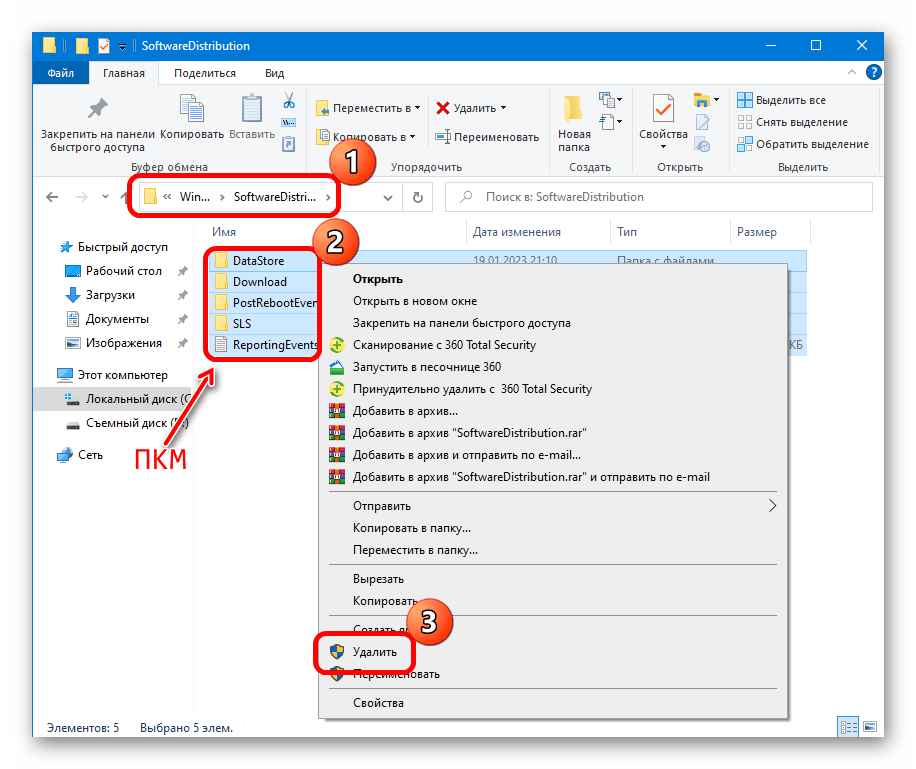
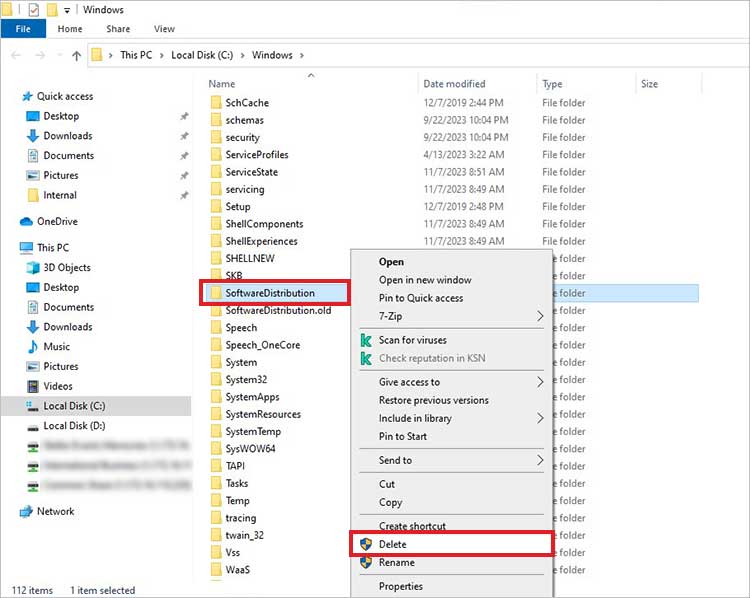
net stop bits - Когда обе команды успешно выполнены, откройте встроенный «Проводник» и перейдите по пути
C:\Windows\SoftwareDistribution\. Очистите содержимое последнего каталога – там хранится кеш обновлений. - Вернитесь к консоли и выполните две команды, запускающие службы «Центра обновления»:
net start bits
net start wuauserv
После этого снова подключитесь к интернету и проверьте, перестал ли грузить диск «Windows Module Installer Worker».
Способ 2: Приостановка работы стороннего антивируса
Если вы заметили, что проблема появилась после установки какого-либо стороннего антивируса или фаервола, есть смысл попробовать отключить такой софт. Все дело в том, что такие программы могут по ошибке заподозрить деятельность самой системы как небезопасную и заблокировать работу установщика модулей, и из-за этого конфликта происходит большая нагрузка на компоненты компьютера. Методы отключения различаются, завися от настроек антивирусного продукта, и в отдельном руководстве мы разбирали некоторые наиболее популярные решения.
Подробнее: Отключение антивируса

В том случае, когда причиной неполадки действительно стал антивирус, лучше поменять его на другой, если есть такая возможность, иначе он будет постоянно блокировать попытки установить апдейты.
Способ 3: Использование диагностических утилит
Для удобства в Windows 10 встроены специальные утилиты, которые способны проверить на ошибки многие системные компоненты. Те, которые связаны с обновлениями, также можно просканировать в автоматическом режиме:
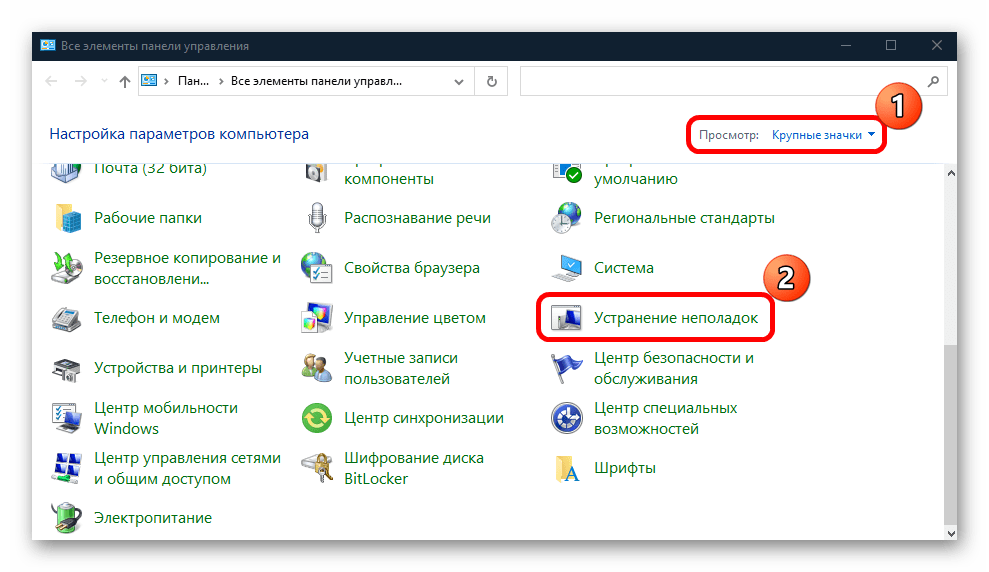
- Откройте «Панель управления», отыскав средство в главном меню.
- В выпадающем меню «Просмотр» выберите «Крупные значки», затем перейдите в раздел «Устранение неполадок».
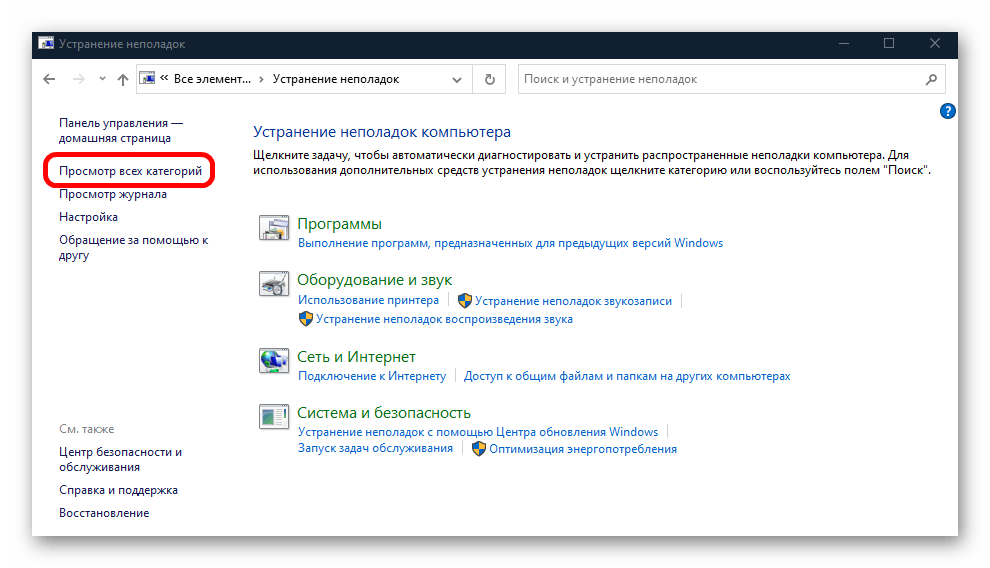
- В новом окне на левой панели кликните по строке «Просмотр всех категорий».
- Выполните диагностику трех компонентов, поочередно нажимая на них и следуя инструкции пошагового мастера: «Обслуживание системы», «Фоновая интеллектуальная служба передачи (BITS)» и «Центр обновления Windows».


Если проблема будет найдена и исправлена, установщик модулей должен корректно заработать.
Способ 4: Проверка целостности системных файлов
Нередко подобного рода ошибки и проблемы появляются из-за поврежденных системных файлов, целостность которых могла быть нарушена вследствие вирусных атак или серьезных сбоев в работе «десятки». Попробуйте использовать встроенные утилиты SFC и DISM, которые сканируют файлы и их хранилища в автоматическом режиме. Ранее мы писали о методах сделать это.
Подробнее: Использование и восстановление проверки целостности системных файлов в Windows 10
Способ 5: Чистая загрузка ОС
Попытайтесь выполнить установку апдейтов безопасности при чистой загрузке операционной системы. В таком режиме все сторонние службы и приложения будут отключены, а это может оказаться эффективным в том случае, если они вмешиваются в работу средств обновления.
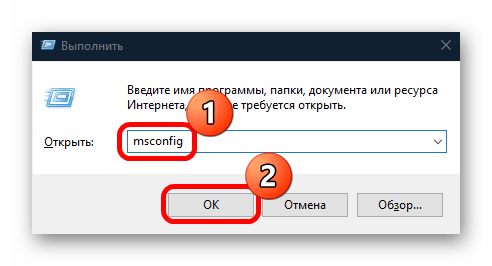
- Перейдите в окно «Конфигурация системы». Для этого нажмите на клавиши «Win + R», затем в поле оснастки «Выполнить» введите
msconfigи кликните по «ОК». - Перейдите на вкладку «Службы», отметьте пункт «Не отображать службы Майкрософт». Если сторонние службы останутся в списке, выберите «Отключить все». Примените настройки.
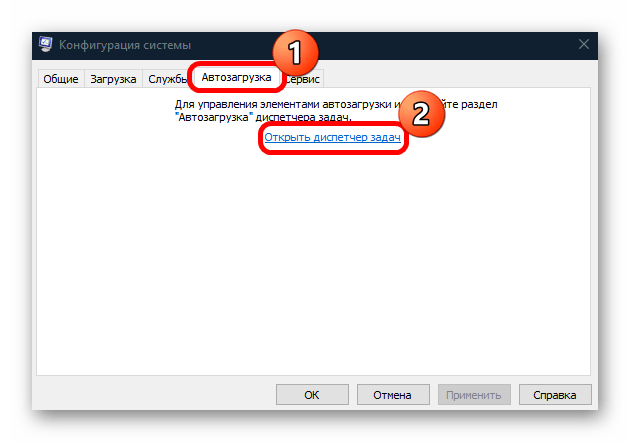
- Далее откройте вкладку «Автозагрузка» и из нее запустите «Диспетчер задач».
- На той же вкладке менеджера отключите все элементы автозагрузки.


После выполнения вышеуказанных действий перезагрузите систему – произойдет чистый запуск. Если в таком режиме «Windows Module Installer Worker» не грузит диск или все обновления проходят успешно, значит, какая-то сторонняя служба или программа вмешивается в эту процедуру. Вспомните, когда появилась проблема и что с ней может быть связано, чтобы удалить этот софт.
Читайте также: Удаление программ в Windows 10
Наша группа в TelegramПолезные советы и помощь
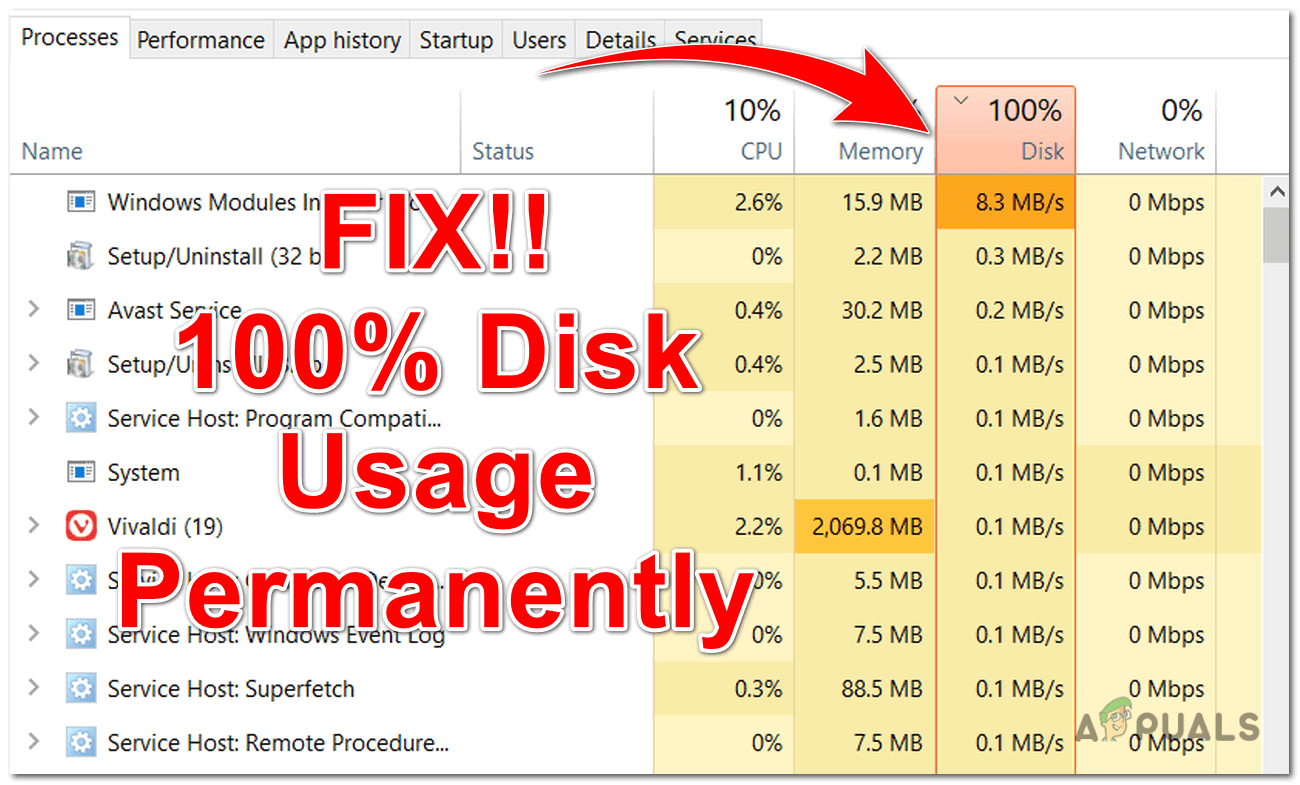
While carrying out a resource-intensive task, a sudden spike in CPU or memory usage is common. This spike usually goes down after some time or when the task is finished. However, there are times when certain processes, like the Windows Modules Installer Worker, shows 100% disk usage in the task manager. This sudden issue leads to a stuttering and sluggish computer without any resources to handle additional tasks.
The Windows Modules Installer Worker’s CPU or memory usage skyrocketing to 100% leaves users wondering about its causes. Regardless of this spike affecting the performance, this issue is not worrisome and can be fixed easily using the methods explained below.
What is Windows Modules Installer Worker (WMIW)?
Windows Modules Installer Worker, WMIW, or TiWorker.exe, is a critical Windows core system process whose function is to check and install Windows updates automatically. This process has administrator-level permissions and works in the background to install all the necessary updates without needing any user interference.
Like any other Windows process or application, the Windows Modules Installer Worker requires some power to work efficiently. Apart from installing updates, the TiWorker.exe also ties up various important system resources like .NET to keep essential processes working smoothly.
While installing updates, it can run into problems, leading to Windows Modules Installer Worker 100% disk usage issue.
Why does the Windows Modules Installer Worker reflect High CPU Usage?
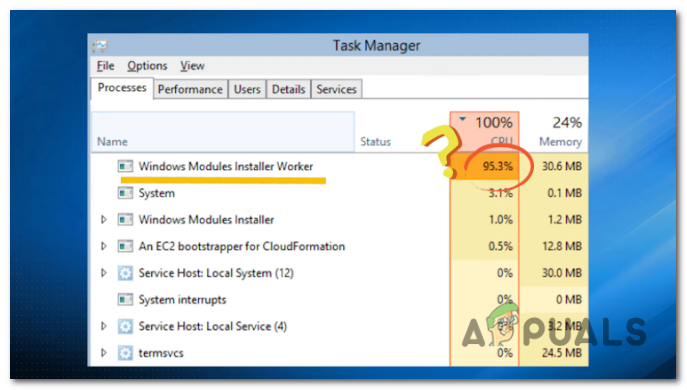
Upon checking the task manager and finding the Windows Modules Installer Worker high CPU usage issue, we assume that the process, in itself, is corrupt or causing problems.
However, there are many other reasons that can cause the Windows Modules Installer Worker high CPU usage. The reasons could be – a malware infection, broken update installer, insufficient power supply, faulty memory or disk, and more.
Windows Modules Installer Worker 100% disk usage can also be due to dust build-up and improper airflow inside the CPU cabinet, resulting in computer overheating and subsequent effects like stuttering, unexpected frame drops, and system crashing.
Methods to Fix the Windows Modules Installer Worker 100% Disk Usage
There is no single cause behind the Windows Modules Installer Worker high disk usage. Nevertheless, we have explained several fixes below that might help fix potential triggers causing this issue.
Method 1: Perform a Clean Boot
A clean boot boots the computer with a minimum set of essential processes and applications. Doing this will help you figure out if the Windows Modules Installer Worker high CPU usage is due to a background program interfering with the TiWorker.exe process. The steps to do this are simple –
- Press WINDOWS + R and type msconfig. Press Enter.
- You’ll see the System Configuration screen.
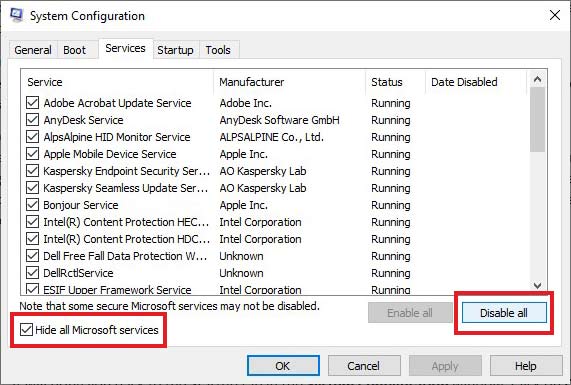
- Navigate to the Services tab and check the Hide all Microsoft services option.
- Then, click on Disable all to disable all third-party services.
- Then, go to the Startup tab and click on Open Task Manager.
- In the startup tab, disable all the applications. Close the Task Manager.
- It will bring you back to the Startup tab in the System Configuration window. Click on OK.
- Restart your computer. Your computer will boot in a clean boot environment.
Method 2: Run Memory Diagnostics
Faulty RAM module/s might be causing the Windows Modules Installer Worker high CPU usage issue on your system. You can test the memory modules via Windows’ built-in memory diagnostics tool. Here’s what to do –
- Press WINDOWS + R and type mdsched.exe. Press Enter.
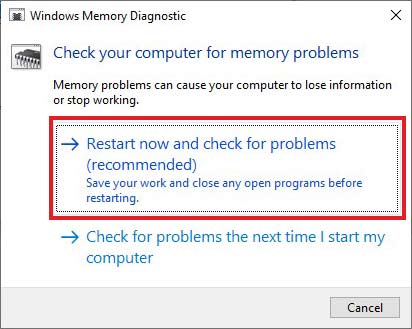
- Click on Restart now and check for the problems option.
- Wait for the tool to finish the scan and restart the computer.
Note – Make sure to save everything and close all applications before using it.
Method 3: Do a Comprehensive Malware Check
A malware inside your system might have already replaced the real Windows Modules Installer Worker process and mimicking it for suspicious activities. If you see something suspicious or you are facing the Windows Modules Installer Worker 100% CPU usage error after visiting a random webpage or connecting an unknown device to your system, perform a virus scan on your Windows PC. Use a reliable and well-renowned antivirus for this purpose.
Method 4: Set PC performance to the Best
Unwanted features like visual effects can hog up the system resources, leading to other processes like TiWorker.exe to stall or show 100% disk usage. You can fix this by opting for the best performance. To do this –
- Open My PC.
- Right-click on the blank space and click on Properties.
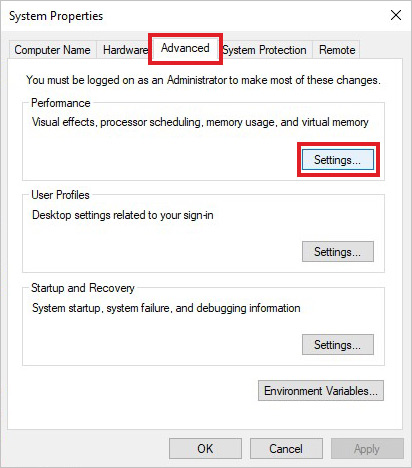
- Click on Advanced system settings to open the System Properties window.

- Under the Advanced tab, go to the Performance section and click on Settings.
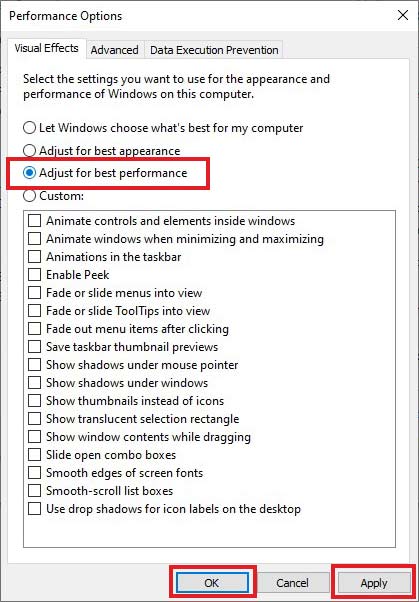
- In the Performance Options window, under the Visual Effects tab, click on Adjust for best performance.
- Click OK.
Method 5: Set Windows Modules Installer Worker to Manual
Automatic update installation in Windows is a great way to prioritize other important tasks. However, in some scenarios, it has issues that lead to Windows Modules Installer Worker 100% CPU usage. You can fix this by toggling the service to ‘manual’ mode. To do this –
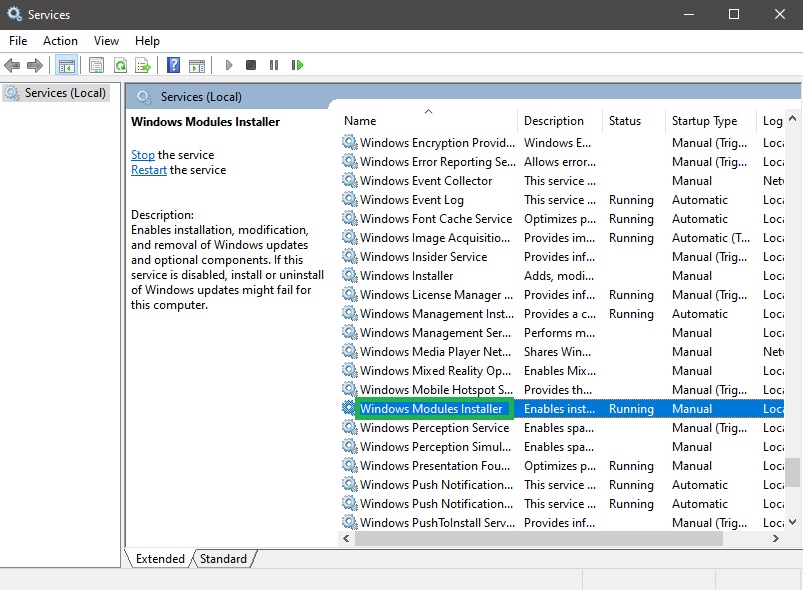
- Press WINDOWS + R and type services.msc. Press Enter.
- Locate the Windows Module Installer and right-click on it. Click on properties.
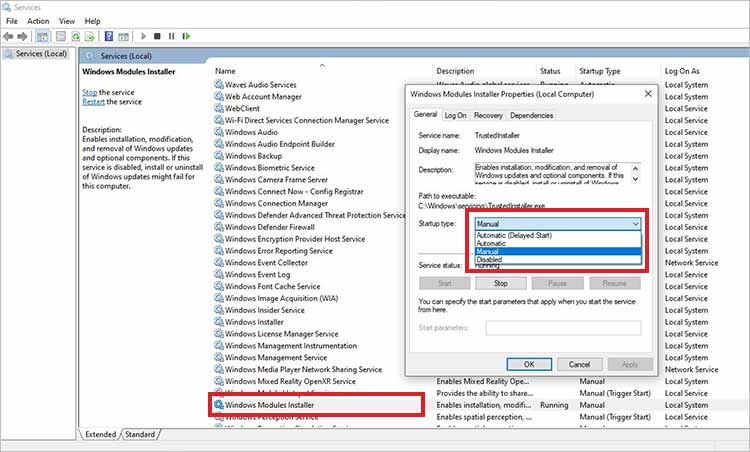
- Change the Startup type to manual.
- Click on Apply and OK.
Method 6: Delete the SoftwareDistribution Folder
SoftwareDistribution is a folder that Windows uses to temporarily store files required for installing Windows updates. These files can sometimes conflict with the Windows Modules Installer Worker process, resulting in high CPU usage errors. You can fix the TiWorker high CPU usage by deleting the SoftwareDistribution folder. Here are the steps for doing this –
- Press WINDOWS + R and type services.msc. Press Enter.
- Locate the Windows Update service and stop it.

- Close the Services Window and again press WINDOWS + R.
- Type C:\Windows\ and press Enter.
- Navigate to the SoftwareDistribution folder and delete it.
You can also clean other temporary files from your computer to clear all unwanted files on your computer.
Method 7: Run Windows Update Troubleshooter
If there is a problem with the Windows updater itself, it can cause the Windows Modules Installer Worker 100% usage on your Windows computer. You can resolve the underlying problem by running the Windows update troubleshooter. For this –
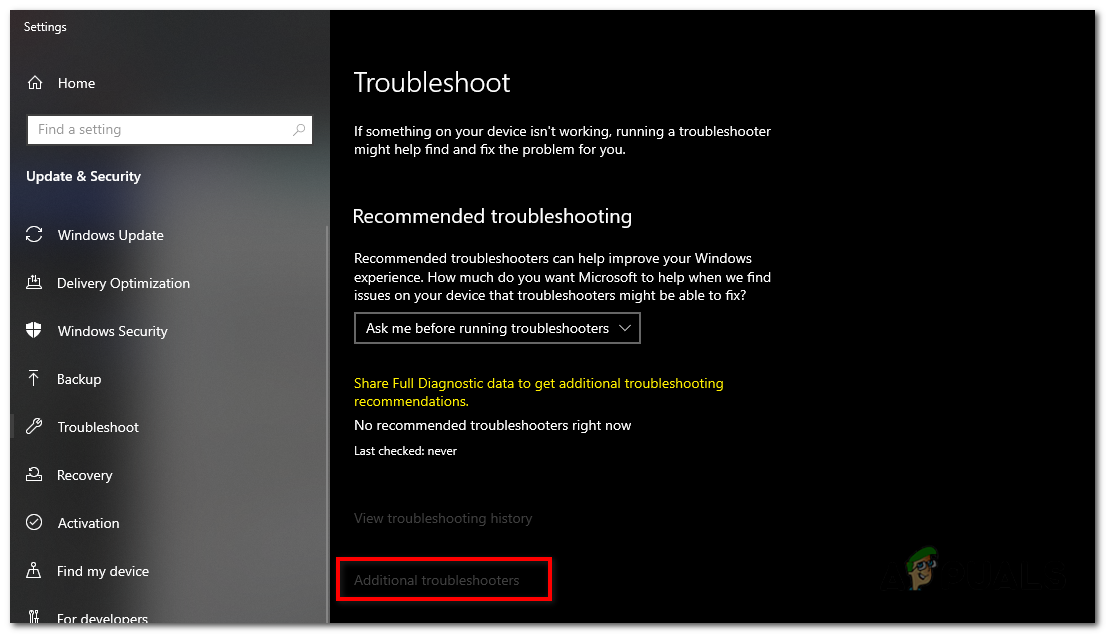
- Press WINDOWS + I to open Settings.
- Click on Update & Security.
- Click on Troubleshoot in the left pane.

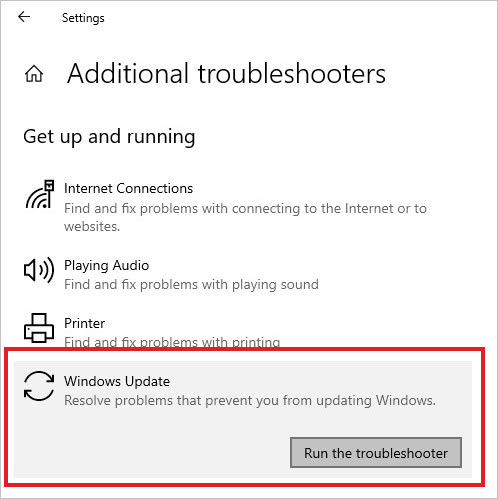
- Click on Additional troubleshooters.
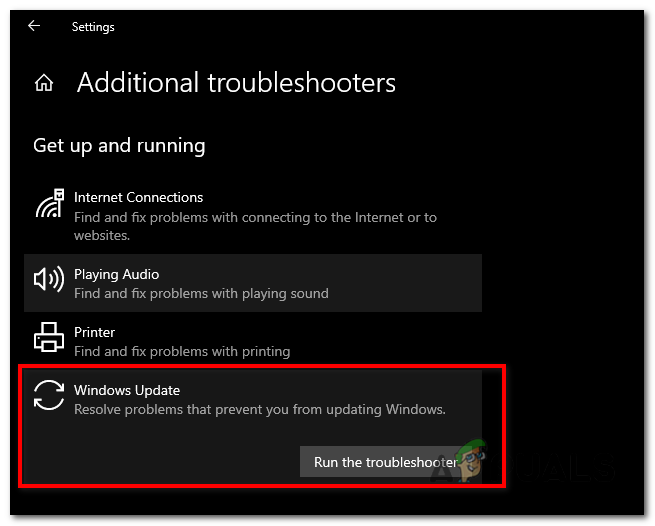
- Locate the Windows Update troubleshooter and click on it.
- Click on Run the troubleshooter. Follow the on-screen instructions afterward.
Reduce Unnecessary CPU Usage
The Windows Modules Installer Worker (WMIW) 100% disk usage is an unusual behavior indicating high CPU/disk image that can slow down the computer.
Using the methods explained above, you can fix the Windows Modules Installer Worker high disk usage issue in no time. And, if your computer is constantly stuttering and crashing due to high CPU usage, try using System Restore to restore the PC to a previous error-free state.
If you accidentally deleted some files on your sluggish computer, worry not and use a powerful Windows data recovery software to recover them.
[FIXED] — Svchost.exe High CPU usage
How to fix modern setup host high CPU usage issue?
Methods to fix WUDFHost.exe high CPU usage on Windows PCs
[FIXED] – Antimalware service executable high CPU usage issue
Is the Windows Modules Installer Worker process essential?
Yes, WMIW or Windows Modules Installer Worker is a core system process that automatically installs various OS and security updates. It also ensures that essential processes are working smoothly.
What causes 100% Disk usage?
Multiple instances of an application running simultaneously, too many applications running parallel, malware or cryptominer working in the background are some of the reasons behind high disk usage.
Will upgrading RAM or SSD solve 100% usage issue?
In some cases, if the 100% usage is due to insufficient RAM or old HDD, upgrading RAM and switching to SSD can help you resolve high CPU/memory issue.
Was this article helpful?
YES7
NO
Многие пользователи Windows 10 сталкиваются с тем, что процесс TiWorker.exe или Windows Modules Installer Worker грузит процессор, диск или оперативную память. Причем нагрузка на процессор бывает такой, что какие-либо другие действия в системе становятся затруднены.
В этой инструкции подробно о том, что такое TiWorker.exe, почему он может нагружать компьютер или ноутбук и что можно сделать в этой ситуации, чтобы исправить проблему, а также о том, как отключить этот процесс.
Что за процесс Windows Modules Installer Worker (TiWorker.exe)

Прежде всего о том, что такое TiWorker.exe — это процесс, запускаемый службой TrustedInstaller (установщик модулей Windows) при поиске и установке обновлений Windows 10, при автоматическом обслуживании системы, а также при включении и отключении компонентов Windows (в Панель управления — Программы и компоненты — Включение и отключение компонентов).
Удалить этот файл нельзя: он необходим для правильной работы системы. Даже если вы каким-то образом удалите этот файл, с большой вероятностью это приведёт к необходимости восстановления операционной системы.
Существует возможность отключить запускающую его службу, о чем тоже поговорим, но обычно, для того, чтобы исправить описываемую в текущем руководстве проблему и снизить нагрузку на процессор компьютера или ноутбука, этого не требуется.
Штатная работа TiWorker.exe может вызывать высокую нагрузку на процессор
В большинстве случаев то, что TiWorker.exe грузит процессор — это штатная работа Windows Modules Installer. Как правило, это происходит при автоматическом или ручном поиске обновлений Windows 10 или их установке. Иногда — при проведении обслуживания компьютера или ноутбука.
При этом обычно достаточно просто подождать, когда установщик модулей завершит свою работу, что на медленных ноутбуках с медленными жесткими дисками, а также в тех случаях, когда обновления давно не проверялись и не скачивались, может занять продолжительное время (вплоть до часов).
Если ждать нет желания, а также нет уверенности, что дело в вышеописанном, начать следует со следующих шагов:
- Зайдите в Параметры (клавиши Win+I) — Обновление и восстановление — Центр обновления Windows.
- Проверьте наличие обновлений и дождитесь их загрузки и установки.

- Перезагрузите компьютер для окончания установки обновлений.
И ещё один вариант, вероятно, нормальной работы TiWorker.exe, с которым несколько раз пришлось столкнуться: после очередного включения или перезагрузки компьютера вы видите черный экран (но не так как в статье Черный экран Windows 10), по Ctrl+Alt+Del можно открыть диспетчер задач и там виден процесс Windows Modules Installer Worker, который сильно грузит компьютер. В этом случае может показаться, что с компьютером что-то не так: но по факту, через 10-20 минут всё приходит в норму, загружается рабочий стол (и больше не повторяется). Судя по всему, такое происходит, когда загрузка и установка обновлений была прервана перезагрузкой компьютера.
Проблемы в работе Центра обновления Windows 10
Следующая по распространенности причина странного поведения процесса TiWorker.exe в диспетчере задач Windows 10 — неправильная работа Центра обновлений.
Здесь следует попробовать следующие способы исправления проблемы.
Автоматическое исправление ошибок
Возможно, помочь решить проблему смогут встроенные средства поиска и устранения неполадок, для использования которых выполните следующие шаги:
- Зайдите в Панель управления — Устранение неполадок и слева выберите «Просмотр всех категорий».
- Поочередно запустите следующие исправления: «Обслуживание системы», «Фоновая интеллектуальная служба передачи», «Центр обновления Windows».


После завершения выполнения, попробуйте выполнить поиск и установку обновлений в параметрах Windows 10, а после установки и перезагрузки компьютера посмотреть, была ли исправлена проблема с Windows Modules Installer Worker.
Ручное исправление проблем Центра обновлений
Если предыдущие шаги не решили проблему с TiWorker, попробуйте следующие:
- Способ с ручной очисткой кэша обновлений (папки SoftwareDistribution) из статьи Не скачиваются обновления Windows 10.
- Если проблема появилась после установки какого-либо антивируса или фаервола, а также, возможно, программы для отключения «шпионских» функций Windows 10, это также могло повлиять на возможность загрузки и установки обновлений. Попробуйте временно их отключить.
- Выполните проверку и восстановление целостности системных файлов, запустив командную строку от имени Администратора через меню правого клика мыши по кнопке «Пуск» и введя команду dism /online /cleanup-image /restorehealth (подробнее: Проверка целостности системных файлов Windows 10).
- Выполните чистую загрузку Windows 10 (с отключенными сторонними службами и программами) и проверьте, будет ли работать поиск и установка обновлений в параметрах ОС.
Если с вашей системой всё в целом в порядке, то один из способов к этому моменту уже должен был бы помочь. Однако, если этого не произошло, можно попробовать альтернативные варианты.
Как отключить TiWorker.exe
Последнее, что я могу предложить в плане решения проблемы — это отключить TiWorker.exe в Windows 10. Для этого проделайте следующие шаги:
- В диспетчере задач снимите задачу с Windows Modules Installer Worker
- Нажмите клавиши Win+R на клавиатуре и введите services.msc
- В списке служб найдите «Установщик модулей Windows» и дважды кликните по ней.
- Остановите службу, а в тип запуска установите «Отключена».

После этого процесс запускаться не будет. Еще один вариант этого же способа — отключение службы «Центр обновления Windows», но в данном случае исчезнет возможность устанавливать обновления вручную (как это описывается в упоминавшейся статье про не скачивающиеся обновления Windows 10).
Дополнительная информация
И еще несколько пунктов, касающихся высокой нагрузки, создаваемой TiWorker.exe:
- Иногда это может быть вызвано несовместимыми устройствами или их фирменным ПО в автозагрузке, в частности встречалось для HP Support Assistant и служб старых принтеров других марок, после удаления — нагрузка пропадала.
- Если процесс вызывает мешающую работать нагрузку в Windows 10, но это не является результатом проблем (т.е. проходит само через некоторое время), вы можете установить низкий приоритет для процесса в диспетчере задач: при этом, ему придется дольше выполнять свою работу, но TiWorker.exe будет в меньшей степени влиять на то, что вы делаете за компьютером.


Надеюсь, какие-то из предложенных вариантов помогут исправить ситуацию. Если же нет, попробуйте описать в комментариях, после чего появилась проблема и что уже предпринималось: возможно, у меня получится помочь.
Windows Module Installer (also known as TrustedInstaller.exe) is a Windows service that is responsible for installing, modifying, and removing system components, updates, and optional Windows features. It is an integral part of the Windows operating system, starting from Windows Vista and onwards.
The main purpose of the Windows Module Installer is to ensure the integrity and security of the Windows operating system by managing the installation and servicing of Windows updates, service packs, and other system components. It is designed to protect critical system files and prevent unauthorized modifications, thereby maintaining system stability and reliability.
The Windows Module Installer runs with elevated privileges and has the ability to access and modify system files and registry settings. It is usually active in the background, working silently to manage the installation and maintenance of system components. However, it may become more noticeable during specific system updates or when installing optional Windows features.
Why is Windows Module Installer Utilizing 100% of My Disk?
It makes sense that the Windows Module Installer would be responsible for excessive disk or CPU usage in Windows, given how time-consuming updates to Windows and its related programs can be. You will often observe increases in CPU and disk usage during updates in Task Manager.
However, if you continue to experience 100% disk utilization and high CPU usage for an hour or more after the updates have been completed, you might have a problem. When stress testing your CPU, sustained high CPU usage is normal; however, it is not normal after an update, as it can result in high CPU temperatures. Increased CPU temperatures can lead to slowdowns, freezes, and even shutdowns.
If you are noticing continuous high disk and CPU usage from Windows Modules Installer, it is time to examine it more closely. Here is how to prevent Windows Modules Installer updates from consuming your CPU and disk resources:
1. Running Windows Memory Diagnostic Tool
You can use this tool to ensure that the issue is not hardware-related. Your computer’s RAM module may have problems, causing instability which this tool allows you to identify.
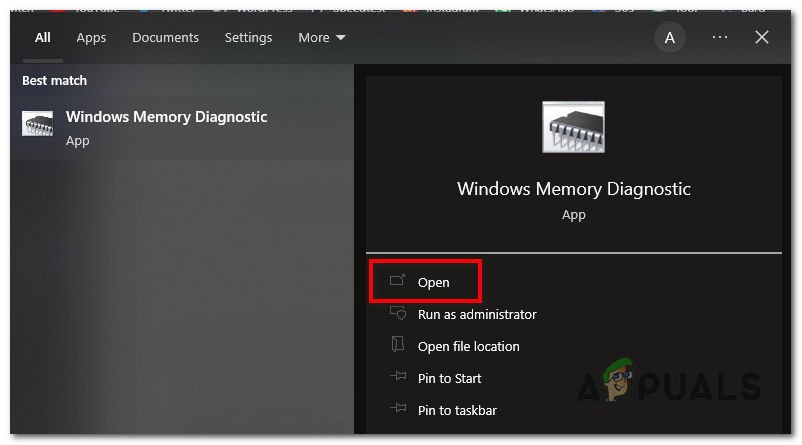
- Click on the Start button located at the bottom left corner of your screen.
- Type “Windows Memory Diagnostic” in the search bar. You should see the tool appear in the search results.
- Click on the “Windows Memory Diagnostic” tool from the search results to launch it.

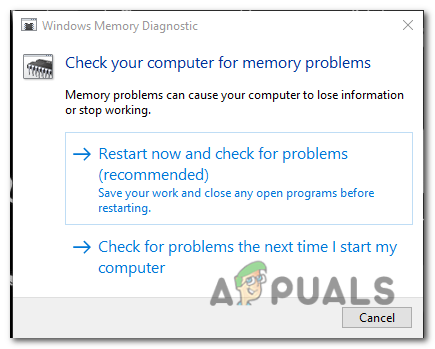
Open Windows Memory Diagnostic. - The tool will present you with two options:
1. Restart now and check for problems (recommended): This option will immediately restart your computer and initiate the memory diagnostic test during the startup process.
2. Check for problems the next time I start my computer: This option allows you to schedule the memory diagnostic test for the next time you restart your computer.
Choose between “Restart now and check for problems” or “Check for problems the next time I start my computer”. - Choose the option that suits your preference. Keep in mind that if you choose the first option, any unsaved work will be lost when your computer restarts.
- Once the memory diagnostic test starts, it will run a series of tests to check for memory errors. The process may take several minutes to complete.
- After the memory diagnostic test finishes, your computer will restart. Upon startup, you’ll be able to view the test results, which will indicate if any memory issues were detected.
2. Running Windows Update Troubleshooter
The Windows Update Troubleshooter is a built in tool in Windows that helps diagnose and resolve issues related to Windows updates. While it mainly focuses on resolving problems with the Windows Update service, it can also be helpful in identifying issues with the Windows Module Installer (TrustedInstaller.exe) if it is causing high CPU and disk usage.
- Click on the Start button and then the gear icon for the Windows Settings app and Navigate to “Update & Security” > “Troubleshoot” > “Additional Troubleshooters”.

- In the “Additional Troubleshooters” section, select “Windows Update” and click on “Run the troubleshooter”.

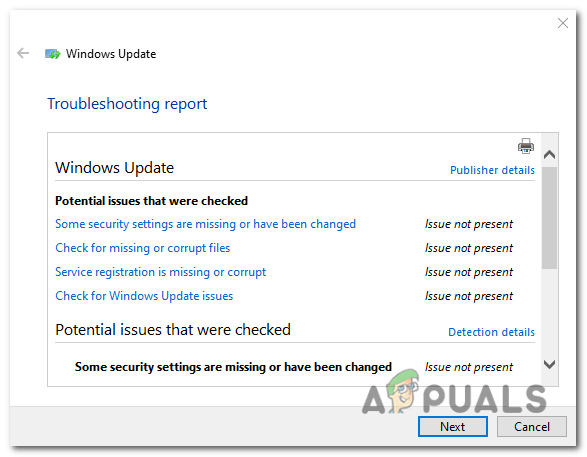
In the “Additional Troubleshooters” section, select “Windows Update” and click on “Run the troubleshooter”. - The Windows Update Troubleshooter will run a series of automated checks and diagnostics to identify and resolve common Windows Update issues. It may take some time to complete.
- Once the troubleshooter has finished, it will provide a summary of the issues it found and any problems it was able to fix. Pay attention to any specific mention of problems with the Windows Module Installer.

Results of the Windows Troubleshooter scan. - If the Windows Update Troubleshooter identifies issues with the Windows Module Installer, it will attempt to apply appropriate fixes. Follow the troubleshooter’s instructions to implement these fixes.
- After applying the recommended fixes, monitor the CPU and disk usage to see if the problem with high usage by the Windows Module Installer is resolved.
While the Windows Update Troubleshooter can be helpful in resolving issues related to the Windows Module Installer, it is important to note that it might not address all possible causes. If the problem persists, refer to the fixes below.
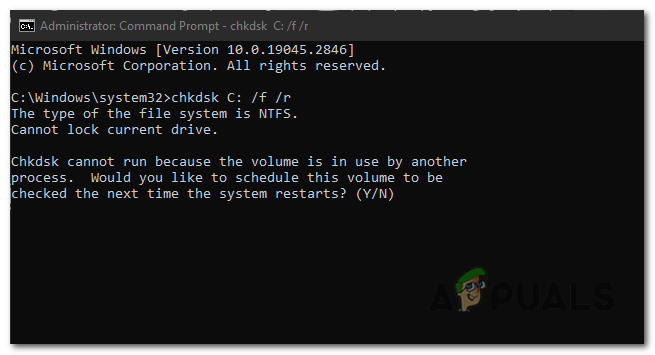
3. Running the “CHKDSK” command
Running the CHKDSK (Check Disk) command can help you find and fix issues with the file system and disk errors on your PC. While it may not directly address problems specifically related to the Windows Module Installer, it can indirectly assist in resolving high CPU and disk usage caused by disk related issues.
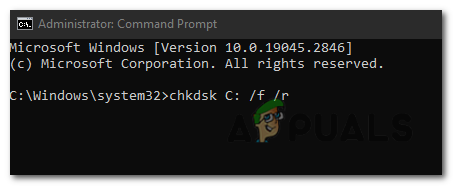
- Press the Windows key, search for “Command Prompt,” right-click on it, and select “Run as administrator.” This will run Command Prompt will administrator privileges.
- In the Command Prompt window, type “chkdsk C: /f /r” and press Enter. Replace “C:” with the appropriate drive letter if your Windows installation is on a different drive.
chkdsk C: /f /r

In the Command Prompt window, type “chkdsk C: /f /r” and press Enter. - CHKDSK will begin scanning the selected drive for errors and attempt to fix any it finds. The process may take a while, depending on the size and health of your disk.
- If prompted to schedule a disk check on the next system restart, type “Y” and press Enter. Restart your computer to initiate the CHKDSK scan before the operating system loads.

If prompted to schedule a disk check on the next system restart, type “Y” and press Enter. - Once the CHKDSK scan completes and your system restarts, monitor the CPU and disk usage to determine if the high usage issue persists. If the problem was caused by disk errors or file system corruption, CHKDSK will have resolved it.
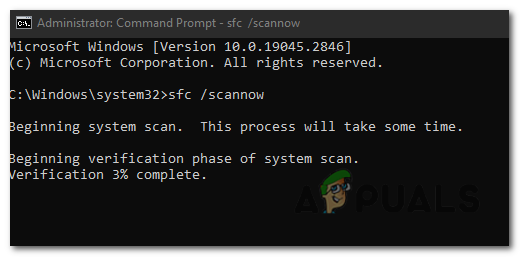
4. Running the “SFC” and “DISM” scans
Running the SFC (System File Checker) and DISM (Deployment Image Servicing and Management) scans will find and repair the existing Windows system files and other similar files on your PC.
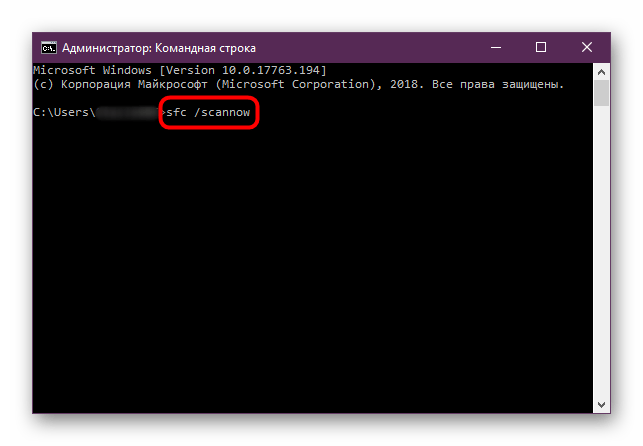
- Press the Windows key, search for “Command Prompt,” right-click on it, and select “Run as administrator.” This will run Command Prompt will administrator privileges.
- In the Command Prompt window, type “sfc /scannow” and press Enter. The System File Checker will start scanning your system files for any errors or corruptions.
sfc /scannow

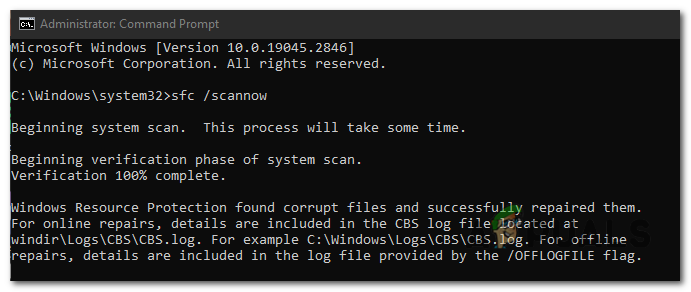
In the Command Prompt window, type “sfc /scannow” and press Enter. - The SFC scan will automatically detect and attempt to repair any corrupted system files it finds. The process may take some time to complete depending on the speed of your drive.

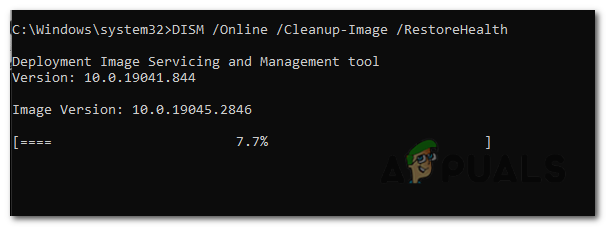
The SFC scan will automatically detect and attempt to repair any corrupted system files it finds. - In the same Command Prompt window, type “DISM /Online /Cleanup-Image /RestoreHealth” and press Enter. The DISM scan will check the Windows image for any issues and attempt to repair them using Windows Update.
DISM /Online /Cleanup-Image /RestoreHealth

In the same Command Prompt window, type “DISM /Online /Cleanup-Image /RestoreHealth” and press Enter. - The DISM scan will connect to Windows Update to download any necessary files and fix problems with the Windows image. This process may also take some time to finish.
- After the scans are complete, restart your computer to apply any repairs made by SFC and DISM.
- Once your system restarts, monitor the CPU and disk usage to determine if the high usage issue persists.
If corrupted system files or issues with the Windows image were the underlying cause, the scans will solve the problem.
5. Killing the “TiWorker.exe” process
TiWorker.exe is the executable file for the Windows Module Installer Worker service, which is responsible for installing updates and system components. Killing this would kill the Windows Module installer, resulting in the termination of Windows Update processes.
- Press “Ctrl + Shift + Esc” on your keyboard to open the Task Manager. Alternatively, you can right-click on the taskbar and select “Task Manager” from the context menu.
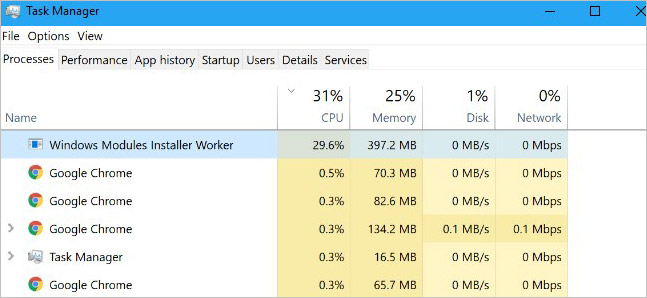
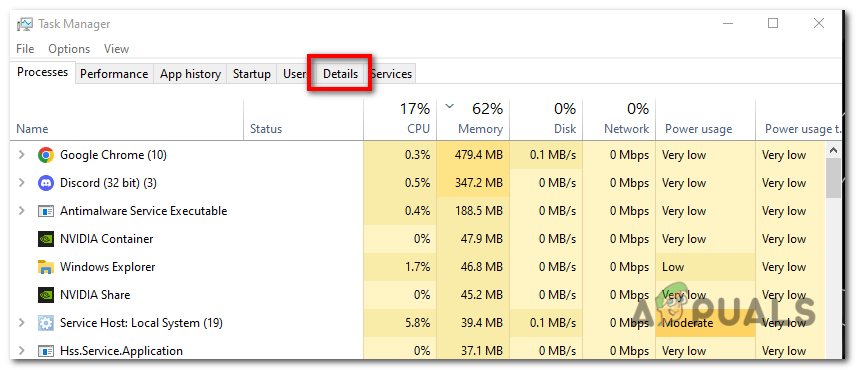
- Depending on your version of Windows, either switch to the “Processes” or “Details” tab in Task Manager. Look for the “TiWorker.exe” process in the list of running processes.

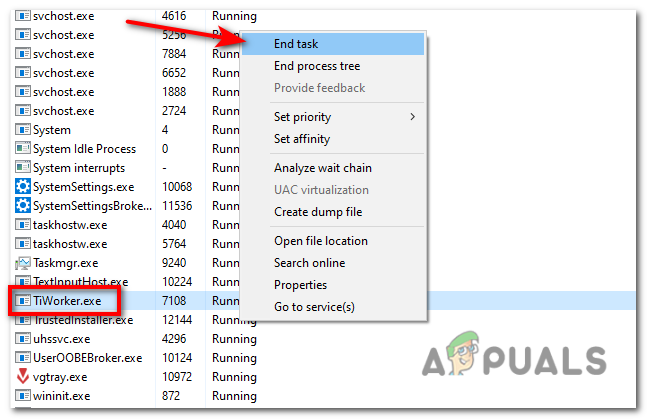
Depending on your version of Windows, either switch to the “Processes” or “Details” tab in Task Manager. - Locate the “TiWorker.exe” process in the list and click on it to select it.
- Once the “TiWorker.exe” process is selected, click on the “End Task” button at the bottom-right corner of the Task Manager window. Confirm any prompts that appear.

Alternatively, you can right-click on the “TiWorker.exe” and select End Task. - After terminating the TiWorker.exe process, monitor the CPU and disk usage to see if the high usage issue disappears. If TiWorker.exe was the cause of the problem, the CPU and disk usage should decrease.
6. Deleting the “SoftwareDistribution” Folder
Windows usually downloads and saves updates to the “SoftwareDistribution” Folder. Since the downloaded updates files are unable to install correctly, those corrupted Windows Update files result in high DIsk usage. Deleting the folder folder allows you to get rid of the corrupted files.
- Press the Windows key, search for “Command Prompt,” right-click on it, and select “Run as administrator.” This will ensure you have the necessary permissions to delete the folder.
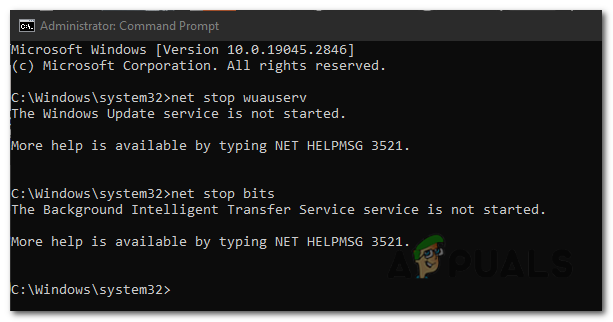
- In the Command Prompt window, type the following commands one by one and press Enter after each:
net stop wuauserv
net stop bits

In the Command Prompt window, type the following commands one by one and press Enter after each: “net stop wuauserv” and “net stop bits”. These commands will stop the Windows Update services temporarily.
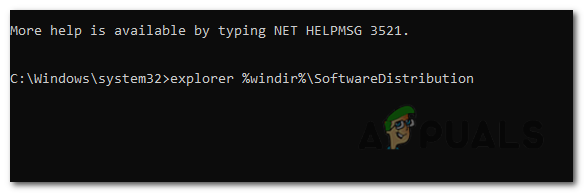
- In the Command Prompt window, type the following command and press Enter:
explorer %windir%\SoftwareDistribution

n the Command Prompt window, type the following command and press Enter: “explorer %windir%\SoftwareDistribution”. This command will open the “SoftwareDistribution” folder in File Explorer.
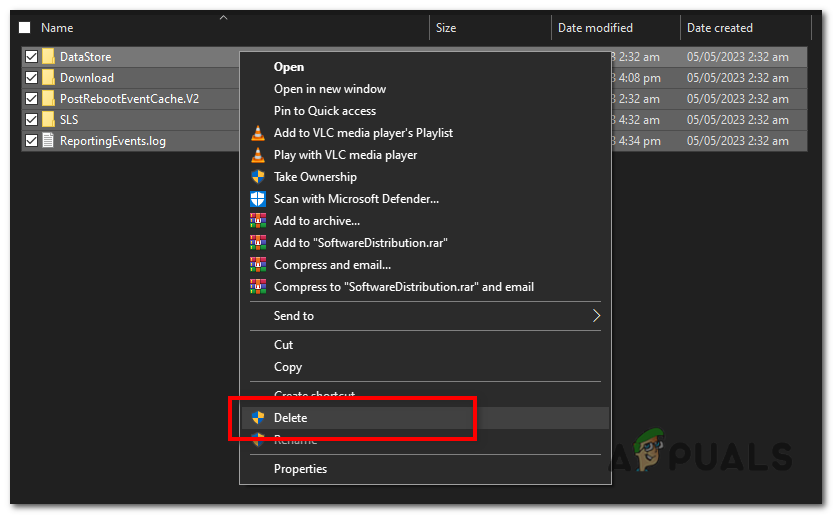
- In the “SoftwareDistribution” folder, select all the files and folders inside, and press the Delete key on your keyboard. Alternatively, you can right-click and select “Delete” from the context menu.

In the “SoftwareDistribution” folder, select all the files and folders inside it, right-click and select “Delete” from the context menu. - Note: If you receive a prompt stating that some files are in use and cannot be deleted, it means the Windows Update services are still running. In that case, repeat step 2 to stop the services again and then try deleting the files.
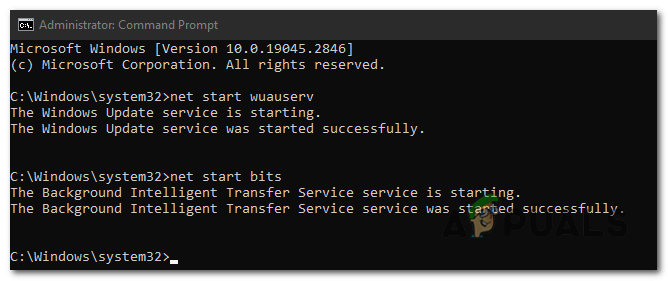
- Go back to the Command Prompt window and type the following commands one by one, pressing Enter after each:
net start wuauserv
net start bits

Go back to the Command Prompt window and type the following commands one by one, pressing Enter after each: “net start wuauserv” and “net start bits”. These commands will start the Windows Update services again.
- Once the services are started, you can close the Command Prompt window.
Deleting the SoftwareDistribution folder helps reset the Windows Update components, and Windows will recreate the necessary files and folders as needed.
7. Turning off Automatic Window Updates
Disabling Automatic Updates will stop this problem from returning in the future as you will only be able to update Windows manually when your device is not in use, allowing optimal resources to carry out the update with no errors.
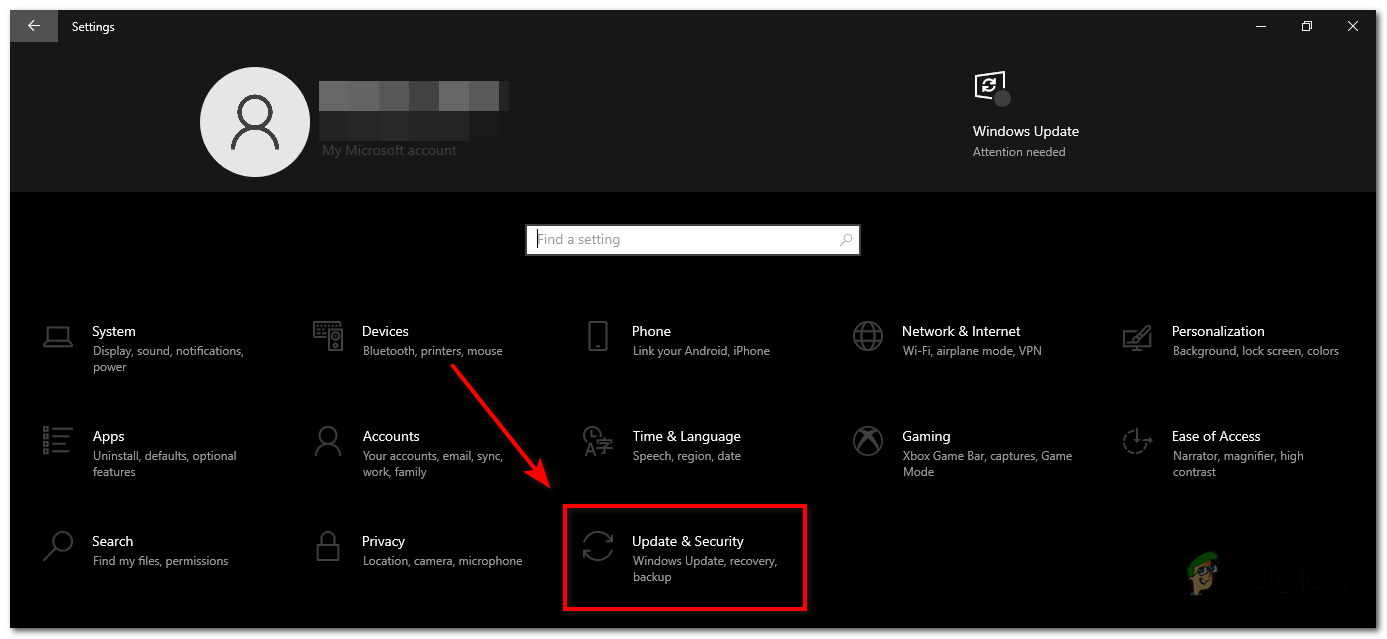
- Press the Windows key on your keyboard or click on the Start button, and then click on the gear icon to open the Windows Settings.
- In the Windows Settings window, click on “Update & Security”.

In the Windows Settings window, click on “Update & Security”. - In the left-hand sidebar of the “Update & Security” section, click on “Windows Update”.
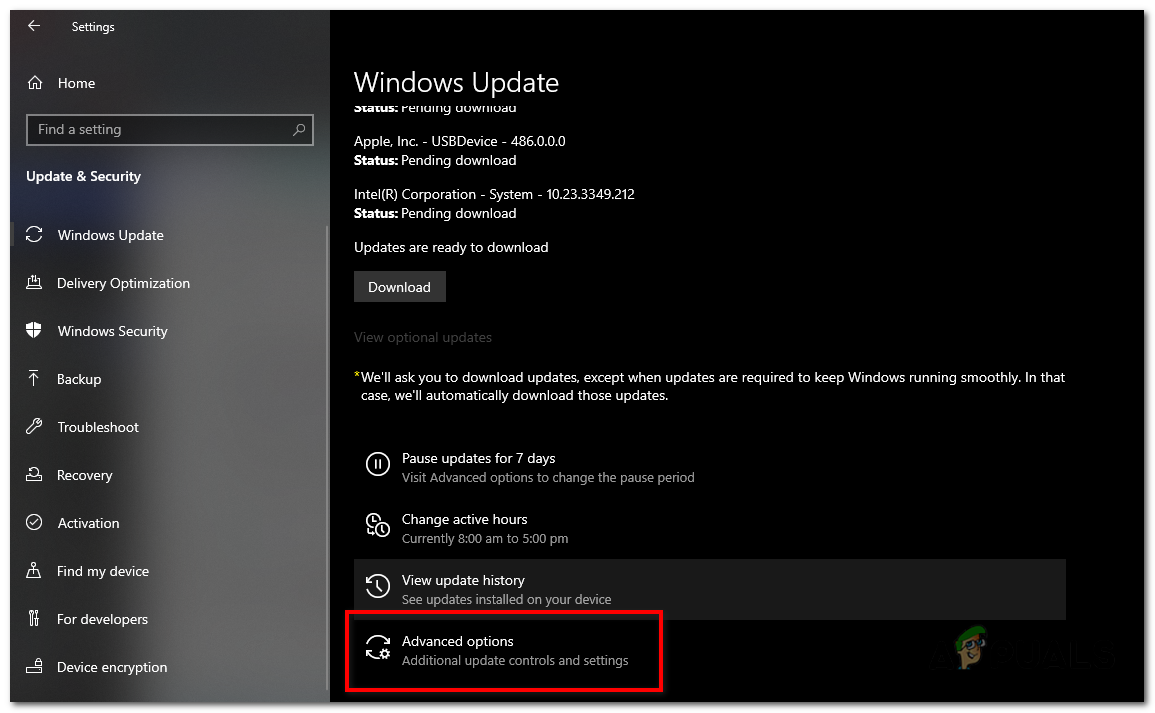
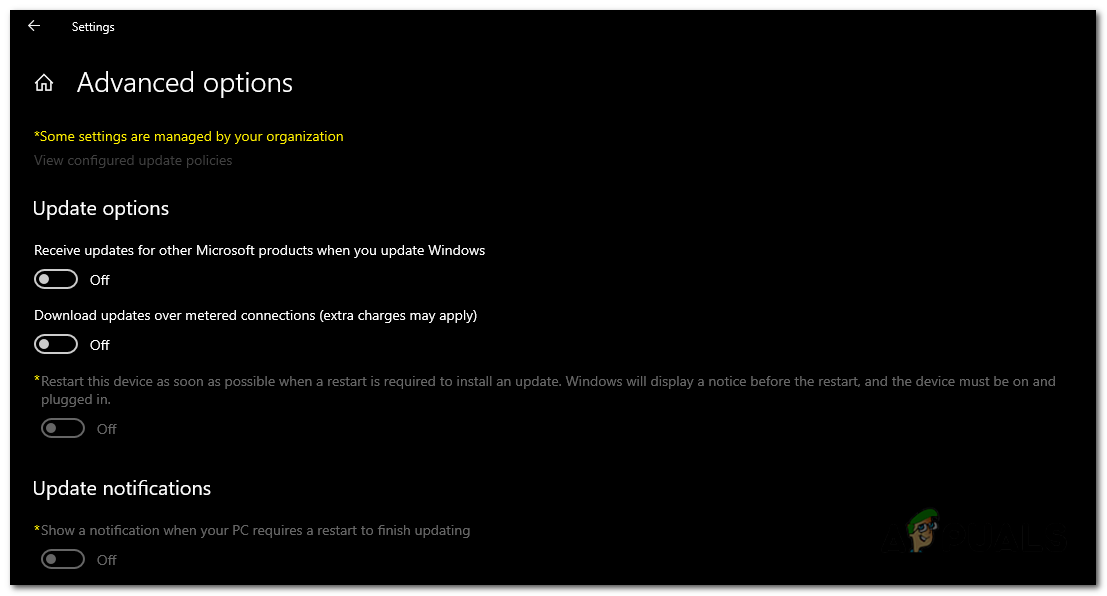
- Under the “Windows Update” section, click on the “Advanced options” link.

Under the “Windows Update” section, click on the “Advanced options” link. - In the “Advanced options” window, toggle off all the options related to Automatic Windows Updates to disable automatic updates.

In the “Advanced options” window, toggle off all the options related to Automatic Windows Updates to disable automatic updates. - Close the “Advanced options” and “Windows Update” windows to save the changes. Your system will no longer automatically download and install Windows updates.
By turning off automatic Windows updates, you can have more control over when and how updates are installed on your system.
However, it’s important that you regularly update your operating system as it is crucial for security and stability. When you disable automatic updates, it becomes your responsibility to manually check for and install important updates to ensure your system remains protected.
Muhammad Zubyan
Muhammad Zubyan is a certified Google IT Support Professional with over 7 years of extensive experience. He has worked on more than 1500 computers, gaining valuable insights that enable him to detect and troubleshoot any complicated root cause of Windows-related issues and errors. In addition to managing Appuals as a Senior Editor, he is currently developing his own Game Optimization program that caters to both gamers and casual users alike.
If you are also facing Windows Modules Installer Worker high CPU usage issues, you can use the most effective solutions offered and detailed in this guide to fix the problem with ease.
The Windows Module Installer or the Windows Modules Installer Worker is a Windows-integrated program that ensures smooth operations of the Windows Update. Whether the task is to update and install new Windows updates or uninstall them, Windows Modules Installer Worker ensures that the system does not face any glitches or issues while performing these operations.
The operability of the tool makes it quite crucial for any Windows operating system. However, even this crucial element can pose some problems on your OS, like Windows Modules Installer Worker high CPU usage.
This problem of high CPU usage by the Windows Module Installer Worker is quite common. Numerous users from across the globe have complained about the occurrence of this problem. Moreover, some users even complain that this issue is recurring and does not fix itself on its own.
This is why we have curated this guide on how to fix the Windows Modules Installer Worker high CPU usage error on Windows 10/11.
Solutions to Fix the Windows Modules Installer Worker High Disk Problem
The subsequent sections of this guide will address the problem of Windows Modules Installer Worker high CPU usage on Windows 11/10. We have curated a list of some of the most effective, tried, and tested solutions to get rid of this error. You can follow these solutions or fixes subsequently to get rid of the error at once. So, let’s start with the first solution right below.
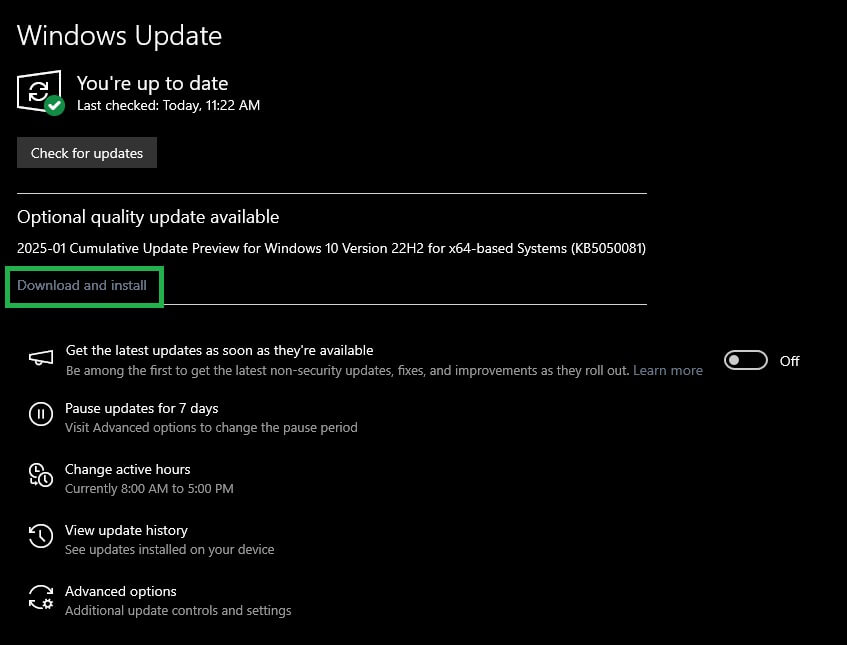
Fix 1: Find and Download the Available Windows Updates
One of the quickest and most feasible solutions to fix the Windows Modules Installer Worker high CPU usage issue on Windows 10/11 is to update the operating system. Issues like this are often related to the presence of a bug in the existing version of the operating system. The developers of Microsoft Windows must have found the bug sooner and fixed it in the latest updates. Hence, you need to update the operating system to fix this problem. You can follow the steps below to fix the error via OS update:
- You need to open the Windows Settings by pressing the Win + I keys to initiate the update process.
- Click on the Update & Security settings.
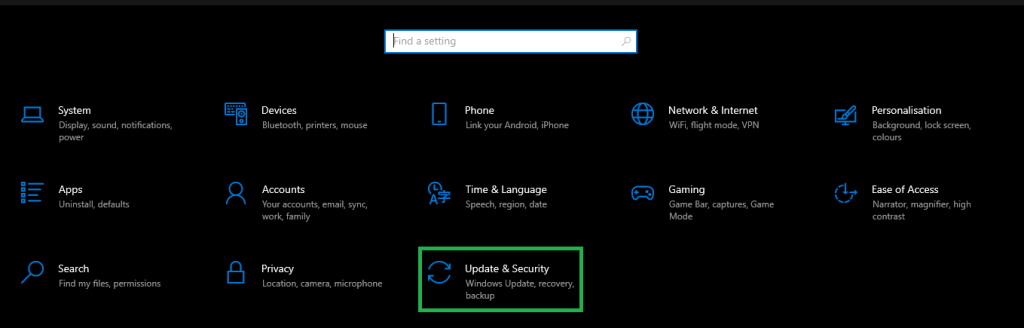
- The window will directly open the Windows Update utility. Wait for some time for the utility to load and click on the Check for Updates button.
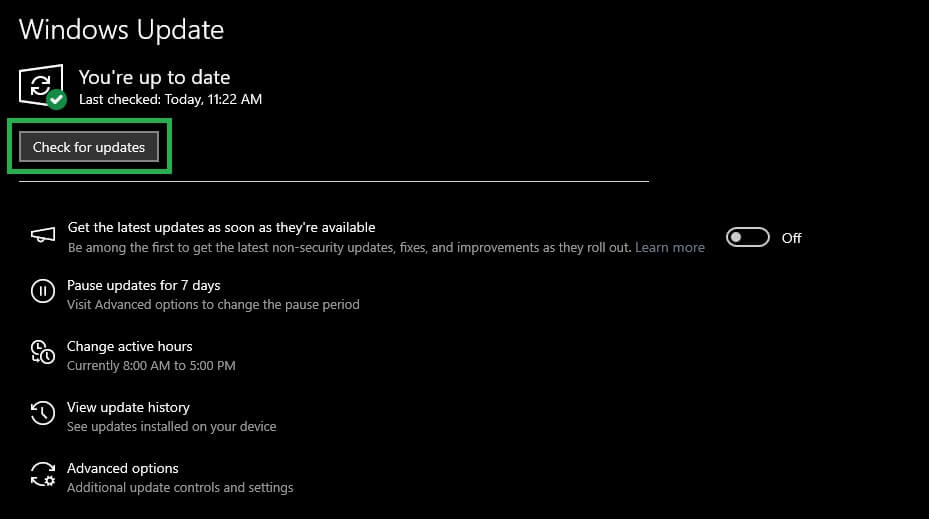
- When all the updates appear, you need to Download and Install all the available updates to update the entire operating system.
This method may require your Windows system to restart multiple times. Allow the system to restart as many times as required. Once your system is updated, you can see if the Windows Module Installer is causing any trouble. Follow the next fix if the issue persists.
Also know: What is an ISO File in Windows and How to Download It for Windows?
Fix 2: Change the Windows Modules Installer Startup Preferences
Here’s another amazing solution to fix the Windows Modules Installer Worker high CPU usage error. Generally, the Windows operating system allows the Windows Modules Installer to start automatically. This automatic operation may affect the working of the system and result in high CPU usage. To avoid such problems, you can switch the operation of the tool from automatic to manual. To do this, you need to take the help of the Services app. Follow the instructions below to learn more:
- Press the combination of the Win + S keys, type Services, and hit the Enter key.
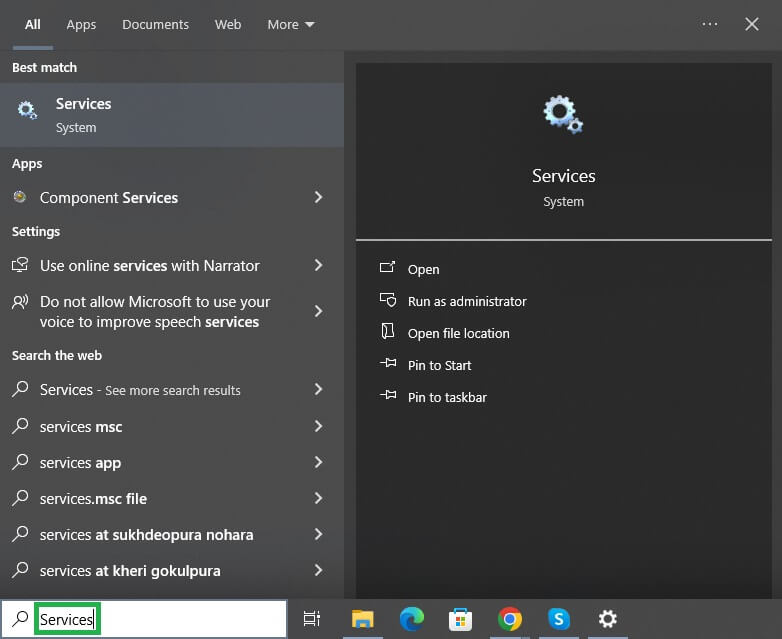
- Double-click on Windows Modules Installer.
- Click the Stop button and set the Startup Type to Manual.
- Now, click on the Apply button and close every window.
Now, you need to check if the Windows Modules Installer Worker high disk usage error still appears. You can try the next fix if the problem persists.
Method 3: Close the TiWorker.exe Program
TiWorker.exe is another name for the Windows Modules Installer Worker program. Hence, if the Windows Modules Installer Worker high CPU usage issue appears, you can try closing the program if it is not in use. You can follow the steps below to know how to close the TiWorker.exe using the Task Manager:
- Press the combination of the Win + X keys and open the Task Manager window from the context list.
- When the tool appears, click on the Details tab to proceed with the process.
- Within the tab, right-click on the TiWorker.exe program and select the option to End Task.
Also know: How to Fix Windows Could Not Automatically Detect This Network’s Proxy Settings Error
Windows Module Installer Worker High CPU Usage Error: Fixed
We are concluding this guide on how to fix the Windows Modules Installer Worker high CPU usage error. Previously, we had a look at some of the best solutions to fix the high disk usage error. All the solutions offered above are very easy to use and do not affect your system’s performance in any way. These solutions can improve the system performance as more storage will be freed up for the use by other necessary apps.
If you need help related to the guide, you can communicate with us using the comments section below. Our team of tech experts will assist with your queries in no time. You can also offer feedback on the solutions and the overall guide if required.