
- Publication date
-
2006
- Topics
- Recovery Disc, Acer, Aspire, 3610, Windows XP, Windows XP Home Edition, SP2, Service Pack 2
- Language
- English
- Item Size
- 2.0G
Recovery Disc for the Acer Aspire 3610. Comes preloaded with Windows XP Home Edition with Service Pack 2.
- Addeddate
- 2021-07-26 23:09:11
- Identifier
- acer-aspire-3610-winxphomesp2-recovery-disc
- Scanner
- Internet Archive HTML5 Uploader 1.6.4
plus-circle Add Review
plus-circle Add Review
comment
Reviews
(2)
There are 2 reviews for this item. .
/Guides /Acer Recovery Disk: Guide for Windows XP, Vista, 7, 8
This is a guide about recovery disks for Acer computers for the following versions of Windows: Windows XP, Windows Vista, Windows 7 and Windows 8.
A recovery disk is also known as a restore disc, repair disc, boot disc or rescue disk.
Acer users can create a recovery and backup disk using the computer’s installed Acer eRecovery Management software. This software is available in most computers made by Acer, by default – unless removed manually.
Looking for a recovery disk for Acer? Download Easy Recovery Essentials, our recovery and repair disk for Acer computers.
Note: Depending on your computer model the following screenshots and steps from these instructions might be slightly different.
Download alternative recovery disk for Acer
If the recovery partition of your Acer computer is corrupt or not working, you can download Easy Recovery Essentials that is compatible with Acer computers and with Windows XP, Vista, 7 or 8:
- Microsoft Windows 8 (read more on our Windows 8 Recovery Disk and Repair Disc Download article)
- Microsoft Windows 7 (read more on our Windows 7 Recovery Disk and Repair Disc Download article)
- Microsoft Windows Vista (read more on our Windows Vista Recovery Disk and Repair Disc Download article)
- Microsoft Windows XP (read more on our Windows XP Recovery and Repair Disk article)
- Microsoft Windows Server 2003, 2008 and 2012 (read more on our Windows Server 2008 and 2012 Recovery Discs Download article)

You can burn Easy Recovery Essentials directly to a CD, DVD or a USB flash drive.
You can use its Automated Repair feature to automatically find and fix boot errors of your computer.
Download Easy Recovery Essentials for Acer
Note: Easy Recovery Essentials can not be used to install or reinstall Windows.
Create the recovery disks for Acer using Acer eRecovery Management
Acer computers have, by default, a recovery partition (similar to the recovery partition of Dell computers) that allows users to restore their Windows system.
The software that allows you to create a recovery media, reinstall Windows without the original installation disk and reinstall the drivers of your system is called Acer eRecovery Management.
The Acer eRecovery Management software
The eRecovery Management software can look different, depending on your Acer model. Here is how it looks on computers with Windows XP:
The Acer eRecovery Management software on different Acer models
The software for Windows 8 users should look like this:
The Acer eRecovery Management software for Windows 8 users
Acer eRecovery Management allows you to:
- Restore your Windows using Recovery Management
- Create and use a recovery media (CD, DVD or USB)
- Reinstall your system drivers and applications
Create the recovery disk in Windows XP
Windows XP users can create a recovery disk for their Acer computers (desktops, laptops/notebooks etc.) by following these instructions.
USB flash drives are not available as a recovery media for Windows XP users.
- Boot your computer. The AC adapter must be plugged in, if you have an Acer laptop.
- Go to Start and then All Programs.
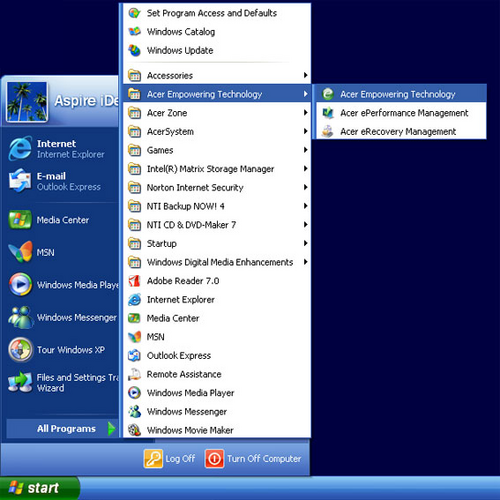
- Find the Acer Empowering Technology folder.
If the folder name is simply “Acer” and not “Acer Empowering Technology“, follow the instructions for Windows Vista (find these below). Your Windows XP system uses a different software version with different steps.
- Click on Acer eRecovery Management.

The Acer Empowering Technology folder
- Click on the icon that appears in the bottom right of your desktop.
The Acer eRecovery Management icon in Windows XP
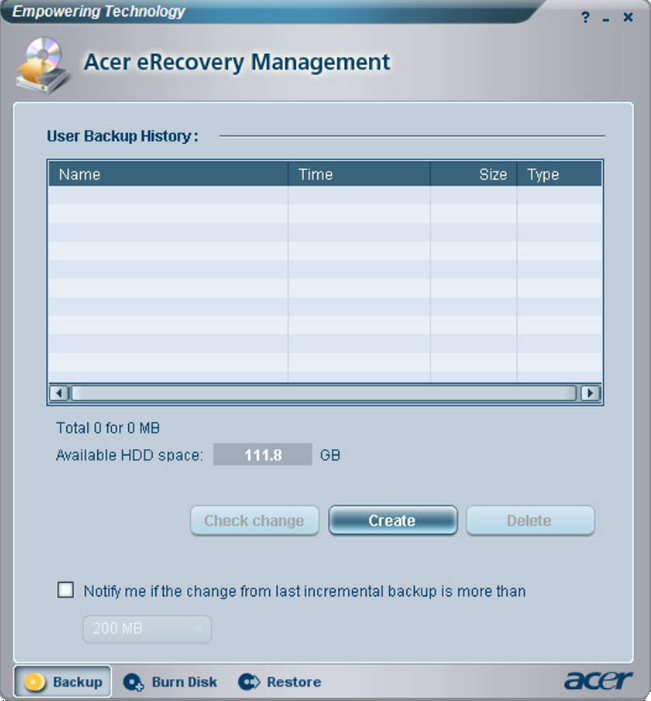
- Acer eRecovery Management now loads.

The Acer eRecovery Management software in Windows XP
- If this is your first time loading the software program, it will ask you to:
- To enter a password for the software. Do so by following the wizard instructions. Keep the password easy to remember and safe.
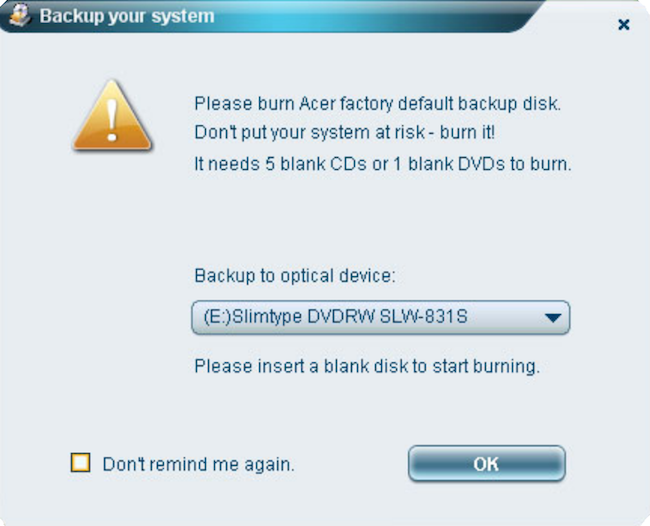
- To create your first factory default settings image CD/DVD. If so, simply add the necessary blank CDs or DVDs (the software will mention how many disks you need) and click OK.At this step, this screen should appear like this:

Acer eRecovery Management Factory Default Settings Image
- To create the recovery disk, click the Create button.
- Select the Full backup option and click Next. The Incremental backup (fast) option will be active after the first Full backup is done. Incremental backups are faster and they use less space.
- Enter a reference name for this backup and click Next.
- If the software program prompts to close all running programs, do so by clicking Yes and then Next.
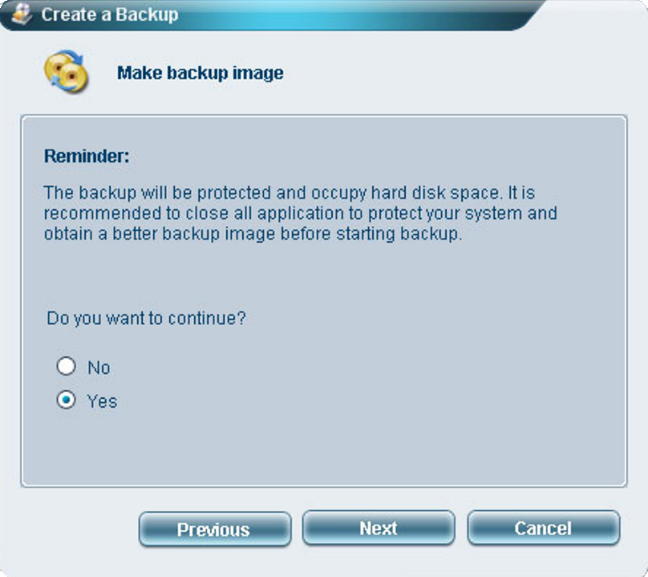
- At the Do you want to continue? screen, make sure Yes is selected and click Next.

Do you want to continue creating the backup discs?
- The creation process starts.
- When the process is finished, a confirmation message will appear – Backup files have been successfully created -, click OK.
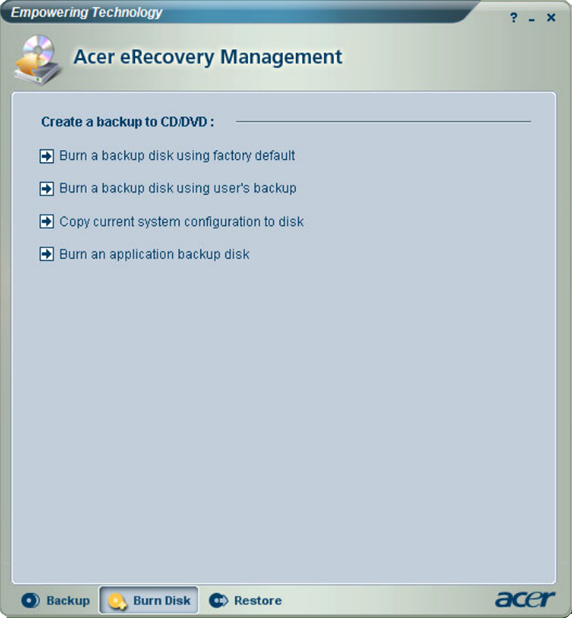
- Go to the Burn Disk tab of the software program. This should be at the bottom of the software’s screen.
- Click on Burn a backup disk using user’s backup. This option will burn your backups to a CD or DVD.

Burn a backup disk item
- Select your optical drive to use and click OK.
- Insert any additional CD or DVD needed when prompted.
- When the process is done, label these disks and keep them safe1
Create the recovery disk in Windows Vista
Users with Windows Vista installed can create a recovery disk for their Acer computer using these instructions:
- Power on your computer. The AC adapter must be plugged in for laptops.
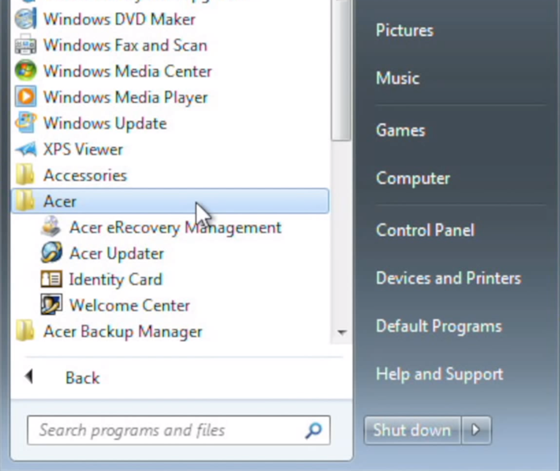
- Go to Start and find the “Acer” folder. You can type Acer in the Search programs and files search bar.
If the folder name is “Acer Empowering Technology“, follow the instructions from Windows XP as your Windows Vista uses a different software version with slightly different steps.
- In this folder, click on Acer eRecovery Management.

The Acer folder at Start
- If Windows’ User Account Control opens and asks for permission to run the program, click Yes.
- Click Backup from the left menu.
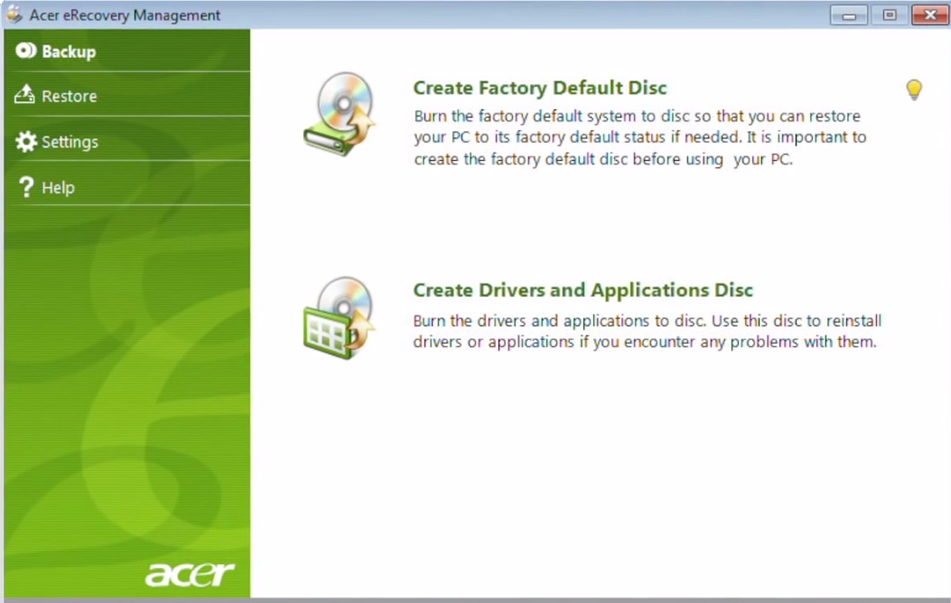
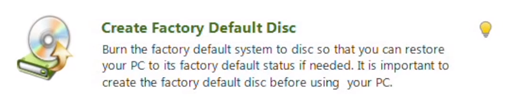
- Click on Create Factory Default Disc.

Create Factory Default Disc
- Insert your first blank DVD.
All DVDs you plan to use for this process must be blank.
The software will notify you how many DVDs you need to create the set of recovery disks. When the first DVD is finished, the software will ask for the second DVD:

Disc 1 is finished
Remove the first DVD, label it and then insert another blank DVD. And so on until the process is complete.
- When the software finishes the process, click Finish to exit the program.
- Your recovery disks are now created. Label them and keep them safe!

Create the recovery disk in Windows 7
Windows 7 users with Acer computers can follow these instructions to create the recovery disks. These instructions are similar with those of Windows Vista.
- Boot your computer. The AC adapter must be plugged in for any Acer laptops before starting this process.
- Go to Start and find the “Acer” folder in All Programs. You can type the folder name in the Search programs and files search bar.
If the folder name is “Acer Empowering Technology” and not “Acer“, follow the steps from Windows XP.
- Click on Acer eRecovery Management.
Find the Acer folder by clicking on Start
- Click Yes, if Windows UAC dialog opens and asks permission to run the software.
- Click Backup
- Click Create Factory Default Disc.
Click on Create Factory Default Disc
- Insert the first DVD.
All DVDs for this process must be blank.
- Insert the second DVD when prompted:
Disc 1 is finished. Insert disc 2
- Click Finish when the creation process is done
- Your recovery disks are now created. Label them with a permanent marker and keep them safe!
Create the recovery disk in Windows 8
Windows 8 users can create their set of recovery disks for Acer using the following instructions.
A CD or a DVD is not available as a recovery media for Windows 8. Use only USB flash drive with more than 16 GB in available file size. Make sure the drive you are about to use is blank. All previous data will be removed from the flash drive during this process.
- Boot the computer.
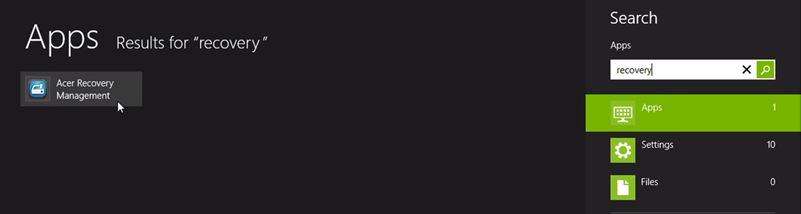
- When Windows 8 boots, simply start typing “recovery” to open the Windows 8 Search Charm (or press the and Q). A search result will appear for “Acer Recovery Management“. Click on that name.

Acer Recovery Management software in Windows 8
- If you receive this message – Do you want to allow the following program to make changes to this computer? – from the Windows 8 UAC (User Account Control), click Yes.
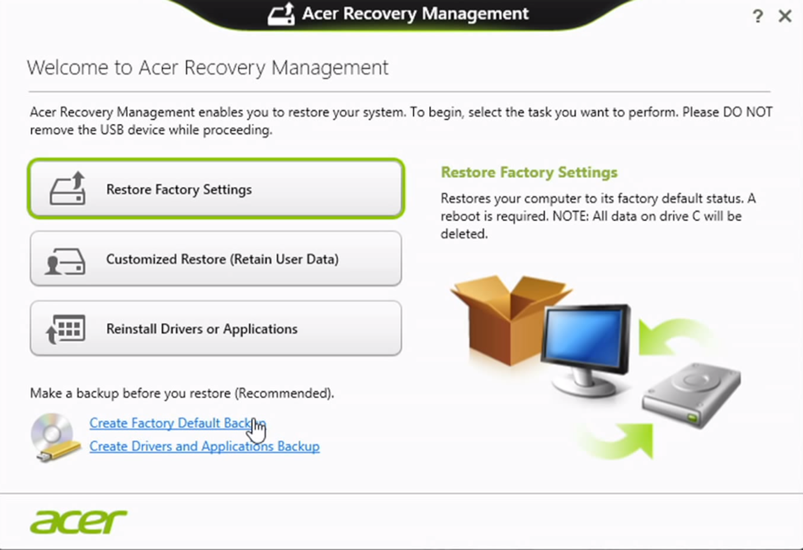
- The Acer Recovery Management software will now load.

How Acer eRecovery Management software should look
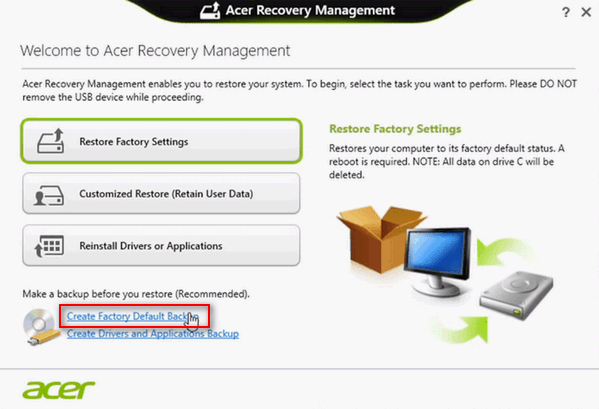
- Click on Create Factory Default Backup.
Create Factory Default Backup in Windows 8
- The “Create a recovery drive” screen will appear, click Next. You can leave the Copy the recovery partition from the PC to the recovery drive checkbox checked.
- When the “Select the USB flash drive” screen appears, make sure your USB flash drive is listed at the “Available drive(s)” list, it has at least 16 GB in available size and it’s blank.
Warning:
All data from the USB flash drive will be removed. Backup your USB drive before using it as a recovery media. - Click Next
- Click Create at the warning message Everything on the drive will be deleted. If you have any personal files on this drive, make sure you’ve backed up the files.
- The process of creating the recovery disk will now begin. It can take up to 30 minutes, if the “Copy the recovery partition” checkbox was checked, otherwise it will take less time.
- When the process is done, at the “The recovery drive is ready” screen, click Finish.
- Exit the software.
- Label your USB drive and keep it safe, away from damage of any kind or loss!
Restore Acer computers
You can restore your system using the recovery partition that comes bundled in with your Acer computer.
You can boot into the recovery mode by pressing and holding the Alt and F10 key, when the splash screen appears (at the Acer logo), after you restart your computer.
If you haven’t created a backup disk of your computer using Acer eRecovery Management, you can only restore your computer to its factory default settings.
Warning:
Restoring your computer to its factory default settings erases all data from your computer and reinstalls Windows. Backup your files before you continue with this process.
You can use the Browse/Backup files feature of Easy Recovery Essentials (our recovery and repair disk) to access and backup your files. Download Easy Recovery Essentials for Acer computers from here.
Restore instructions for Windows XP
Restore your Acer computer to its factory default settings or to the latest saved backup disk settings by following the instructions below.
If you are not able to boot into Windows XP to open Acer eRecovery Management, you need to:
- Restart your computer.
- Press and hold the Alt + F10 keys to boot into the Acer eRecovery Management software, when the Acer splash screen appears.
If you want to restore the computer to its default factory settings without using the recovery disks, these are the instructions:
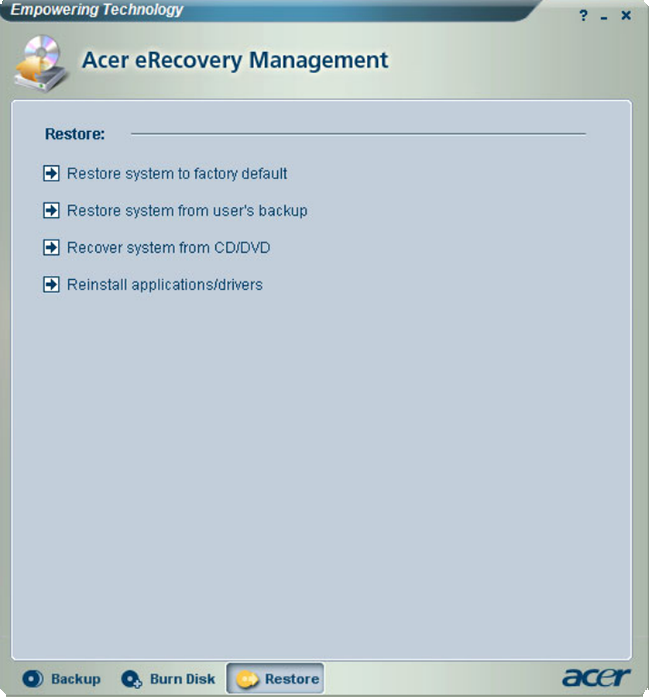
- If your computer has the Acer eRecovery Management software branded with Empowering Technology, continue with these instructions:
- Make sure the Restore tab is selected.

Restore Tab in Acer eRecovery Management Empowering Technology
- Click on Restore system to factory default.
- Enter the Acer eRecovery Management software password. By default this is
000000(6 zeros). If you can not remember it, go to Troubleshooting for more information and find out how you can recover the password. - Confirm that you want to proceed with the restore process.
Warning:
This process erases all your data. Backup your files! - Follow the next set of instructions from the wizard.
- Make sure the Restore tab is selected.
- If the Acer eRecovery Management software your computer uses doesn’t mention Empowering Technology, continue with these instructions:
- Click Restore from the left.
Restore tab in Acer eRecovery Management
- Click on Completely Restore System to Factory Defaults.
- Select Yes when the “This process will reboot and restore your system” window appears.
- Click Start.
- Click OK to confirm.
- Your computer will now restart and boot into the Acer eRecovery Management program.
- At the “Notice” screen, click Next.
- Click Next at the “Restore Destination” screen.
- Click OK to confirm the action.
- The restore process should now start. It may take up to 30-40 minutes.
- When the Restore finished message appears, click OK.
- Your computer will restart and Windows will reconfigure. Your computer may restart afterwards.
- Click Restore from the left.
If you want to restore the computer using your saved Acer recovery disks, follow these instructions. These apply for the Acer eRecovery Management software branded with the Empowering Technology name:
- Select the Restore tab.
The Restore Tab
- Click on Recover system from CD/DVD.
- Insert the first disk of your recovery disks set into your optical drive.
- Confirm the process.
Warning:
This process will erase all your data. Backup your files first! - Insert any of the next set of disks when prompted by the software.
Restore instructions for Windows Vista
If you want to restore the computer using the created Acer recovery disks, follow these steps. These instructions are for Windows Vista.
These steps are for the Acer eRecovery Management software without the Empowering Technology name. If your software version for the Windows Vista system is branded with Empowering Technology, follow the steps from Windows XP.
The Windows Vista software version should look like this:
The Acer eRecovery Management software
The instructions are:
- Boot your computer and press F12 repeatedly to enter the Boot menu.
- When the Boot menu has loaded, use your arrow keys and select your optical drive, e.g. IDE CD-ROM Device
- Add your first disk from the recovery disk set and hit Enter.
- The recovery media should now load.
- Follow the instructions from the wizard to reinstall your Windows Vista.
Restore instructions for Windows 7
You can restore your Windows 7 using your saved sets of Acer recovery disks by following these instructions:
- Boot the computer.
- Press F12 repeatedly to enter the Boot menu.
- Select your optical drive, e.g. IDE CD-ROM Device, by using your arrow keys: ↑ and ↓.
- Add the first disk from your recovery disks set.
- Hit Enter.
- Your Acer recovery media should load.
- Follow the wizard instructions to reinstall your Windows 7.
Restore instructions for Windows 8
If you are able to boot into Windows 8, you can restore your system by following these instructions:
- Press the and C to open the Search charm of Windows 8.
- Type “recovery” in the search bar.
- Select the Acer Recovery Management item.
- If you are being asked to allow this software program to make changes, click Yes.
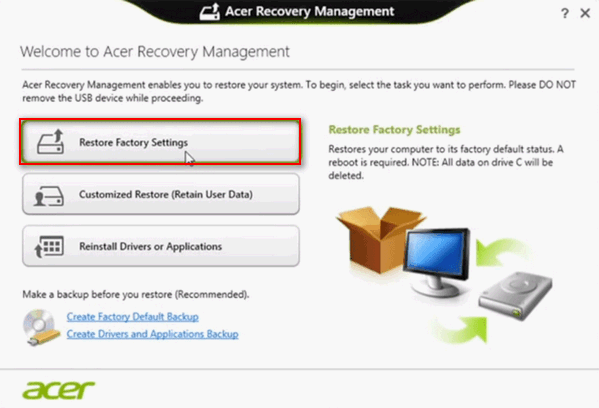
- Click on Restore Factory Settings.

Restore Factory Settings in Windows 8
- Click Next.
Warning:
Restoring to Factory Settings will erase all your personal files. Backup your files first! - Select either Just remove my files or Fully clean the drive (this is recommended).
- Click Reset to confirm.
- The restore process will now begin.
- Follow any wizard instructions after this process is done to setup your Windows 8 again.

If you are not able to boot into Windows 8, but have the USB recovery disk created, you can restore the system by following these instructions:
- Power off your computer.
- Insert the USB recovery disk.
- Power on the computer.
- Press F2 as soon as possible to enter BIOS. If you have a desktop from Acer, press Del instead.
- Navigate to the Boot tab of BIOS using your arrow keys: ← and →.
- Find a “USB HDD” (this is your USB recovery disk) item from the list and highlight it by using your arrow keys: ↑ and ↓.
- When “USB HDD” is selected, press F6 to move it at the top of the list. Depending on its current position, you may need to press F6 multiple times to move it up.
- Once “USB HDD” is at the top of the list, navigate to the Exit tab using your arrow keys: ← and →.
- Highlight Exit Saving Changes using your arrow keys: ↑ and ↓ and hit Enter
- Make sure [Yes] is selected and hit Enter.
- Your computer will reboot.
- When Windows 8 starts again, select a keyboard language.
- Click on Troubleshoot.
- Click on Reset your PC.
- Click Next to confirm the action.
Warning:
This action will erase all your personal files. Backup your files before proceeding! - Choose Windows 8 from the list.
- Select Yes, repartition the drives if you no longer have the recovery partition Acer to reinstall this. Otherwise, select No, keep the existing partitions.
- Select Just remove my files or Fully clean the drive. Fully clean the drive longer, but cleans the entire drive (this is recommended).
- Click Reset.
- The process will now start.
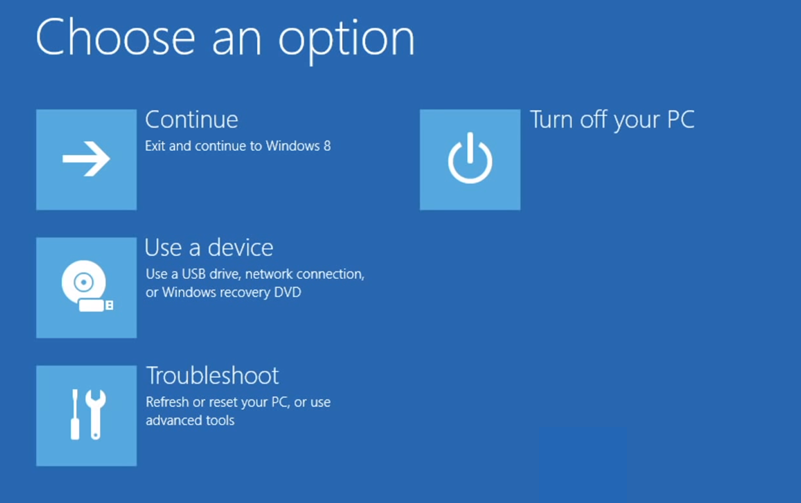
- Once the process is finished, the “Choose an option” screen will appear.
- Remove the USB recovery disk.
- Click Continue at the “Choose an option” screen.

Choose an option at boot
- Follow the wizard instructions to setup your Windows 8 again.
Troubleshooting
Acer eRecovery Management is not working
Acer eRecovery Management may not work if the D2D recovery option in the computer’s BIOS is disabled.
You can enable D2D Recovery option by following these instructions:
- Boot your computer.
- Press F2 when the plash screen appears to open BIOS.
- Navigate to Main tab by using the arrow keys (← and →).
- See if the D2D Recovery item (usually the last item in the menu) is marked as [Enabled] or [Disabled].If D2D Recovery is [Disabled], use the arrow keys (↑ and ↓) to select the D2D Recovery item and once it’s selected (highlighted), press Enter and then select Enabled.
Acer eRecovery Management is stuck
The Acer eRecovery Management can be stuck at various steps during either the process of creating the set of recovery disks or through the process of restoring the computer settings.
Common issues is having the software stuck at 0% or 99% or at loading files.
The hard disk or the Acer recovery partition (required to restore the computer to default settings) might be corrupted.
You can try one of the following fixes (or both) below.
Warning:
If the recovery partition from Acer is corrupted and you don’t have a create recovery disk set, you may not be able to restore your computer.
You can use Easy Recovery Essentials (our recovery and repair disk) to automatically find and fix boot errors. Download Easy Recovery Essentials.
Fix #1: Remove any peripherals from your computer and leave only the essentials (keyboard and mouse): printers, USB flash drives, scanners etc.
Fix #2: You can run the chkdsk command through Command Prompt to verify the integrity of your hard drive.
Warning:
chkdsk will check for hard drive bad sectors. If any bad sectors are found, chkdsk will try to repair the sectors resulting in potential data lost found in any of those sectors. Backup your computer!
You need to have your Windows installation CD to boot into Recovery Console and access Command Prompt.
If you don’t have the original Windows CD, you can download Easy Recovery Essentials, our recovery and repair disk for Windows. If your computer displays boot errors, you can run the Automated Repair feature to automatically find and fix boot errors.
Run the chkdsk command by following these steps:
- Insert your Windows installation CD.
- Restart your computer to boot from the installation CD.
- Press any key when the “Press any key to boot from CD” message appears on your computer.
- Depending on your Windows version, follow these steps:
- If you have Windows XP:
- Press R to open the Recovery Console at the Options menu.
- Type in your Administrator password.
- Hit Enter.
- If you have Windows Vista or Windows 7:
- Select “Repair your computer” after you select your language, time and keyboard method.
- Select your Windows installation drive (usually C:\) and click Next.
- Click on Command Prompt from the System Recovery Options box.
- If you have Windows XP:
- When Command Prompt opens, type the following command:
chkdsk /f /r
Windows Vista and 7 users may need to add the hard drive letter after
chkdsk, like this:chkdsk C: /f /r
where C: (without a trailing slash: /) is where you have Windows installed (usually C:).
- After the
chkdskprocess is completed, restart your computer. - Try running Acer eRecovery Management again.
Forgot the password for Acer eRecovery Management
Default password
Acer eRecovery Management software default password is 000000 (6 zeros).
Change the password
If you need to change the password, but you are able to boot your computer follow these instructions.
Depending on your Acer computer model the following options can be slightly different, but you should be able to change the password.
- Boot your computer and find the Acer eRecovery Management software (start by clicking Start, go to All Programs and find the “Acer” folder or the “Acer Empowering Technology” folder).
- When the software opens, either select Password: Change eRecovery Password and click Next (if you have this options; this depends on your software version) or go to Settings where you should find an option to change your password.
Run Acer eRecovery Management in Safe Mode
If you are not able to boot into Windows, you can try running Acer eRecovery Management in Safe Mode and try changing the password from this mode.
To boot into Safe Mode, follow these instructions:
- Windows XP users:
- Press F8 multiple times before Windows XP splash screen appears.
- Select “Safe Mode with Networking” from the Options menu.
- Windows Vista users:
- Press F8 multiple times before the Windows Vista splash screen is shown.
- Select the Safe Mode option from the Advanced Boot Options menu.
- Windows 7 users:
- Press F8 repeatedly after you restarted your computer.
- Select Safe Mode from the Options menu.
- Windows 8 users:
- Restart your computer and immediately hold the Shift key and click on the Restart key.
- When the Startup Settings screen appears, select the Safe Mode option.
Find the aimdrs.dat file on the recovery partition
If you are not able to boot into Windows or run the software in Safe Mode to change the password, you can try the following alternative: finding the aimdrs.dat file on the recovery partition.
You need to use a live Linux CD to run commands in Terminal. When Terminal is open, run these commands:
- Type
ls /dev/sda1, hit Enter.If your computer has SATA drives, run
ls /dev/sda1. Otherwise, runls /dev/hda1. - Type
cd /mnt, hit Enter. - Type
mkdir acer, hit Enter.If you receive a “permission denied” error, run
sudo mkdir acer. - Type
ls, hit Enter to verify that an “acer” appears listed (folder created). - Type
mount /dev/sda1 /mnt/acer, hit Enter.If you receive the a “permission denied” error, run
sudo mount /dev/sda1 /mnt/acer.If you used
hda1at step #1, replacesda1withhda1. In this case, the command would bemount /dev/hda1 /mnt/acer. - Type
cd /mnt/acer, hit Enter. - Type
ls, hitEnter. A list of files should be listed now, one of each should be named asaimdrs.dat. - Type
cat aimdrs.dat, hit Enter. - Your Acer eRecovery Management password should be at the [MyData] tab, under this format:
[MyData]
PD=your_password
Or it can be under this format:
[MyData]
PASSWORD=your_password
Creating the USB recovery drive in Windows 8 doesn’t work
If the Acer Recovery Management software for Windows 8 displays errors when creating the USB recovery drive, make sure you have all the Microsoft Windows updates available and installed to your computer.
Microsoft released a hotfix for this issue in May, 2013.
Your Windows 8 system must have the updates released in May, 2013 by Microsoft installed.
More Information
Support Links
- Easy Recovery Essentials for Windows – our repair and recovery disk.
It’s an easy-to-use and automated diagnostics disk. It’s available for Windows 8, Windows 7 and Windows Vista. It’s also available for Windows XP and Windows Server.
Read more at Windows Recovery Disks.
- The NeoSmart Support Forums, member-to-member technical support and troubleshooting.
- Get a discounted price on replacement setup and installation discs: Windows XP, Windows Vista, Windows 7, Windows 8.
Applicable Systems
This Windows-related knowledgebase article applies to the following operating systems:
- Windows XP (all editions)
- Windows Vista (all editions)
- Windows 7 (all editions)
- Windows 8 (all editions)
- Windows 8.1 (all editions)
- Windows Server 2003 (all editions)
- Windows Server 2008 (all editions)
- Windows Server 2012 (all editions)
Applicable Models
This Acer-related knowledge base article applies to the following computer models:
- Aspire series: 1300, 1350, 1360, 1400, 1410, 1420P, 1430, 1430Z, 1500, 1520, 1551, 1640, 1640Z, 1650, 1660, 1670, 1680, 1690, 1700, 1710, 1800, 1810T, 1810TZ, 1820PT, 1830, 1830T, 1830TZ, 2000, 2010, 2020, 2420, 2430, 2920, 2920Z, 2930, 2930Z, 3000, 3050, 3100, 3500, 3600, 3610, 3620, 3630, 3640, 3650, 3660, 3680, 3690, 3750, 3750G, 3750Z, 3750ZG, 3810T, 3810TZ, 3820T, 3820TG, 3820TZ, 3830, 3830G, 3830T, 3830TG, 3935, 4220, 4230, 4250, 4251, 4252, 4253, 4310, 4315, 4320, 4330, 4332, 4333, 4336, 4339, 4349, 4350, 4350G, 4352, 4352G, 4410, 4520, 4520G, 4530, 4535, 4535G, 4540, 4540G, 4551, 4551G, 4552, 4552G, 4553, 4553G, 4560, 4560G, 4625G, 4710, 4710G, 4710Z, 4710ZG, 4715Z, 4720, 4720G, 4720Z, 4720ZG, 4730, 4730Z, 4730ZG, 4732Z, 4733Z, 4735Z, 4735ZG, 4736, 4736G, 4736Z, 4736ZG, 4738, 4738G, 4738Z, 4738ZG, 4739, 4739Z, 4740, 4740G, 4741, 4741G, 4741ZG, 4743, 4743Z, 4745, 4745G, 4745Z, 4749, 4749Z, 4750, 4750G, 4750Z, 4750ZG, 4752, 4752G, 4752Z, 4752ZG, 4755, 4755G, 4810T, 4810TG, 4810TZ, 4810TZG, 4820, 4820G, 4820T, 4820TG, 4820TZ, 4820TZG, 4830, 4830G, 4830T, 4830TG, 4830Z, 4920, 4920G, 4925, 4925G, 4930, 4930G, 4930ZG, 4935, 4935G, 4937, 4937G, 5000, 5010, 5020, 5030, 5040, 5050, 5100, 5110, 5220, 5230, 5235, 5250, 5251, 5252, 5253, 5310, 5315, 5320, 5330, 5332, 5333, 5334, 5335, 5336, 5338, 5342, 5349, 5350, 5410, 5500, 5500Z, 5510, 5515, 5516, 5517, 5520, 5520G, 5530, 5530G, 5532, 5534, 5535, 5536, 5536G, 5538, 5538G, 5540, 5541G, 5542, 5542G, 5550, 5551, 5551G, 5552, 5552G, 5553, 5553G, 5560, 5560G, 5570, 5570Z, 5580, 5590, 5600, 5610, 5610Z, 5620, 5625, 5625G, 5630, 5650, 5670, 5680, 5710, 5710G, 5710Z, 5710ZG, 5715Z, 5720, 5720G, 5720Z, 5720ZG, 5730, 5730G, 5730Z, 5730ZG, 5732Z, 5732ZG, 5733, 5733Z, 5734Z, 5735, 5735Z, 5736G, 5736Z, 5737Z, 5738, 5738DG, 5738DZG, 5738G, 5738PG, 5738PZG, 5738Z, 5738ZG, 5739, 5739G, 5740, 5740DG, 5740G, 5741, 5741G, 5741Z, 5741ZG, 5742, 5742G, 5742Z, 5742ZG, 5745, 5745DG, 5745G, 5745P, 5745PG, 5745Z, 5749, 5749Z, 5750, 5750G, 5750Z, 5750ZG, 5755, 5755G, 5810T, 5810TG, 5810TZ, 5810TZG, 5820, 5820G, 5820T, 5820TG, 5820TZ, 5820TZG, 5830G, 5830T, 5830TG, 5910, 5910G, 5920, 5920G, 5925G, 5930, 5930G, 5930Z, 5935G, 5940G, 5942G, 5943G, 5951G, 6530, 6530G, 6920, 6920G, 6930, 6930G, 6930Z, 6930ZG, 6935, 6935G, 7000, 7100, 7110, 7220, 7230, 7235G, 7250, 7250G, 7315, 7320, 7330, 7339, 7520, 7520G, 7530, 7530G, 7535, 7535G, 7540, 7540G, 7551, 7551G, 7552G, 7560, 7560G, 7715Z, 7720, 7720G, 7720Z, 7720ZG, 7730, 7730G, 7730Z, 7730ZG, 7735, 7735G, 7735Z, 7735ZG, 7736, 7736G, 7736Z, 7736ZG, 7738G, 7739, 7739G, 7739Z, 7739ZG, 7740, 7740G, 7741, 7741G, 7741Z, 7741ZG, 7745, 7745G, 7745Z, 7750, 7750G, 7750Z, 7750ZG, 8530, 8530G, 8730, 8730G, 8730ZG, 8735, 8735G, 8735ZG, 8920G, 8930G, 8935G, 8940G, 8942G, 8943G, 8950G, 8951G, 9100, 9110, 9120, 9300, 9400, 9410, 9410Z, 9420, 9500, 9510, 9520, 9800, 9810, 9920, 9920G, E1-410, E1-410G, E1-421, E1-422, E1-422G, E1-430, E1-430G, E1-430P, E1-431, E1-431G, E1-432, E1-432G, E1-432P, E1-451G, E1-470, E1-470G, E1-470P, E1-470PG, E1-471, E1-471G, E1-472, E1-472G, E1-472P, E1-510, E1-510P, E1-521, E1-522, E1-530, E1-530G, E1-531, E1-531G, E1-532, E1-532G, E1-532P, E1-532PG, E1-570, E1-570G, E1-571, E1-571G, E1-572, E1-572G, E1-572P, E1-572PG, E1-731, E1-731G, E1-732G, E1-771, E1-771G, E1-772, E1-772G, EC-471G, R7-571, R7-571G, R7-572, R7-572G, V3-431, V3-471, V3-471G, V3-531, V3-531G, V3-551, V3-551G, V3-571, V3-571G, V3-731, V3-731G, V3-771, V3-7710, V3-7710G, V3-771G, V3-772G, , M3-481, M3-481G, M3-580G, M3-581G, M3-581PT, M3-581PTG, M3-581T, M3-581TG, M5-481, M5-481G, M5-481PT, M5-481PTG, M5-481T, M5-481TG, M5-581G, M5-581T, M5-581TG, M5-582PT, M5-583P, P3-131, P3-171, S3-331, S3-371, S3-391, S3-392, S3-392G, S3-951, S5-391, S7-191, S7-391, S7-392, V5-121, V5-122P, V5-123, V5-131, V5-132, V5-132P, V5-171, V5-431, V5-431G, V5-431P, V5-431PG, V5-452G, V5-452PG, V5-471, V5-471G, V5-471P, V5-471PG, V5-472, V5-472G, V5-472P, V5-472PG, V5-473, V5-473G, V5-473P, V5-473PG, V5-531, V5-531G, V5-531P, V5-531PG, V5-551, V5-551G, V5-552, V5-552G, V5-552P, V5-552PG, V5-561, V5-561G, V5-561P, V5-561PG, V5-571, V5-571G, V5-571P, V5-571PG, V5-572, V5-572G, V5-572P, V5-572PG, V5-573, V5-573G, V5-573P, V5-573PG, V7-481, V7-481G, V7-481P, V7-481PG, V7-482P, V7-482PG, V7-581, V7-581G, V7-581P, V7-581PG, V7-582P, V7-582PG, 1100X, 1110X, 1600X, 1601M, 1601X, 1602M, 6100, 6400, 6600, C500, E360, E380, E500, E560, E571, E600, E650, E700, EL, ELD, G3-605, G7700, G7710, G7750, IDea500, IDea510, L100, L310, L320, L350, L3600, L5100, M1100, M1200, M1201, M1202, M1420, M1470, M1600, M1610, M1620, M1640, M1831, M1860, M1920, M1930, M1935, M3100, M3160, M3200, M3201, M3202, M3203, M3300, M3400, M3410, M3420, M3450, M3470, M3470G, M3600, M3640, M3660, M3710, M3800, M3802, M3860, M3900, M3910, M3920, M3970, M3970G, M3985, M5100, M5200, M5201, M5400, M5600, M5620, M5621, M5630, M5640, M5641, M5700, M5800, M5802, M5810, M5811, M5910, M7720, MC605, ME600, R1600, R3600, R3610, R3700, SA10, SA20, SA60, SA80, SA85, SA90, T100, T135, T136, T160, T180, T300, T3-100, T320, T3-600, T3-605, T600, T630, T650, T660, T670, T671, T680, T690, TC-100, TC-102, TC-105, TC-600, TC-603, TC-605, X1200, X1300, X1301, X1400, X1420, X1420G, X1430, X1430G, X1440, X1470, X1700, X1800, X1900, X1920, X1930, X1935, X3-100, X3200, X3300, X3400, X3400G, X3450, X3470, X3475, X3-600, X3810, X3812, X3910, X3950, X3960, X3990, X3995, X5810, XC100, XC-105, XC600, XC-602, XC-603, XC-603G, XC-605, 5600U, 7600U, U5-610, Z1100, Z1110, Z1220, Z1620, Z1650, Z1800, Z1801, Z1810, Z1811, Z1850, Z3100, Z3101, Z3-105, Z3170, Z3171, Z3280, Z3-600, Z3-605, Z3-610, Z3620, Z3730, Z3731, Z3760, Z3761, Z3770, Z3771, Z3800, Z3801, Z5101, Z5600, Z5610, Z5700, Z5710, Z5730, Z5751, Z5760, Z5761, Z5770, Z5771, Z5801, ZC-102, ZC-105, ZC-602, ZC-605, ZC-610, ZS600, ZS600G
- Aspire One series: AO521, AO522, AO531h, AO532h, AO533, AO721, AO722, AO725, AO751h, AO752, AO753, AO756, AOA110, AOA150, AOD150, AOD250, AOD255, AOD255E, AOD257, AOD260, AOD270, AOD271, AOHAPPY, AOHAPPY2, AOP531h
- Ferrari series: 1000, 1100, 3000, 3200, 3400, 4000, 5000
- Extensa series: 2000, 2300, 2350, 2500, 2600, 2900, 2900D, 2900E, 2950, 3000, 3100, 4010, 4100, 4120, 4130, 4210, 4220, 4230, 4420, 4430, 4620, 4620Z, 4630, 4630G, 4630Z, 4630ZG, 500, 5010, 5120, 5200, 5210, 5220, 5230, 5230E, 5235, 5410, 5420, 5420G, 5430, 5510, 5510Z, 5610, 5610G, 5620, 5620G, 5620Z, 5620ZG, 5630, 5630EZ, 5630G, 5630Z, 5630ZG, 5635, 5635G, 5635Z, 5635ZG, 6600, 6700, 6700Z, 710, 7120, 7220, 7230, 7230E, 7420, 7620, 7620G, 7620Z, 7630, 7630EZ, 7630G, 7630Z, 7630ZG
- Veriton series: A430_31, A430_51, Z2610G, Z2611G, Z2620G, Z2621G, Z2630G, Z2640G, Z2650G, Z2660G, Z280G, Z290G, Z291G, Z410G, Z430, Z431G, Z4610G, Z4611G, Z4620G, Z4621G, Z4630G, Z4631G, Z6610G, Z6611G
Propose an edit
Related Articles
-
Disable Legacy Boot Mode and Enable UEFI
-
How To Reinstall Windows 10
-
Remove Dual Boot Menu – Fix for Windows
-
Windows won’t start – Guide for Windows XP, Vista, 7, 8, 10
-
Fix slow boot – Guide for Windows XP, Vista, 7, 8, 10
-
How to Reset PC BIOS/CMOS
Здравствуйте админ, купил ноутбук Acer Aspire V5, на нём нет дисковода, как мне создать к нему диски восстановления в программе Acer Recovery Management или что нужно создать, на случай серьёзного сбоя винды, если скрытые разделы с заводскими настройками окажутся неработоспособными и при необходимости я не смогу вернуть ноуту изначальную конфигурацию? Именно так было с моим предыдущим ноутбуком, я не смог восстановить загрузку Windows 8 и не смог откатиться к «магазинному» состоянию с помощью Alt + F10, в результате пришлось искать дистрибутив Windows 8 Single Language и просто переустанавливать систему со всем программами заново. Теперь вот хочу застраховать себя от подобных прецедентов.
Как создать флешку восстановления заводских настроек ноутбука Acer Aspire V5

Привет друзья! Если на вашем ноутбуке с Windows 8.1, 10 нет дисковода, значит встроенная в ноут программа отката к заводским настройкам Recovery предложит нам создать флешку восстановления.
Наш читатель очень мудро поступает, желая застраховать себя от возможных неприятностей, ведь такая флешка, как и диски восстановления, является последней надеждой на возвращение вашему ноутбуку первоначального заводского состояния.
Обычно же как получается, купили мы ноутбук и первым делом устанавливаем компьютерные игрушки, забиваем его информацией, делим жёсткий диск на дополнительные разделы, потом оказывается, что поделили мы винчестер не так, как нужно и делим по другому, затем обращаем внимание, что на ноутбуке есть какие-то скрытые разделы и нам в голову приходит замечательная мысль удалить их и присоединить появившееся пространство к диску (D:), ведь это же наш ноутбук.
Через год-два из-за какой-либо ошибки Windows 8.1 перестаёт загружаться и мы узнаём от друзей, что вопрос очень просто можно решить при помощи отката ноута к заводской конфигурации, но у нас ничего не выйдет, так как скрытые разделы повреждены или совсем удалены, вот на такой случай и пригодится заранее подготовленная флешка восстановления первоначальных настроек нашего ноутбука. Также читайте в следующей статье, как произвести откат ноутбука Acer Aspire V5 к заводским настройкам с помощью этой флешки.
Подсоединяем к ноутбуку Acer Aspire V5 флешку объёмом не менее 16 ГБ.

Переходим в интерфейс Metro Windows 8.1

и жмём на стрелочку
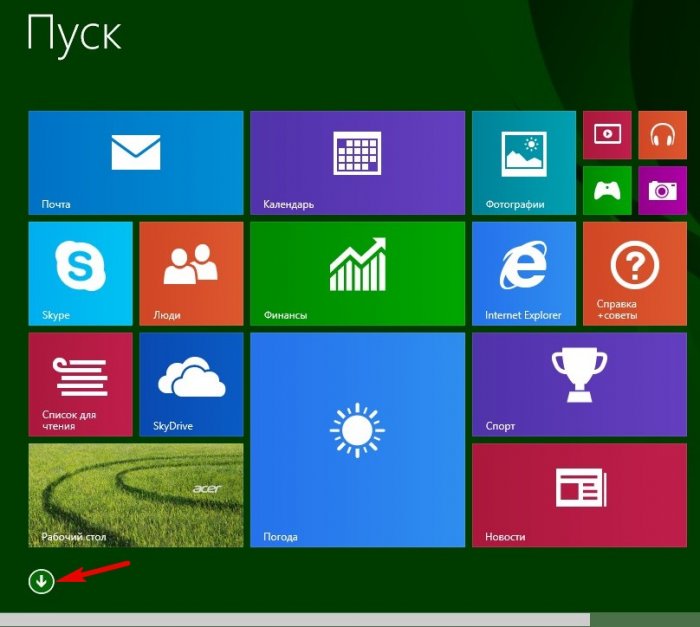
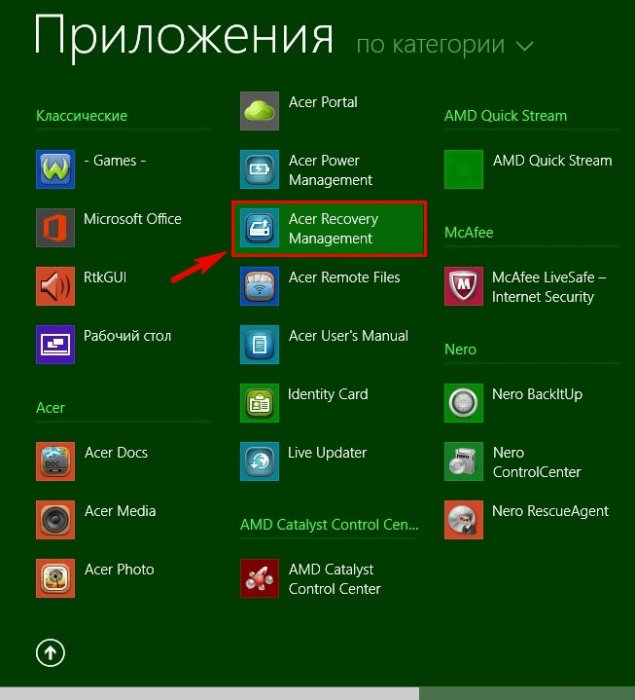
Выбираем программу Acer Recovery Management
В главном окне программы выбираем Резервное копирование заводской конфигурации.

Далее

Если к ноутбуку подсоединено несколько флешек, выбираем нужную и жмём Далее.

Создать

Начинается создание флешки восстановления

Готово.

Флешка готова! В следующей статье мы с вами произведём откат ноутбука Acer Aspire V5 к заводским настройкам в двух случаях:
1. Ноутбук ещё нормально загружается, но работает нестабильно.
2. Windows 8.1 на ноутбуке не загружается.
Acer refers to Acer Inc., which is a Taiwan-based multinational hardware and electronics corporation. It’s professional in the field of electronics technology and Acer devices like Acer laptop is world famous. Today, I’m going to talk about Acer recovery which helps you fix problems on Acer computers.
MiniTool Solution offers many suggestions and methods for computer recovery.
There are a lot of users talking about encountering problems on an Acer computer and they want to find a good solution to fix them. To provide help to these people, I’d like to focus on Acer recovery in the following content.
There are many tools and methods used for Acer laptop recovery:
- Factory reset
- System Restore
- Acer recovery USB
- Acer recovery disk
- Acer recovery keys
- Acer recovery partition
- Acer recovery management
- And so on
Factory Reset Acer Laptop on Startup
What does factory reset mean?
Actually, it refers to the action of restoring an electronic device to its original system state. This action is harmful to your data stored on the device. So you’d better make a backup before restoring the laptop to its original manufacturer settings.
Tip: If you forgot to make backup or didn’t have chance to do so, you should resort to a professional recovery tool to recover files after factory reset immediately.
How to reset Acer laptop to factory settings:
- Press the power button and hold it for a few seconds (about 5 seconds or more) until the system is powered off completely.
- Release the button and press it again to turn on the laptop.
- Look at the screen carefully so that you can press Alt + F10 buttons in time when Acer logo appears on the laptop screen.
- If you do it right, you’ll see a blue screen which asks you to Choose an option.
- At this time, you should select Troubleshoot.
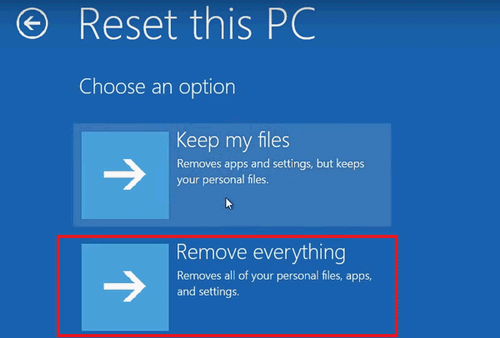
- After that, select Reset this PC from the menu. Then, you’ll be asked to choose to keep or remove your files.
- Select Remove everything (Removes all of your personal files, apps, and settings.).
- Click on the Restart button to confirm your selection and start the PC resetting process.
However, there are some users saying that pressing Alt + F10 (the Acer restore key) didn’t work for their case when they want to factory reset the Acer laptop. Let’s see an example:
Acer recovery won’t start from Alt + F10.
Hi, I want to completely restore my laptop to the factory settings, but it doesn’t seem to work. I have followed the guides from Acer; made sure my D2D Recovery is enabled, and tried pressing Alt + F10. When I do, it only starts a Black screen, where it says Edit Windows boot options for: Windows 7 and so on. If I press escape I get to Windows boot manager, but that shouldn’t be right according to the guides. What am I doing wrong?– said Amazingnr7 in Tom’s Guide Forums
You can also use the setup/repair disk or eRecovery Management to factory reset an Acer laptop.
Acer Recovery Disk Windows 10 Download
Acer recovery media is available for users to recover from a broken Acer computer easily. So, please start Acer recovery disk Windows 10 free download at once.
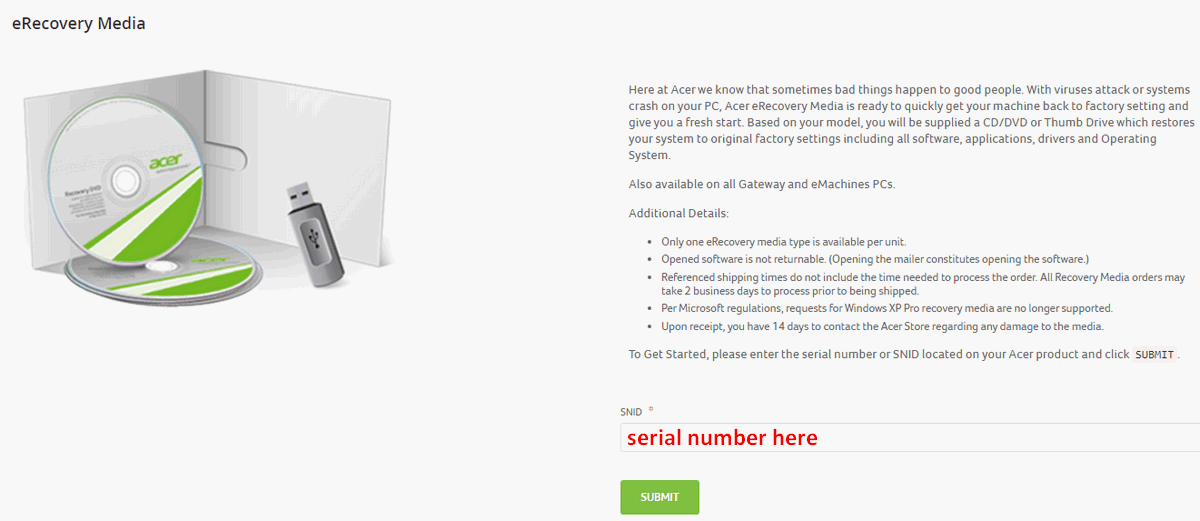
How to get an Acer Recovery Media (eRecovery Media/Acer eRecovery Management)?
- Pay a visit to the Acer Store.
- Look for the SNID text box and type in the serial number of your Acer laptop. (Please go to check the serial number and type it correctly.)
- Click on the SUBMIT button below to confirm.
- After that, you should follow the on-screen instructions to get the recovery media successfully.
That’s how Acer recovery management Windows 10 download can be done.
Acer Recovery Management
The Acer recovery disk is also known as restore/repair disc or boot disc. So do you know how to make an Acer recovery USB or Acer recovery drive on CD/DVD? The steps for making Acer recovery disk Windows 10, Window 8 and Windows 7 are basically the same. Therefore, I’ll take Windows 8 system as an example.
How to make Acer recovery disk Windows 8?
- Press Win + S or Win + Q to open the Search box.
- Type acer recovery into the search box.
- Click Acer Recovery Management from the search result. (You can also access Recovery Management through Acer Care Center.)
- If a User Account Control (UAC) window pops up and asks you the question – Do you want to allow the following program to make changes to this computer, you should just click Yes.
- Click Create Factory Default Backup link.
- Click Next in the Create a recovery drive window.
- Keep the Copy the recovery partition from the PC to the recovery drive option checked.
- Look for your USB drive from the Available drive(s) list in the select the USB flash drive window. (You’d better connect the USB drive to computer before this step.) Then, select the USB drive and click Next.
- Make sure there is no useful data on the drive you’ve selected since all data saved on it will be destroyed if you continue with the next few steps.
- Click Create to confirm your choice.
- Then, wait for the process to complete. It may last for about 30 minutes when the Copy the recovery partition option is checked. Otherwise, the process should be finished a little bit quicker.
- Click on the Finish button when you see the message – The recovery drive is ready.
- Now, you can close the software and remove the USB drive from computer properly.
Please click here if you’d like to recover data from your USB drive FOR FREE!
How to perform Acer recovery with the Acer Recovery Management tool?
- Also, you need to open the Search box.
- Type recovery into the search box and select Acer Recovery Management from the result.
- Click Yes if you see a User Account Control (UAC) window.
- Choose Restore Factory Settings from the menu.
- Click Next (you should note that this action will erase all your files).
- Choose from Fully clean the drive (this option is recommended) or Just remove my files.
- Think twice before you click Reset to start the restore process.
- Wait until the process is finished and follow the on-screen instructions to setup your computer.
Acer eRecovery Management issues troubleshoot.
There are 3 common problems of Acer eRecovery Management.
Problem one: Acer eRecovery Management gets stuck.
You may find your Acer eRecovery Management freeze during the Acer recovery disk creating process and the computer settings restoring process. Many users reported that their software is stuck at 0% or 99% or at loading files.
The possible reason responsible for such issues is a corrupted drive or files. How to fix the problem?
Method 1: remove all the peripherals that are not necessary for your computer, such as printers, scanners, external hard drive, USB flash drives, and so on.
Method 2: check hard drive integrity by running CHKDSK command.
Warning: The CHKDSK command will check your disk for errors and it will start to repair the error it finds automatically. Therefore, this action may lead to data loss in your drive. So I advise you to back up the drive with MiniTool ShadowMaker. If you have no backup and find some important files are lost, please use MiniTool Power Data Recovery to recover data after CHKDSK.
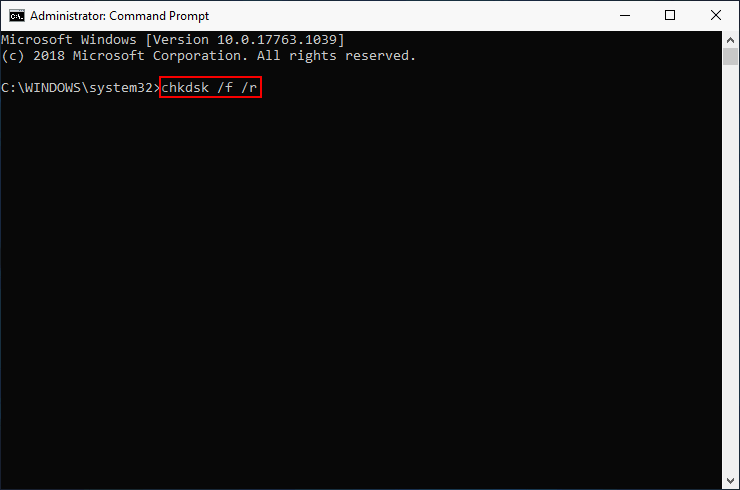
- Run Command Prompt as administrator on your computer.
- Type chkdsk /f /r or chkdsk * /f /r (* stands for the drive letter).
- Press Enter and wait for the process to accomplish.
- Restart your computer and try using Acer eRecovery Management again.
Problem two: Acer eRecovery Management stops working (not loading).
According to the users’ feedback, the Acer eRecovery Management may not work if the D2D recovery option is disabled in BIOS. So how to enable the Acer BIOS key?
- Restart your computer.
- Look at the screen instructions carefully so that you can press F2 in time to open BIOS.
- Navigate to the Main tab by using arrow keys and look for the D2D Recovery option (it’s usually the last one).
- Select the option and press Enter to open it.
- Choose Enabled, instead of Disabled from the menu.
Solved: PC Not Booting After BIOS Update – Recovery & Repair!
Problem three: forget the password.
If you haven’t changed the password for eRecovery Management software, you should try the default password: 000000 (6 zeros).
But in most cases, people need to change the password by rebooting the Acer computer.
- Reboot your computer.
- Click Windows and look for All Programs.
- Locate the Acer or Acer Empowering Technology folder (the options may be slightly different in different Acer computer models).
- Choose Password: Change eRecovery Password and click on the Next button.
- If you didn’t see this option, please go to Settings and find the corresponding option to change password.
Click to Tweet
Acer Recovery Partition
What is Acer Recovery Partition?
There is a special partition built in every Acer laptop; it’s called Recovery Partition and hidden by default. That is to say, people won’t see it while using the Acer computer. The main function of the Acer Recovery Partition is to help users restore the operating system to its default factory state. This Recovery Partition is the best Acer recovery mode after the system has been attacked by virus or the software-related problems have been detected.
Acer Recovery Partition Not Working
What disappoints us is that the Recovery Partition is not always working. If the Recovery Partition is deleted by mistake or damaged somehow, you can’t restore system with it.
What to do when partition deleted/not working? Of course, the answer is to recover deleted Acer Recovery Partition.
You can experience MiniTool Partition Wizard by getting a Free Edition. But in order to recover lost/deleted Recovery Partition, you must buy a license that supports Partition Recovery (the free edition cannot save the searched partitions).
MiniTool Partition Wizard FreeClick to Download100%Clean & Safe
How to recover Acer Recovery Partition?
- Install and launch MiniTool Partition Wizard properly.
- Select the disk that includes the deleted Recovery Partition.
- Choose Partition Recovery Wizard from the left sidebar or select Partition Recovery from the menu bar or disk right-click menu.
- Follow the instructions to set Scanning Range and Scanning Methods. Then, wait for the scan to finish.
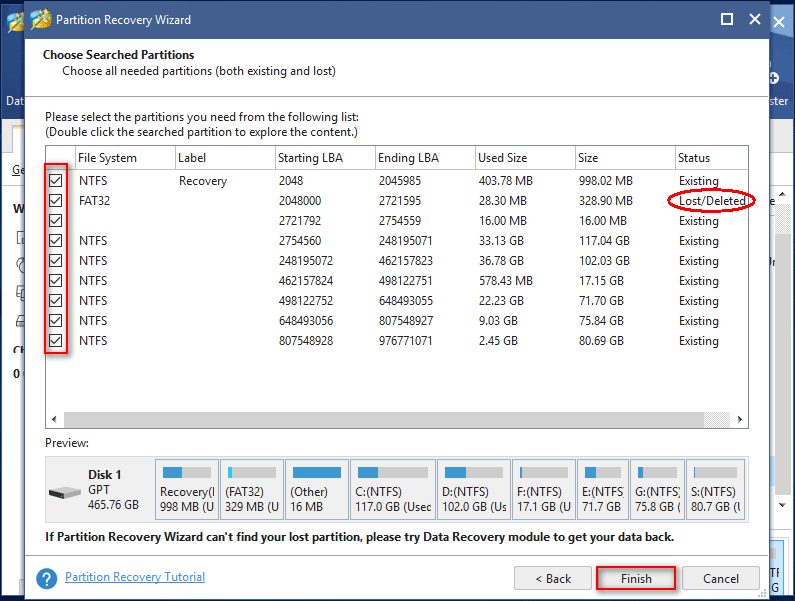
- Check all the found partitions, including the existing ones and the Lost/Deleted ones.
- Click on the Finish button to close Partition Recovery Wizard.
- Click on the Apply button in the lower left corner of software main interface.
- Select Yes in the pop-up Apply Changes window to confirm the action.
- Wait for a while and click OK in the Successful window.
How can you recover a lost partition (or use other functions of MiniTool Partition Wizard) when your system can’t boot? You need to make a bootable USB or CD/DVD drive (please connect the drive to computer immediately).
- Find another computer and get a license for MiniTool Partition Wizard that includes Boot Media Builder.
- Install, register and launch the software. Then, click Bootable Media from menu bar.
- Follow the on-screen instructions in MiniTool Media Builder to make a bootable USB disk or CD/DVD drive.
How to use the Acer recovery USB or CD/DVD?
- Remove the bootable disk from current computer properly.
- Connect it to your Acer laptop and restart it.
- Boot into BIOS to change boot order, making USB or CD/DVD drive the first boot device.
- Exit BIOS and save changes.
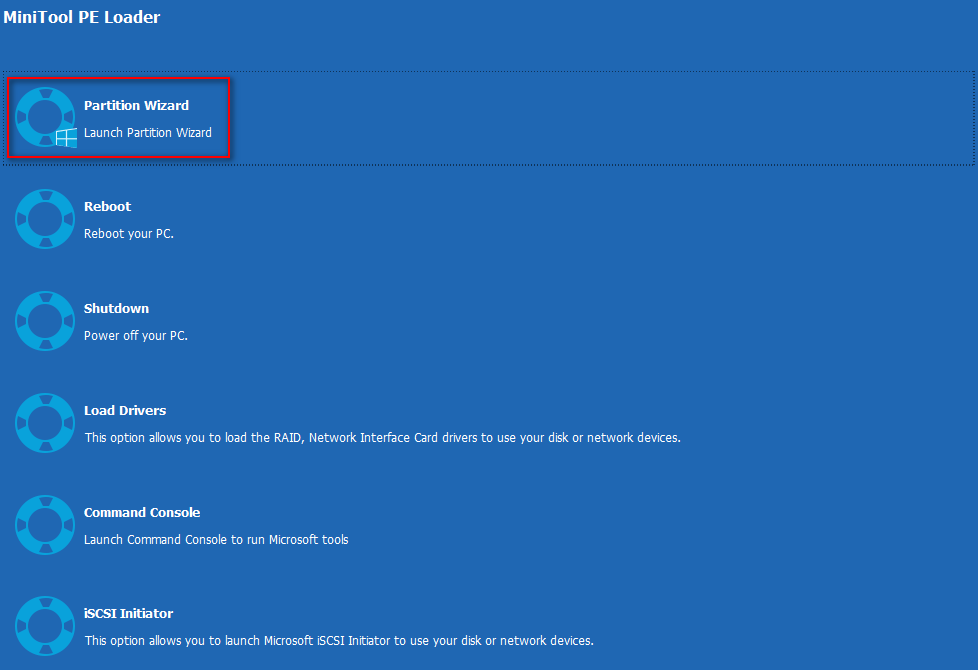
- Select Launch Partition Wizard and repeat the steps mentioned above to recover deleted Acer Recovery Partition.
[2020] Top Windows 10 Boot Repair Tools You Should Know!
Alternative to Acer Recovery Partition
You can use MiniTool Power Data Recovery to recover lost files from a deleted partition easily. (The Trial Edition is released for people who want to experience the software performance first.)
MiniTool Power Data Recovery TrialClick to Download100%Clean & Safe
How To Recover Deleted/Lost Files On PC Easily In Seconds (2020)?
If you want to recover any of the found files, you’ll need to register the software to an advanced edition by acquiring a license.
How to recover data from Acer laptop?
- Install Power Data Recovery properly and launch it.
- Select Hard Drive Recovery from the left sidebar.
- Specify the hard disk that contains the deleted partition. Then, click on the Scan button below.
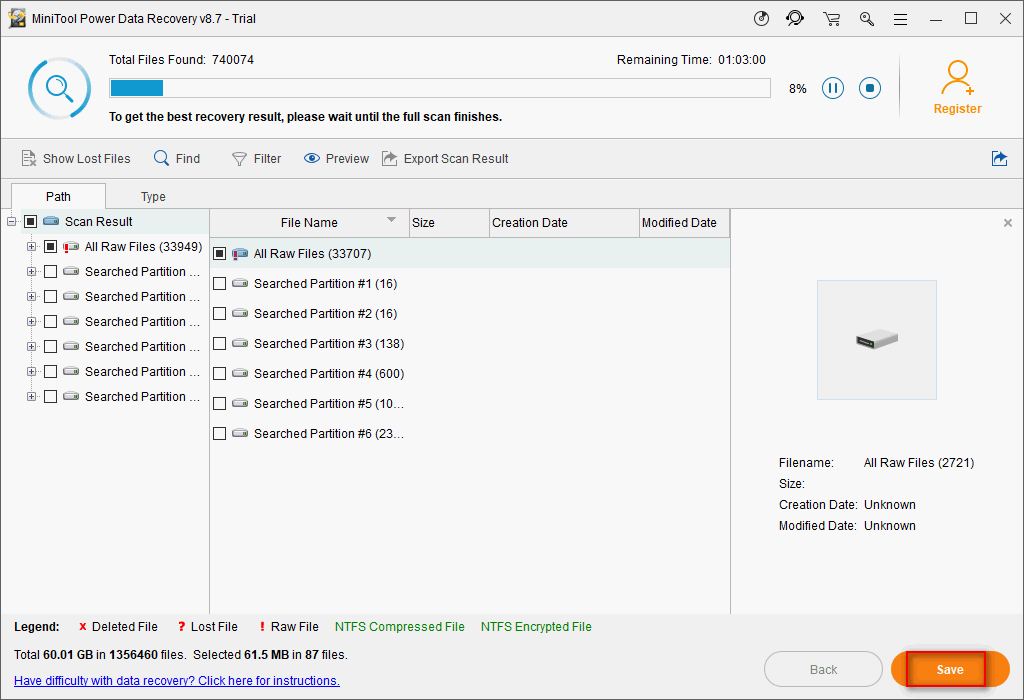
- Wait for the scan process and browse the found files carefully in order to pick out the ones you need.
- Check the files and folders you’d like to recover and click on the Save button.
- Choose another storage location for the files and folders and click OK.
- Wait for the file recovery process to complete on Acer laptop.
By using MiniTool Power Data Recovery, you can also recover files from hard disk without operating system.
- You should create Acer recovery USB or CD/DVD by clicking on the Bootable Media button (located at the bottom left corner).
- Then, change the boot sequence in BIOS.
- Finally, use the Acer recovery boot to recover files from an unbootable Acer laptop.
These tools are very useful for Acer laptop data recovery.
Please note: Acer recovery Windows 10, Acer recovery Windows 8, and Acer recovery Windows 7 are the same.
Click to Tweet
Final Words
Acer recovery is not so difficult, right? You need to finish Acer recovery disk download at first; then, make an Acer recovery drive when the Acer recovery download is completed; after that, you can use the drive to perform Acer recovery on your laptop.
In the above content, I provided several ways for you to achieve Acer recovery easily; you should choose one or more according to needs.
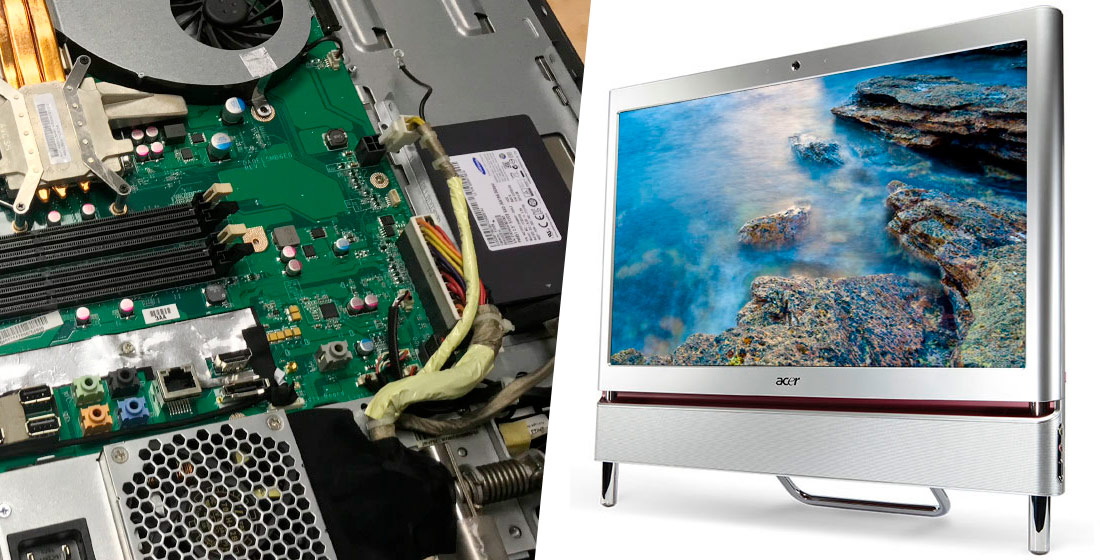
Накануне отпуска дал вторую молодость моноблоку Acer Aspire Z5710, заменив штатный жёсткий диск на SSD и доставив в него максимально доступный объём памяти в 8 ГБ.
На моё счастье, первый (скрытый) раздел на старом диске моноблока находился в сохранности, никто его случайно не удалил при переустановке системы и не отключали в BIOS функцию «D2D Recovery — enable». Так что шансы вернуть в первозданном виде предустановленную лицензионную Windows 7 Pro были весьма высоки.
Перенести скрытый раздел восстановления на новенький SSD диск вообще не проблема, с этим легко справляется любой менеджер дисков (я использую Acronis Disk Director).
Однако, на мои попытки запустить Acer eRecovery Management сочетанием клавиш Alt+F10 при загрузке, моноблок никак не прореагировал. Про эту утилиту я уже упоминал в блоге, когда рассказывал как создать образы дисков восстановления на нетбуке. Дело в том, что для запуска Acer eRecovery Management требуется оригинальный загрузчик (MBR) от Acer, а его то как раз и не было.
На специализированном форуме acerfans.ru я отыскал патч mbr.exe [101,29 Kb] для исправления загрузчика на фирменный (скачать mbr.zip). Запускать патч желательно от имени администратора, загрузившись с флешки WinPE или диска, например как рассказывал тут.
После замены mbr на фирменную, моноблок успешно восстановился до заводских установок уже на новом SSD. Так что, если у вас подобная проблема с загрузкой по Alt+F10, просто поменяйте загрузчик.
Подписывайтесь на канал
Яндекс.Дзен
и узнавайте первыми о новых материалах, опубликованных на сайте.