
Диск отключен из-за конфликта подписей с другим диском — как исправить?
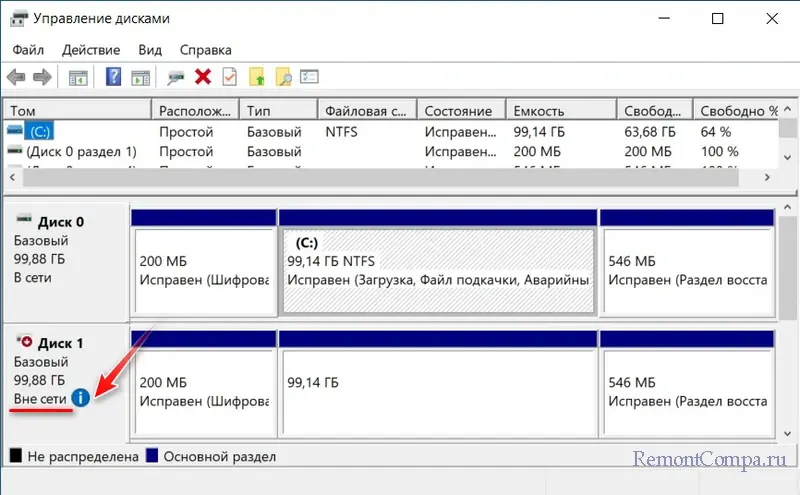
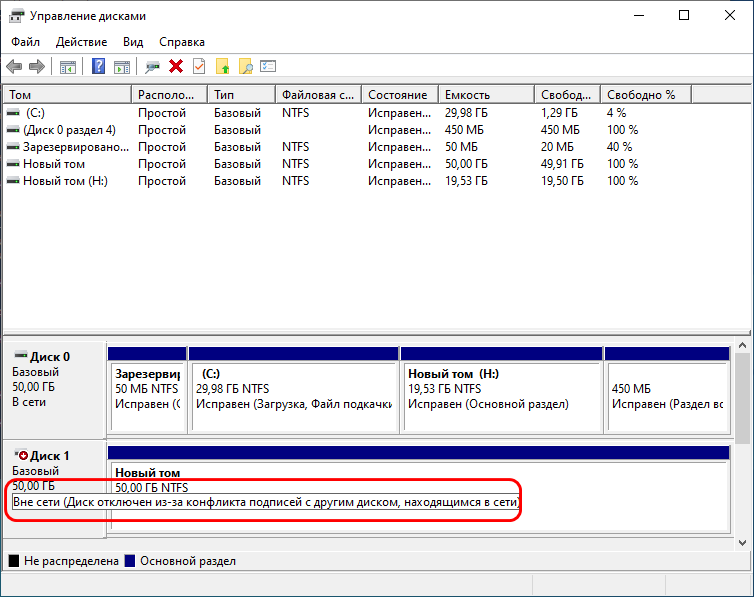
Некоторые пользователи, чаще всего — после клонирования диском могут столкнуться с тем, что один из дисков не виден в системе, а в управлении дисками сообщается «Вне сети (Диск отключен из-за конфликта подписей с другим диском, находящимся в сети)».
В этой инструкции о том, почему возникает проблема, и как исправить ситуацию в Windows 11, Windows 10 и других версиях системы.
Решение проблемы с конфликтом подписей дисков в Windows

Диски в Windows 11, Windows 10 и предыдущих версиях ОС, помимо прочих характеристик, имеют уникальный идентификатор. Если этот ID совпадает у нескольких дисков в системе, что может возникнуть при переносе системы с одного диска на другой (клонировании дисков) статус «В сети» будет иметь лишь один из них, второй будет отключен.
Обычно проблема легко решаема изменением ID на уникальный. Важно: в случае, если речь идёт о системном диске (то есть именно для него планируется изменять ID), после проделанных действий загрузка с него может быть испорчена и потребуется восстановление загрузчика (инструкция для Windows 11, но подойдет и для Windows 10).
Автоматическое назначение уникального ID
Первый и самый быстрый способ — положиться на возможности самой ОС и утилиты «Управление дисками», но он может сработать не всегда:
- Откройте «Управление дисками», в Windows 11 и Windows 10 для этого достаточно нажать правой кнопкой мыши по кнопке «Пуск» и выбрать соответствующий пункт контекстного меню. Также можно нажать клавиши Win+R на клавиатуре, ввести diskmgmt.msc и нажать Enter.
- Нажмите правой кнопкой мыши по диску «Вне сети» и выберите пункт «В сети» в контекстном меню.

- Если статус диска изменился на «В сети» и ошибок нет — диску была присвоен уникальный (отличающийся от других дисков в системе) ID и конфликта подписей с другим диском больше нет.


Изменение ID в командной строке
Вторая возможность — вручную назначить уникальный ID для диска в командной строке, для этого:
- Запустите командную строку от имени администратора (как это сделать).
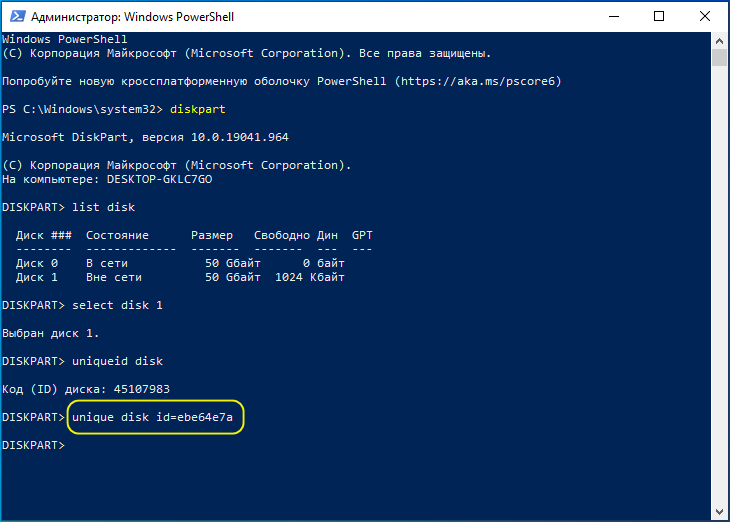
- По порядку введите команды
diskpart
list disk
- Вторая команда отобразит список дисков, обратите внимание на номер диска «Вне сети», с которым возникла проблема (далее — N) и используйте следующие команды:
select disk N
uniqueid disk
- Вы увидите текущий ID диска, который требуется изменить. Его формат будет отличаться в зависимости от структуры разделов диска — GPT или MBR. Для изменения ID достаточно использовать команду
unique disk id=новый_id
при этом для нового ID используйте тот же формат, который уже используется, и просто заменить одну или несколько цифр в шестнадцатеричном формате. Если текущий ID отобразился с фигурными скобками, в команде для смены ID их вводить не требуется.

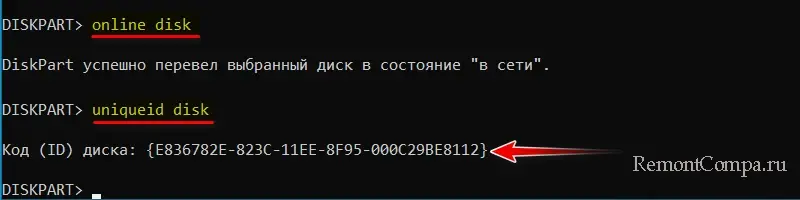
- Подключите диск и выйдите из DISKPART с помощью команд
online disk
exit

Готово, диск будет в сети, и вы сможете выполнять операции над ним как обычно.
Напомню: если вы столкнулись с проблемой после клонирования системного диска, то после изменения ID на одном из дисков, загрузчик, находящийся на этом диске, перестанет запускать систему, находящуюся на этом диске из-за изменившейся подписи и конфигурацию BCD придётся перезаписать.
Диск отключён из-за конфликта подписей
В этой статье, друзья, разберём такую проблему Windows: диск отключён из-за конфликта подписей. Обычно возникает, когда два или более диска имеют одинаковые цифровые подписи и идентификаторы. Это может произойти вследствие клонирования жёсткого диска или его виртуализации. Windows автоматически отключает диск, если обнаруживает конфликт подписей. Как решить эту проблему?
Диск отключён из-за конфликта подписей
При отключении диска из-за конфликта подписей для такого диска в управлении дисками Windows будет отображаться статус «Вне сети».
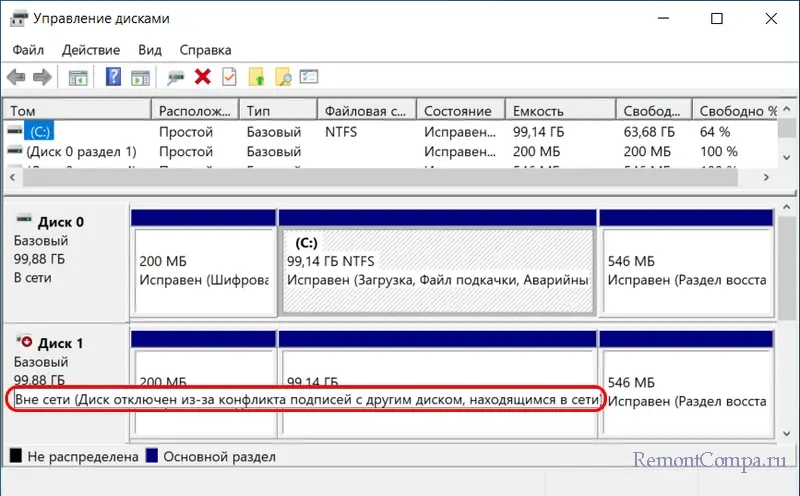
А при наведении курсора на статус увидим формулировку проблемы:
«Диск отключён из-за конфликта подписей с другим диском, находящимся в сети»
Если проблема касается диска, на котором установлены сама Windows и её загрузчик, компьютер не загрузится. И мы увидим синий экран восстановления Windows с ошибками 0xc000000e, 0xc000000e2 или нечто наподобие.
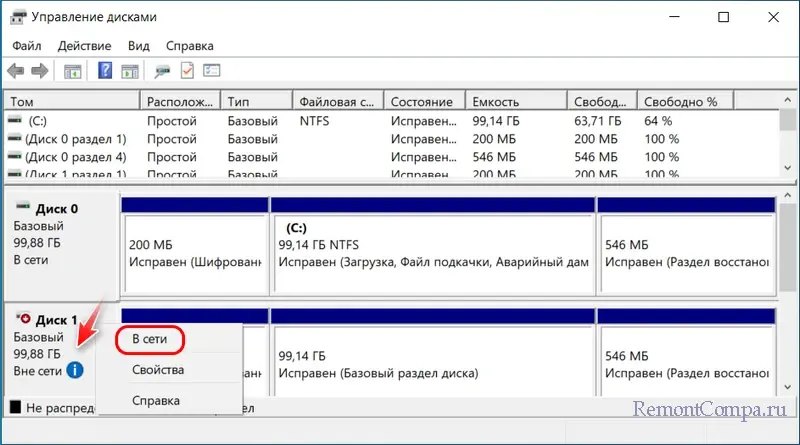
Решить такую проблему достаточно просто, если она касается не того диска, на котором установлены Windows и её загрузчик. Заходим в системное управление дисками. Вызываем контекстное меню на диске, который «Вне сети». И выбираем для него статус «В сети».
Вот, собственно, и всё.
Что за проблема такая – конфликт подписей диска, и что происходит при выборе статуса «В сети» для диска-клона, может наглядно продемонстрировать командная строка. Запустим её от имени администратора, когда проблема у нас ещё имеется. Введём команды:
diskpart
lis dis
Это запуск консольной утилиты diskpart и запрос на отображение жёстких дисков. Видим исходный диск и его клон. У клона состояние «Вне сети».

Введём команды:
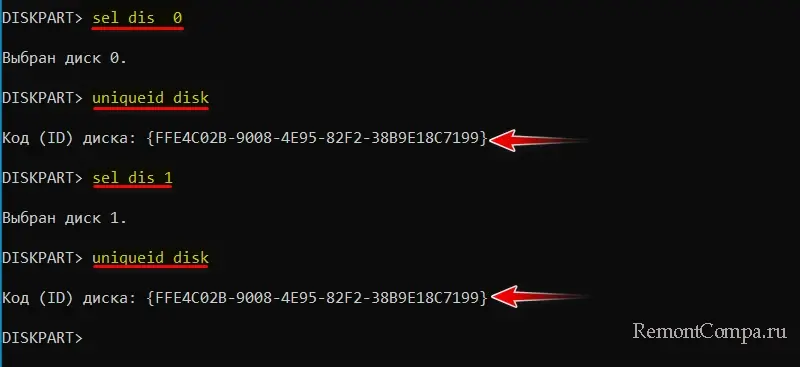
sel dis 0
uniqueid disk
Это выбор исходного диска и запрос на отображение его идентификатора. Далее вводим:
sel dis 1
uniqueid disk
Это выбор диска-клона и запрос на отображение его идентификатора. Как видим, идентификаторы у дисков идентичные.
Введём:
online disk
uniqueid disk
Это перевод диска-клона в состояние «В сети» и новый запрос на отображение его идентификатора. Как видим, идентификатор диска сменился на уникальный.
И диск теперь может исправно функционировать.
Что же делать, если проблема касается диска, на котором установлены Windows и её загрузчик? Необходимо загрузить компьютер с флешки с WinPE 11-10-8 Sergei Strelec. И в среде WinPE перевести диск-клон в состояние «В сети». Далее потребуется восстановить загрузчик Windows. Из-за изменившегося идентификатора диска в его конфигурации BCD будет содержаться неверная информация. И Windows не сможет загрузиться. Проще всего восстановить загрузчик Windows с помощью утилиты Dism++, она есть в составе WinPE 11-10-8 Sergei Strelec. Но он содержит и многие другие способы восстановления загрузчика Windows, применимые как для MBR-загрузчиков, так и EFI-загрузчиков.
As you know, storage devices are an important part of the computer system for porting, saving, and extracting data files. And for you to differentiate between storage devices on your computer system, each one of the storage devices is labeled with a unique number referred to as Disk Signature for identification.
The unique disk identifier is stored as a part of the MBR or Master Boot Record. Disk signature is used by operating systems in order to identify and set apart different data storage devices and hard disk drives in the computer for data access.
These days, Disk cloning has become a regular practice in upgrading to larger hard disk drives. Drives are cloned in order to produce a similar copy to use both the original drive and cloned copy together. Moreover, lots of virtualization tools are being used to virtualize the physical hard disk drives to create virtual hard disk drives and several virtual machine clones that are created with the existing virtual hard disk drives. And since these are identical copies, chances these copies may have identical disk signatures. As a result, when you use both disks that have identical signatures at the same time you run into the Disk Signature Collision problem. This kind of problem does not often occur as the Windows system does not really allow two disks to function simultaneously when they have the same disk signature.
When you encounter a Disk Collision problem in your Windows 10 computer, you may see the following error messages:
- The boot selection failed because a required device is inaccessible
- The disk is offline because it has a signature collision
- This disk is offline because it has a signature collision with another disk that is online
You can fix the disk collision problem by changing the disk signature which you can achieve using the command line utility diskpart in Windows PowerShell or Command Prompt or using Windows Disk Management utility.
To fix the disk collision problem, you can make use of the command-line utility called diskpart in Windows PowerShell or Command Prompt to view and change the signature, or can make use of Master Boot record in the Windows Registry. You can also make use of Windows Disk Management Utility to change the signature. Simply follow the given options below to change the disk signature either way.
Option 1 – Change Disk Signature via Diskpart
- Type “command prompt” in the Windows Search bar and then right-click on the related search result and select the “Run as administrator” option.
- After that, type the “diskpart” command and hit Enter to open Diskpart.
- Next, type the “list disk” command to display all the disks available in the system.
- Next, take note of the problematic disk number with the status Offline from the list and then type the “Select disk x” command where x is the offline disk to select the offline disk. For instance, if you type “select disk 1”, it will display the “Disk 1 is now the selected disk” message.
- Now type the “Uniqueid disk” command to display the disk signature and to change the disk’s signature and set the disk online, type the “unique disk ID= (New signature)” where (New signature) is the new ID in hexadecimal. For instance, you can set the new id as “unique disk ID= 1456ACBD”.
Note: If you have given the wrong format ID, the command prompt will display the following error:
“The specified identifier is not in the correct format. Type the identifier in the correct format: in hexadecimal form for an MBR disk or as a GUID for a GPT disk.”
- After you’re done, the disk will be online, and then restart your computer.
Option 2 – Change Disk Signature via Disk Management Utility
- Tap the Win + R keys to open the Run dialog box and then type “diskmgmt.msc” and hit Enter or click OK to open Disk Management.
- Next, right-click on the disk that is marked as Missing or Offline.
- After that, select the Online command from the drop-down menu.
- Then from the selecting option Online, Windows will generate a new disk signature.
Do You Need Help with Your Device?
Our Team of Experts May Help
Troubleshoot.Tech Experts are There for You!
GET HELP
Troubleshoot.Tech experts work with all versions of Microsoft Windows including Windows 11, with Android, Mac, and more.
Share this article:
You might also like
Bttray.exe Application – What is it?
Bttray.exe is basically a Bluetooth Tray Application. Bluetooth Tray Application is developed by WIDCOMM.
It provides a system tray icon that allows users to see the status of their Bluetooth connections at a glance. It allows you to easily access the configuration and settings for the Bluetooth products enabling you to change the configuration of the Bluetooth devices.
The bttray.exe application error may pop up on your computer screen due to some issue with the Bluetooth software. The process fails to initialize and therefore stops working.
Bttray.exe application error code is displayed in the following format:
- “BTTray.exe can’t initialize (0xc0150004).”
- “BTTray.exe – System Error”
Though this is not a fatal or critical computer error it is advisable to resolve it otherwise it will hamper your access to Bluetooth software and cause you a great deal of inconvenience.
Solution
Error Causes
Bttray.exe application error code may be triggered due to one of the reasons stated below:
- Bttray.exe application is damaged
- Bttray.exe is accidentally removed from your PC
- The Bluetooth software or driver becomes problematic.
- Some modules that run by the process are corrupt
- Malware infection
- Invalid registry entries
Further Information and Manual Repair
If you experience a bttray.exe application error code on your system, it is recommended to fix it right away.
To resolve this error you don’t have to be a computer programmer or a technical whiz or have to hire a professional and spend hundreds of dollars in repair. It is easy to fix, simply follow the manual methods given below:
Method 1- Reinstall Bluetooth Software
If the Bluetooth Software is damaged or outdated, the bttray.exe will also not work. If this is the cause of the error code, then simply reinstall Bluetooth software on your system.
To do this, first, uninstall the current software and then download the latest version of the Bluetooth Software on your PC. To uninstall click start, go to the control panel, and then programs. Now select Bluetooth software and click uninstall to remove it.
After that, install the latest version and update it. To activate changes
Method 2: Scan for Malware
Sometimes the bttray.exe application error code may pop up due to malware and viral infection. To fix it, download a powerful antivirus. Scan and remove malware to resolve.
Method 3: Clean Registry
The registry basically saves all the activities being performed on the PC including junk and obsolete files. If the registry is not clean frequently, unnecessary files like cookies, junk files, temporary files, and internet history can take up a lot of space and cause the registry to damage.
Due to this error code like the bttray.exe application can also pop up. To resolve, clean the registry. You can do it manually but that may be difficult and time-consuming if you are not a computer programmer. However, a good alternative would be to download Restoro.
This is a user-friendly and next-generation PC Fixer deployed with multiple utilities like a registry cleaner and an antivirus. Simply run it to remove viruses and clean the registry.
Click here to download Restoro and resolve the bttray.exe application error now!
Read More
There are cases when you want to undo some changes you’ve made to your computer and to do that you have to perform the System Restore task. However, if you encounter an error that states “To use System Restore you must specify which Windows installation to restore”, when doing so, read on as this post will help you fix the problem.
This kind of error in System Restore could be due to corrupted files in the system. There are also situations where you are not able to boot up once you encounter this error which could be a big problem. On the other hand, this error might have something to do with corrupted BCD files. Whatever the cause is, here are some potential fixes you have to try.
Option 1 – Try to run System File Checker offline
Like pointed out, since the error might be due to corrupted system files, you can try to run System File Checker offline. How? Refer to these steps:
- You need to go to the Advanced Startup Options and from there select Troubleshoot.
- Next, select the Advanced Options and then Command Prompt.
- After opening Command Prompt, type the commands given below and tap Enter right after you type each one of them.
- Cd /
- Dir
- If you can see the “Users” folder, that is your system’s drive. However, if you can’t see it, you can just change the drive-by assigning “D” as its alphabet volume.
- Then execute this command where “C” is the system drive: sfc /scannow /offbootdir=C: /offwindir=C:Windows
- Now repeat the given steps sequentially.
Option 2 – Try to run DISM tool
You can also run the DISM tool to repair the potentially corrupted system image. First, you have to check the health of the system like checking the integrity of the system files and Windows services. To run DISM, follow the given steps below sequentially.
- Open Command Prompt from the Advanced Startup options.
- After that, execute this command where “C:” is the system volume: DISM /Image:C:Windows /Cleanup-Image /RestoreHealth /Source:C:WindowsWinSxS
- If you encounter an error after executing the given command, insert the Windows USB or DVD and then execute this next command where “E:” is the USB or DVD drive: DISM /Image:C:Windows /Cleanup-Image /RestoreHealth /Source:esd:E:SourcesInstall.esd:1 /limitaccess
- In some cases, “install.esd” would be “install.wim” and in such case, you have to modify and execute this command: DISM /Image:C:Windows /Cleanup-Image /RestoreHealth /Source:wim:E:SourcesInstall.wim /limitaccess
Option 3 – Try to repair corrupted BCD
As mentioned, the error could also be due to corruption in BCD, and to fix it, you can use Bootrec.exe – a built-in command-line tool used to troubleshot issues related to boot up and Windows Startup. Before you run this tool, make sure that you have inserted a bootable USB or DVD into your computer. Once you have that covered, follow these steps:
- You need to go to the Advanced Startup Options.
- Then click on Troubleshoot.
- Next, select the Advanced Options and then Command Prompt.
- Once Command Prompt has been pulled up, enter each one of the following commands and in the sequence that they are given to rebuild BCD files and repair MBR files:
- Bootrec /Fixmbr
- Bootrec /FixBoot
- After you execute the commands given above, you should see a confirmation message that says, “The operation completed successfully”.
- Now type the “Bootrec /RebuildBCD” command to rebuild BCD.
- Finally, close Command Prompt and then restart your computer to successfully apply the changes made.
Option 4 – Try to run the Automatic Repair Utility
You might also want to use Automatic Repair in fixing the error. To do so, follow the steps below.
- You can start by creating and booting from a bootable Windows 10 USB Stick.
- After that, click on Repair your computer located in the bottom left corner when you are on the initial Windows Startup screen.
- Next, click on Troubleshoot, and then on the other screen, click the Startup Repair option.
- Now select the operating system you want to repair. Once you do that, it will start to repair your operating system. Wait until the process is completed and then check if the problem’s now fixed.
Option 5 – Try to use the Windows Recovery Environment
If the four options given above didn’t help fix the problem, you could try running Windows Repair and a Windows bootable USB or DVD.
- First, insert the bootable USB or DVD and boot into it, and select the “Repair your computer” option.
- Next, once you see the manufacturer logo on your computer, tap the key to enter into Windows Recovery Environment.
- After that, change the Boot sequence to DVD drive under the UEFI Firmware settings and restart your computer.
- Once your computer has restarted, select the boot order and make changes accordingly as displayed in the BIOS.
Option 6 – Try running System Restore in Advanced Startup Options
Since you probably can’t boot into your Windows 10 computer, you can try to run System Restore again in the Advanced Startup Options.
- Boot your computer into the Advanced Startup Options screen.
- From there, you will see some options to troubleshoot when you can’t log in to Windows in the usual way.
- Now select Troubleshoot > Advanced Options > Command Prompt.
- After that, type “exe /OFFLINE:C:Windows” and hit Enter to execute the command which will start the System Restore process.
Note: You need to replace “C” with the drive where Windows Installation is located.
Read More
If you aren’t able to pull up any website and instead got the ERR QUIC PROTOCOL ERROR error message in Google Chrome then read on as this post will help you resolve the problem. When you encounter such an error in Chrome, you will see the following error message:
“This site can’t be reached, The webpage at [website URL] might be temporarily down or it may have moved permanently to a new web address, ERR_QUIC_PROTOCOL_ERROR”
This kind of error message pops up when the URL is down. However, if you are certain that the site is not down and you’re still seeing this error message, then troubleshoot further using the suggestions given below.
Option 1 – Try to disable the QUIC Protocol
QUIC is an experimental transport layer network protocol that is present in Google Chrome in order to establish a connection between two endpoints over UDP. So if there is any problem on the development side, you will most likely encounter ERR_QUIC_PROTOCOL_ERROR on your Google Chrome browser when you try to open any website. Thus, you have to disable the QUIC protocol in order to resolve the error. How? Simply follow the steps below.
- Open your Google Chrome browser.
- Now type in “chrome://flags/” in the address bar and hit Enter.
- After that, look for the Experimental QUIC protocol which should be set by default.
- Then expand the drop-down menu and select Disable.
- Restart Google Chrome and see if the error is fixed or not.
Option 2 – Disable VPN
As mentioned, if you are using VPN, this could be the reason why you’re getting the Windows Update error 0x800F0922 so the most obvious thing to do is for you to turn off the VPN and try to run the Windows Update once more. And if you use a VPN software that works using their software, you can just completely exit or log-off from its account. On the other hand, if you are using a built-in Windows 10 VPN, you can simply turn it off or delete all the settings you have created there. Although it’s understandable that you might have to use a VPN connection to connect to the work network, you really have to disable it at least until the Windows Update is no longer stuck in the error 0x800F0922. It would be best if you do this when you are not working.
Option 3 – Disable the Proxy server
You can also try to disable the Proxy server to fix the ERR_QUIC_PROTOCOL_ERROR in Chrome. Refer to these steps to do so:
- Tap the Win + R keys to open the Run dialog box.
- Then type “inetcpl.cpl” in the field and hit Enter to pull up the Internet Properties.
- After that, go to the Connections tab and select the LAN settings.
- From there. Uncheck the “Use a Proxy Server” option for your LAN and then make sure that the “Automatically detect settings” option is checked.
- Now click the OK and the Apply buttons.
- Restart your PC.
Note: If you are using a third-party proxy service, you have to disable it.
Read More
Google’s Pixel smartphone is one if not the best Android smartphone on the market. It regularly gets updates and Google is really trying to keep it as a top choice for Android smartphone users. One of the new things that Google has released for its smartphone series is a new emergency dialer.
With an emergency dialer, you will be able to quickly access local contact information for police, fire, and medical services. This dialer is able to contact before mentioned services even when the phone is locked and when you are traveling.
The idea is to quickly access the default emergency number no matter in which country you are currently in, service will find the appropriate number and set it as default so if you need it there is no delay in searching for the appropriate number and dialing it.
Once the service is enabled on the device you can swipe up and tap Emergency call without unlocking your phone or you can press and hold the power button for five seconds and tap Emergency.
If you have a Pixel smartphone go to the Google support page and follow instructions on how to enable this service. It costs nothing and it could potentially even save your life.
Read More
One of the most important User Interface elements in a Windows 10 operating system is the Start Menu. Not too long ago, Microsoft has added some new features and redesigned the Start Menu a couple of times as well. Thus, it is not uncommon for Windows 10 users to use several monitors. That’s why in this post, you will be guided on how you can move the Start Menu to your second monitor in Windows 10.
There are a lot of advantages in using more than one monitor like a better and widescreen as well as help in improving and increasing productivity. Usually, the Start Menu and the taskbar is present in the original monitor only. In most cases, it helps users in moving the Start Menu to the second monitor and helps users in segregating tasks, and uses separate monitors for each kind of task.
There are two simple steps to move the Start Menu to the second monitor. You have the option to unlock and drag the taskbar, as well as make adjustments in the settings. To get started, refer to each one of the following options to move the Start Menu to the second monitor.
Option 1 – Move the second monitor by unlocking and dragging the taskbar
The first option you can try to move the Start Menu to the second display is to simply unlock and then drag the taskbar. To do so, follow these steps:
- First, click on the Taskbar and unlock it.
- Next, uncheck the Lock the taskbar feature in the menu of the Taskbar Settings. This will free the taskbar so you can move or drag it around.
- After that, push the Start Menu to the furthermost corner of the screen and then transfer it to the second monitor.
Option 2 – Move the second monitor using the keyboard
- The first thing you have to do is to tap the Windows key to open the Start Menu.
- Next, close the Start Menu by tapping the Esc key.
- After that, the controls will shift back to the taskbar.
- Now open the context menu of the taskbar by tapping the Alt + space bar together. This will move the Start Menu to the second monitor.
Option 3 – Move the Start Menu to the second monitor via Settings
If you find that the Taskbar is moving to the wrong monitor automatically or if the program does not start on the same monitor as the taskbar, then you can try this option.
- Click on Start first and click Run.
- Then type “desk.cpl” in the field and click OK.
- Alternatively, you could also right-click on the desktop and select the Screen Resolution option from the drop-down menu.
- After that, click on the monitor that you want to use as the primary monitor and select the checkbox labeled “Make this my main display”.
- Once done, you have to choose the “Show desktop” on only 1 from the drop-down menu of Multiple displays.
- Now click the Keep Changes option and select the Extend these displays from the Multiple displays drop-down menu and then click on the Apply button to save the changes made.
- Afterward, click the Keep changes option once the dialog box pops up.
Read More
Internal Error 2771 — What is it?
Internal Error 2771 is an internal error code associated with Kaspersky Internet Security and Antivirus software. This error pops up when Kaspersky Internet Security software fails to install on your PC successfully.
Installation of the software is interrupted and therefore it ends prematurely. This happens mostly when you try to install a new build on an existing installation.
Internal Error 2771 is displayed in one of the following formats:
Internal Error 2771, Sandbox Feature
or
Internal Error 2771, WholeProduct Feature
Solution
Error Causes
This error may result on your computer screen due to several reasons. Some of the most common underlying causes include:
- A leftover Registry Key
- Bad entries from previous Security Package
- INFCACHE.1 file corrupted
- Conflicts with other security software installed on your system
Further Information and Manual Repair
To successfully overcome this problem and ensure the successful installation of Kaspersky Internet Security software on your system, try the methods given below.
Method 1- Remove the Leftover Registry Key
Sometimes Internal error code 2771 may appear during installation due to the leftover registry key from the previous Kaspersky software removal.
A registry key is often created when uninstalling the previous Kaspersky version from the PC. This key is left behind even after you reboot your system.
This key is called AVP**_post_ uninstall, you need to delete it to ensure the new version of the Kaspersky program is installed successfully on your PC. For this, simply go to the start menu and type Regedit in the search bar.
Now navigate to HKEY_LOCAL_MACHINESOFTWAREMicrosoftWindowsCurrentVersionRun and then look here for the registry key called AVP**_post_ uninstall. In order to delete this file, right-click it and then select delete.
Once uninstalled, reboot your PC and then try installing the Kaspersky Internet Security program again.
Hopefully, this will resolve the issue. If the software installs smoothly, then the error is fixed, in case it still persists, then try other methods illustrated below.
Method 2 — Remove the INFCAHCE.1 Corrupt File
Another reason for the error pop-up may be INFCAHCHE.1 corruption.
This file is basically used to store driver information and inf file locations. However, if it contains corrupted information, then you must remove it.
To do this, go to the start menu and type cmd into the search bar. This will open a command prompt. Here type del C:\Windows\infinfcache.1. Now reboot your PC and try installing Kaspersky software on again.
Method 3 — Fix Software Conflict
Security software conflict can also result in internal error 2771 code display. And when this happens, the installation of Kaspersky prematurely ends.
Security software conflict may occur if you have Comodo Firewall installed on your PC. A firewall is known to cause issues with Kaspersky software programs.
The best way to resolve this issue is to uninstall all security software programs on your PC. Once all security software is removed, then install Kaspersky on your system. If the installation is successfully completed, then reinstall the other software again.
Method 4 — Download Restoro
Error 2771 can also result on your computer screen if traces of the previously installed Kaspersky software still remain in the registry despite the program removal. In such an event it is advisable to download Restoro.
This is a cutting-edge and user-friendly PC Repair Tool deployed with an intuitive interface and a powerful registry cleaner. The registry cleaner scans your entire PC in seconds and detects all registry-related problems.
It removes all the bad entries, invalid registry keys, traces of previously uninstalled programs, junk files, and cookies that are known for registry corruption. It takes just a few clicks to perform this process.
Once all traces are removed, you can install the new version of the Kaspersky Internet Security program on your PC without interruption.
Click here to download Restoro and be on your way to resolve Internal Error 2771 on your computer!
Read More
What Is Error 1713?
Error 1713 is essentially a programming error. It has specifically been designed in Microsoft applications. This is intended to allow customers to continue using the appropriate setup tool.
The error can be quite annoying and is used by manufacturers to determine what caused the error so that counteractive methods can be employed. The number 1713 is simply the hexadecimal code that informs where the instruction was loaded when the error occurred.
Solution
Error Causes
As far as the causes of Error 1713 are in question, the primary cause is damaged, misconfigured, or corrupt windows system files. There are several other factors that lead to the occurrence of Error 1713.
For instance, if the applications or hardware on your system has been improperly deleted, installed, or uninstalled, Error 1713 will occur.
Similarly, Error 1713 is triggered when the computer has recovered from an attack by some virus, spyware, malware, or adware only recently. This attack corrupts the file and so the error appears. Incorrect system shutdown can also be blamed for this error.
All the scenarios listed above actually damages the registry entries in Windows system files.
The corrupt or damaged files will then lead to improperly linked or missing information. It goes without saying that such problems will keep the applications from performing in the desired manner and this makes it even more crucial to fix this error as soon as it appears.
Further Information and Manual Repair
Two of the most useful workarounds for Error 1713 are listed below.
- This solution is for advanced users. Restart your computer. Log on to it as the admin in the safe mode. Now go to the Start button and follow this path All Programs-> Accessories-> System Tools->System Restore. Now an option will appear asking you to ‘Restore your computer to an earlier time’. Select it. This option will actually appear in a new window. Click Next. A list of restore points will be displayed to you. Select the most recent restore point before the occurrence of the error and press Next. Now click on the Next button that appears in the confirmation window. Restart your computer as soon as the restoration is finished.
- This solution is for novice users. Download a 1713 repair utility available online. Install this program and use it to scan your system. After the scan is complete, click on repair to fix the error.
Read More
Hive ransomware has been targeting Microsoft exchange servers lately vulnerable to ProxyShell security issues in order to deploy various backdoors. Once the backdoor has been placed various attacks can be performed including but not limited to network reconnaissance, stealing admin accounts, taking valuable data, and even installing and deploying file-encrypting algorithms.

ProxyShell wide abuse
ProxyShell is a set of three vulnerabilities in the Microsoft Exchange Server that allows remote code execution without authentication on vulnerable deployments. The flaw has been used in past by various ransomware like Conti, BlackByte, Babuk, Cuba, and LockFile.
Security vulnerabilities have been reported to be fully patched on May 2021 but how Hive was able to still be successful in exploiting PowerShell and infiltrating into the system there seems to be still some unpatched and open issues.
Hive
Hive has gone a long way since it was first observed in the wild back in June 2021, having a successful start that prompted the FBI to release a dedicated report on its tactics and indicators of compromise.
In October 2021, the Hive gang added Linux and FreeBSD variants, and in December it became one of the most active ransomware operations in attack frequency.
Last month, researchers at Sentinel Labs reported on a new payload-hiding obfuscation method employed by Hive, which indicates active development.
Read More
Error Code 0x8007007e – What is it?
Error code 0x8007007e occurs in Windows 8 or 8.1 when users attempt to, but fail to successfully use Windows Update. When this occurs, Windows 8 or 8.1 users will not be able to access updates or certain web pages. This error manifests itself via the following common symptoms:
- Inability to complete tasks via Windows Update
- Message box displaying error code 0x8007007e message
Solution
Error Causes
Error code 0x8007007e is usually caused by a malfunction within your system. This malfunction may be due to several issues such as malware on your device, or the accidental removal of a registry entry or system file.
Further Information and Manual Repair
To correct issues related to error code 0x8007007e in Windows 8.1, users may need to employ one or several manual repair methods. Users will not necessarily need technical skills to accomplish this task. However, if you are uncertain of your skills or you are unable to resolve the issue after completing the tasks below, consult a Windows repair technician or use an automated tool.
Method one: System File Checker
System File Checker (SFC) enables users to check their system for corrupt or missing system files. You will need to use Command Prompt. To access System File Checker on Windows 8 or 8.1, follow the instructions below.
- Step one: Tap or use the mouse to click Search
- Step two: Type Command Prompt in the Search box
- Step three: Select Command Prompt, and then click Run as administrator
- Step four: Type password if prompted by Command Prompt to do so or simply click Allow
Whether you run Windows 8 or 8.1 operating system on your computer, System File Checker will begin to find and repair missing or corrupted system files. If, however, you are unable to successfully complete the task via Command Prompt, repeat the steps above. You may also consider help from a professional or simply move to the next manual repair method listed below.
Method two: Perform a Clean Boot
A Clean Boot will help users determine if error code 0x8007007e in Windows 8.1 is caused by a problem associated with startup programs. Problems may arise when there is conflict among programs that run in the background when users turn on their device. To run a clean boot, follow the steps below:
- Step one: Click the Start button and type msconfig in the search box
- Step two: Click Services tab
- Step three: Click Hide all Microsoft Services box then select Disable All
- Step four: Click Startup tab
- Step five: Select Disable All, then OK
- Step six: Restart the computer then check if you can now update the system
If the Clean Boot is successful, you will be able to successfully update your system without receiving error code 0x8007007e. However, if the error code reappears while you attempt to access updates or web pages, proceed to the next manual repair method below.
Method three: Scan for Malware
Since error code 0x8007007e in Windows 8 or 8.1 can be caused by issues related to malware, it’s important for users to check their system using a powerful antivirus or anti-malware software. If you do not have one on your system, you will need to download such software as soon as possible.
Once you have the software on your PC, run a scan to check if your computer has been infected. If malware is indeed on your device, remove it using the anti-malware tool.
Method four: Run System Restore Tool
Another effective manual repair method relates to System Restore. This tool enables Windows users to restore their computer to an earlier period of time in which the error code was not present. When done properly, it can effectively resolve error code 0x8007007e. Before running this tool, however, be sure you select a time in which all important files and programs are present so as not to lose them.
Method Five: Use an Automated Tool
If you wish to always have at your disposal a utility tool to fix these Windows 8 and other related issues when they do arise, download and install a powerful automated tool.
Read More
New malware with extensive spyware capabilities steals data from infected Android devices and is designed to automatically trigger whenever new info is read to be exfiltrated. The spyware can only be installed as a ‘System Update’ app available via third-party Android app stores as it was never available on Google’s Play Store. This drastically limits the number of devices it can infect, given that most experienced users will most likely avoid installing it in the first place. The malware also lacks a method to infect other Android devices on its own, adding to its limited spreading capabilities.
However, when it comes to stealing your data, this remote access trojan (RAT) can collect and exfiltrate an extensive array of information to its command-and-control server. Zimperium researchers who spotted it observed it while «stealing data, messages, images and taking control of Android phones.»
What happens when malicious software is installed
«Once in control, hackers can record audio and phone calls, take photos, review browser history, access WhatsApp messages, and more,» they added. Zimperium said its extensive range of data theft capabilities includes:
- Stealing instant messenger messages;
- Stealing instant messenger database files (if the root is available);
- Inspecting the default browser’s bookmarks and searches;
- Inspecting the bookmark and search history from Google Chrome, Mozilla Firefox, and Samsung Internet Browser;
- Searching for files with specific extensions (including .pdf, .doc, .docx, and .xls, .xlsx);
- Inspecting the clipboard data;
- Inspecting the content of the notifications;
- Recording audio;
- Recording phone calls;
- Periodically take pictures (either through the front or back cameras);
- Listing of the installed applications;
- Stealing images and videos;
- Monitoring the GPS location;
- Stealing SMS messages;
- Stealing phone contacts;
- Stealing call logs;
- Exfiltrating device information (e.g., installed applications, device name, storage stats).
How does it work?
Once installed on an Android device, the malware will send several pieces of info to its Firebase command-and-control (C2) server, including storage stats, the internet connection type, and the presence of various apps such as WhatsApp. The spyware harvests data directly if it has root access or will use Accessibility Services after tricking the victims into enabling the feature on the compromised device. It will also scan the external storage for any stored or cached data, harvest it, and deliver it to the C2 servers when the user connects to a Wi-Fi network. Unlike other malware designed to steal data, this one will get triggered using Android’s contentObserver and Broadcast receivers only when some conditions are met, like the addition of a new contact, new text messages, or new apps being installed.
«Commands received through the Firebase messaging service initiate actions such as recording of audio from the microphone and exfiltration of data such as SMS messages,» Zimperium said.
«The Firebase communication is only used to issue the commands, and a dedicated C&C server is used to collect the stolen data by using a POST request.»
Camouflage
The malware will also display fake «Searching for the update..» system update notifications when it receives new commands from its masters to camouflage its malicious activity. The spyware also conceals its presence on infected Android devices by hiding the icon from the drawer/menu. To further evade detection, it will only steal thumbnails of videos and images it finds, thus reducing the victims’ bandwidth consumption to avoid drawing their attention to the background data exfiltration activity. Unlike other malware that harvests data in bulk, this one will also make sure that it exfiltrates only the most recent data, collecting location data created and photos taken within the last few minutes.
If you would like to read more helpful articles and tips about various software and hardware visit errortools.com daily.
Read More
Copyright © 2023, ErrorTools. All Rights Reserved
Trademark: Microsoft Windows logos are registered trademarks of Microsoft. Disclaimer: ErrorTools.com is not affiliated with Microsoft, nor claims direct affiliation.
The information on this page is provided for information purposes only.
Подключенные к компьютеру диски, как правило, распознаются системой автоматически и становятся доступными сразу после подсоединения. Исключение составляют лишь новые накопители без данных, которые сначала необходимо проинициализировать в оснастке управления дисками. Впрочем, проблемы могут возникнуть с уже проинициализированными дисками. Так, клонированные диски, а также диски, ранее входившие в состав массива RAID могут оказаться недоступными.
При проверке статуса такого накопителя в оснастке управления обнаруживается, что диск находится не в сети, если же на него навести курсор мыши, появляется всплывающее сообщение «Диск отключен из-за конфликта подписей с другим диском, находящимся в сети». Решается проблема элементарно, но сейчас хотелось бы поговорить не столько о ее решении, сколько ее о причинах.
Подпись диска
Причиной ошибки является совпадение цифровых подписей двух или более дисков – четырехбайтовых идентификаторов, хранящихся в основной загрузочной записи. Цифровая подпись, или иначе сигнатура диска генерируется Windows автоматически при подключении устройства и используется для различения физических накопителей, отображения разделов в RAID, также подпись диска используется BCD для нахождения загрузочных файлов процессом загрузки операционной системы.
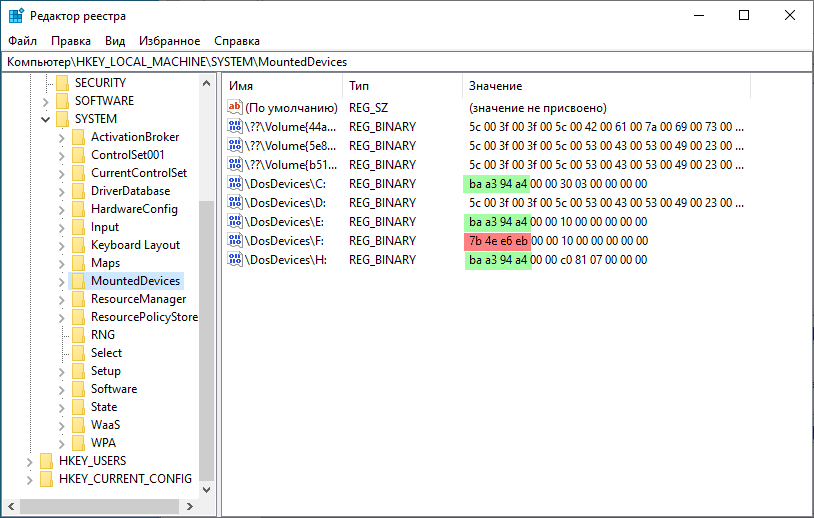
Просмотреть список подписей дисков можно в разделе реестра HKLM\SYSTEM\MountedDevices – представлены они в виде первых байтов шестнадцатеричных значений логических разделов диска, также получить ID диска можно средствами утилиты diskpart, о чем будет сказано ниже.
Если идентификаторы разных физических дисков окажутся одинаковыми, а так бывает при клонировании диска, Windows автоматически переведет диск, ID которого был изменен последним, в режим оффлайн.
Примечание: четырехбайтовое значение сигнатуры диска в реестре записывается в обратном порядке – справа налево, тогда как diskpart выводит значение ID слева направо.
Подключение диска
Если диск не является системным, устранение проблемы займет меньше минуты.
Зайдите в оснастку управления дисками, кликните по заголовку отключенного диска и выберите в контекстном меню опцию «В сети».
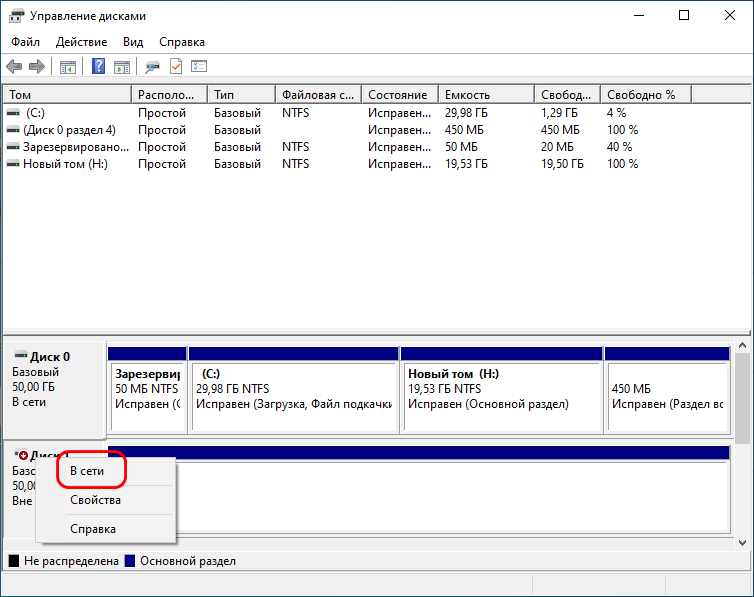
Windows создаст для диска новую цифровую подпись, и он вновь станет доступен.
Также вы можете присвоить диску свой собственный ID в шестнадцатеричном формате.
Для этого откройте от имени администратора PowerShell и выполните следующие команды:
diskpart
list disk
select disk 1
uniqueid disk
unique disk id=12345678
Первая команда запускает Diskpart, вторая – выводит список физических дисков, третьей командой выбирается диск с неуникальным ID. Четвертая команда не является обязательной, она показывает текущую сигнатуру, диска, пятая команды назначает диску новый ID.
Системные диски
А вот с системными дисками все гораздо сложнее.
Во-первых, так как диск будет отключен, система не сможет загрузиться.
Да, вы можете загрузить компьютер с установочного диска и создать средствами того же Diskpart новый ID, но Windows все равно не загрузится, поскольку связанные записи BCD станут некорректными, ведь они как указывали, так и продолжат указывать на старую сигнатуру. Можно попробовать восстановить загрузочную запись в среде восстановления, но это вряд ли поможет. Если что и сработает, так это восстановление старой подписи, однако эта процедура требует определенных знаний о работе BCD. Тема интересная и заслуживающая рассмотрения, но займемся мы ею уже в следующий раз.
Присоединили второй жесткий диск, а комп его не видит или видит, если подключать HDD по отдельности. Что делать? Читаем статью..
Доброго времени суток, друзья! В этой статье я расскажу вам почему комп не видит жесткие диски и покажу как их подключить средствами Windows. Прогресс развития техники и технологий не стоит на месте, сегодня популярность HDD набирает все новые обороты, жесткие диски становятся все востребовательнее, чем usb-флешки. Из основных достоинств можно выделить:
- Объем — с каждым годом он растет, так что 2 ТБ уже никого не удивить;
- Размер — в скором будущем HDD догонят по размерам флешки, сейчас они уже не превышают величину вашего смартфона;
- Скорость — в этом HDD может серьезно конкурировать с флешками.
Так, давайте все таки вернемся к проблеме.. Мы подключаем второй жесткий диск к компьютеру, но его не видно, причем ранее мы использовали его неоднократно, знакомая ситуация? Причин может быть сотни и тысячи. Приложим палец к «невидимому» HDD, если он крутиться, то и пожалуй самая основная причина — диск отключен из-за конфликта подписей с другим диском.
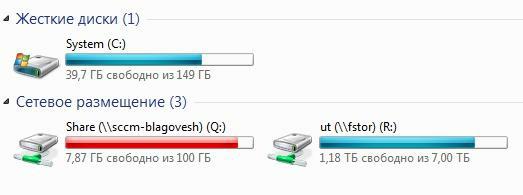
На изображении мы видим только один жесткий диск, а не два.
Первое, что нужно сделать — зайти сюда:
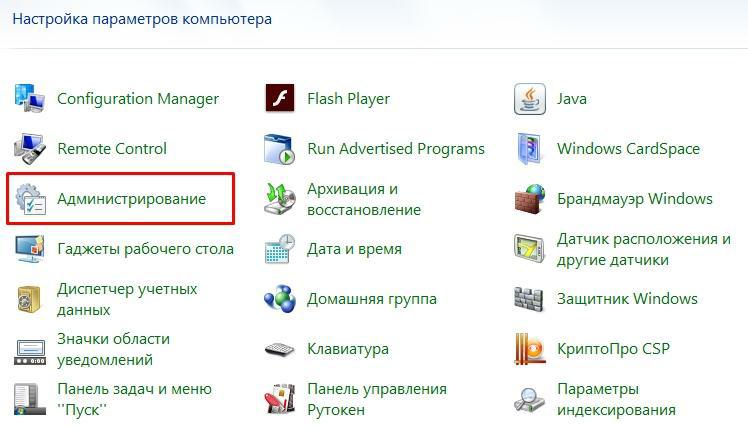
«Пуск» — «Панель управления» — «Администрирование«:
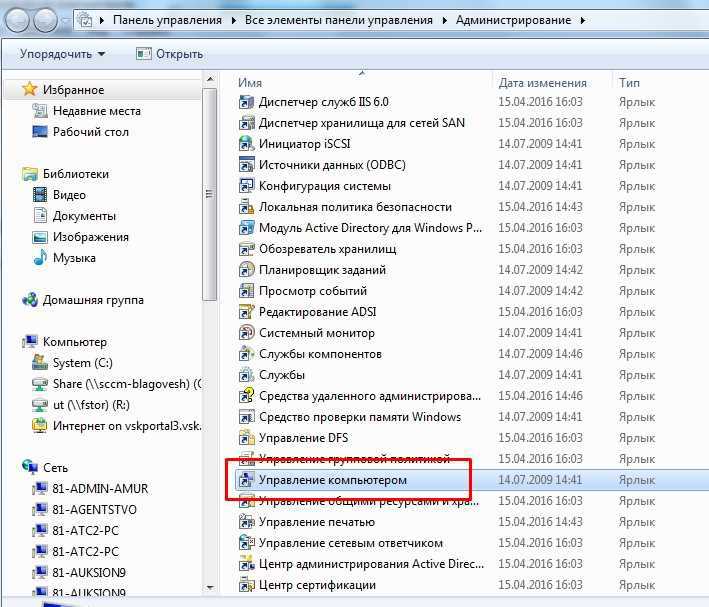
Далее ищем ярлык с названием «Управление компьютером«:
В списке отыщем «Запоминающие устройства» — «Управление дисками«, нашли? Молодцы, открываем:
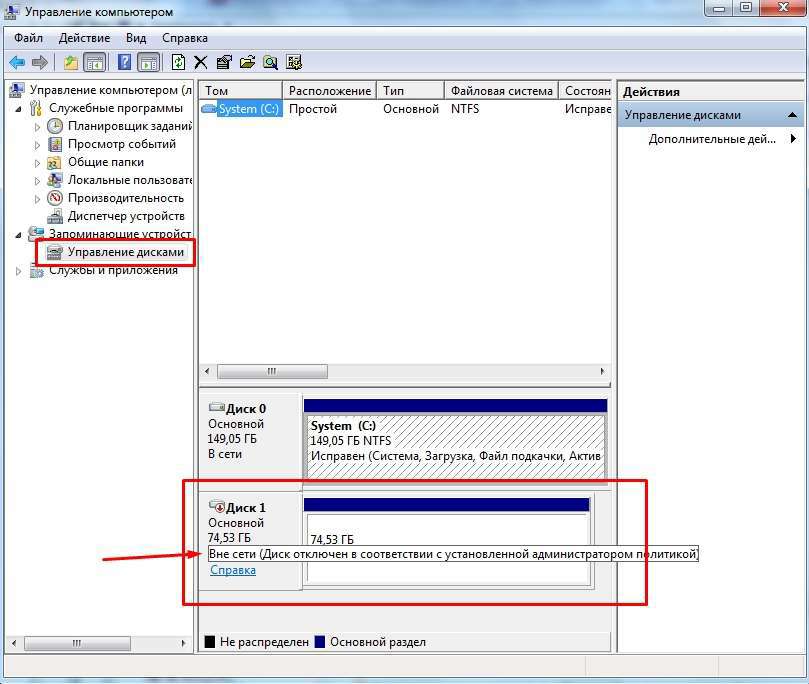
В окне в нижней части видим «Диск 1«, он у нас недоступен. Щелкаем по нему правой кнопкой мыши и выбираем пункт «Изменить букву диска или путь к диску…«, на этом этапе меняем букву и диск появляется. Однако, если же этот пункт не доступен и при наведении на диск вы видите всплывающее сообщение как на моем изображении — «Вне сети (Диск отключен в соответствии с установленной администратором политикой)«, то переходим к плану «Б».
Здесь явная причина конфликта дисков. Решается проблема так: открываем «Пуск» — «Выполнить» или же нажимаем клавиши «Win+R«, в появившемся окне набираем «cmd«, запускаем командную строку и далее поочередно набираем команды, у меня они выделены красным на изображении:
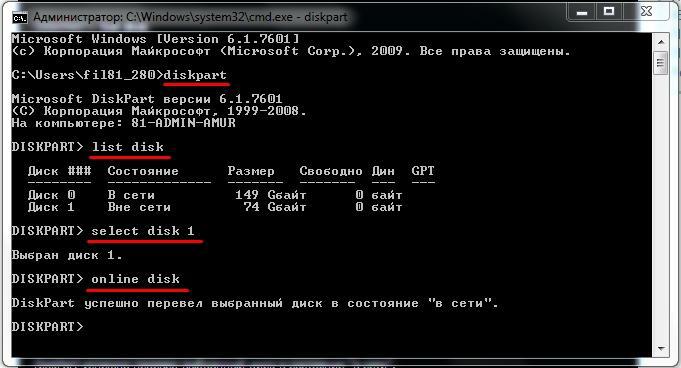
То есть, мы должны набрать:
diskpart
list disk
select disk 1
online disk
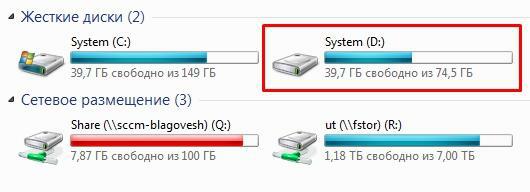
Теперь поспешим зайти в «Мой компьютер«, чтобы увидеть долгожданный второй диск в списке:
Если HDD никак не хочет появляться, то пробуйте переподключить шлейфы, если HDD работает через USB, пробуйте подключать в другой usb-порт. Об успехах или неудачах в подключении пишите в комментариях под статьей.