
Even though Disk Cleanup is not a very often used tool in Windows, it still does come in handy and I have found that it does a good job of getting rid of some stuff that other cleaners can’t. In Windows 10, you can open Disk Cleanup in a number of ways. In this post, I’ll walk you through the different ways to get to Disk Cleanup.
Disk Cleanup via Administrative Tools
The first way to get to Disk Cleanup is to go to the Control Panel and then open Administrative Tools and click on Disk Cleanup. Pretty straight-forward, but kind of a tedious process.

If you happen to be using Windows 8 still, you can read my previous post on how to open the Control Panel in Windows 8 if you’re having trouble doing that.
If you really use it a lot, you can right-click on Disk Cleanup in Administrative Tools and choose Pin to Start or Pin to Taskbar.

Disk Cleanup via Run Dialog
Another way to do this is to open a run dialog and type in the direct executable for disk cleanup. Click on Start, type in run and press Enter. Type in Cleanmgr.exe.

Disk Cleanup via Disk Properties
You can also open Explorer, right-click on the drive you want to run Disk Cleanup on and choose Properties.
You’ll see the Disk Cleanup button located on the right-hand side down where it shows the capacity of the drive.
Disk Cleanup via Start Search
The easiest way to open Disk Cleanup is to simply click on Start and type in disk cleanup. It should be the first result.
If you are using Windows 8, the easiest way to open Disk Cleanup is to open the Charms bar and then click on Search. Type in Disk Cleanup and then click on Settings.

Click on Free up disk space by deleting unnecessary files. This will bring up Disk Cleanup.
Running the Extended Disk Cleanup
Windows 10 also has an extended Disk Cleanup that can be run, which includes more options than what you get in the standard version. Some sites have stated that the extended version is the same as when you click on Clean up system files in the normal Disk Cleanup dialog, but that’s not true.
I had at least 11 more options on my PC when I ran the extended disk cleanup and it actually cleared out a few extra GB’s that was not removed even after I chose the system files option. You can get to the extended disk cleanup by opening an elevated command prompt and then copying and pasting the following:
cmd.exe /c Cleanmgr /sageset:65535 & Cleanmgr /sagerun:65535

Go ahead and check everything if you like and then click OK. It should definitely clear out more files than it does normally. Obviously, your mileage will vary.
Troubleshooting Disk Cleanup
If you have run into the rare instance where disk cleanup won’t run, then there are a few simple things you can try. Firstly, try to run a system file checker scan to make sure all the system files are OK. You can do that by opening the command prompt (Start – type cmd) and running the following command:
sfc /scannow
The second thing you can do is to open Explorer and type in %temp% into the address bar and manually deleting all the files and folders located there.

That’s about all there is to Disk Cleanup. It’s a utility that’s been around for ages in Windows and rightfully so. It does an overall excellent job of cleaning out your hard drive without having to install third-party tools. Enjoy!
Related Posts
- How to Fix a “This file does not have an app associated with it” Error on Windows
- How to Fix an Update Error 0x800705b4 on Windows
- How to Resolve “A JavaScript error occured in the main process” Error on Windows
- How to Fix the Network Discovery Is Turned Off Error on Windows
- How to Change Folder Icons in Windows
Регулярная очистка диска C на Windows 10 — это важная процедура, которая помогает не только освободить дополнительное место на жестком диске, но и улучшить общую производительность компьютера.
«Цифровой мусор» может накопиться на диске C по разным причинам: временные файлы, кэш браузеров, старые установки программ и операционных систем, а также файлы, которые остаются после установки обновлений. Процесс очистки Windows 10 может быть быстрым и эффективным, если правильно подойти к этому вопросу.
В статье расскажем как очистить диск C на Windows 10 от мусора, вручную удалить ненужные программы и файлы, а также оптимизировать систему.

Прежде чем приступить к очистке системы и удалению ненужных файлов на компьютере с Windows 10, важно выполнить несколько подготовительных шагов, чтобы минимизировать риски и гарантировать безопасность данных.
Создание резервных копий и точек восстановления
Перед тем как начать очищать диск C и выполнять операции с системой, необходимо позаботиться о сохранности данных. Действия, связанные с удалением или изменением системных файлов, могут привести к непредсказуемым последствиям, включая потерю важных данных и нестабильность работы операционной системы. Что можно сделать, чтобы минимизировать риски:
- Перед удалением ненужных файлов создать резервные копии важных документов, изображений, видео и других данных. Это можно сделать с помощью облачных сервисов или внешних накопителей (жесткий диск, флешка).
- Создать точки восстановления системы, что позволит вернуться к предыдущему состоянию системы в случае, если после очистки возникнут проблемы.

Чтобы создать точку восстановления системы:
- Открываем «Панель управления» и переходим в раздел «Система».
- Выбираем «Восстановление».
- Нажимаем «Создать» для создания диска восстановления.
- Называем диск восстановления (например, «Перед очисткой Windows») и нажимаем «Создать».
Это поможет вернуть систему в прежнее состояние, если после очистки возникнут ошибки или проблемы с производительностью.
Права администратора
Чтобы выполнить очистку системы, необходимо иметь права администратора. Если пользователь не обладает правами, очистка будет невозможна.
Основные шаги по удалению ненужных файлов с диска C вручную
1. Очистка папки «Temp»
Папка «Temp» на компьютере хранит временные файлы, которые создаются операционной системой и приложениями для выполнения различных операций. Эти данные обычно не нужны после завершения процесса или работы программы, но, к сожалению, не удаляются автоматически.

Чтобы их очистить, необходимо:
- Перейти в папку C:\Windows\Temp.
- Нажать Ctrl+A, чтобы выделить все файлы, затем Delete.
- Появится запрос на подтверждение. Потребуется подтвердить удаление, если система не блокирует файлы.
Кроме того, временные файлы могут находиться в папке C:\Users[ВашеИмя]\AppData\Local\Temp. Необходимо повторить те же действия для этой папки.
2. Удаление ненужных файлов из папки «Загрузки»
Папка «Загрузки» часто содержит старые файлы, установочные программы и архивы, которые больше не нужны.
Чтобы очистить эту папку:
- Переходим в «Загрузки».
- Отбираем ненужные файлы и удаляем их.
- Также можно переместить некоторые файлы на внешний накопитель, если они могут пригодиться в будущем.
Важно проверять содержимое папки на регулярной основе, чтобы избежать накопления ненужных данных.
3. Очистка «Корзины»
Корзина на компьютере может содержать файлы, которые уже удалены, но все еще занимают место на диске C.
Чтобы освободить место, необходимо:
- Перейти на рабочий стол и открыть корзину.
- Выбрать все файлы в корзине и нажать «Удалить».
Этот шаг освободит несколько гигабайт, в зависимости от того, сколько данных хранилось в корзине.
4. Удаление предыдущих установок Windows
После обновления Windows 10 или установки новой версии операционной системы остаются старые файлы, которые занимают много места.
Чтобы удалить их:
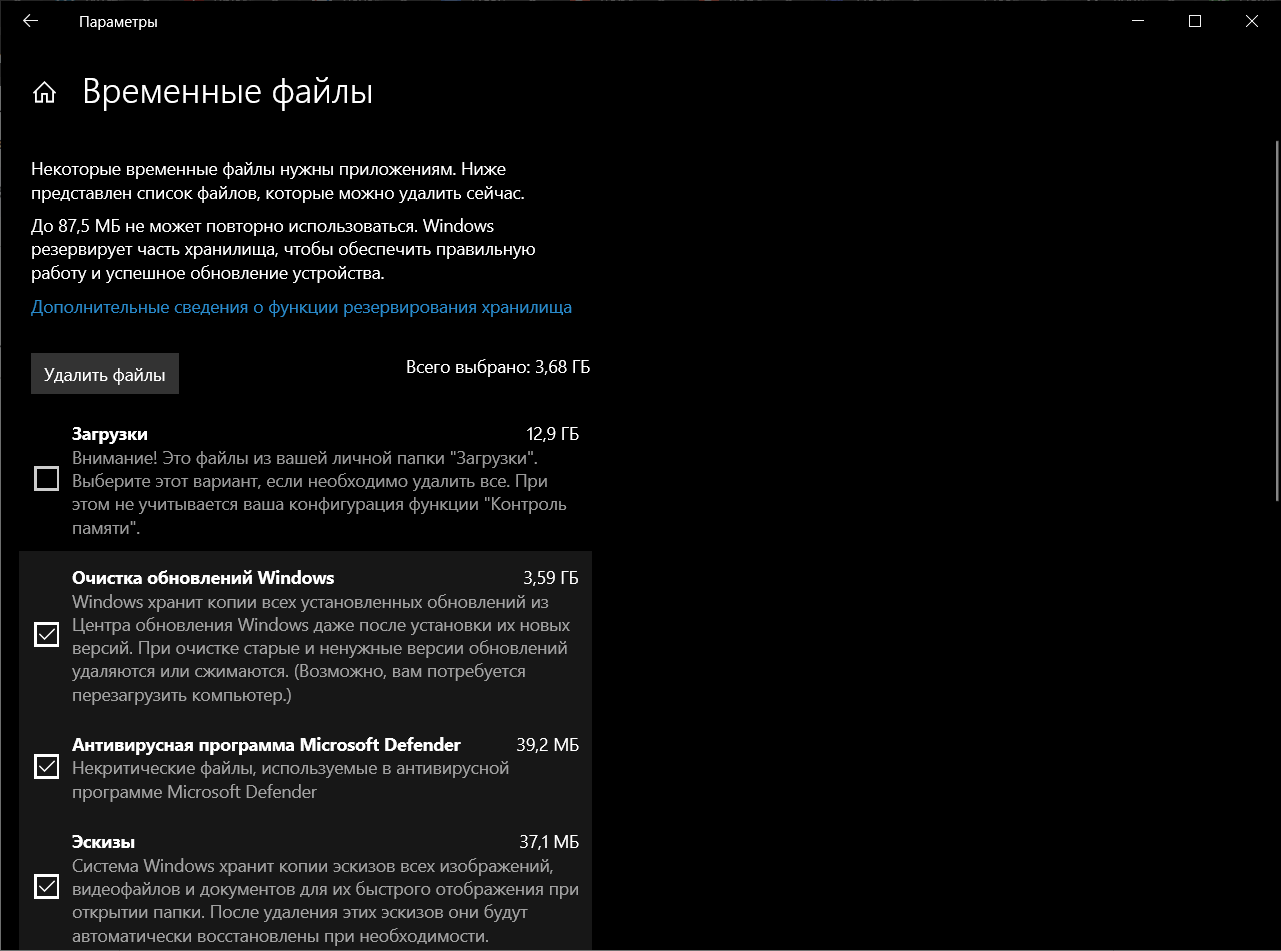
- Открываем «Параметры» и переходим в раздел «Система».
- Выбираем «Параметры Хранилища» > «Память» и нажимаем «Временные файлы».
- В окне очистки диска выбираем «Очистка обновлений Windows» и нажимаем ОК.
Эти файлы можно удалить, если вы уверены, что не собираетесь откатываться к предыдущей версии системы.
Оптимизация с помощью программ для очистки ПК
Использование специализированных программ для оптимизации и очистки Windows может существенно облегчить процесс поддержания вашего компьютера в отличном состоянии. Программы для очистки Windows предлагают ряд преимуществ по сравнению с ручной очисткой:
- Они способны быстро и эффективно очистить систему Windows от ненужных файлов, которые могут замедлять работу системы.
- Программы часто имеют доступ к областям системы, которые сложно очистить вручную, обеспечивая комплексный подход к удалению ненужных данных.
- Программа для очистки ПК автоматически выявляет данные, которые можно удалить, минимизируя необходимость в пользовательском вмешательстве.
- Регулярные обновления помогают поддерживать программу актуальной и эффективной против новых проблем, связанных с производительностью и безопасностью.
JWIZARD Cleaner
JWIZARD Cleaner — это программа для очистки Windows и оптимизации ПК. Она быстро удаляет ненужные файлы и приложения, замедляющие работу системы.

ПО регулярно обновляется и настраивается под текущие стандарты безопасности и эффективности, благодаря чему остается актуальным для оптимизации и очистки Windows. Программа разработана российскими разработчиками, поэтому она доступна для использования в России и не будет заблокирована, как, например, приложение CCleaner. JWIZARD Cleaner имеет простое и интуитивно понятное управление с поддержкой русского языка.
Функции JWIZARD Cleaner
JWIZARD Cleaner предлагает следующие функций:
- Очистка временных файлов, кэша и системного мусора;
- Удаление ненужных файлов из корзины и папки «Загрузки»;
- Очистка истории браузеров, кэша и cookies;
- Оптимизация реестра Windows для повышения производительности;
- Полная деинсталляция приложений и их остаточных файлов;
- Опция «Smart Scan» для комплексной очистки всех категорий файлов с минимальной необходимостью вмешательства пользователя.
Advanced SystemCare
Advanced SystemCare — это комплексное решение для оптимизации и защиты ПК под управлением Windows. Программа предлагает глубокую очистку системы, подходит как для начинающих, так и для опытных пользователей.

Функции Advanced SystemCare:
- Удаление временных файлов и системных журналов.
- Очистка данных браузера.
- Управление автозагрузкой.
- Защита от вирусов, шпионского ПО, рекламного ПО и т.д.
- Обновление устаревших драйверов.
- Дефрагментация жесткого диска.
Ashampoo WinOptimizer
Ashampoo WinOptimizer — это программа для очистки и оптимизации Windows, направленная на улучшение производительности компьютера. Она предлагает широкий набор инструментов, которые помогают пользователям поддерживать систему в отличном состоянии.

Функции Ashampoo WinOptimizer:
- Удаление временных файлов и кэша.
- Управление автозагрузкой для ускорения запуска системы.
- Очистка истории браузеров, cookies и следов активности.
- Дефрагментация жестких дисков.
- Отслеживание состояния системы в реальном времени.
- Восстановление удаленных файлов.
- Управление установленными программами и плагинами браузеров.
Используя инструменты, такие как JWIZARD Cleaner, Advanced SystemCare и Ashampoo WinOptimizer, можно повысить производительность системы, удалив все ненужные файлы и очистив дисковое пространство.
Использование встроенных инструментов для очистки Windows
В Windows 10 есть встроенные инструменты, которые помогают удалить ненужные файлы, очистить кэш и временные файлы, а также освободить место на жестком диске.
Диск Cleanup: как использовать встроенное средство «Очистка диска» в Windows 10
Для того чтобы удалить лишние файлы также можно использовать средство «Очистка диска» в Windows 10. Для этого нужно:
- Открыть меню «Пуск» и ввести в поисковую строку «Очистка диска».
- Выбрать приложение «Очистка диска», которое появится в результатах поиска.
- В диалоговом окне выбрать диск C (или другой диск, который нужно очистить).
- Нажать «ОК», и инструмент начнет сканировать диск на наличие файлов, которые могут быть удалены, например, временные файлы системы, кэш интернет-обозревателя, файлы журналов, резервные копии обновлений Windows и т.д.
- Выбрать, какие файлы хотите удалить, и нажать «ОК». Возможно понадобится подтвердить действие, чтобы удалить файлы.
Шаги по очистке кэша в популярных браузерах и как это связано с общей очисткой системы Windows
Также важно очищать кэш в браузерах. Они сохраняют файлы, изображения, скрипты и другие элементы веб-страниц для ускорения загрузки при повторном посещении сайтов. Кроме того, очистка данных браузера помогает защитить вашу конфиденциальность, так как при очистке удаляются следы посещений сайтов.

«Яндекс Браузер»:
- Открываем «Яндекс Браузер» и нажимаем на три полоски в правом верхнем углу, чтобы открыть меню.
- Выбираем «Настройки».
- Переходим в раздел «История».
- Нажимаем «Очистить историю».
- Выбираем то, что необходимо удалить: историю посещений, кэш, куки и другие данные сайта.
- Нажимаем «Очистить».
Google Chrome:
- Открываем Chrome и нажимаем на три точки в верхнем правом углу, чтобы открыть меню.
- Выбираем «Настройки» > «Конфиденциальность и безопасность».
- Нажимаем «Удалить данные браузера».
- В появившемся окне выбираем то, что хотим удалить: историю, кэшированные изображения и файлы, куки и другие данные.
- Нажимаем «Очистить данные».
Mozilla Firefox:
- Открываем Firefox и нажимаем на три горизонтальные полоски в верхнем правом углу.
- Переходим в «Настройки» > «Конфиденциальность и безопасность».
- В разделе «Конфиденциальность и безопасность» нажимаем «Очистить данные».
- Выбираем «Кэшированные веб-данные» и нажимаем «Очистить».
Microsoft Edge:
- Открываем Edge и нажимаем на три точки в верхнем правом углу.
- Переходим в «Настройки» > «Конфиденциальность, поиск и услуги».
- В разделе «Очистить данные браузера» нажимаем «Выбрать, что очистить».
- Выбираем «Кэшированные изображения и файлы» или другие параметры, если необходимо.
- Нажимаем «Очистить сейчас».
Opera:
- Открываем Opera и нажимаем на значок в левом верхнем углу.
- Переходим в «Настройки» > «Дополнительно» > «Конфиденциальность и безопасность».
- Нажимаем «Очистить данные просмотра».
- Выбираем «Кэшированные изображения и файлы» и другие данные, которые хотим удалить.
- Нажимаем «Очистить данные».
Очистка кэша браузера может существенно улучшить производительность компьютера и ускорить работу браузеров, а также освободить место на жестком диске. Это особенно полезно для тех, кто использует множество вкладок и работает с интернет-ресурсами ежедневно.
Завершение и поддержка результата
После тщательной очистки и оптимизации вашего компьютера важно поддерживать достигнутый результат регулярно. Выделим несколько ключевых аспектов планового обслуживания.
- Частота проведения очистки. Очистку диска, удаление временных файлов и кэша рекомендуется проводить как минимум раз в месяц. Это предотвращает излишнее накопление данных и поддерживает быстродействие системы.
- Важность обновления ОС и программ. Регулярное обновление операционной системы и установленных программ важно для стабильной работы компьютера и защиты от уязвимостей.
- Улучшение производительности компьютера:
- Дефрагментация HDD или оптимизация SSD может способствовать более быстрому доступу к данным. Это особенно важно для традиционных жестких дисков, которым требуется регулярная дефрагментация.
- Проверка антивирусом защищает систему от вредоносных программ, которые могут замедлять её работу.
- Регулярные проверки состояния устройства:
- SMART (Self-Monitoring, Analysis, and Reporting Technology) предоставляет данные о состоянии жесткого диска, позволяя обнаружить его неисправности до того, как они повлекут за собой потерю данных.
- Мониторинг температуры и загрузки процессора, видеокарты и других компонентов позволяет убедиться в том, что система работает в оптимальных условиях.
Для того чтобы компьютер прослужил долго, важно регулярно проводить очистку системы Windows 10. Это можно делать вручную, но современные программы, такие как JWIZARD Cleaner, предлагают гибкие инструменты, которые помогают пользователям эффективно и быстро очищать компьютер от «мусора».
Every Windows Users must have faced this problem once in a while, no matter how much disk space you got, there will always come a time when it will fill right up to its total capacity, and you will have no place to store more data. Well, modern songs, videos, games files etc. easily take up more than 90% space of your hard drive. When you want to store more data, then you must either increase the capacity of your hard disk which is quite a costly affair if you believe me or you need to delete some of your previous data which is a very daunting task and no one dares to do that.
Well, there is a third way, which will free up some space on your hard disk not much but enough to give you a little more space to breathe for a couple of more months. The way which we are talking about is using Disk Cleanup, yes you heard it right, although not many people are aware that it can actually free up to 5-10 gigabytes of space on your disk. You can use Disk Cleanup regularly to reduce the number of unnecessary files on your disk.
Disk Cleanup generally deletes temporary files, system files, empties Recycle Bin, remove a variety of other items that you might no longer need. Disk Cleanup also comes up with a new System compression which will compress Windows binaries and program files to save disk space on your system. Anyway, without wasting any time, let’s see How to Use Disk Cleanup in Windows 10 with the help of the below-listed tutorial.
Table of Contents
Make sure to create a restore point just in case something goes wrong.
1. Press Windows Key + R then type cleanmgr or cleanmgr /low disk (If you want all options checked by default) and hit Enter.
2. If you have more than one partition on your system, you need to select the partition you need to clean (it’s generally the C: drive) and click OK.
3. Now follow the below-listed methods for what you want to do with disk cleanup:
Note: You must be signed in as an administrator account to follow this tutorial.
Method 1: Clean Up Files for Only Your Account Using Disk Cleanup
1. After step 2 make sure to check or uncheck all the items you want to include in Disk Cleanup.
2. Next, review your changes and then click OK.
3. Wait for few minutes before Disk Cleanup can complete its operation.
This is How to Use Disk Cleanup in Windows 10 but if you need to clean up System files then follow the next method.
Method 2: Clean Up System Files Using Disk Cleanup
1. Type Disk Cleanup in Windows Search then click on it from the search result.

2. Next, select the drive for which you want to run the Disk Cleanup.
3. Once the Disk Cleanup windows open, click on the “Clean up system files” button at the bottom.
4. If prompted by UAC, select Yes, then again select the Windows C: drive and click OK.
5. Now check or uncheck items you want to include or exclude from Disk Cleanup and then click OK.
Method 3: Clean Up Unwanted Program Using Disk Cleanup
1. Right-click on the drive you want to run Disk Cleanup for then select Properties.

2. Under the General tab, click on the Disk Cleanup button.
3. Again click on the “Clean up system files” button located at the bottom.
4. If prompted by UAC, make sure to click Yes.
5. On the next window that opens, switch to the More Options tab.
6. Under Program and Features, click on “Cleanup” button.
7. You can close the disk cleanup if you like and then uninstall unwanted programs from the Programs and Features window.

8. Once done, close everything and reboot your PC.
This is How to Use Disk Cleanup in Windows 10 to clean up Unwanted Programs but if you want to delete all Restore Points except the latest one then follow the next method.
Method 4: Delete all Restore Point except the latest one using Disk Cleanup
1. Make sure to open Disk Cleanup for C: drive using any of the above methods.
2. Now click on the “Clean up system files” button located at the bottom. If prompted by UAC select Yes to continue.
3. Again select Windows C: drive, if needed and wait for few minutes to Disk Cleanup to load up.
4. Now switch to More Options tab and click on Clean up button under “System Restore and Shadow Copies“.
5. A prompt will open up asking you to confirm your actions, click Delete.
6. Again click on Delete Files button to continue and wait for Disk Cleanup to delete all the Restore Points except the latest one.
Method 5: How to Use Extended Disk Cleanup
1. Open Command Prompt. The user can perform this step by searching for ‘cmd’ and then press Enter.

2. Type the following command into cmd and hit Enter:
cmd.exe /c Cleanmgr /sageset:65535 & Cleanmgr /sagerun:65535

Note: Make sure you don’t close Command Prompt until the Disk Cleanup is complete.
3. Now check or uncheck items you want to include or exclude from Disk Clean up then click OK.
Note: Extended Disk Cleanup gets far more options than normal Disk Cleanup.
4. Disk Cleanup will now delete the selected items and once finished, you can close cmd.
5. Reboot your PC to save changes.
Recommended:
- 3 Ways to Check if a Disk Uses MBR or GPT Partition in Windows 10
- Link Microsoft Account to Windows 10 Digital License
- Enable or Disable Case Sensitive Attribute for Folders in Windows 10
- How to Install or Uninstall Graphics Tools in Windows 10
That’s it you have successfully learned How to Use Disk Cleanup in Windows 10 but if you still have any queries regarding this tutorial then feel free to ask them in the comment’s section.
You seemed to have met the situation before- that PC hard drive is getting larger but somehow it is filled up not long after. This can be caused by a solid-state drive (SSD), which offers much less hard drive space than traditional hard drives. The other reason is that your computer is filled with too many junk files.
If you want to reduce the number of unnecessary files on your disk drive to free up disk space on Windows and make your PC run faster, there are two tricks should help you to regain more hard drive space for important files and programs by removing the useless junks cluttering up your Windows disk.
- Solution 1: Use Disk Cleanup to Delete Windows Disk Files
- Solution 2: Get Disk Cleanup Software Free Download for Windows 10/8/7/XP
Solution 1: Use Disk Cleanup to Delete Windows Disk Files
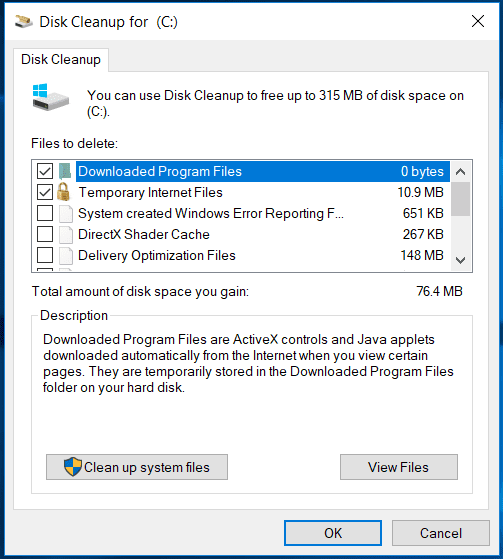
Disk Cleanup is a Microsoft software utility and included in all subsequent releases of Windows.
As can be seen in the picture, Disk Cleanup can delete Temporary Internet Files (associated with Internet Explorer), Downloaded Program Files, and Offline webpage. Disk Cleanup also allows you to empty the Recycle Bin, delete Temporary Files, and delete Thumbnails.
Part 1: How to Open Microsoft Disk Cleanup
Windows 10 and Windows 8
1. On the Desktop screen, press Windows key + R to open the Run dialog.
2. In the Run text field, type cleanmgr and press Enter.
Windows 7 and earlier
1. Open the Start menu.
2. Click on Programs > Accessories > System Tools.
3. In System Tools, click the Disk Cleanup utility.
Or
1. Open the Start menu.
2. Click the Run option.
3. In the Run text field, type cleanmgr and press Enter.
Part 2: How to Clear Junk Files in Disk Cleanup
Once Disk Cleanup opens, the initial window will ask you which drive you want to clean up. Select the appropriate drive and click OK. In the next window that opens, check each of the boxes you want to clean up. To the right of each item is the disk drive space each of the items are taking up on the hard drive.
Note: We highly recommend that users DO NOT check the option to Compress old files (if seen). Often this option causes more issues than the small amount of space it recovers is worth.
Solution 2: Get Disk Cleanup Software Free Download for Windows 10/8/7/XP
Here comes the third-party software called Tenorshare Windows Care Genius, which is a world-class PC clean and speed up tool for Windows PC, will remove temporary files, empty the Recycle Bin, and remove a variety of system files and other items that you no longer need. This Windows 10/8.1/8/7 disk cleanup tool also enables to one-click to checkup and cleanup Windows system and compatible with Dell, Lenovo, HP, Asus, Acer, Toshiba, Sumsung and other computers.
To wipe out unnecessary files for Windows, firstly, download free Windows cleanup tool-Tenorshare Windows Care Genius, install and launch it on your Windows PC.
Step1: Tap Data Wipe and then click Start to start data wiping.
Step2. Select the entry you want to delete and click Delete at the upper right corner. After the few clicks, the disk junk files will be clean up completely.
Now, come and give this disk cleanup tool for Windows a free download to enjoy the faster computer as the new one!
If
you are short on time:
If you don’t want to try manual methods to clean disk space on Windows 10, then you can use best disk cleanup software for Windows 10. CCleaner and CleanMyPC are two best PC cleaners that deep scan your system storage to free up disk space in Windows 10. You can download these powerful tools here:
Overview
Windows gets overwhelmed over time due to mass storage of files, documents, and programs. While most of these files and programs remain useful to you even after a long time, still some of this data accumulate in the form of digital junk. It not only consumes device storage and resources, it also affects system performance negatively.
What is the solution to clean disk space in Windows 10?
To disk cleanup Windows 10, you can use
various built-in utilities & features. Some of them include Storage Sense,
Disk Cleanup, uninstalling unnecessary apps, moving data to another storage,
and more. You can even try best PC cleaner software for instant & effective
results.
Ways to Disk Cleanup Windows 10
Method 1: Use Disk Cleanup Utility
One of the easiest & most effective
ways to clean disk space in Windows 10 is to use built-in Disk Cleanup utility.
This powerful utility is designed to help you find and free up disk space in
Windows 10. You can use Disk Cleanup utility to delete temp files, log files,
cache, DirectX Shader Cache, temporary Internet files, obsolete downloads, and
other junk. To recover disk space using Disk Cleanup, follow these steps:
- Search & select disk cleanup from the search bar on the
taskbar. - Select the drive that you want
to clean when prompted. - Now it will scan the selected
drive and display scan results on Disk Cleanup window. - To remove any of these files
(you can select multiple files), simply select it and press OK. - You’re done!
Cleanup
System Files: In addition to junk cleanup in
Windows 10, you can also clean unnecessary system files using this utility. To
do this, click Clean up System Files > select the drive that you want to
clean when prompted and simply select the files to clean and press OK.
It will help you clean Windows upgrade log
files, downloaded program files, delivery optimization files, device driver
packages, and other system junk files. You can also click on More Options to delete system restore
and shadow copies.
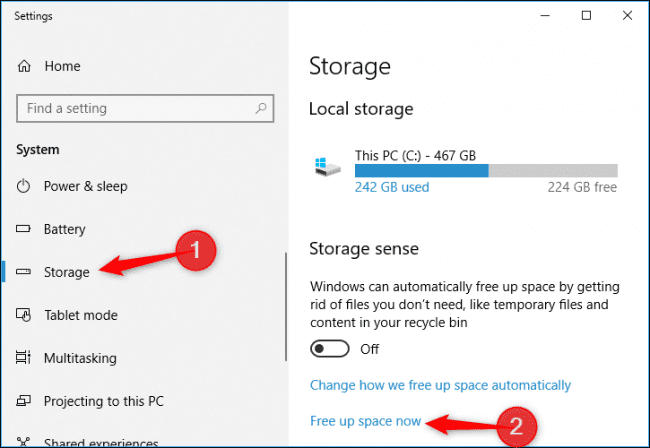
Method 2: Use Free up Space Now Option
Another built-in feature that helps you
clean up disk space in Windows 10 is Free
Up Space Now option. It helps you clear temporary files of different types
including Windows upgrade log files, system created Windows error reporting
files, Windows update cleanup, thumbnails, recycle bin items, temporary
Internet files, and other temporary files. To use this feature, follow these
steps:
- Press Windows + I keys to open
system Settings. - On Settings window, select System.
- On the next window, select Storage from the left pane.
- Now in the right pane, click Free up space now option below Storage
Sense.
Note: This feature is part of April 2018 Windows Update, so if you can’t
see that option, the April 2018 update hasn’t been installed on your system
yet.
Once you click this option, it will scan
your system storage to help you find & remove temp files in Windows 10.
Here, it will display a detailed report of all temporary files on your system
and helps you remove them instantly.
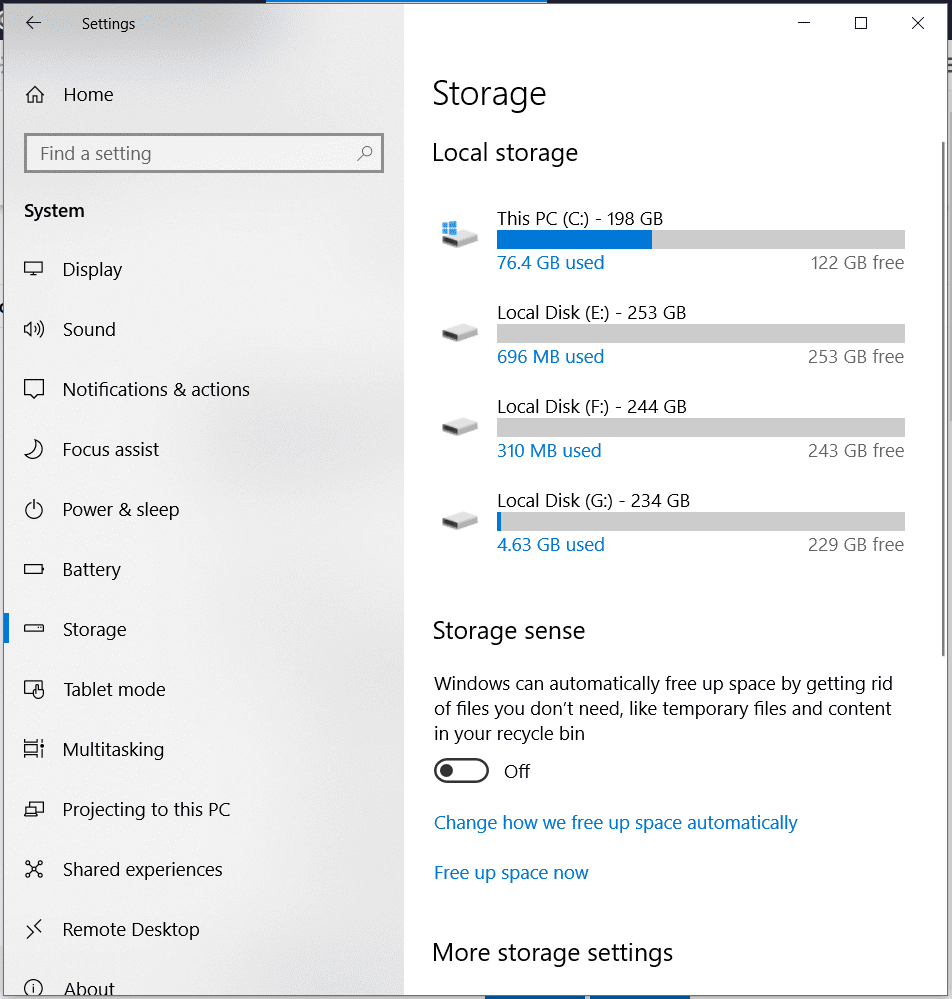
Method 3: Use Storage Sense
Storage Sense is powerful built-in utility
that enables Windows to find and clean junk files automatically. It helps you
free up disk space by deleting temp files, recycle bin contents, and more. You
can enable Storage Sense by following below mentioned steps:
- Press Windows + I keys to open
system Settings. - On Settings window, select System.
- On the next window, select Storage from the left pane.
- Now in the right pane, toggle
on Storage Sense button. - You’re done!
Method 4: Empty Recycle Bin
This is the easiest method to disk cleanup in Windows 10. You keep on deleting files & folders over time that finally lands in system Recycle Bin before it gets deleted permanently. You may find GB’s of disk space is occupied with these junk files in recycle bin. Thus, it is no brainer to get rid of this junk immediately. To do this, right click on the Recycle Bin icon and select the Empty Recycle Bin option. It will ask for confirmation, press Yes.
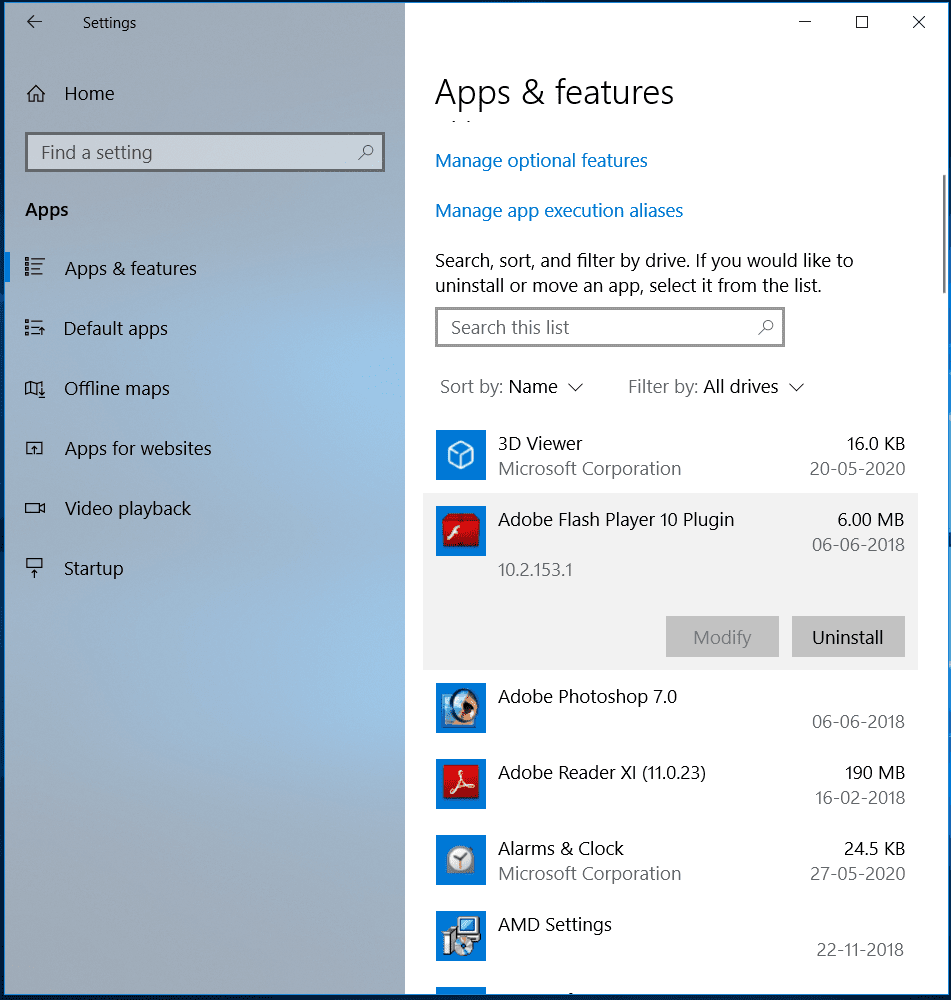
Method 5: Uninstall Unnecessary Apps & Programs
You keep installing apps & programs and
stop using many of them over time, right? To get rid of these obsolete apps
& programs and to disk cleanup Windows 10, follow below mentioned steps:
- Right click on Start menu and
select Settings. - On Settings window, select Apps.
- On the next window, select Apps & Features fro left pane.
- Now in the right pane, select
the program that you want to remove and press Uninstall button below it. - Confirm uninstallation.
- You’re done!
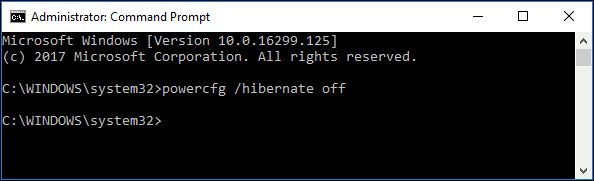
Method 6: Disable Hibernation in Windows 10
Windows Hibernate keeps your system in
quasi-shut-down state. Here, it saves a snapshot of your system drivers and
files before shutting down. It is done to save system turn on time. While it is
useful feature, but, if you want to free up disk space in Windows 10 and not worried
about that extra time during system turn on, then you should clean hibernate
files. To do this, follow these steps:
- Search for Command Prompt in the search bar on the taskbar.
- Right-click the result and
select Run as administrator. - In the Command Prompt window,
type powercfg/hibernate off and hit Enter. - You’re done!
Note: If you want to enable hibernate again, simply type
powercfg/hibernate and hit Enter.
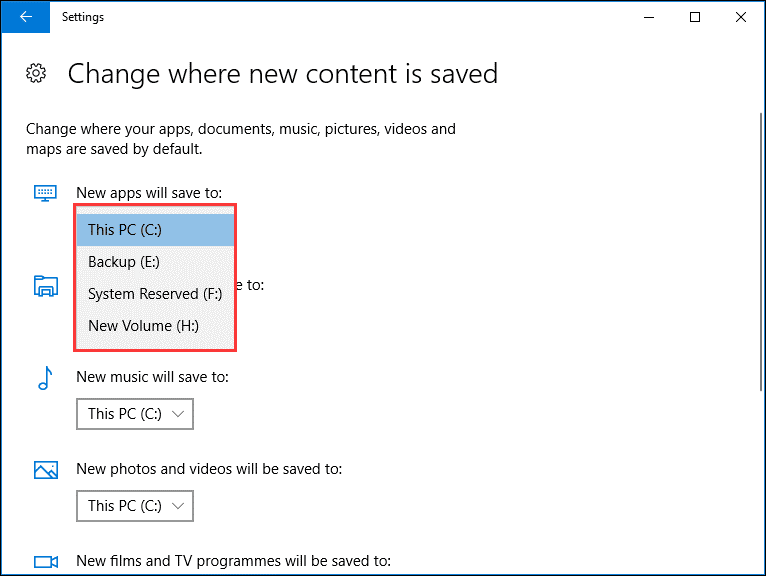
Method 7: Move Data to another Location
To free up disk space in Windows 10, you can move some of your data to another location. You can move this data to external drive, another partition, or on the best cloud backup servers. Once you connect external storage drive such as USB flash drive, you can specify where you want to store each file type. To do this, follow these steps:
Go to Settings > System > Storage.
In the right-pane click Change where new content is saved
option under More Storage Settings.
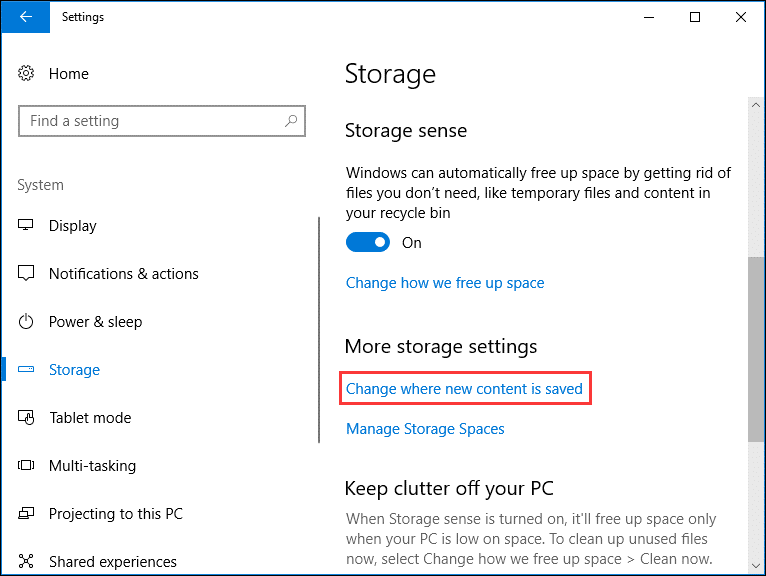
Now click the drop-down and select the new location for each file type.
It is useful feature to free up disk space
on your system drive.
Method 8: Use Compact OS
Compact OS is useful addition by Microsoft.
It is designed to help you decrease the OS size and run the OS from compressed
files. You can use this feature to save few GB’s disk space. It also helps you
reduce the footprint of Windows apps. To use this option, follow these steps:
Note: It is suggested to take Windows backup before you try this option.
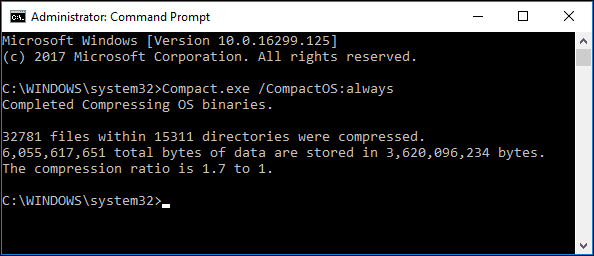
- Run Command Prompt as
administrator. - In the Command Prompt window,
type Compact.exe /CompactOS:always
and hit Enter. - It will take 10 to 20 minutes
to take effect.
Note: To revert changes, type Comact.exe
/CompactOS:never and hit Enter.
Method 9: Use Best PC Cleaner Software
If you have tried manual steps to disk cleanup Windows 10 and still think you could free up disk space, then we suggest using best PC cleaner software for instant & effective results. These powerful tools work on advanced algorithms to help you deep scan your system storage to find & clean all junk. These tools help you clean & optimize Windows for better performance. In addition to that, you can also use best duplicate files remover tools to remove junk accumulated in the form of duplicate files in Windows 10.
Method 10: Upgrade Hard Drive
Even after trying all other steps, if you think you often run out of space on Windows 10, then you should consider upgrading hard drive. You should upgrade hard drive to larger one to avoid disk space low issue. Here, you can use best disk partition software for Windows 10 to effectively allocate disk space for different files and programs.
FAQ
How
to disk cleanup Windows 10?
You can use Disk Cleanup utility to clean
disk space on Windows 10. To do this, search & select disk cleanup in the search bar on the taskbar. Next select the
drive that you want to clean when prompted. Now it will scan your system
storage and display scan results on Disk Cleanup window. To remove any of these
files, simply select it and press OK.
You’re done.
Is
it safe to use Disk Cleanup utility?
Yes, Disk Cleanup utility on Windows comes
as a built-in solution to help you clean & optimize your disk space. You
can use Disk Cleanup to clean disk space in Windows 10 and also clean
unnecessary system files automatically.
Does
Disk Cleanup improve performance?
The built-in Disk Cleanup utility helps
find and clean a lot of junk files efficiently. It helps you free up space in
Windows 10 and also boosts your overall system performance.
Should
I disk cleanup or Defrag first?
You should perform disk cleanup first as it
will help you get rid of a lot of unnecessary files & data. Later, you can
disk defrag that helps you remove fragmentation of your selected drive. Here
unnecessary files & data will not interfere with disk defrag process.
Which
is the best PC cleaner software?
CleanMyPC and CCleaner are the best PC cleaner tools available for Windows 10. It helps you deep scan your system storage and also helps you optimize your system for better performance. The malware protection features of these tools help you protect your system against malicious content effectively.
Conclusion
So, this was a quick discussion on how to
free up disk space in Windows 10. Trying disk cleanup Windows 10 features, you
can manage to recover disk space and speed up Windows 10 performance. Do try
these steps and share your experience in the comments below.