
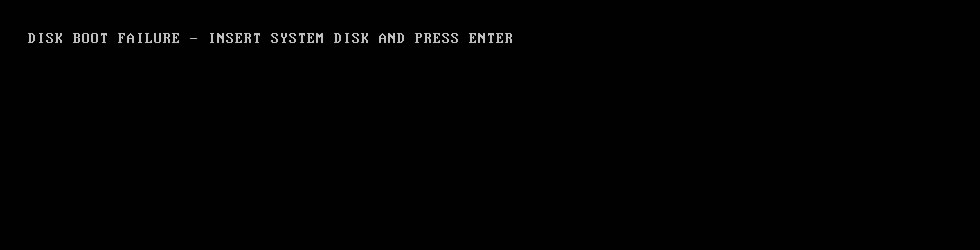
При загрузке компьютера или ноутбука некоторые пользователи могут получить сообщение об ошибке: Disk boot failure, insert system disk and press enter — происходить это может как при попытке запуска установленной системы, так и при попытке загрузки с флешки.
В этой инструкции подробно о том, что делать при ошибке Disk Boot Failure — возможных её причинах и вариантах решения.
Неправильный порядок или режим загрузки

Перевести текст ошибки «Disk boot failure, insert system disk and press enter» можно как «Ошибка загрузки с диска, вставьте системный диск и нажмите Enter». Причина — в том, что начать загрузку системы с дисков, установленных в качестве загрузочных в BIOS/UEFI не удалось, поскольку «системных» или «загрузочных» среди них не обнаружилось.
Прежде чем приступать к другим методам решения проблемы, рекомендую зайти в БИОС и изучить параметры загрузки:
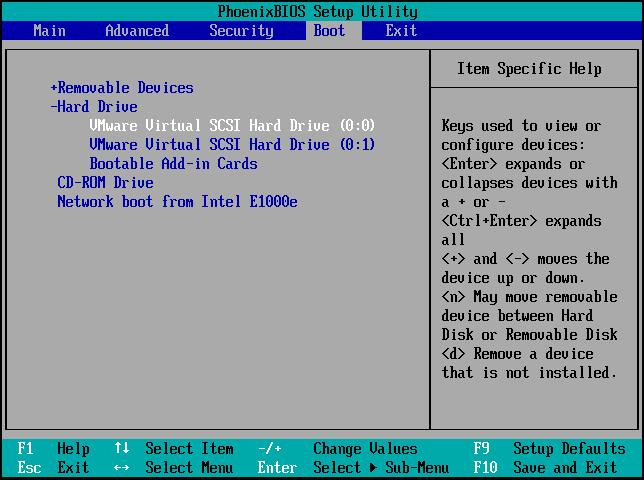
- Зайдите в БИОС/UEFI, на ПК для этого обычно можно использовать клавишу Del при загрузке, на ноутбуках часто — F2, F10 или F12, но возможны и иные варианты (Как зайти в БИОС/UEFI в Windows 11, подойдет для Windows 10 и для компьютера без ОС).
- Найдите раздел управления загрузкой в БИОС, обычно он называется «Boot», «Boot Settings», «Boot Sequence».
- Проверьте, чтобы системный диск (или флешка, с которой нужно произвести загрузку) была на первом месте в списке устройств загрузки. Если требуется загрузка установленной Windows и в списке присутствует пункт «Windows Boot Manager», установите его на первое место (обычно перемещение пунктов вверх/вниз выполняется клавишами F5 и F6 соответственно).

- Если правильное устройство уже было выбрано, но загрузка не выполняется, попробуйте изменить режим загрузки (Boot Mode) — с Legacy (CSM) на UEFI или наоборот.

- Учитывайте, что при включенном режиме UEFI (при отключенной поддержке Legacy) устройства (например, флешки), не поддерживающие UEFI загрузку, отображаться в списке устройств загрузки не будут, а при включенном режиме Legacy и отключенном UEFI не будет показываться Windows Boot Manager для системы, установленной в режиме UEFI.
- После изменения настроек БИОС, сохраните их (на вкладке Exit, также обычно это можно сделать с помощью клавиши F10) и проверьте, будет ли выполняться загрузка без ошибок после перезагрузки.
- Дополнительный важный момент: если у вас вставлены какие-либо компакт-диски в оптический привод, подключены флешки или карты памяти (или USB-хабы), а загрузку нужно выполнить с локального HDD или SSD — отключите все внешние накопители перед загрузкой.


Подводя итог: при появлении ошибки «Disk boot failure, insert system disk and press enter» прежде всего проверьте порядок загрузки и попробуйте поэкспериментировать с переключением режимов загрузки UEFI и Legacy (на некоторых материнских платах выглядит как переключение между Windows и Other OS).
Проблемы с диском или его подключением
Следующая возможная причина рассматриваемой ошибки — те или иные проблемы с диском, с которого выполняется загрузка. При этом бывает, что он то появляется, то исчезает в БИОС (либо не отображается там вообще, независимо от выбранного режима загрузки). Что можно сделать в этой ситуации?
- Переподключите диск: в случае ПК лучше всего — другим SATA-кабелем и к другому разъему SATA на материнской плате.

- Если предыдущий вариант не помог, по возможности проверьте работу диска на другом компьютере.
- Если проблема появилась после того, как вы подключили новые накопители к вашему компьютеру, проверьте: сохраняется ли она, если отключить их — случается, что из-за аппаратных проблем не системных дисков (или недостатка питания для всех накопителей из-за износа блока питания), возникают проблемы с доступом и к исправному системному диску.

В некоторых случаях причина в аппаратной неисправности диска: если он отказывается читаться и на других компьютерах, не форматируется или совсем не определяется — похоже, что дело именно в этом.
Батарейка БИОС и настройки по умолчанию
Если компьютер достаточно старый, причиной ошибки может быть севшая батарейка БИОС: в этом случае ошибку обычно однократно удается исправить ручными настройками порядка загрузки, а затем она появляется вновь. Решение — замена элемента питания CR2032 (для ноутбуков потребуется приобретать специальный, с соответствующими коннекторами).
Также в некоторых случаях помогает сброс БИОС на настройки по умолчанию: обычно это можно сделать на вкладке «Exit», лучше использовать пункт для сброса на оптимизированные настройки по умолчанию (Load optimized defaults, Load fails-safe defaults), после чего перепроверить порядок загрузки и попробовать снова загрузиться с нужного диска.
Также могут быть доступны другие способы сброса настроек БИОС: перемычка/кнопка CLR CMOS на материнской плате, либо снятие батарейки на полностью обесточенном компьютере на некоторое время (15-30 минут), подробнее: Как сбросить настройки БИОС.

Повреждение файловой системы или загрузчика
В случае, если ошибка «Disk boot failure, insert system disk and press enter» возникает при загрузке системы с локального диска, при этом он виден в БИОС/UEFI, причиной может быть сбой файловой системы или повреждение загрузчика Windows. Действия в данном случае:
- Где-то на другом компьютере подготовьте загрузочную флешку Windows 11 или Windows 10 и загрузитесь с неё.
- В запустившейся программе установки нажмите клавиши Shift+F10 (Shift+Fn+f10 на некоторых ноутбуках) — это откроет командную строку.
- По порядку введите команды
diskpart
list volume
- Обратите внимание на букву системного диска (она может отличаться от C при загрузке с флешки), а также на наличие тома (раздела) FAT32 (присутствует для систем, установленных в UEFI-режиме) и его номер.

- Если раздел FAT32 присутствует, введите команды (заменив N на номер этого раздела):
select volume N
assign letter=Z
- Введите команду exit для выхода из diskpart.
- Используйте команду (заменив букву диска C: на фактическую букву системного раздела при необходимости):
chkdsk C: /f
- Если раздел FAT32 присутствовал, для него также выполните проверку файловой системы с помощью команды
chkdsk Z: /f
- В случае, если в отчете о проверке файловой системы дисков на ошибки вы увидели информацию о том, что они были найдены и исправлены, попробуйте перезагрузить компьютер в обычном режиме.


В ситуации, если ошибок файловой системы найдено не было, можно попробовать выполнить восстановление загрузчика Windows вручную, подробнее об этом в инструкциях:
- Восстановление загрузчика Windows 11
- Восстановление загрузчика Windows 10
Некоторые дополнительные возможные причины проблемы и варианты решения:
- Если ошибка Disk Boot Failure появляется после завершения работы при последующем включении, но исчезает при принудительном выключении долгим удержанием кнопки питания и не появляется при перезагрузке, попробуйте отключить быстрый запуск Windows и, при наличии — опцию Fast Boot в БИОС.
- Если ваш ПК или ноутбук с чистым диском (без ОС), эта ошибка — нормальное явление: просто установите операционную систему с флешки: Установка Windows 11 с флешки, Установка Windows 10 с флешки.
- При появлении ошибки после подключения системного диска с другого компьютера причина может быть в отличающемся режиме загрузки (как описано в первом разделе инструкции), в том, что загрузчик системы находится не на том же диске, где система, а в некоторых случаях (для M.2 накопителей) — в неподдерживаемом интерфейсе: например, накопитель PCI-e NVMe был установлен на компьютере, где разъем M.2 поддерживает работу только по интерфейсу SATA).
- В случае, если вы столкнулись с проблемой после установки дополнительного диска в оптибэй, причина может быть в его неправильной работе.
- Если проблема появилась после апгрейда оборудования, например, установки новых модулей памяти, проверьте, исправляет ли ошибку возврат старых комплектующих.
Надеюсь, один из предложенных вариантов поможет разобраться в причинах и исправить ситуацию. Также вы можете подробно описать проблему в комментариях ниже — я постараюсь подсказать решение.
On this page, we provide 5 fixes to help you remove the Windows Disk Boot Failure error and help you restore lost data with reliable file recovery software. Follow to remove this error and make your computer work again:
| Workable Solutions | Step-by-step Troubleshooting |
|---|---|
| Fix 1. Change Boot Order | Enter BIOS > Go to «Boot» > Set the system disk in the first option > Save changes…Full steps |
| Fix 2. Run Windows Boot Repair Tool | Boot the computer again and enter the WinPE interface. Then, open EaseUS Partition Master…Full steps |
| Fix 3. Repair Operating System | Boot computer from installation disk > Click «Net» in Windows Setup > «Repair your computer»…Full steps |
| Fix 4. Fix by Running chkdsk | Run CHKDSK to check system disk > Fix unrecognizable system disk…Full steps |
| Fix 5. Remove Installed Hardware | Remove the newly added hardware > Check the cables of the hard disk…Full steps |
| Extra Tip. Recover Data | For the lost data on problematic disk, run EaseUS Data Recovery Wizard > Scan and recover…Full steps |
The disk boot failure, or more specifically speaking, «DISK BOOT FAILURE — INSERT SYSTEM DISK AND PRESS ENTER», is an error that means Windows couldn’t load correctly. Indicated from the error message, it asks you to insert a system disk. It means that the disk boot failure occurs because BIOS is unable to find a bootable drive to start up the computer during the startup process.
Error Explanation
The boot process of any computer generally includes the following steps:
- Power on
- Power-on self-test (POST)
- Find the boot device
- Load the operating system
- Transfer control to the operating system
These steps always go unnoticedly and quickly. However, if any issue happens during this process, you will encounter boot problems. For example, if BIOS fails to load the operating system, you may be stuck at a screen saying «Windows is loading files». If BIOS couldn’t find a boot device, you will see the error message mentioned above.
Causes of Windows Disk Boot Failure
The disk boot failure appears when there is no boot device found. Why can’t the BIOS locate your boot disk? There are three kinds of possibilities:
- Incorrect Boot Order in BIOS: A device that doesn’t have the OS ranks first in the boot sequence
- Damaged operating system: The operating system is corrupted and BOIS can’t recognize it
- Corrupted system disk: The system hard drive is damaged, unreadable, or unrecognizable
- Improper new hard drive configuration: The new hard drive is configured improperly
The disk boot failure is an upsetting issue. If you couldn’t find a way to fix the disk boot failure, it will finally result in some other terrible problems like the black or blue screen of death, computer freezing randomly, system crash, etc. Therefore, carry out the fixes as soon as possible to eliminate your worries.
5 Fixes for Disk Boot Failure on Windows
Based on the potential causes of the disk boot failure, you can follow the solutions below to get rid of the error.
Method 1. Change BIOS Boot Order
If some other device, like a USB, has a higher priority than your system disk and you have a USB without OS connected to your computer, you can simply remove the external storage device and let BIOS boot from your system disk. If not, change the boot order in BIOS and make your system disk as the first option. (System disk doesn’t show up in BIOS? Move to method 3 for solutions.)
To check a computer’s boot order, follow these instructions:
Step 1. Restart the computer.
Step 2. Keep pressing F2 (Del, F8, F10, or F12) while your system boots to enter BIOS.
Step 3. Go to the Boot tab.
Step 4. Change the order to position the hard disk as the 1st option.
Step 5. Save these settings.
Step 6. Restart the computer.
Also read: The System Cannot Find Any Bootable Devices
Method 2. Run Windows Boot Repair Tool
A disk boot failure will prevent you from accessing the system. The best solution is to seek a professional boot repair tool — EaseUS WinRescuer. It provides Boot Repair features to create WinPE bootable drive and fix disk errors. The software has been professionally researched and tested to improve the success rate of fixing blue screen errors.
Step 1. Connect the USB drive/external drive to a working computer, open EaseUS WinRescuer, and click «Create Bootable Media.»
Step 2. Select EaseUS Boot Toolkits and other components you need. Then, click «Next.»

Step 3. Select your movable device and click «Go» to create an image on your USB drive/external drive. You can also burn the Windows ISO file to the storage media.
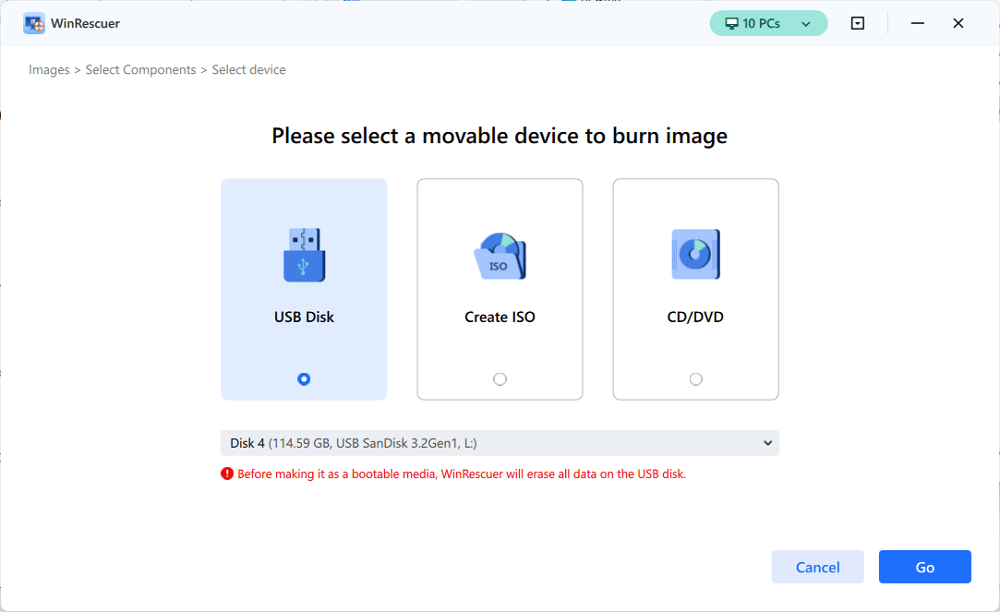
Step 4. Confirm the warning message and then wait for the creation process to complete.
Step 5. Connect the created bootable drive to the faulty computer and reboot it by pressing and holding «F2″/»Del» to enter the BIOS. Then, set the WinPE bootable drive as the boot disk and press «F10» to exit.

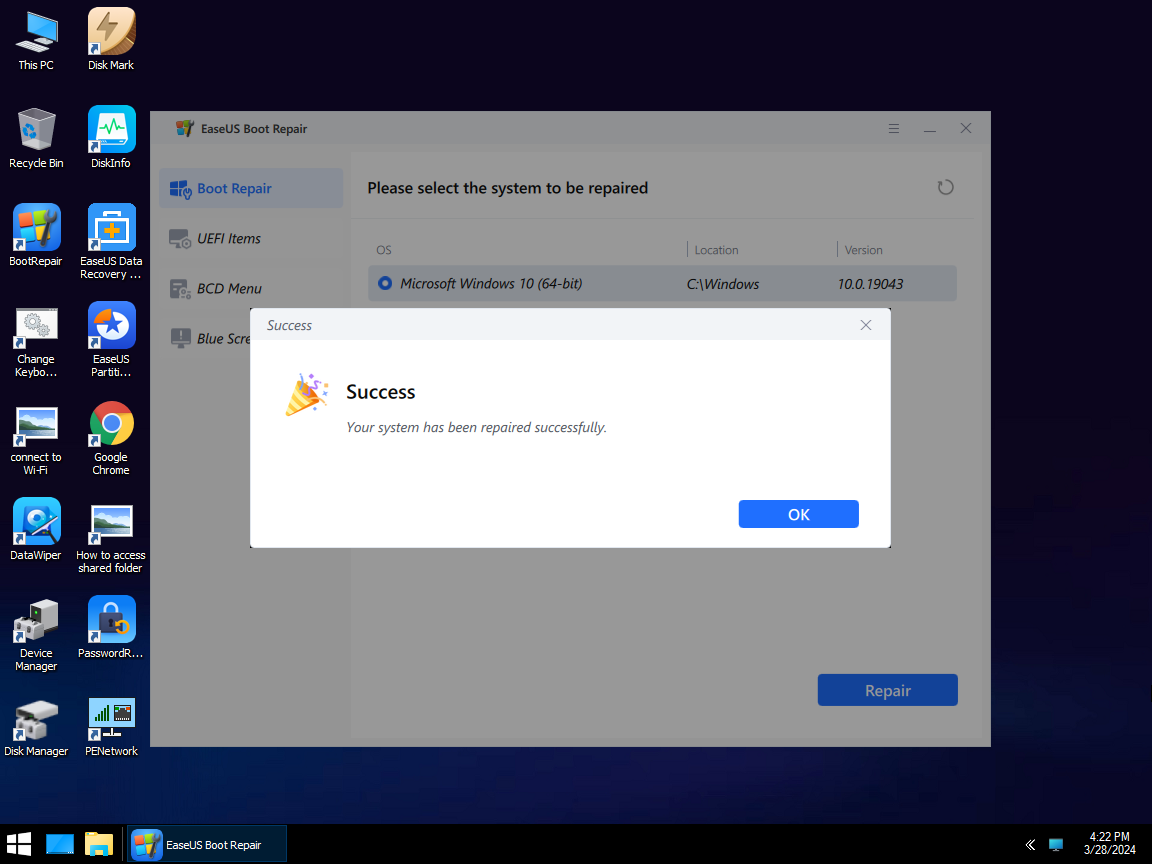
Step 6. Then, the computer will enter WinPE desktop. Open BootRepair, select the system you want to repair, and click «Repair.»
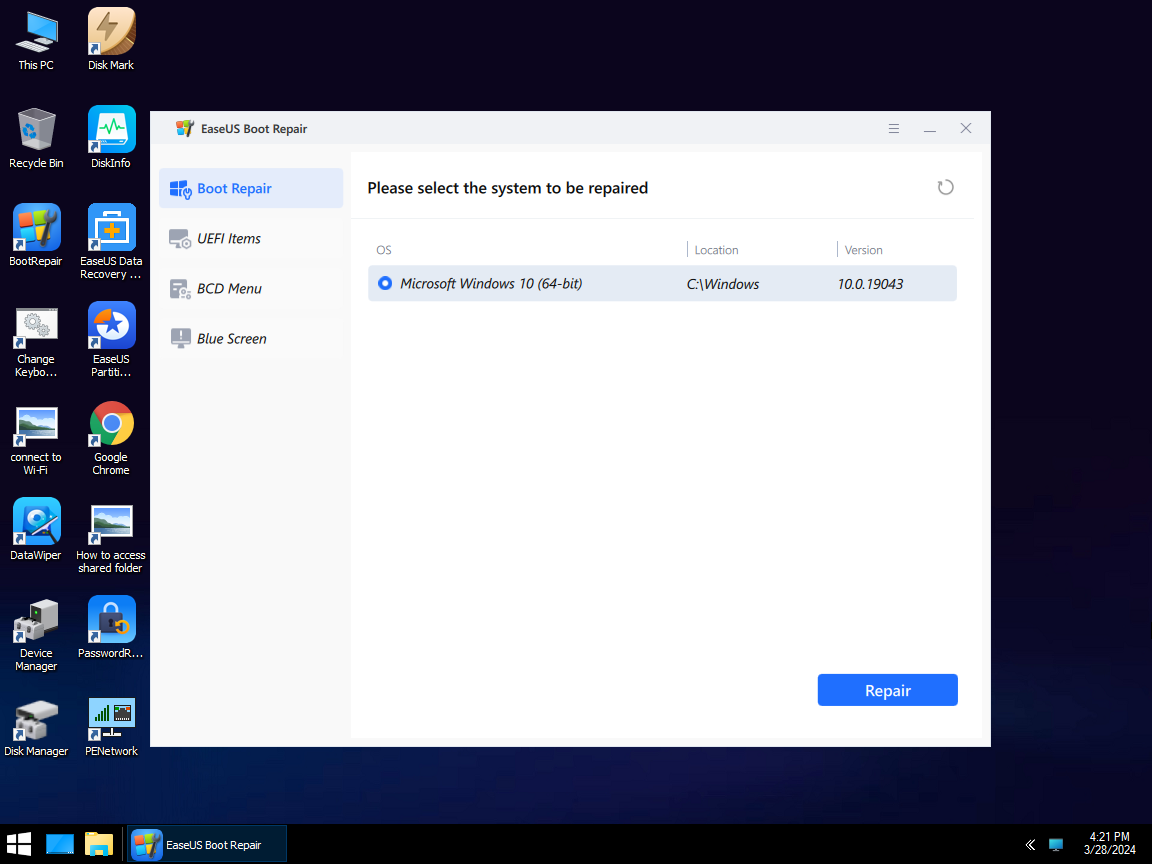
Step 7. Wait a moment, and you will receive an alert that the system has been successfully repaired. Click «OK» to complete the boot repair process.
Download this powerful Windows boot repair tool and follow the instructions to fix boot errors.
Method 3. Repair Corrupted Operating System
Does the boot disk failure persist after setting the boot order correctly? If so, it’s possible that the operating system is corrupted or the system disk is damaged. Since repairing the operating system is much easier than fix the hard drive, let’s see how to repair the OS first.
Step 1. Boot your computer from the installation CD/DVD/USB.
Step 2. In the Windows Setup window, click «Next».
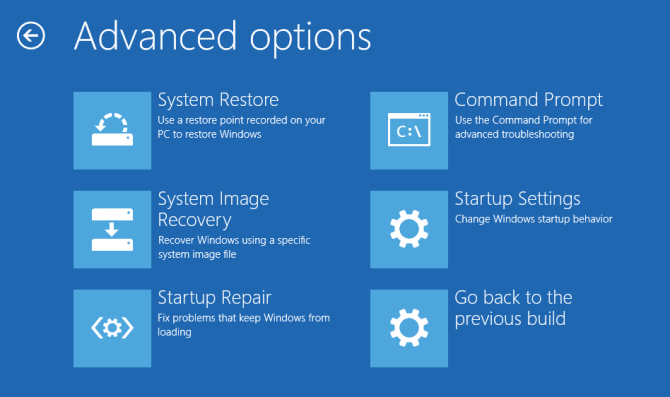
Step 3. In the screen, choose «Repair your computer» > «Troubleshoot,» and then you will see the Advanced options.
Step 4. Among these options, choose «Startup Repair» first. (You may see the message «Startup Repair cannot repair this computer automatically». Refer to the related article for fixes.) If it doesn’t work, try «System Restore» instead.
You May Also Like:
Method 4. Run chkdsk to Fix the Damaged System Disk
If the disk boot failure problem appears due to the operating system or system disk is corrupted, you can run the chkdsk command to solve the problem. The chkdsk utility can detect if the computer’s hard disk has certain issues.
Step 1. Boot from a Windows install disc
Step 2. Click on Repair your computer after selecting proper language, time, and keyboard input.
Step 3. Select the Windows installation drive, which is usually C:\, and click Next.
Step 4. Choose Command Prompt when the System Recovery Options box appears.
Step 5. Write the following command and press Enter afterward:
chkdsk C: /f
Replace «C:» with the letter of the driver where Windows is installed.
Method 5. Remove Newly Installed Hardware
If your problem happens because the new hard drive is configured improperly, try the steps below to fix the problem.
Step 1. Remove the newly added hardware and restart the computer to check if the error still appears.
Step 2. Check the cables of the hard disk where Windows is installed.
Step 3. Check the jumpers of the hard disk.
These are all the solutions to fix the disk boot failure issue caused by all the typical reasons. I hope at least one of them is helpful! If the disk boot failure still exists after all the fixes, you should consider reinstalling OS or sending your computer for manual repair.
Do You Need Specialized Services for System Boot Issues?
EaseUS also provides 1-on-1 remote assistance to fix the boot issue. If the solution above does not work for you, please contact our professionals via Email or LiveChat in this page. To ensure our professional assistance work, you are suggested to connect the unbootable system drive to a healthy computer when getting connected with us.
Extra Tip: Recover Data After Fixing the Disk Boot Failure
Data loss may occur on your hard drive after the repair. If you lose any important files, you can use the trustworthy data recovery software — EaseUS Data Recovery Wizard to retrieve them.
The Bottom Line
The disk boot failure is largely caused by a faulty boot order in most of the cases. And it’s the simplest situation among the three possibilities. Boot issues like this always trigger anxiety in the mind of the user who is troubled by them. Luckily, by knowing how to cope with it, you can greatly weaken this emotion and get the problem solved by yourself.
When starting your computer system, a ‘disk boot failure — insert system disk’ error can occur for several reasons, including either hardware or software changes. It is possible to fix the disk boot failure error by restoring the boot sector in the case of corrupt system files. If the disk is damaged, partitioning the disk and reinstalling the operating system will solve the problem.
What does the insert system disc error message mean?
If you see the error message «DISK BOOT FAILURE INSERT SYSTEM DISK AND PRESS ENTER», «No system disk», it means the computer could not find the operating system and therefore could not boot.
Below are some possible causes and solutions.
BIOS corruption
This problem can be caused by a faulty setting in your BIOS or UEFI. To resolve this, you should try the following procedure :
- Hold on the power-button for at least 5 seconds in order to power off the computer.
- Power the system back on. When the logo screen is displayed, immediately press the F2 key (or DEL key, or any key to access your specific BIOS).
- Try to navigate through the option to load the default configuration.
- Save your changes (often by pressing F10), and restart the PC.
Disc stuck in the drive
Check to see if this is the case — if so, remove the disc(s) and try again
Incorrect boot sequence
Enter the BIOS setup of your computer and edit the boot sequence so that the computer starts primarily on drive C.
New hard drive installed
If a new hard drive has been installed, this message is quite normal. Insert the installation CD for the operating system you wish to use and then restart the machine, having made sure the CD-ROM is defined in the BIOS setup as first in the boot sequence.
Hard drive unplugged
Open the system unit and check the power cable of the hard drive is properly connected.
How to check for corrupt system files?
It may be that some system files needed to boot the computer have been deleted or damaged or that the boot sector of the disc is damaged.
To find out if this is the case, start the computer with a system disk or CD-ROM installation of your operating system (via the Recovery Console), and type «Dir C:» to check if the contents of the C drive are accessible. If they are accessible, the problem comes from missing or damaged files and you need to run the command:
fdisk /mbr
sys c:
Note: Before restoring the boot sector with the command fdisk / mbr, it is recommended to use an antivirus running under DOS, such as f-prot. https://support.microsoft.com/en-us/help/166454
Damaged disc
If the hard disk or a partition is damaged:
- If it is detected in the BIOS setup, there is a chance that it can be recovered
- If so, try reinstalling the system through the installation CD, in order to reformat or recover the partition using a utility
visit our forum for more windows related topics
Position: Resource — Disk Utilities — Fixed: DISK BOOT FAILURE INSERT SYSTEM DISK AND PRESS ENTER
This Article Contains:
The «Disk boot failure, insert system disk and press enter» is an error message that appears when the computer is unable to boot from the hard disk or SSD. This error message typically indicates that the boot process is unable to find the operating system files on the hard disk or SSD.

Here are some common symptoms of this error:
- The computer displays the error message «DISK BOOT FAILURE INSERT SYSTEM DISK AND PRESS ENTER» during startup.
- The computer fails to boot up and displays a black screen or a message that indicates there is no bootable device available.
- The computer may make unusual noises such as clicking, grinding, or buzzing sounds during the boot process.
- The computer may freeze or crash during the boot process.
- The computer may repeatedly restart or shut down on its own.
If you are experiencing any of these symptoms, it is likely that your computer is experiencing a disk boot failure issue. You may need to troubleshoot the issue or rescue data from the crashed computer.
What Causes Disk Boot Failure?
The disk boot failure error can be caused by a variety of issues, including:
- Corrupted or damaged boot sector: The boot sector is a small portion of the hard disk or SSD that contains information about the file system and the operating system. If the boot sector is damaged or corrupted, the computer may be unable to boot from the system disk.
- Faulty hard disk or SSD: A failing hard disk or SSD can cause boot failure. This can happen due to physical damage to the disk, bad sectors, data corruption, or other issues.
- Incorrect BIOS settings: The BIOS (Basic Input/Output System) is responsible for initializing hardware and launching the operating system. If the BIOS settings are incorrect, the computer may not be able to boot from the system disk.
- Non-bootable disk or USB device: If a non-bootable disk or USB device is connected to the computer, it may prevent the computer from booting from the system disk.
- Loose cables or connections: If the cables or connections between the hard disk or SSD and the motherboard are loose or damaged, the computer may be unable to boot from the system disk.
- Malware or virus infections: Malware or virus infections can damage the boot sector or other critical system files, leading to boot failure.
How Do I Fix «DISK BOOT FAILURE INSERT SYSTEM DISK AND PRESS ENTER»?
Fixing the «DISK BOOT FAILURE INSERT SYSTEM DISK AND PRESS ENTER» error can range from relatively easy to quite difficult, depending on the root cause of the issue.
If the error is caused by something simple like a loose cable or an incorrect boot order in the BIOS, it may be relatively easy to fix with basic troubleshooting steps. On the other hand, if the error is caused by a failing hard drive or other hardware issue, the solution may be more complex and may require advanced technical knowledge or the help of a professional.
Here are some solutions you can follow to fix the OS boot failure issue:
Fix #1: Disconnect External Devices
Disconnect any external devices that are not required for booting, such as USB drives, external hard disks, or memory cards.
Note: If your computer cannot boot to Windows after restarting, you can just shut down computer and remove external drives directly.
To safely disconnect external devices from your computer, follow these steps:
Step 1. Save any open files and close all programs that are using the device.
Step 2. Locate the «Safely Remove Hardware» icon in the notification area of the taskbar (usually located on the bottom right of the screen).
If you do not see the «Safely Remove Hardware» icon in the notification area, you may need to click the arrow next to the icons to show hidden icons. If you still cannot find the icon, you can also safely remove the device by shutting down your computer and disconnecting the device while it is powered off.
Step 3. Click the icon to open the «Safely Remove Hardware and Eject Media» window. Then select the device that you want to remove from the list of devices.
Step 4. Wait for the message that says it is safe to remove the device. Then disconnect the device from your computer.
Step 5. Restart computer and check if the error still occurs.
Fix #2: Check Hard Disk / SSD Connections
Check the hard disk or SSD connections to ensure that they are properly connected and not loose.
Step 1. Power off your computer and unplug it from the power source. Open the computer case to access the internal components.
Step 2. Locate the hard disk or SSD, which is typically a rectangular-shaped device that is connected to the motherboard using a SATA cable.
Step 3. Check that the SATA cable is securely connected to both the motherboard and the hard disk or SSD.
Step 4. If the connection appears loose, gently push the cable into the socket until it clicks into place. If your hard disk or SSD is connected via an older IDE or SCSI interface, check the cable connections and ensure that the jumpers are set correctly.
Step 5. After ensuring the connections are secure, close the computer case and reconnect the power source.
Step 6. Turn on your computer and check if the hard disk or SSD is detected in the BIOS or in the operating system.
Note: If you are not comfortable with opening your computer case or making hardware changes, it is recommended to seek assistance from a qualified technician.
Fix #3: Check Boot Order in BIOS
Ensure that the boot order is correctly set in BIOS, so that the computer tries to boot from the correct device. The system disk should be the first boot device in the boot order.
Step 1. Turn on your computer and press the key to enter the BIOS setup utility. The key to press may vary depending on your computer’s manufacturer and model, but it is usually displayed on the screen during startup. Common keys include F2, Del, Esc, or F10.
Step 2. Navigate to the Boot tab using the arrow keys and press Enter to select it. You will see a list of boot devices in the Boot Priority or Boot Order section. The top device in the list is the first boot device, followed by the second, third, and so on.
Step 3. Check that the device containing your operating system, usually your hard disk or SSD, is listed as the first boot device.
Step 4. If the boot order is incorrect, use the arrow keys to highlight the device you want to move and press the + or — key to move it up or down in the list.
Once you have set the correct boot order, press F10 to save and exit the BIOS setup utility. Confirm that you want to save the changes and exit.
Your computer will now boot from the first device in the boot order, which should be the device containing your operating system.
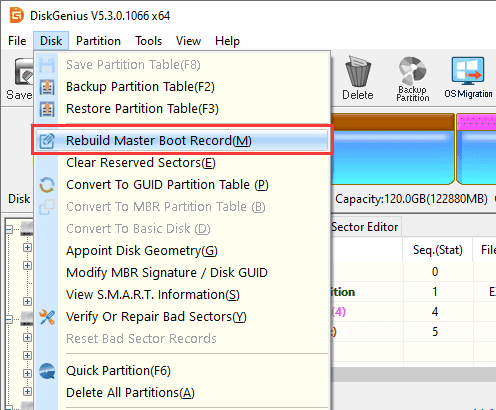
Fix #4: Repair the Master Boot Record (MBR)
If the Windows installation disc is not available, you can use a bootable USB drive to repair/rebuild MBR (Master Boot Record).
Step 1. Insert a USB drive to a computer that can boot to Windows 11 or Windows 10. Then launch DiskGenius Free Edition to create the bootable USB. Here are the detailed steps to create a bootable USB drive.
Step 2. Insert the bootable disk to the computer that is reporting the «DISK BOOT FAILURE» error. Enter BIOS to make the USB drive as the boot device. Restart computer.
Step 3. Computer boots from the USB drive and DiskGenius Free Edition will be launched automatically.
Step 4. Click «Disk» – «Rebuild Master Boot Record». Then click «Yes» to confirm the option.
Fix #5: Check Bad Sectors for the Boot Hard Disk or SSD
Checking for bad sectors on a hard drive or SSD can help identify potential problems with the drive before they become more serious issues. Bad sectors are sections of a hard drive that are physically damaged and cannot be read or written to. If bad sectors are present on a hard drive, they can cause data loss, system crashes, and other issues.
By checking for bad sectors on a hard drive, you can detect these potential problems early on and take appropriate action, such as repairing the sectors or replacing the drive if necessary. Regularly checking for bad sectors can also help prolong the life of your hard drive and ensure that your data is safe and secure.
Since DiskGenius Free Edition has been launched after computer boots from the USB drive in Fix #4, you can check if the boot hard disk or SSD has bad sectors using DiskGenius Free Edition.
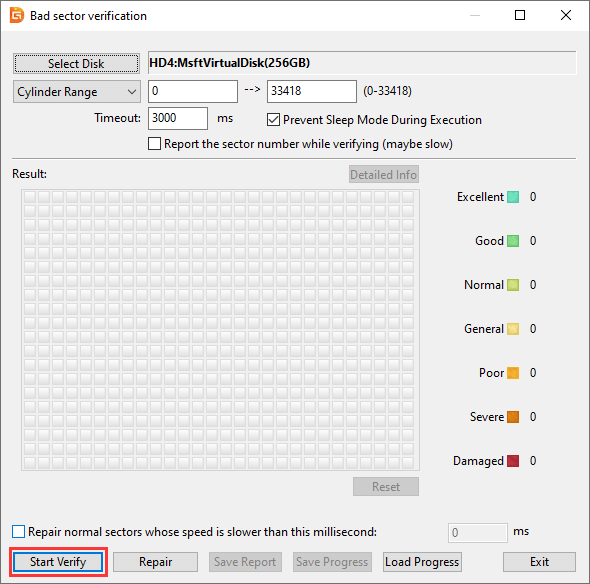
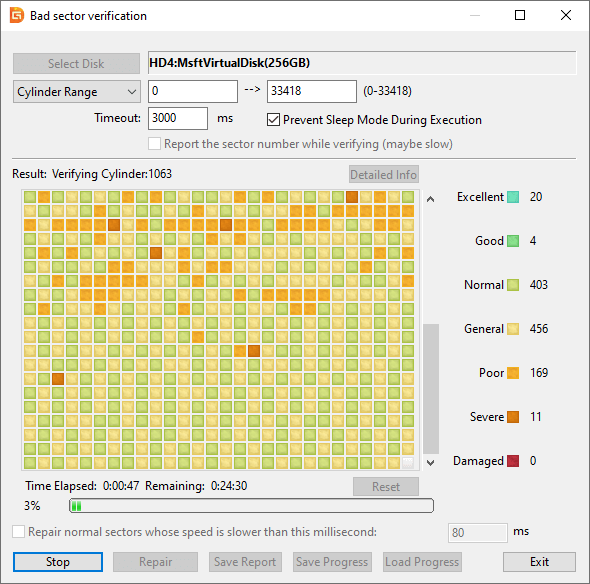
Step 1. Select the boot disk on the left pane, and click «Disk» – «Check or Verify Bad Sectors», see the picture below:
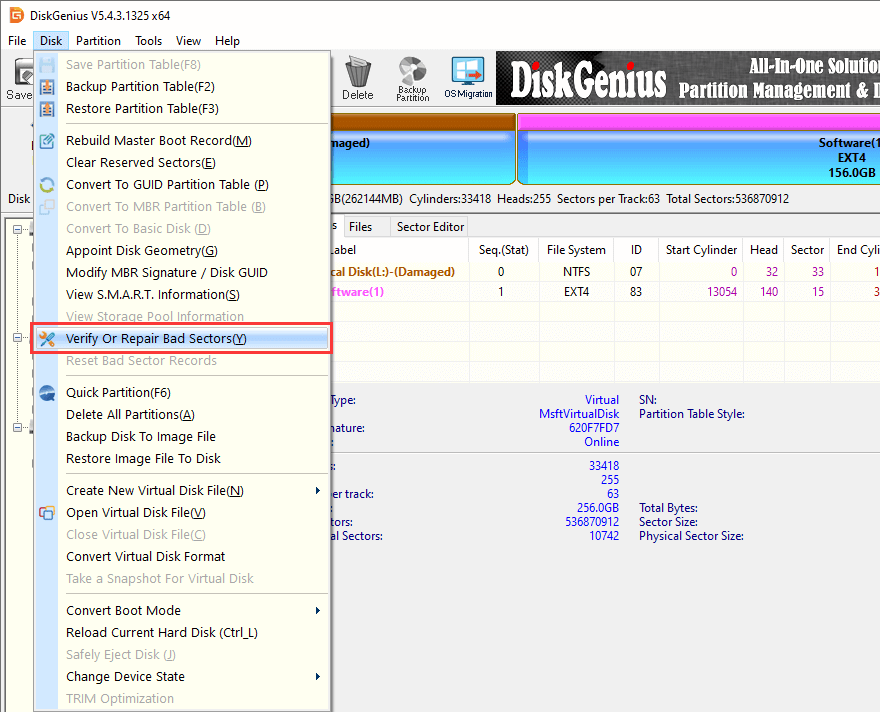
Step 2. Click «Start Verify» button to start the bad sector scanning process.
Step 3. DiskGenius is analyzing the disk.
Once bad sectors are found, the «Damaged» block will record number of bad sectors. If the boot hard drive or SSD has bad sectors, you should back up files as soon as possible and then replace the drive with a new one.
Fix #6: Run SFC To Repair Corrupted System Files
Step 1. Boot the computer using the bootable USB disk created in Fix #4.
Step 2. Click the start menu and choose «Windows Command Processor» to launch Command Prompt.
Step 3. Type the command sfc /scannow and press Enter. This will initiate the System File Checker scan.

Step 4. Wait for the scan to complete. This may take some time, so be patient and avoid interrupting the process.
After the scan is complete, the Command Prompt will display the results of the scan. If the scan finds any corrupted system files, it will attempt to repair them automatically.
Step 5. Once the repair process is complete, restart your computer and check if the boot failure error still appears.
Fix #7: Perform a System Restore or Clean Installation of Windows
If the error occurred after installing new software or making changes to the system, perform a system restore to roll back to a previous working state.
If previous restore points are not available, you will have to consider reinstalling Windows or resetting computer to factory settings. You should pay attention to that reinstalling Windows or resetting computer erases all data on your computer, so it’s important to back up your important files, documents, photos, and other data to an external hard drive, cloud storage, or another device.
Tips To Fix Boot Failure Issues
There are some dos and don’ts to keep in mind when fixing the DISK BOOT FAILURE error:
- Do identify the root cause of the error before attempting any fixes.
- Do follow recommended troubleshooting steps for the specific cause of the error.
- Do back up important data before attempting any fixes. If the hard drive is no longer accessible, then try data recovery using DiskGenius.
- Do consult documentation or seek professional help if you are not comfortable with advanced troubleshooting steps.
- Don’t attempt to fix the error without identifying the root cause, as this can lead to further issues.
- Don’t attempt to open or repair the hard drive unless you are a professional with the proper equipment and training.
- Don’t panic and attempt to force the computer to work, as this can cause further damage to the hardware.
- Don’t use untested or unverified software or solutions, as they may cause further issues or data loss.
Further Reading: How to Recover or Backup Data from Disk Boot Failure?
It is recommended to prioritize data recovery before attempting to fix the «DISK BOOT FAILURE INSERT SYSTEM DISK AND PRESS ENTER» error. This is because attempting to fix the error may involve further troubleshooting steps, such as reinstalling the operating system or replacing hardware components, which can potentially cause data loss or damage to the hard drive.
Therefore, it is best to first attempt to recover any important data from the disk that won’t boot, either by connecting it to another computer as an external drive or by using data recovery software, before proceeding with any fixes for the boot failure error. Once the data is safely backed up, you can then proceed with attempting to fix the boot failure error without worrying about potential data loss.
If you are experiencing a DISK BOOT FAILURE error, it may be possible to recover or backup your data using the following steps:
Step 1. Use A Bootable USB Drive to Boot the Computer
Once the computer boots from the USB bootable disk, you can run data recovery software, disk repair tools, or data recovery software to either rescue data or repair disk errors. Or alternatively, you can connect the disk with booting issues to another computer as an external drive.
Here is an easy-to-follow method to make a USB drive bootable:
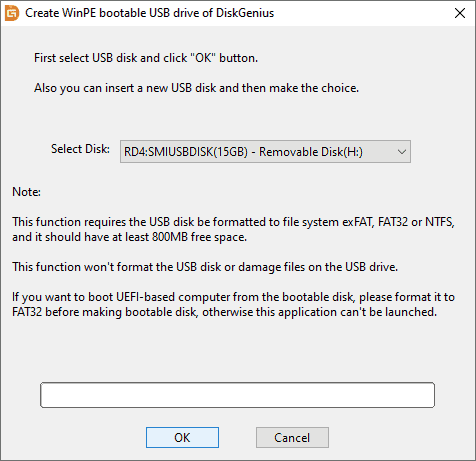
1. Connect the USB drive to a computer that runs Windows 10 or Windows 11. Forma the USB drive to either FAT32 or exFAT file system.
2. Install and launch DiskGenius Free Edition. Select the USB drive in the software and click «Tools» — «Create WinPE Bootable USB Drive of DiskGenius».

3. Click «OK» button and wait for a while.
4. Connect the USB drive back to the crashed computer. Change boot order in BIOS and restart computer. Once booted from the USB drive, DiskGenius will be launched automatically.
Step 2. Rescue Data from The Crashed Computer
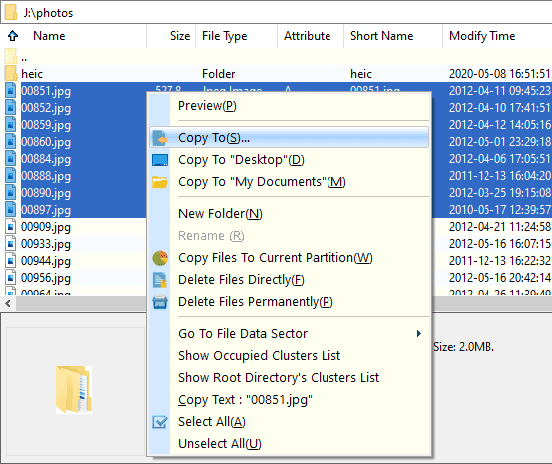
1. Backup files. If partitions on the boot disk are still accessible, you can export files to another disk:
Select files you want to keep > right-click selected data > select «Copy To» > specify a location and start exporting files.
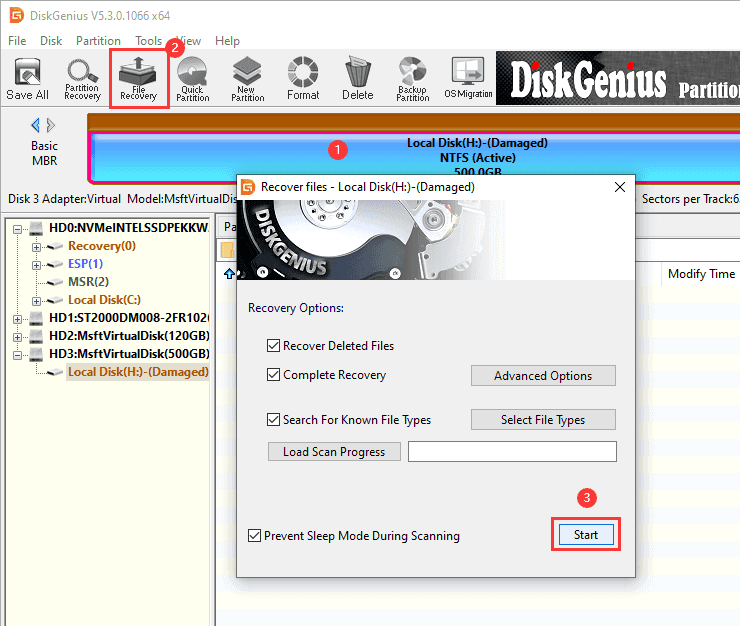
2. If the hard drive becomes corrupted, for example, partitions are shown as Unformatted, Damaged, or RAW, you can use the «Load Partition Intelligently» feature or «File Recovery» feature to look for lost data from the drive.
Load Partition Intelligently:
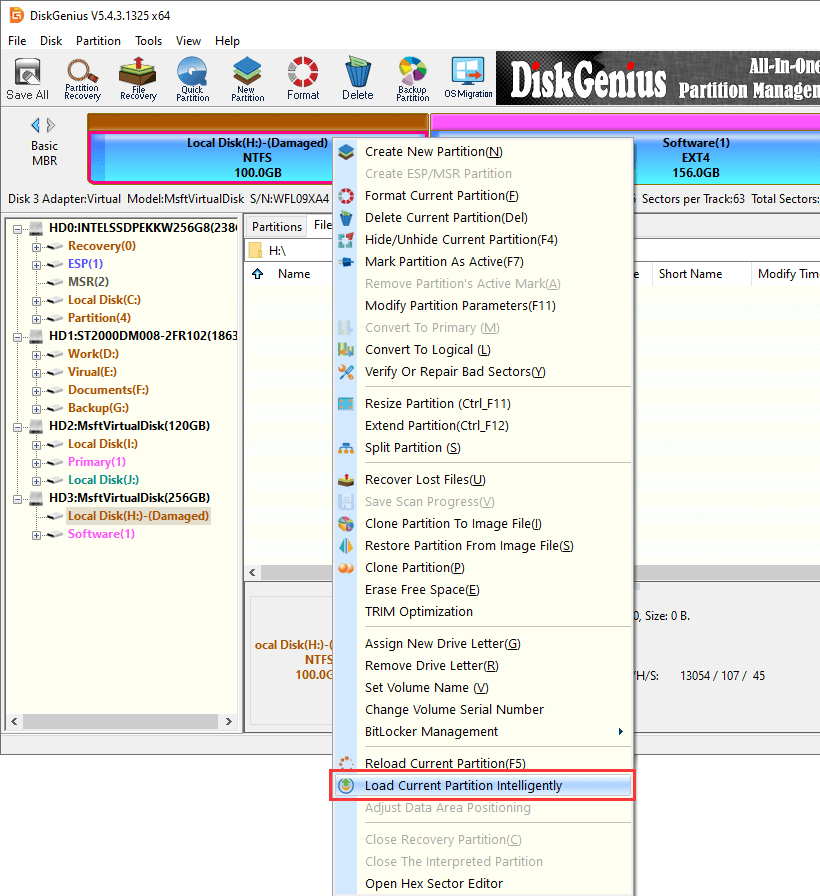
File Recovery:
It is important to note that data recovery is not guaranteed, for the hard drive might be physically damaged, which is beyond the ability of data recovery software. In that case, you need to seek help from professional data recovery services.
Conclusion
Fixing the «DISK BOOT FAILURE INSERT SYSTEM DISK AND PRESS ENTER» error can be safe and easy if done correctly and with proper precautions. However, if you are not familiar with troubleshooting computer issues, it is recommended to seek professional help to avoid causing further damage or data loss.
It is also important to backup any important data before attempting any fixes to the boot failure error, as some fixes may involve reinstalling the operating system or replacing hardware components, which can potentially cause data loss. Additionally, it is important to follow recommended troubleshooting steps and avoid using unverified or untested solutions, as they may cause further issues or damage to the hardware.
Related Questions
1. How to fix invalid system disk replace the disk and then press any key?
The «Invalid system disk, replace the disk and then press any key» error message usually appears when the computer is unable to find a valid operating system on the disk that it is trying to boot from. This could be due to a variety of reasons, such as a damaged disk, a corrupted boot sector, or a misconfigured BIOS setting.
Here are some steps you can take to fix this error message: Check the boot order in your BIOS, check for disk errors, repair the Master Boot Record (MBR), or replace the disk.
If you have important data on the disk, you may want to try to recover it before attempting any of these steps. There are data recovery tools like DiskGenius that can help you recover data from a damaged disk.
2. How do I fix the problem for reboot and select proper boot device or insert boot media in selected boot device and press a key?
This error «reboot and select proper boot device or insert boot media in selected boot device and press a key» message typically appears when a computer is unable to find a valid operating system to boot from. It usually indicates that the computer is attempting to boot from a device or location that does not have a valid operating system installed on it, or that the boot order settings in the BIOS are incorrect.
To resolve this error message, you should first ensure that your bootable storage device (usually your hard drive) is properly connected to your computer. You should also check your BIOS settings to ensure that the boot order is set correctly, with the first boot device being the one containing the operating system.
If you have recently installed or changed any hardware or software, try disconnecting the new hardware or reverting the software changes to see if that resolves the issue. If the issue persists, you may need to use recovery tools to repair your operating system or reinstall it entirely.
3. How do I fix reboot and insert proper boot device?
The error message «Reboot and select proper boot device» typically occurs when the computer is unable to find a valid boot device or operating system. This can be caused by a variety of issues such as a faulty hard drive, misconfigured BIOS settings, or corrupted boot files.
Here are some steps you can take to fix this error message: Check the boot order in the BIOS, check the hard drive connections, run startup repair, check for corrupted boot files, reinstall the operating system. Remember to back up any important data before attempting any of these steps, as they may result in data loss.
4. How to fix disk error in BIOS?
If you are seeing a disk error message in your computer’s BIOS, it usually means that there is a problem with the hard drive or other storage device that the BIOS is trying to access. Here are some steps you can take to fix the disk error in BIOS: Check the hard drive connections, check bad sectors for the drive, check the boot order in BIOS, update BIOS, replace the damaged disk with a new one, etc. If you have important data on the disk, you may want to try to recover it before attempting any of these steps. There are data recovery tools available that can help you recover data from a damaged disk.
5. How to repair boot from BIOS?
The BIOS is responsible for initializing hardware components and booting up the operating system. If there is a problem with the boot process, it could be due to a faulty hardware component, corrupted boot files, or misconfigured BIOS settings. Here are some steps you can take to repair boot from BIOS: make sure the boot order is correct, repair MBR, run Startup repair, use SFC to repair corrupted boot files, check hardware connection. Remember to back up any important data before attempting any of these steps, as they may result in data loss.
6. What causes disk failure?
There are many factors that can cause disk failure, including: physical damages, manufacturing defects, wear and tear, power surges, viruses and malware, bad sectors, file system corruption, human error, driver issues, etc. It’s important to back up important data regularly to avoid data loss in case of disk failure.
7. How do I reboot my computer without a boot disk?
You can reboot your computer without a boot disk by following these steps:
Step 1. Press and hold the power button on your computer until it turns off. If your computer is unresponsive, you may need to unplug it from the power source.
Step 2. Wait a few seconds, then press the power button again to turn on the computer.
Step 3. Enter BIOS boot menu to check if the boot order is set correctly.
Step 4. If the boot order is correct and the computer still fails to boot, you can try boot computer into the recovery environment by pressing a specific key (often F11 or F12) during startup. From there, you may be able to perform a system restore or repair the operating system without a boot disk.
8. What causes a laptop to fail to boot?
A laptop may fail to boot due to various reasons, some of the common causes include hardware failure, software issues, power failure, incorrect BISO setting, boot device failure, overheating, physical damages, etc.
It’s important to identify the cause of the problem to determine the appropriate solution for a laptop that fails to boot. If you are unsure, it may be best to seek professional assistance.
9. How do I reset boot mode?
Note that changing the boot mode may affect the way your operating system is installed, so it’s important to understand the implications before making any changes. If you are unsure about how to reset the boot mode or need further assistance, it may be best to seek professional help or consult the documentation provided by the computer manufacturer. To reset the boot mode on your computer, follow these steps:
Step 1. Restart your computer and enter the BIOS setup utility. The key to enter the BIOS setup utility varies depending on the computer manufacturer, but it is usually F2, F10, Del, or Esc.
Step 2. Navigate to the Boot menu in the BIOS setup utility. Locate the Boot Mode setting and select it.
Step 3. If the Boot Mode is set to UEFI, change it to Legacy. If the Boot Mode is set to Legacy, change it to UEFI.
Step 4. Save the changes and exit the BIOS setup utility. Restart your computer and check if the boot mode has been reset successfully.
10. How to repair Windows 10 boot without CD?
You can repair Windows 10 boot without a CD by following these steps:
Step 1. Restart your computer and press and hold the power button to force shutdown your computer three times in a row. This should trigger the Automatic Repair process.
Step 2. Once Automatic Repair starts, select the Troubleshoot option. Then select Advanced options > Startup Repair.
Step 3. Windows will scan your system and attempt to repair any issues that are preventing it from booting properly.
Step 4. Once the commands have been executed, restart your computer and check if the boot issue has been resolved.
11. How do I fix Windows 7 boot failure?
To fix a Windows 7 boot failure, you can try the following steps:
Step 1. Restart your computer and press F8 key repeatedly until you see the Advanced Boot Options screen.
Step 2. Select «Last Known Good Configuration» from the list of options and press Enter.
Step 3. If «Last Known Good Configuration» doesn’t work, try performing a System Restore to restore your system to an earlier point in time when it was working correctly.
12. How do I know if my boot drive is failing?
There are several signs that can indicate if your boot drive is failing. Here are some of the most common signs: slow boot speed, BSOD (Blue screen of death), clicking or grinding noises, error messages like «disk read error», corrupted file, frequent freezing, etc.
If you are experiencing any of these signs, it’s important to back up your important data immediately and seek the assistance of a professional to diagnose and fix the issue with your boot drive.
13. What do I do when my laptop says insert boot disk?
If your laptop says «insert boot disk,» it means that your computer is not able to find the operating system or the boot device from which it can start up. Here are some steps you can take to fix this issue: remove unnecessary devices such as CD/DVD or USB drive, check boot order in BIOS settings, check the cables and connections between the boot disk and computer, run a Startup repair, restore OS to a previous state, replace the boot disk with a new one.
14. How do I fix no system disk or disk error?
«No system disk or disk error» message usually appears when the computer is trying to boot from a device other than the hard disk or SSD where the operating system is installed. Here are some steps you can take to fix this issue:
- Remove any USB devices or CDs/DVDs from the computer.
- Check the boot order in the BIOS settings.
- Check the cables and connections between system disk and the motherboard.
- Use the Windows installation media to repair the startup process.
Keep Reading
- Fixed: The Boot Selection Failed Because a Required Device Is Inaccessible
- Fix Blue Screen Inaccessible Boot Device Error in Windows 11/10/8/7
- How to Fix Unmountable Boot Volume in Windows 11/10/8/7?
- How To Recover Data from Crashed Internal Hard Disk?
- How To Fix «No Bootable Device» Issue on Windows 11/10 Computer?