
Unidentified Network or non-working Ethernet connections on Windows 11 often disrupt wired internet access, even when cables and hardware appear functional. This issue can result from incorrect IP settings, outdated drivers, hardware conflicts, or network misconfiguration, and typically presents as «Unidentified Network,» «No Internet,» or «Ethernet doesn’t have a valid IP configuration» messages in Windows networking settings. Addressing the root causes requires a systematic approach, starting with the most reliable solutions and moving to advanced troubleshooting if basic fixes do not resolve the problem.
Check Cables, Ports, and Hardware
Physical connection problems frequently cause Ethernet issues. Begin by verifying that the Ethernet cable is securely connected to both your PC and the router or switch. Swap out the cable with a different one to rule out potential cable faults. If your router has multiple Ethernet ports, try using another port. Testing the same cable and port with another device, such as a laptop or game console, can help determine whether the problem is isolated to your Windows 11 PC.
If the Ethernet connection works on other devices but not your PC, the issue is likely within your Windows 11 system. If the connection fails on all devices, focus on troubleshooting your router, switch, or ISP connection.
Restart PC and Router
Restarting both the computer and network equipment can resolve temporary glitches that cause network misidentification. Power off your PC and unplug your router and modem from the power source. Wait at least 30 seconds; if your modem has a backup battery, remove it. Reconnect the modem and wait for its lights to stabilize, then reconnect the router and allow it to fully boot up. Power your PC back on and check the Ethernet status in Settings > Network & Internet. This process often clears up transient network assignment issues.
Update or Reinstall Network Adapter Drivers
Outdated or corrupted network drivers can prevent Windows 11 from correctly identifying wired networks.
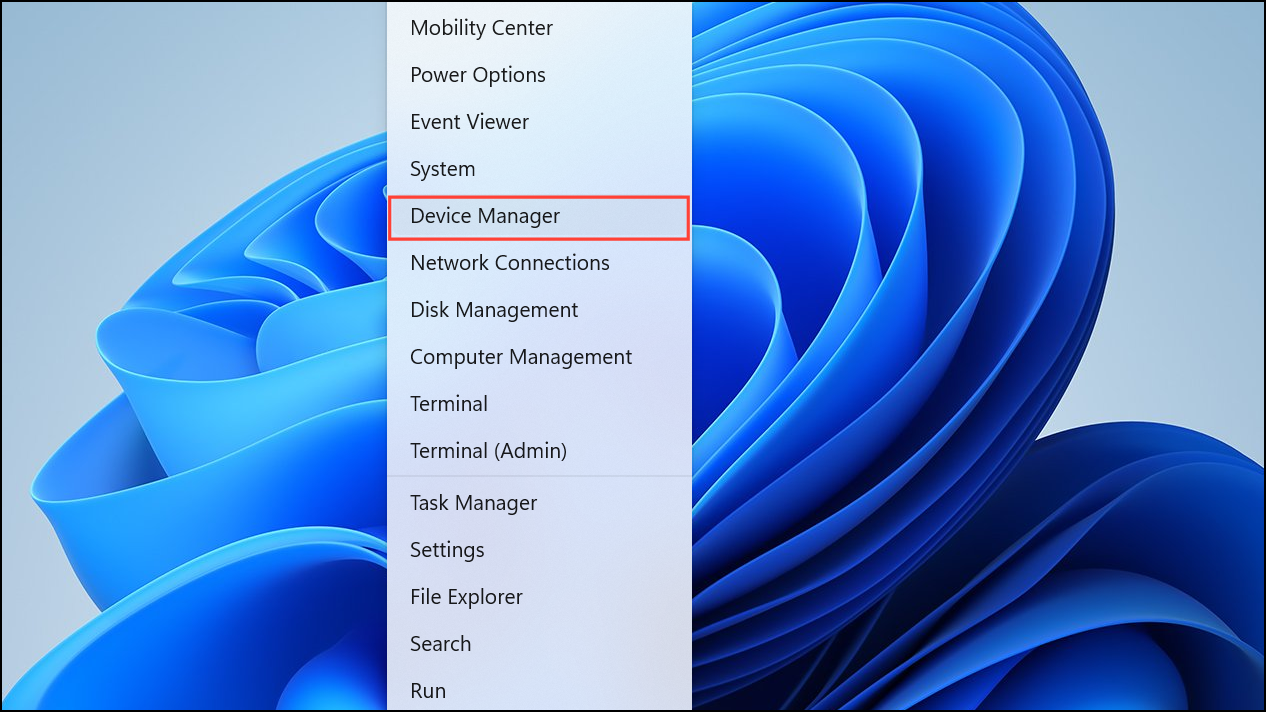
Step 1: Access Device Manager by pressing Windows + X and selecting Device Manager.
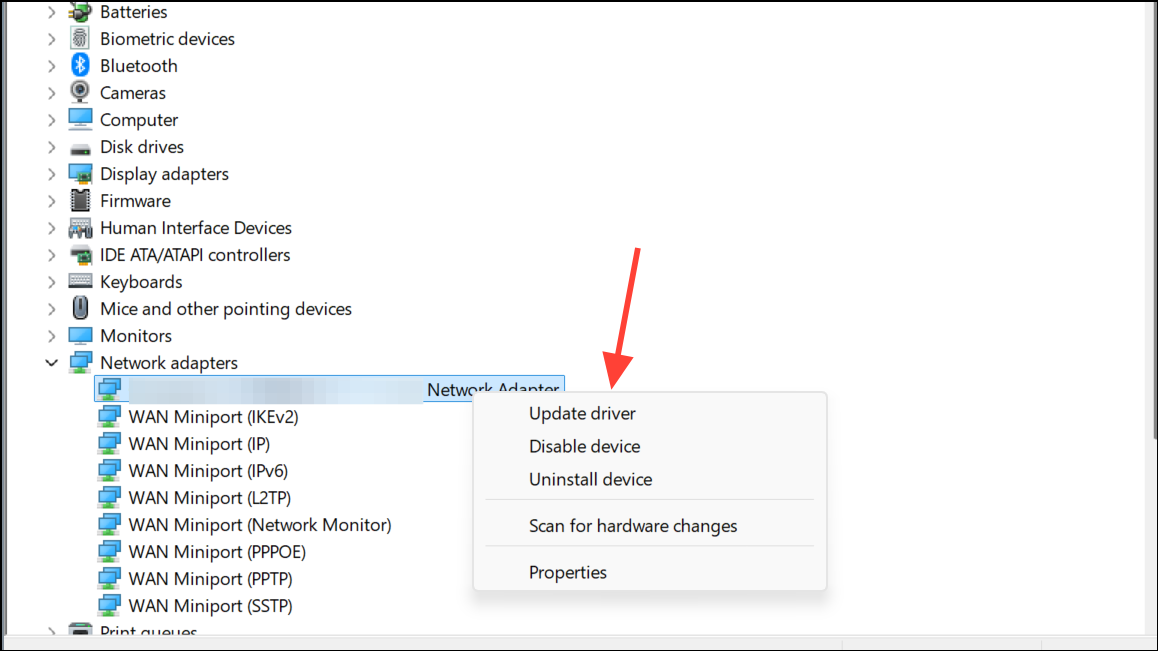
Step 2: Expand Network adapters, right-click your Ethernet device, and choose Update driver.
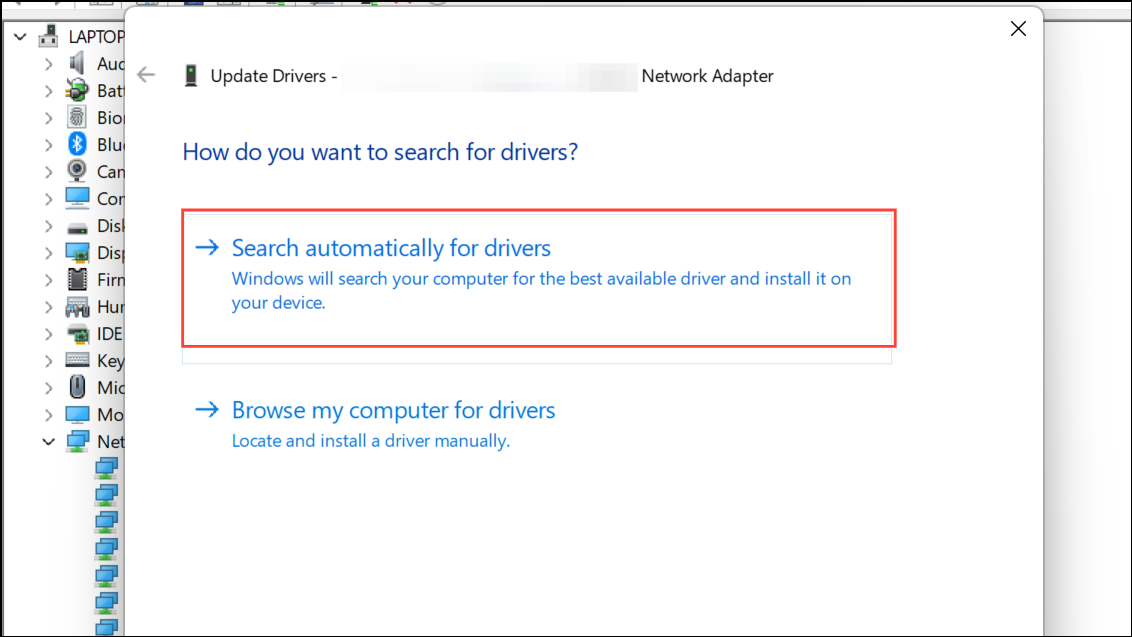
Step 3: Select Search automatically for drivers to let Windows find updates.
Step 4: If no updates are available or the issue persists, download the latest driver from your network adapter or motherboard manufacturer’s website and install it manually.
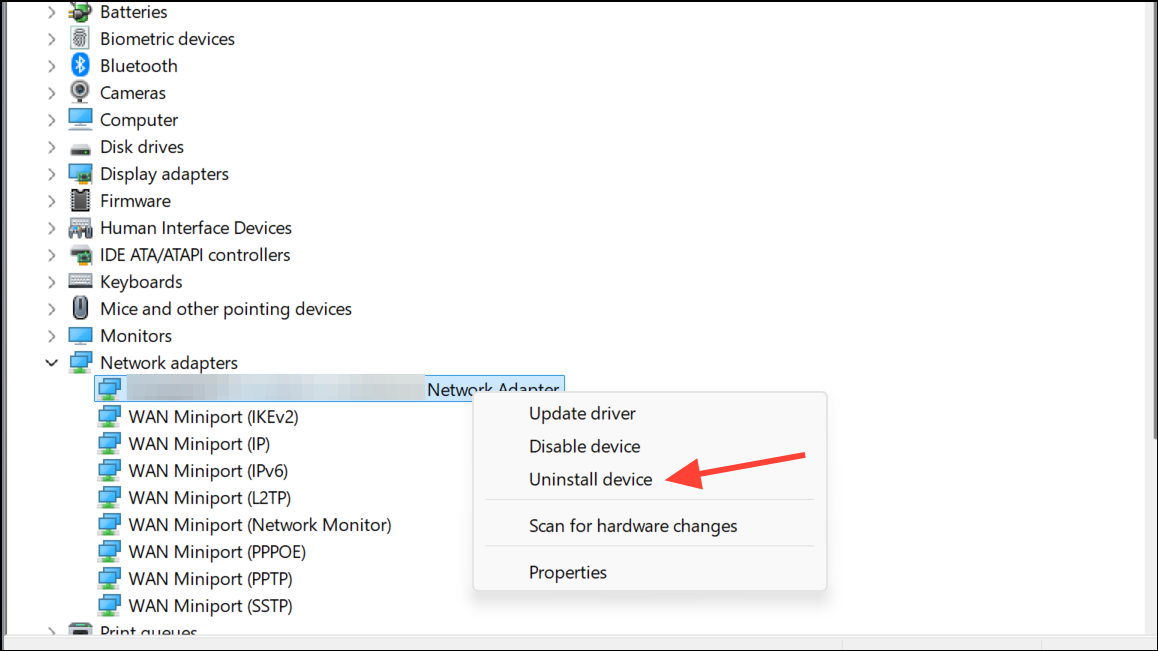
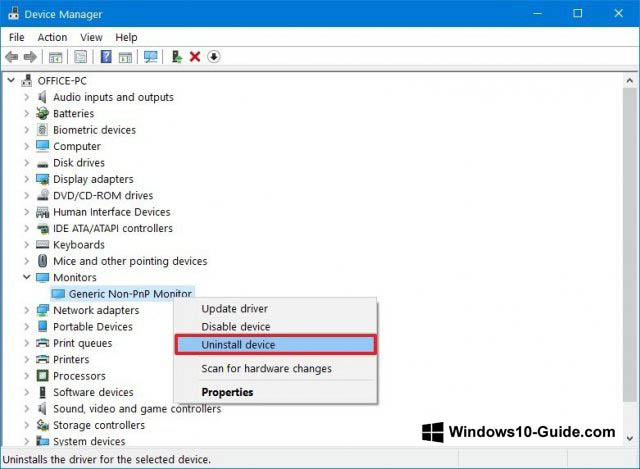
Step 5: If updating does not resolve the issue, right-click the Ethernet adapter in Device Manager and choose Uninstall device, check Attempt to remove the driver for this device, and restart your PC. Windows will attempt to reinstall the driver. If the PC cannot access the internet, download the driver on another device and transfer it via USB.
Disable Power Management Settings for Ethernet Adapter
Windows 11 may turn off network adapters to save power, disrupting Ethernet connectivity.
Step 1: In Device Manager, right-click your Ethernet adapter, select Properties.
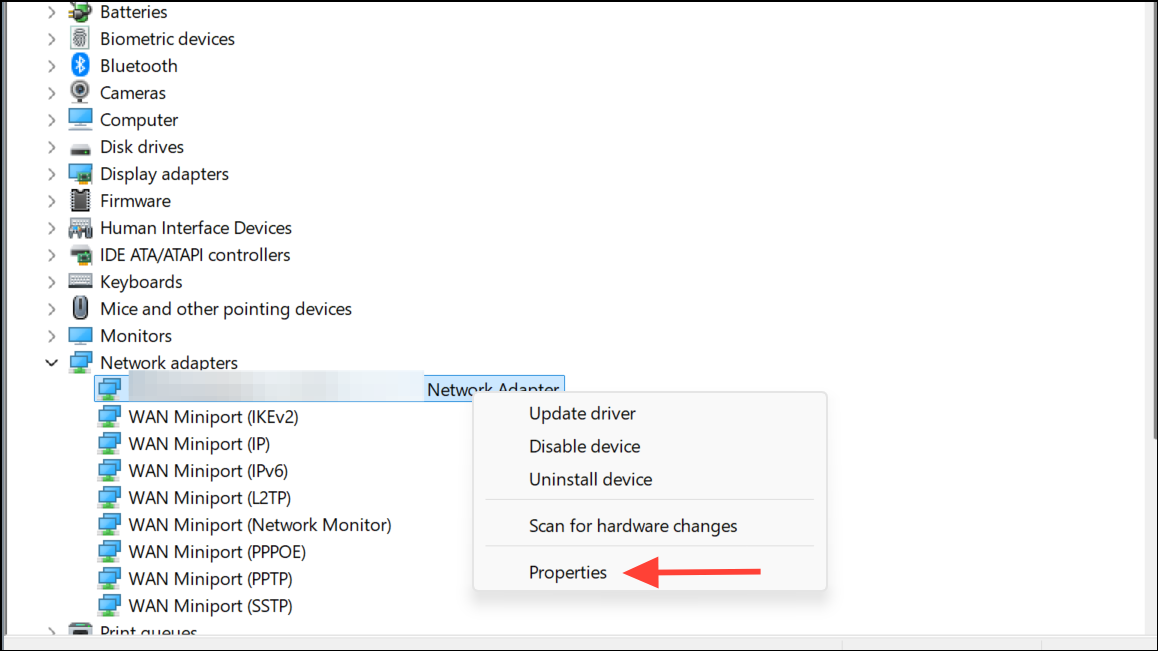
Step 2: Go to the Power Management tab, uncheck Allow the computer to turn off this device to save power and click OK. This setting ensures your adapter remains active and prevents random disconnections.

Run Network Reset and TCP/IP Stack Commands
Network configuration errors or corrupted TCP/IP settings can lead to unidentified network errors.
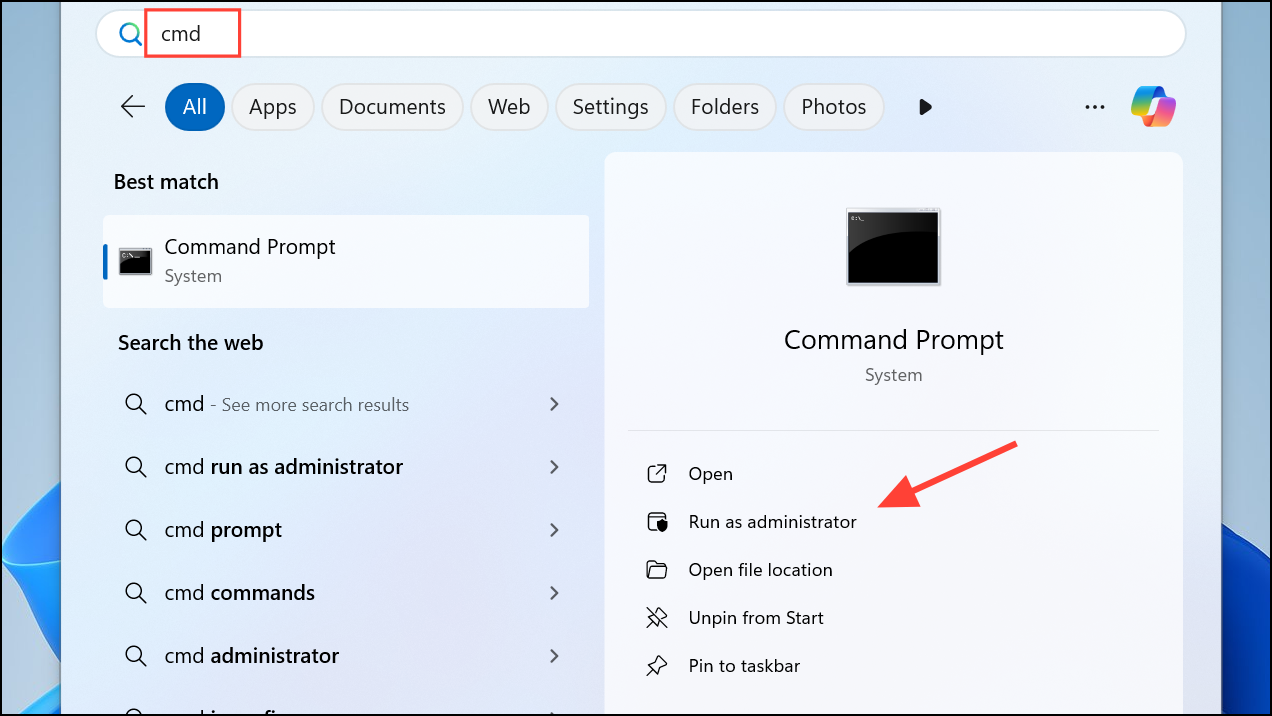
Step 1: Open an elevated Command Prompt by searching for cmd, right-clicking, and selecting Run as administrator.
Step 2: Enter the following commands one by one, pressing Enter after each:
netsh winsock reset
netsh int ip reset
ipconfig /release
ipconfig /renew
ipconfig /flushdns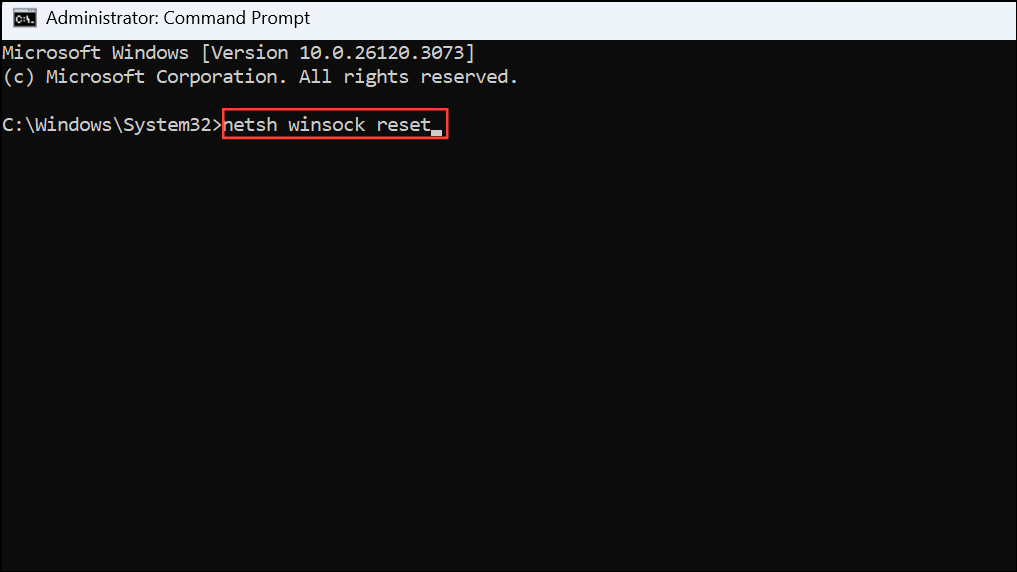
These commands reset network sockets, TCP/IP stack, and DNS cache, and request a new IP address from your router. Restart your computer after running the commands to apply changes. This process often resolves persistent configuration errors that standard troubleshooting tools miss.
Set IP and DNS Settings Manually
Missing or invalid IP configuration frequently causes Ethernet connections to show as «Unidentified Network.»
Step 1: Go to Settings > Network & Internet > Ethernet, select your network, then click Edit under IP assignment.
Step 2: Change from Automatic (DHCP) to Manual and enter a valid IP address, subnet mask, gateway, and DNS server. Use IP details from another working device on your network as a reference, but ensure the IP address is unique. Common DNS servers like 8.8.8.8 (Google) or 1.1.1.1 (Cloudflare) can be used for reliability.
If manual configuration resolves the issue, the problem may be with your router’s DHCP server. Check router settings or consider a firmware update if DHCP is not working as expected.
Disable IPv6 Protocol
Certain network adapters or older routers may not fully support IPv6, which can cause Windows 11 to misidentify the network.
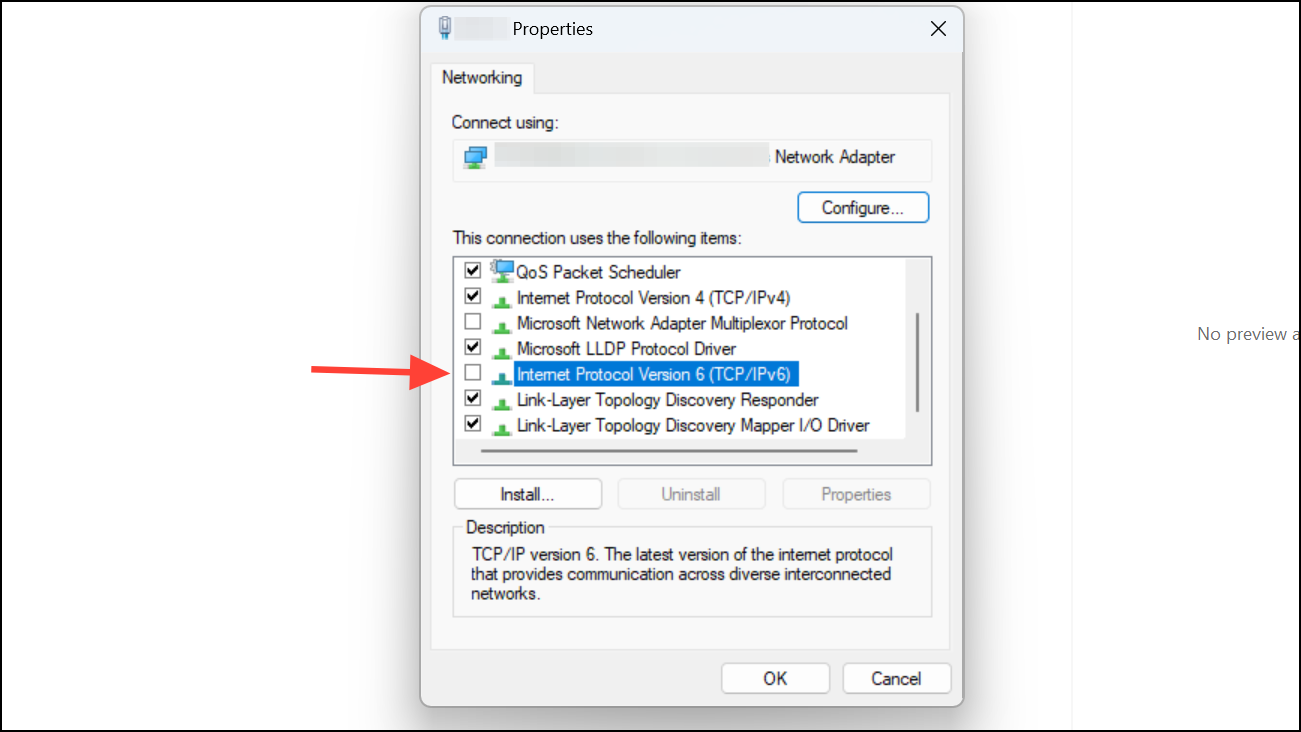
Step 1: To disable IPv6, go to Control Panel > Network and Sharing Center > Change adapter settings.
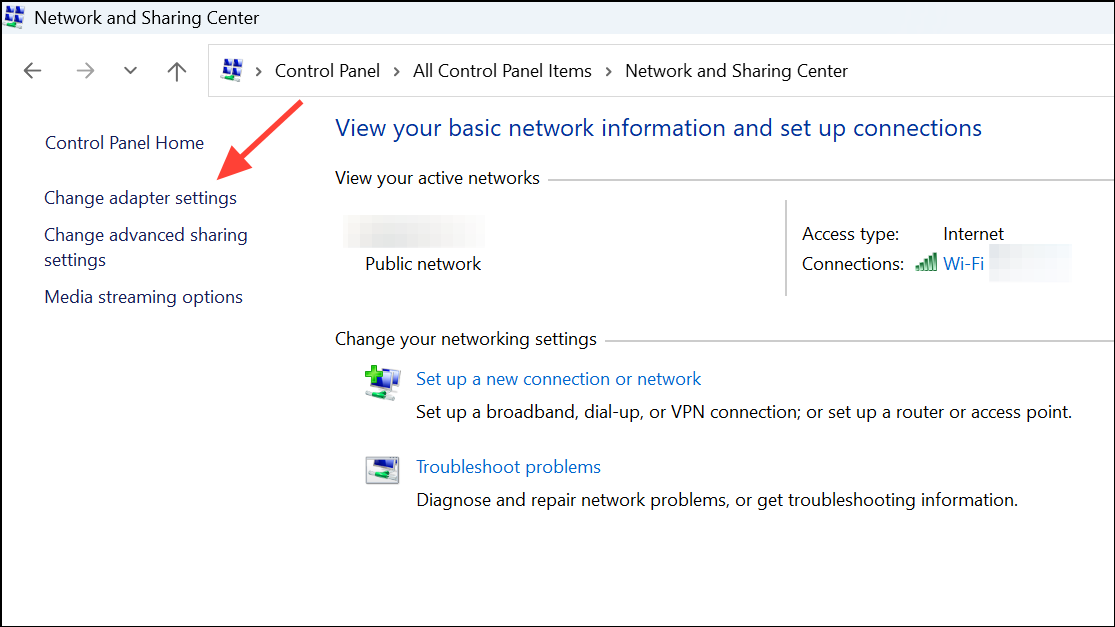
Step 2: Right-click your Ethernet connection, select Properties, and uncheck Internet Protocol Version 6 (TCP/IPv6). Click OK and restart your PC. Disabling IPv6 can resolve conflicts that interfere with DHCP or network identification.
Check for VPN, Proxy, or Security Software Conflicts
Active VPNs, proxies, or aggressive firewall/antivirus software can block or misroute Ethernet traffic, resulting in unidentified network errors. Temporarily disable any VPN or proxy services, and pause or uninstall third-party firewall or antivirus programs to check if Ethernet connectivity is restored. If the issue resolves, adjust your VPN or security software settings to allow local network traffic.
Try an External USB Ethernet Adapter
If all software troubleshooting fails and Ethernet works on other devices, your PC’s built-in network card may be faulty. Using an external USB-to-Ethernet adapter provides a quick way to test this. Plug in the adapter, let Windows install drivers, and connect the Ethernet cable. If the connection works, consider replacing the internal network card or using the external adapter as a permanent solution.
Reset Network Settings in Windows 11
As a last resort, use Windows’ built-in network reset tool.
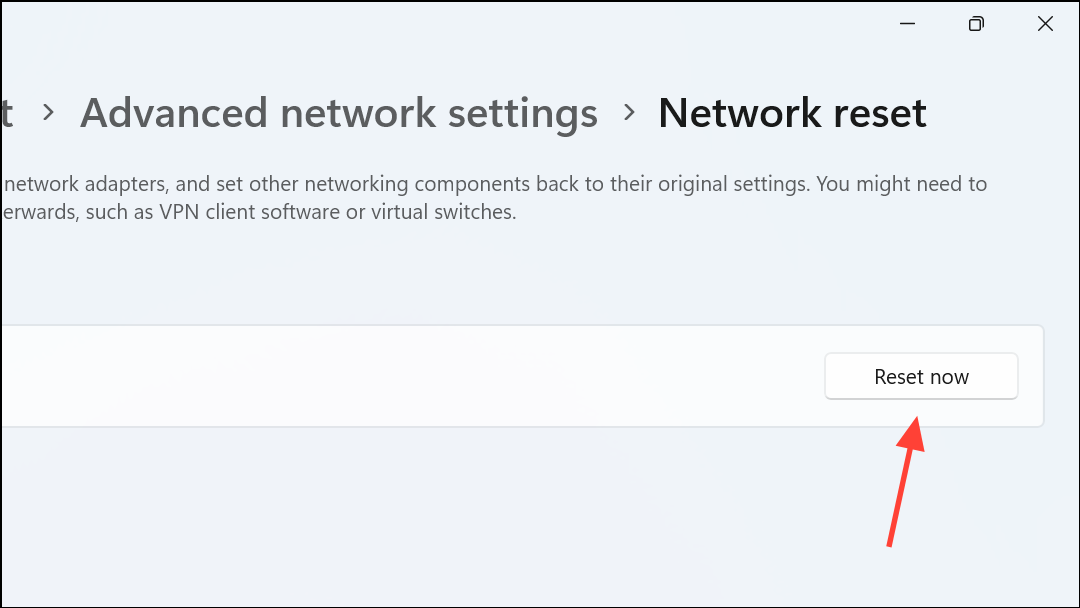
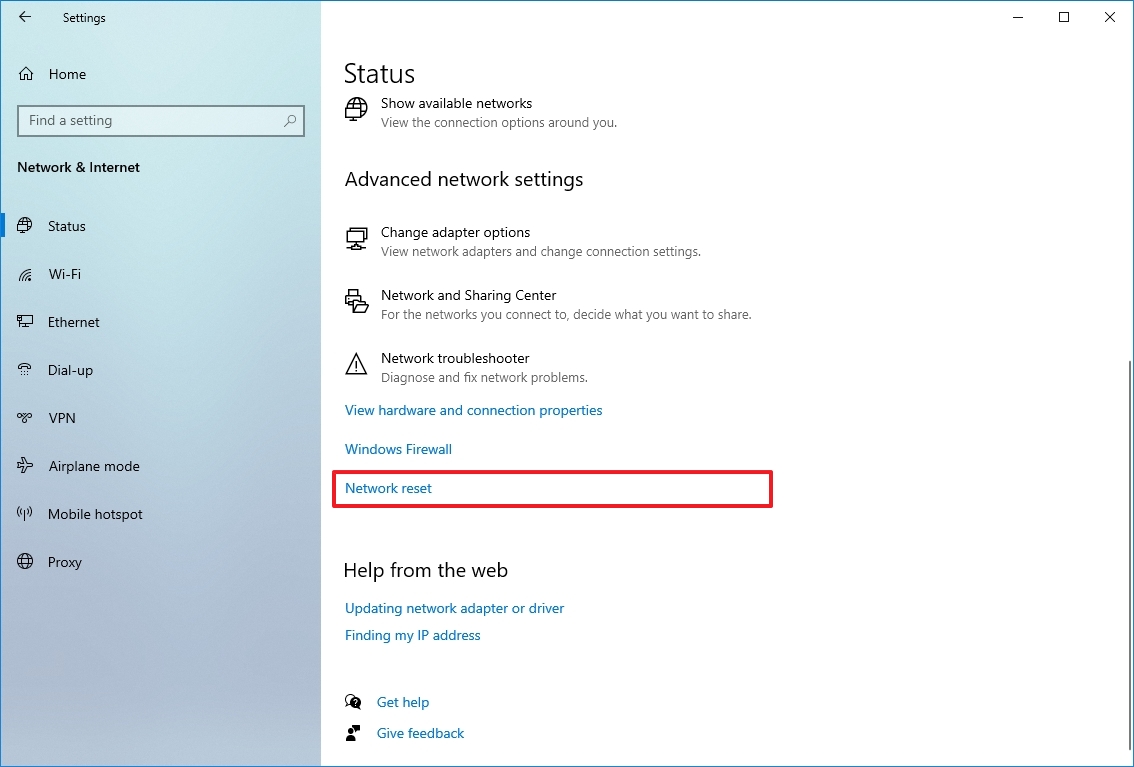
Step 1: Go to Settings > Network & Internet > Advanced network settings > Network reset.
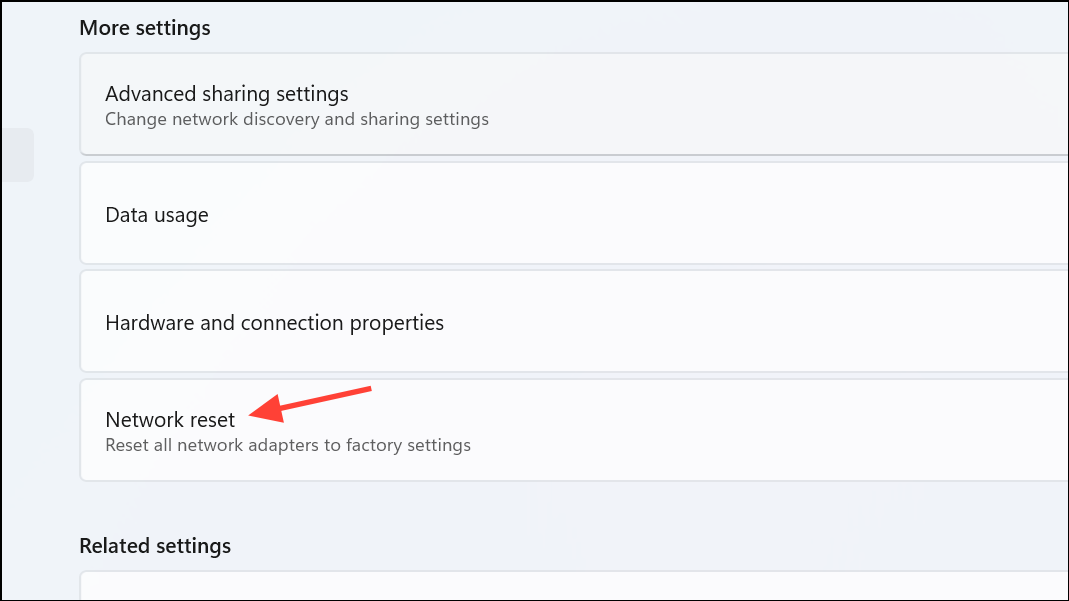
Step 2: Click Reset now and confirm. This process removes all network adapters and resets all networking components to default. Your PC will restart, and you may need to reinstall VPN clients or reconfigure custom network settings afterwards.
Resolving Ethernet not working or unidentified network errors in Windows 11 requires a stepwise approach—starting with cable and port checks, progressing through driver updates and configuration resets, and finishing with hardware replacement or network reset if needed. Consistent troubleshooting restores stable wired connectivity and ensures reliable internet access.
Windows 10: Network Conflict with the installation of Windows 10.
Discus and support Network Conflict with the installation of Windows 10. in Windows 10 Network and Sharing to solve the problem; Since I’ve downloaded Windows 10 my Ethernet (wired), connection has been absolutely useless. I’m 100% positive it’s not the cable itself, and I’ve…
Discussion in ‘Windows 10 Network and Sharing’ started by Coolikethat, Oct 10, 2015.
-
Network Conflict with the installation of Windows 10.
Since I’ve downloaded Windows 10 my Ethernet (wired), connection has been absolutely useless. I’m 100% positive it’s not the cable itself, and I’ve tried lots of things to resolve it. Nothing seems to work. So for the time being I’ve been using WiFi, it’s not all that bad, however I get random disconnects while playing games periodically every 5 minutes for about 2-3 seconds. Not the biggest deal in the world, however when playing MOBAs like League of Legends those 2-3 seconds can literally change the outcome of a game depending on the situation you’re in. Plus, this has been happening since the download of Windows 10, and quite frankly I’m sick of it. When using my Ethernet connection, it will work for about 10-15 minutes then just completely drop connection and seize to work. I literally have to reset my router, and computer for it to work again. It’s just ridiculous. Can anyone please offer me some advice to fix this? Some drivers I could download, or something within the computer to enable the Ethernet to actually function properly?
I’m running a 64bit G771J Asus Gaming laptop.

-
PC Suite Installation Conflict with Leftover PC Suite Components
Looking through the threads, this is a common problem. I have tried all the previous suggestions and either have failed to spot the one that would work, have misapplied one that would or its a quirk that hasn’t surfaced hitherto. Or I’m just plain dumb
I suppose! I am working on XP with SP2. I am trying to install PC Suite 6.6 as issued with my new N70. When I try to install the software it gives me an error message that says it has detected PC Suite on my system and that PC Suite can not work flawlessly
with PC Suite (surely a candidate for daftest error message of the year) and that I should uninstall PC Suite and try again. I have used Cleaner 3 from the website several times. I have tried all the problem type options, having first tried the obvious one
of course. They either say nothing needs to be removed from system or registry, that successful removal has taken place or that and I should reboot — or in one case, it identified ole.dll in System32 folder and claimed to have removed it succesfully. Looking
in System 32 there are quite a number of extension files with what appear to be very close naming resemblance to ole.dll (eg ole2.dll) but none has information in their properties sufficient for me to be confident that I am not going to interfer with other
applcations if I manually remove. I should say that the residual components probably come from a PC Suite installation for the phone before last. I removed in the standard way using the utility in XP but have also tried to use System Mechanic to find any residual
components. I quite urgently need to download contents from my phone and would be really gateful for any help. Be specific in instructions though as I am no geek! -
PC Suite Installation Conflict with Leftover PC Suite Components
I too have been unfortunate! I am unable to unload the new version Nokia_PC_Suite_68_rel_22_eng_web as I was getting error messages and asked me to reload the software.I treied repair as well as remove but a sreen depicting error 1316 pops up. I tries
cleaner, remmoved any «nokia» entries from the registery and even went on to search for any «nokia» word on the hard drive. I practically removed everything but couple of the entries refused to be removed. Has anyone any clue or answer to this? I now cannot
download from the cd provided with the phone. I ahve Nokia v70, windows XP professional and updated to SP2.«HELP ME PLEASE, HELP ME»
-
Network Conflict with the installation of Windows 10.
Hello and welcome to tenforums,,, first thing i would do is go to device manager and try updating the network adapter drivers ,if it say you are using the best drivers ,then delete them ,and reboot computer to reinstall them , the modem may have just picked a bad time to start going bad,do you have other devices connected to the modem ,if so do they also have issues
-
Do the driver update as suggested, then if that doesn’t work try running Windows in safe mode and see if the connection still keeps dropping. It not, then some program in Windows is likely causing the issue.
-
Or instead of updating the driver to the latest — go to the manufacturers website and get the latest driver they have for the network adapter, even it is for Windows 7 or 8 and install the manufacturer’s driver. Newest is not always best.

Network Conflict with the installation of Windows 10.
-
Network Conflict with the installation of Windows 10. — Similar Threads — Network Conflict installation
-
Network Adapter Driver Not Working driver conflict
in Windows 10 Gaming
Network Adapter Driver Not Working driver conflict: My all network adapter are disappeared Ethernet,Wifi, Bluetooth . I am not able to connect to internet any way for update drivers . It’s caused by bridge connection between wifi adapter and vpn adapter .After updating driver it shows windows is still setting up the class… -
Network Adapter Driver Not Working driver conflict
in Windows 10 Software and Apps
Network Adapter Driver Not Working driver conflict: My all network adapter are disappeared Ethernet,Wifi, Bluetooth . I am not able to connect to internet any way for update drivers . It’s caused by bridge connection between wifi adapter and vpn adapter .After updating driver it shows windows is still setting up the class… -
Windows 10 conflict
in Windows 10 Gaming
Windows 10 conflict: My Sony vaio laptop no longer connects to WiFi automatically on startup. I can’t turn WiFi on via the windows network & sharing centre but I can if I head to the viao smart Center and advanced settings. I’ve triple checked that those settings are configured to start… -
Windows 10 conflict
in Windows 10 Software and Apps
Windows 10 conflict: My Sony vaio laptop no longer connects to WiFi automatically on startup. I can’t turn WiFi on via the windows network & sharing centre but I can if I head to the viao smart Center and advanced settings. I’ve triple checked that those settings are configured to start… -
Windows 10 conflict
in Windows 10 Network and Sharing
Windows 10 conflict: My Sony vaio laptop no longer connects to WiFi automatically on startup. I can’t turn WiFi on via the windows network & sharing centre but I can if I head to the viao smart Center and advanced settings. I’ve triple checked that those settings are configured to start… -
Windows 10 — bluetooth / hdmi conflict
in Windows 10 Drivers and Hardware
Windows 10 — bluetooth / hdmi conflict: I have my TV setup to run off of a Windows 10 box for streaming, etc. Periodically I will use bluetooth headphones instead of the TV speakers. Until recently I could just turn off the bluetooth headphones and the sound would automatically re-route to the TV via a display to… -
Windows 10 Headset AND Webcam Conflict
in Windows 10 Drivers and Hardware
Windows 10 Headset AND Webcam Conflict: I have Windows 10, circa 9/2020. I need to have both a Logitech headset and a Microsoft webcam/mic plugged in as I alternate between them for different contexts. One always stops functioning after I use the other. After a miserable two hours, my webcam camera is functioning… -
Network conflict
in Windows 10 Network and Sharing
Network conflict: Windows 10 has detected an IP address conflicthttps://answers.microsoft.com/en-us/windows/forum/all/network-conflict/53f944f5-7318-476d-9085-aba3bc17be3a
-
Conflicting stuff with Windows 10
in Windows 10 Support
Conflicting stuff with Windows 10: This morning I observed on my Windows 10 desktop that the Wi-Fi icon replaced by a mini airplane. The pop-up said that internet is not connected. However I can browse the internet and in fact I registered for this TenForums site. This is simply crazy!!!!*Mad. I have only…
Users found this page by searching for:
-
system mechanic will not update
The Microsoft company has already started the gradual distribution of May 2020 Update for Windows 10. It contains many changes and new features designed to improve the performance of computers and laptops. This is the ninth major system update and the first one in 2020.
Microsoft completed the update development earlier than usual, which allowed them to devote more time to testing and finding solutions to the problems discovered. As a result, version 2004 contains impactful code changes. This means potential compatibility issues, problems with drivers, unexpected errors, etc.
Since May 2020 Update requires a reinstallation of the system, there may arise problems that aren’t related specifically to this version. Typically, the update process may fail due to storage problems, incompatible programs, damaged or outdated drivers, custom component configurations, and component performance issues. In this guide, we will talk about some of the known problems and their possible solutions.
Guide to troubleshooting when installing Windows 10 May 2020 Update
When a new version of Windows 10 comes out, two types of problems can emerge. You may encounter known errors that occur during and after the update installation. These are problems with activation, storage, and functionality. These problems are not necessarily related to or caused by the 2004 version.
However, you may also encounter problems that arise specifically due to bugs in this update. These may be related to drivers, incompatibility with an application, or third-party antiviruses.
This article describes both types of problems, including ones that may arise during and after the installation which you performed utilizing Windows Update, Update Assistant, and Media Creation Tool.
How to fix Windows Update issues when installing May 2020 Update
Windows Update is the recommended tool for installing updates. However, this mechanism isn’t perfect and sometimes errors occur, preventing the update from being installed.
Guide to troubleshooting unexpected errors in Windows Update
If Windows Update does not work, you can use the troubleshooter to fix the most common errors.
Here’s a step-by-step manual to fix the download problems with the 2004 update using the troubleshooting tool:
- Launch the Settings application.
- Open Update and Security.
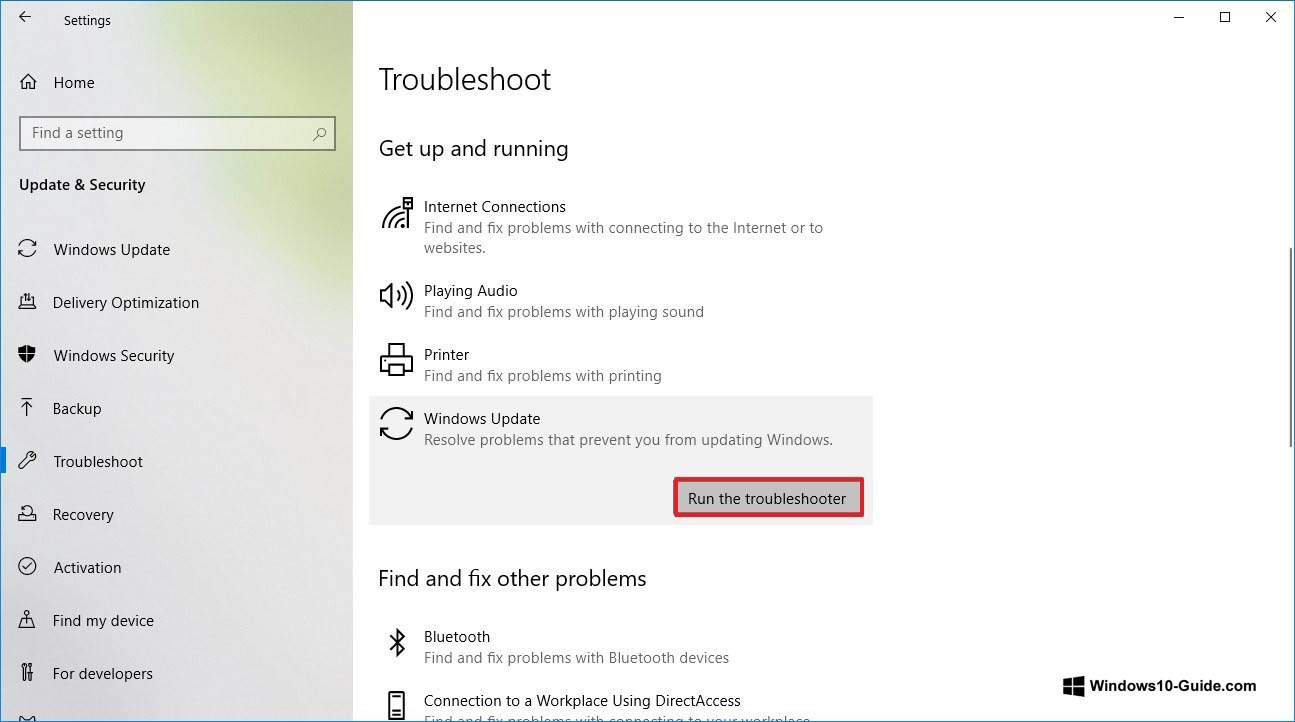
- Click Troubleshoot.
- In the “Troubleshoot – Get up and running” section, select “Windows Update”.
- Click on the “Run the troubleshooter” button.

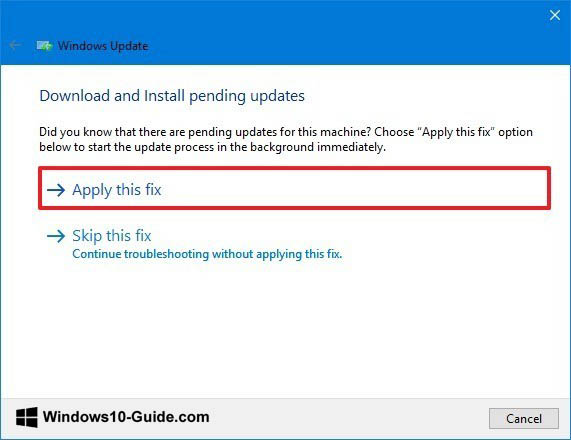
- Click “Apply this fix”, if such a button appears.

Note: if you don’t see the “Apply this fix” button, it is nothing abnormal. The tool will apply the fix automatically. If user approval is required, you will see the corresponding option.
- Continue following the instructions that pop up on your screen.
- Reboot your computer.
After you have done all this, Windows Update should download and install the May 2020 Update.
If you get error 0xc1900223, there are problems with downloading the update, and you cannot do anything about it. Later, the update center will try to download it again.
Quick guide to fixing Error 0x80073712 when using Windows Update
If you encounter error 0x80073712 while updating to Windows 10 2004, one or more of the necessary files are missing or damaged.
Solving this problem is possible employing the DISM command-line tool (which stands for Deployment Servicing and Management). It allows you to restore system files.
- Click on the “Start” button.
- Type cmd, then right-click and select Run as Administrator.
- Type the following command and press enter:

dism /Online /Cleanup-image /Restorehealth
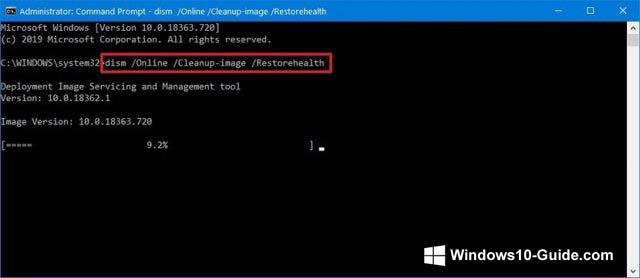
After this, the necessary files will be restored and Windows Update will be able to download and install the update.
Fixing Error 0x800F0922 when using Update Center
Error 0x800F0922 pops up when Windows Update isn’t able to connect to a Microsoft server or when the System Reserved section is lacking the necessary amount of free space.
Turning off the VPN
Error 0x800F0922 may indicate that you have a VPN connection enabled.
Disabling the VPN will solve this problem. Here’s a manual on how to turn it off:
- Click on the network icon in the taskbar.
- Select the VPN connection.
- Turn it off by clicking on the corresponding button.

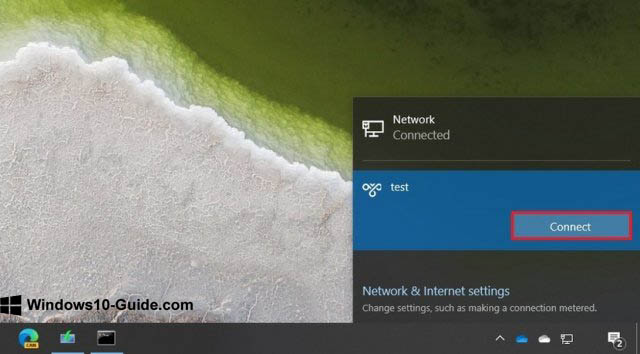
This fix will work if you utilize the VPN settings in Windows 10. If you make use of a separate, third-party application, check its documentation to find out how to turn off the VPN connection.
Changing the size of the System Reserved partition
If third-party security applications – for example, antiviruses – store their data in the System Reserved section, there is a likelihood that the Windows 10 update will not be able to install on your computer.
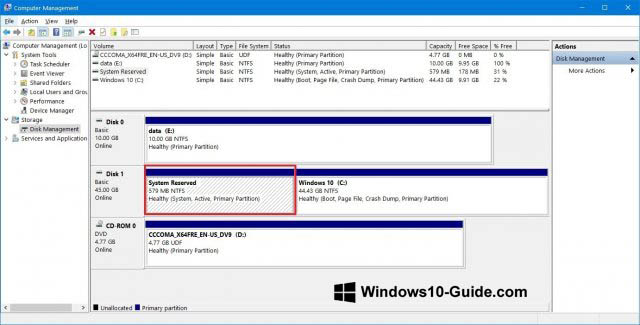
When this happens, the solution is to resort to third-party applications to adjust the size of the partition reserved for the needs of the system. This partition must not be less than 500 MB. Alternatively, you can perform a clean install of Windows 10 2004. This approach solves not only the partition size problem but also all other issues, which ultimately increases the productivity of your device.
Guide to fixing issues with Media Creation Tool when installing May 2020 Update
Media Creation Tool is a utility designed primarily for performing clean installations and updates of Windows 10. But if you choose to use this tool, you may also encounter problems at the beginning of the May 2020 Update distribution.
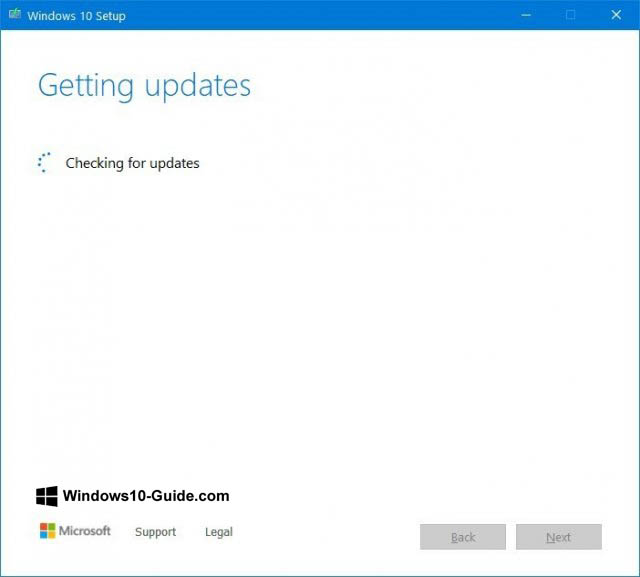
Fixing the freezing of the update download in Media Creation Tool
When performing an update, Media Creation Tool downloads the installation files of Windows 10, as well as additional updates. The downloading of additional updates may freeze, which will prevent the utility from installing version 2004.
If the download has been frozen for a long while, you can try the following solution:
- Close the window by pressing the corresponding button.
- Launch the Media Creation Tool again.
- Follow the instructions that show up on your screen.
- When the download of the installation files is completed, plug out the network cable or disconnect your computer from the Wi-Fi network.

Once you complete these steps and the update download timeout expires, the installation process will continue. Next, Windows Update will install all remaining updates.
Media Creation Tool does not start installing the update
If the files are downloaded but their installation does not start, you need to perform a manual launch of the process.
- Open File Explorer.
- Go to: C:\$Windows.~BT\Sources
- Double-click on the file named Setupprep.exe.

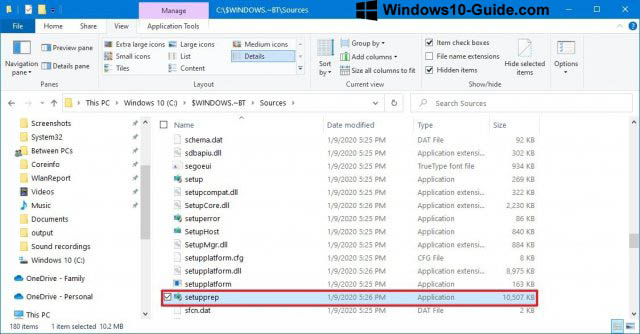
After doing these steps, you will be able to continue the installation process of May 2020 Update.
If problems remain, you can use Update Assistant to update your PC.
Brief manual for fixing problems when installing May 2020 Update from a USB drive
When the installation from a USB media fails, it may mean that the necessary files are corrupted or missing. The problem is easy to fix using Media Creation Tool.
Here’s a manual for creating bootable USB media:
- Go to the Microsoft support site: https://www.microsoft.com/en-us/software-download/windows10
- Click “Download tool now” after getting acquainted with the section “Use the tool to create installation media”.
- Save the installation file to your computer.
- Double-click on the file named MediaCreationTool2004.exe to start the installation process.
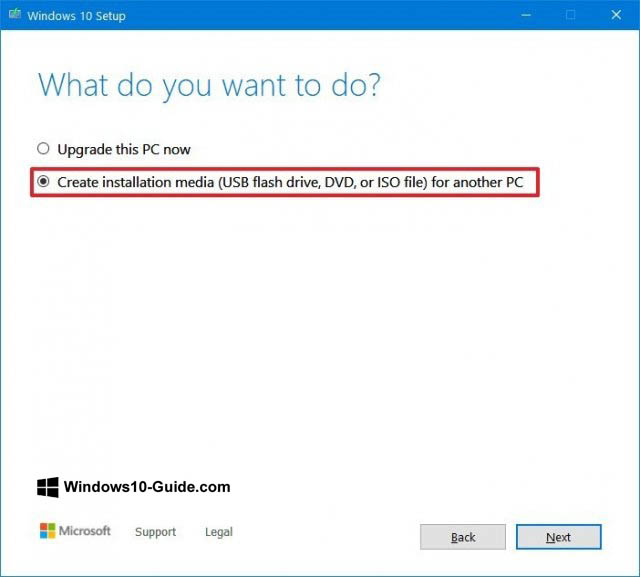
- Click on the “Accept” button.
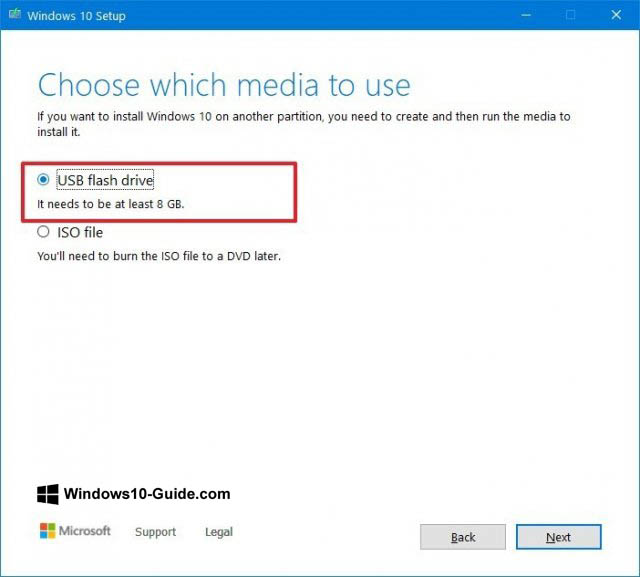
- Select the option “Create installation media (USB flash drive, DVD, or ISO file) for another PC”.
- Click “Next”.
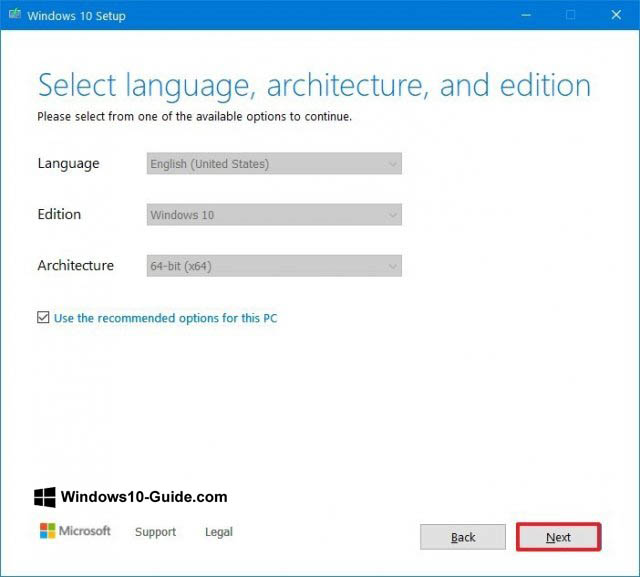
- Select the language, processor architecture, and edition of Windows 10, if they differ from the default options.
- Click “Next”.
- Select “USB flash drive”.
- Click “Next”.
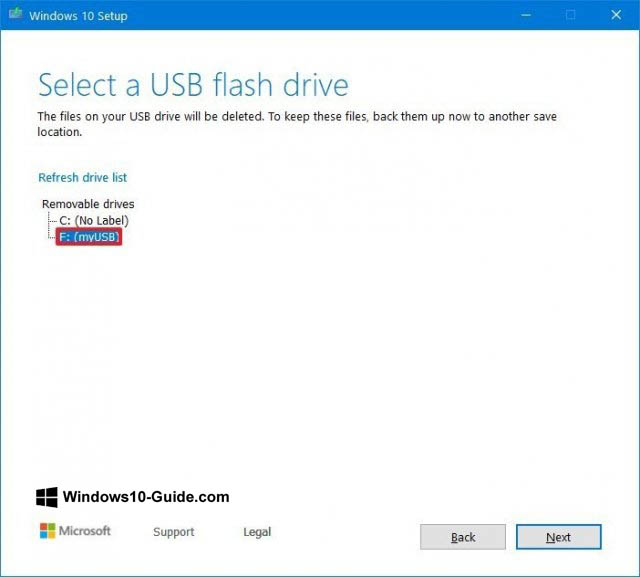
- Select a removable disk from the list.
- Click “Next”.
- Click “Finish”.
As a result of these actions, you will have an installation media with updated files.
If your attempts to install from this media fails again, try recreating the above steps one more time, but on a different computer. Or use a different application – for example, Rufus – to create the installation media.
Guide to fixing installation problem with May 2020 Update
If the process of updating your system to Windows 10 May 2020 Update has begun, various errors may arise throughout its duration. They can be caused by different problems.
Troubleshooting errors 0x8007042B 0x4000D and 0x800700B7 0x2000A
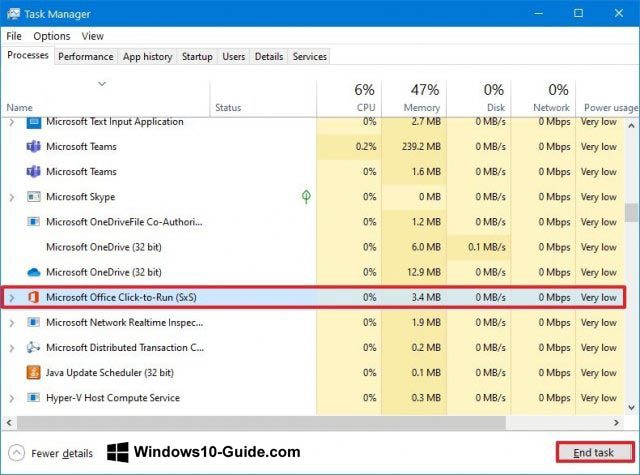
These errors indicate that another process is currently running in the background. Typically, these are applications and services from the startup program group (such as system processes), third-party antivirus, and desktop applications.
You can use the task manager to shut down these processes and applications.
- Click on the “Start” button.
- Enter “task manager” into the search box and click on the top result.
- Click on the “Details” button.
- Select the application.
- Click on the “End task” button.

- Do this for all applications and services that interfere with installation.
After following this manual, launch the update installation again.
As an alternative, you can also perform a clean installation of Windows 10 or temporarily uninstall the interfering programs.
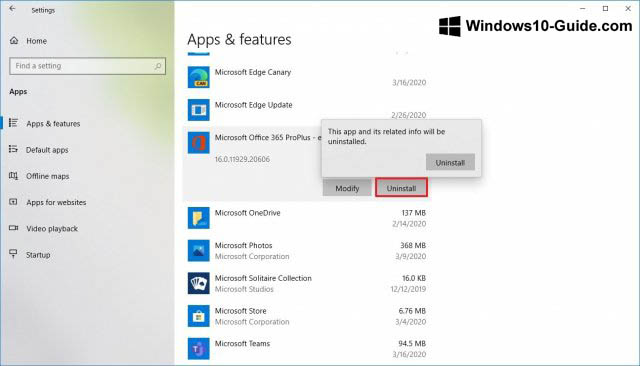
To uninstall the programs:
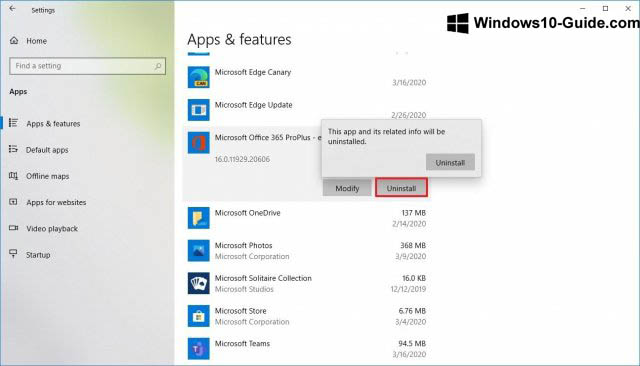
- Open the Settings app.
- Go to the Apps section.
- In the “Apps and features” section, select the interfering application.
- Click on the “Uninstall” button.

- Follow the instructions appearing on your screen.
After this, errors 0x8007042B 0x4000D and 0x800700B7 0x2000A should stop appearing and you will be able to complete the installation of the version 2004 update.
How to fix Error 0xC1900107
Error 0xC1900107 means that the device has recently been updated to a new version. However, the installation files were not deleted, and now they interfere with the next update.
As a rule, restarting the computer helps to resolve this issue. However, if the error continues to appear, use the “Storage Sense” option.
- Open the “Settings” app.
- Go to the “System” section.
- Go to the “Storage” subsection.
- Click “Configure Storage Sense or run it now”.

- In the section “Free up space now”, check the box for “Delete previous versions of Windows”.
- Click on the “Clear now” button.
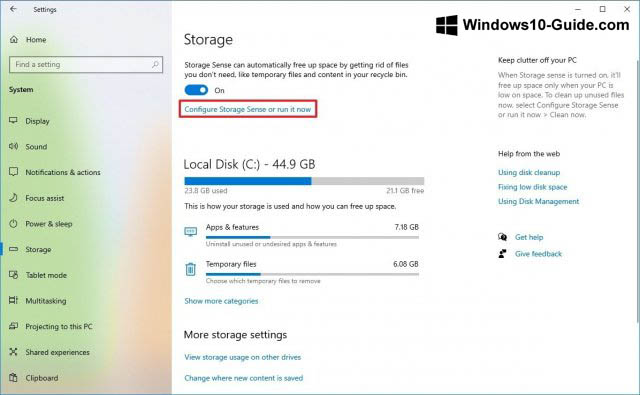
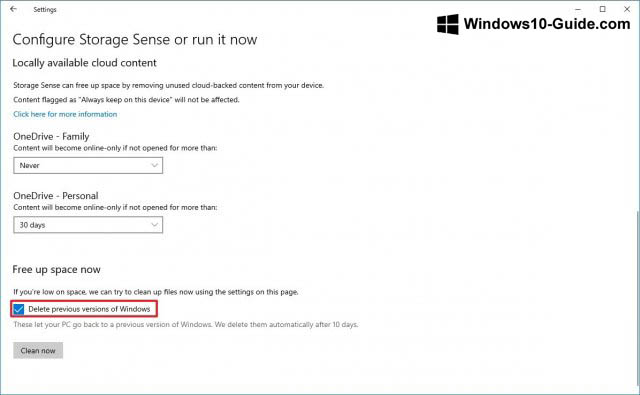
After these actions, the previous installation files will be deleted and Error 0xC1900107 will no longer appear.
How to fix problems during the completion of the Windows installation
Whether you are trying to install a major Windows 10 update or cumulative updates, the following two errors may appear:
Error: We couldn’t complete the updates. Undoing changes. Don’t turn off your computer.
Error: Failure configuring Windows Updates. Reverting changes.
Before looking for a solution, you need to determine the code of the error. To this end, you need to follow this manual:
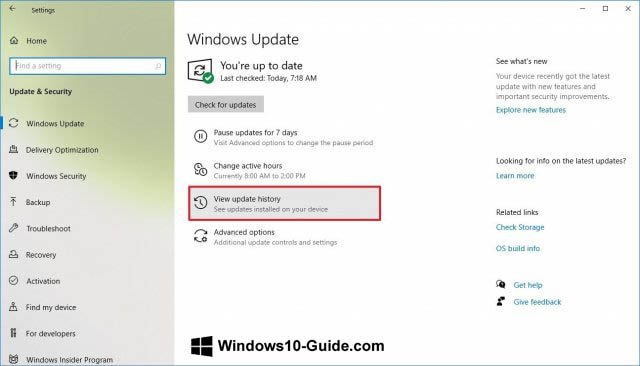
- Launch the Settings application.
- Go to the “Update and Security” section.
- Open the “Windows Update” subsection.
- Click “View update history”.
- Look at the error code that is indicated next to the update that failed to install.

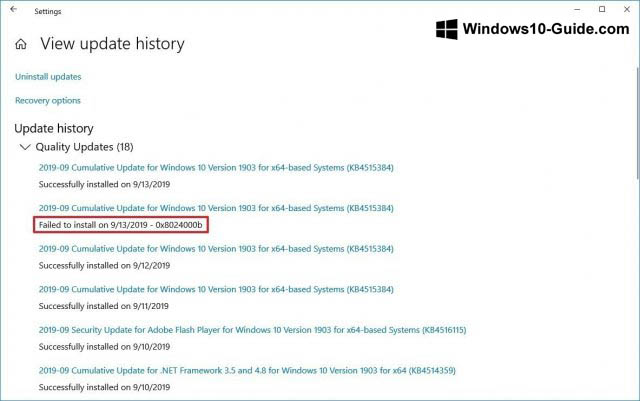
After that, use this error code to look for a solution on the Internet. You can also check the Windows 10 update log page https://support.microsoft.com/en-us/help/4498140/windows-10-update-history. On this page, you can see what problems the update has, as well as troubleshooting suggestions.
Brief guide to fixing Windows installation issues
If you get the message “Error: The update doesn’t apply to your computer”, this means your device does not have the updates that are necessary to install version 2004.
- Launch the “Settings” app.
- Go to the “Update and Security” section.
- The “Windows Update” subsection will unfold on your screen.
- Click on “Check for updates”.
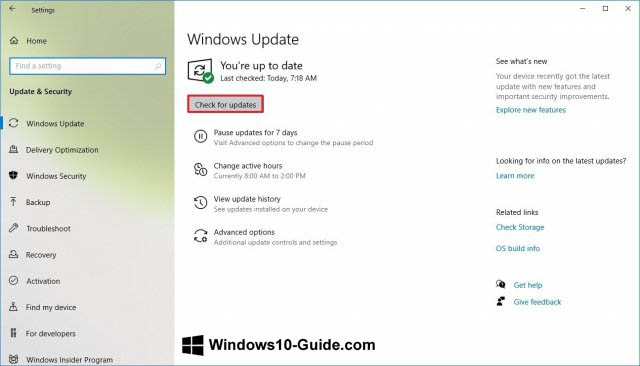
After obtaining the necessary updates, you will be able to upgrade your system to May 2020 Update using any supported method.
Troubleshooting Error 0x80200056
Error 0x80200056 is not critical. It means an accidental reboot was performed when the update was in progress. To fix it, you simply need to restart the installation of the update.
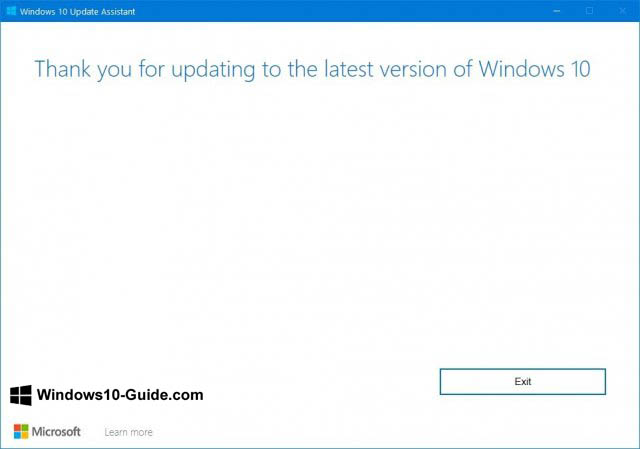
Solutions for problems that occur when installing May 2020 Update through Update Assistant
In addition to Windows Update and Media Creation Tool, Microsoft provides one more tool called Update Assistant, which can be used to force the installation of updates. There may also be errors.
If there are problems like freezes when downloading update files, it may be related to network activity. To fix such problems, follow this step-by-step manual:
- Disconnect the device from the network. You need to plug out the cable or turn off the Wi-Fi. After that, wait a minute and re-establish the connection to the network, then restart Update Assistant.

- Reboot the device and restart Update Assistant.
- Re-download Update Assistant.
- If the problems persist, use Media Creation Tool to update.
How to fix storage problems when installing May 2020 Update
Although Windows 10 has the Reserved Storage function for storing temporary files, you may still encounter errors related to disk space:
- 0x80070070 – 0x50011
- 0x80070070 – 0x50012
- 0x80070070 – 0x60000
On a 32-bit version of Windows 10, you need 16 GB of disk space to install updates. A 64-bit version requires 20 GB. If there is not enough space, you won’t be able to install the update.
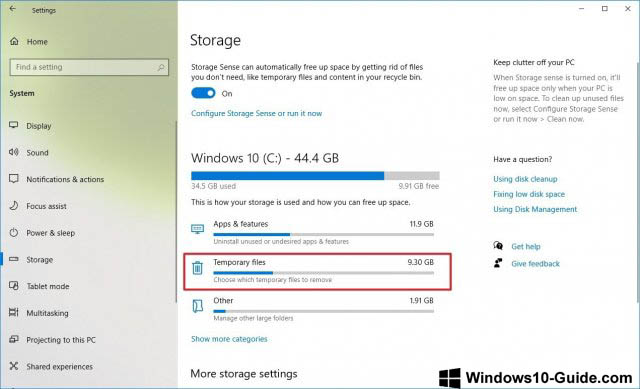
- Open the Settings app.
- Go to the “System” section.
- Open the “Storage” subsection.
- Under the description of the system partition, click on “Temporary files”.

- Select objects to delete.
Hint: Do not select “Temporary Windows installation files” or “Windows ESD installation files”. These files are needed for updating.
- Click on the button “Remove files”.
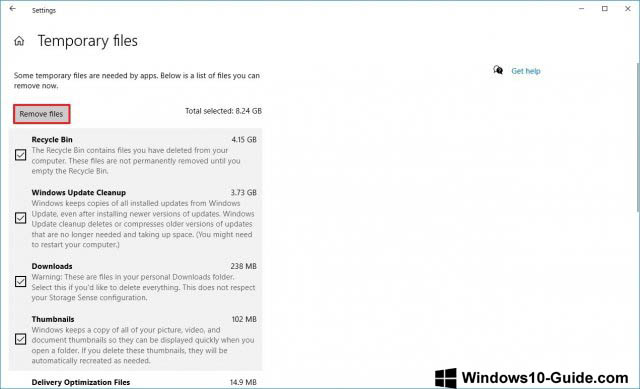
After these steps, version 2004 should install without a hitch. If there is still not enough free space, you can use external storage, such as a hard disk or flash drive with no less than 16 GB. You can put the temporary installation files there.
Guide to fixing hardware and software incompatibility issues when installing May 2020 Update
Hardware and software incompatibilities can block the update process. In this case, you must find the source of incompatibility and eliminate it.
Error 0x80070002 0x20009
If you’re updating from an older version of Windows 10 to May 2020 Update, you may encounter error 0x80070002 0x20009. This means that certain files were not found.
This is another common problem with updating to the new version of Windows 10. You can solve it by disconnecting auxiliary disks, including flash drives. After disconnecting the peripherals, restart the installation process.
Error 0xC1900101
When trying to install version 2004 or another update, you may encounter errors 0xC1900101 and 0x80090011. They indicate a driver problem. The error codes are as follows:
- 0xC1900101 – 0x2000c
- 0xC1900101 – 0x20017
- 0xC1900101 – 0x30017
- 0xC1900101 – 0x30018
- 0xC1900101 – 0x3000D
- 0xC1900101 – 0x4000D
- 0xC1900101 – 0x40017
Disconnect peripherals
To minimize possible errors, it is necessary to disconnect all peripheral devices, such as external hard drives, printers, Bluetooth and USB devices, cameras, and others.
After installation, you can reconnect them to your computer.
Updating drivers
Updating the drivers of your devices to the latest versions can fix the errors. To check for driver updates on Windows 10, do the following:
Important note: if you acquire updates on the website of the device manufacturer, skip the steps below.
- Click the Start button.
- Enter “device manager” and run it.
- Expand the problematic device, which is usually marked with a yellow exclamation mark.
- Right-click on the device and select “Update driver”.

- If you have already downloaded the driver to your computer, select the option “Browse my computer for driver software”. Or you can click “Search automatically for updated driver software.”

- Click the Browse button.
- Specify the location with the unpacked driver files.
- Click “Next”.
- Follow the instructions you see on your screen.
After you update the drivers, the errors 0xC1900101 and 0x80090011 should no longer appear.
Storage optimization
If you encounter Error 0xC1900101, you can resort to the storage settings, delete unnecessary applications and games, transfer some files to another partition or another storage to free up disk space.
Installation repair
Error 0xC1900101 may indicate problems with the current installation of Windows that prevent you from updating the system.
This error can be fixed using the command line utilities Deployment Servicing and Management (DISM) and System File Checker (SFC).
Clean installation
If the error persists, use Media Creation Tool to perform a clean installation of Windows 10.
Guide to troubleshooting hardware errors 0xC1900200, 0xC1900202, 0x80300024
If Windows 10 is already installed on your computer, you are not likely to see these errors. But if errors 0xC1900200 – 0x20008, 0xC1900202 – 0x20008 or 0x80300024 appear, it means your device does not meet the minimum system requirements.
These requirements are as follows:
| Processor | 1 GHz |
| RAM | 2 GB for 32-bit and 64-bit |
| Storage | 16 GB of disk space for the 32-bit version and 20 GB for the 64-bit version |
| GPU | DirectX 9 or later with WDDM 1.0 |
| Display | 800 x 600 |
If you get one of these errors, you most likely need to upgrade the RAM.
Error 0x800F0923
Error 0x800F0923 means compatibility problems with a driver or application on the computer. When upgrading to a new version of Windows 10, this error usually indicates a problem with the video card driver, an outdated program, or an antivirus.
One of the ways to find the problem is to run Update Assistant or Media Creation Tool. During installation, if there are compatibility issues, these tools show the error in more detail.
If the problem is related to a driver, you need to install its latest version from the website of the device manufacturer. Download the beta version of the driver, if one is available. In the early days of a new Windows 10 version, manufacturers test their new drivers for compatibility with the updated software.
Uninstalling incompatible drivers
You can try completely deleting the drivers, installing the update, and then reinstalling the device, if possible.
To remove the problematic driver, follow this manual:
- Click on the “Start” button.
- Enter “device manager” into the search box and open it.
- Expand the problematic application.
- Right-click on the device and select “Uninstall device”.
- Press the “Uninstall” button again.
After uninstalling the driver, try completing the installation of May 2020 Update.
You may also encounter errors 0x80070490 – 0x20007, which indicate a driver incompatibility, and 0x80070003 – 0x20007, which stands for failure to install the update during driver installation.
If you see one of these errors, disconnect the problematic device, and try updating again.
Error 0xC1900208
While updating to version 2004, you may encounter error 0xC1900208 – 0x4000C. This may mean an application installed on the computer is incompatible. Typically, it is an old desktop program or a third-party antivirus.
To remove incompatible applications, follow this manual:
- Open the Settings app.
- Go to the “Apps” section.
- The subsection “Apps and features” will open up on your screen.
- Select the incompatible application.
- Click on the “Uninstall” button.
- Click on the “Uninstall” button again.
- Follow the instructions that appear on your screen.
Repeat these steps to remove all conflicting applications.
Guide to fixing errors after installing May 2020 Update
Even if the installation of Windows 10 2004 has been completed successfully, problems still may arise later on. You may encounter a black screen, as well as connectivity and activation issues.
Fixing the black screen issue after updating
It is quite common to encounter the black screen issue during and after the update installation. This usually indicates a problem with the graphics driver or hardware components or incorrect installation of the new version.
The easiest way is to fix this issue is to remove May 2020 Update from the computer using the advanced startup options:
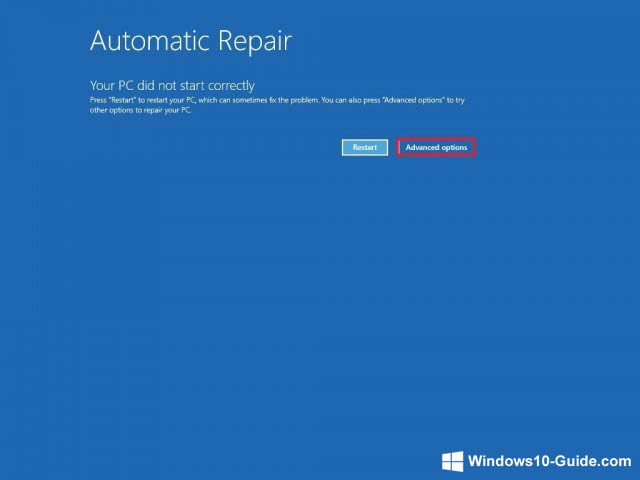
- Turn on the computer.
- When the Windows logo appears on the screen, press the power button.
- Repeat the first two steps two more times.
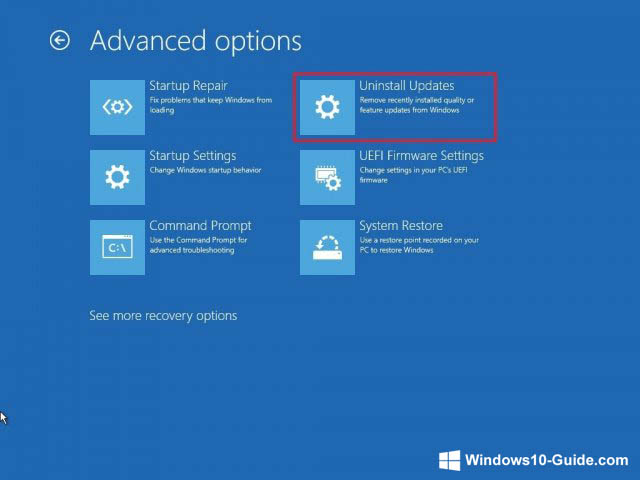
- Click on the “Advanced options” button.

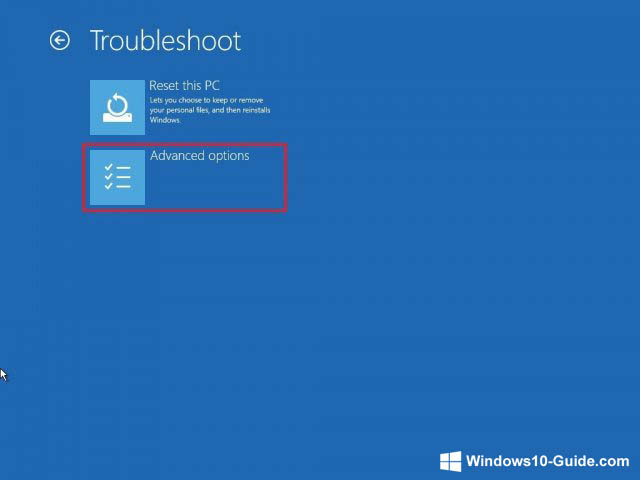
- In the advanced startup settings window, select “Troubleshoot”.
- Click “Advanced options.”
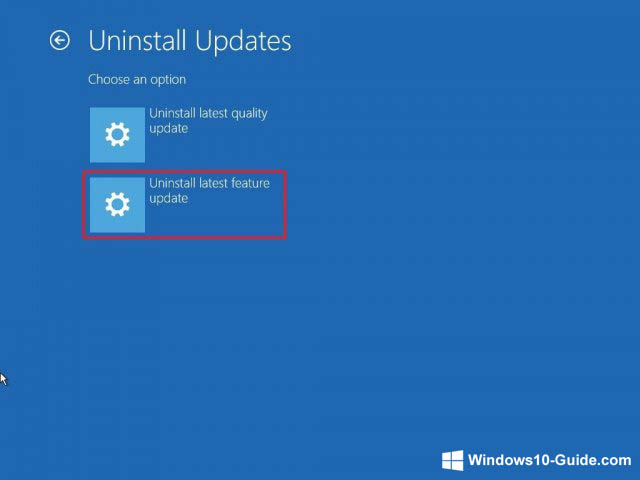
- Select “Uninstall Updates”.
- Click “Uninstall latest feature update”.
- Log in to your Windows 10 account.
- Click “Uninstall update”.
After you perform these steps, Windows 10 2004 will be uninstalled. Your computer will revert to the previous version, and the black screen issue will be solved. It is recommended that you do not re-install the update until a patch is released.
Guide to fixing network problems after updating
After installing Windows 10 May 2020 Update, there is a chance that you will encounter network problems, such as a slow wireless connection, disconnects, inability to connect to the network, or an inaccessible network adapter.
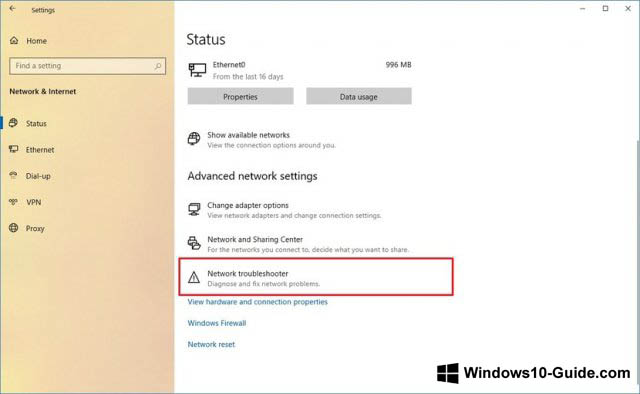
To fix network adapter problems, follow this manual:
- Open the Settings app.
- Go to the “Network and Internet” section.
- The “Status” subsection will open up in the window.
- Under the heading “Advanced network settings”, click on “Network troubleshooter.”

- Follow the instructions displayed on your screen.

After you perform these steps, the above-described network problems should be eliminated.
Resetting network adapters
If the problem persists, you can try resetting the network stack, which will remove, reinstall, and set the settings to default, solving the problem.
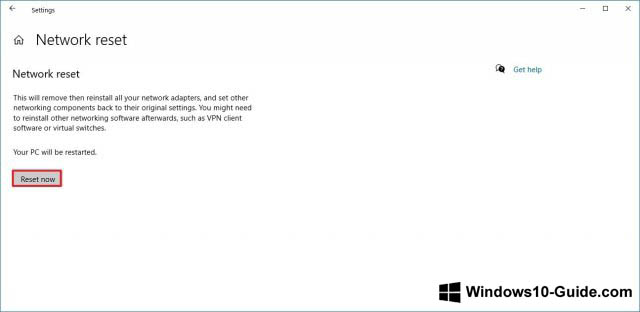
To reset Wi-Fi and wired adapters after updating to version 2004, do the following:
- Open the Settings app.
- Go to the “Network and Internet” section.
- The “Status” subsection will unfold in the window.
- Under the heading “Advanced network settings”, click on the link “Network reset”.
- Click “Reset now”.
- Click on the “Yes” button.

After completing these steps, Windows 10 will remove and reinstall all network adapters. The settings will be reset to factory defaults, which may solve the connection problems.
If the network problems persist, there can be many causes, including problems with the adapter, drivers, settings, signal, cable, router, provider, and Windows 10 2004 itself.
Solving activation issues after updating
On Windows 10, when you have already activated the system, re-activation occurs automatically after updating or even a clean installation. The user is not required to enter the license key again. But sometimes the re-activation fails to work and you get the message “Windows is not activated” with Error 0x803F7001 on the activation settings page.
In this case, you just need to wait. Later, Windows 10 should activate automatically. If several days have passed and activation still hasn’t taken place, you can use the activation troubleshooter.
Guide to minimizing problems when updating to Windows 10 May 2020 Update
Windows 10 is installed on thousands of hardware and software configurations. The development of such a system is a very complex process, so there is always a chance to encounter problems during or after updating.
But if you properly prepare before installing the update, the probability of encountering problems can be minimized.
Backup
Backing up your computer is one of the best ways to prepare for the update. The Windows 10 installation process features all the security mechanisms that allow for restoring a previous installation in case of problems. But this mechanism does not always work as intended.
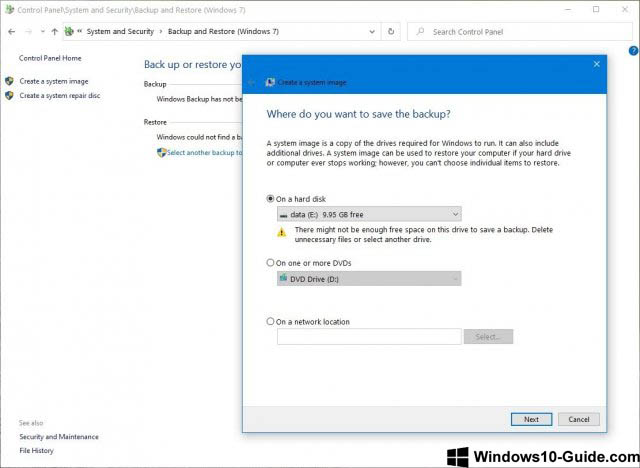
Before clicking on the “Install” button, create a temporary backup. To this end, you can use third-party applications or the tool for creating system images in Windows 10.
In addition to backing up the operating system, it is recommended that you copy your files to an external hard drive or cloud storage.
Deleting unnecessary applications
Desktop applications and third-party antivirus programs are often the reason for the inability to install an operating system update. It is recommended that you delete these applications before installing the update. Once the updating process is complete, you can reinstall them.
The process of uninstalling applications on a Windows 10 computer has already been described above.
Disabling security applications
In addition to uninstalling conflicting applications, you can remove third-party antivirus and other security applications. After updating Windows 10, you can reinstall them on your computer.
Windows Defender cannot be removed, but if the problem is caused by this component, but you can disable it.
Important: temporarily uninstalling and disabling security applications is not dangerous. However, you should never leave your device unprotected for a long time.
To temporarily disable Windows Defender, perform the following steps:
- Open the Settings app.
- Go to the “Update and Security” section.
- Open the “Windows Security” subsection.
- Click on “Virus and threat protection”.
- In this section, click on “Virus and threat protection settings”.
- Flip the switch “Real-time protection: into the “Off” position
After you perform these steps, the antivirus should no longer conflict with the update process. And once the installation is completed, Windows Defender will turn on automatically.
Freeing up disk space
If the amount of free disk space on your device is small, the update will not install. You need to free up disk space before proceeding with the update.
Removing unnecessary peripherals
Unnecessary peripheral devices often become the source of problems during an update. Before installing May 2020 Update, it’s better to disconnect all flash drives, memory cards, external hard drives, printers, scanners, Bluetooth devices, etc. from the computer. Disconnect the docking station from the laptop.
All that should remain is a mouse, keyboard, monitor, and internet connection. After installing the update, all peripheral devices can be reconnected.
Disabling the firewall
The firewall can cause problems if you have changed its default settings or use an application that is incompatible with Windows 10.
To disable a third-party firewall, read the developer’s instructions. If the problem is caused by the built-in Windows firewall, follow this manual to disable it:
- Open the Settings app.
- Go to the “Update and Security” section.
- Open the “Windows Security” subsection.
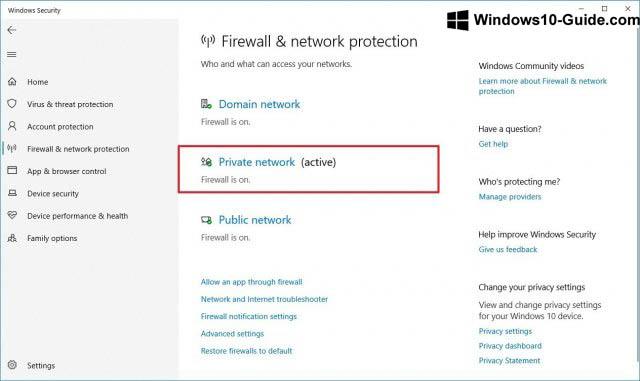
- Click on “Firewall and network protection”.
- Click on the active network.

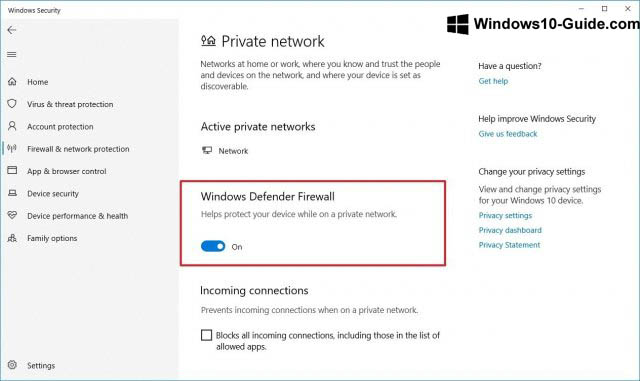
- Turn off Windows Defender Firewall.
After you disable the firewall, there should be no more problems with the installation of Windows 10 2004.
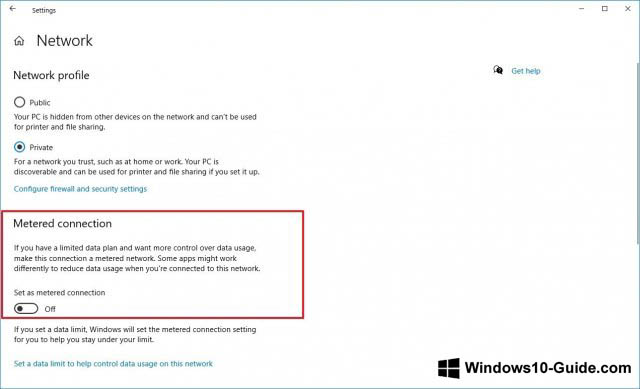
Disabling metered connections
If you configured your network connection as metered, Windows 10 2004 will not download. The update needs Internet access with unlimited traffic.
To disable the metered connection, you need to do the following:
- Open the Settings app.
- Go to the “Network and Internet” section.
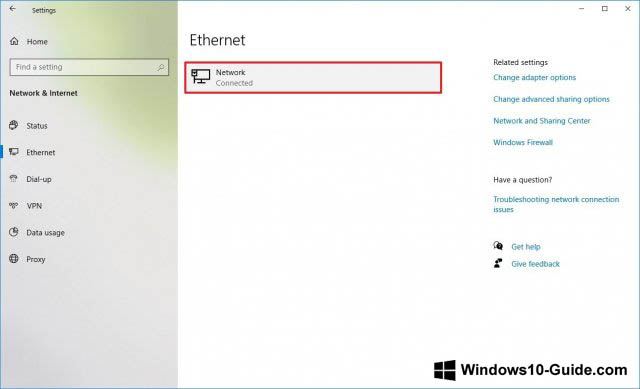
- Click on Wi-Fi or Ethernet.
- Select the active network connection.
- In the “Metered connection” section, turn off the switch “Set as metered connection”.
You can also create bootable USB media using another computer with a connection with unlimited traffic and then use the USB drive to update without access to the Internet.
Clean installation
If you want to minimize the probability of problems, the easiest way is to perform a clean installation of Windows 10. A clean installation will delete all the data on the current partition of the hard drive, allowing you to install the system without any bugs or issues.
If you want to perform a clean installation, you need to create a bootable USB flash drive using Media Creation Tool.
Concluding words
Microsoft is trying to maximize the system’s performance and simplify the process of transitioning to the next version of Windows 10. But its high complexity makes it nearly impossible to envisage all errors.
It is not recommended to install such major updates on your computer immediately after their release. They may contain unknown bugs and errors, causing problems on your device. It is preferable to wait until several cumulative updates have been released to make the system more stable.
(Image credit: Future)
Although Windows 10 updates are important to patch security vulnerabilities and improve system performance, it is a known fact that quality and feature updates can introduce unwanted problems.
Typically, one of the most common issues after installing an update is related to network connectivity. For example, slow speeds, unreliable or loss of connectivity using a wireless or wired connection resulting in problems accessing the internet and network resources, such as shared printers and folders.
Regardless of the reason, when a device cannot connect to the local network or internet after a recent update of Windows 10, there are many ways that Microsoft recommends to fix the issue.
This guide will walk you through several ways to resolve common network connection problems after installing an update on your device.
How to fix common network problems after update on Windows 10
If a quality update breaks the network connection, you can follow some basic troubleshooting steps to resolve the problem quickly.
Restart computer
Although it might be obvious, it’s not for everyone. Typically, a simple reboot can fix most common problems, including issues connecting to the network and the internet.
All the latest news, reviews, and guides for Windows and Xbox diehards.
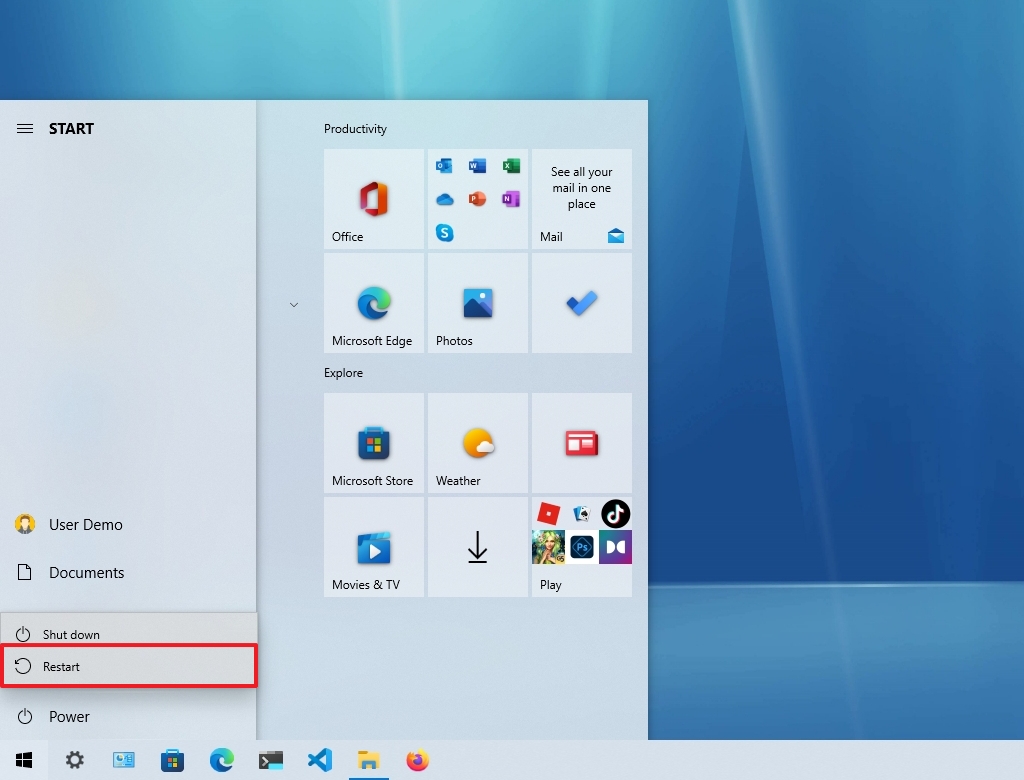
To restart a device, use these steps:
- Open Start.
- Click the Power option.
- Select the Restart option.
Once you complete the steps, open the web browser and confirm the internet is working, loading a website upon restart.
If the network icon in the notification area shows an active connection, but you cannot open a particular website, try to load a different site, as the problem could be with the website. You can also try using a different browser to confirm the problem is not the application.
Confirm network settings
The next step involves using command lines to confirm the problem is not something happening between the device and the router.
To check if the Windows 10 network configuration is working, use these steps:
- Open Start.
- Search for Command Prompt and click the top result to open the console.
- Type the following command to find out the IP address of the router and press Enter: ipconfig
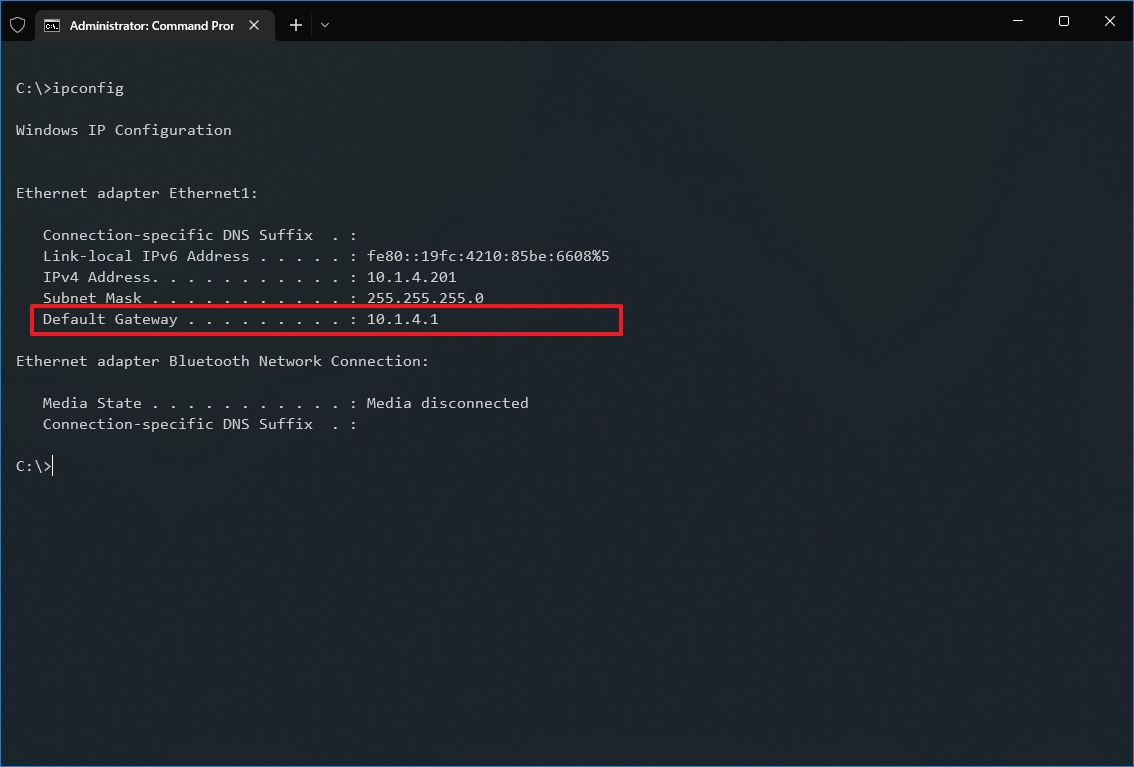
- Confirm the «Default Gateway» address that should be the address of the local router.
- Quick tip: In home networks, most routers use the 192.169.1.1 or 192.168.2.1 address. However, depending on the configuration or Internet Service Provider (ISP), the address might be different.
- Type the following command to determine if the router is reachable and press Enter: ping ROUTER-IP
This example tests the connection between the computer to the router with the 10.1.4.1 address: ping 10.1.4.1
In the command, remember to change the 10.1.4.1 for the router’s IP address
- Quick tip: You can also use the ping 127.0.0.1 command to test if the networking stack is installed correctly and working on the computer.
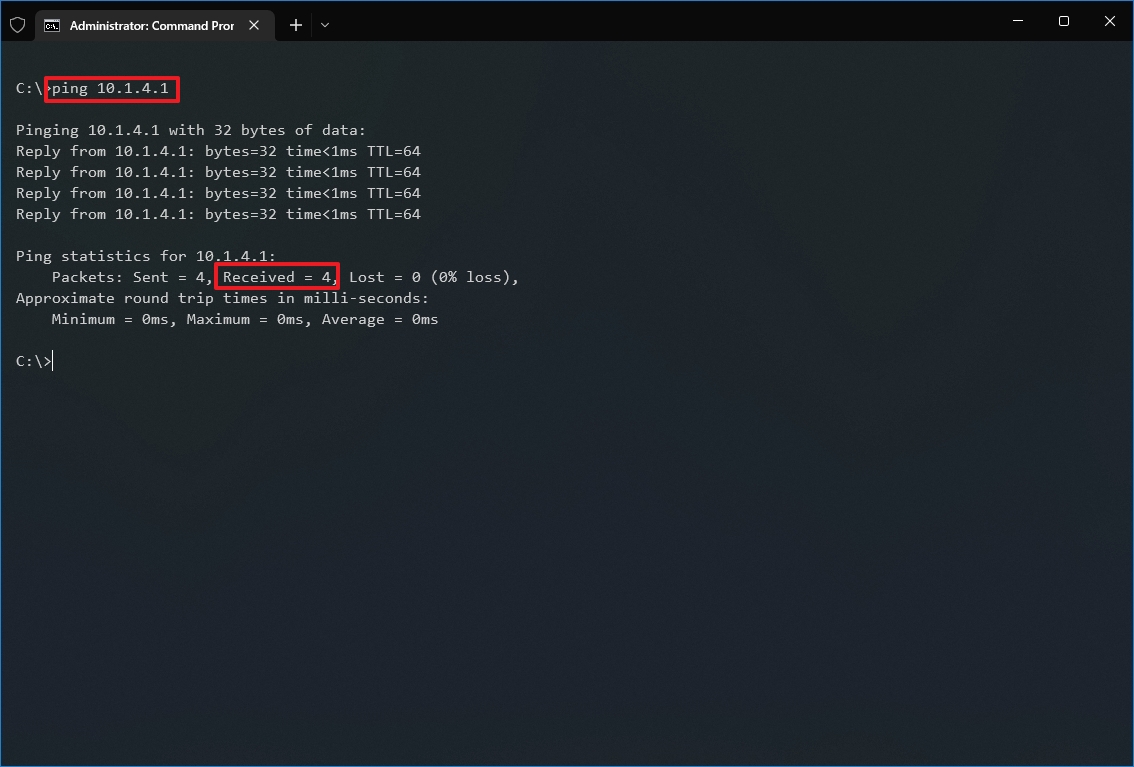
- Confirm successful replies without packet loss in the output.
After you complete the steps, if the «Packets» field returns with «4» successful replies, the router’s connection is working, indicating that the problem could lie in the connection between the router and ISP. Or it could be the case that the ISP is currently experiencing issues.
If you can access the internet from your phone or another computer connected to the same network, the problem could be the device in question.
Enable Wi-Fi interface
If there’s no connection to the internet, the wireless interface may not be disabled.
To check and enable a Wi-Fi interface, use these steps:
- Open Settings.
- Click on Network & Internet.
- Click on Wi-Fi.
- Turn on the Wi-Fi toggle switch.

Alternatively, you can also click the «Not connected» network icon from the taskbar notification area and click the Wi-Fi button.
If there is a physical button in the device, turn it on to enable the interface.
Reconnect Wi-Fi connection
On laptops, the problem could be the wireless adapter or signal, which you might be able to resolve by disconnecting and reconnecting to the network.
To reconnect to a Wi-Fi network, use these steps:
- Open Settings.
- Click on Network & Internet.
- Click on Wi-Fi.
- Quick tip: If the wireless section is missing, Windows 10 can no longer detect the network adapter, which could indicate a driver or hardware problem.
- Turn off the Wi-Fi toggle switch.
- Turn on the Wi-Fi toggle switch.
- Click the «Show available networks» option.
- Select the wireless network from the list.
- Click the Connect button.
- Quick tip: Almost all modern routers allow wireless connections using two band frequencies, including the 2.4GHz and 5GHz, which could appear as separate networks. If you see both networks, you can try connecting with a different frequency to see if that resolves the problem. You can use this guide to learn more ways to connect to a wireless network.
- Confirm the wireless password (if applicable).
- Click the Next button.
Once you complete the steps, you should be able to connect to the network and the internet.
You can also create a report of the wireless connection history, which can help diagnose the issue.
Re-enable network adapter
Sometimes updates can inadvertently change settings without the user’s consent. For instance, an update could disable the adapter or a specific feature, such as Airplane mode, blocking the connection to the internet.
If the network adapter is not present in the Settings app, it could be a driver problem, or the adapter may be disabled.
To check and enable a network adapter on Windows 10, use these steps:
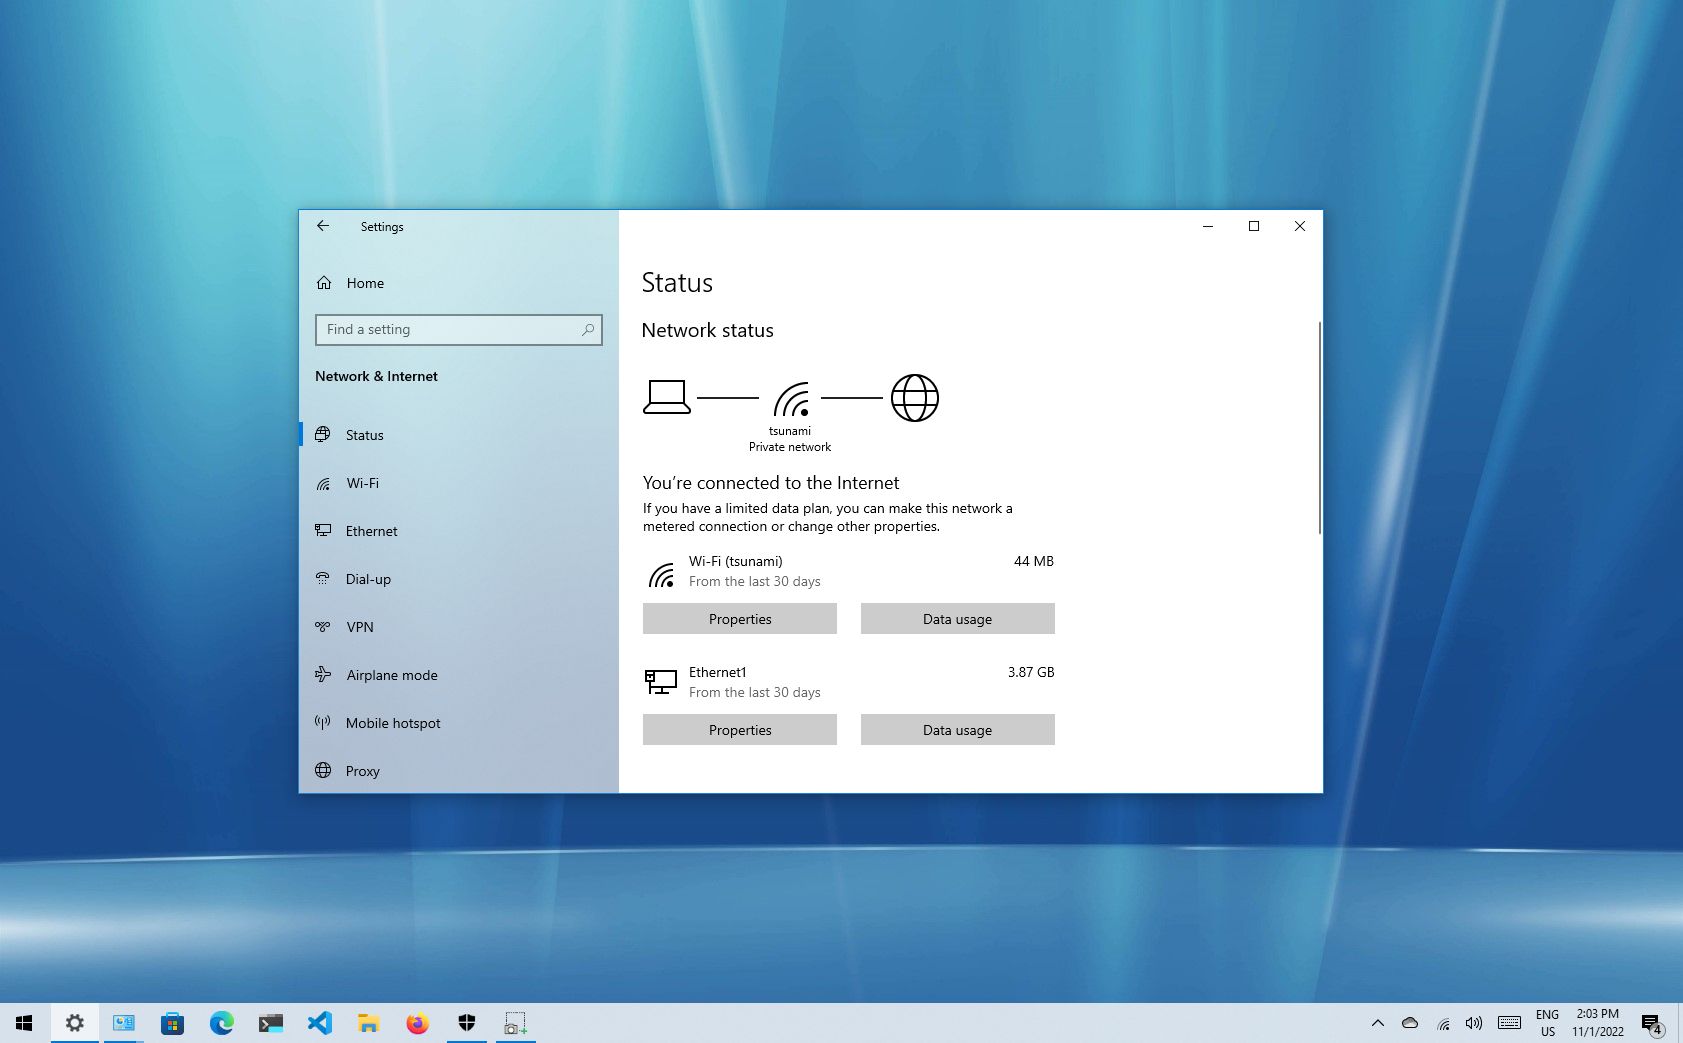
- Open Settings.
- Click on Network & Internet.
- Click on Status.
- Under the «Advanced network settings» section, click the «Change adapter options» option.

- Right-click the adapter and select the Enable option.
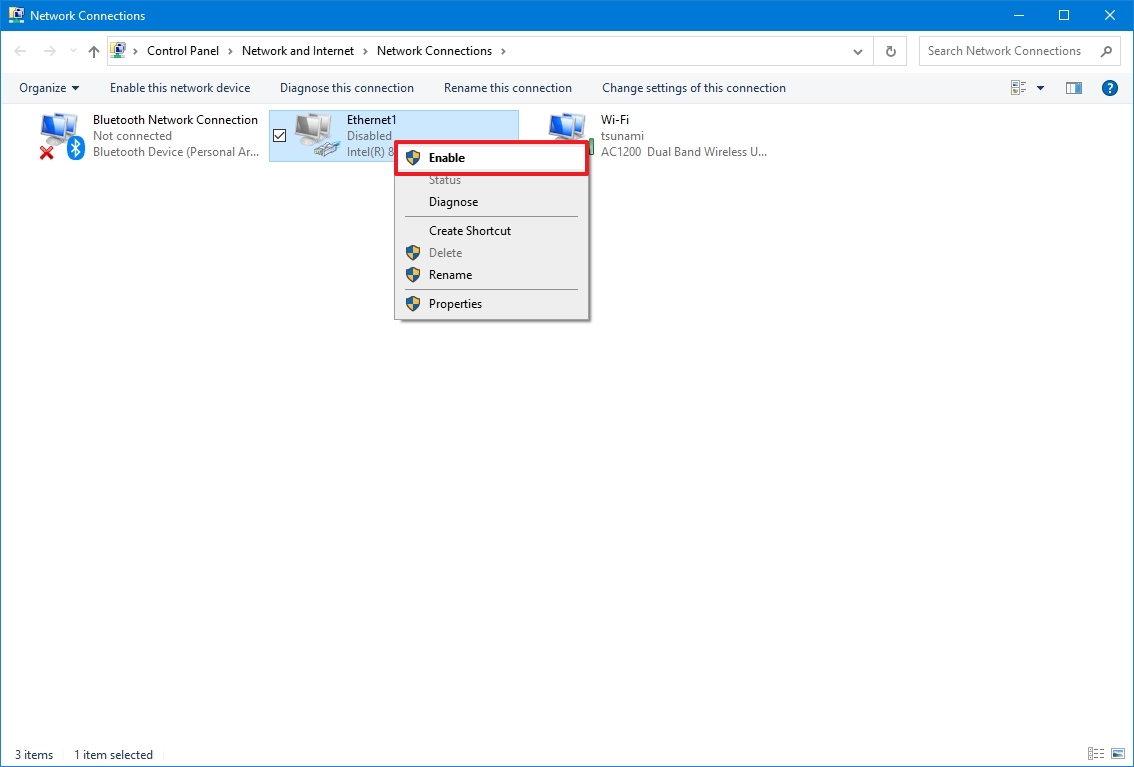
After you complete the steps, the Wi-Fi or Ethernet adapter will enable and reconfigure automatically.
Disable Airplane mode
If the «Airplane» mode is enabled, you won’t be able to connect to the network. In the case that the update turned on the feature automatically or you forgot it was enabled, you need to make sure to disable it.
To turn off Airplane mode on Windows 10, use these steps:
- Open Settings.
- Click on Network & Internet.
- Click on Airplane mode.
- Turn off the Airplane mode toggle switch.
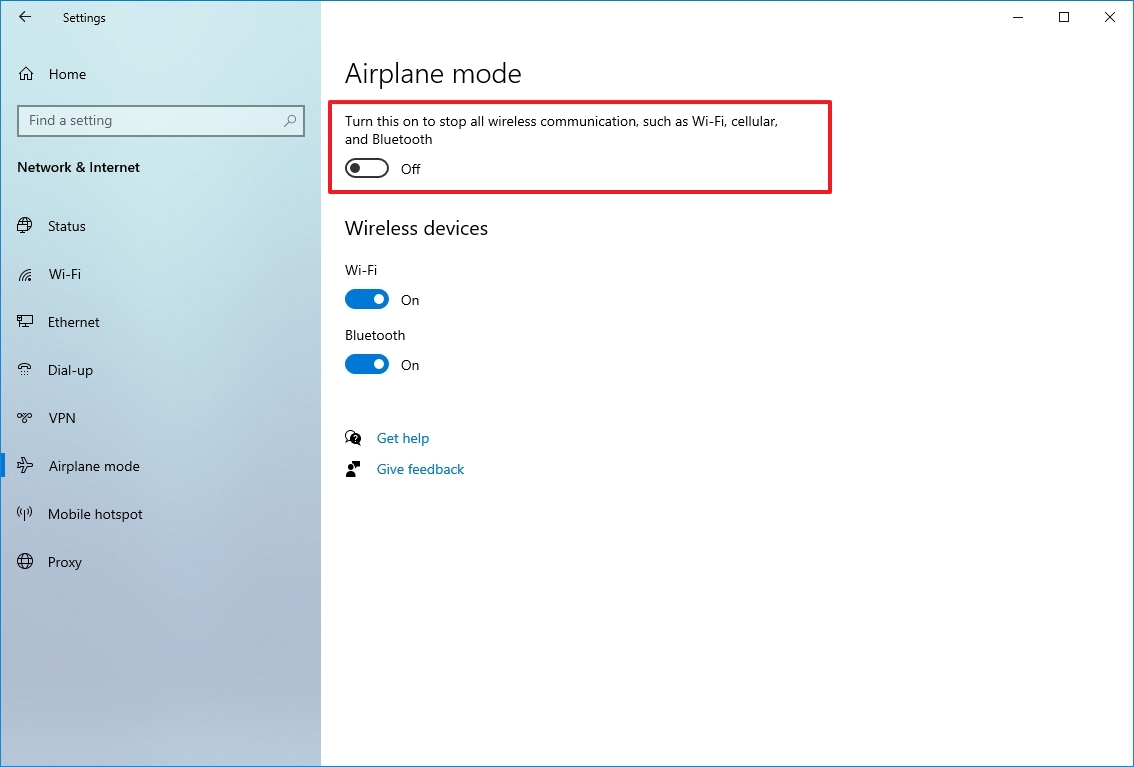
- (Optional) Restart your device.
Alternatively, you can also click the airplane icon in the taskbar and click the Airplane mode button.
Recreate Wi-Fi profile
Every time you connect to a wireless network, the credentials, security, and other settings will save into a profile. If you are having trouble connecting to a particular network, the profile could be a problem.
To fix this problem, you can delete and recreate the profile using these steps:
- Open Settings.
- Click on Network & Internet.
- Click on Wi-Fi.
- Under the «Wi-Fi» section, click the «Manage known networks» option.
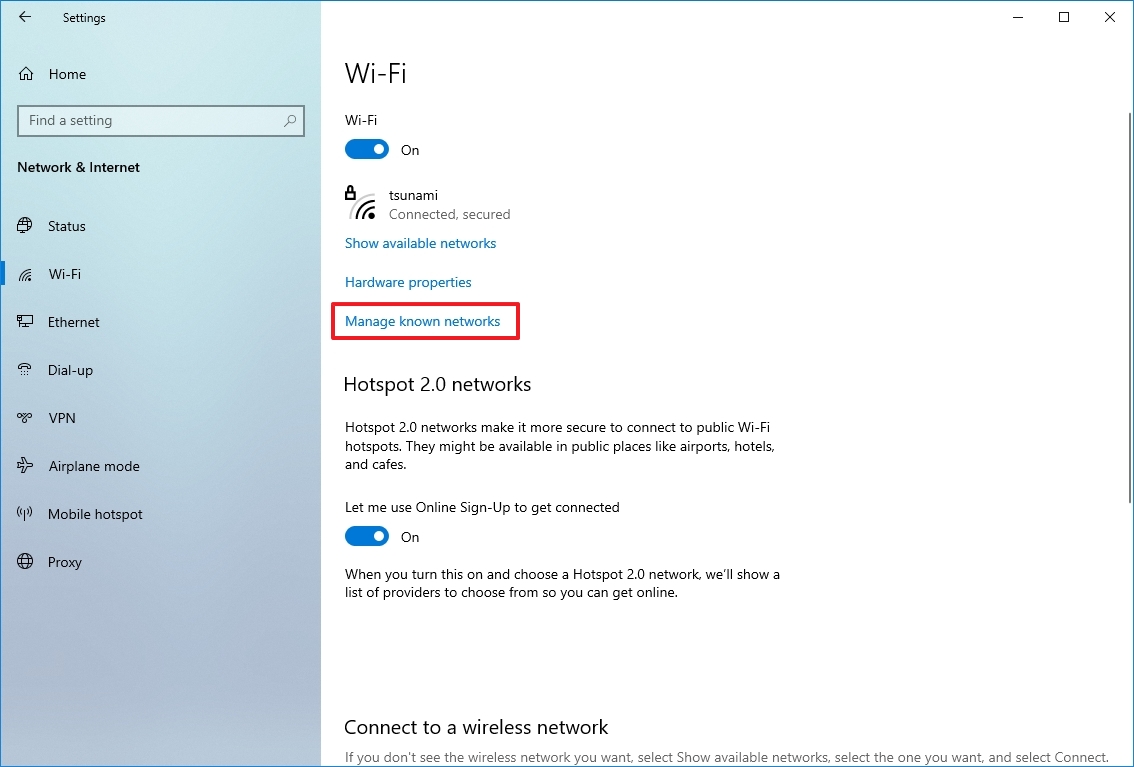
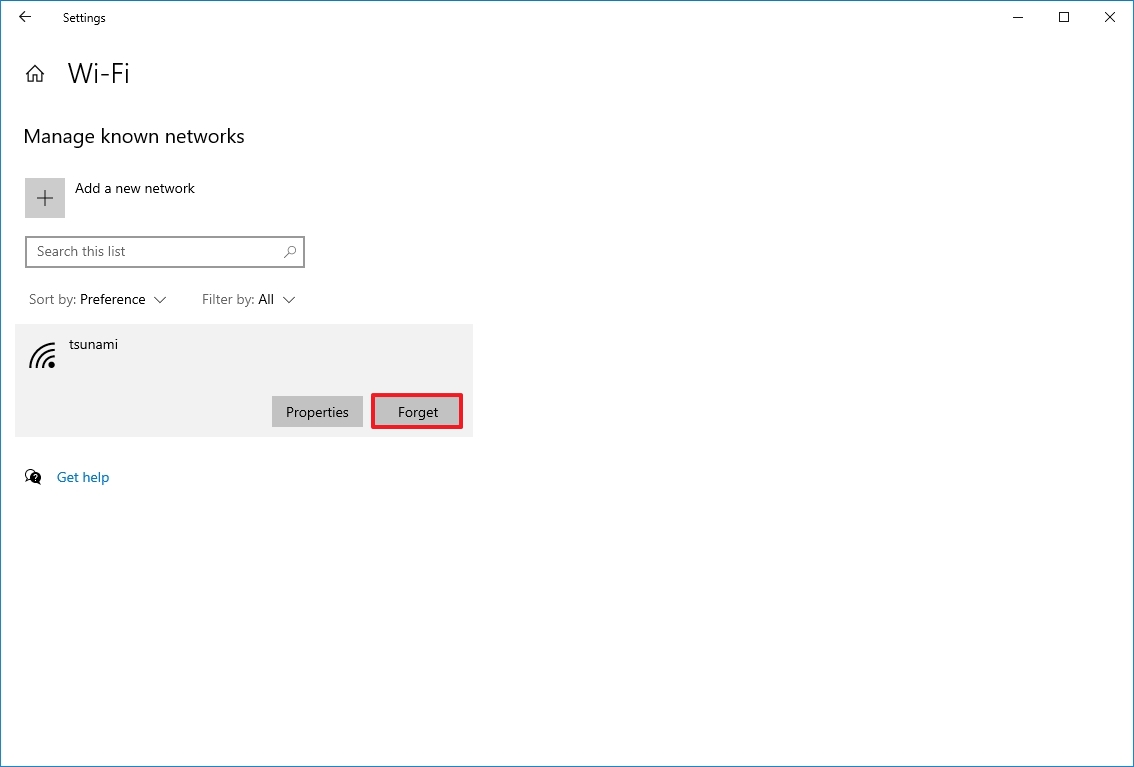
- Select the Wi-Fi network with the problem.
- Click the Forget button.
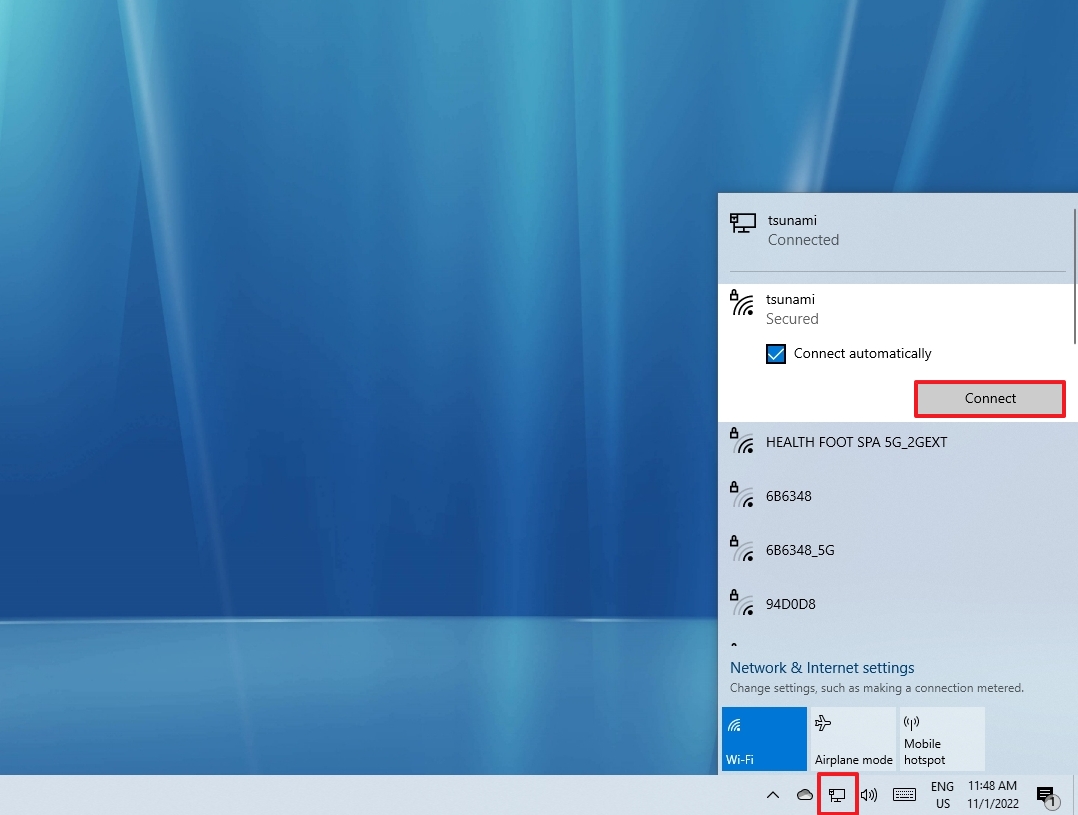
- Click the network icon from the notification area in the taskbar.
- Select the wireless network with access to the internet.
- Click the Connect button.
- Confirm the network security key.
- Click the Next button.
- (Optional) Click the Yes button if you want to make the device discoverable in the network.
After you complete the steps, use the web browser to confirm the internet is working again.
It is also possible to manage a Wi-Fi network with the netsh command-line tool, and in this guide, you can learn more about the process.
Reboot router
If the computer does not seem to be the problem, you can also restart the router, which can sometimes fix many common connectivity problems.
To restart the home router, use these steps:
- Locate the router.
- Unplug the power cord.
- Wait at least 60 seconds.
- Reconnect the power cord.
Once you complete the steps, allow three to five minutes for the router to start and check the connection.
Ping the connection
Opening the web browser and loading a website can confirm whether the internet is working. However, you can also use the ping command tool to check the connection.
To test the network connection with the ping command, use these steps:
- Open Start.
- Search for Command Prompt and click the top result to open the console.
- Type the following command to test the connectivity and press Enter: ping google.com
- Quick tip: We are using «Google.com» as an example, but you can use any online service to test the connection, for instance, «Bing.com.»
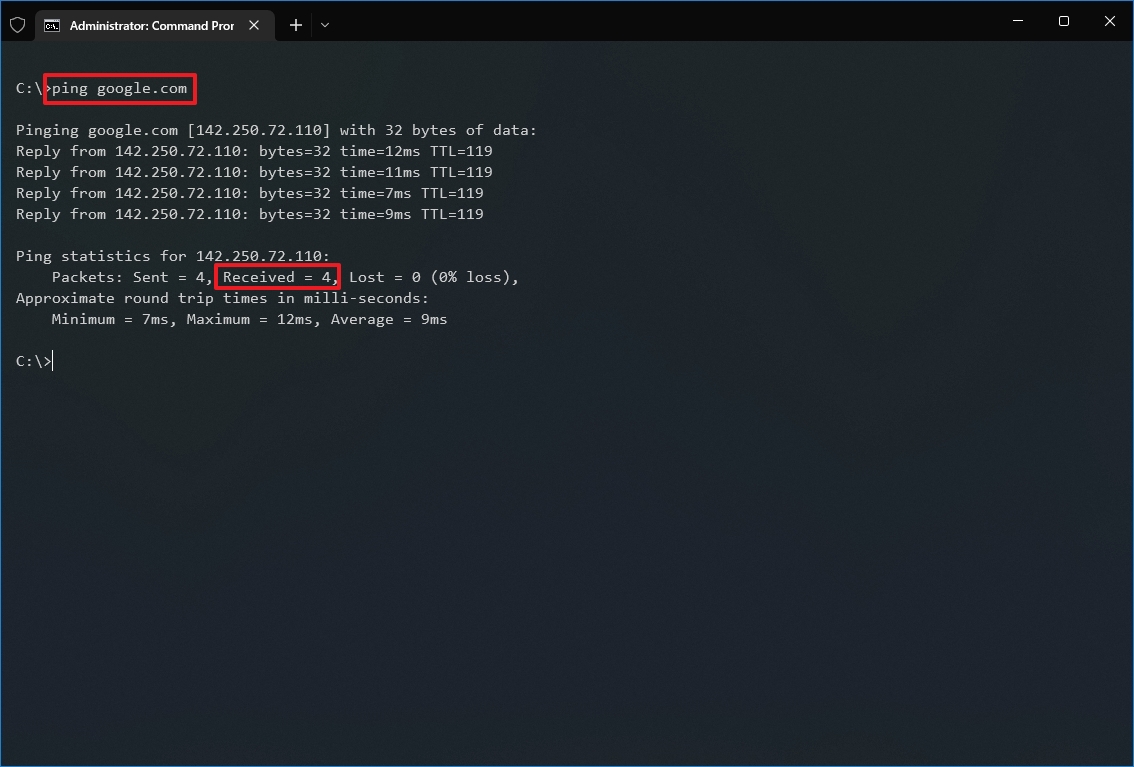
- Confirm successful reply without packet loss in the output.
Once you complete the steps, if you see four successful replies, it indicates that the internet connection is working.
When using a wired connection, it is wise to change cables and ports on the switch to eliminate the possibility of problems with those elements.
In addition to the ping command, Windows 10 offers many other tools to troubleshoot and fix network problems. In this guide, you can learn eight of them.
How to fix connectivity using Network troubleshooter
Windows 10 also includes a troubleshooter tool that you can use to diagnose and repair common networking problems quickly.
To use the network troubleshooter on Windows 10, use these steps:
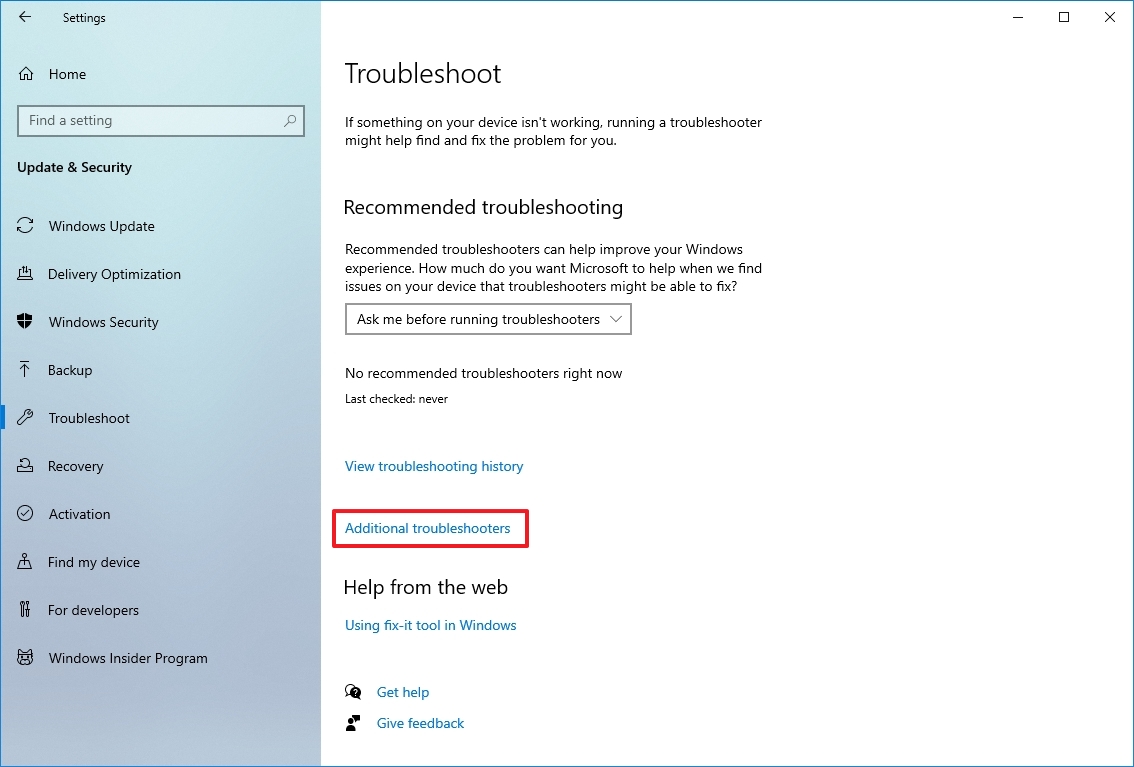
- Open Settings.
- Click on Update & Security.
- Click on Troubleshoot.
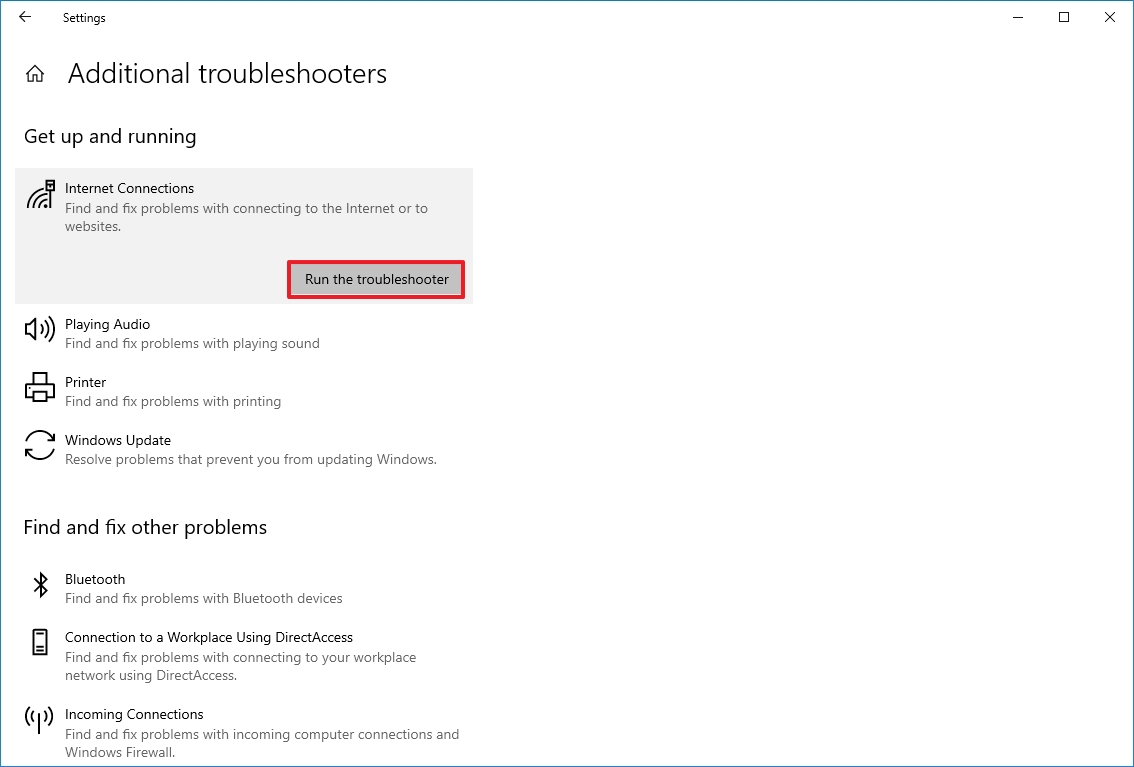
- Under the «Recommended troubleshooting» section, click the Additional troubleshooters option.
- Under the «Get up and running» section, select the Internet Connections troubleshooter.
- Click the «Run the troubleshooter» button.
- Select the «Troubleshoot my connection to the internet» option.
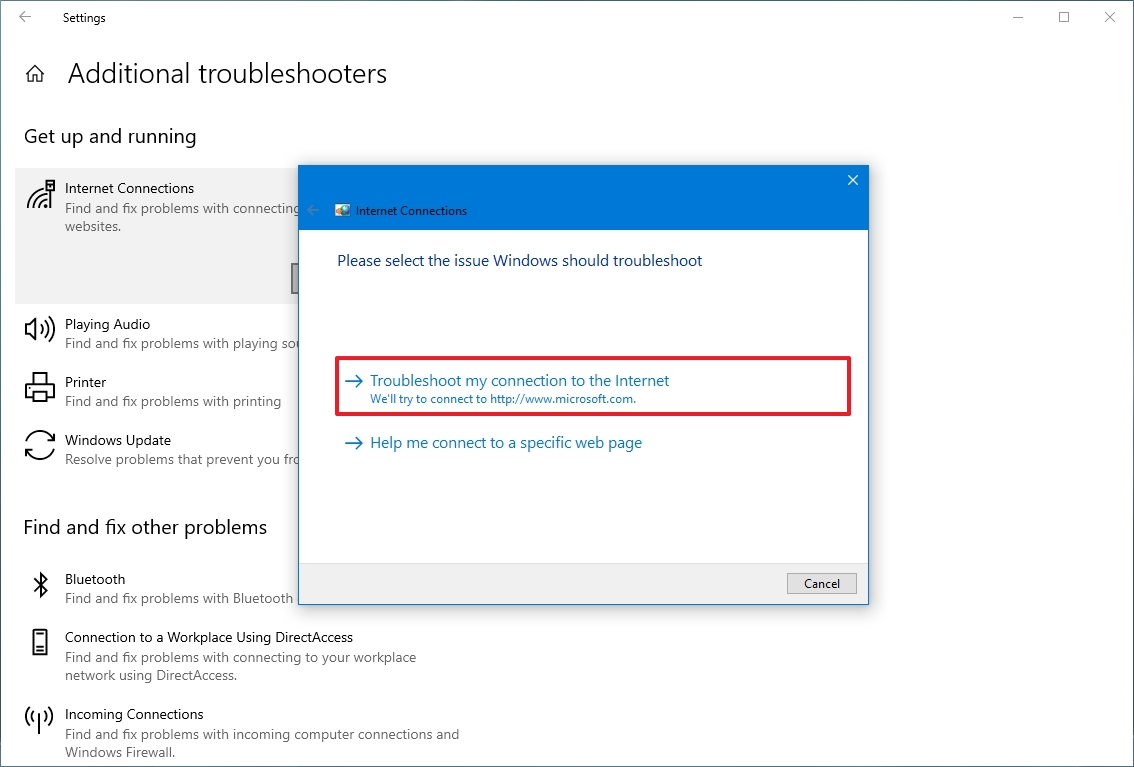
- Select the «Try these repairs as an administrator» option (if applicable).
- Continue with the on-screen directions (if applicable).
After you complete the steps, the troubleshooter will scan and resolve any connectivity problem.
How to reset network stack using Command Prompt
You can also try resetting the TCP/IP stack and clearing any DNS information on Windows 10 to resolve the network problem.
To reset the network stack with commands, use these steps:
- Open Start.
- Search for Command Prompt, right-click the top result, and select the Run as administrator option.
- Type the following command to reset the components that handle network requests and press Enter: netsh winsock reset
- Type the following command to reset the internet protocol (IP) stack and press Enter: netsh int ip reset
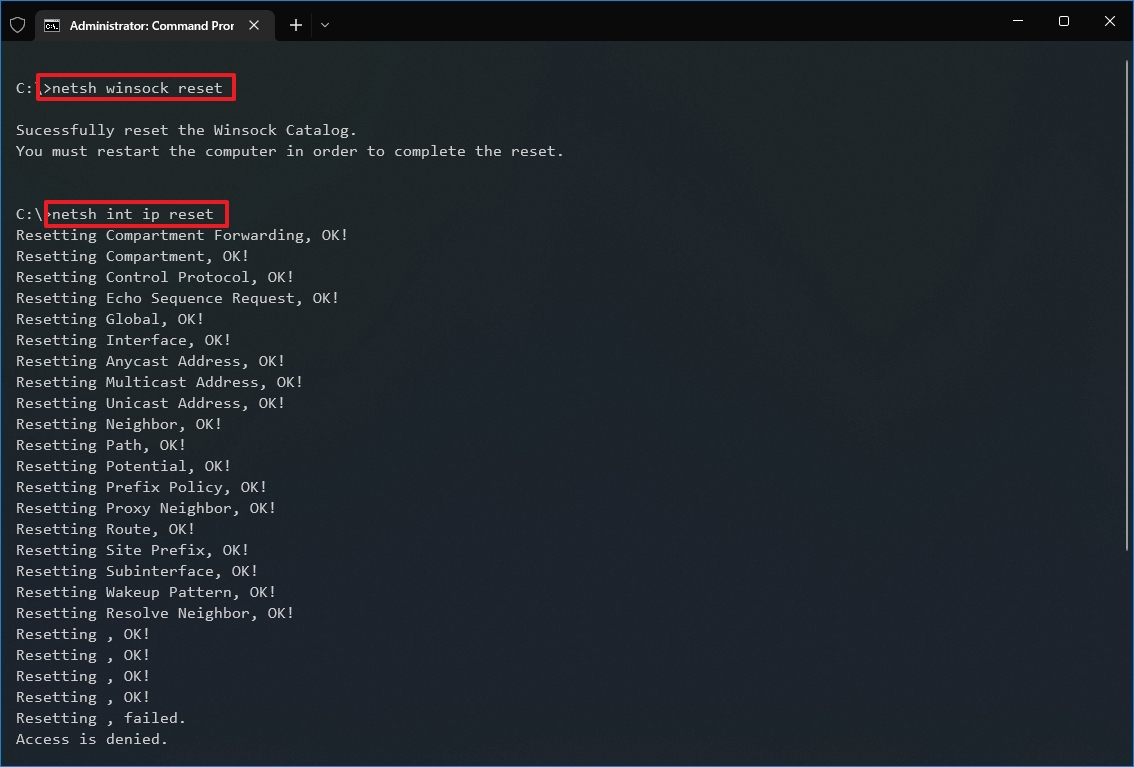
- Type the following command to clear the current networking configuration and press Enter: ipconfig /release

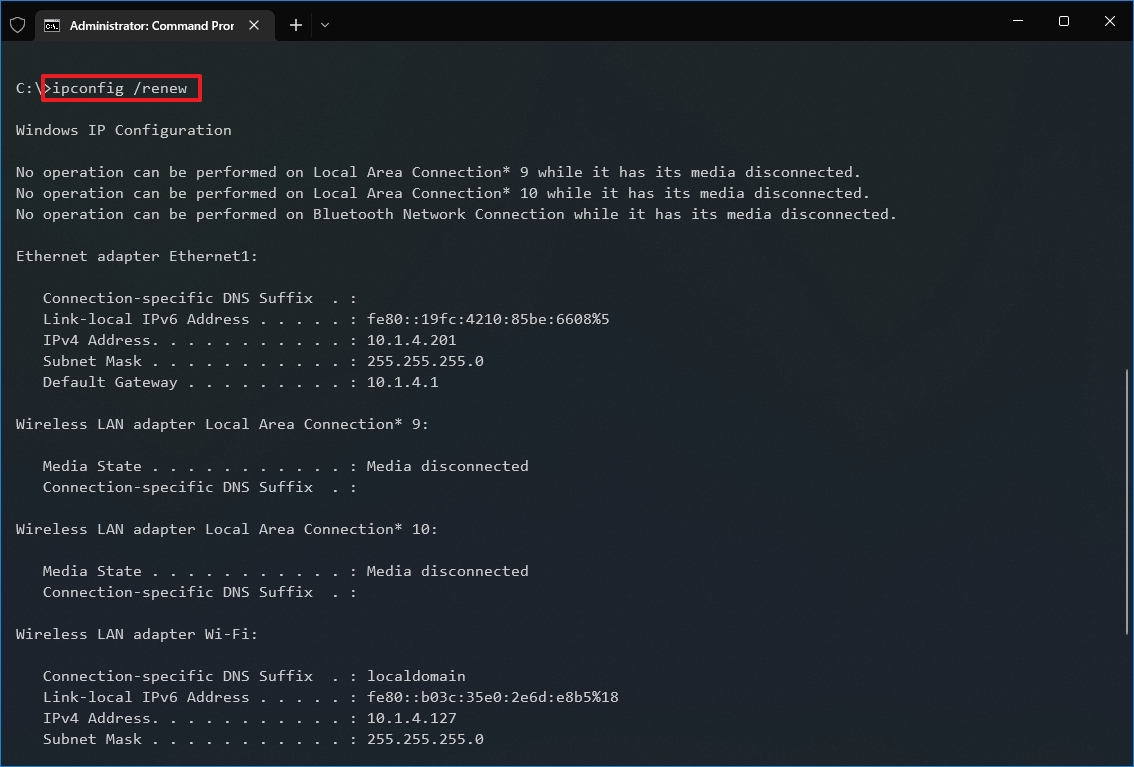
- Type the following command to reconfigure the network settings automatically and press Enter: ipconfig /renew
- Type the following command to clear the Domain Name System (DNS) information cached and press Enter: ipconfig /flushdns
- Restart your computer.
Once you complete the steps, launch the web browser and confirm whether the internet connection is working.
How to reset network adapter using Settings
If you are still dealing with networking problems, Windows 10 has the option to reset all the Wi-Fi and Ethernet network adapters to fix most problems.
To reset all the network adapters on Windows 10, use these steps:
- Open Settings.
- Click on Network & Internet.
- Click on Status.
- Under the «Advanced network settings» section, click the Network reset option.
- Click the Reset now button.
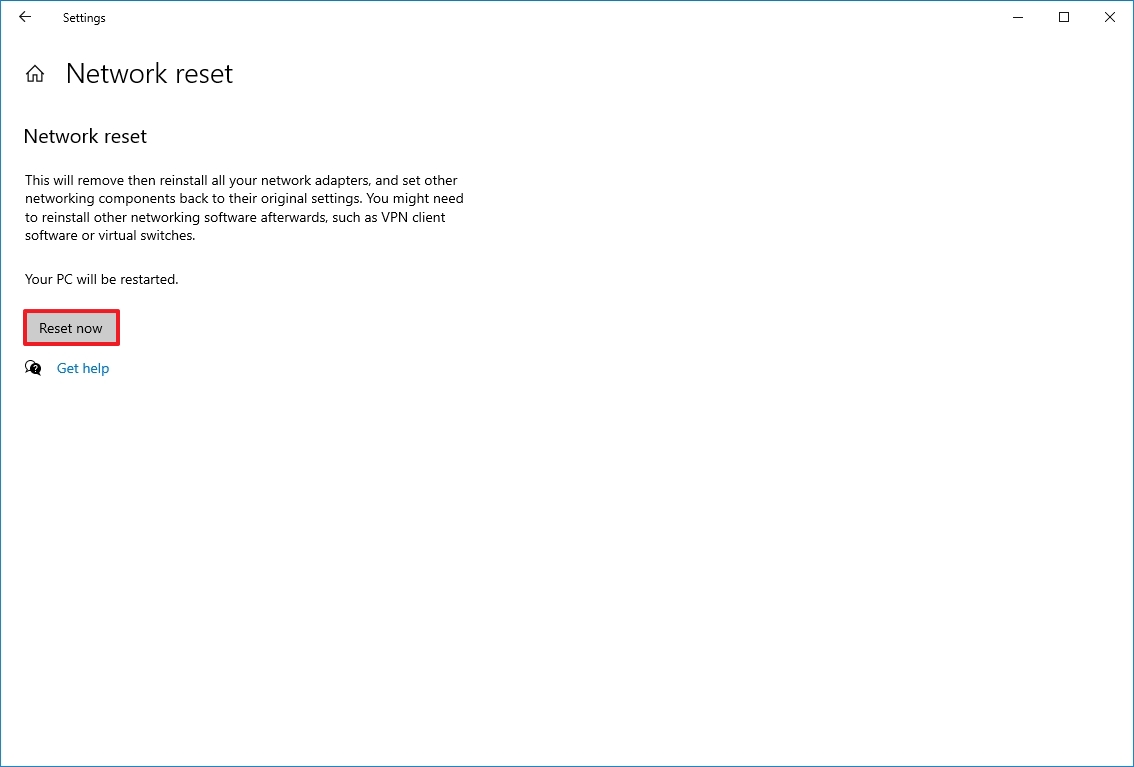
- Click the Yes button.
After you complete the steps, the device will restart automatically, and after the reboot, you should be able to connect to the network and internet.
The process of resetting the networking settings means that you will need to re-enter the security key again. Also, you will have to reconfigure other networking software, such as VPN clients, as necessary.
How to update network adapter driver using Device Manager
An older version of the network driver can sometimes cause compatibility issues with a Windows 10 update. Usually, you can fix this by updating the driver to the latest version.
Update network adapter online
If the device is experiencing unreliable connectivity but it is still possible to connect to the internet, you can check for driver updates using Windows Update.
To install a newer version of the network adapter driver, use these steps:
- Open Settings.
- Click on Update & Security.
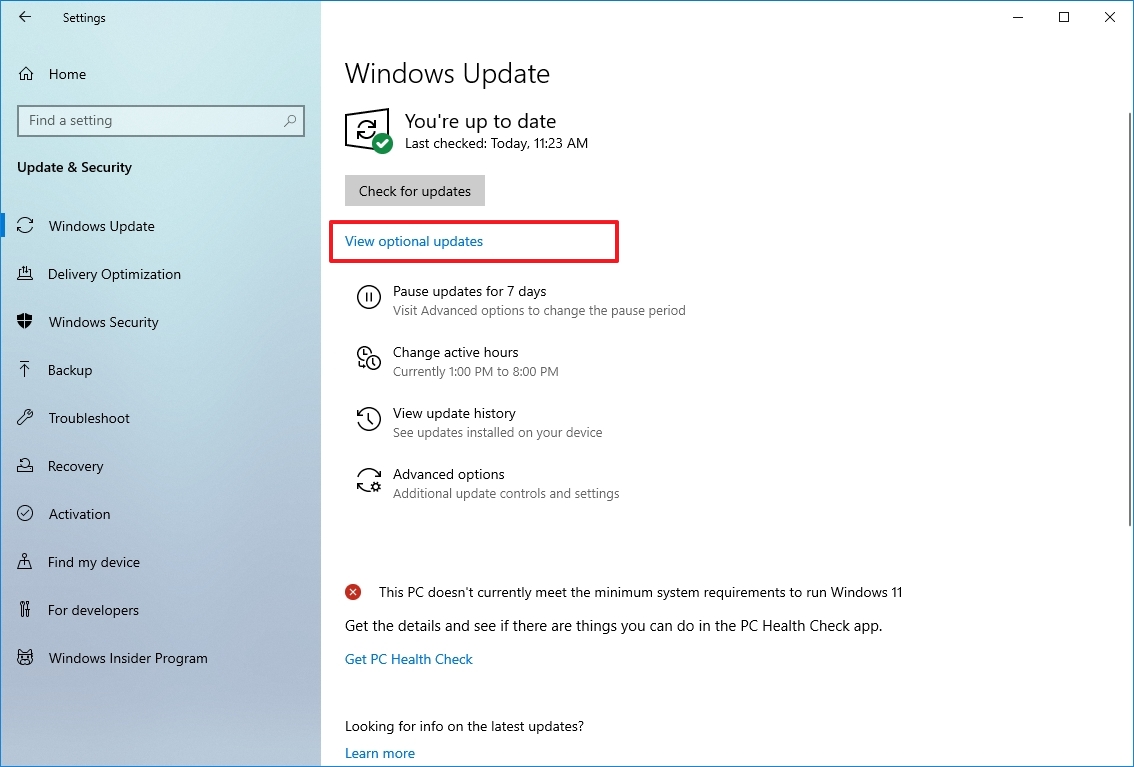
- Click on Windows Update.
- Click on «View optional updates» option.
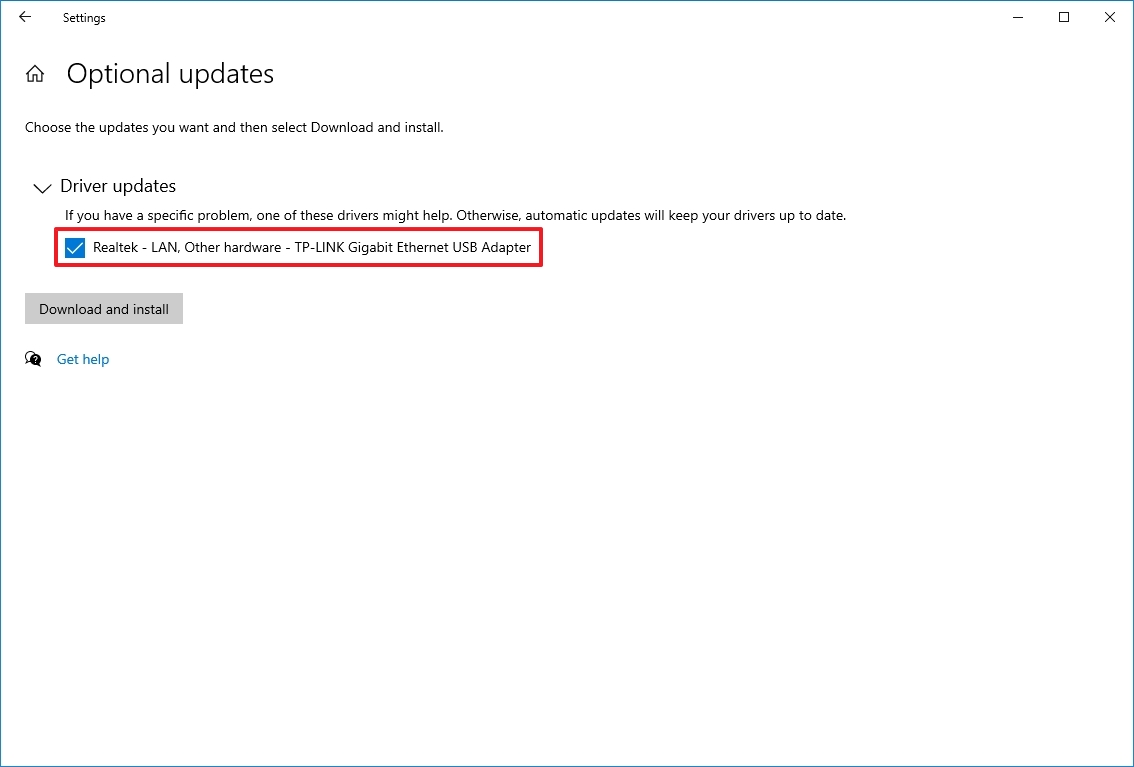
- Under the «Driver updates» section, select the newer network driver.
- Click the «Download and install» button.
After you complete the steps, the new driver will download and install automatically to fix the problem. If you cannot find an update, then Windows Update does not have newer drivers, in which case, you may need to update the adapter manually (see the steps below).
Update network adapter offline
If you cannot connect to the internet, you will have to download the driver manually from your manufacturer support website using another device and bring it over using a USB flash drive. You should always use the manufacturer’s instructions to complete the process, but you can always use the steps below.
To update a network adapter on Windows 10, connect the USB flash drive with the extracted files, and use these steps:
- Open Start.
- Search for Device Manager and click the top result to open the app.
- Expand the Network adapters branch.
- Right-click the adapter with the problem and select the Update driver option.
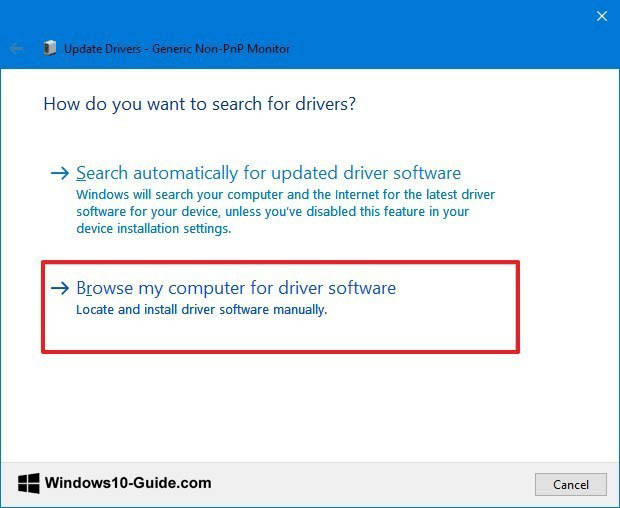
- Click the «Browse my computer for drivers» option.
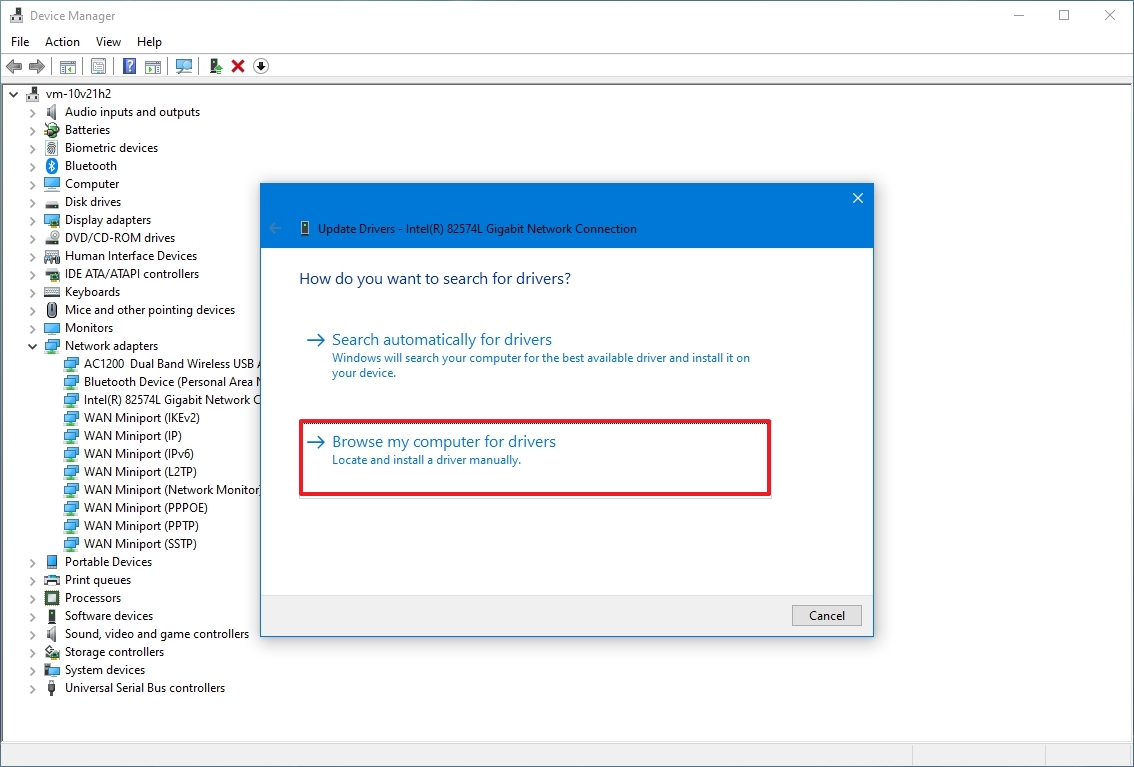
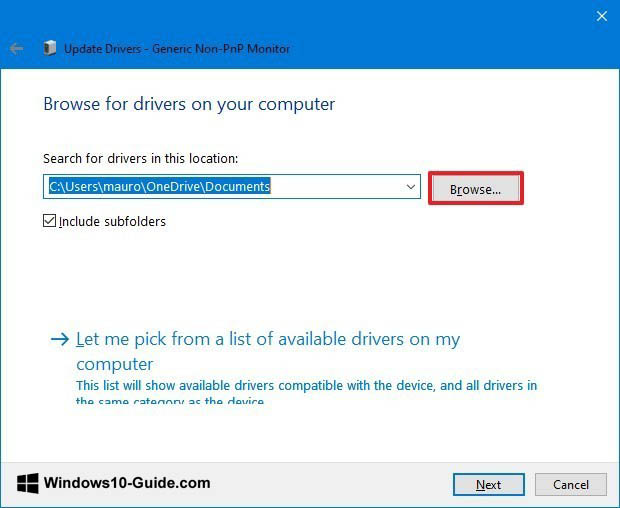
- Click the Browser button.
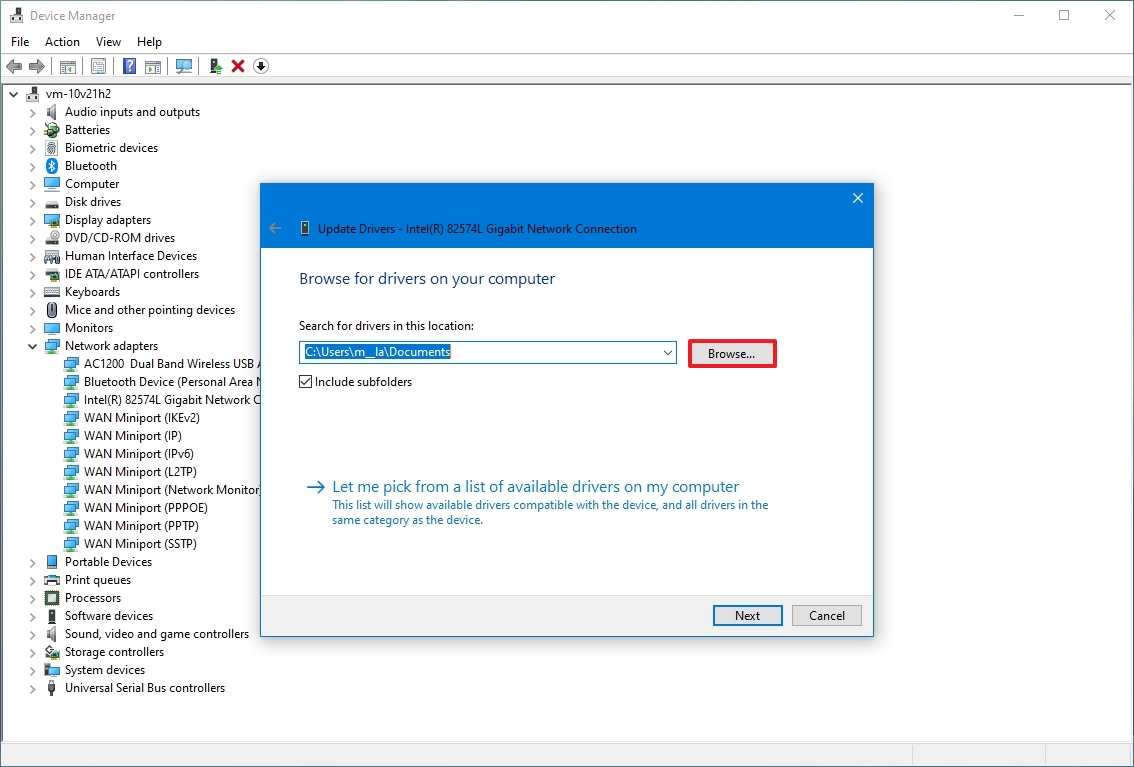
- Select the folder location with the driver package.
- Click the OK button.
- Click the Next button.
- Continue with the on-screen directions (if applicable).
Once you complete the steps, the new update will install to fix the compatibility problem.
How to rollback network adapter driver using Device Manager
If the problem started after applying a driver update, you could roll back to the previous version to temporarily fix the network problem until a newer update becomes available.
To restore a previous version of a driver, use these steps:
- Open Start.
- Search for Device Manager and click the top result to open the app.
- Expand the Network adapters branch.
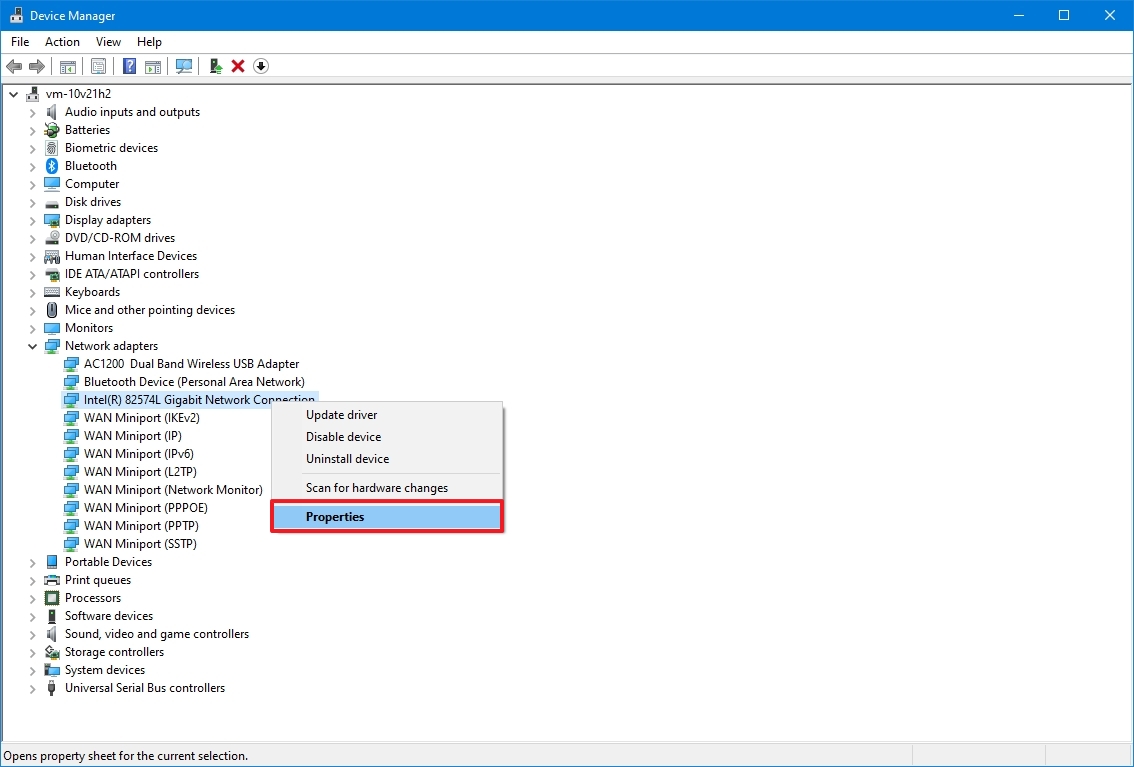
- Right-click the adapter with the problem and select the Properties option.
- Click the Driver tab.
- Click the «Roll back driver» button.
- Quick tip: If the button is grayed out, it means that the system does not have a backup of the driver.
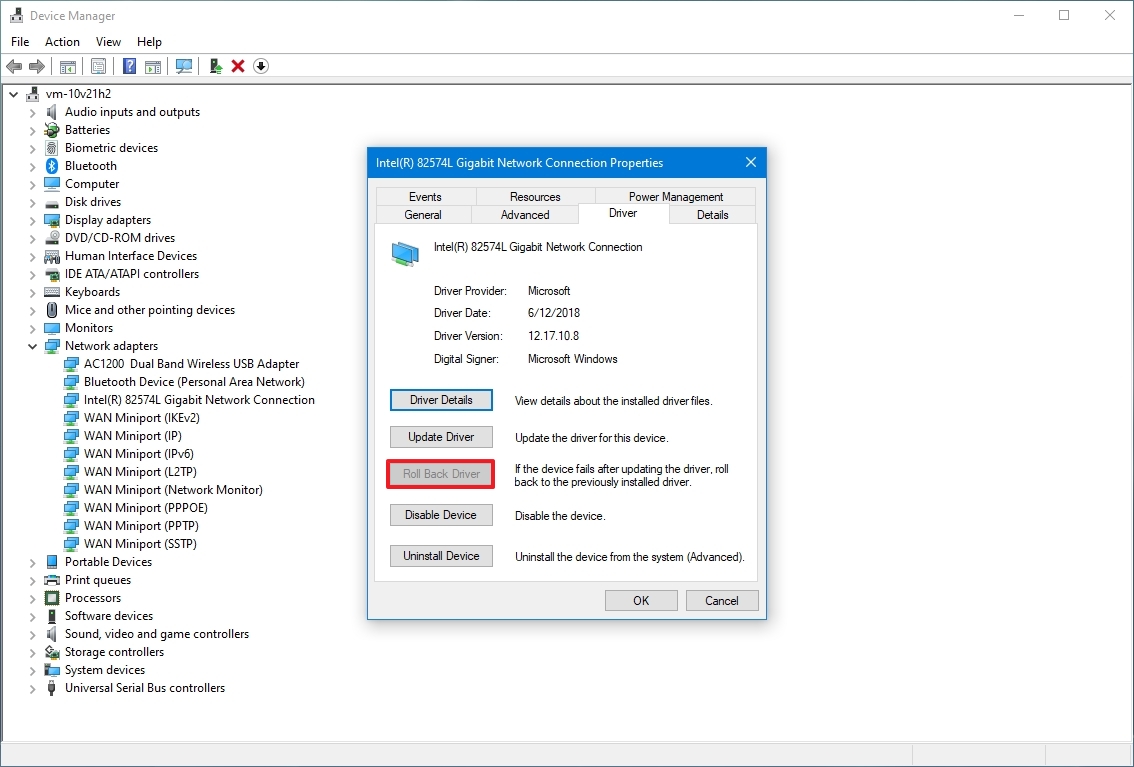
- Click the OK button.
- Select a reason why you are rolling back (select any option).
- Click the Yes button.
- Restart your computer.
Once you complete the steps, test the connection with the ping command or load a website with your preferred web browser.
How to uninstall network adapter driver using Device Manager
If the problem occurs after applying a cumulative system update, it could indicate a corruption with the driver or the update made unwanted changes. In this specific situation, you can remove the driver manually, and then Windows 10 will try to reinstall it automatically.
To remove a network adapter driver, use these steps:
- Open Start.
- Search for Device Manager and click the top result to open the app.
- Expand the Network adapters branch.
- Right-click the Wi-Fi or Ethernet network adapter and select the Uninstall device option.
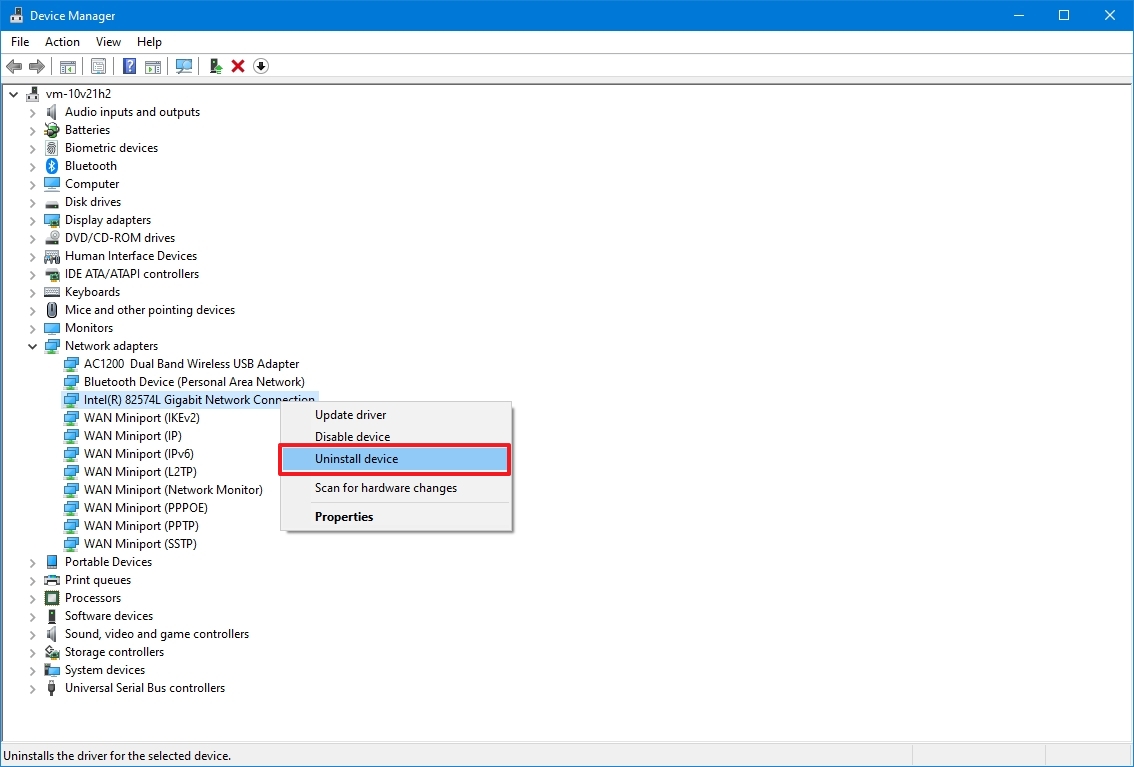
- Click the Uninstall button.
- Restart your computer.
After you complete the steps, Windows 10 will detect and reinstall the driver automatically, fixing the network problem.
If the system cannot find the appropriate driver, you can use the previous steps to download and install the network adapter manually.
How to disable security apps to fix network problems on Windows 10
On Windows 10, sometimes, third-party security software (such as antivirus and firewall) can prevent the device from accessing the internet. If this is the case, you can determine if the application is the problem by temporarily disabling it and testing the network connection.
The steps below will help you to disable the security features built into Windows 10. If you have a different solution, check your software support website for more details.
Disable Microsoft Defender Antivirus
To temporarily disable Microsoft Defender on Windows 10, use these steps:
- Open Start.
- Search for Windows Security and click the top result to open the app.
- Click on Virus & threat protection.
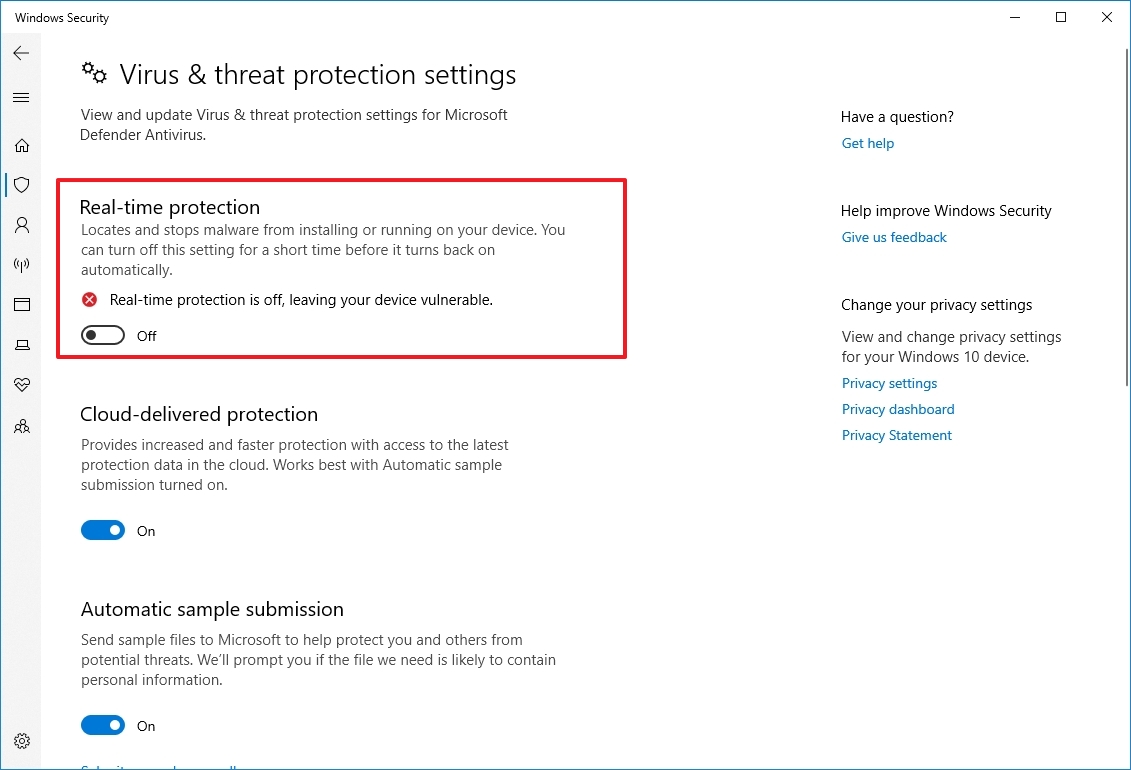
- Under the «Virus & threat protection settings» section, click the Manage settings option.
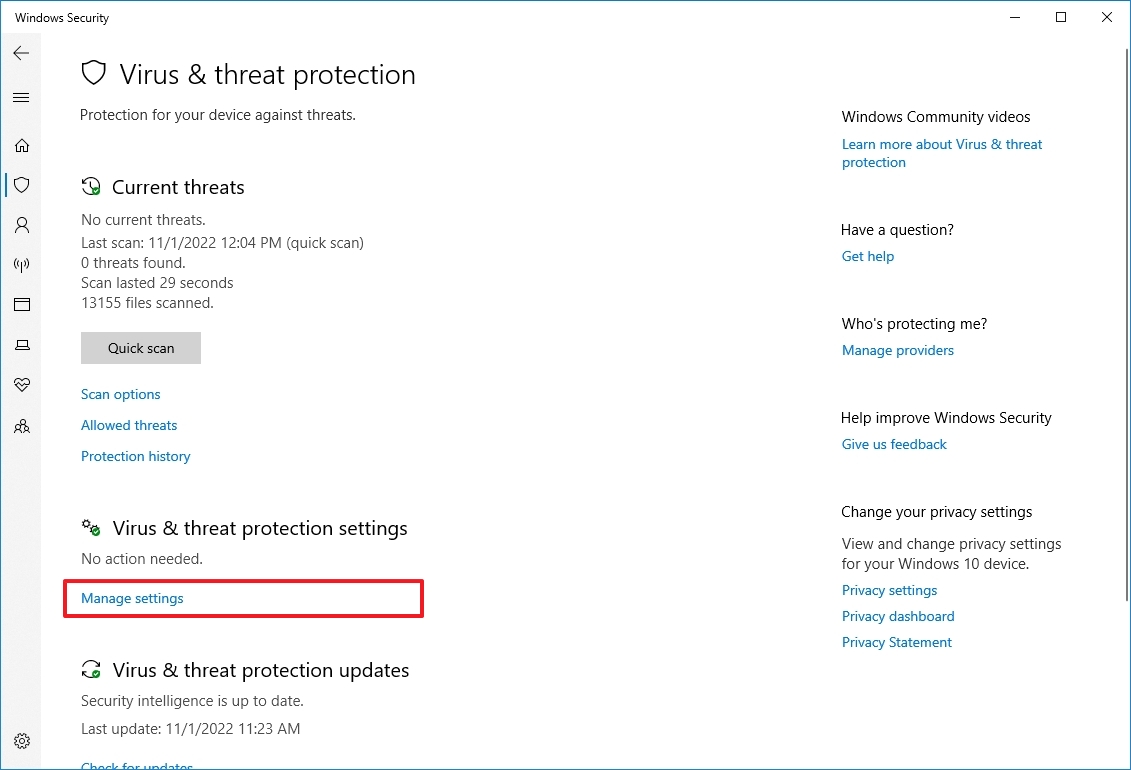
- Turn off the «Real-time protection» toggle switch.
Once you complete the steps, test the connection by going to «Bing.com» or «Google.com» on your device.
You can always revert the changes by restarting the computer or enabling the Real-time protection option again in step 5.
Disable Microsoft Defender Firewall
To temporarily disable the Microsoft Defender Firewall, use these steps:
- Open Start.
- Search for Windows Security and click the top result to open the app.
- Click on «Firewall & network protection.»
- Click the (active) network.
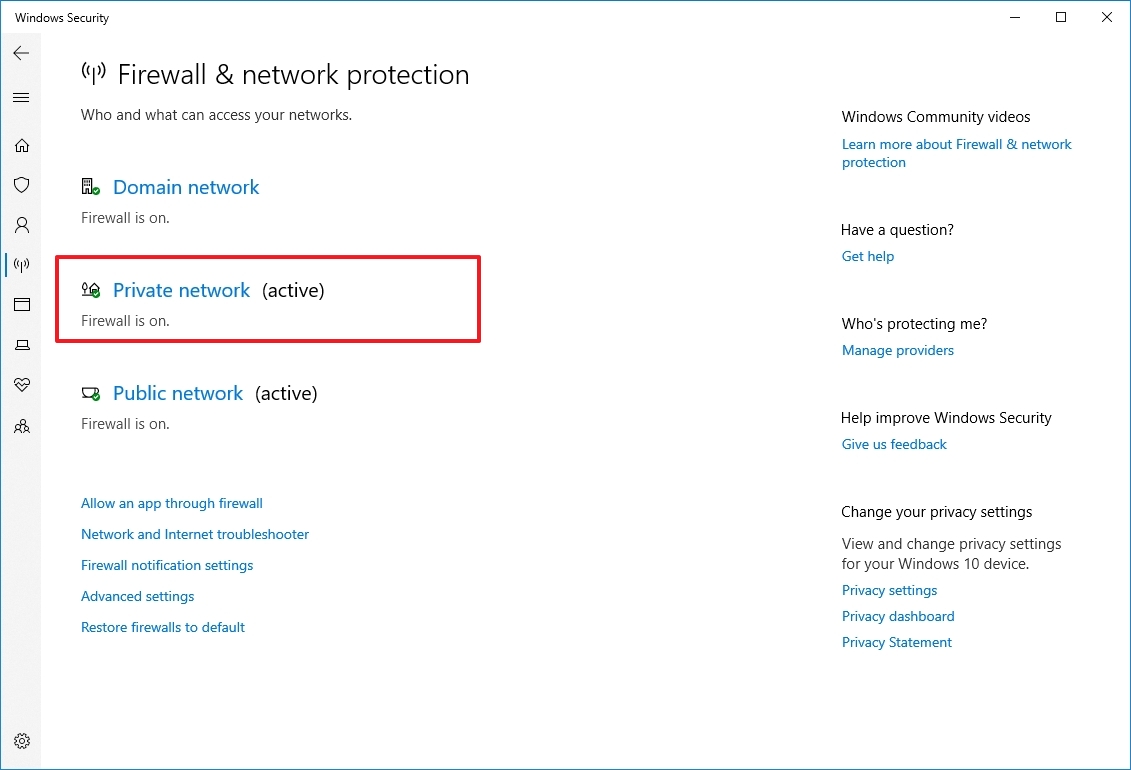
- Turn off the «Microsoft Defender Firewall» toggle switch.
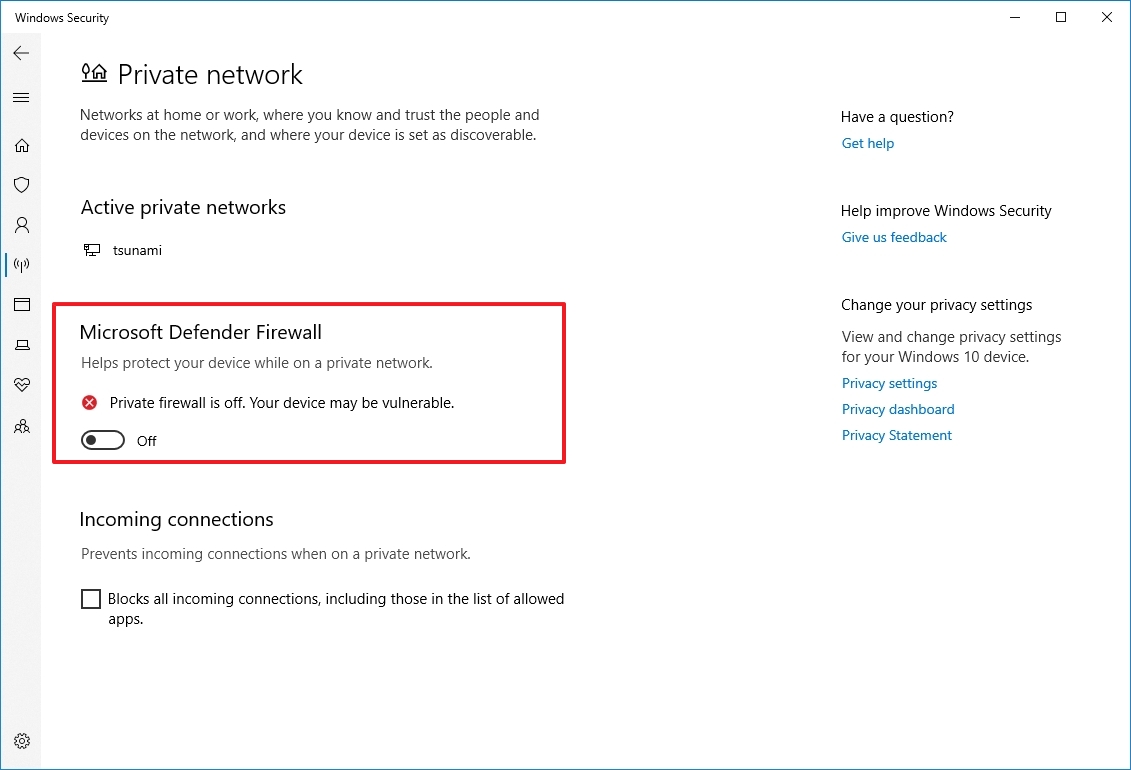
After you complete the steps, confirm whether the internet is working by loading a website with your web browser.
You can enable the firewall again using the same instructions outlined above, but in step 5, make sure to turn on the «Microsoft Defender Firewall» toggle switch.
How to uninstall update to fix network problems on Windows 10
Although system updates are meant to resolve issues and improve the experience, it is not uncommon to see buggy updates through Windows Update that can cause connectivity problems. If you suspect a recent update is causing networking issues, you can remove it to mitigate the problem until a newer update becomes available.
Uninstall quality update
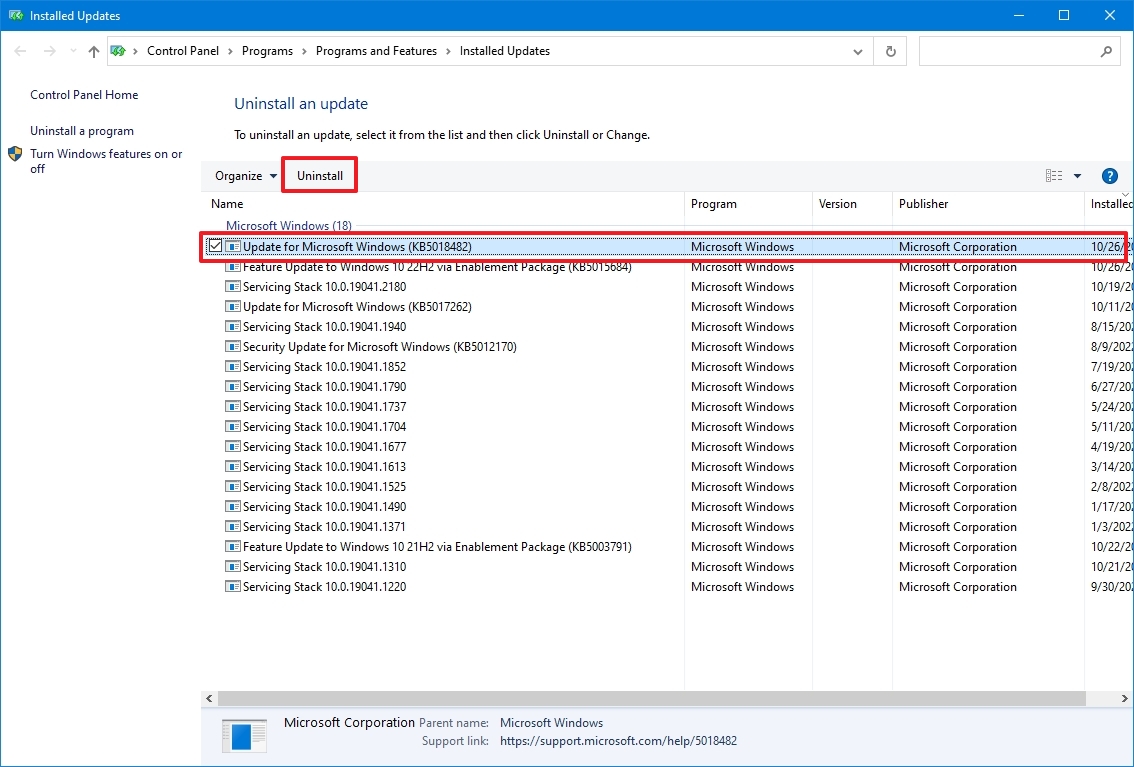
To uninstall a quality update on Windows 10, use these steps:
- Open Settings.
- Click on Update & Security.
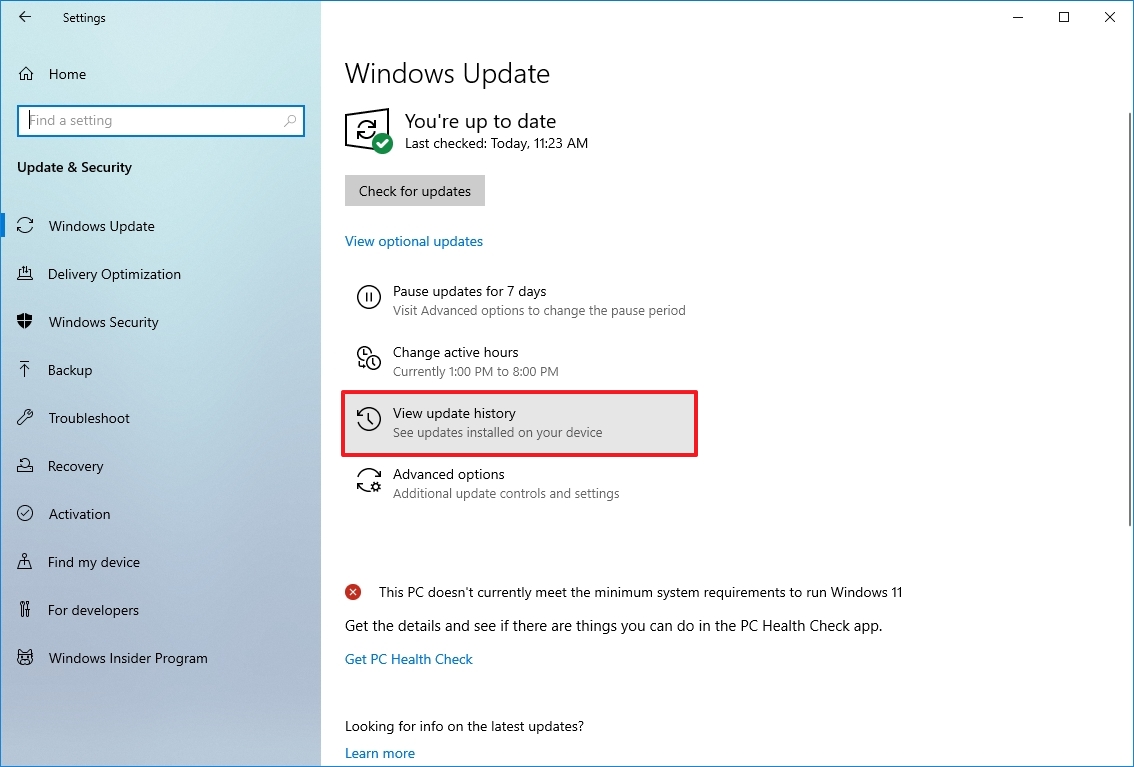
- Click on Windows Update.
- Click the «View update history» button.
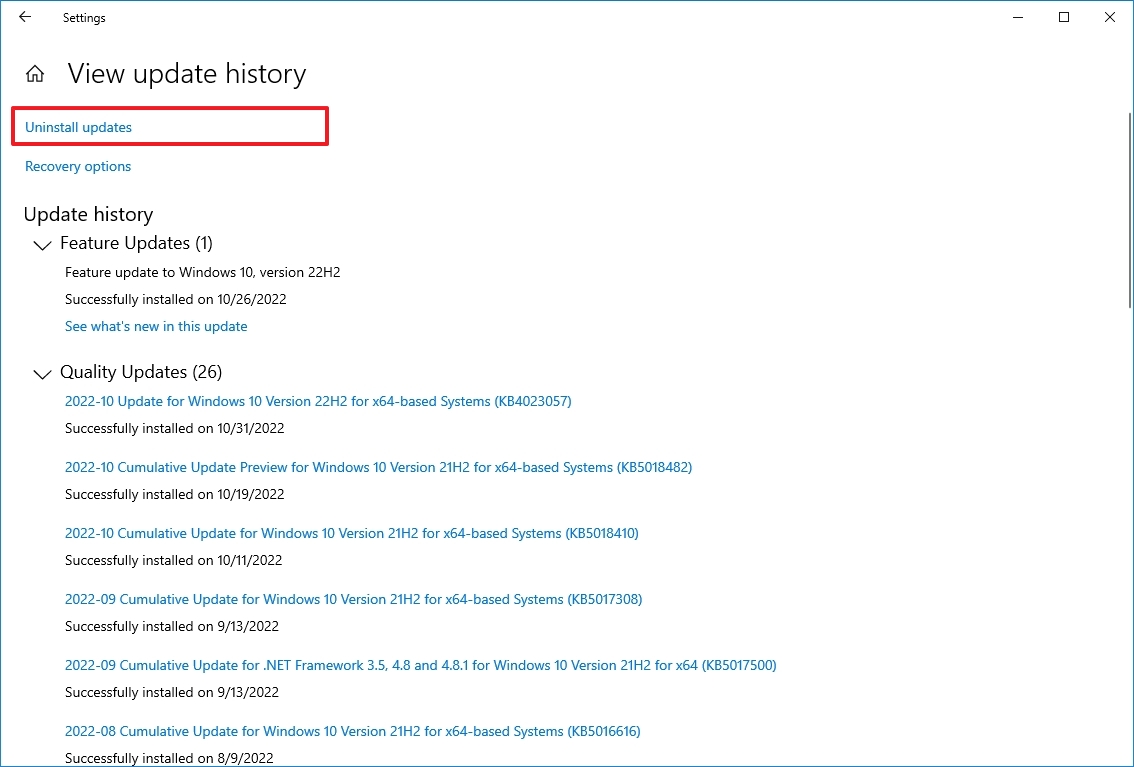
- Click the Uninstall updates option.
- Select the most recent update causing the network problem on Windows 10.
- Click the Uninstall button.
- Click the Yes button.
- Click the Restart now button.
Once you complete the steps, Windows 10 will remove the update to allow the network adapter to work again.
Uninstall feature update
When the problem occurs after installing a major update (such as the October 2020 Update), you can also remove the update to roll back to the previous version, but the steps will be slightly different.
Important: Although rolling back to a previous version is a non-destructive process, creating a temporary full backup of your PC is recommended in case something goes wrong. Also, the rollback option is only available during the first ten days after upgrading. After this time, you won’t be able to undo the changes unless you re-install the version you want using a clean installation.
To uninstall a feature update, use these steps:
- Open Settings.
- Click on Update & Security.
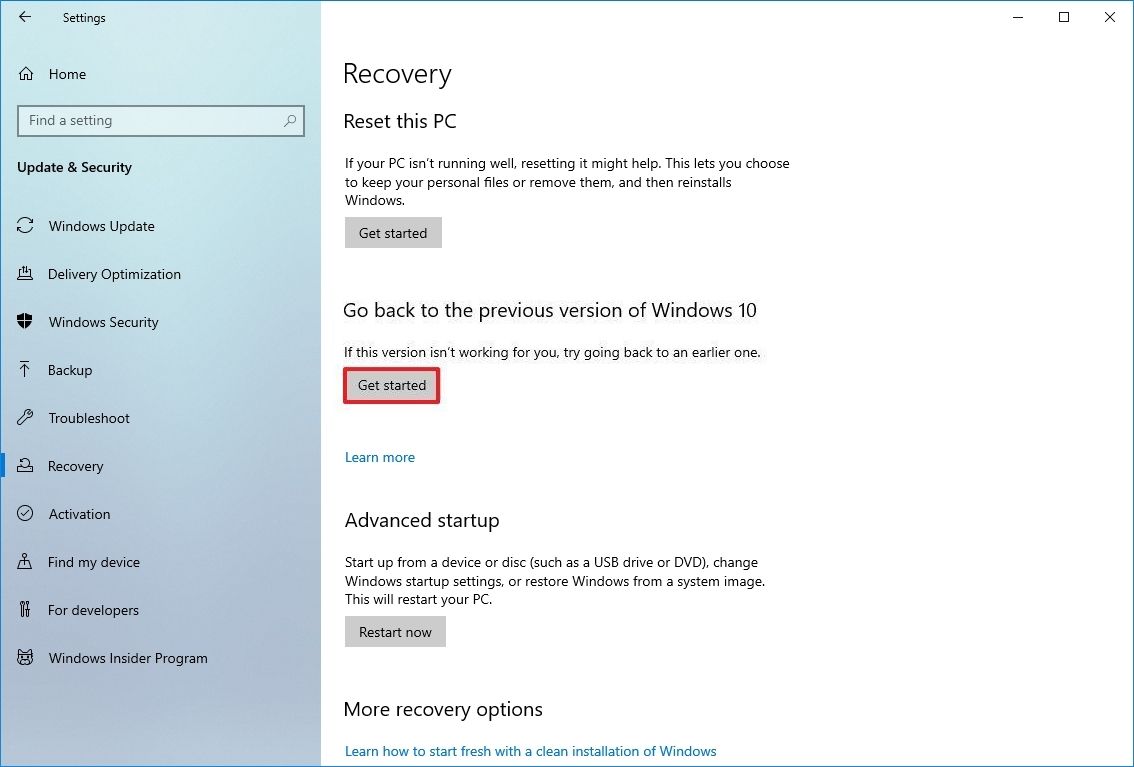
- Click on Recovery.
- Under the «Go back to a previous version of Windows 10» section, click the Get started button.
- Check any of the reasons available.
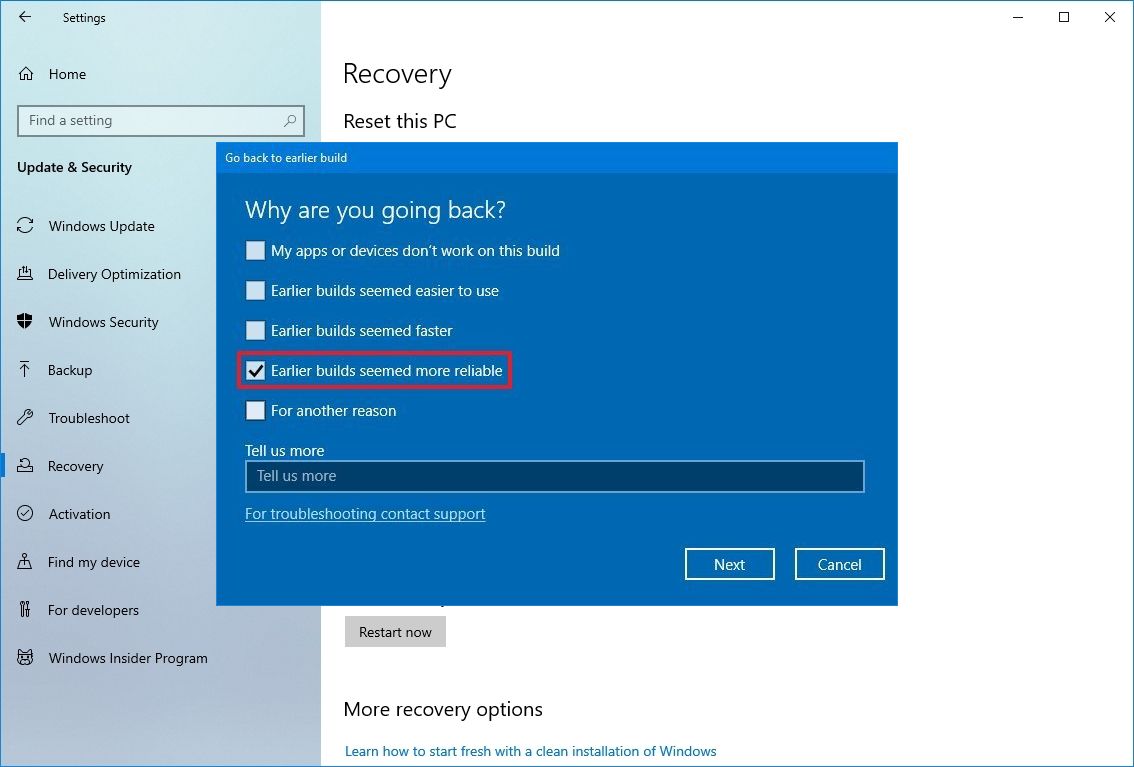
- Click the Next button.
- Click the No, thanks button.
- Click the Next button.
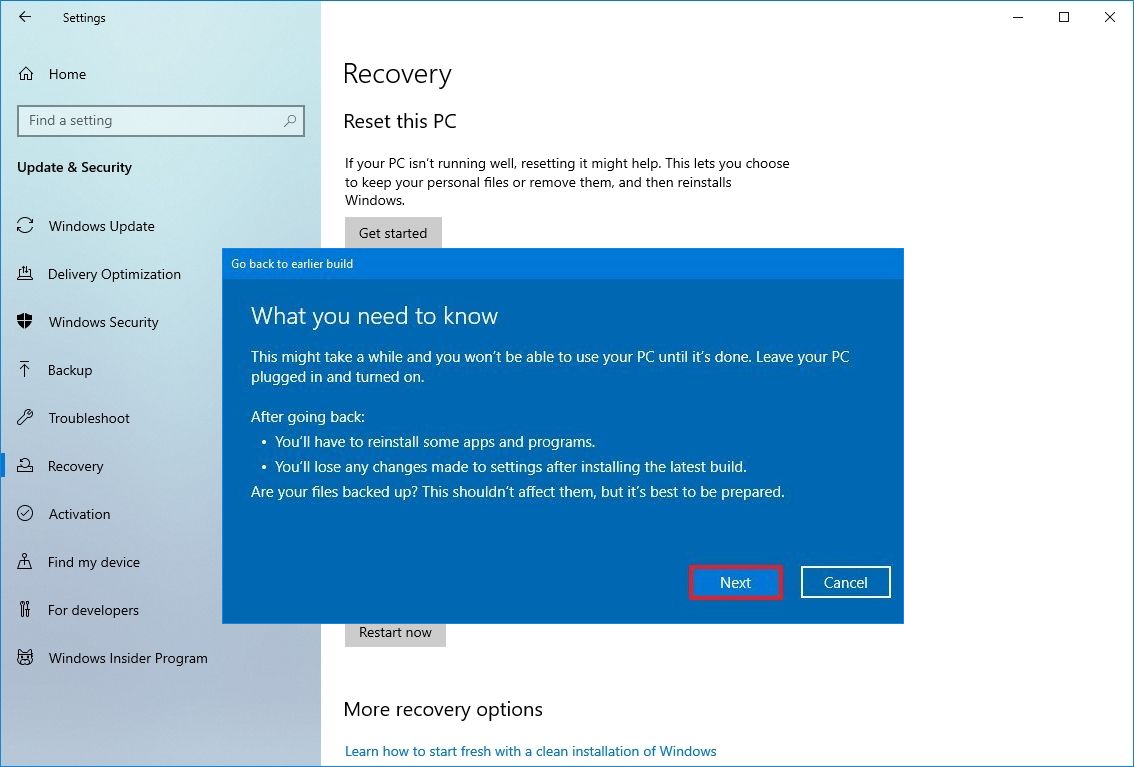
- Click the Next button again.
- Click the «Go back to earlier build» button.
After you complete the steps, Windows 10 will roll back to the previous setup when the network was working correctly.
More resources
For more helpful articles, coverage, and answers to common questions about Windows 10, visit the following resources:
- Windows 11 on Windows Central — All you need to know
- Windows 10 on Windows Central — All you need to know
Mauro Huculak has been a Windows How-To Expert contributor for WindowsCentral.com for nearly a decade and has over 15 years of experience writing comprehensive guides. He also has an IT background and has achieved different professional certifications from Microsoft, Cisco, VMware, and CompTIA. He has been recognized as a Microsoft MVP for many years.
Readers help support Windows Report. We may get a commission if you buy through our links.
Read our disclosure page to find out how can you help Windows Report sustain the editorial team. Read more
Stable Internet has become a vital part of our lives, and network connection issues in Windows 11 often come in the way of it, necessitating the need to identify and fix the problem!
Network connection issues with Wi-Fi or Ethernet in Windows 11 often arise due to outdated or buggy drivers, misconfigured network settings, a problem with a recent Windows update, and third-party software conflicts.
Before you start with the complex solutions, restart the PC and router, run the Network and Internet troubleshooter in Windows 11, disconnect and then reconnect to the affected network, switch to another network band (from 2.4 GHz to 5 GHz and vice versa), and if nothing works, move the PC closer to the router (if on a wireless network).
How can I fix network connection issues in Windows 11?
1. Update the network adapter drivers
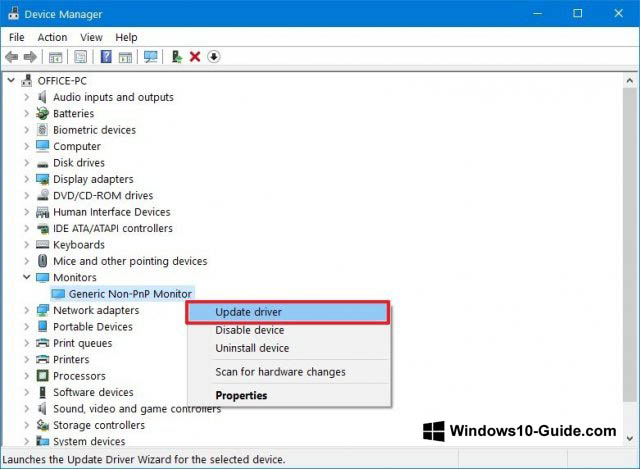
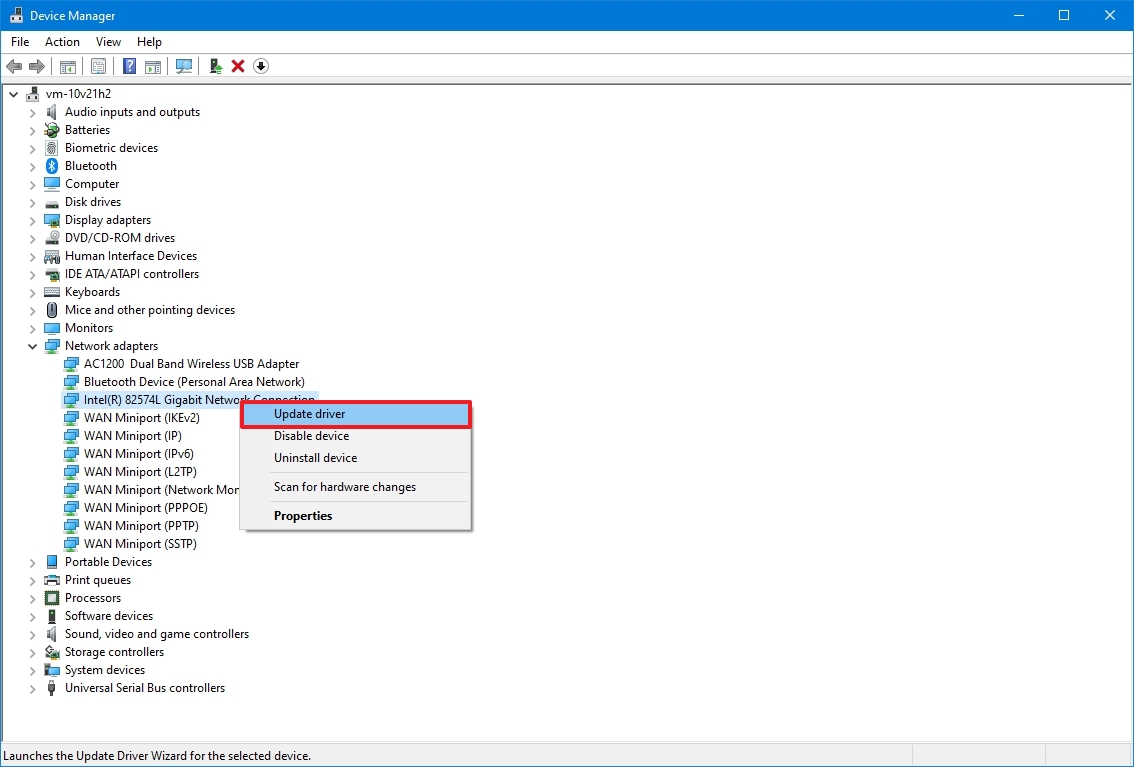
- Press Windows + X to open the Power User menu, and select Device Manager from the list of options.
- Expand the Network adapters entry, right-click on the Wi-Fi or Ethernet adapter (the one having problems), and select Update driver.

- Choose Search automatically for drivers and wait for Windows to automatically detect and install the best locally available driver version.


Since the problem mostly lies with the driver when you can’t connect to a network in Windows 11, updating the network driver should get things up and running in no time.
If Windows can’t find a better one, use a dedicated driver updater software to install the latest version!
2. Switch to a generic network driver
- Press Windows + R to open Run, type devmgmt.msc in the text field, and hit Enter.

- Double-click on Network adapters, right-click on the problematic adapter (Wi-Fi or Ethernet), and select Update driver.
- Choose Browse my computer for drivers.
- Select Let me pick from a list of available drivers on my computer.
- Pick the driver that has Microsoft listed next to it instead of the official manufacturer, and click on Next.
- Once done, click on Close and then restart the PC for the changes to come into effect.


3. Uninstall the conflicting application
- Press Windows + R to open Run, type appwiz.cpl in the text field, and hit Enter.
- Select any network-related application installed, updated, or modified around the same the problem first appeared, and click on Uninstall.

- Follow the on-screen instructions to complete the process.
- Restart the computer and check for improvements.

In my research, VPNs, third-party antivirus software, and firewalls were often the underlying cause. So, if you have any of these, uninstall the app.
If the problem persists, I recommend you use an effective software uninstaller tool to get rid of any leftover files and Registry entries that might still be triggering conflicts.
4. Set the default network adapter settings
- Press Windows + R to open Run, type ncpa.cpl in the text field, and click OK.
- Right-click on the problematic adapter facing network connection issues, and then choose Properties.
- Double-click on the Internet Protocol Version 4 (TCP/IPv4) entry.
- In the General tab, make sure you have the Obtain an IP address automatically and Obtain DNS server address automatically settings selected, and click OK to save the changes.


If this doesn’t work, set network settings to default or reset the network adapter!
5. Uninstall the recent Windows 11 update
- Press Windows + I to open Settings, go to Windows Update from the navigation pane, and click on Update history.

- Scroll down to the bottom and click on Uninstall updates.
- Click on Uninstall next to the update downloaded right before the problem first appeared.
- Again, click Uninstall in the confirmation prompt, wait for the process to complete, then restart the PC and check for improvements.


In the recent past, we have seen network connection issues in Windows 11 due to KB5037771, and uninstalling the update fixed things in no time!
This also helps fix the No Internet, secured network error in Windows 11.
6. Modify the Registry
Tip
Do not reconfigure any entries in the Registry other than the ones explained below. Also, before you start making the changes, create a restore point in Windows 11 since this way, you can always revert to the previous stable configuration.
- Press Windows + R to open Run, type regedit in the text field, and hit Enter.
- Click Yes in the UAC prompt.
- Paste the following path in the address bar and hit Enter:
HKEY_LOCAL_MACHINE\SOFTWARE\Policies\Microsoft\Windows\NetworkConnectivityStatusIndicator
- If you don’t find a NoActiveProbe DWORD listed here, right-click on the empty portion, hover the cursor over New, select DWORD (32-bit Value), and name it NoActiveProbe.
- Double-click on the NoActiveProbe DWORD, enter 0 under Value data, and click OK to save the changes.
- Similarly, create a DisablePassivePolling DWORD and set its Value data to 1.


7. Perform a repair upgrade
- Go to Microsoft’s official website, choose the edition, and then download the Windows 11 ISO.

- Once downloaded, right-click on the ISO file, choose Mount, and then click Open. The File Explorer may hang for a minute, but it’s alright. Let the process complete.
- Run the setup.exe file, and click Yes in the UAC prompt.

- Click on Next to proceed.
- Click Accept on the Applicable notices and license terms page.
- Make sure the setup reads Keep personal files and apps, and click on Install.

- Wait for the in-place upgrade to complete. It may take up to 2-3 hours.


When nothing else helps fix network connection issues in Windows 11 or slow Internet, an in-place upgrade does the trick. It’s basically like re-installing Windows, but without affecting any of the personal files and apps!
In case your Wi-Fi keeps disconnecting or the Ethernet is not working, our experts have already curated a tested set of solutions that will come to your aid.
Which fix worked for you? Let us know in the comments section below.
Kazim Ali Alvi
Windows Hardware Expert
Kazim has always been fond of technology, be it scrolling through the settings on his iPhone, Android device, or Windows PC. He’s specialized in hardware devices, always ready to remove a screw or two to find out the real cause of a problem.
Long-time Windows user, Kazim is ready to provide a solution for your every software & hardware error on Windows 11, Windows 10 and any previous iteration. He’s also one of our experts in Networking & Security.