Overview:
In this guide, we’ll discuss why you might want to disable Windows Update services and Background Intelligent Transfer Service (BITS) completely in the File Level with a PowerShell script, to prevent Unintended Re-enabling.
Many Windows users find that automatic updates are a double-edged sword. While they deliver critical security fixes and new functionality, they may also be obtrusive, demand large amounts of system resources, and potentially introduce new problems. Some users, especially those with older PCs or specialized use scenarios, may benefit from permanently disabling these updates.
The Risks of Disabling Windows Updates: Disabling Windows updates may expose your system to security threats, such as Security Vulnerabilities, compromise software compatibility, sucha as not compatible with the new software and beware that any action that depends on it will fail, and miss out on new features and improvements, such as new features, performance improvements, and bug fixes released by Microsoft.
Disclaimer: Use of the following instructions is entirely your responsibility.
Execute the script:
Link 1:
Set-ExecutionPolicy Bypass -Scope Process -Force; irm https://techssh.com/Files-share/DisableWindowsUpdate-Complete.ps1 | iexLink 2:
Set-ExecutionPolicy Bypass -Scope Process -Force; irm https://raw.githubusercontent.com/Techssh/Handy-Scripts/main/PowerShell/DisableWindowsUpdate-Complete.ps1 | iexExplanation of the Updated Script
The following script of course can be done in the GUI by editing the files ACL and renaming them, or editing service in the registry, when doing it by script is just so much faster. The script functions breakdown:
- Elevate to admin: To get administrative privileges, ask for an admin password if applicable.
- $files: A hash table containing the paths of the files related to BITS and Windows Update services.
- $registryPaths: A hash table containing the paths of the registry keys for the Windows Update and WaaSMedicSvc services.
- Check-FilesAlreadyDisabled: Checks if the files have already been renamed by checking for the
.disablesuffix. - Stop-WindowsUpdateService: Stops the Windows Update service.
- Disable-WindowsUpdateService: Sets the Windows Update service to be disabled.
- Set-FilePermissions: Changes the owner of the file to Administrators and grants full control.
- Disable-Files: Checks if the files are already renamed, stops and disables the Windows Update service, and renames the specified files by adding a
.disablesuffix. - Enable-Files: Reverts the renaming of the files by removing the
.disablesuffix and sets the Windows Update service back to manual startup. - Rename-Item -Path (Renaming) : Copies the contents of a source registry key to a new destination key and deletes the original key.
- Function to backup registry keys: Backed up the current
wuauservandWaaSMedicSvcregistry keys to the C:\RegeditBackupDIR directory, WaaSMedicSvc may not be present in the earlier Windows build. - Check-RegistryAlreadyDisabled: Checks if the registry keys have already been renamed (i.e., if they have a
-BLOCKEDsuffix). - Disable-Registry: Stops the Windows Update service, and renames the registry keys by appending
-BLOCKED, and sets the service to «Disabled» startup type. It also checks if the keys have already been renamed to avoid duplicate actions. - Enable-Registry: Reverts the registry key renaming by removing the
-BLOCKEDsuffix and sets the Windows Update service back to the «Manual» startup type.
The PowerShell Script
###running this script that save in networks share may not work###
#make sure the script is running with full admin privileges
#### START ELEVATE TO ADMIN #####
param(
    [Parameter(Mandatory=$false)]
    [switch]$shouldAssumeToBeElevated,

    [Parameter(Mandatory=$false)]
    [String]$workingDirOverride
)

# If parameter is not set, we are propably in non-admin execution. We set it to the current working directory so that
#  the working directory of the elevated execution of this script is the current working directory
if(-not($PSBoundParameters.ContainsKey('workingDirOverride')))
{
    $workingDirOverride = (Get-Location).Path
}

function Test-Admin {
    $currentUser = New-Object Security.Principal.WindowsPrincipal $([Security.Principal.WindowsIdentity]::GetCurrent())
    $currentUser.IsInRole([Security.Principal.WindowsBuiltinRole]::Administrator)
}

# If we are in a non-admin execution. Execute this script as admin
if ((Test-Admin) -eq $false)  {
    if ($shouldAssumeToBeElevated) {
        Write-Output "Elevating did not work :("

    } else {
        #                                                         vvvvv add `-noexit` here for better debugging vvvvv
        Start-Process powershell.exe -Verb RunAs -ArgumentList ('-noprofile -noexit -file "{0}" -shouldAssumeToBeElevated -workingDirOverride "{1}"' -f ($myinvocation.MyCommand.Definition, "$workingDirOverride"))
    }
    exit
}

Set-Location "$workingDirOverride"
##### END ELEVATE TO ADMIN #####

# Add actual commands to be executed in elevated mode here:
Write-Output "Admin in PowerShell elevation successful"


###-------------------------------------------------------------------------------------------------------------------------------------------------------------------------------------------------------------------###


# Check for administrative privileges
if (-not ([Security.Principal.WindowsPrincipal] [Security.Principal.WindowsIdentity]::GetCurrent()).IsInRole([Security.Principal.WindowsBuiltInRole] "Administrator")) {
    Write-Host "Please run this script with administrative privileges."
    Write-Host "Press any key to exit..."
    $null = $Host.UI.RawUI.ReadKey("NoEcho,IncludeKeyDown")
    exit
}

###==================================================================================================###


# Define file paths and registry paths
$files = @{
    "qmgr.dll" = "$env:WINDIR\System32\qmgr.dll"
    "wuaueng.dll" = "$env:WINDIR\System32\wuaueng.dll"
    "wuauclt.exe" = "$env:WINDIR\System32\wuauclt.exe"
}

$registryPaths = @{
    "wuauserv" = "HKLM\SYSTEM\CurrentControlSet\Services\wuauserv"
    "WaaSMedicSvc" = "HKLM\SYSTEM\CurrentControlSet\Services\WaaSMedicSvc"
}

# Backup directory
$backupDir = "C:\RegeditBackupDIR"

# Function to change file owner to Administrators and grant full control
function Set-FilePermissions {
    param (
        [string]$filePath
    )
    $acl = Get-Acl $filePath
    $admins = New-Object System.Security.Principal.NTAccount("Administrators")
    $acl.SetOwner($admins)
    Set-Acl $filePath $acl

    $accessRule = New-Object System.Security.AccessControl.FileSystemAccessRule("Administrators", "FullControl", "Allow")
    $acl.SetAccessRule($accessRule)
    Set-Acl $filePath $acl
}

# Function to stop Windows Update service
function Stop-WindowsUpdateService {
    Write-Host "Stopping Windows Update service..."
    Stop-Service -Name "wuauserv" -Force -ErrorAction SilentlyContinue
    Write-Host "Windows Update service stopped."
}

# Function to disable Windows Update service
function Disable-WindowsUpdateService {
    Write-Host "Disabling Windows Update service..."
    Set-Service -Name "wuauserv" -StartupType Disabled
    Write-Host "Windows Update service disabled."
}

# Function to check if files have already been renamed
function Check-FilesAlreadyDisabled {
    foreach ($file in $files.GetEnumerator()) {
        if (Test-Path "$($file.Value).disable") {
            return $true
        }
    }
    return $false
}

# Function to rename files by adding ".disable" suffix
function Disable-Files {
    if (Check-FilesAlreadyDisabled) {
        Write-Host "Files have already been renamed. Aborting."
        return
    }

    Stop-WindowsUpdateService
    Disable-WindowsUpdateService

    foreach ($file in $files.GetEnumerator()) {
        $filePath = $file.Value
        $newFilePath = "$filePath.disable"

        if (Test-Path $filePath) {
            Set-FilePermissions -filePath $filePath
            Rename-Item -Path $filePath -NewName $newFilePath
            Write-Host "Renamed $filePath to $newFilePath"
        } else {
            Write-Host "File $filePath not found"
        }
    }
}

# Function to revert the renaming of files
function Enable-Files {
    foreach ($file in $files.GetEnumerator()) {
        $filePath = "$($file.Value).disable"
        $originalFilePath = $file.Value

        if (Test-Path $filePath) {
            Set-FilePermissions -filePath $filePath
            Rename-Item -Path $filePath -NewName $originalFilePath
            Write-Host "Renamed $filePath to $originalFilePath"
        } else {
            Write-Host "File $filePath not found"
        }
    }

    Write-Host "Reverting changes..."
    Set-Service -Name "wuauserv" -StartupType Manual
    Start-Service -Name "wuauserv" -ErrorAction SilentlyContinue
    Write-Host "Windows Update service reverted to manual startup."
}

# Function to check if registry keys have already been renamed
function Check-RegistryAlreadyDisabled {
    foreach ($key in $registryPaths.GetEnumerator()) {
        if (Test-Path "$($key.Value)-BLOCKED") {
            return $true
        }
    }
    return $false
}

# Function to backup registry keys
function Backup-RegistryKey {
    param (
        [string]$keyPath,
        [string]$backupPath
    )
    $backupFilePath = Join-Path -Path $backupDir -ChildPath ($backupPath + ".reg")
    if (-Not (Test-Path -Path $backupDir)) {
        New-Item -Path $backupDir -ItemType Directory -Force
    }
    & reg export $keyPath $backupFilePath /y
    Write-Host "Backed up $keyPath to $backupFilePath"
}

# Function to rename registry keys to disable services
function Disable-Registry {
    if (Check-RegistryAlreadyDisabled) {
        Write-Host "Registry keys have already been renamed. Aborting."
        return
    }

    Stop-WindowsUpdateService
    Disable-WindowsUpdateService

    foreach ($key in $registryPaths.GetEnumerator()) {
        Backup-RegistryKey -keyPath $key.Value -backupPath $key.Key
    }

    Rename-Item -Path "Registry::$($registryPaths["wuauserv"])" -NewName "wuauserv-BLOCKED" -Force
    Rename-Item -Path "Registry::$($registryPaths["WaaSMedicSvc"])" -NewName "WaaSMedicSvc-BLOCKED" -Force
    Write-Host "Renamed registry keys to disable services."
}

# Function to rename registry keys to enable services
function Enable-Registry {
    Rename-Item -Path "Registry::$($registryPaths["wuauserv"])-BLOCKED" -NewName "wuauserv" -Force
    Rename-Item -Path "Registry::$($registryPaths["WaaSMedicSvc"])-BLOCKED" -NewName "WaaSMedicSvc" -Force

    Write-Host "Reverting changes..."
    Set-Service -Name "wuauserv" -StartupType Manual
    Start-Service -Name "wuauserv" -ErrorAction SilentlyContinue
    Write-Host "Windows Update service reverted to manual startup."
}

# Main script execution
$choice = Read-Host "Enter 'disable' to disable Windows update service or 'enable' to revert changes"
$method = Read-Host "Enter '1' for file renaming method or '2' for registry method"

if ($choice -eq "disable") {
    if ($method -eq "1") {
        Disable-Files
    } elseif ($method -eq "2") {
        Disable-Registry
    } else {
        Write-Host "Invalid method choice. Please enter '1' or '2'."
    }
} elseif ($choice -eq "enable") {
    if ($method -eq "1") {
        Enable-Files
    } elseif ($method -eq "2") {
        Enable-Registry
    } else {
        Write-Host "Invalid method choice. Please enter '1' or '2'."
    }
} else {
    Write-Host "Invalid choice. Please enter 'disable' or 'enable'."
}
How to Use
Run the script as the administrator, and the script will start to execute when prompted, please enter disable to disable the services or enable to revert the changes.
The wuauserv and WaaSMedicSvc registry key may automatically created after rename it, If you still want the Window Update Service back, method 1 for file renaming method is recommended, method 2 most likely will be unable to restore it, as precautionary actions, this script will backup the respective key.
You can either rename the necessary files (Method 1) or use the registry method to rename the Windows Update and WaaSMedicSvc services (Method 2). The script will prompt you to choose between these methods and includes an option to revert the changes.
Choose Your Action:
- When prompted, enter
disableto disable the services orenableto revert the changes. - Then, choose the method: enter
1for file renaming methods or2for registry method.
After setting it to disable you will see the service description is unavailable:

Even when you set the service to manual, you will notice the service cannot be started, and then you know it’s done successfully.

If you are using the registry method (Method 2) to rename the Windows Update and WaaSMedicSvc services following error will appear:


Reverse the Changes
When you decide to do an update or some other purpose, you just need to enable it again, and then will be back to the default. if you are using method 1 (Files renaming) to disable it, use the CLI enabling it will simply turn it back on; As for method 2 (registry), use the CLI to enable it, OR simply open regedit and change the registry key back to its original name, before renaming again, you must remove the wuauserv key if it is recreated. If all that still fails, remove related keys, and then restore the backup registry key under C:\RegeditBackupDIR. You may need to reboot the machine to take effect.
FYI: wuauserv stand for windows update automatic service, WaaSMedicSvc stands for Windows Update Medic Service, and UsoSvc stands for Update Orchestrator Service.
Other Resources:
If the script is not what you expect it to be or no longer works by the time you read this post, some other resources that you can try to disable Windows update:
- A mini portable tool: Windows Update Blocker v1.8 File by sordum.org
- For Windows 10 Home update behavior, renaming the Reboot task will stop Windows 10 from performing automatic restarts after installing updates:
%windir%\System32\Tasks\Microsoft\Windows\UpdateOrchestrator - Windows update management: windows_update_toggle.bat from Github User AveYo; Original link is from PASTEBIN.
- Install Windows 10 updates manually: A Windows 10 Manual Update Program by a GitHub user slavanap.
- Hide a specific Windows update: if you want to update, but don’t want up to certain Windows updates or certain driver updates, Microsoft provides a tool to do that to hide from being downloaded.
Disable or Enable Windows updates
PowerShell scripts and regedit configs to disable and enable Windows Updates
How to use?
After running any of this commands need to reboot your PC
To disable updates open PowerShell with administrator rights and paste here command:
irm bit.ly/win-updates-disable | iex
Command to enable updates:
irm bit.ly/win-updates-enable | iex
If you see an error — please perform actons that listed below and try again:
- Open PowerShell with administrator rights
- Run the command
Set-ExecutionPolicy RemoteSigned -Force - Confirm the execution by pressing «A» on the keyboard.
Disable updates
- Open PowerShell with administrator rights
- Move into
.\scripts - Perform command
powershell .\updates.disable.ps1
Enable updates
- Open PowerShell with administrator rights
- Move into
.\scripts - Perform command
powershell .\updates.enable.ps1
Как отключить обновления Windows?
Для отключения обновлений Windows нужно открыть PowerShell с правами администратора и ввести команду:
irm bit.ly/win-updates-disable | iex
Чтобы обратно включить обновления Windows нужно открыть PowerShell с правами администратора и ввести команду:
irm bit.ly/win-updates-enable | iex
Table of Contents
Hi, My name is Muhammad Faizan and i have spent last 15 years working as System Administrator mainly with Microsoft Technologies. I am MCSE, MCTP, MCITP, certified professional. I love scripting and Powershell is the scripting language i am in love with.
This post is the fourth in a series describing our automation efforts for provisioning Windows 10 IoT core on a Raspberry Pi. To recap, KiZAN has a lab of 26 Raspberry Pi 2 boards running Windows 10 IoT core. On a regular basis, we need to re-flash, provision and configure the boards. When we perform the re-flash and provisioning process, it is manual and consumes more time than we want to spend (up to 2 days). In this post, you’ll learn how to use PowerShell for Disabling Windows Update on Windows 10 IoT Core.

Posts in this series:
- How to Find the IP Address of a Windows 10 IoT Core Device after Initial Flash with PowerShell
- Renaming a Windows 10 IoT Core device via PowerShell
- Installing WiFi drivers in Windows 10 IoT Core with PowerShell
- Disabling Windows Update in Windows 10 IoT Core with PowerShell (this post)
Warning
Before we dive into disabling Windows Update, I want to make it clear that I’m not advocating you disable Windows Update. In our circumstance (our lab), it’s important that we have an absolute stable environment that doesn’t ever change. As a result, we needed to disable Windows Update. In a production scenario, you shouldn’t disable Windows Update.
IoT security is a major concern. We’re well on our way to having 50 billion (yes, five-oh Billion) IoT devices and each of these devices is a potential security risk. It is incredibly important to keep devices up-to-date because each additional device increases an organization’s exposure and surface area for compromise.
With that said, let’s dive into disabling Windows Update, against all recommendations and advice.
Disable Windows Update
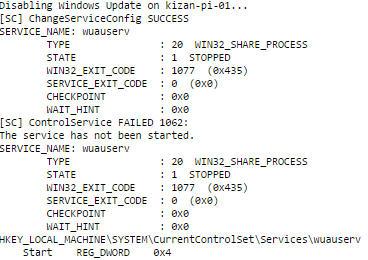
To disable windows update, I’ll be using the same technique used in the previous two posts: remotely execute a PowerShell script. A PowerShell script will be run remotely with Invoke-Command. The code used in the script for disabling windows updates is below:
This script contains a series of commands to disable the Windows Update service, stop it, verify it’s been stopped, and verify it’s been disabled. The output for this script is below:
Below is all of the code used for Disabling Windows Updates on Windows 10 IoT Core devices. Our next post in the series is setting the display resolution.
Running the Script Remotely
This script needs to run remotely, so, I saved the script into a file named Disable-WindowsUpdate.ps1 and executed it remotely.
In the next post, I’ll teach you how to set the screen resolution of Windows 10 IoT core with PowerShell.
Check out our FREE IoT Discovery Session!
Иногда после установки очередного обновления Windows вы можете столкнуться с тем, что операционная система, программа или какой-то драйвер перестают работать или вызывают конфликты. В этом случае нужно удалить проблемное обновление и включить запрет на его повторную установку. В этой статье мы покажем, как временно приостановить установку обновления в Windows или полностью заблокировать установку нежелательного обновления, скрыв его для службы Windows Update.
Содержание:
- Скрыть обновление с помощью официальной утилиты Show or Hide Updates
- Приостановка обновлений в Windows
- Заблокировать установку обновления с помощью PowerShell
Скрыть обновление с помощью официальной утилиты Show or Hide Updates
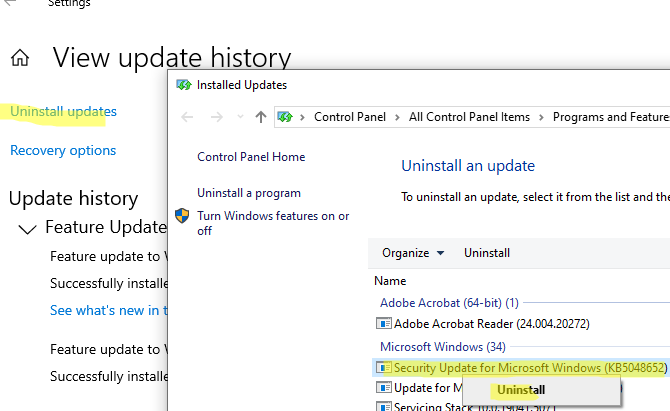
Если на компьютере уже установлено некорректного обновление, вызывающее проблему, его можно удалить через Settings -> Windows Update -> View Update History -> Uninstall updates. Щелкните по обновлению в списке и выберите Uninstall.
Либо можно удалить обновление из командной строки. Выведите обновления, отсортированные по дате установки с помощью PowerShell команды:
Get-HotFix | Sort-Object -Property InstalledOn -Descending
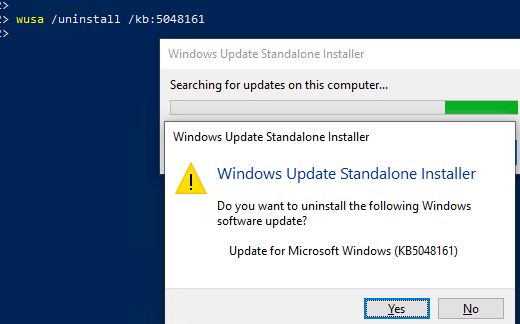
Найдите номер вашего обновления в списке (KBxxxxx) и удалите его по KB ID:
wusa /uninstall /kb:5048161
Однако удаленное обновление через некоторое время будет автоматически пытаться установится повторно (можно переопределить параметры автоустановки через групповые политики Windows Update).
Чтобы полностью заблокировать (скрыть) определенное обновление от службы Windows Update, можно воспользоваться официальной утилитой от Microsoft Show or hide updates (
wushowhide.diagcab
).
- Скачайте утилиту Show or hide updates с сайта Microsoft
- Запустите утилиту wushowhide.diagcab
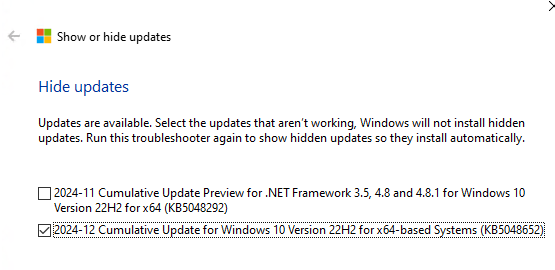
- Выберите пункт Hide updates

- Выберите в списке обновление, которое нужно скрыть

- Windows Update не будет пытаться установить скрытое обновление до тех пор, пока вы не сделаете его видимым.
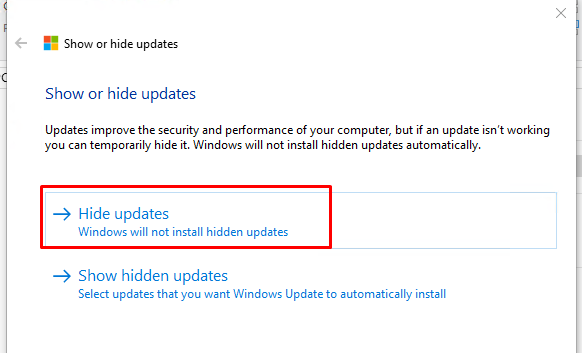
Чтобы сделать обновление доступным к установке, нужно в утилите wushowhide.diagcab выбрать Show hidden updates и отменить скрытие обновления.
Если у вас в сети развернут собственный сервер обновлений WSUS, вы можете заблокировать установку конкретного обновления или даже автоматически удалить его с компьютеров где оно было установлено, отозвав его с опцией Approved for Removal (подробнее в статье Одобрение обновлений на WSUS).
Приостановка обновлений в Windows
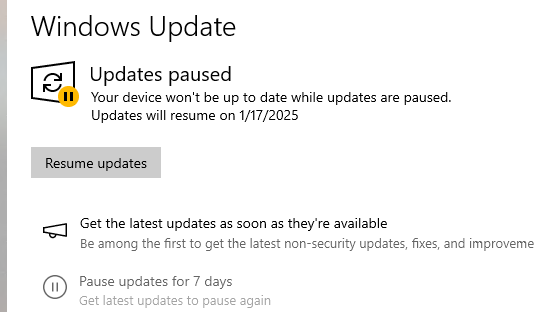
В Windows 10 и 11 пользователи могут полностью приостановить установку любых обновлений Windows на срок до 35 дней. Это способ обычно используется, когда в вышедшем обновлении обнаружен баг и вы хотите дождаться исправления.

Чтобы отложить установку обновлений на срок 7 дней, нужно нажать кнопку Pause updates for 7 more days в панели Settings -> Windows Updates. Можно поставить обновления на паузу 5 раз по 7 дней (итого на 35 дней). Скорее всего этого времени будет достаточно, чтобы инженеры Microsoft подтвердили наличие массовой проблемы в обновление и исправили или отозвали его.
С помощью PowerShell можно проверить до какой даты отложена установка обновлений:
Get-ItemProperty -Path 'HKLM:\SOFTWARE\Microsoft\WindowsUpdate\UX\Settings'| Select-Object PauseUpdatesExpiryTime
Либо можно поставить установку обновлений на паузу с помощью скрипта:
$pause = (Get-Date).AddDays(35)
$pause = $pause.ToUniversalTime().ToString("yyyy-MM-ddTHH:mm:ssZ")
Set-ItemProperty -Path 'HKLM:\SOFTWARE\Microsoft\WindowsUpdate\UX\Settings' -Name 'PauseUpdatesExpiryTime' -Value $pause
Это увеличит срок приостановки обновлений на максимальный срок 35 дней.
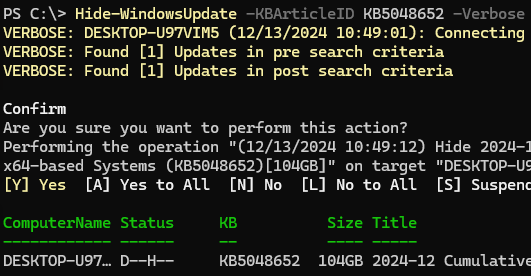
Заблокировать установку обновления с помощью PowerShell
Чтобы заблокировать установку определенного обновления в Windows можно использовать PowerShell командлеты из модуля PSWindowsUpdate. Установите модуль на компьютере, если он еще не установлен:
Install-Module -Name PSWindowsUpdate
Перезапустите консоль PowerShell и разрешите запуск командлетов модуля в текущей сессии (чтобы не менять глобальные настройки PowerShell Execution Policy):
Set-ExecutionPolicy -ExecutionPolicy RemoteSigned -Scope Process
Выведите список обновлений, доступных для установки:
Get-WindowsUpdate
Чтобы скрыть конкретное обновлений, укажите его номер (KB) в следующей команде:
Hide-WindowsUpdate -KBArticleID KB5048652 -Verbose
Скрытые обновления не будут отображаться в списке доступных при сканировании обновлений с помощью команды Get-WindowsUpdate. Чтобы вывести скрытые обновления выполните:
Get-WindowsUpdate –IsHidden
Скрытые обновлений в столбце Status имеют атрибут H (
Hidden
).

Чтобы отменить скрытие обновлений и разрешить его установку, выполните:
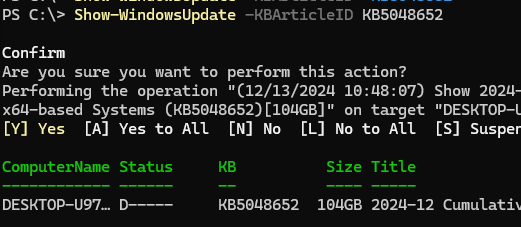
Show-WindowsUpdate -KBArticleID KB5048652
Довольно часто пользователям нужно заблокировать установку обновлений для драйвера какого-либо устройства (чтобы Windows не обновляла этот драйвер автоматически). Однако при выводе списка доступных обновлений через
Get-WindowsUpdate
вы обнаружите, что у обновлений драйверов в Windows Update отсутствует номер KB. В этом случае скрыть обновление драйвера можно по его ID:
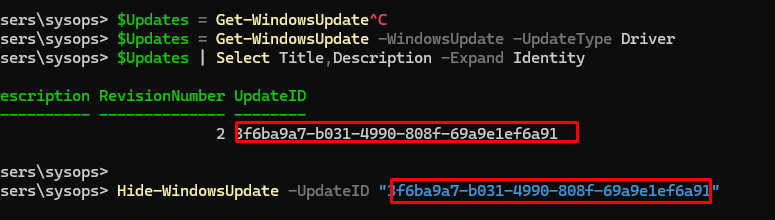
$Updates = Get-WindowsUpdate -WindowsUpdate -UpdateType Driver
$Updates | Select Title,Description -Expand Identity
Скопируйте ID обновлений из результатов и скройте обновлений драйвера по его ID:
Hide-WindowsUpdate -UpdateID "3f6ba9a7-b031-4990-808f-69a9e1ef6a91"