
Среди различных советов на тему оптимизации Windows 10 или работы системы с SSD вы можете встретить рекомендацию отключить индексирование. Сам метод оптимизации неоднозначный, но, если вы решили, что это требуется сделать, а поиск не используете, вполне можете применить его.
Отключение индексирования возможно путем изменения соответствующих параметров системы в панели управления, в том числе и для каждого диска отдельно, так и путем отключения соответствующей службы. В этой простой инструкции подробно о том, как отключить индексирование Windows 10 различными способами. Также может быть интересным: Настройка SSD для Windows 10, Программы для SSD.
- Отключение индексирования в панели управления Windows 10 и свойствах диска
- Отключить службу индексирования (Windows Search)
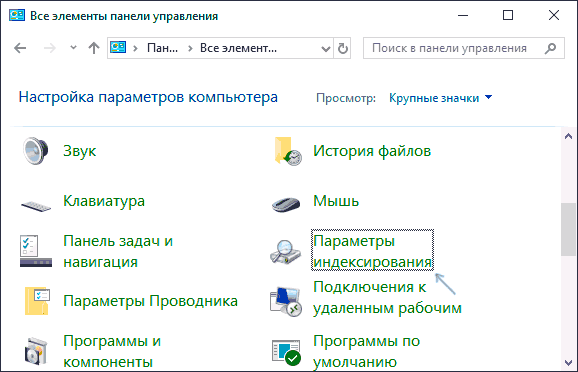
Отключаем индексирование Windows 10 в параметрах панели управления
Стандартный метод настройки и отключения индексирования Windows 10 — использование соответствующего раздела в панели управления:
- Откройте панель управления, а затем — Параметры индексирования. Можно просто начать набирать в поиске на панели задач слово «Индексирование», чтобы быстро открыть нужный пункт.

- В открывшемся окне вы увидите список расположений, для которых включено индексирование. Чтобы изменить этот список нажмите кнопку «Изменить».

- Снимите отметки с тех расположений, которые не требуется индексировать и примените настройки.


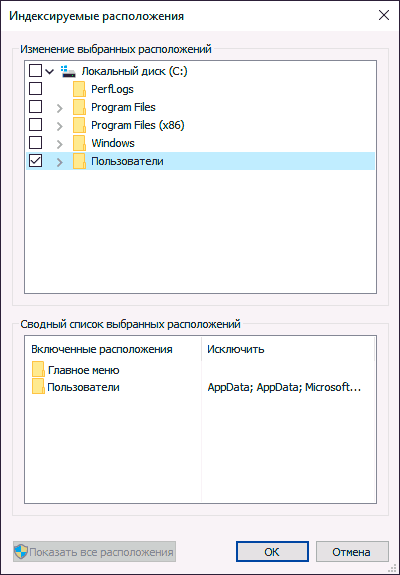
Дополнительно, вы можете отключить индексирование содержимого файлов на отдельных дисках (например, только для SSD) как самую затратную по ресурсам операцию индексирования. Для этого достаточно выполнить следующие шаги.
- Откройте свойства нужного диска.
- Снимите отметку «Разрешить индексировать содержимое файлов на этом компьютере в дополнение к свойствам файлам» и примените сделанные настройки.
Как видите, все сравнительно несложно, но при этом сама служба индексирования на компьютере продолжает работать.
Отключение службы индексирования Windows 10 (Windows Search)
Если вам требуется полностью отключить индексирование Windows 10, сделать это можно путем отключения соответствующей системной службы, которая называется Windows Search:
- Нажмите клавиши Win+R на клавиатуре, введите services.msc
- Найдите в списке служб «Windows Search».

- В типе запуска установите «Отключена», примените настройки и перезагрузите компьютер (если просто отключить и остановить, она запустится снова).


После этого индексирование в Windows 10 будет полностью отключено, но поиск по параметрам, системным элементам и установленным программам в панели задач продолжит работать, равно как и поиск по файлам, если использовать окно поиска в проводнике (в последнем случае вы будете видеть уведомление о том, что поиск может быть медленным, так как индексирование не выполняется).
Home
Windows
By
Abhishek Silwal

Windows Search is a great feature that helps you avoid having to go through all the path directories to access a file or a folder.
However, you may have to disable this feature in some scenarios. For instance, you may want to restrict user access to search if you want to create a limited environment domain.
Many search features are also redundant and you may want to disable those instead of the search application altogether.
So, we have created this article to help you enable/disable Windows Search or its specific features.
How to Enable/Disable Windows Search
There are mainly two ways to enable or disable Windows Search. They actually have different outcomes, so read carefully and pick one according to your need.
Change Search Service Behavior
The most convenient method to enable or disable Windows Search is by changing its service configuration. The Windows Search service handles indexing, caching, and search results for files, e-mail, etc.
So, disabling this service turns off indexing altogether. However, keep in mind that you can still use the search app. It can’t find your files and folders unless you enter the exact name or the initial part of the name. But you can still use the Start menu to search for apps and web results.
Regardless, here are some of the ways to disable your search service:
Through Services App
The Services app is the default program you can use to change the configuration of your system services, including the Windows Search service.
Here’s how you can enable/disable Windows Search Service:
- Open Run by pressing Win + R.
- Type
services.mscand press Enter to open the Services app. - Look for Windows Search and double-click on it.
- To Disable Search, set the Startup type to Disabled and click Stop.

- To Enable Search, set the Startup type to Automatic (Delayed Start) and click Start.
- Click on Apply and OK.

Using Command Prompt
Another easy way to enable or disable the Windows Search service is by using the Command Prompt. You only need a single command in both cases, so copying and pasting the command is more convenient.
Here’s what you need to do:
- Open Run.
- Type
cmdand press Ctrl + Shift + Enter to open the Elevated Command Prompt. - Enter the following commands depending on whether you want to disable or enable Search:
- Disable:
sc config "wsearch" start=disabled && sc stop "wsearch" - Enable:
sc config "wsearch" start=delayed-auto && sc start "wsearch"
- Disable:

With Registry Editor
You can also modify the service’s settings by changing its configuration in your registry settings. In fact, all the above methods change the values in the relevant registry entries and your system directly looks at these entries to check the service configuration.
To use the Registry Editor to change such entries,
- Open Run and enter
regeditto open the Registry Editor. - Navigate to
Computer\HKEY_LOCAL_MACHINE\SYSTEM\CurrentControlSet\Services\WSearch\ - To disable Windows Search, change the value of Start to 4. And, to enable Windows Search, change the value of Start to 2 and DelayedAutoStart to 1.
- You need to double-click on the entry, change the Value data and click OK to change its value.


Restart your PC after changing the values for your system to apply the changes.
Rename Search Folder
Renaming the system folders and files used in the search feature is a great way to disable the feature from your File Explorer as well as the Start menu. Here, renaming is the same as deleting the files while creating backups. It effectively stops your system from using such files altogether, making search impossible unless you change the folder back to their default names.
However, this method requires you to change the permission settings for the folders and files. So we recommend you create a restore point beforehand to account for any issues due to improper permissions.
The complete method is as follows:
- Open Run and enter
%WinDir%\SystemApps - Click on Microsoft.Windows.Search_cw5n1h2txyewy and press F2 to rename it. You can set its name to anything you want, but we recommend just appending
.bakor.oldto make renaming it again easier. - Open this folder, select
SearchApp.exe, and press Alt + Enter to open its Properties. - Go to its Security tab and check whether any users other than TrustedInstaller allow Full Control.
- If Users, Administrators (if your account is an admin) or your current user has such permission, you can directly rename the file.
- Otherwise, click on Advanced.
- Select Change under Owner.

- Click on Advanced and on the next page, Find Now.
- Select your current user from the list and click OK. Selecting any other users is not recommended. Click OK again to change the owner.
- Keep on clicking OK until you close the Properties.
- Open the
SearchApp.exeProperties and go to Security > Advanced. - Click on Add and then, Select a principal.

- Perform steps 7-9 to select your current user as a principal.
- Set Type to Allow and tick Full Control.
- Keep on Pressing OK till you close Properties while applying the changes.
- Rename
SearchApp.exein a similar manner to its parent folder. For example,SearchApp.exe.old. - Now, go inside the
%WinDir%\SystemApps\MicrosoftWindows.Client.CBS_cw5n1h2txyewyfolder. - Look for
SearchHost.exeand perform steps 3-16 for this file too. - If the SystemApps folder contains Microsoft.Windows.Cortana_cw5n1h2txyewy folder, you also need to change the name of the folder and the executable file inside this folder as well.


You need to restart your Windows Explorer to apply the changes. To do so,
- Press Ctrl + Shift + Esc to open the Task Manager.
- Go to the Details tab.
- Select
explorer.exeand click End Task. Confirm with End process.
- Click on File > Run new task from the menu and enter explorer.

If a window with the name, Search, keeps popping up and closing continuously, you need to restart Windows Explorer again.
Through Group Policy Management Editor
This method is a safer alternative to renaming the search files and folders. However, you can only use it by creating a Software Restriction Group Policy Object for a domain. Here’s how you can do so:
- Open the Group Policy Management Editor.
- Go to Computer Configuration > Policies > Windows Settings > Security Settings > Software Restriction Policies > Additional Rules.
- If Software Restriction Policies does not expand to Additional Rules, right-click on it and select New Software Restriction Policy.
- Right-click on Additional Rules and select New Path Rule.

- Enter the following paths on the Path text box, set the Security level to Disallowed, and click OK:
%WinDir%\SystemApps\Microsoft.Windows.Search_cw5n1h2txyewy%WinDir%\SystemApps\Microsoft.Windows.Cortana_cw5n1h2txyewy(if the folder exists)%WinDir%\SystemApps\MicrosoftWindows.Client.CBS_cw5n1h2txyewy\SearchHost.exe

How to Enable/Disable Windows Search Web Results
Showing web results in Windows Search does not have many advantages. In fact, many users unknowingly open the web result when they actually want to run an app or any file in their local drive.
So, if you want to disable this feature, you can do so easily using the steps below:
- Open Run and enter
regedit. - Navigate to
Computer\HKEY_CURRENT_USER\SOFTWARE\Policies\Microsoft\Windows - Right-click on Windows and select New > Key.

- Name it as
Explorer. - Right-click on Explorer and select New > DWORD (32-bit) Value.
- Set its name to DisableSearchBoxSuggestions and double-click on it to change its value.
- Change the Value data to 1 to disable web results and click OK.
- If you want to enable it, you can change its value to 0.


Restart Windows Explorer (see above) to apply the changes.
How to Enable/Disable Search Highlights
Another possible search feature you might want to delete is the search highlights. It distracts you from your work and many users prefer customizing the start or search menu to their liking instead of automatically getting highlights based on Bing searches.
You can use the methods we have mentioned below to enable or disable this feature. Some of the methods overwrite other methods, so we recommend performing all of them.
Change Search Settings
The usual way to enable or disable search highlights is through the search permission Settings. The methods differ between Windows 10 and 11, so we have included both of them
On Windows 11
- Open Run and Enter
ms-settings:search-permissions. - Scroll down to Show search highlights and set its switch to On/Off per your need.


On Windows 10
- Right-click on the taskbar or the search bar.
- Click on Search and select Show search highlights to toggle this option.
Using Group Policy Editor
You can also change the group policy settings to enable or disable search highlights. This option overrides the settings so make sure to check it as well.
- Open Run and enter
gpedit.msc. - Go to Computer Configuration > Administrative Templates > Windows Components > Search.
- Double-click on Allow search highlights.

- Check Disabled or Enabled according to your preference and click OK.

Through Registry Editor
Another way you can change this setting is by modifying the relevant registry entry. Here’s how you can do so:
- Open Run and enter
regedit. - Navigate to
Computer\HKEY_CURRENT_USER\Software\Microsoft\Windows\CurrentVersion\SearchSettings - If IsDynamicSearchBoxEnabled exists, double-click on it to edit its value.

- If not, right-click on SearchSettings and select New > DWORD (32-bit) Value. Set its name to
IsDynamicSearchBoxEnabledand double-click on it. - Set the Value data to 0 to disable and 1 to enable the feature and click OK.

Related Questions
How to Hide and Unhide Search Icon on Windows
If you have disabled Windows Search, you might as well hide its icon to save space on the Taskbar. Here’s how you can do so:
On Windows 11
- Open Run and Enter
ms-settings:taskbar. - Click on the switch next to Search to hide or show its icon.

On Windows 10
- Right-click on the taskbar or the search bar.
- Click on Search and select Show search box to toggle the option.
How to Enable/Disable Win + S Search Shortcut?
Here’s how you can enable or disable the Win + S shortcut for Search. However, keep in mind that it also disables other hotkeys that include Win + S, such as Win + Shift + S for the snipping tool.
To enable or disable this shortcut:
- Open Run and enter
regedit. Computer\HKEY_CURRENT_USER\Software\Microsoft\Windows\CurrentVersion\Explorer\Advanced- Right-click on Advanced and select New > String Value.
- Set its name to
DisabledHotkeysand double-click on it. - Change the value data to
Sand click OK.
You don’t need to create this value if it already exists. You can also add S to any other keys already present in the value by separating them with a comma.
Windows Search is an essential component of the Windows operating system, providing users with a quick way to find files, folders, apps, and information on their computers. However, there are times when you might want to disable Windows Search to improve performance or to reduce distractions. In this comprehensive guide, we will explore several methods to disable Windows Search on Windows 11, detailing the steps involved and the implications of each approach. Whether you’re looking to disable it temporarily for troubleshooting purposes or want to turn it off permanently, this article will equip you with the necessary knowledge.
Understanding Windows Search
Before diving into the methods to disable Windows Search, it’s important to understand what it is and how it functions. Windows Search indexes files and folder contents to enable quick retrieval when users enter queries in the search bar. The indexing process occurs in the background, continuously updating the index as new files are added or edited. While this speeds up searches significantly, it can consume system resources, leading to performance issues, particularly on lower-end machines.
Additionally, some users may find the search feature unnecessary, especially if they prefer to navigate their file systems manually. For these reasons, knowing how to disable Windows Search can be advantageous.
Method 1: Disabling Windows Search via the Services App
One of the most straightforward ways to disable Windows Search is through the Services app. This method allows you to stop the Windows Search service, effectively disabling the search functionality on your computer. Here’s how to do it:
-
Open the Services App
- Press
Windows + Rto open the Run dialog. - Type
services.mscand hitEnter. This will open the Services window.
- Press
-
Locate Windows Search
- In the Services window, scroll down to find the entry titled «Windows Search.»
-
Stop the Service
- Right-click on «Windows Search» and select
Stop. This action will stop the service from running.
- Right-click on «Windows Search» and select
-
Disable the Service
- Right-click on «Windows Search» again, and select
Properties. - Under the «Startup type» dropdown menu, select
Disabled. This setting ensures that the Windows Search service does not start again when you reboot your computer.
- Right-click on «Windows Search» again, and select
-
Apply Changes
- Click
OKto apply the changes. Windows Search is now disabled.
- Click
Implications of Disabling Windows Search via Services
Disabling Windows Search through the Services app will immediately stop indexing and searching functionalities. This change can free up system resources, which is especially beneficial for older or lower-end computers. However, keep in mind that this will also disable features such as search in the Start menu, File Explorer, and settings, which some users may find inconvenient.
Method 2: Using Group Policy Editor
If you’re using Windows 11 Pro or Enterprise editions, you have access to the Group Policy Editor, which allows for more granular control over system settings. Disabling Windows Search via Group Policy can prevent users from enabling it again easily.
-
Open Group Policy Editor
- Press
Windows + R, typegpedit.msc, and hitEnter.
- Press
-
Navigate to Search Policies
- In the Group Policy Editor, navigate to the following path:
User Configuration > Administrative Templates > Start Menu and Taskbar
- In the Group Policy Editor, navigate to the following path:
-
Locate the Setting
- Find the policy titled «Do not allow search» from the list of settings.
-
Enable the Policy
- Double-click on the policy, set it to
Enabled, and clickOK.
- Double-click on the policy, set it to
-
Force Update Group Policies
- To ensure your changes take effect immediately, open Command Prompt as an administrator and type:
gpupdate /force - Press
Enter.
- To ensure your changes take effect immediately, open Command Prompt as an administrator and type:
Implications of Using Group Policy Editor
By using the Group Policy Editor, you effectively lock down Windows Search features, making it challenging for users to re-enable the functionality without administrative permissions. This is particularly useful in environments like offices, where IT administrators may decide that search capabilities are unnecessary for certain users.
Method 3: Turning Off Windows Search in Settings
If you prefer a more user-friendly approach, the Settings app in Windows 11 also provides options to disable or limit Windows Search indexing. While this method may not fully disable Windows Search, it can reduce its burden on system resources.
-
Open Settings
- Click on the Start menu and select
Settings(you can also use the shortcutWindows + I).
- Click on the Start menu and select
-
Go to Privacy & Security
- In the Settings menu, click on
Privacy & securityfrom the left panel.
- In the Settings menu, click on
-
Access Windows Search Settings
- Scroll down and click on
Searching Windows.
- Scroll down and click on
-
Change Indexing Options
- Under the «More indexing options» section, click on
Advanced indexing options.
- Under the «More indexing options» section, click on
-
Modify Indexing Locations
- In the Indexing Options dialog, click on
Modify. - Uncheck the locations you do not want to index, such as specific drives or folders.
- In the Indexing Options dialog, click on
-
Stop the Indexer
- Back in the Advanced Options, click on the
Stopbutton to stop the indexing service.
- Back in the Advanced Options, click on the
Implications of Limiting Windows Search in Settings
This method offers a softer approach to disabling Windows Search. Instead of turning it off entirely, you reduce its workload by modifying the locations that it indexes. This can still improve performance if indexing results in unnecessary resource usage. However, keep in mind that disabling certain locations may lead to incomplete or inaccurate search results.
Method 4: Uninstalling Windows Search Component
In some cases, users may want to uninstall Windows Search entirely. While this option isn’t officially supported by Microsoft, it can be done through PowerShell. Use this approach with caution, as it can affect system stability.
-
Open PowerShell as Administrator
- Right-click on the Start menu and select
Windows Terminal (Admin)orWindows PowerShell (Admin).
- Right-click on the Start menu and select
-
Enter Uninstall Command
- Use the following command to uninstall Windows Search:
Get-AppxPackage *Microsoft.Windows.Search* | Remove-AppxPackage - Press
Enter.
- Use the following command to uninstall Windows Search:
-
Reboot Your Computer
- Restart your computer to apply the changes.
Implications of Uninstalling Windows Search
Uninstalling Windows Search via PowerShell removes the search capabilities from the system completely. This can significantly impact the ease of locating files and applications. If you change your mind, you may need to perform a repair install of Windows or use a backup solution to re-enable Windows Search.
Method 5: Disabling Windows Search via Registry Editor
The Registry Editor can be a powerful tool to tweak system settings, including Windows Search. However, this method should be approached with caution, as improper changes can lead to system instability.
-
Open Registry Editor
- Press
Windows + R, typeregedit, and hitEnter. If prompted by User Account Control, clickYes.
- Press
-
Navigate to the Search Key
- Navigate to the following path in the Registry Editor:
HKEY_CURRENT_USERSoftwareMicrosoftWindowsCurrentVersionSearch
- Navigate to the following path in the Registry Editor:
-
Modify the Search Setting
- Look for a key named
BingSearchEnabledand set its value to0. If it’s not present, you can create a new DWORD (32-bit) value with that name and set it to0.
- Look for a key named
-
Restart Your Computer
- After making the changes, reboot your system to apply.
Implications of Modifying the Registry
Modifying the registry can effectively disable certain features of Windows Search. However, improper changes can lead to system issues. Always create a backup of your registry before making significant changes, and if you are uncomfortable, consider using other methods outlined above.
Conclusion
Disabling Windows Search on Windows 11 can enhance system performance and cater to personal preferences. Various methods, including using the Services app, Group Policy Editor, Settings, PowerShell, and Registry Editor, provide flexibility based on users’ skill levels and requirements.
While disabling Windows Search might improve performance, it can also reduce the efficiency of file location and search functionalities. Weigh the pros and cons to determine the best approach for your usage.
Whether you choose a temporary or permanent solution, the steps outlined above will empower you to control the search capabilities on your Windows 11 device effectively. With this newfound knowledge, you can customize your system according to your needs, ensuring a smoother and more personalized user experience.
on April 27, 2015
‘Windows Search’ helps to find files, programs and emails easily on the computer. To use this, we just need to click on start button and start typing the search words in the search box. This feature is enabled by Windows Search service, which indexes the files on the computer for a faster search experience.
If you are not going to use Windows search feature, then you can disable the service permanently. Open administrator command prompt and run the below command.
C:\WINDOWS\system32>sc config WSearch start= disabled
[SC] ChangeServiceConfig SUCCESS
C:\WINDOWS\system32>
To enable windows search, we can run the below command.
C:\WINDOWS\system32>sc config WSearch start= auto
[SC] ChangeServiceConfig SUCCESS

C:\WINDOWS\system32>
Disable windows search for specific items
Windows search can index files, emails in Outlook and items and also browsing history from Internet explorer. Search for these items can be configured separately.
- Click on start button
- Type ‘Indexing options’

- Click on Modify.
Here you can select/deselect the folders/categories for enabling or disabling search.
Download Windows Speedup Tool to fix errors and make PC run faster
If you want to enable or disable Windows Search service in Windows Server, this step-by-step guide will help you do that. You can turn on or off the Windows Search service in Windows Server 2025/2022 with the help of Server Manager and PowerShell.
To enable the Windows Search service in Windows Server using Server Manager, follow these steps:
- Open the Server Manager.
- Choose Manage > Add Roles and Features.
- Select Role-based or feature-based installation and click Next.
- Tick the Windows Search Service checkbox and click Next.
- Click the Install button.
To get started, you need to open the Server Manager first. Then, click on Manage > Add Roles and Features.

Next, select the server from the server pool and choose the Role-based or feature-based installation option.
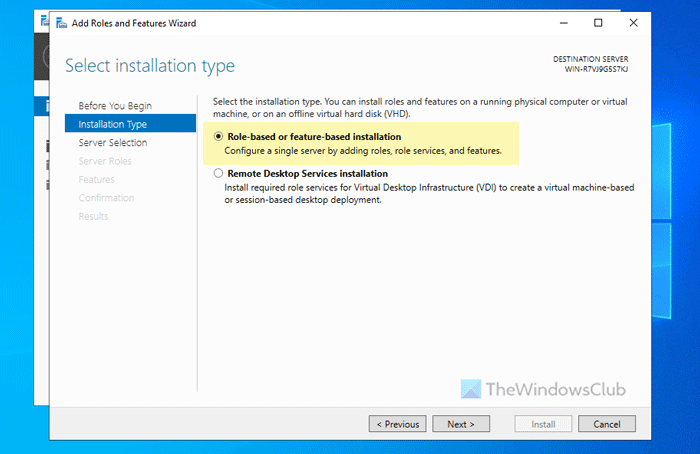
Then, tick the Windows Search Service checkbox and click Next.

Finally, confirm the installation by clicking the Install button.

Once done, you will be able to use the Windows Search Service on your Windows Server.
Disable Windows Search Service in Windows Server using Server Manager
To disable Windows Search Service in Windows Server using Server Manager, follow these steps:
- Open the Server Manager.
- Choose Manage > Remove Roles and Features.
- Select a server from the server pool.
- Clear the Windows Search Service checkbox.
- Click the Remove button.
- Let it be finished.
First, open the Server Manager and click on Manage > Remove Roles and Features.
Next, choose the server from the server pool and click on Next. Then, clear the Windows Search Service checkbox and click the Remove button.
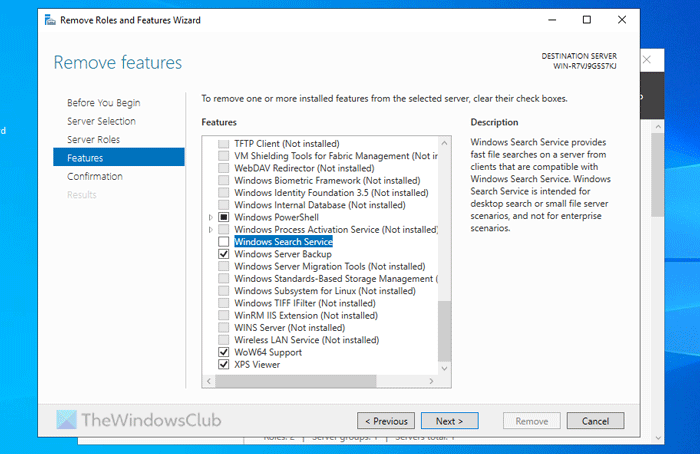
Let the process be finished.
How to enable Windows Search Service in Windows Server using PowerShell
To enable the Windows Search service in Windows Server using PowerShell, follow these steps:
- Search for PowerShell in the Taskbar search box.
- Right-click on the individual search result.
- Select Run as administrator.
- Enter this command:
Install-WindowsFeature Search-Service
To know more about these steps, keep reading.
First, you need to open PowerShell with administrator privileges. To do that, search for PowerShell in the Taskbar search box, right-click on the individual search result, and select the Run as administrator option.
Then, enter this command:
Install-WindowsFeature Search-Service
Once done, Windows Search Service will be installed.
Read: How to get Extended Security Updates (ESU) for Windows Server
Why is my Windows Search disabled?
By default, the Windows Search service is disabled on Windows Server. However, you can enable it using Server Manager or PowerShell. Following that, you need to open the Services panel, double-click on the Windows Search service, choose the Automatic (Delayed Start) option, and click the Start button. Finally, click on Apply and OK.
How to fix Windows Search service not running?
If the Windows Search service is not running on Windows Server, you should restart the service once. Double-click on the Windows Search service in the Services panel and click on the Stop and Start buttons accordingly. Alternatively, you can right-click on the service and choose the Restart option.
Read: How to set up and use Remote Assistance in Windows Server.
When he is not writing about Microsoft Windows or Office, Sudip likes to work with Photoshop. He has managed the front end and back end of many websites over the years. He is currently pursuing his Bachelor’s degree.