
Last Updated :
21 Dec, 2023
In Windows 10, you have to go through a lock screen in order to reach your desktop. This might be helpful for people whose devices are shared by many, but if it’s a personal device, then it may feel unnecessary. Many people don’t like this but are not aware of the fact that the lock screen in Windows 10 can be removed.
If you are in that category, here are the steps that you need to follow to remove your lock screen.
Disable Lock Screen in Windows 10
Step 1: Press Windows + R to open Run. Then, type regedit in the box to open Registry Editor.

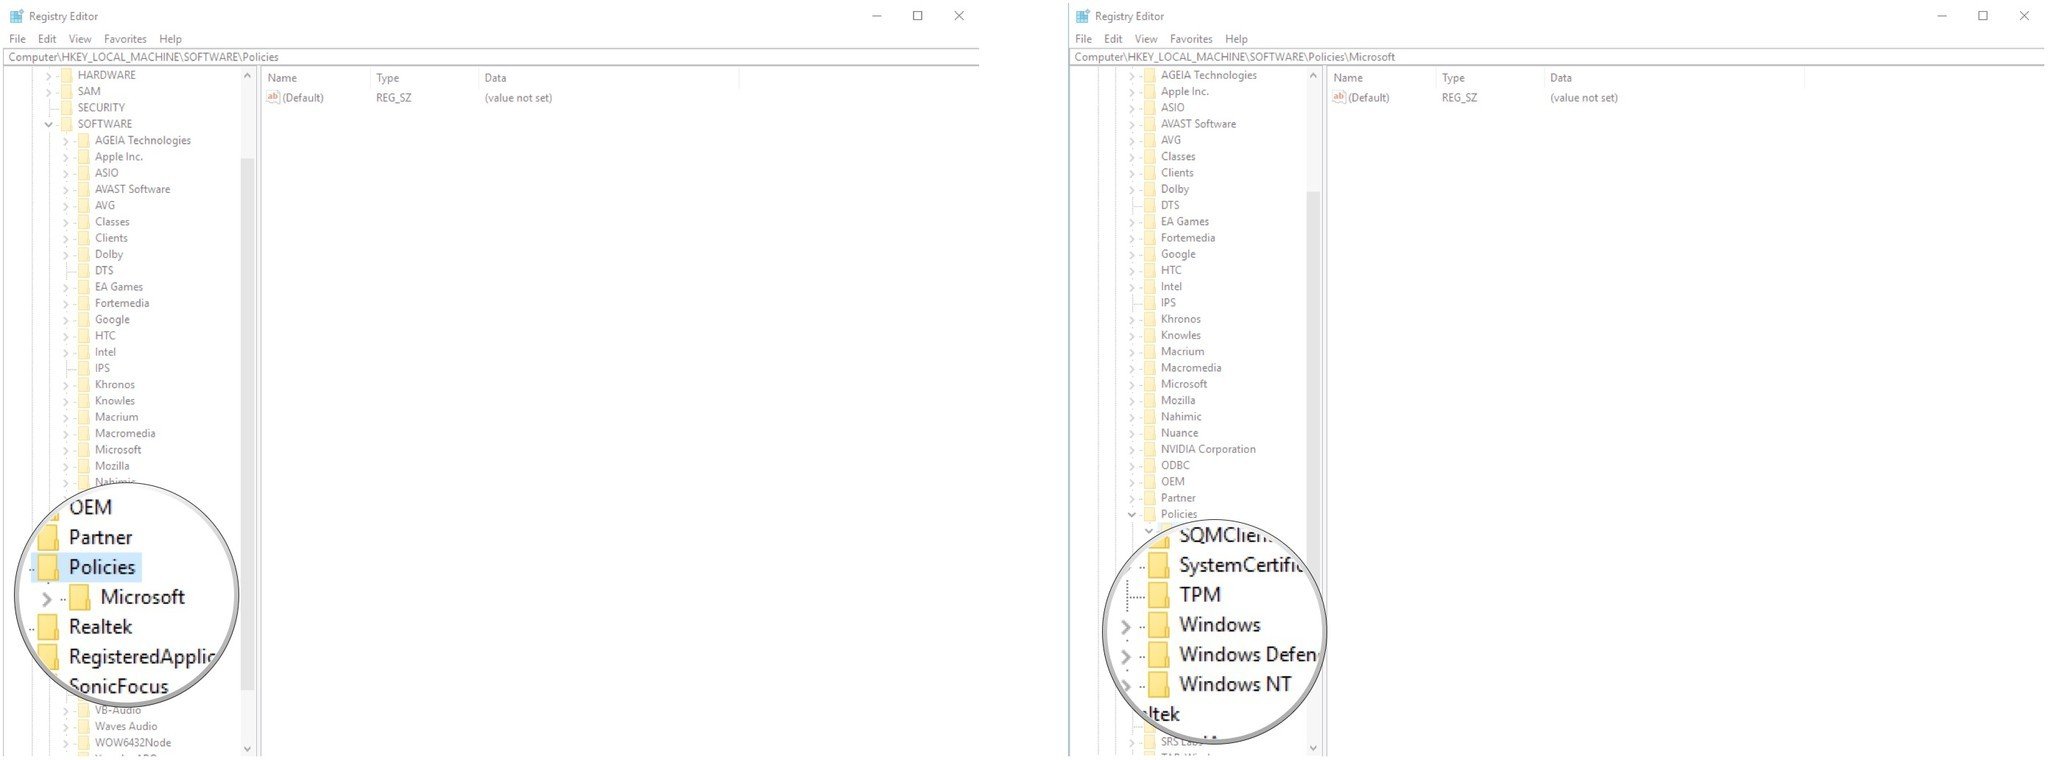
Step 2: Navigate to HKEY_LOCAL_MACHINE\SOFTWARE\Policies\Microsoft\Windows by double-clicking each directory.
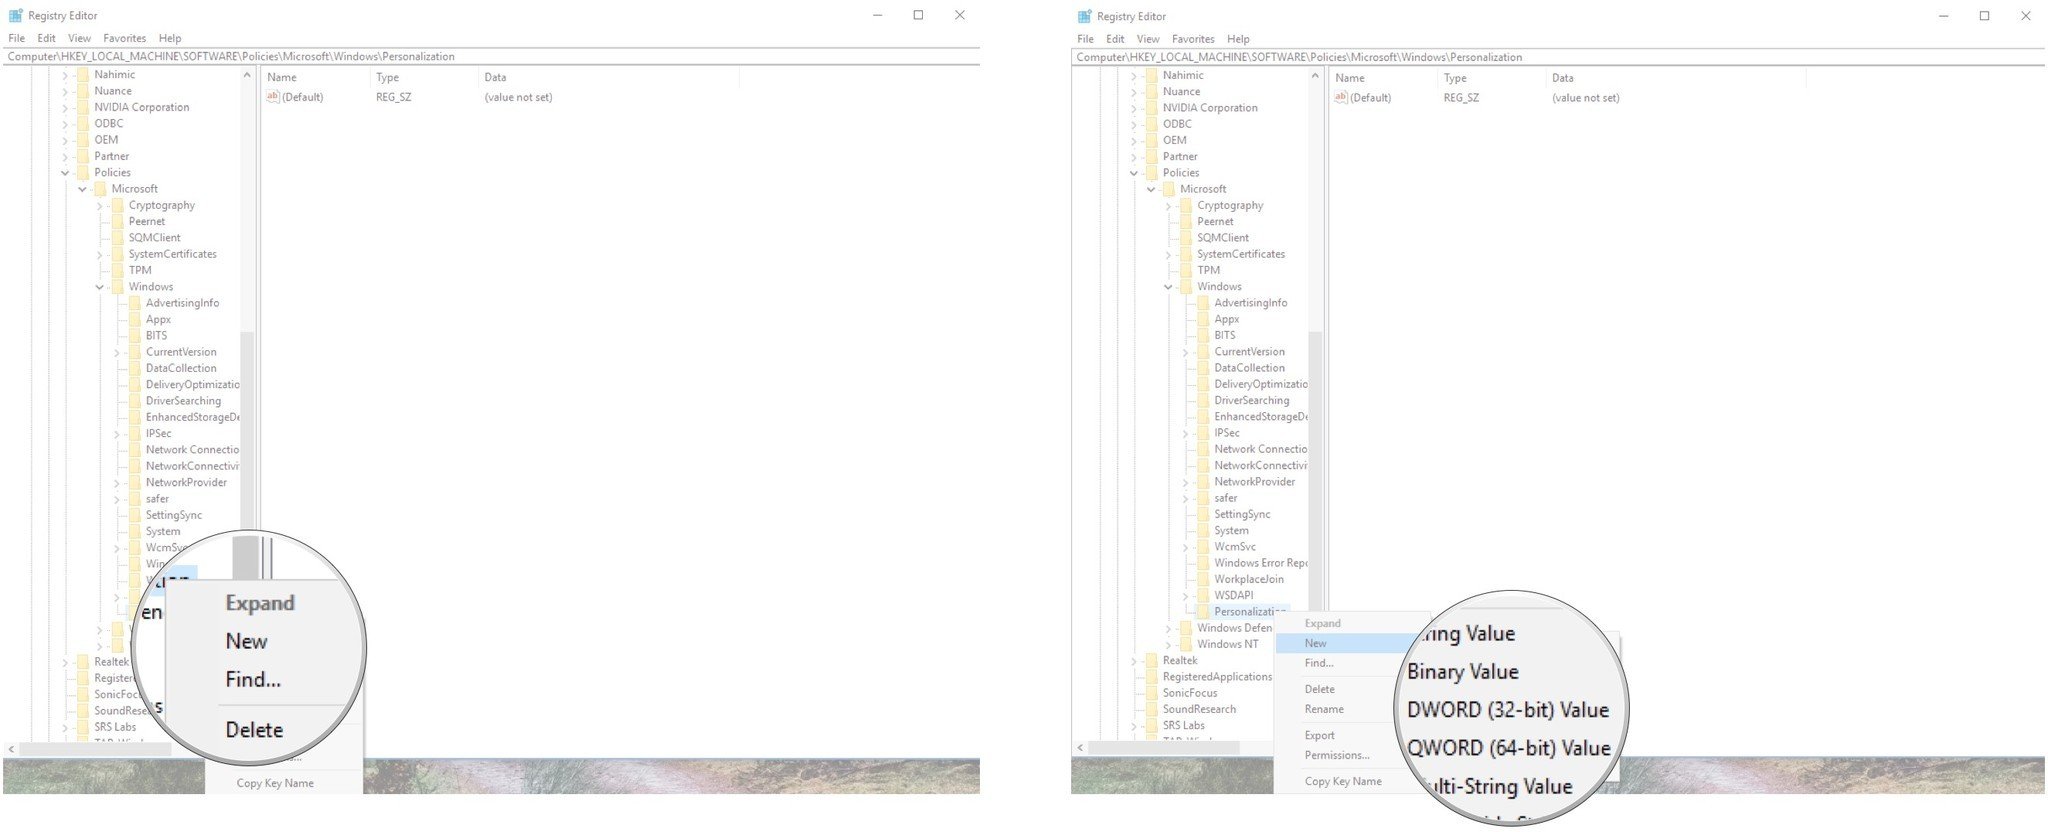
Step 3: On the right-side pane, right-click on the blank space and then hover on New. A dropdown will appear. Click on the Key that appears on the list.

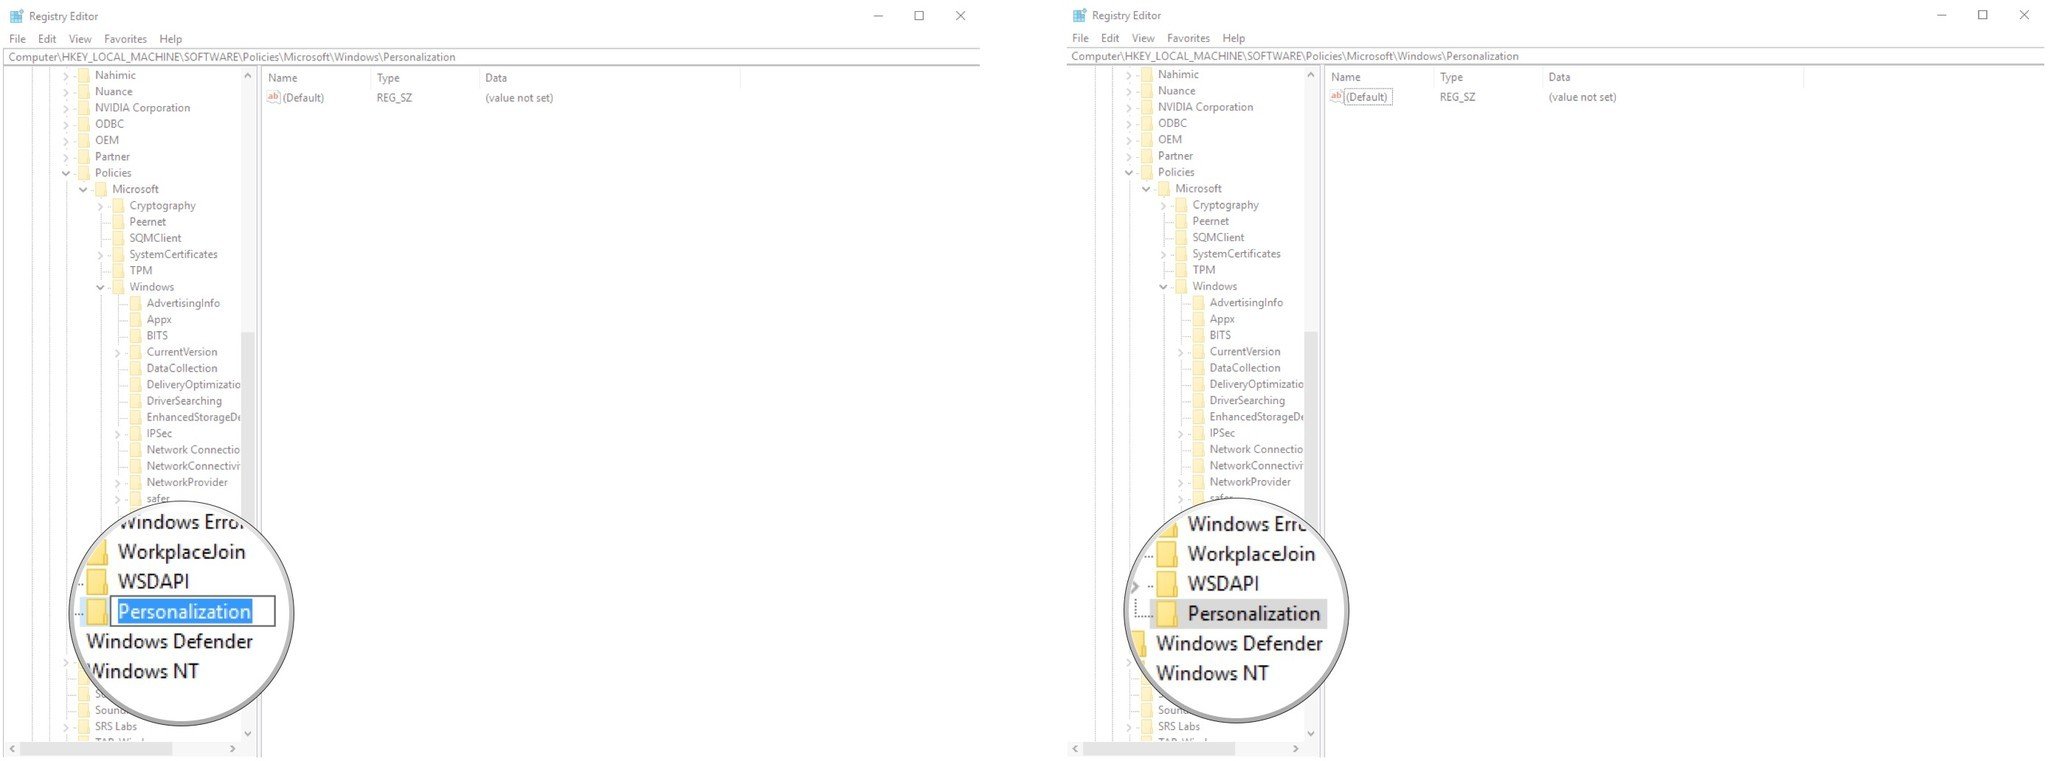
Step 4: A folder will appear on the left-side pane. Rename the folder to Personalization.
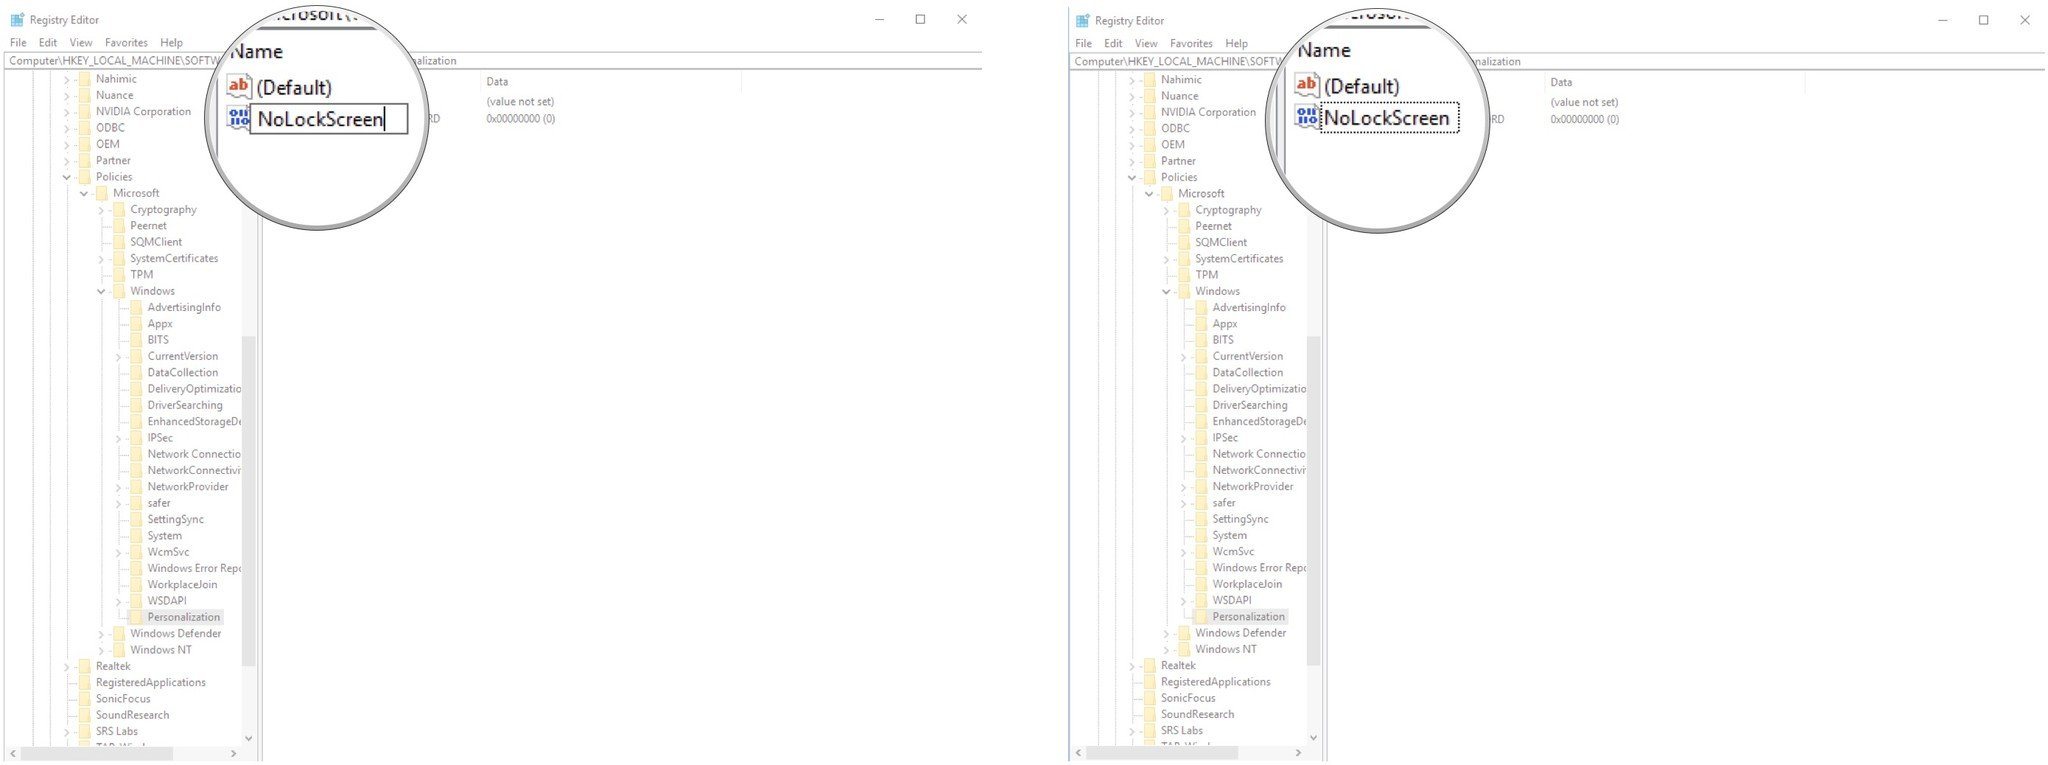
Step 5: Then right-click again on the right-side pane, hover on New, and then click on DWORD (32-bit) Value.

Step 6: A new key will appear. Rename the key to NoLockScreen. Remember, the name of the key is case-sensitive.

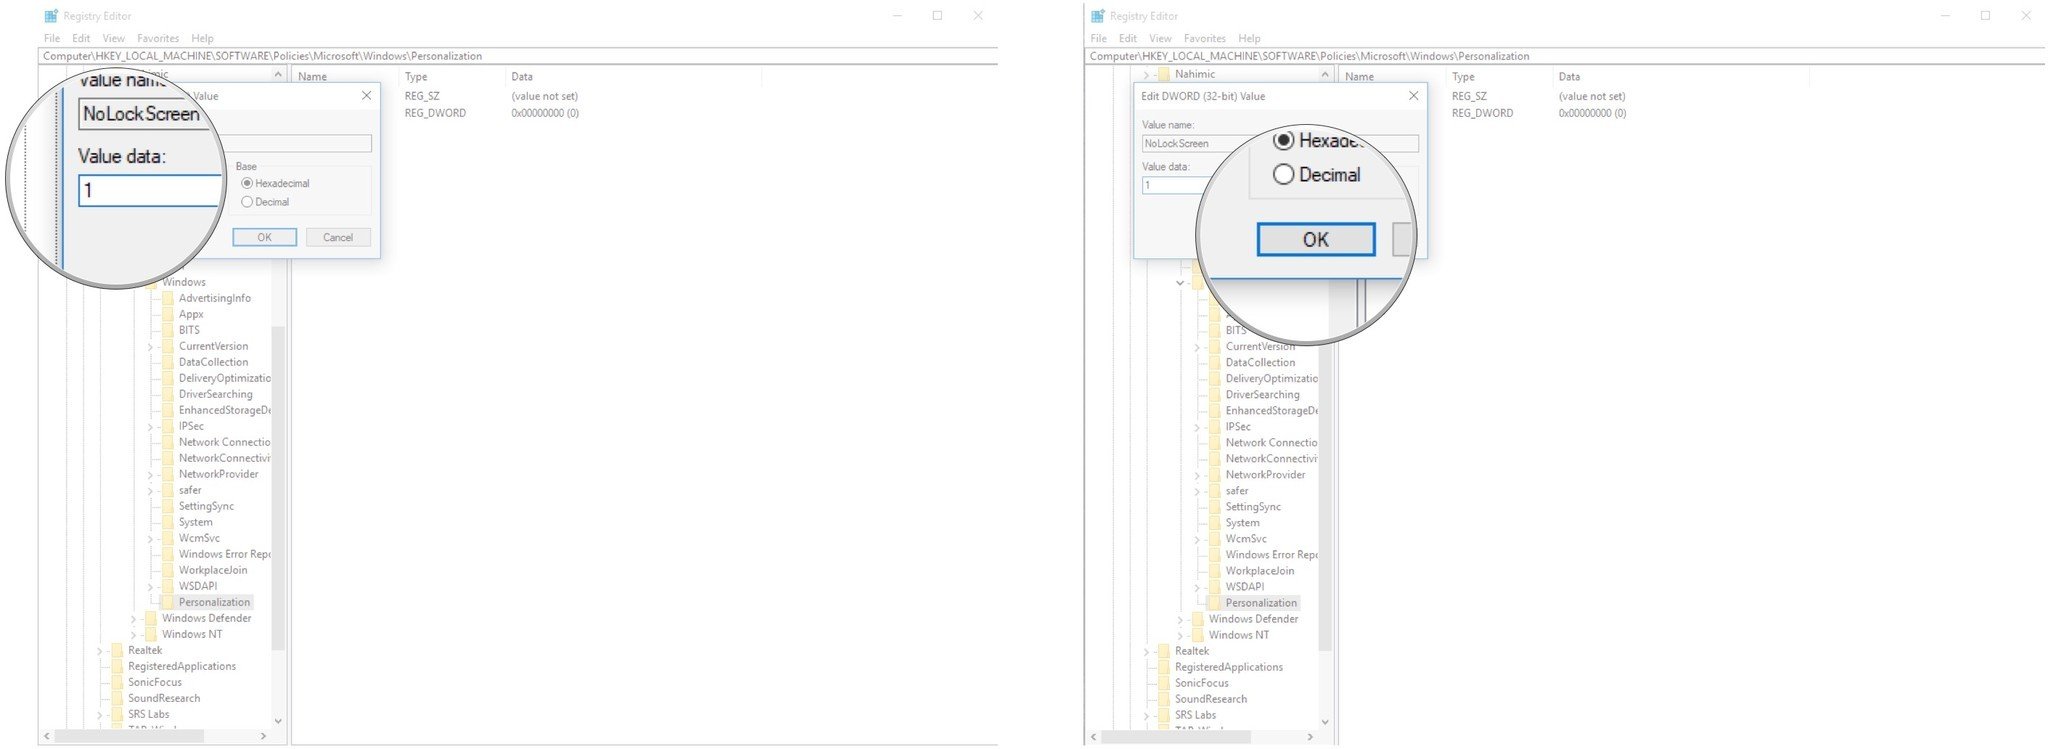
Step 7: Now, double-click on the key. A window will appear. In the Value data box, you will see the value 0. Change it to 1. Then, click on OK to save your changes.

Congratulations, you have successfully made the necessary changes to disable the lock screen on your device. Now, reboot your device to check if your lock screen has been removed. If the operation is successful, you will be able to log in to your desktop without any lock screen authentication.
The Windows 10 lock screen divides many users. Some don’t mind seeing a nice picture along with a news blurb, some notifications, and the time of day. Others find it to be a waste. Why click or drag just to get to the actual sign-in screen?
Disabling the lock screen is entirely possible as long as you’re running the Creators Update or anything newer, including the Windows 10 April 2018 Update. The steps required are a bit different for Home and Pro versions, but we’ll explore them both here.
How to disable the lock screen in the Home edition of Windows 10
If you have Windows 10 Home edition, to disable the lock screen you need to make some changes in your registry.
Note: As always when editing your registry, there is a chance that your OS can fail if the exact steps are not followed. Before beginning, make sure you create a full backup of your PC.
- Right-click the Start button.
- Click Search.
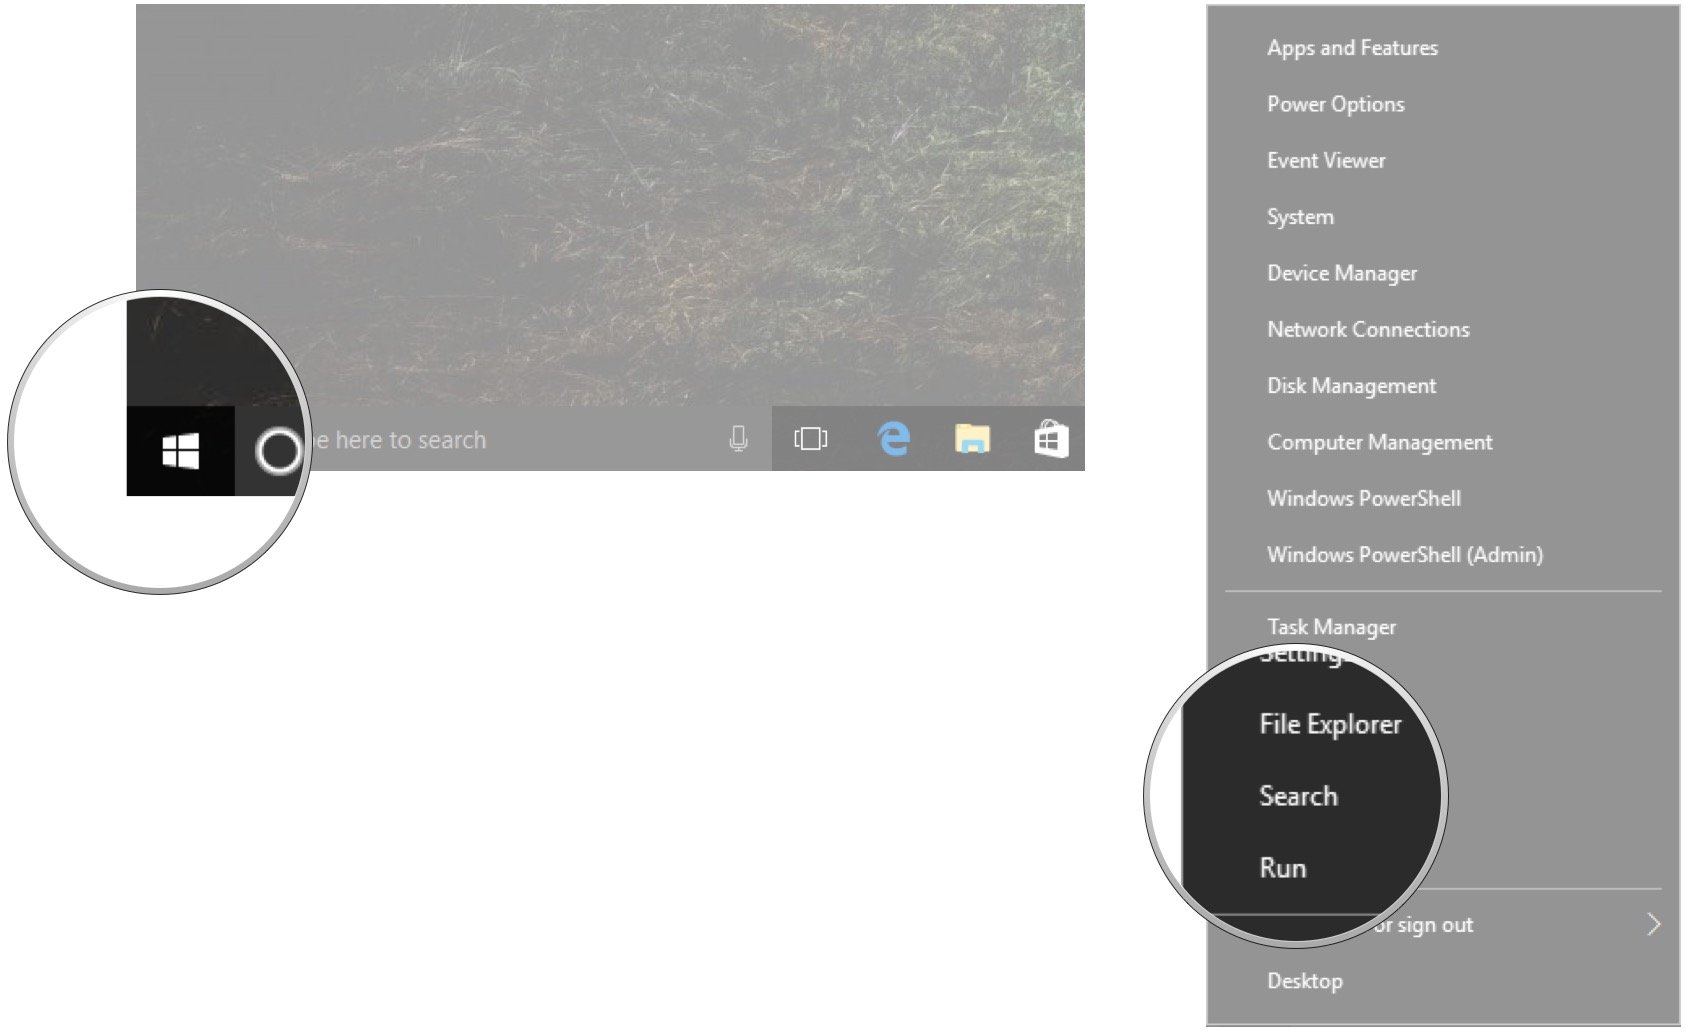
- Type regedit and hit Enter on your keyboard.
- Double-click HKEY_LOCAL_MACHINE.
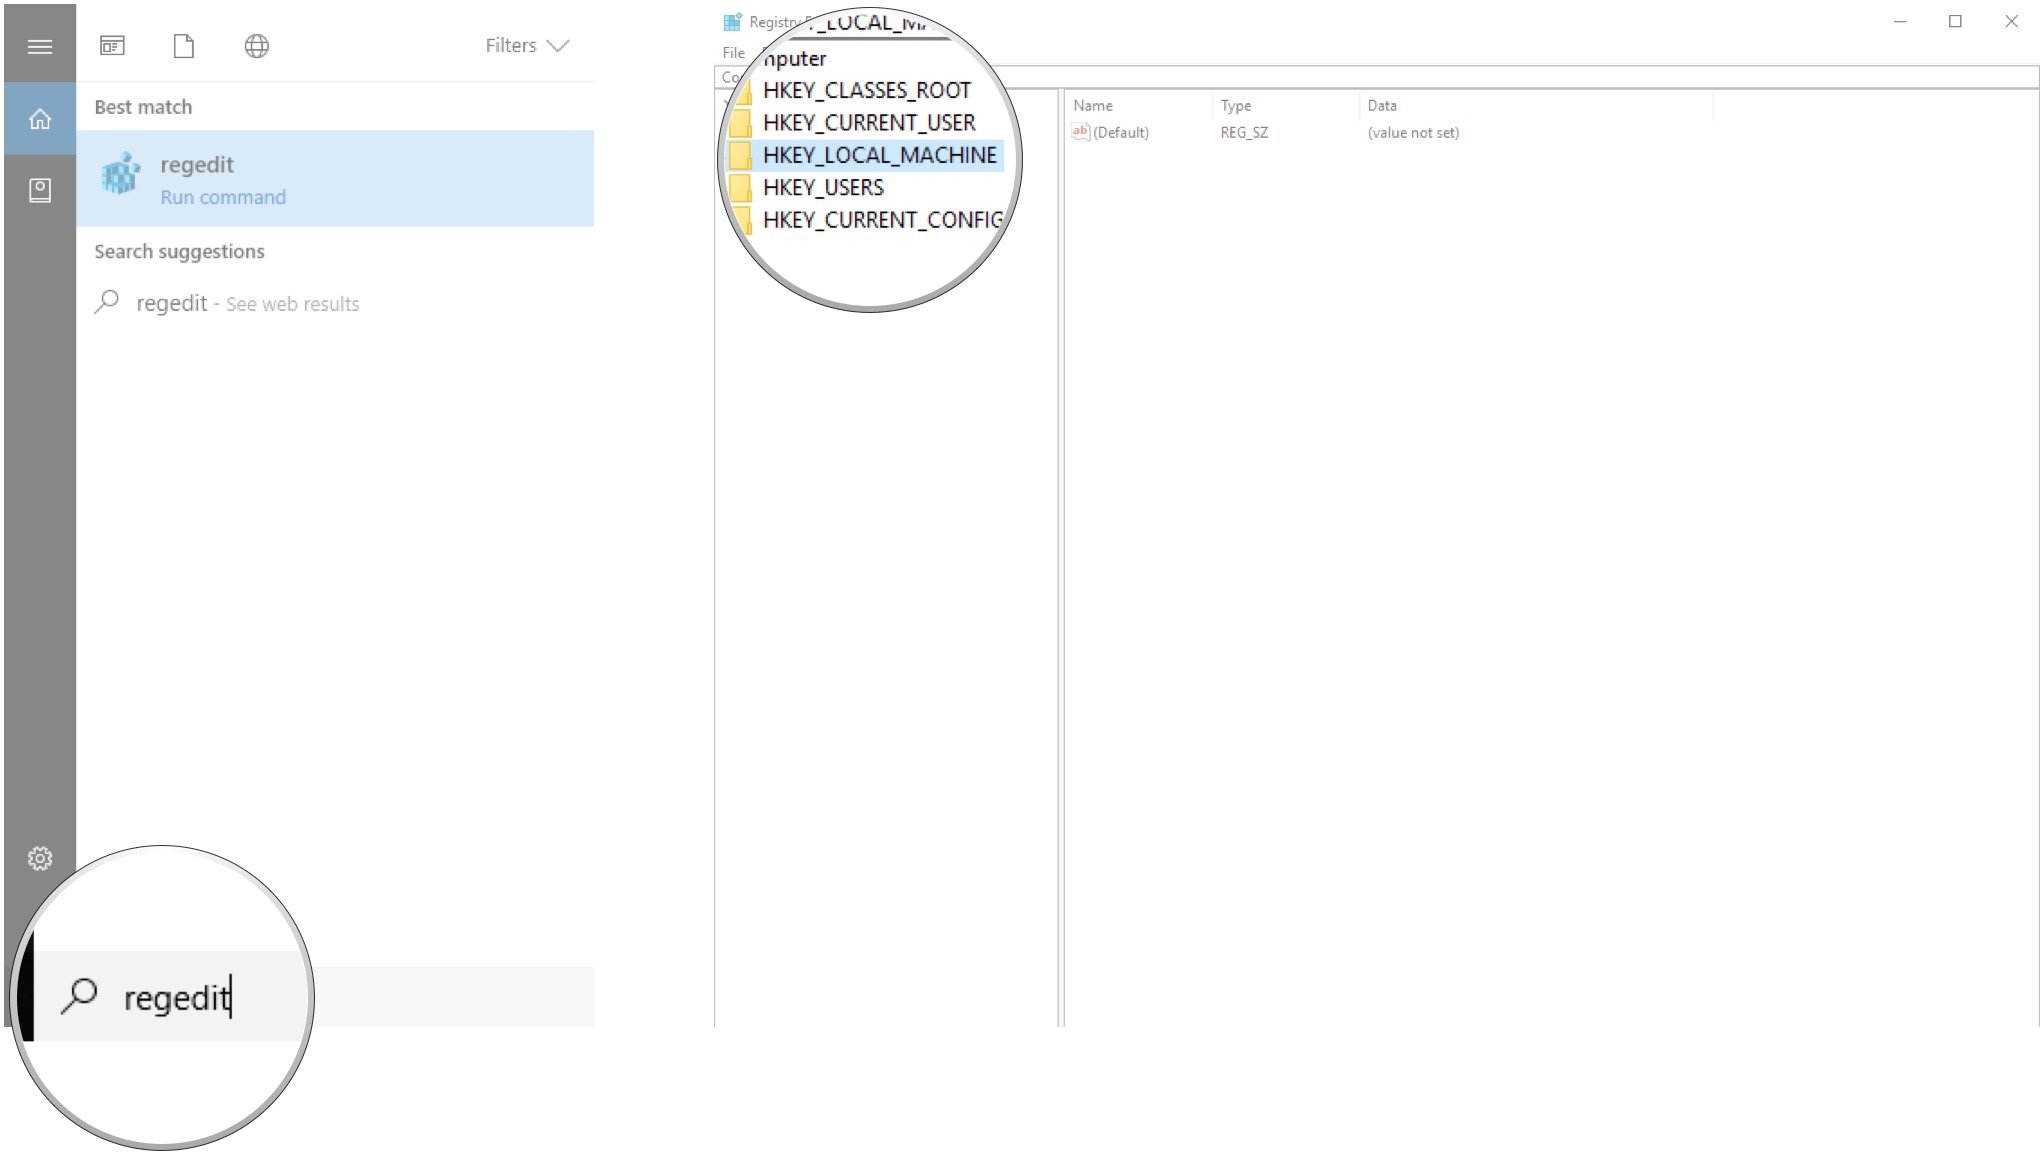
- Double-click SOFTWARE.
- Double-click Policies.
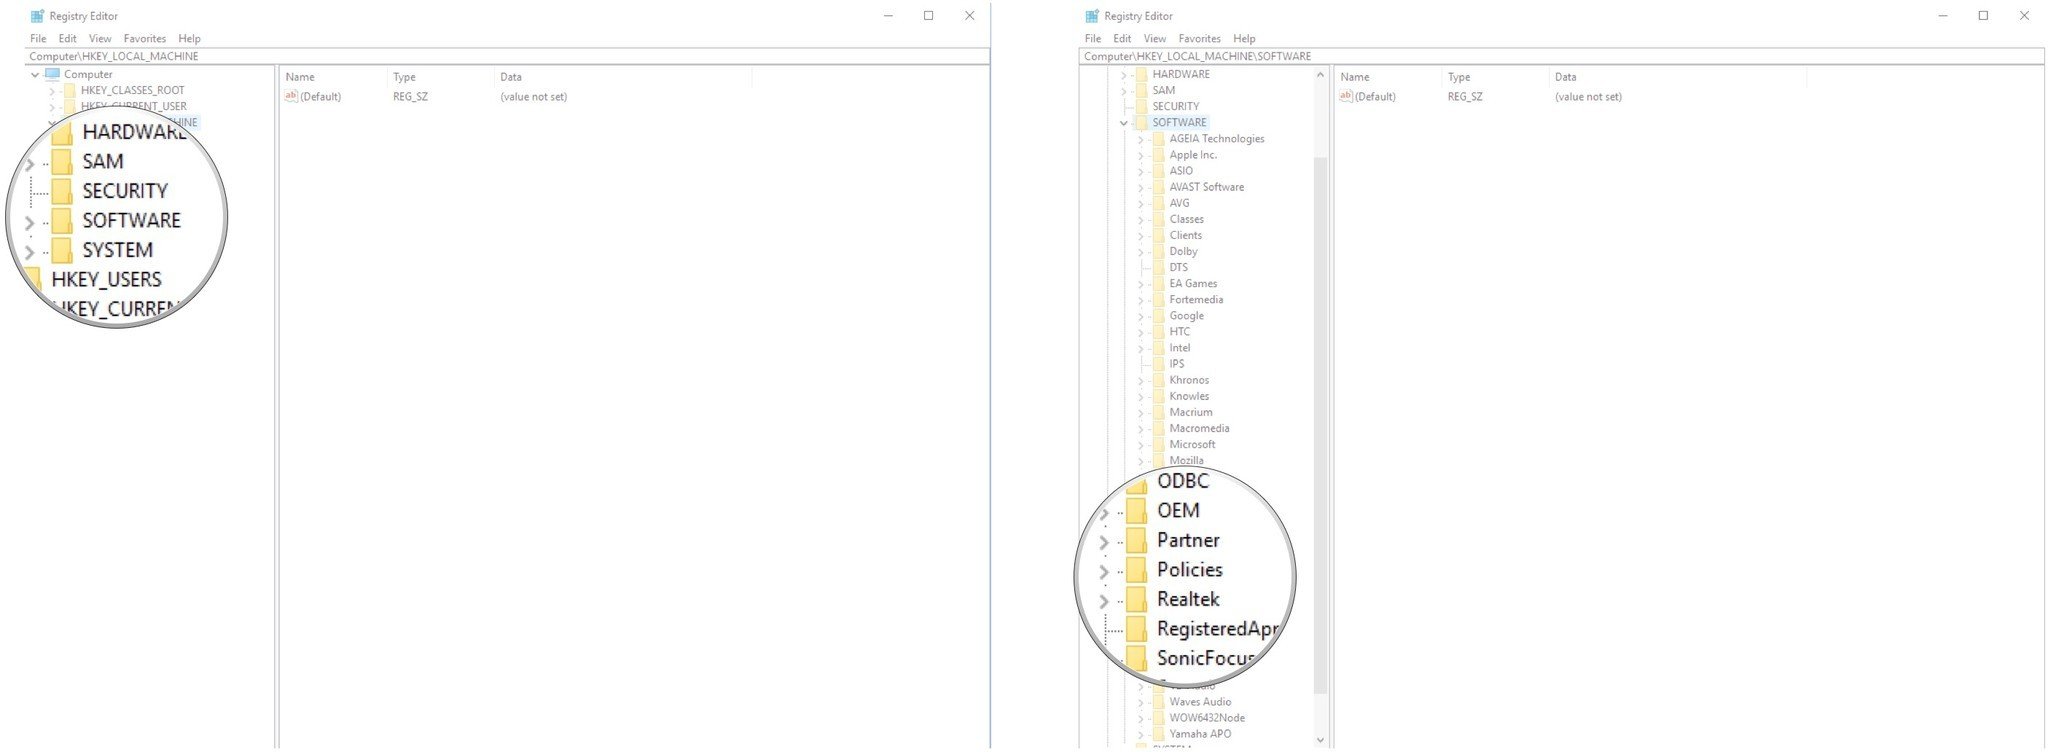
- Double-click Microsoft.
- Right-click Windows.
- Click New.
- Click Key.

- Type Personalization and hit Enter on your keyboard.
- Right-click the Personalization key you just created.
- Click New.
- Click DWORD (32-bit) Value.
- Type NoLockScreen and hit Enter on your keyboard.
- Double-click the NoLockScreen DWORD you just created.
- Type 1 in the Value data field.
- Click OK.
To re-enable the lock screen, change the DWORD value back to 0.
How to disable the lock screen in the Pro edition of Windows 10
If you’re running a Pro edition (including Enterprise and Education) of Windows 10, you can use the Group Policy editor to remove the lock screen.
- Right-click the Start button.
- Click Search.
- Type gpedit and hit Enter on your keyboard.
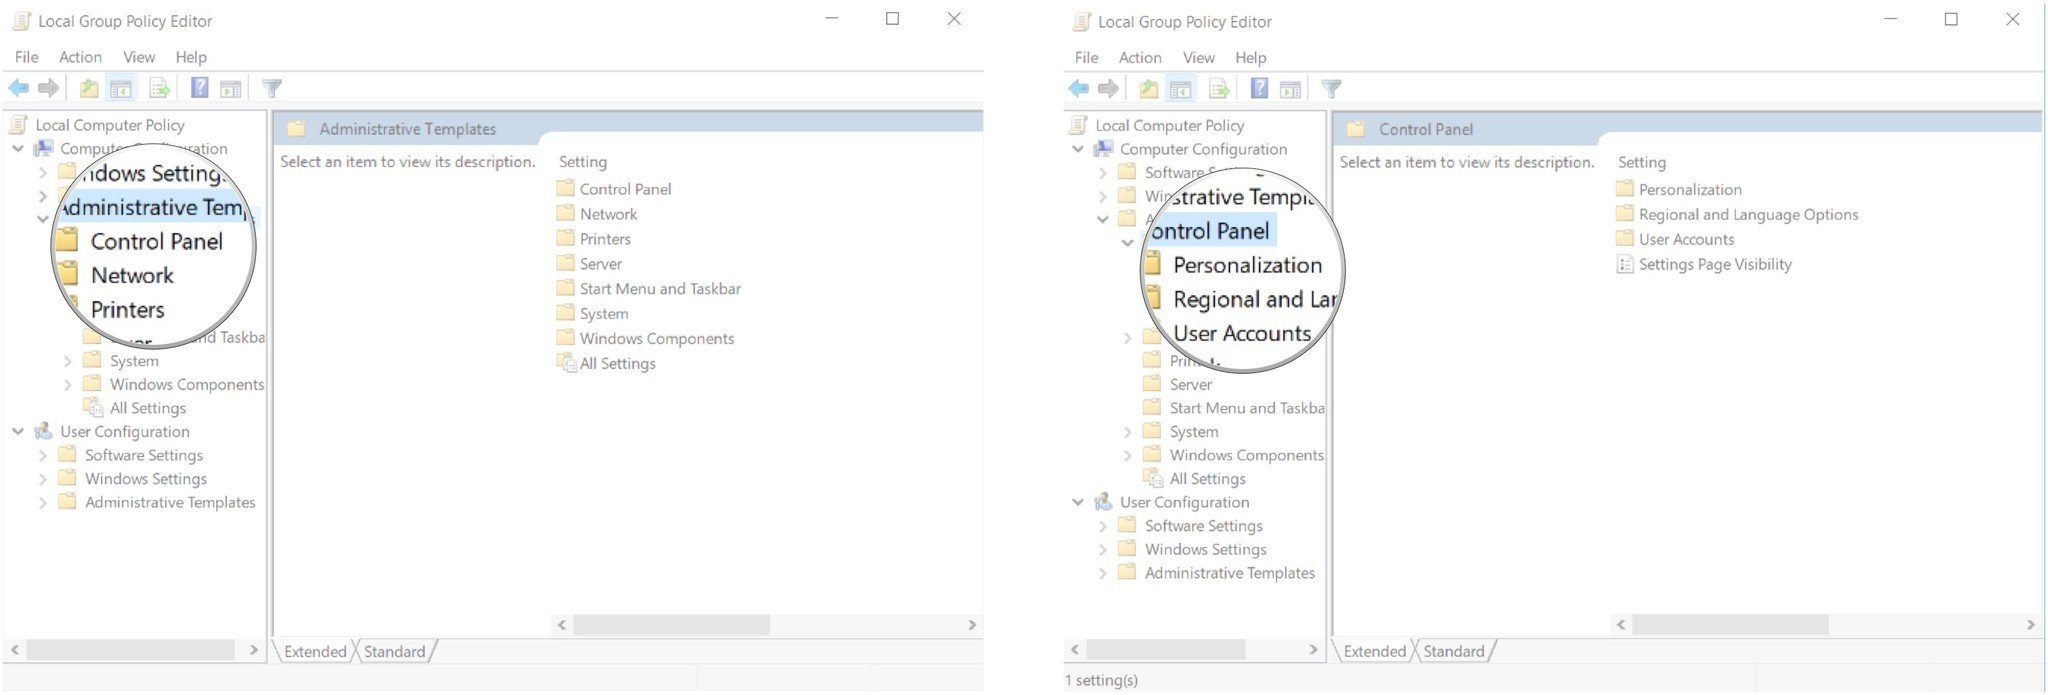
- Double-click Administrative Templates.

- Double-click Control Panel.
- Click Personalization.
- Double-click Do not display the lock screen.
- Click Enabled.
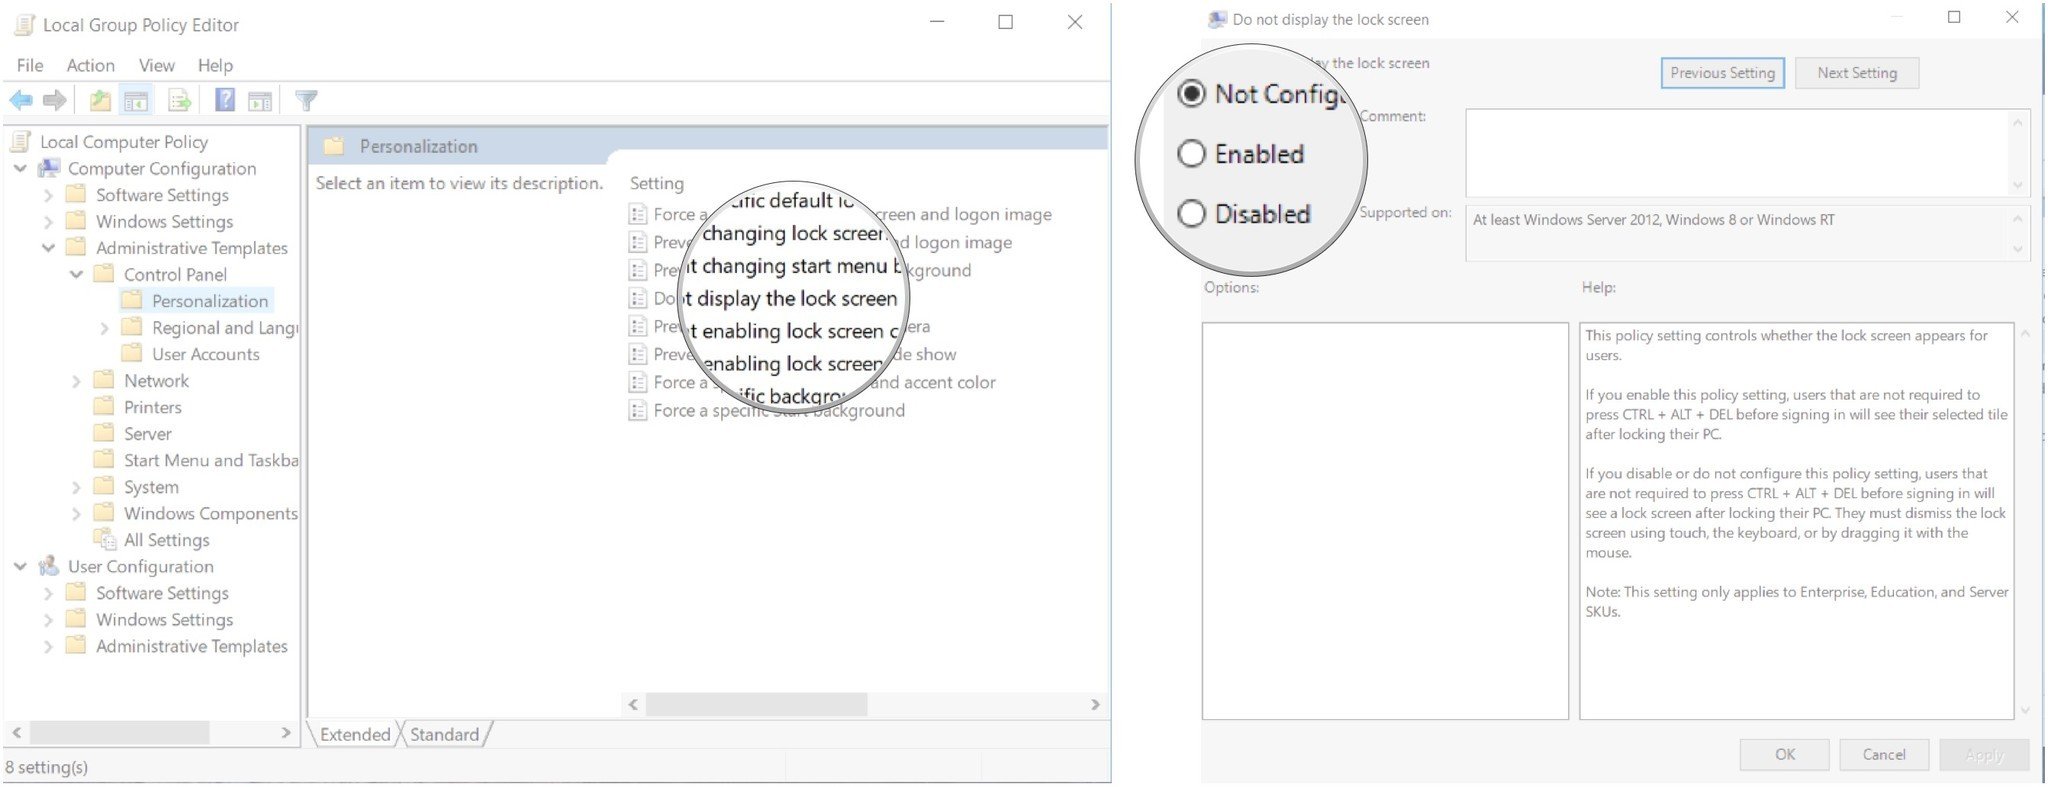
- Click Apply.
- Click OK.

More resources
- Windows 10 April 2018 Update review: It’s about the little things
- Windows 10 April 2018 Update common problems and fixes
- Windows 10 April 2018 Update ultimate resource guide
Updated June 7, 2018: I’ve refreshed this guide to ensure it still works after the Windows 10 April 2018 Update.
All the latest news, reviews, and guides for Windows and Xbox diehards.
Cale Hunt brings to Windows Central more than eight years of experience writing about laptops, PCs, accessories, games, and beyond. If it runs Windows or in some way complements the hardware, there’s a good chance he knows about it, has written about it, or is already busy testing it.
Экран блокировки Windows 10 представляет собой панель, появляющуюся при запуске устройства или после его выхода из спящего режима. На нем можно увидеть текущую дату, время, уведомления и другие полезные сведения. Например, прогноз погоды или ближайшие события из календаря.
Если вы по тем или иным причинам решили отключить экран блокировки, то наш гайд в помощь.
Предназначение экрана блокировки
Экран блокировки Windows 10 имеет ряд полезных функций. Он защищает данные пользователя, скрывая содержимое рабочего стола до момента ввода пароля. Помимо этого, экран предоставляет возможность быстро просмотреть уведомления, не выполняя вход в систему. Также он выполняет эстетическую задачу, отображая красивые фоновые изображения, которые могут регулярно обновляться.
Источник: Pinterest / Экран Windows 10
Для отключения экрана блокировки в Windows 10 можно воспользоваться различными методами, начиная с редактирования реестра и заканчивая использованием специализированных приложений.
С помощью реестра
- Для того чтобы приступить к отключению экрана блокировки через редактор реестра, начните с открытия окна «Выполнить». Сделать это можно, одновременно нажав клавиши Win + R. В появившемся диалоговом окне введите команду regedit и подтвердите своё действие нажатием клавиши Enter. Таким образом вы запустите редактор реестра Windows, который предоставляет возможность изменять внутренние параметры операционной системы;
- Когда редактор откроется, обратите внимание на панель с папками, расположенную в левой части окна. Здесь вам нужно последовательно пройти по пути: HKEY_LOCAL_MACHINE\SOFTWARE\Policies\Microsoft\Windows. Этот путь содержит настройки, связанные с управлением системой и её интерфейсом. Для навигации просто раскрывайте вложенные папки, начиная с корневой папки HKEY_LOCAL_MACHINE;
- Если в указанной директории отсутствует раздел с именем Personalization, его необходимо создать самостоятельно. Для этого щёлкните правой кнопкой мыши по папке Windows, чтобы вызвать контекстное меню. В появившемся списке выберите опцию «Создать», а затем из предложенных вариантов выберите «Раздел». Новый раздел появится в списке, и вам потребуется присвоить ему имя. Введите Personalization в качестве названия, убедившись в правильности его написания, так как даже небольшая ошибка может привести к тому, что изменения в реестре не будут работать корректно;
- После создания раздела проверьте, что он отображается в структуре реестра, и убедитесь в его правильном расположении. Этот шаг является ключевым, так как дальнейшие настройки будут внесены именно в этот раздел. Неправильное имя или расположение может вызвать проблемы с функционированием системы;
- Редактирование реестра требует аккуратности и точности, поскольку внесённые изменения напрямую влияют на работу системы. Убедившись, что все выполнено правильно, вы сможете продолжить настройку для отключения экрана блокировки, используя только встроенные инструменты Windows. Такой подход исключает необходимость в установке стороннего программного обеспечения и позволяет сохранить контроль над процессом настройки операционной системы.
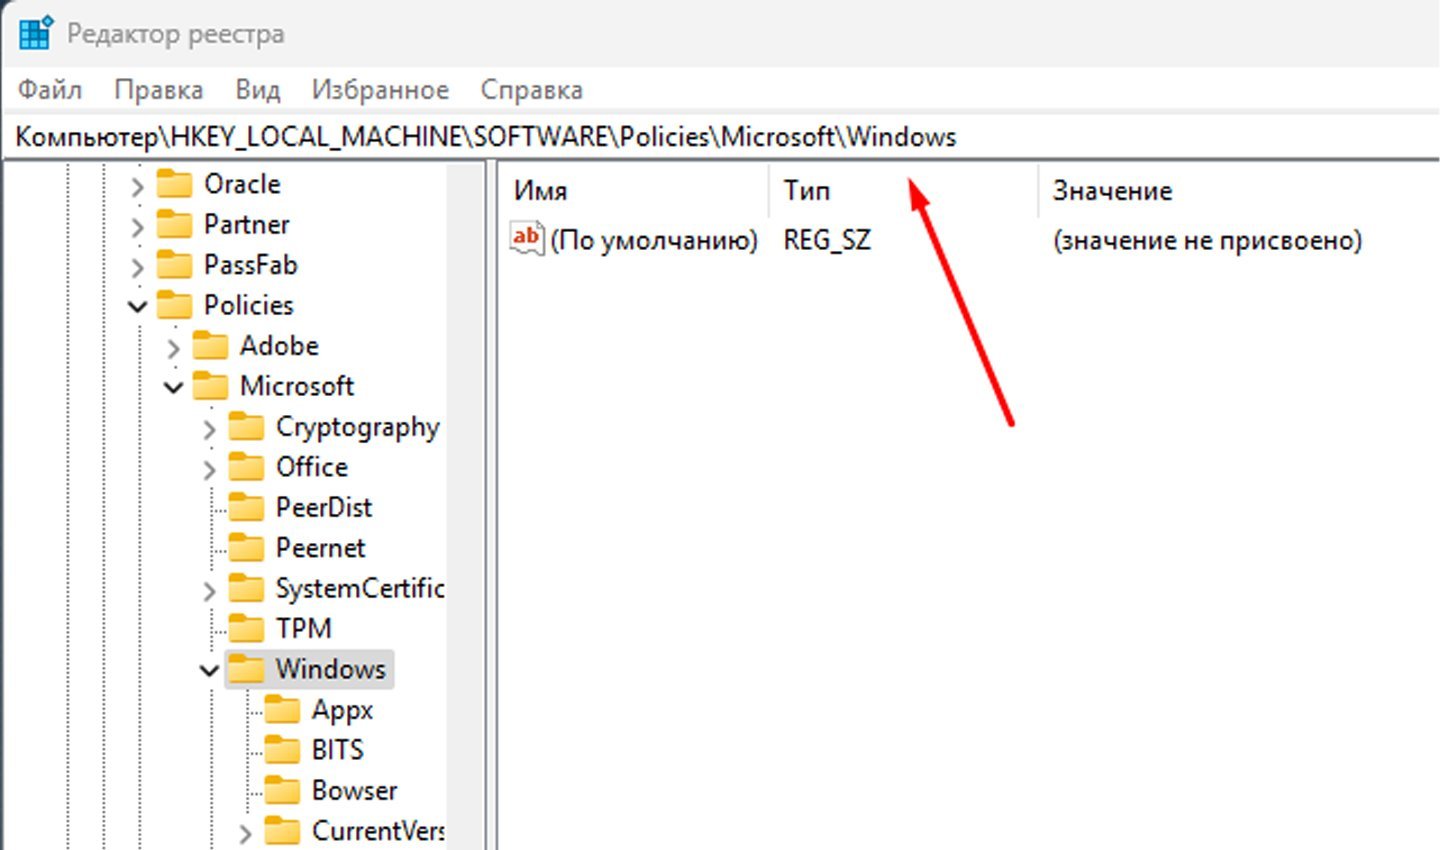
Источник: CQ / Путь для раздела
- Чтобы отключить экран блокировки, начните с открытия раздела Personalization, созданного ранее в редакторе реестра. В правой области окна редактора нажмите правую кнопку мыши, чтобы открыть контекстное меню. В появившемся меню выберите опцию «Создать», затем укажите «Параметр DWORD (32 бита)». В результате в правой части окна отобразится новый параметр. Назовите его NoLockScreen, следя за тем, чтобы имя было введено точно и без ошибок. Это важно для корректной работы изменения;
- Далее откройте настройки нового параметра, дважды щёлкнув на нём левой кнопкой мыши. В появившемся окне вы увидите поле для ввода значения. Установите в этом поле цифру 1, а затем нажмите «ОК», чтобы сохранить изменения. Это действие активирует настройку, отключающую экран блокировки;
- После выполнения этих шагов закройте редактор реестра и перезагрузите компьютер. После перезагрузки экран блокировки больше не будет отображаться, и вы сразу попадёте на экран входа в систему или рабочий стол, если пароль отсутствует.
- Если потребуется восстановить экран блокировки, можно вернуться в редактор реестра, найти параметр NoLockScreen и изменить его значение на 0 или удалить его.
Через редактирование локальной групповой политики
Данный метод доступен только для обладателей версий Windows 10 Pro и Enterprise. Он позволяет полностью деактивировать экран блокировки с использованием встроенных системных инструментов.
- Чтобы приступить к отключению экрана блокировки через локальную групповую политику, откройте окно «Выполнить», нажав комбинацию клавиш Win + R. В строке ввода введите команду gpedit.msc и подтвердите её выполнение нажатием Enter. Это действие откроет редактор локальной групповой политики, который позволяет настраивать продвинутые параметры системы;
- В редакторе перейдите в раздел «Конфигурация компьютера». Найдите в списке категорию «Административные шаблоны» и откройте её. Затем выберите раздел «Панель управления» и внутри него найдите пункт «Персонализация». В правой части окна появится настройка с названием «Запрет отображения экрана блокировки»;
- Дважды щёлкните по данной настройке, чтобы открыть её параметры. В открывшемся окне выберите опцию «Включено», что позволит отключить экран блокировки на вашем устройстве. После выбора нужного состояния нажмите кнопку «ОК» для сохранения изменений.
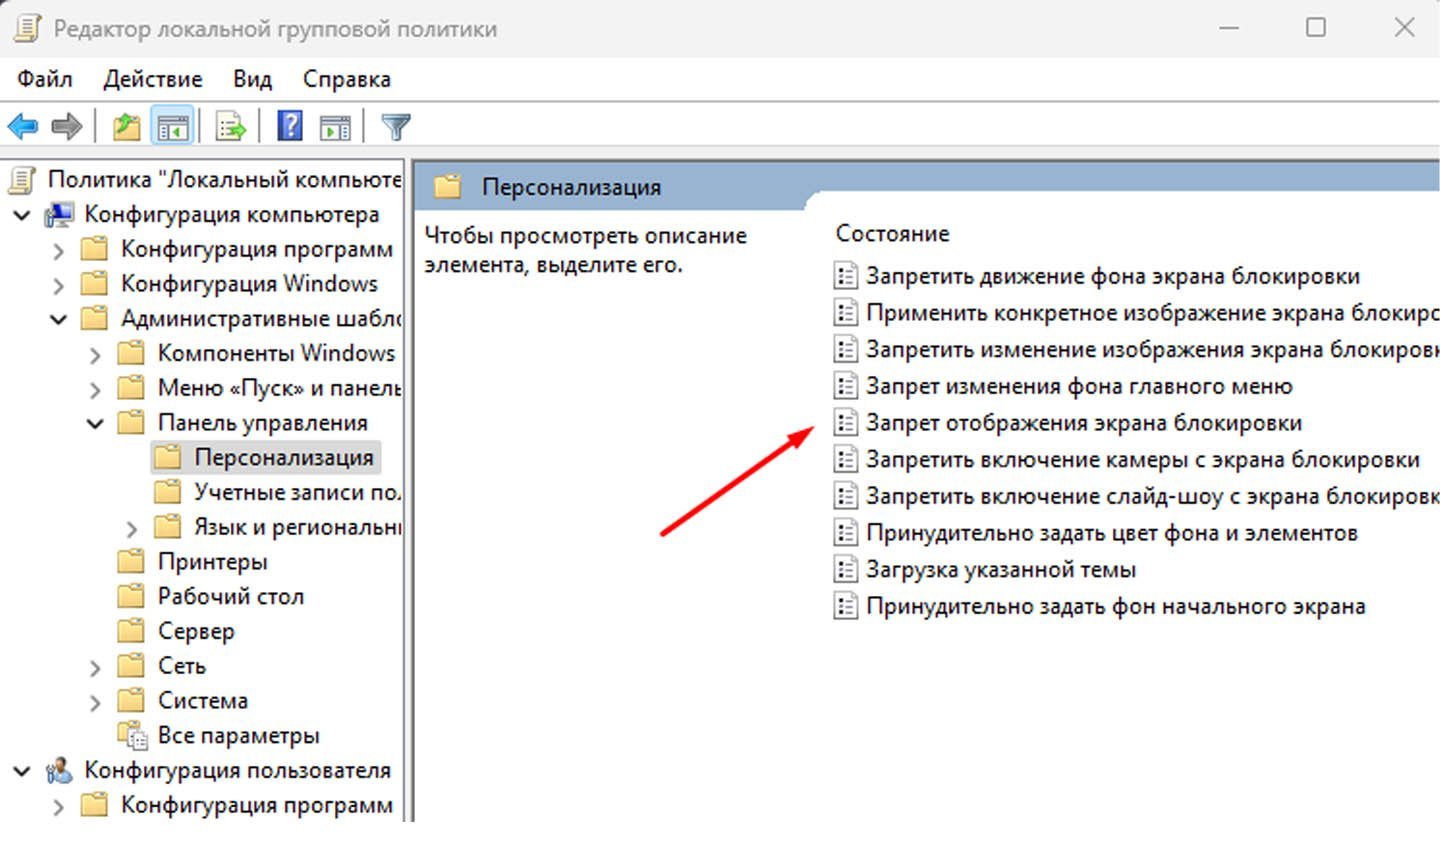
Источник: CQ / Запрет отображения экрана блокировки
- Когда изменения будут внесены, закройте редактор локальной групповой политики и перезагрузите компьютер. После перезапуска экран блокировки перестанет отображаться, и вы будете перенаправлены сразу к окну ввода пароля или на рабочий стол (если пароль не установлен);
- Метод через локальную групповую политику позволяет управлять параметрами системы без необходимости вносить изменения в реестр или использовать сторонние программы. Это удобное и эффективное решение для пользователей, которые ценят время и стремятся оптимизировать процесс работы.
Путем переименования системной папки
Этот метод позволяет полностью отключить запуск приложения экрана блокировки.
- Откройте «Проводник» и перейдите в папку системного каталога, расположенного по пути: C:\Windows\SystemApps. Этот каталог включает в себя файлы и папки, отвечающие за различные встроенные приложения Windows, в том числе за функционирование экрана блокировки. Найдите в списке папку с именем Microsoft.LockApp_cw5n1h2txyewy. Эта папка связана с приложением, которое отвечает за отображение экрана блокировки после включения компьютера или выхода из спящего режима;
- Для отключения экрана блокировки переименуйте указанную папку. Щёлкните по ней правой кнопкой мыши и выберите пункт «Переименовать» в контекстном меню. Добавьте к названию папки любой символ или сочетание символов, например, подчёркивание _ в конце названия. В результате новое имя папки может выглядеть следующим образом: Microsoft.LockApp_cw5n1h2txyewy_;
- После выполнения этого изменения система Windows перестанет запускать приложение экрана блокировки, поскольку не сможет обнаружить соответствующий файл. Это автоматически приведёт к отключению экрана блокировки без необходимости редактировать реестр или использовать дополнительные утилиты.
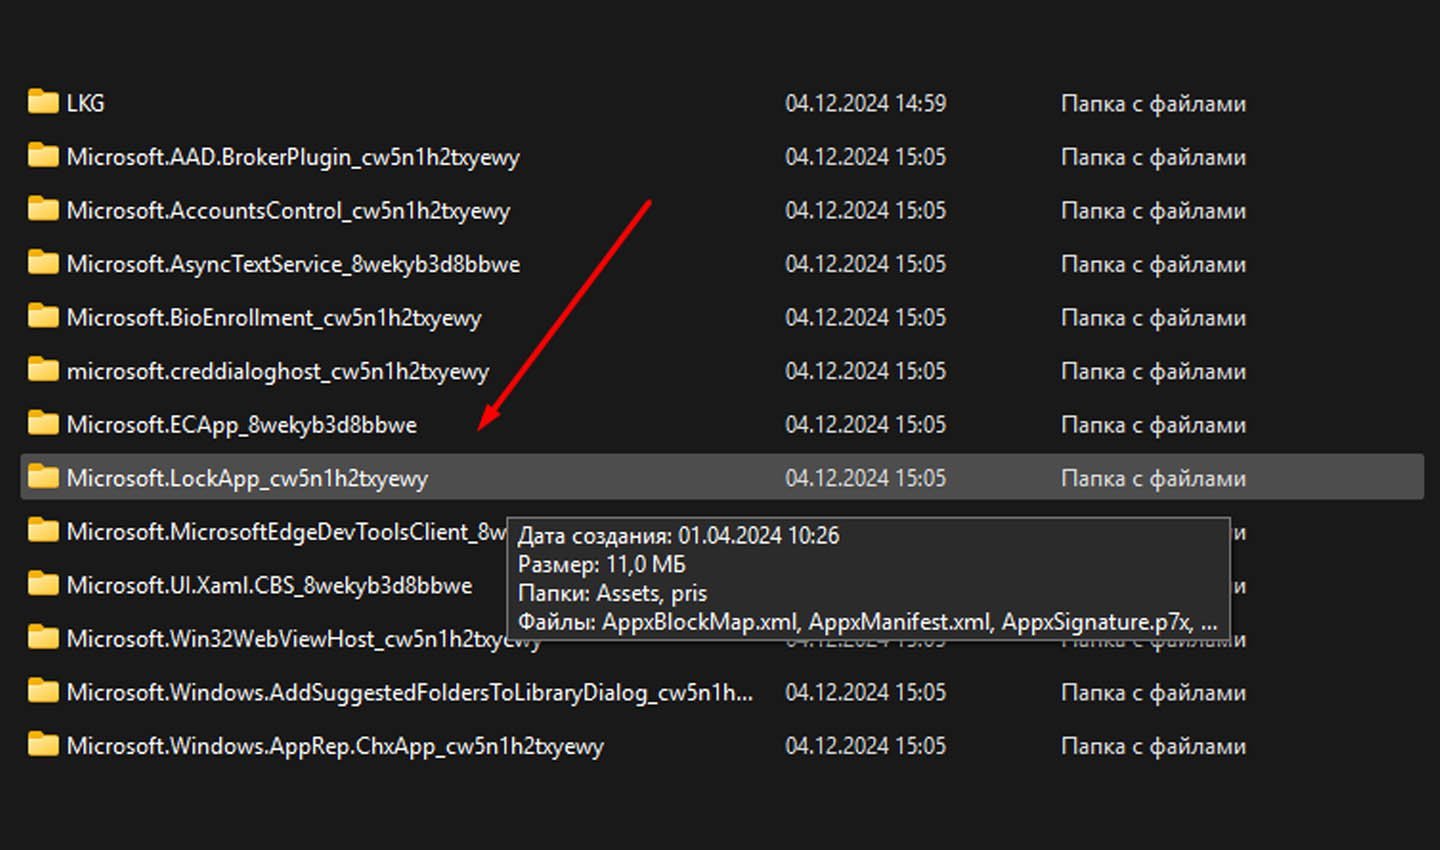
Источник: CQ / Изменение названия папки
При помощи сторонних программ
Этот способ удобен тем, что он довольно простой. Только для этого потребуется установка стороннего приложения.
- Для отключения экрана блокировки с помощью программы Winaero Tweaker начните с её загрузки. Перейдите на официальный сайт разработчика, чтобы скачать последнюю версию приложения. Убедитесь, что загрузка выполняется с проверенного источника для обеспечения безопасности системы. После завершения скачивания установите программу, следуя инструкциям установщика;
- Запустите установленное приложение. В интерфейсе программы найдите раздел «Boot and Logon». Внутри этого раздела выберите опцию «Disable Lock Screen». Активируйте эту настройку, чтобы отключить экран блокировки;
- После внесения изменений перезагрузите компьютер. После перезапуска экран блокировки больше не будет отображаться. Этот метод особенно удобен для пользователей, которые предпочитают избегать сложных манипуляций с реестром или локальной групповой политикой, так как Winaero Tweaker предоставляет удобный графический интерфейс для управления параметрами системы.
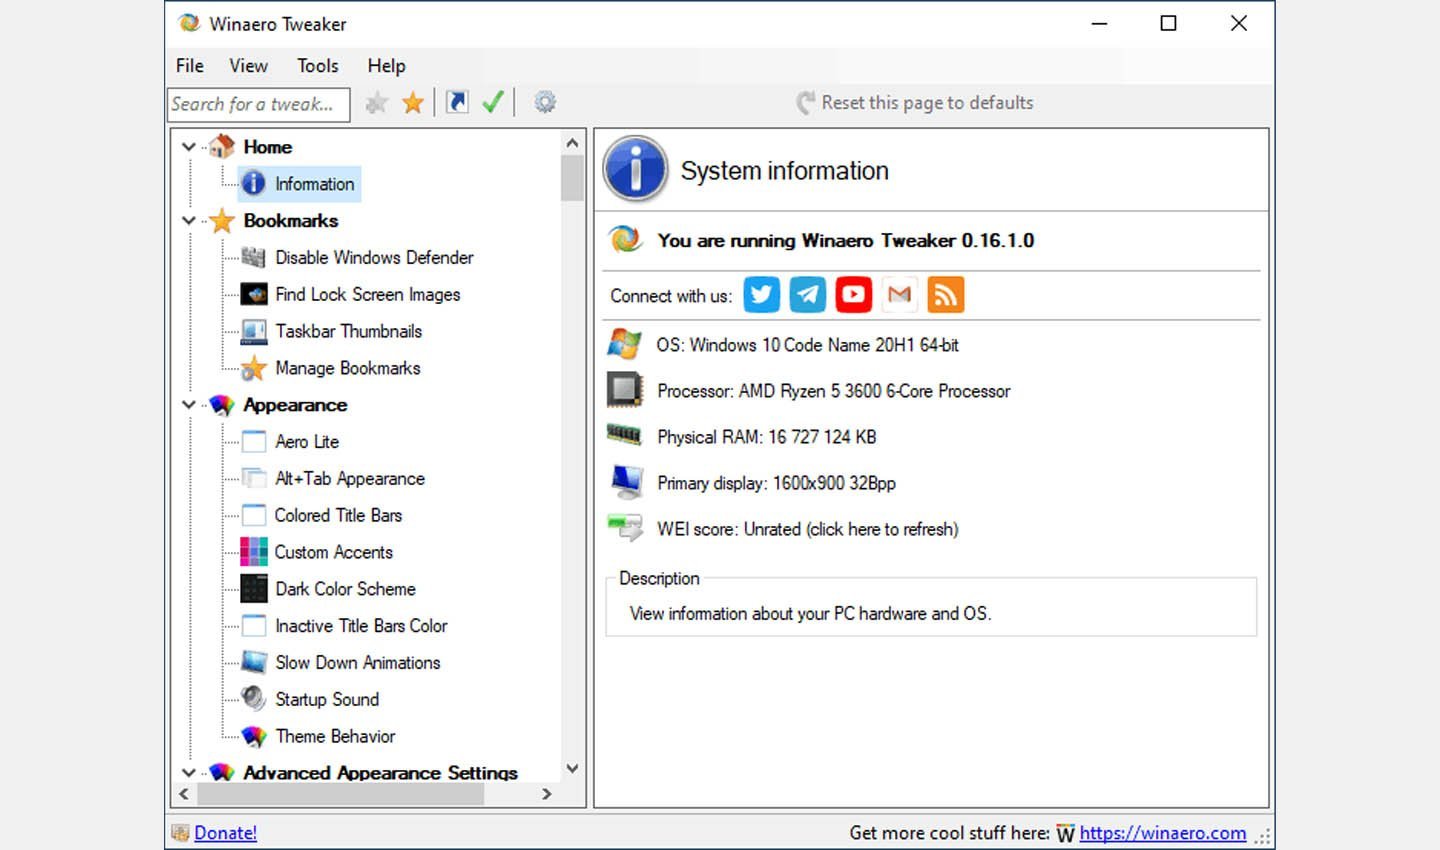
Источник: Winaero Tweaker / Интерфейс Winaero Tweaker
Через «Планировщик заданий»
Этот способ подойдет для опытных пользователей, желающих автоматизировать процесс.
- Откройте приложение «Планировщик заданий», используя поиск в меню «Пуск». Это встроенная утилита Windows, которая позволяет автоматизировать выполнение различных системных задач;
- Создайте новое задание. Для этого выберите в меню справа опцию «Создать задачу». Присвойте задаче понятное имя, например, «Отключение экрана блокировки», чтобы в будущем легко идентифицировать её;
- В настройках задачи установите запуск с наивысшими правами. Это позволит задаче корректно выполняться даже без дополнительных разрешений. Также задайте триггер «При входе в систему», чтобы задача запускалась автоматически сразу после входа пользователя;
-
В разделе «Действие» выберите опцию «Запустить программу» и пропишите:
reg add HKEY_LOCAL_MACHINE\SOFTWARE\Policies\Microsoft\Windows\Personalization /v NoLockScreen /t REG_DWORD /d 1 /f; - Эта команда изменит настройку ПК, отключающую блокировку экрана. После ввода команды сохраните созданную задачу, закрыв окно настроек.
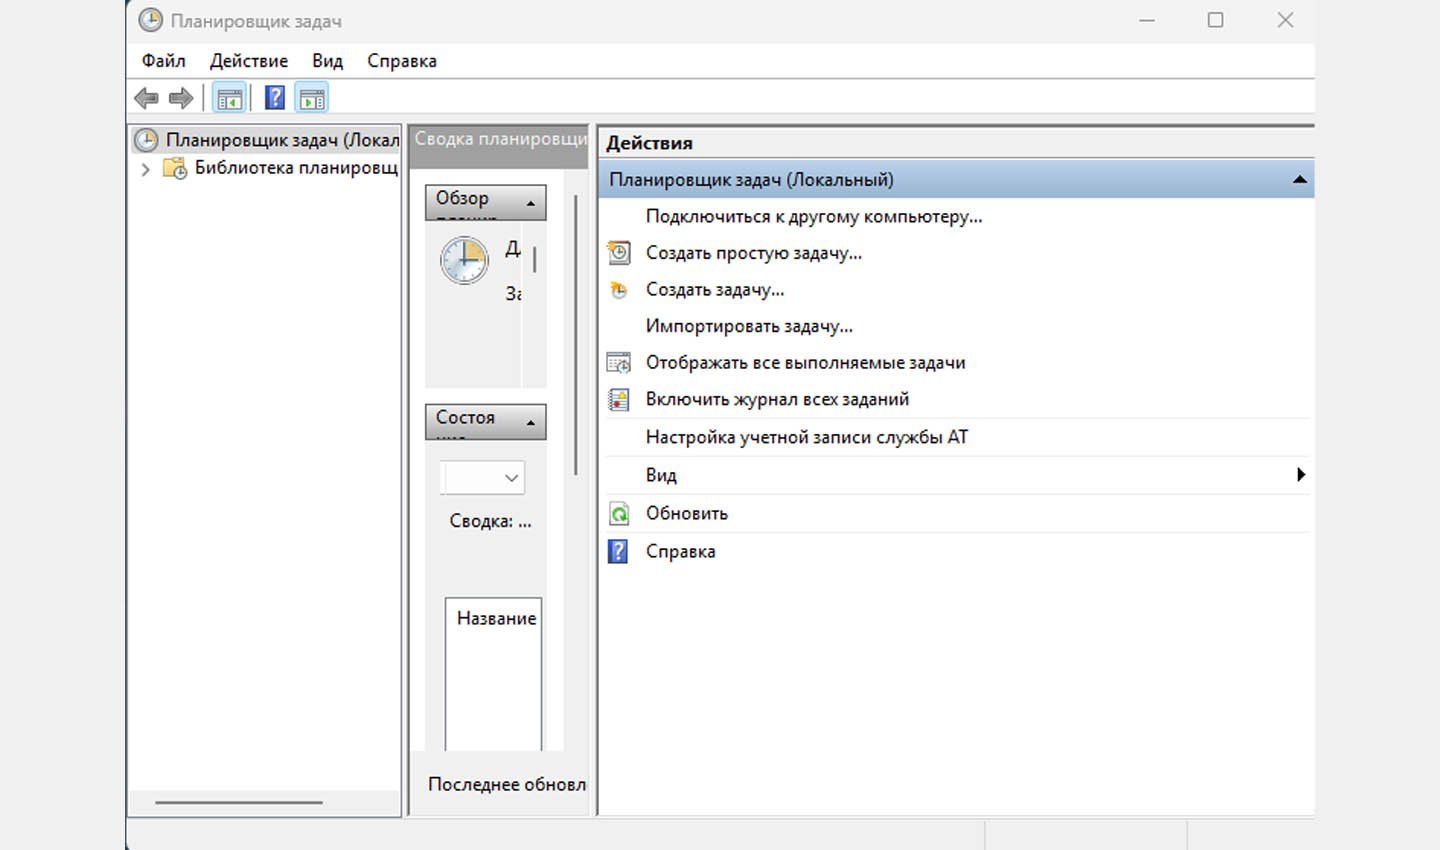
Источник: CQ / Планировщик заданий
Этот способ удобен тем, что позволяет автоматизировать процесс внесения изменений, исключая необходимость ручного редактирования реестра.
Заглавное фото: Playground
Читайте также:
- Лучшие виджеты погоды на рабочий стол в Windows 10
- Чем Windows 10 отличается от Windows 11
- Как удалить администратора в Windows 10
- Как настроить и отключить контроль учетных записей в Windows 10
- Windows 10 LTSB — что это такое и где скачать
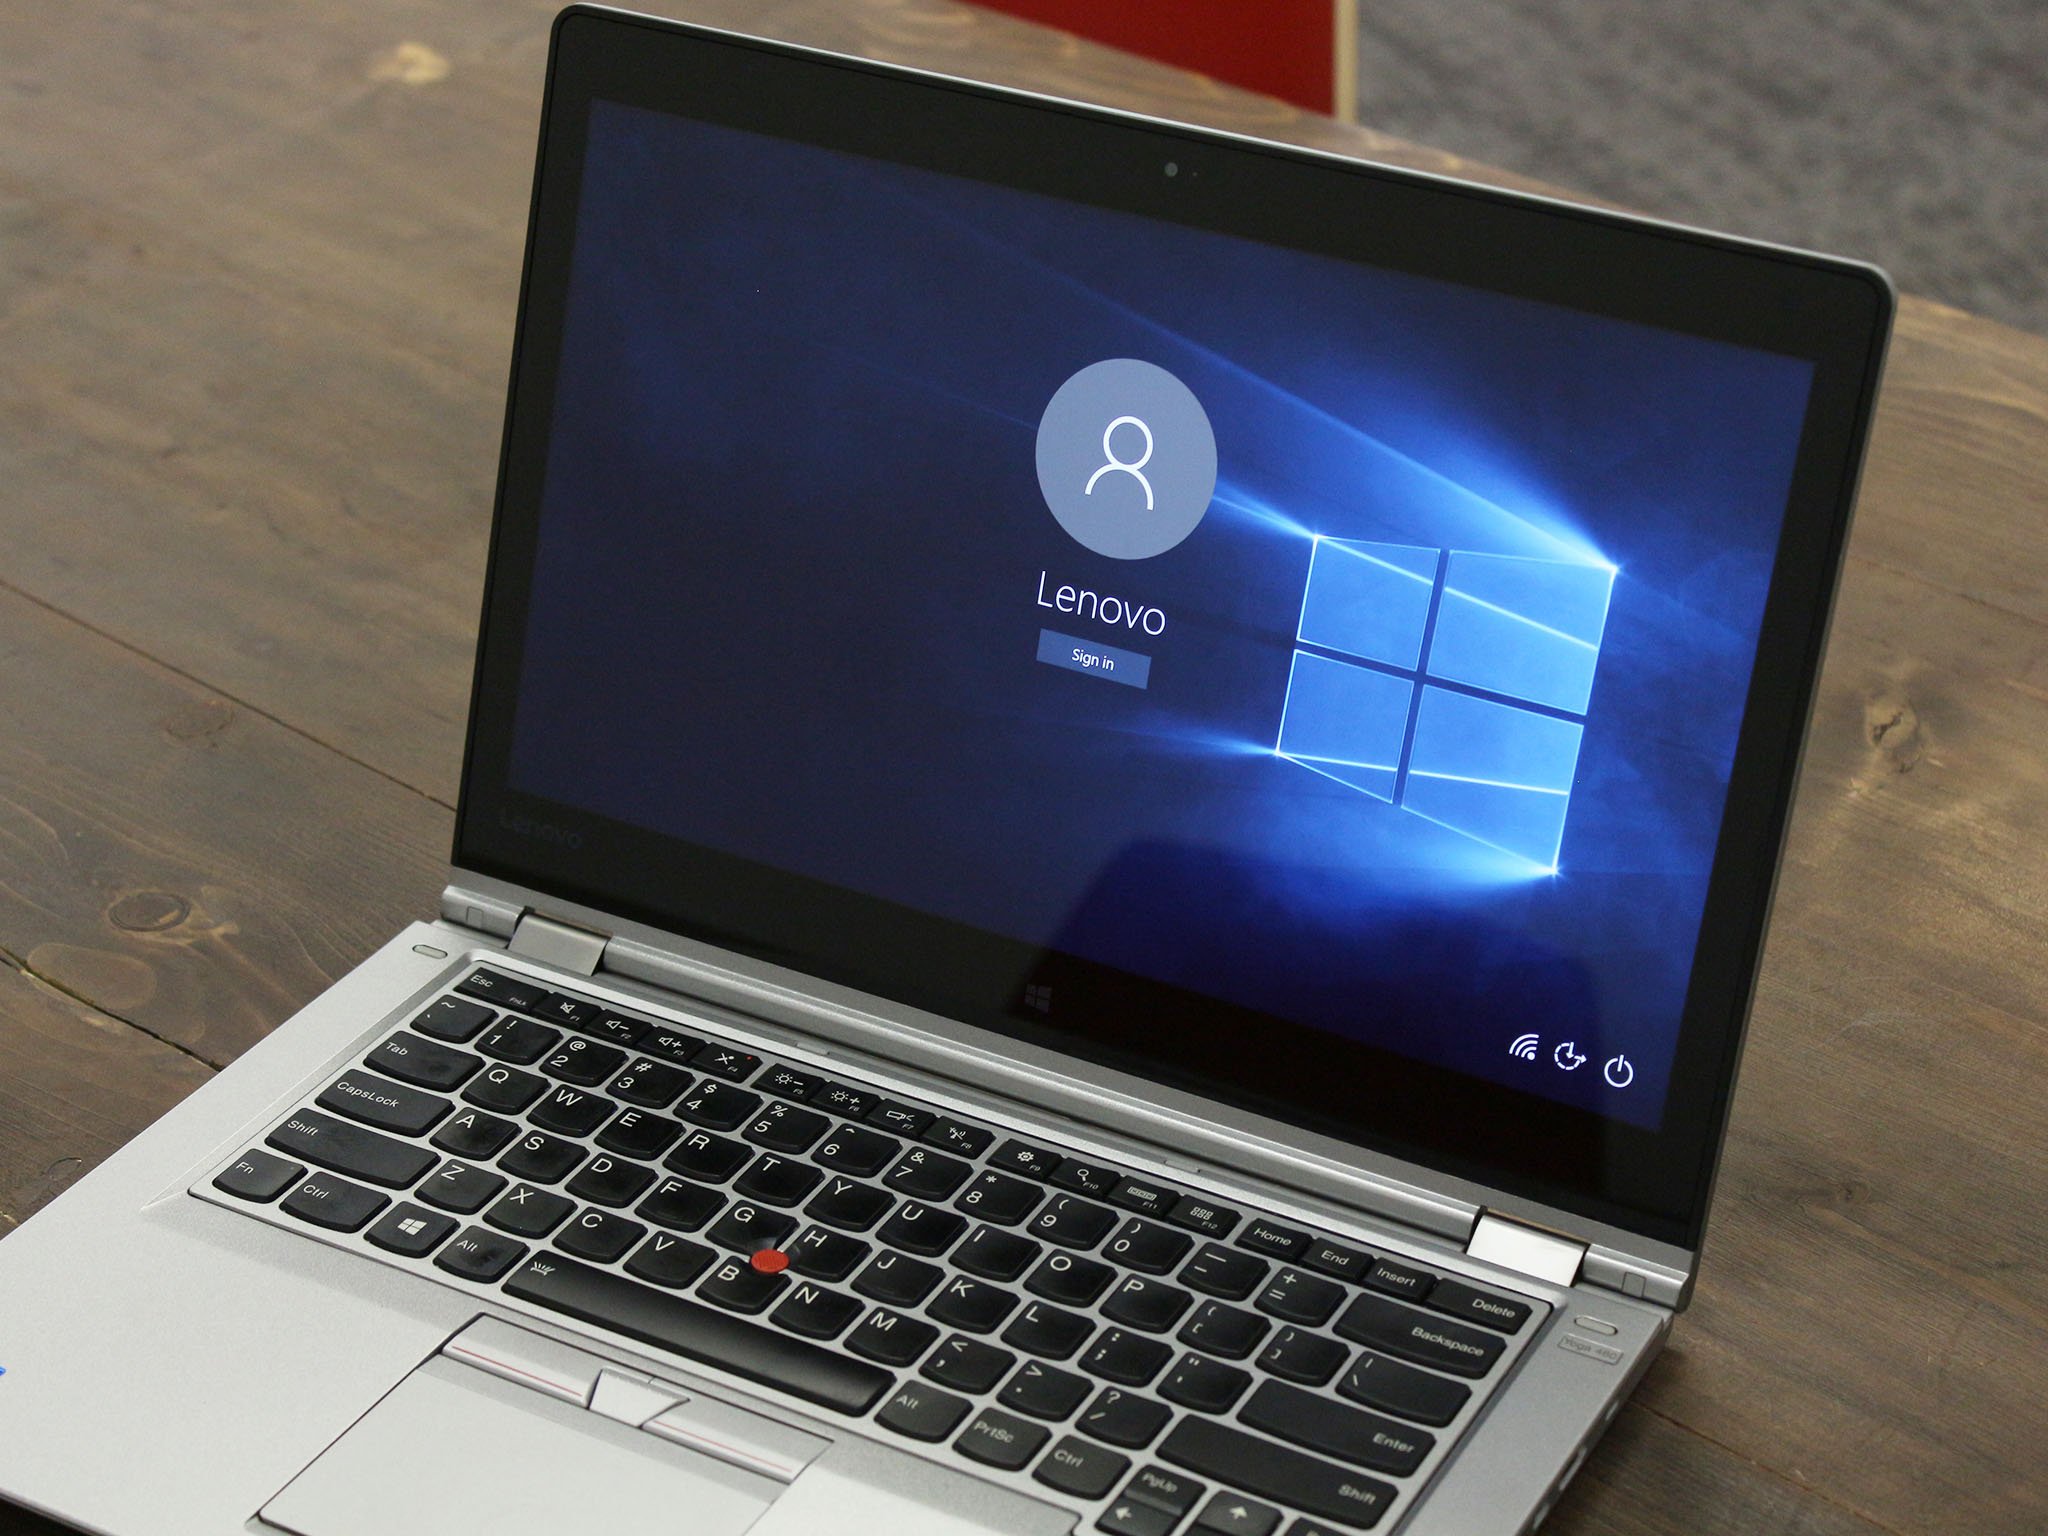
Windows 10 Lock Screen is the first screen you find after powering on the PC. This greets you with an awesome high-quality image but at the same time, it becomes a hindrance to reaching the desktop quickly. As you click the lock screen, the sign-in screen appears that requires username and password or PIN to allow you to access the desktop. This is somewhat a bothersome process so there are users who don’t like the concept of the Lock Screen. By default, the version does not provide any method to Turn Off Windows 10 Lock Screen.
To unlock the Lock Screen is again a process in itself and may be due to this reason, some users avoid this in Windows 10. This article will help those who want to Disable or Turn Off Windows 10 Lock Screen. Here are 7 ways and applying anyone will help you with this work.
Disable or Turn Off Windows 10 Lock Screen
Here is How to Disable or Turn Off Windows 10 Lock Screen –
1] From Accounts Settings
- First of all, press – Win+I.
- Select the – Accounts.
- Click the – Sign-in options.
- Next, click the dropdown under – Require Sign-in.
- Select – Never.
2] Through User accounts
- Click the Search on the taskbar.
- Type – control userpasswords2.
- Press the – Enter.
- Uncheck the box for – Users must enter a user name and password to use this computer.
- Hit the – Apply and then OK.
3] Via Screen saver settings
The method is applicable to the whom who use Screensaver.
- Press the – Windows key.
- Type – lock screen.
- Hit – Enter.
- Select – Screen saver settings.
- Next, uncheck the box before – On resume, display logon screen.
4] By Regedit or Registry Editor Turn Off Windows 10 Lock Screen
- To open the Registry Editor, first, you have to open the Run Command.
- And to do so jointly press Windows and R keys on your keyboard.
- Type regedit on the text field provided.
- Click Ok to go to the next step.
- A User Account Control will prompt up asking for your permission.
- Click Yes and allow the Registry Editor to appear on your screen.
- Now you have to navigate the path below to do the changes –
HKEY_LOCAL_MACHINE \ SOFTWARE \ Policies \ Microsoft \ Windows \ Personalization
- Now on the right pane of the Personalization key, create a new DWORD value.
- To do so go to the right pane and right click on the empty area.
- Select the option – DWORD (32-bit) value.
- And name it – NoLockScreen.
- Double click it and on the Edit DWORD Value window set its value data 1.
- Click Ok to save the changes.
- Follow the string –
HKEY_LOCAL_MACHINE\SOFTWARE\Microsoft\Windows\CurrentVersion\Authentication\LogonUI\SessionData
- Double click – AllowLockScreen.
- Put in 0 to disable or turn off Windows 10 Lock Screen.
- Exit the Registry Editor.
- Restart the system.
- Lock Screen will be totally disabled now.
5] With help of Gpedit or Group Policy Editor
- Open the Run Command window using the shortcut keys as mentioned above.
- Type gpedit.msc in the command field and click Ok to proceed.
- Local Group Policy Editor window is now in front of you.
- Follow this path –
Computer Configuration \ Administrative Templates \ Control Panel \ Personalization
- Now on the right pane, you can see an option that says – Do not display the lock screen.
- Double click that option.
- Check – Enabled.
- Click – Apply then – Ok.
- Restart the system to see the result.
6] Turn Off Windows 10 Lock Screen using Task Scheduler
- Click the start and type in – taskschd.
- Press Enter to open Task Scheduler.
- Select – Create Task from the right pane.
- Name the task – Disable or Turn Off Windows 10 Lock Screen.
- Check – Run with highest privileges.
- Click the drop-down after – Configure for: and select – Windows 10.
- Next, click the – Triggers tab.
- Select – New.
- On the New Trigger window click the dropdown for – Begin the task.
- Select – At logon.
- Click – OK.
- Again, click – New.
- Next, click the dropdown beside – Begin the task:.
- Choose – On workstation lock.
- Select – OK.
- Click – Actions tab.
- Hit – New.
- In the box for Program/script, type – regedit.
- Copy the following path –
add HKLM\SOFTWARE\Microsoft\Windows\CurrentVersion\Authentication\LogonUI\SessionData /t REG_DWORD /v AllowLockScreen /d 0 /f
- Paste in the field for – Add arguement (optional):.
- Click – OK.
- Select – Conditions tab.
- Unselect the box for – Start the task only if the computer is on AC power.
- Hit – OK and close the Task scheduler.
- Restart your system and the method will be effective.
7] Via rules in Local security policy
- Click the Start, type secpol.msc and press Enter.
- Next, double click – Software Restriction Policies.
- Right-click – Additional Rules.
- Select – New path rule…
- Copy the location – C:\Windows\SystemApps\Microsoft.LockApp_cw5n1h2txyewy
- Paste into the field for – Path.
- Click the dropdown under – Security level:.
- Choose – Disallowed.
- Finally, click Apply followed by OK.
1] How to Disable Windows 8 / 10 Lock Screen While Working on Battery
Methods:
1] From Accounts Settings
2] Through User accounts
3] Via Screen saver settings
4] By Regedit or Registry Editor
5] With help of Gpedit or Group Policy Editor
6] Using Task Scheduler
7] Via rules in Local security policy
Windows Lock Screen feature was introduced in Windows 8; it has been included in every Windows version, be it Windows 8.1 or Windows 10. The problem here is that the Lock Screen features used in Windows 8 were designed for touchscreen PC but non-touch PC’s this feature was probably a waste of time as it doesn’t make sense to click on this screen and then the sign-in option comes up. In fact, it’s an extra screen which does nothing; instead, users want to directly see the sign-in screen when they boot up their PC or even when their PC wakes up from sleep.

Most of the time the Lock Screen is just an unnecessary obstruction which doesn’t let the user sign-in directly. Also, users complain that sometimes they are not able to enter the right password because of this Lock Screen feature. It would be better to disable the Lock Screen feature in Windows 10 from Settings which would rapidly increase the sign-in process. But again there is no such option or feature for disabling the lock screen.
Even though Microsoft hasn’t provided a built option to disable the lock screen, but they can’t stop users from disabling it with the help of various hacks. And today we are going to exactly discuss these various tips & tricks which will help you in this task. So without wasting any time let’s see How to Disable the Lock Screen in Windows 10 with the help of the below-listed guide.
Table of Contents
Make sure to create a restore point just in case something goes wrong.
Method 1: Disable the Lock Screen Using Group Policy Editor
Note: This method will not work for users who have Home Edition of Windows; this only works for Windows Pro Edition.
1. Press Windows Key + R then type gpedit.msc and hit Enter to open Group Policy Editor.
![gpedit.msc in run | Disable the Lock Screen in Windows 10 [GUIDE]](https://techcult.com/wp-content/uploads/2016/06/gpedit.msc-in-run.png)
2. Now navigate to the following path in gpedit in the left window pane:
Computer Configuration > Administrative Templates > Control Panel > Personalization
3. Once you have reached Personalization, double-click on “Do not display the lock screen” setting from the right window pane.

4. To disable the lock screen, checkmark the box labelled as Enabled.

5. Click Apply, followed by OK.
6. This would Disable the Lock Screen in Windows 10 for Pro Edition users, to see how to do this in Windows Home Edition follow the next method.
Method 2: Disable the Lock Screen Using Registry Editor
Note: After Windows 10 Anniversary Update this method doesn’t seem to work anymore, but you can go ahead & try. If it didn’t work for you, then go to the next method.
1. Press Windows Key + R then type regedit and hit Enter to open Registry Editor.
2. Navigate to the following Registry key:
HKEY_LOCAL_MACHINE\SOFTWARE\Policies\Microsoft\Windows\Personalization
3. If you can’t find Personalization key then right-click on Windows and select New > Key.
![Right-click on Windows then select New then click Key and name this key as Personalization | Disable the Lock Screen in Windows 10 [GUIDE]](https://techcult.com/wp-content/uploads/2017/10/Right-click-on-Windows-then-select-New-then-click-Key-and-name-this-key-as-Personalization.png)
4. Name this key as Personalization and then continue.
5. Now right-click on Personalization and select New > DWORD (32-bit) value.

6. Name this new DWORD as NoLockScreen and double click on it to change its value.
7. In the Value data field, make sure to enter 1 and click OK.

8. Reboot your PC to save changes, and you shouldn’t see the Windows Lock Screen anymore.
Method 3: Disable the Lock Screen Using Task Scheduler
Note: This method only disable the lock screen in Windows 10 when you lock your PC, this means when you boot up your PC, you would still see the lock screen.
1. Press Windows Key + R then type Taskschd.msc and hit Enter to open Task Scheduler.
2. Then, from the Actions section from the far right, click Create Task.
![From the Actions menu click on Create Task | Disable the Lock Screen in Windows 10 [GUIDE]](https://techcult.com/wp-content/uploads/2017/10/From-the-Actions-menu-click-on-Create-Task.png)
3. Now make sure to name the Task as Disable Windows Lock Screen.
4. Next, make sure “Run with highest privileges” option is checked in the bottom.

5. From “Configure for” drop-down select Windows 10.
6. Switch to Triggers tab and click on New.
7. From the Begin the task drop-down select “At log on.”

8. That’s it, don’t change anything else and click OK to add this specific trigger.
9. Again click New from triggers tab and the Begin the task dropdown select “on workstation unlock for any user” and click OK to add this trigger.

10. Now move to the Action tab and click on the new button.
11. Keep “Start a program” under Action dropdown as it is and under Program/Script add “reg.”
12. Under Add arguments field add the following:
add HKLM\SOFTWARE\Microsoft\Windows\CurrentVersion\Authentication\LogonUI\SessionData /t REG_DWORD /v AllowLockScreen /d 0 /f
![Keep Start a program under Action dropdown as it is and under Program or Script add reg | Disable the Lock Screen in Windows 10 [GUIDE]](https://techcult.com/wp-content/uploads/2017/10/Keep-Start-a-program-under-Action-dropdown-as-it-is-and-under-Program-or-Script-add-reg.png)
13. Click OK to save this new Action.
14. Now save this Task and reboot your PC to save changes.
This would successfully Disable the Lock Screen in Windows 10 but to Automatically login on Windows 10 follow the next method.
Method 4: Enable Automatic Login On Windows 10
Note: This will bypass the Lock screen and Sign-in screen both and it won’t even ask for the password as it will automatically enter it and log you on your PC. So it has a potential risk, make sure only to use this if you have your PC somewhere safe and secure. Otherwise, others may be able to access your system easily.
1. Press Windows Key + R then type netplwiz and hit Enter.
2. Select the user account you want to automatically sign in with, uncheck the “Users must enter a user name and password to use this computer” option.

3. Click Apply, followed by OK.
4. Enter your administrator account password and click OK.
5. Reboot your PC you will automatically sign in to Windows.
Recommended:
- Fix ERR_QUIC_PROTOCOL_ERROR in Chrome
- Fix Hmm, we can’t reach this page error in Microsoft Edge
- How To Fix ERR_NETWORK_CHANGED in Chrome
- Fix ERR_INTERNET_DISCONNECTED in Chrome
That’s it you have successfully Disable the Lock Screen in Windows 10 but if you still have any questions regarding this post feel free to ask them in the comment’s section.