
Last Updated :
21 Apr, 2025
Keyboard shortcuts are a game-changer for boosting productivity on Windows think Ctrl+C to copy or Alt+Tab to switch apps in a flash. But what if they’re getting in your way, triggering accidentally, or conflicting with your favorite programs? Whether you’re a shortcut enthusiast looking to customize your setup or someone who wants to turn them off entirely, knowing how to enable and disable keyboard shortcuts in Windows can make your computing life smoother.
In this guide, we’ll explore simple steps to tweak these handy (or pesky) key combos, giving you full control over your keyboard experience.
How to Enable Keyboard Shortcuts in Windows?
If you are not able to use the shortcuts keys in Windows, then follow the below keyboard troubleshooting to enable the keyboard shortcuts in Windows.
Method 1: Enable Keyboard Shortcuts on Windows by Running the Keyboard Troubleshooter
Step 1: Go to Settings
- Click on Start Menu > Select Settings > Tap on System > then Update & Security.

Step 2: Go to Troubleshoot
- Click on Troubleshoot > Additional Troubleshooter
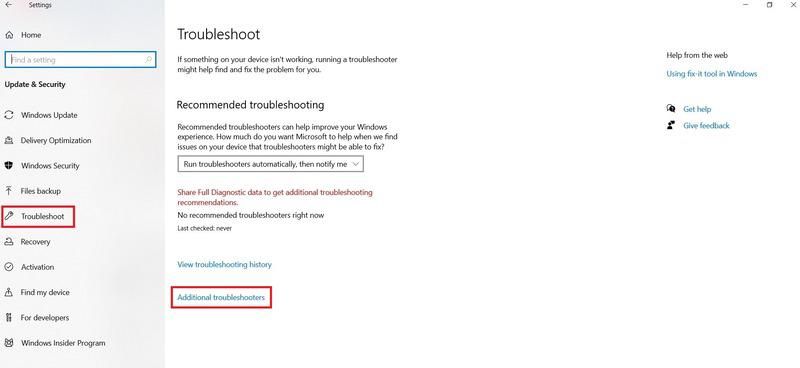
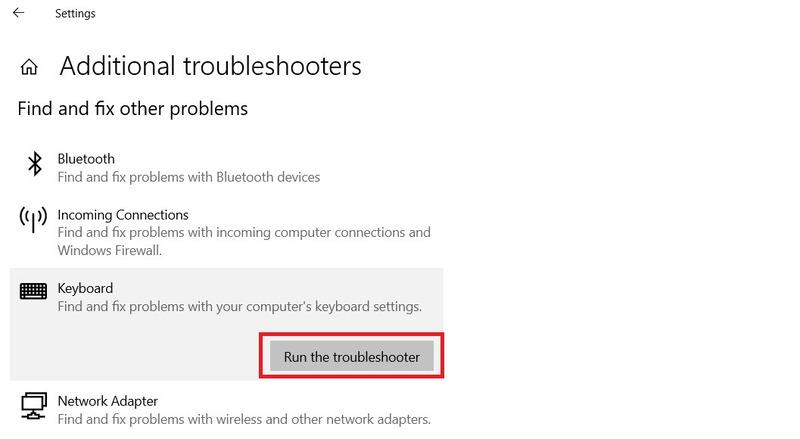
Step 3: Run Troubleshooter
- Under Find and Fix problems > Select Keyboard > Tap on Run the Troubleshooter
Method 2: Enable Keyboard Shortcuts on Windows by Sticky Keys
Note: Keyboard shortcuts sometimes fail to process if users can’t press the shortcut keys simultaneously. Users need to enable the Static Keys to work with shortcut keys in Windows.
Step 1: Go to Settings
- Click on Start Menu > Settings > Select Ease of Access.
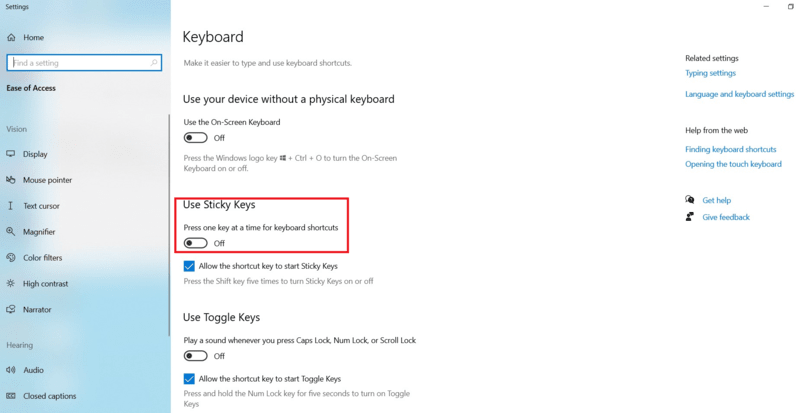
Step 2: Choose Keyboard
- Go to the Interaction section > Select Keyboard.
Step 3: Select Sticky Keys
- Turn on the toggle which shows «Use Sticky Keys«
Method 3: Enable Keyboard Shortcuts on Windows by Turning on Hotkeys
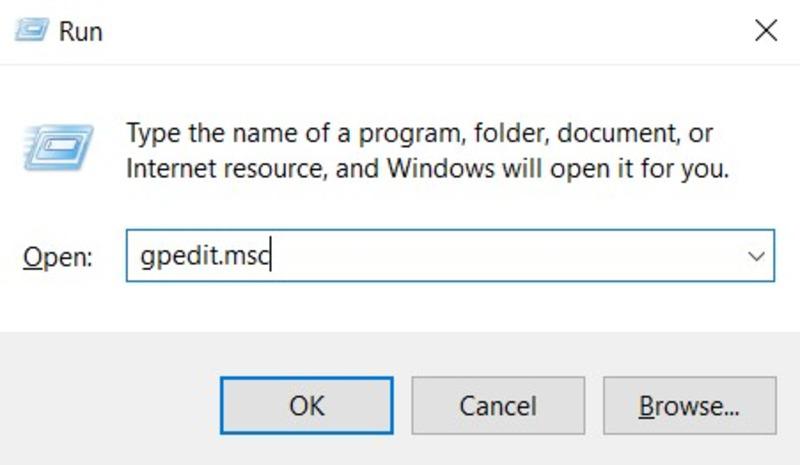
Step 1: Go to gpedit.msc
- Press Windows Key + R > type gpedit.msc into the dialog box > Press Enter.
Step 2: Choose Configration
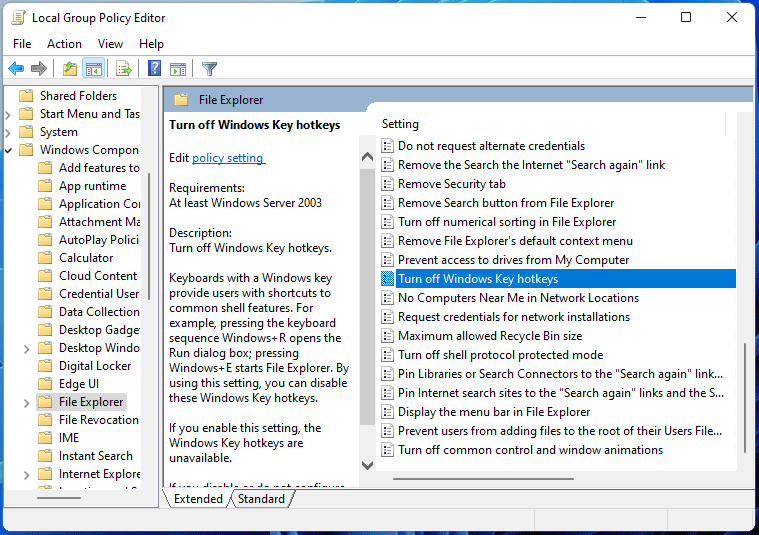
- Press User Configuration > Administrative Templates > Windows Components > File Explorer
Step 3: Choose Disabled
- Open Turn off Windows keys hotkeys > Select Disabled or Not Configured > Click on Apply.
How to Disable Keyboard Shortcuts in Windows?
Just like the Enable Process of Windows Keyboard Shortcuts, there are three different methods present to Disable Keyboard Shorcuts in Windows. Let us start with the Windows Group Policy Editor.
Method 1: Disable Keyboard Shortcuts in Windows by Local Group Policy Editor
Note: Users can troubleshoot the internal system and resolve the system settings. Now we can see how to disable Windows shortcut keys using the Local Group Policy Editor.
Step 1: Go to Edit Group Policy
- Go to the Start menu > Type Edit Group Policy > Right-click on Best Match > Select Run as administrator
Step 2: Choose File Explorer
- Navigate to User Configuration > Tap on Administrative Templates> Click on Windows Components > File Explorer button.
Step 3: Turn Off Windows Key Hotkeys
- Double-click on Turn off Windows Key Hotkeys.

Method 2: Disable Keyboard Shortcuts in Windows by Registry Editor
Step 1: Open Registry Editor
- Go to the Search Menu > Type Registry Editor
Step 2: Open as Administrator
- Right-click on the Best Match result > Select Run as administrator
Step 3: Enter Below Command
- Now, copy and paste the below command into the address bar > Enter.
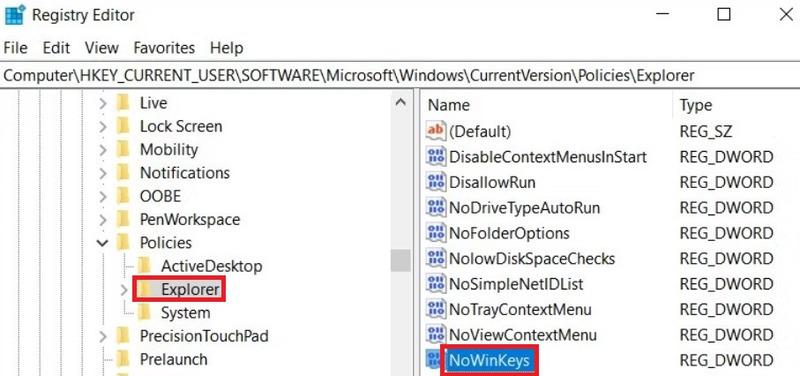
HKEY_CURRENT_USER\Software\Microsoft\Windows\CurrentVersion\Policies
Step 4: Enter Value of NoWinKeys
- Click on Explorer key > Right-click on a blank space > Select New > DWORD (32-bit) Value > Name this value NoWinKeys > Press Enter.
Method 3: Disable Keyboard Shortcuts in Windows By System Settings (for Certain Hotkeys)
Step 1: Go to Settings
- Go to the Search Menu > Type Allow the shortcut key to start Filter Keys > Tap on Best Match
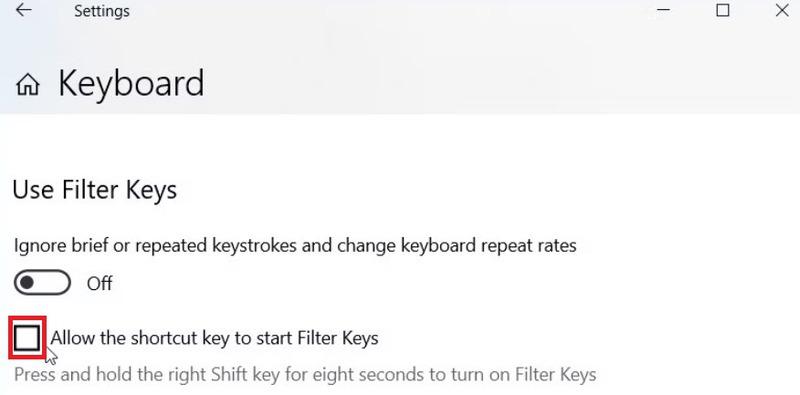
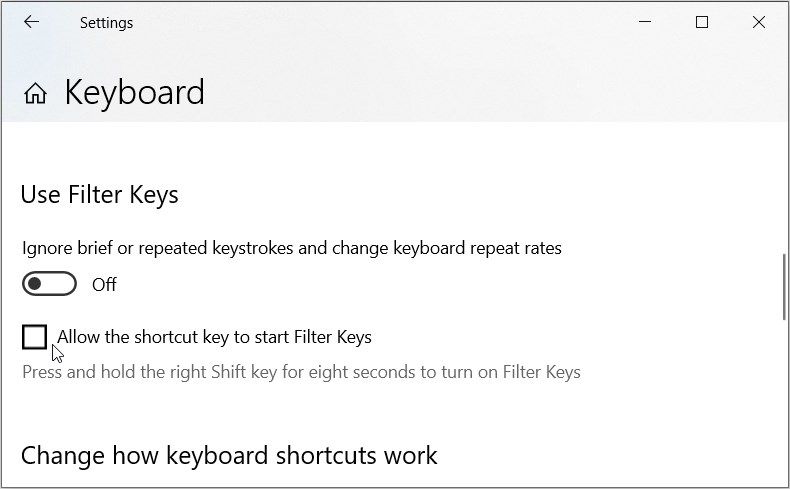
Step 2: Uncheck Allow the Shortcut Key
- Uncheck the Allow the shortcut key to start Filter Keys > Locate Use Sticky Keys > Uncheck Allow the shortcut key to start Sticky Keys
Step 3: Go to Toggle Key Option
- Scroll down to the Use Toggle Keys option > Uncheck the Allow the shortcut key to start Toggle Keys option.
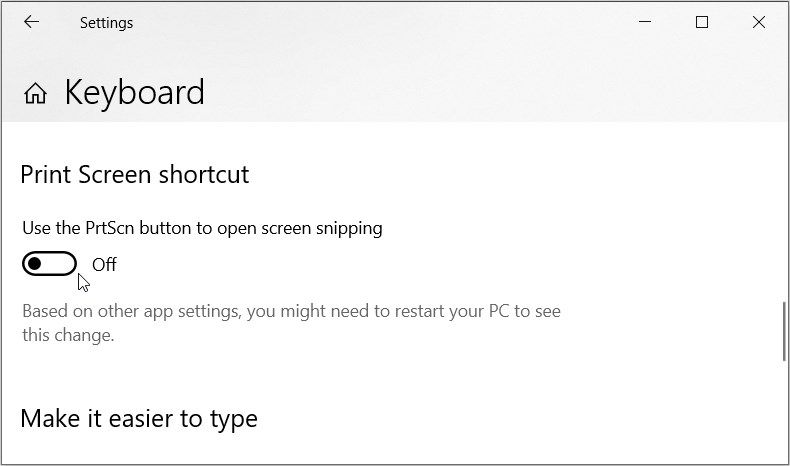
Step 4: Use the PrtScn Button
- Scroll down to the Print screen shortcut option > Turn off Use the PrtScn button to open the disabling snipping button.
Conclusion
Users can access multiple types of Windows System Settings by using proper Keyboard Shortcuts or Hotkeys. By Disabling Keyboard Shortcuts on Windows, users can improve their overall computing experience and prevent effective accidental actions. By following all the mentioned methods and steps, we can Enable and Disable Keyboard Shortcuts on Windows properly.
Also Read
- How to Create Keyboard Shortcuts in Windows 10?
- Top 100+ Computer Keyboard Shortcut Keys List (A to Z), PDF Available
- Keyboard Shortcuts that Work on Both Windows 11 & Windows 10
Sign in to your MUO account
Quick Links
-
Use the Settings App (for Certain Hotkeys)
-
Disable Shortcuts Using the Group Policy Editor
-
Disable Keyboard Shortcuts Using the Registry Editor
Accidental keystrokes can disrupt your workflow and cause unnecessary interruptions. Fortunately, you can disable keyboard shortcuts on Windows to prevent these issues and create a smoother typing experience. Below, we’ll explore your options for getting rid of unwanted shortcuts.
1. Use the Settings App (for Certain Hotkeys)
The Settings app on Windows can be useful for disabling a few specific Windows shortcut keys, such as those for Windows Narrator, Sticky Keys, Print Screen, Filter Keys, Toggle Keys, and color filters.
Here’s how to disable hotkeys using the Settings app:
- Type Allow the shortcut key to start Filter Keys in the Start menu search bar and select the Best match.
- Uncheck the Allow the shortcut key to start Filter Keys box to disable this option. When this option is enabled, pressing and holding the right Shift key for about eight seconds will activate Filter Keys.
- Likewise, if you scroll up, you’ll see similar checkboxes for Sticky Keys and Toggle Keys. Uncheck them too.
- Next, scroll down and disable the toggle below Print Screen Shortcut to prevent the PrtScn button from opening the snipping tool.
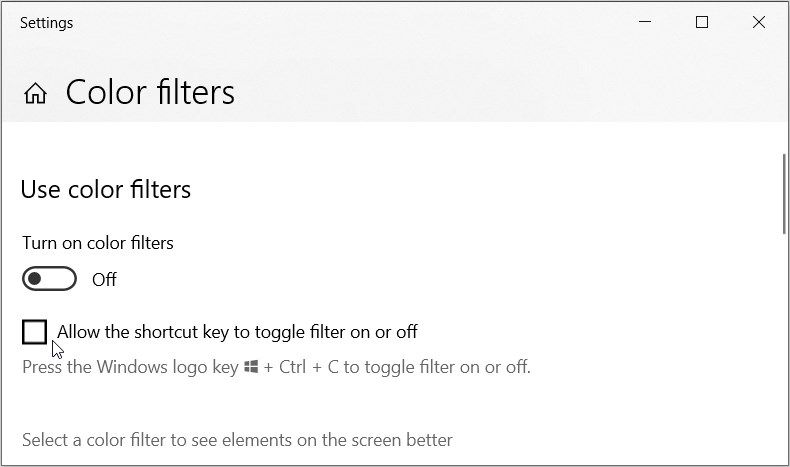
Now, you can follow the set of instructions below to disable keyboard shortcuts for color filters:
- Now, type Allow the shortcut key to turn color filters on or off in the Start menu search bar and select the Best match.
- Uncheck the Allow the shortcut key to toggle filter on or off box. When this is enabled, pressing Win + Ctrl + C will toggle the color filters on or off.
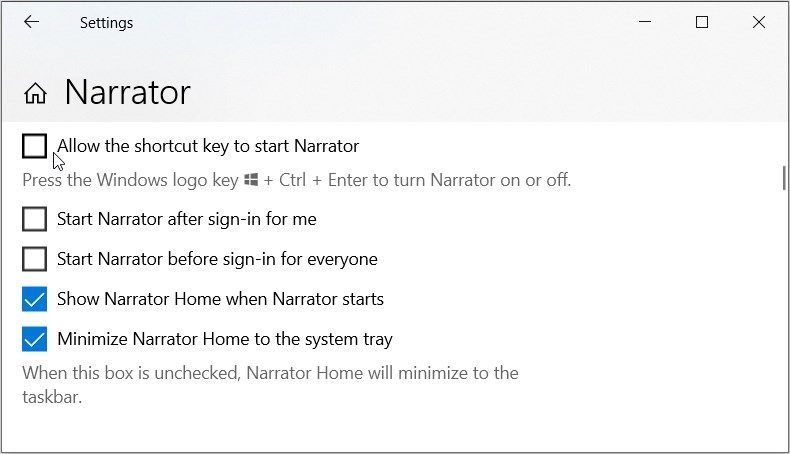
Finally, we’ll show you how to disable keyboard shortcuts for the Narrator feature that describes the content that appears on your screen:
- Type Allow the shortcut key to start Narrator in the Start menu search bar and select the Best match.
- Next, uncheck the Allow the shortcut key to start Narrator box to disable this option. When this option is enabled, pressing Win + Ctrl + Enter will turn Narrator on or off.
2. Disable Shortcuts Using the Group Policy Editor
Unfortunately, the Settings app on Windows doesn’t let you manage all the keyboard shortcuts. That’s where the Group Policy Editor comes in. The Local Group Policy Editor allows you to troubleshoot PC issues and tweak various system settings.
Here’s how to use it to disable the Windows shortcut keys:
- Type Edit group policy in the Start menu search bar.
- Right-click on the Best match result and select Run as administrator.
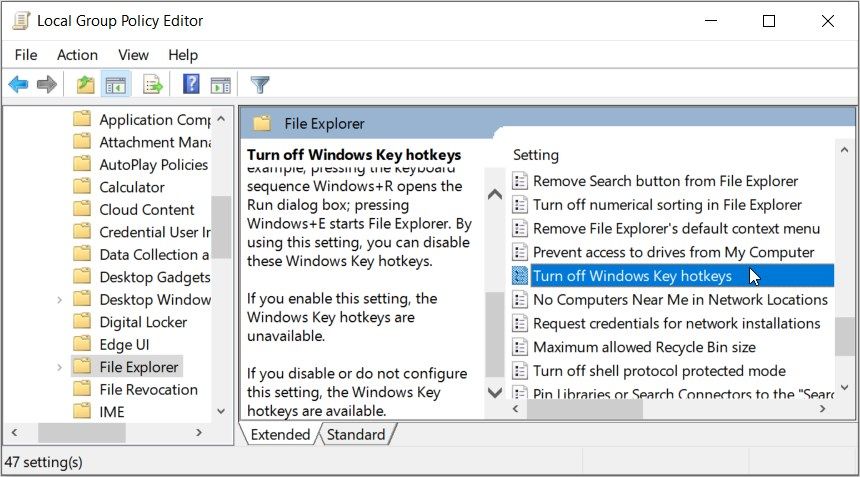
- Navigate to User Configuration > Administrative Templates > Windows Components and click the File Explorer folder.
- Now, scroll down on the right and double-click the Turn off Windows Key Hotkeys option.
- Select Enabled from the window that appears.
Finally, close the Local Group Policy Editor and restart your computer to apply these changes.
3. Disable Keyboard Shortcuts Using the Registry Editor
You can disable the keyboard shortcuts by tweaking a few Registry keys. But before you begin, consider backing up the Windows Registry to ensure you can recover it if issues arise. Now, here’s how to disable keyboard shortcuts using the Registry Editor:
- Type Registry Editor in the Start menu search bar. Right-click on the Best match result and select Run as administrator.
-
Copy-paste the following command into the address bar and press Enter:
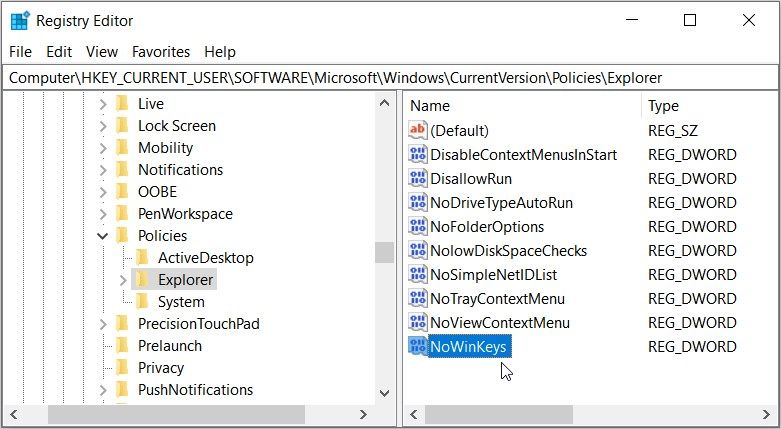
HKEY_CURRENT_USER\Software\Microsoft\Windows\CurrentVersion\Policies - Now, double-click Policies to expand and reveal the Explorer key. If it’s missing, create it by right-clicking the Policies key and selecting New > Key. From there, name this key as Explorer.
- When you’re on the «Explorer» key, right-click on a blank space on the right and select New > DWORD (32-bit) Value. Next, name this value as NoWinKeys and press Enter.
- To disable the hotkeys, double-click on the NoWinKeys value and set the Value data as 1.
Finally, close the Registry Editor and restart your computer to save these changes.
While keyboard shortcuts can improve efficiency and speed up certain operations, they can cause unintended actions if you’re prone to misclicking and interrupt your workflow. Hopefully, with our detailed instructions, you managed to disable all the keyboard shortcuts you don’t really use or need.
-
Home
-
News
- 4 Ways to Disable Hotkeys in Windows 11/10
4 Ways to Disable Hotkeys in Windows 11/10
By Linda | Follow |
Last Updated
Do you need to enable or disable keyboard shortcuts in Windows 11/10? If so, you come to the right place. This post from MiniTool Partition Wizard shows you how to do that in 4 ways.
Do You Need to Enable Keyboard Shortcuts?
In general, if you didn’t tweak your computer and it runs well, the keyboard shortcuts are enabled by default. You don’t need to enable keyboard shortcuts manually. You may want to know how to enable the keyboard shortcuts, only if you have changed them or they don’t work normally.
Some of these ways may just disable part of Windows keyboard shortcuts, you can try them according to your conditions.
Way 1. Disable Windows Key Hotkeys
Many keyboard shortcuts may use the Windows logo key, like Win + A, Win + B, Win + C, etc. Now, you can disable all these Windows key hotkeys in the following 2 ways.
#1. Use Local Group Policy Editor
- Use the Windows Search tool to open Local Group Policy Editor.
- Go to User Configuration > Administrative Templates > Windows Components > File Explorer.
- Scroll down to find Turn off Windows Key hotkeys and double-click on it.
- On the pop-up window, select Enabled and then click the Apply and OK buttons to save changes.
#2. Use Registry Editor
- Use the Windows Search tool to open Registry Editor.
- Go to HKEY_CURRENT_USER\Software\Microsoft\Windows\CurrentVersion\Policies.
- Check if there is an Explorer key under Policies. If not, right-click on the Policies key and select New > Key. Name this key as Explorer.
- Right-click on the Explorer key and select New > DWORD (32-bit) Value. Next, name this value as NoWinKeys.
- Double-click on the NoWinKeys value and set the Value data as 1.
Tips:
If you want to enable Windows key hotkeys again, just need to change the value data to 0.
Way 2. Use System Settings
System Settings can also disable keyboard shortcuts.
- Press the Windows logo key + I to open Settings.
- Go to Accessibility > Keyboard. Turn off the shortcut keys of the Sticky keys, Filter keys, Toggle keys, and the Print Screen key.
- Go to Accessibility > Color filters to turn off the Color filters shortcut key.
- Go to Accessibility > Narrator to turn off the shortcut key of Narrator.
Way 3. Disable Function Keys
Function keys are F1 – F12 keys. These keys’ functions in Windows are as follows:
F1: Get help in Windows.
F2: Rename the selected item.
F3: Search for a file or folder in File Explorer.
F4: Display the address bar list in File Explorer.
F5: Refresh the active window.
F6: Cycle through screen elements in a window or on the desktop.
F7, F8, and F9: No function.
F10: Activate the Menu bar in the active app.
F11: Maximize or minimize the active window.
F12: Full screen File Explorer, IE, and other programs.
However, many PCs will add multimedia functions to these keys like enabling or disabling mute, increasing or decreasing volume, etc. Then, they will use the Fn key to distinguish the Windows functions from multimedia functions.
If you want to change the functions of these keys, you can press Fn + Esc (FnLock) or enable/disable Hotkey Mode in the BIOS > Configuration tab.
Way 4. Third-Party Software
You can use third-party software to remap or disable keyboard shortcuts. If you know some nice tools, share them with us in the following comment zone.
In addition, MiniTool Partition Wizard is a nice tool that can migrate OS, clone disks, recover data, etc. You can try it if you have these needs.
MiniTool Partition Wizard DemoClick to Download100%Clean & Safe
About The Author
Position: Columnist
Linda has been working as an editor at MiniTool for 5 years. She is always curious about computer knowledge and learns it crazily. Her articles are simple and easy to understand. Even people who do not understand computer can gain something. By the way, her special focuses are disk management, data recovery and PDF editing.
Download Windows Speedup Tool to fix errors and make PC run faster
This post explains how to disable keyboard shortcuts on Windows 11/10 PC. Windows offers some built-in shortcut keys (or hotkeys) that are intended to help users quickly launch apps or perform other tasks without using the mouse. For example, the Windows logo key launches the Start menu on Windows 11/10. Similarly, the Esc key aborts or closes the current task.

These hotkeys can sometimes create issues when accidentally pressed by other people, such as small kids at home. A few Windows users have also reported that the hotkeys are troubling them when they play games in full-screen mode. For example, the Windows logo key, which is located near the Shift key (universal key for running) and the Ctrl key (fires a weapon in gaming), causes them to jump out of the game all of a sudden when pressed accidentally. Likewise, the Shift key opens the Sticky Keys prompt when pressed accidentally multiple times.
If Windows hotkeys are somehow bothering you or ruining your PC gaming experience, then you have the option to disable them temporarily. To disable keyboard shortcuts on Windows 11/10, use the following solutions:
- Disable keyboard shortcuts using Local Group Policy Editor
- Disable keyboard shortcuts using Registry Editor
- Disable keyboard shortcuts using Microsoft PowerToys
Let us look at each of these solutions in detail.
1] Disable keyboard shortcuts using Local Group Policy Editor

Microsoft’s Group Policy Editor is an administrative tool that allows you to configure policies and override default settings on your Windows 11/ 10 PC. Here’s how you can use it to disable hotkeys on Windows:
-
- Press the Win+R key combination on your keyboard.
- In the Run dialogue box that appears, type gpedit.msc.
- Press the Enter key.
- Select Yes in the User Account Control prompt.
- In the Group Policy Editor window, navigate to the following path:
User Configuration > Administrative Templates > Windows Components > File Explorer
- Navigate to Turn off Windows Key hotkeys policy on the right panel.
- Double-click on it and select Enabled in the Policy Settings window.
- Click on the Apply button.
- Then click on OK.
- Exit the Group Policy Editor and reboot your Windows 11/ 10 PC.
Note:
- You will not be able to access the Group Policy Editor if you have the ‘Home’ edition of Windows. In that case, you may either install the Group Policy Editor via this workaround or move to the next solution in the queue.
- To enable the Windows hotkeys back, you may navigate to the same path in the Group Policy Editor and turn the policy setting to ‘Disabled’.
2] Disable keyboard shortcuts using Registry Editor

Windows Registry Editor allows you to view or edit keys in the Windows registry database. This database consists of settings required by the Operating System to function properly. Here’s how you may use the Registry Editor to disable keyboard shortcuts on Windows:
- Click on the taskbar search icon.
- Type ‘regedit‘. Registry Editor will appear on top of the search results.
- Click on Run as administrator on the right panel.
- In the Registry Editor window, navigate to the following path:
HKEY_CURRENT_USER > Software > Microsoft > Windows > CurrentVersion > Policies
- Right-click anywhere in the empty space on the right panel.
- Select New > Key and name the key as ‘Explorer‘.
- No again right-click anywhere on the right panel and select New > DWORD (32-bit) Value.
- Name it as NoKeyShorts.
- Double-click on NoKeyShorts and set its value to 1.
- Click on the OK button.
- Exit the Registry Editor and Reboot your PC.
This should disable all your Windows keyboard shortcuts. To re-enable them, simply delete the NoKeyShorts key you’ve created following the steps mentioned above.
Tip: Create a system restore point before tweaking the Windows registry or changing the Group Policy settings. A slight error while working with these applications might lead you to a problematic situation.
Also Read: Windows Registry Editor Tips & Features.
3] Disable keyboard shortcuts using Microsoft PowerToys

Microsoft PowerToys is an open-source Windows utility software that allows users to enhance their Windows experience through a set of applications including (but not limited to) Color Picker, Image Resizer, and Keyboard Manager. The Keyboard Manager allows you to remap shortcuts on Windows. Let’s see how to use it to temporarily disable the Windows logo key or any other key on your keyboard.
- Download and Install PowerToys.
- Launch the PowerToys app.
- Select Keyboard Manager from the options available on the left.
- Click on the Open Settings button on the right panel.
- Click on Remap a key option under the heading ‘Keys’.
- In the Remap Keys window that appears, click on the + icon.
- Choose Win in the ‘Physical Key’ dropdown.
- Choose Disable in the ‘Mapped To’ dropdown.
- Click on the OK button on top.
- Click on Continue Anyway in the confirmation prompt that appears.
This will immediately disable your Windows logo key, without having you reboot the PC. When the Win key is disabled, all its associated keyboard shortcuts will stop working. Similarly, you can temporarily disable other keys. When you wish to re-enable the keys, simply click on the Delete (bin) icon next to the mapping in the PowerToys app.
How do I turn off keyboard shortcuts in Windows 11?
You may turn off your keyboard shortcuts in multiple ways. The easiest way is to use the Microsoft PowerToys application. This application allows you to disable certain keys, such as the Windows logo key or the Esc key. You can temporarily disable keys to turn off the keyboard shortcuts associated with them. Other methods include using the Local Group Policy Editor and the Windows Registry Editor. Refer to the above post to know how to use these methods to turn off keyboard shortcuts on Windows 11/ 10 PC.
How do I manage keyboard shortcuts in Windows 11?
Although there is no in-built tool to manage keyboard shortcuts in Windows 11, you can use the PowerToys to get the job done. It comes with several options that allow you to manage hotkeys. Whether you want to modify a preset shortcut or custom shortcut, you can manage them both using this app.
Read Next: Keyboard shortcuts and Hotkeys are not working in Windows 11/10.
Sangeeta holds a Bachelor’s in Computer Science, and a Post Graduate Diploma in Computer Applications. She has been associated with the Information Technology industry for over 10 years, and enjoys reading and sharing Windows & technology-related tips.
You can quickly open applications or programs, menus, etc., on your computer with some built-in keyboard shortcuts in Windows 11 and 10. Nevertheless, if you frequently press keyboard shortcuts by mistake or don’t use keyboard shortcuts at all and want to disable this feature on your PC, this gearupwindows article will help.
You can disable keyboard shortcuts on Windows 11/10 PCs using either the Local Group Policy Editor or Registry Editor. Each of these methods will be reviewed, and you can choose whichever method is most convenient for you.
How to Turn Off Keyboard Shortcuts on Windows 11 or 10 through Local Group Policy Editor?
Follow these steps to disable Keyboard Shortcuts in Windows 11 or 10 through Local Group Policy Editor:-
Step 1. Open Local Group Policy Editor.
Step 2. From the left sidebar of the Local Group Policy Editor window, navigate to the following path:-
User Configuration > Administrative Templates > Windows Components > File Explorer
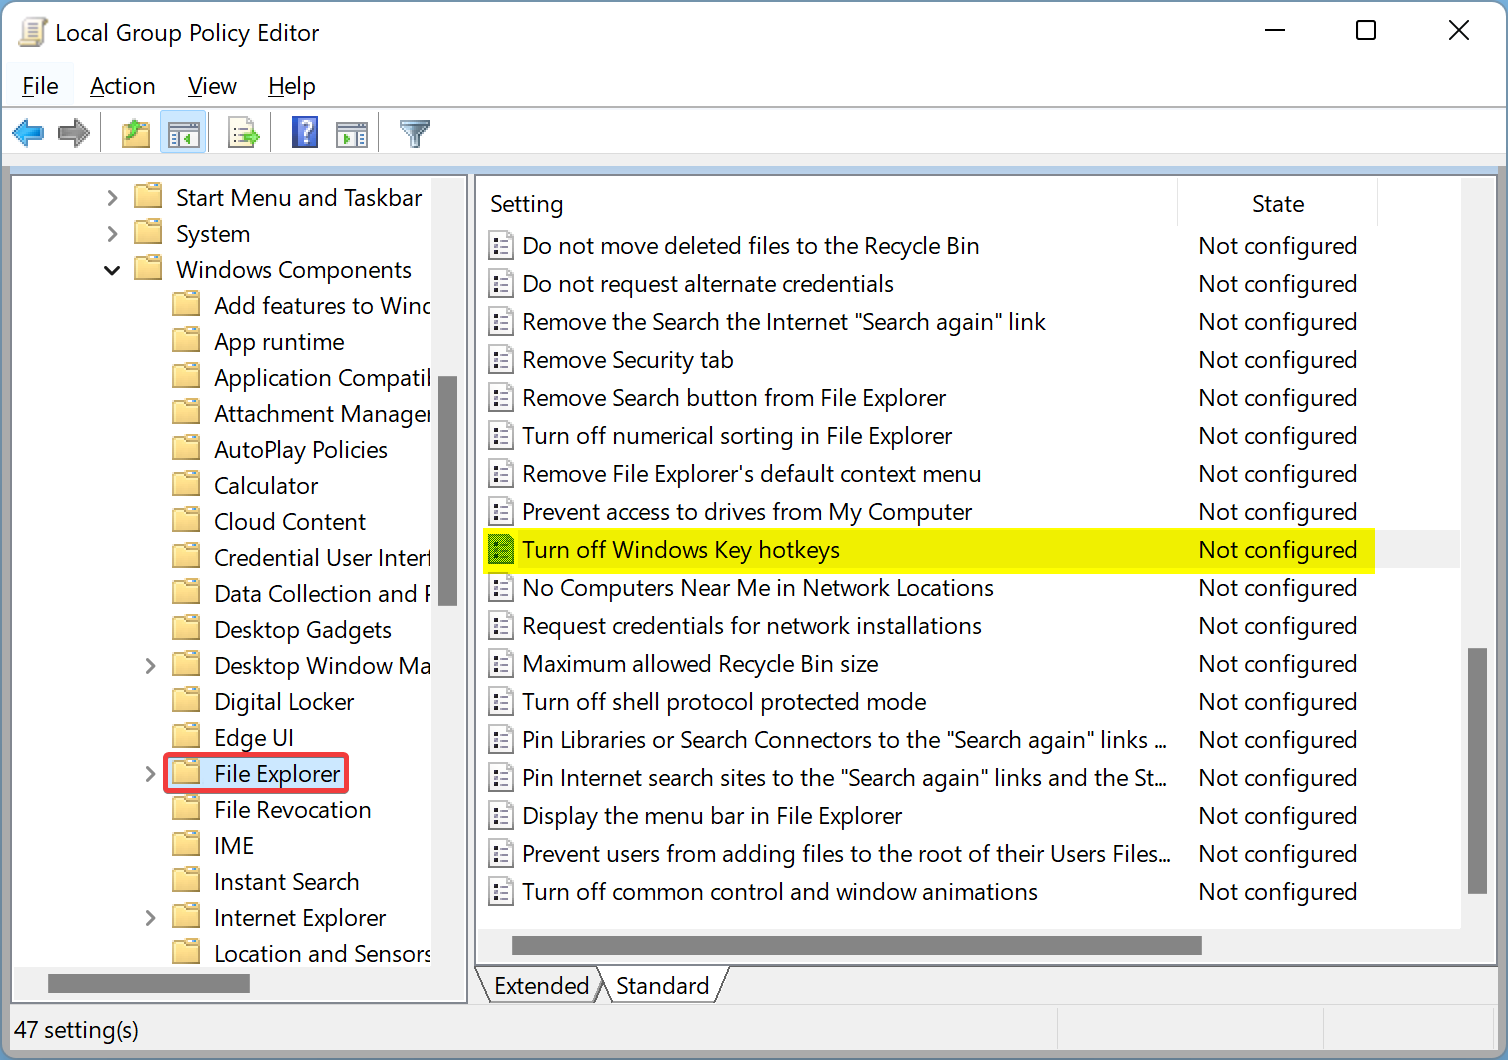
Step 3. Double-click on the Turn off Windows key hotkeys policy to configure it on the right sidebar.
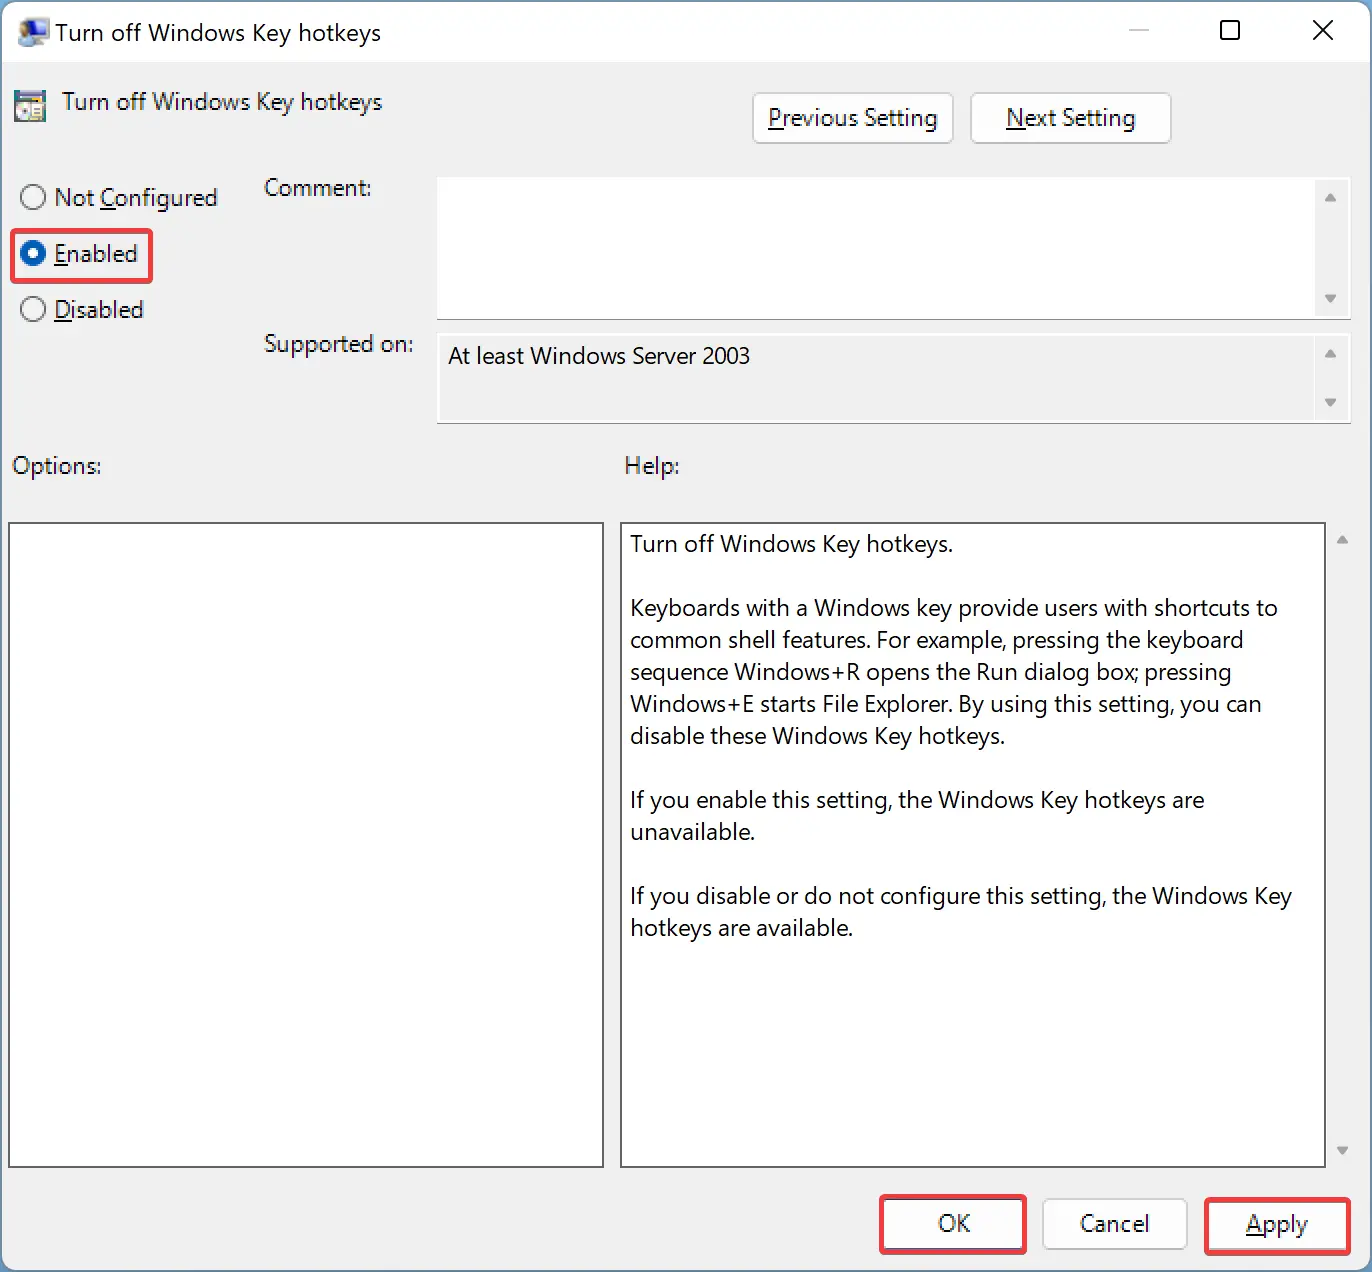
Step 4. Make sure Enabled is selected.
Step 5. After that, click the Apply button.
Step 6. Then, click the OK button.
Step 7. To apply the changes, reboot your PC.
Windows 11 or 10 will no longer support keyboard shortcuts or hotkeys after you complete the above steps.
To re-enable the hotkeys, open the Local Group Policy Editor again and navigate to the File Explorer option. Select either Not Configured or Disabled on the “Turn off Windows Key hotkeys” policy.
How to Disable Keyboard Shortcuts on Windows 11 or 10 using Registry Editor?
The following steps will guide you through disabling Keyboard Shortcuts in Windows 11 and 10 using Registry Editor:-
Step 1. Open Registry Editor first.
Step 2. Then, navigate to the following key in the left sidebar of Registry Editor:-
HKEY_CURRENT_USER\Software\Microsoft\Windows\CurrentVersion\Policies\Explorer
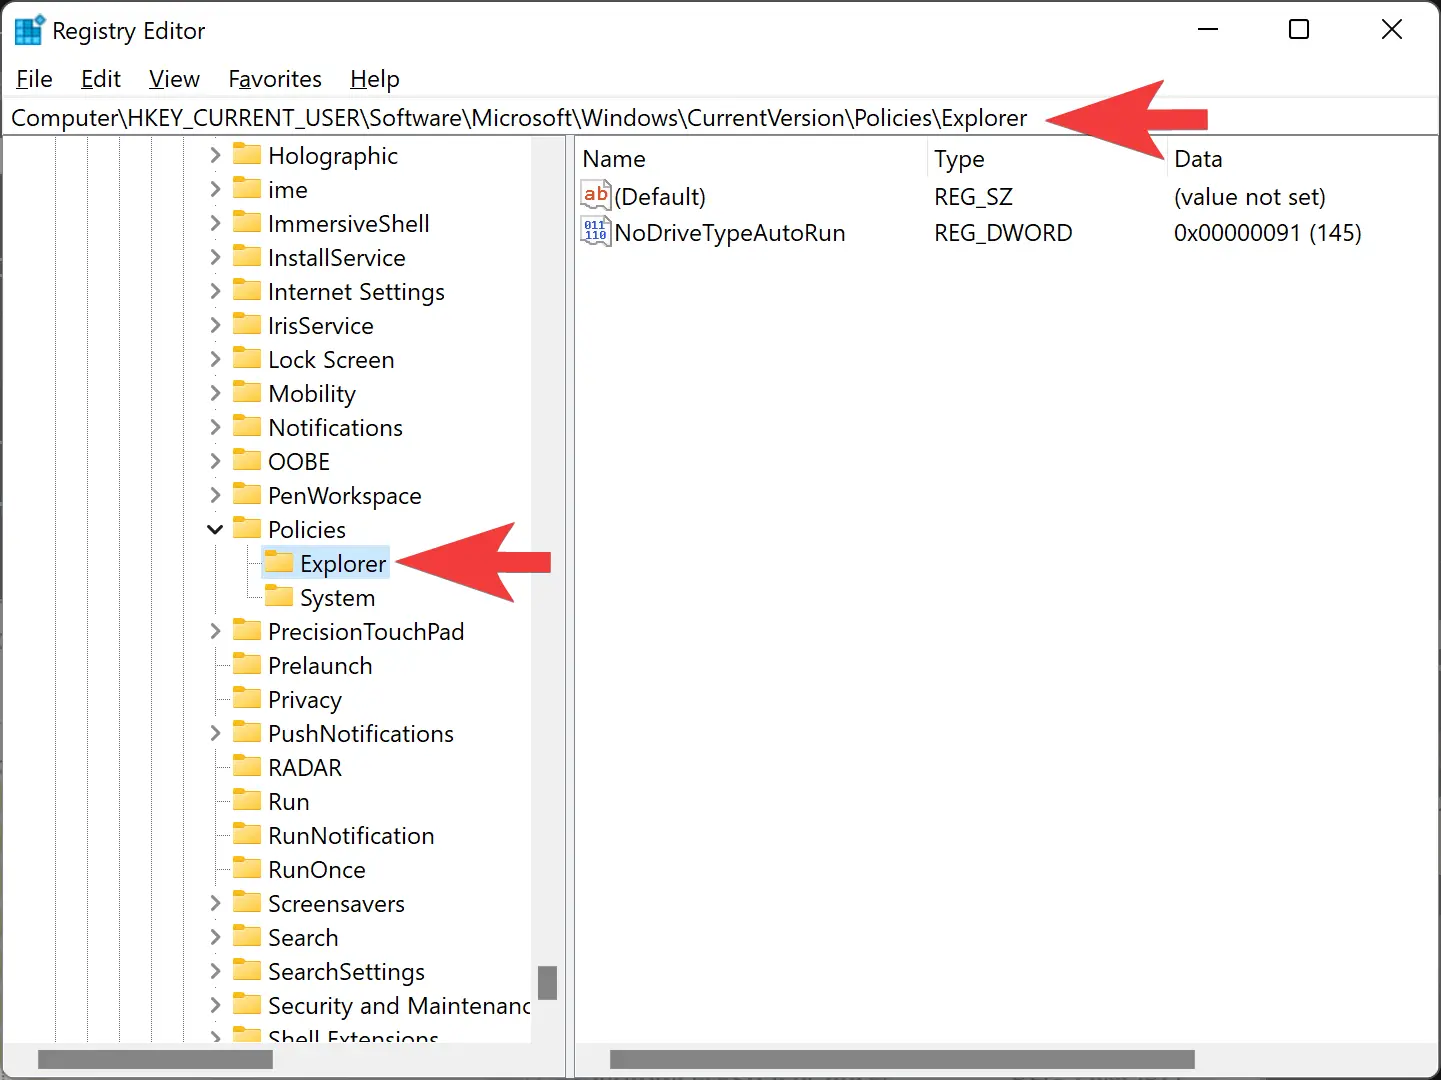
Step 3. Choose New > DWORD (32-bit) Value by right-clicking on the Explorer key.
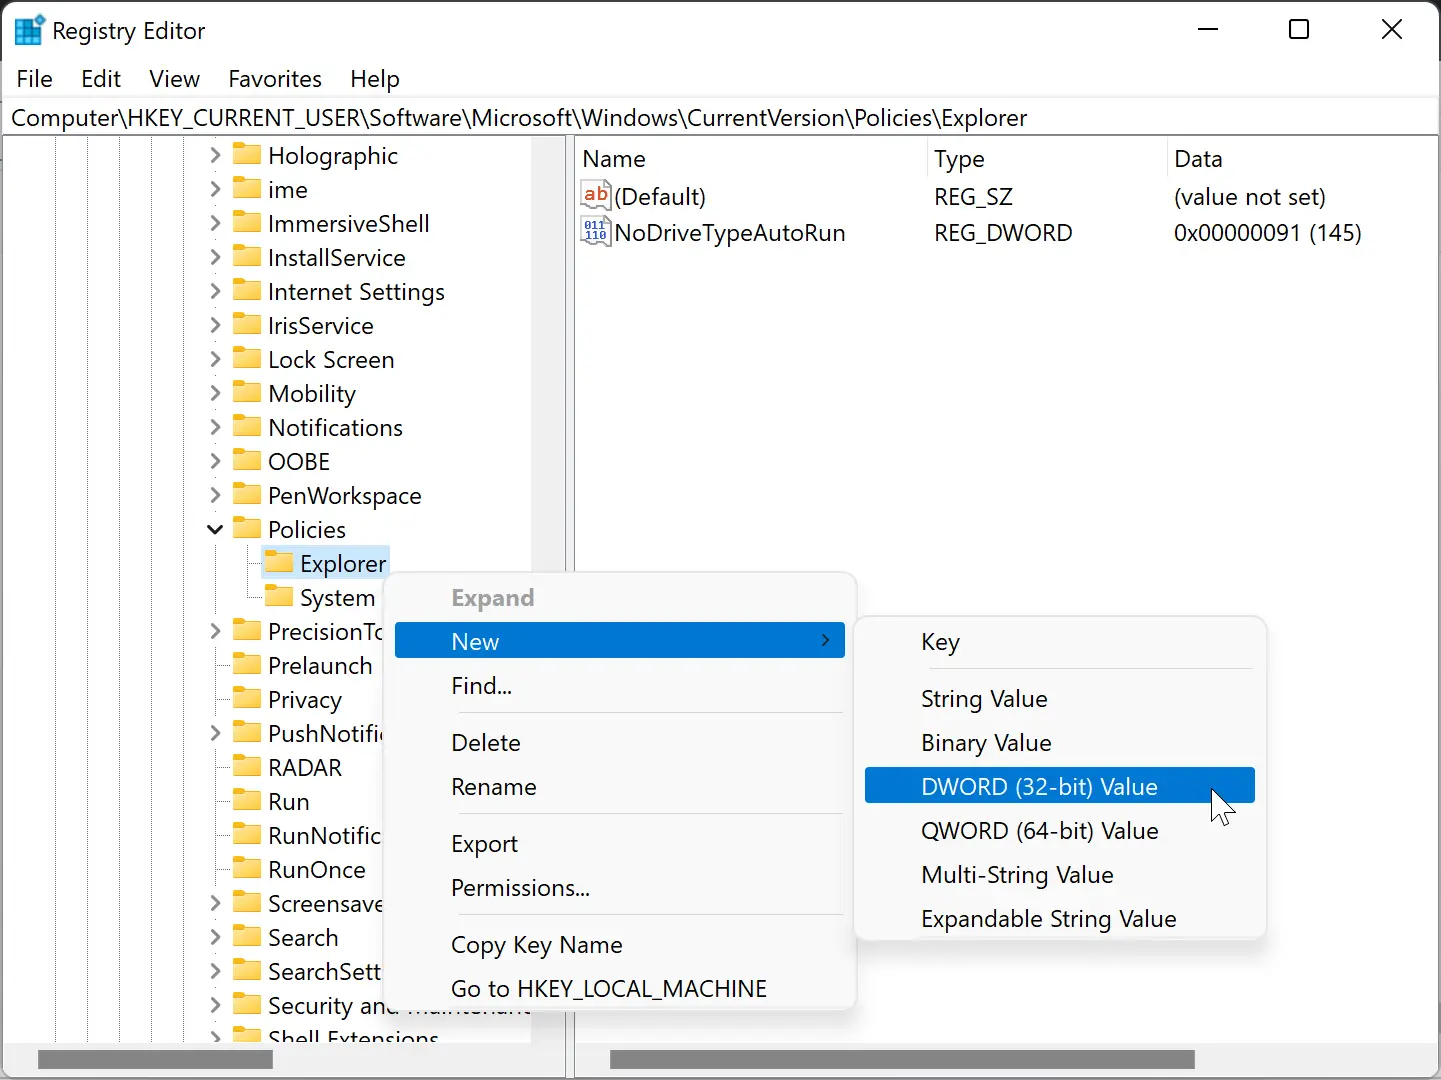
Step 4. Make the new REG_DWORD NoWinKeys.
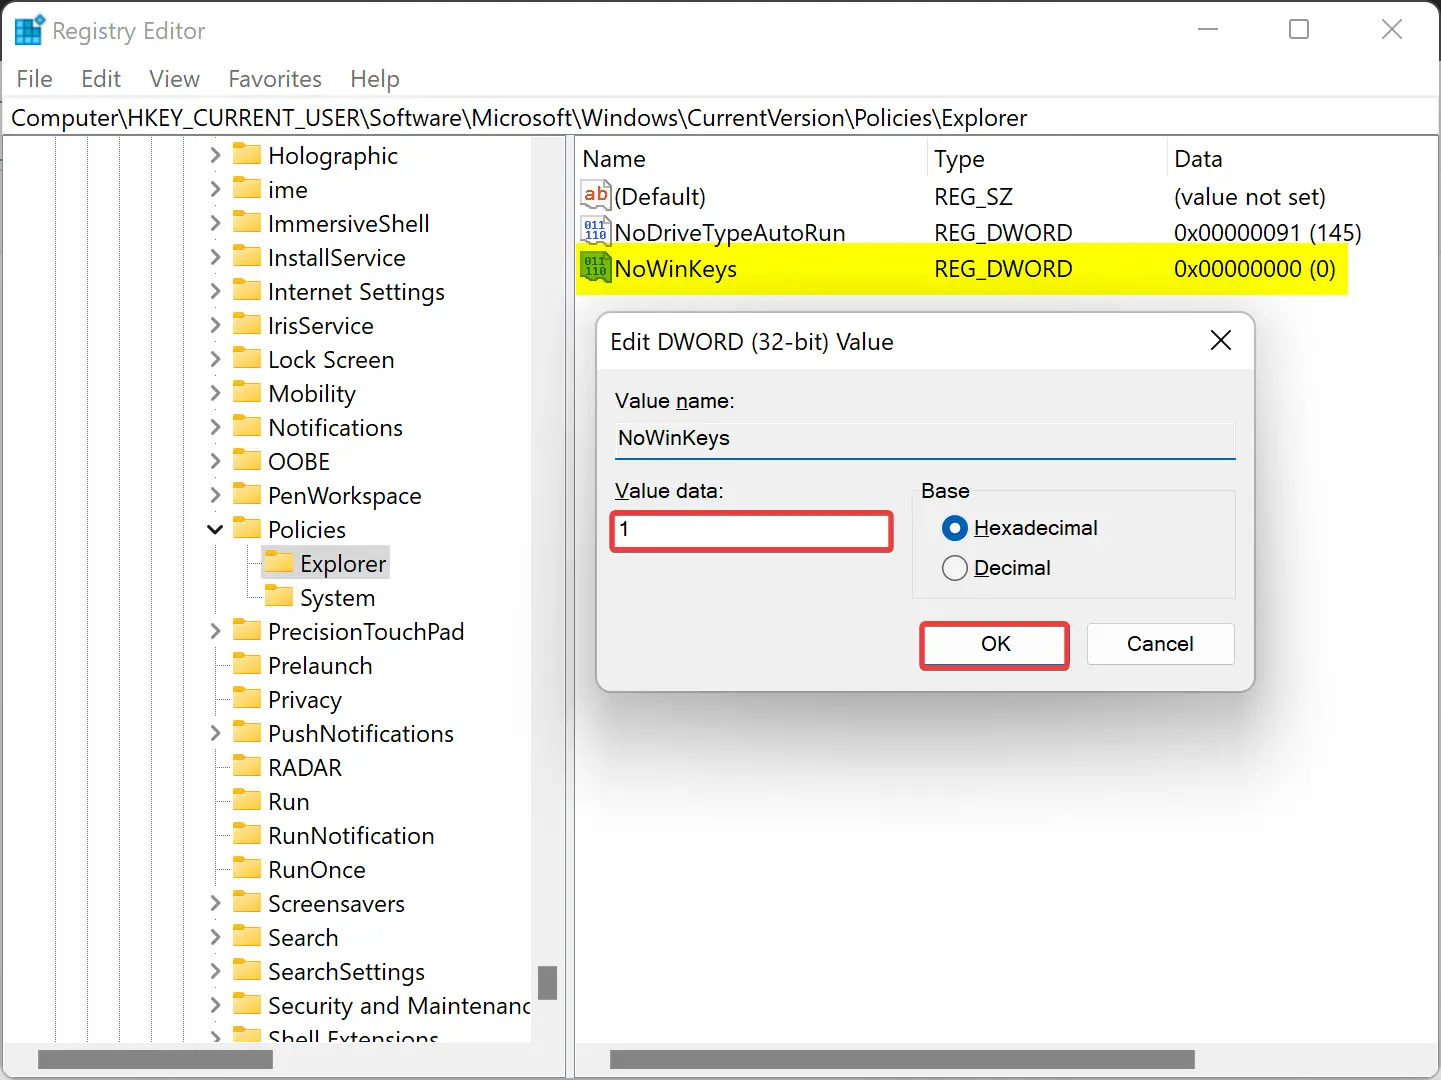
Step 5. Now, set the “Value data” of the NoWinKeys REG_DWORD to the following:-
- 0: To enable the hotkey.
- 1: To disable the keyboard shortcut.
Step 6. Click OK.
Step 7. Once done, reboot your PC to apply the changes.
If you follow the steps above, you should be able to enable or disable keyboard shortcuts on your Windows 11 or 10 computer.
Conclusion
In conclusion, keyboard shortcuts can be a useful way to quickly open applications or programs on your Windows 11 or 10 computer, but if you find yourself pressing them by mistake or simply don’t use them, you may want to disable them. This gearupwindows article provides two methods for disabling keyboard shortcuts: through the Local Group Policy Editor or the Registry Editor. By following the steps outlined in this article, you can easily turn off keyboard shortcuts on your PC and then re-enable them if needed.