
Learn how to permanently disable Windows Defender on Windows 10 & 11 using Registry, Group Policy, or PowerShell, with step-by-step instructions.
Disabling Windows Defender permanently can be necessary when you need to install certain software, run customized security setups, or rely on a third‑party antivirus. In this guide, we’ll walk through every step on how to turn off Windows Defender permanently on both Windows 10 and Windows 11.

We will also cover troubleshooting if Defender re‑enables after restart, and discuss risks of disabling Defender as well as alternatives & complementary security measures.
What is Windows Defender Role in Windows Security
Windows Defender is Microsoft’s built‑in antivirus and anti‑malware solution integrated into the Windows Security Center. It provides real‑time protection, automatic scans, and firewall capabilities. While its default configuration serves most users well, there are scenarios—such as testing software in a sandbox, gaming performance optimization, or deploying a corporate security suite—where you may wish to disable Windows Defender permanently. Before proceeding, it’s crucial to understand:
- Defender’s core functions: file scanning, cloud‑based threat detection, firewall management.
- How Defender integrates with Windows Security settings, including Windows Defender exclusions and real‑time protection toggle.
- The distinction between temporarily disabling Windows Defender (via the Windows Security app) and permanent disable (via policy, registry, or command‑line).
Knowing what you’re turning off—and why—will help you make informed choices and avoid unexpected gaps in your security posture.
Before making any system‑level changes, back up your system and registry to safeguard against misconfigurations:
Backup Your Registry and Create a System Restore Point
Editing the Windows Registry or Group Policy can have unintended effects. To disable Defender via Registry Editor, you will create and modify keys under HKLM\SOFTWARE\Policies\Microsoft\Windows Defender. Always export the current branch and set a restore point:
- Open System Properties ➔ System Protection ➔ Create.
- Name your restore point (e.g., “Pre‑Disable Defender”).
- In Registry Editor (
regedit.exe), right‑click theWindows Defenderkey, choose Export, and save the.regfile.
These precautions let you revert if the system behaves unexpectedly.
How to Disable Windows Defender Permanently
Method 1: Disable Windows Defender via Windows Security Settings
Windows Security provides a simple interface to toggle off real‑time protection, but this method is temporary and Defender re‑enables after restart.
Turn Off Real‑Time Protection in Windows Security
Navigate to Start ➔ Settings ➔ Privacy & Security ➔ Windows Security ➔ Virus & Threat Protection ➔ Manage Settings. Here, switch off Real‑time Protection and Cloud‑delivered Protection.
You may see a prompt confirming you want to turn off Windows Defender via Windows Security; accept to proceed.
Limitations of the Windows Security Method
Because Microsoft designed Defender to re‑activate at each boot for baseline protection, this approach only temporarily disables Windows Defender. If you need a permanent disable, proceed to the Group Policy or Registry methods below. Use this method only when you need a quick, one‑off suspension of antivirus scans (for instance, when installing certain development tools that Defender might flag).
Method 2: Permanently Disable Windows Defender Using Group Policy Editor
For Windows 10/11 Pro, Enterprise, and Education editions, Group Policy Editor (gpedit.msc) offers a reliable way to permanently disable Defender Windows 10/11.
Opening the Group Policy Editor
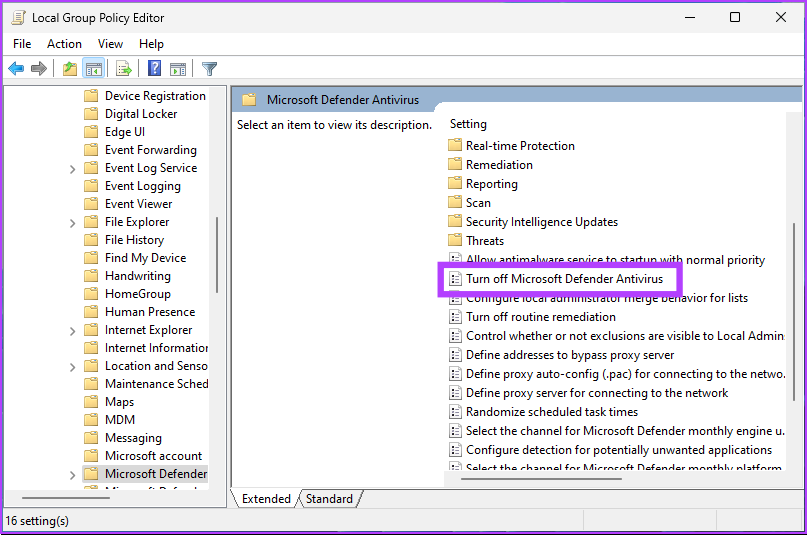
Press Win + R, type gpedit.msc, and press Enter. In the Local Group Policy Editor window, expand Computer Configuration ➔ Administrative Templates ➔ Windows Components ➔ Microsoft Defender Antivirus.
Configuring Defender Settings via gpedit.msc
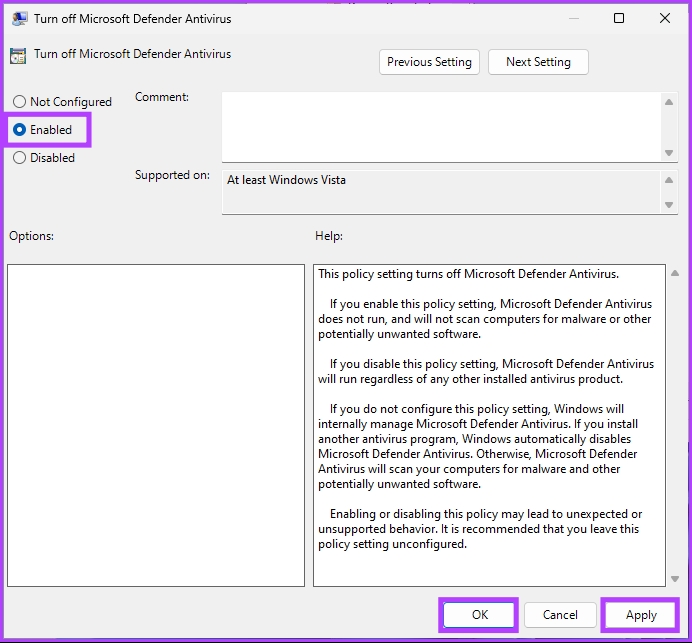
Locate the policy named “Turn off Microsoft Defender Antivirus”. Double‑click it and select Enabled, then click Apply and OK. This configuration tells Windows to disable Microsoft Defender permanently and prevents Defender from initializing on startup.
Applying and Verifying the Group Policy
After enabling the policy, open an elevated Command Prompt and run gpupdate /force. Then, check Services (services.msc) for the WinDefend service; it should be set to Disabled and not running. You can also revisit Windows Security to see that Real‑time Protection options are grayed out, confirming a successful Windows Defender group policy permanent disable.
Method 3: Permanently Disable Windows Defender via Registry Editor
When Group Policy Editor isn’t available (e.g., Windows 10/11 Home), you can disable Defender via Registry Editor to achieve a permanent disable.
Editing the HKLM Registry to Turn Off Windows Defender
Open Registry Editor (regedit.exe) and navigate to:
HKEY_LOCAL_MACHINE\SOFTWARE\Policies\Microsoft\Windows Defender
If the Windows Defender key doesn’t exist, create it.
Creating and Editing the DisableAntiSpyware Key
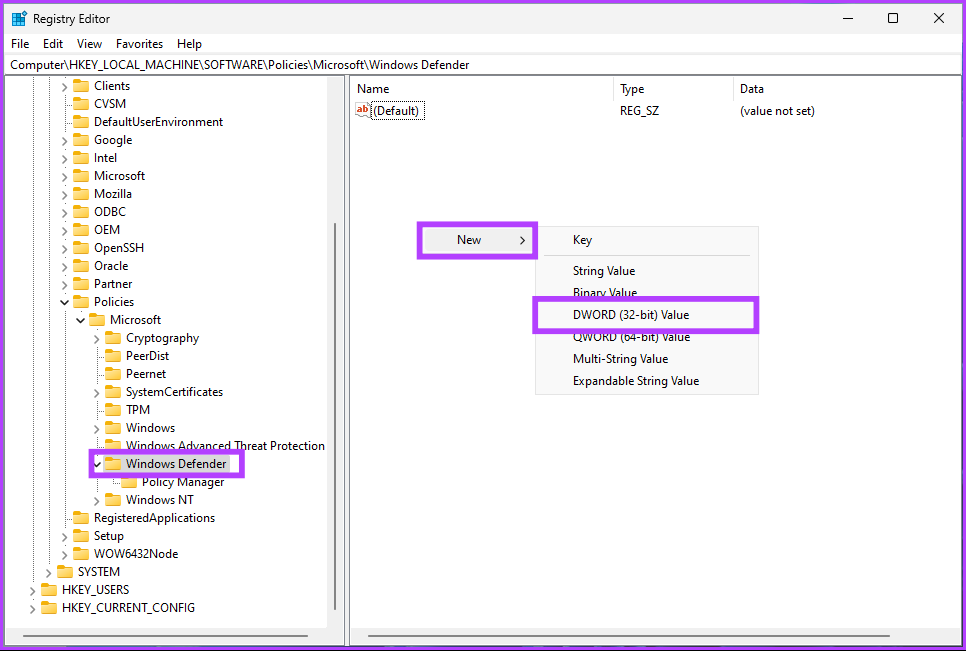
Inside the Windows Defender key, right‑click on the right pane, choose New ➔ DWORD (32‑bit) Value, name it DisableAntiSpyware, and set its value to 1. This registry edit not only disables Windows Defender but also prevents future automatic re‑enabling, achieving a permanent disable.
Restarting and Verifying Registry Changes
Restart your PC. After reboot, open Windows Security or Services to confirm that Defender is inactive. If Defender still shows active components, double‑check the registry path and value, and ensure there are no conflicting policies under Windows Defender\Real-Time Protection keys.
Method 4: Disabling Windows Defender via Command‑Line & PowerShell
For script‑based automation or deployment scenarios, you can disable Windows Defender command line or use PowerShell to disable Windows Defender.
Using Command Prompt to Stop WinDefend Service
Launch an elevated Command Prompt and run:
sc config WinDefend start= disabled
sc stop WinDefend
This sequence stops the Defender service (WinDefend) and prevents it from starting at boot, effectively turning off Windows Defender via command line.
Using PowerShell to Disable Windows Defender
Open an elevated PowerShell window and execute:
Set-MpPreference -DisableRealtimeMonitoring $true
Set-MpPreference -DisableBehaviorMonitoring $true
Stop-Service -Name WinDefend -Force
The Set‑MpPreference cmdlets disable real‑time protection toggle and behavior monitoring, while Stop-Service halts the Defender service.
Automating the Disable Process with Scripts
Combine the above commands into a .ps1 script to distribute across multiple machines. Ensure the execution policy allows running your script (Set‑ExecutionPolicy RemoteSigned) and include error handling to detect if Defender won’t disable or re‑enables after restart.
Troubleshooting Common Issues When Disabling Defender
Even after following these methods, Windows Defender may resist being turned off or keep re‑enabling after restart. Here’s how to tackle these problems.
Windows Defender Won’t Disable or Re‑Enables After Restart
If Defender returns after reboot despite Group Policy or Registry tweaks, check for:
- Conflicting keys under
HKLM\SOFTWARE\Policies\Microsoft\Windows Defender\Real-Time Protection(e.g.,DisableBehaviorMonitoringset to0). - Third‑party AV installations that automatically re‑enable Defender to maintain a baseline shield.
Remove or correct conflicting registry entries, then re‑apply your disable method.
Fixing “Can’t Turn Off Windows Defender” Errors
Errors like “This setting is managed by your administrator” indicate an active Group Policy or MDM policy. Run rsop.msc (Resultant Set of Policy) to identify the controlling policy, then adjust accordingly. On domain‑joined machines, coordinate with IT to update domain‑level policies.
Dealing with Conflicts and Exclusions
Sometimes Windows re‑enables Defender to protect critical system files. Use Windows Defender exclusions (via Registry or PowerShell Add-MpPreference -ExclusionPath) to exempt specific folders, then disable real‑time scans. This hybrid approach lets you maintain Defender in a minimal state without fully turning it on.
Alternatives & Related Concerns After Disabling Defender
Disabling Defender exposes you to threats if no other protections are in place. Consider these Windows Defender alternatives and safety precautions.
Installing Third‑Party Antivirus Software to Disable Defender
Windows automatically disables Defender when a compliant third‑party AV is installed. Popular choices include Bitdefender, Kaspersky, and Norton. During installation, these tools set the appropriate registry and Group Policy flags to turn off Windows Defender permanently and manage AV responsibilities.
Risks and Precautions When You Permanently Disable Microsoft Defender
Completely turning off your built‑in antivirus invites malware, ransomware, and phishing attacks. To mitigate risks:
- Ensure regular backups and offline restore points.
- Use a firewall appliance or software firewall alternative.
- Schedule frequent manual scans with your chosen AV.
- Keep Windows and all applications patched.
Configuring Defender Exclusions and Complementary Security Measures
If full disablement feels too risky, you can apply a partial approach: disable real‑time protection but retain on‑demand scans, or set up Defender exclusions for development folders and high‑performance applications. Complement this with network monitoring, intrusion detection, and sandboxing tools to maintain a robust security stance.
Conclusion
Disabling Windows Defender permanently on Windows 10 and Windows 11 can be achieved through multiple avenues: the built‑in Windows Security app (temporary), Group Policy Editor (permanent on Pro/Enterprise/Education), Registry Editor (permanent on Home), and command‑line or PowerShell scripts for automation.
Each method has its place depending on your edition of Windows and security requirements.
Always back up your system before making changes, and consider installing a reputable third‑party antivirus or using a hybrid disable‑exclusion strategy to keep your PC protected. By following the detailed steps above, you’ll be able to turn off Windows Defender permanently while managing the associated risks effectively.
Visit Our Post Page: Blog Page
Дарёному коню в зубы не смотрят, но не в нашем случае)!
В Windows 10 имеется интегрированный антивирус Windows Defender («Защитник Windows»), который выполняет функции защиты нашего компьютера и данных на нём от нежелательных программ.
Встроенное решение от Microsoft пагубно влияет на производительность системы, запускаясь вместе с ней, работает в фоновом режиме, собирая статистику о системе, и имеет привычку обновляться в «удобное» для него время. Также бывают ситуации, например, когда необходимо настроить устройство под себя или установить какой-то файл из Интернета, что, конечно же, «Защитник Windows» будет блокировать.
Тогда перед Вами станет задача отключить данную систему или вовсе искоренить из системы, но есть проблема: полностью удалить или отключить Windows Defender у Вас не выйдет – эта система глубоко интегрирована в Windows 10 и в последующие версии, начиная с 1903 version (С выходом Windows 10 May 2019 Update (версия 1903) Microsoft представила функцию «Защита от подделки», которая предотвращает изменение настроек приложения «Безопасность Windows» и антивируса Microsoft Defender вне интерфейса Windows. Под термином «настройки» здесь также учитываются инструменты командной строки, изменения реестра и групповых политик).
Однако, не спешите отчаиваться, есть несколько обходных путей, при помощи которых мы сейчас отключим антивирус Windows.
Для этого нам понадобятся 2 программы:
1) Defender Control — https://www.sordum.org/9480/defender-control-v2-1/ (официальный сайт) 2) Reg organizer — https://chemtable.ru/organizer.htm (официальный сайт)
Далее по пунктам:
1. Устанавливаем и открываем Defender Control:

2. Нас интересует 3 файл «Defender_Settings». Открываем его, нас перекидывает в «Параметры Безопасности Windows», отключаем все ползунки до самого конца страницы.

3. Далее открываем первую папку «dControl» и открываем первое приложение.

-
В открывшимся окне выбираем пункт «Отключить Защитник Windows», после чего Вы должны увидеть характерный красный цвет интерфейса.


5. Устанавливаем и открываем Reg organizer.
6. В левой панели открываем вкладку «Другие функции» и выбираем «Редактор Реестра»:

Далее просто копируете путь: HKEY_LOCAL_MACHINE\SOFTWARE\Policies\Microsoft\Windows Defender
Вы сразу попадаете в нужную папку, где необходимо правой кнопкой мыши нажать на пустое место, выбрать «Создать 32-битный целочисленный параметр (REG_DWORD)». Далее обязательно называем новый ключ DisableAntiSpyware и нажимаем «ОК».
Затем двойным щелчком откройте редактор ключа и задайте ему значение «1». Проверьте, чтобы все значения были, как на скриншоте ниже.

7. Отлично, осталось немного! Теперь чуть выше находим «Автозапуск программ», заходим в него. Выбираем Windows Security, правой кнопкой мыши выбираем пункт «Удалить и не давать появиться снова». Жмём «ОК».

Перезагружаем компьютер и радуемся отсутствию Defender-а. Победа!
Если кому-то будет полезно регулярное временное отключение, то:
Открываем PowerShell от имени Администратора и прописываем:
Set-MpPreference -DisableRealtimeMonitoring $true — чтобы выключить
Set-MpPreference -DisableRealtimeMonitoring $false — чтобы включить
Немного рекомендаций от автора: (к прочтению необязательно)
Несмотря на возможность отключения Защитника Windows, автор статьи не рекомендует использовать компьютер без антивируса вообще. Будет хорошо иметь на своём ПК антивирусное решение или хотя бы раз в месяц использовать » Полное сканирование системы». Для избежания проблем, советую обратить внимание в сторону отечественных ПО: Антивирус Kaspersky, Dr.Web и NANO Антивирус. Первые два антивируса входят в «Реестр отечественного ПО», а третий, в свою очередь, – «Единый реестр российских программ для ЭВМ и БД».
Пройдёмся кратко по каждому:
1) Dr.Web:
Российский производитель антивирусных средств защиты информации. Продукты Dr.Web разрабатываются с 1992 года. Это один из первых антивирусов в мире. Компания «Доктор Веб» — ключевой игрок на российском рынке программных средств обеспечения базовой потребности бизнеса — безопасности информации.
Стоимость: от 1209 ₽ в год (1 ПК + 1 Android)
Пробный период платной версии: 30 дней, (без техподдержки и защита только 1 ПК).

Также имеется Dr.Web CureIt! — лечащая утилита «Dr.Web CureIt!», которая не является постоянным средством для защиты компьютера от вирусов, но способна вылечить инфицированную систему однократно.
2) Kaspersky Total Security:
Стоимость: от 1709 Р в год
Пробный период платной версии: 30 дней
«Лаборатория Касперского» — международная компания, работающая в сфере информационной безопасности и цифровой приватности с 1997 года. Глубокие экспертные знания и многолетний опыт компании лежат в основе защитных решений и сервисов нового поколения, обеспечивающих безопасность бизнеса, критически важной инфраструктуры, государственных органов и рядовых пользователей. Обширное портфолио «Лаборатории Касперского» включает в себя передовые технологии для защиты конечных устройств, ряд специализированных продуктов и сервисов, а также кибериммунные решения для борьбы со сложными и постоянно эволюционирующими киберугрозами.

Помимо платных версий, имеются полностью бесплатные решения. В полностью бесплатной версии доступно:
· Помогает обеспечить безопасность устройств
Решение Kaspersky Free оснащено передовыми технологиями безопасности. Оно автоматически анализирует новые угрозы в реальном времени, помогая защищать компьютеры, мобильные устройства и планшеты, в том числе iPad.
· Бесплатный антивирус и не только
Kaspersky Free – это бесплатное антивирусное решение, которое защищает компьютеры с ОС Windows и мобильные устройства Android от вредоносного ПО, зараженных файлов, опасных приложений и подозрительных сайтов.
· Безопасность без замедления работы
Система безопасности защищает устройства, не мешая вашей работе. Kaspersky Free получает обновления автоматически, благодаря чему у вас всегда будет актуальная версия антивируса.
3) NANO Антивирус:
Стоимость: от 799 Р в год
Пробный период платной версии: 30 дней
Компания NANO Security создана в 2009 году на базе коллектива высококвалифицированных специалистов, работающих в области антивирусной безопасности с 2003 года.
Главной идеей проекта было предложить основанные на тщательно изученных предпочтениях пользователей и клиентов программные продукты, выгодно отличающиеся по ряду параметров от антивирусных решений других производителей.
Сегодня NANO Security представляет собой команду профессионалов, обладающих высокими компетенциями. В компании работают опытные эксперты в области информационной безопасности: программисты, аналитики, тестировщики и т.д.

Надеюсь, статья вышла для Вас полезной.
Далее планирую написать про хорошие антивирусные решения, которые продолжают на сегодняшний день работать/продаваться/обновляться на территории РФ.
| permalink | layout |
|---|---|
|
index.html |
default |
Disable Windows Defender on Windows 10
Why?
Windows Defender is infamous for its tendency to monopolize CPU and I/O
resources. Moreover, some of its «security» measures are undesirable and may
put user privacy at risk. This has many practical consequences, such as:
- slower general operation due to increased resource usage,
- excessive CPU usage while copying files, slowing down the entire system,
- increased heat and noise output, as well as reduced battery life on laptops,
- deletion of files detected as «malware» without the user’s consent, even in
ZIP archives or on attached network drives, - user privacy at risk, due to automatic sending of «malware samples» to
Microsoft, - …
Windows 10 allows you to disable Windows Defender in the Settings, but this is
only temporarily effective; it will be automatically re-enabled eventually –
the exact timing for this is random and unpredictable.
This repository contains a «disable» .reg file which can be used to
permanently disable Windows Defender. But don’t worry, you can revert it
using the included «restore» .reg file.
Usage
Disabling Windows Defender permanently
- Clone this repository or
download a ZIP archive. - Double-click
disable_windows_defender_on_windows_10.regthen accept the
administrator and the warning prompts. - Reboot your system.
Restoring Windows Defender (in case something goes wrong)
- Clone this repository or
download a ZIP archive. - Double-click
restore_windows_defender_on_windows_10.regthen accept the
administrator and the warning prompts. - Reboot your system.
Frequently asked questions
Isn’t it insecure to disable Windows Defender?
With today’s security threats, antivirus software is becoming
less relevant over the years. Many antiviruses are now fooled by malware
executables, and other forms of malware aren’t detected by most antiviruses.
While perfect security doesn’t exist, it still is a good idea to avoid exposing
yourself to modern threats such as ransomware.
To make your computing more secure, consider the following options:
- Block tracking and malware scripts using
uBlock Origin.
This will also make browsing faster and decrease network traffic. - Block tracking and malware domains using
Dan Pollock’shostsfile.
This has the upside of working on all software on your computer,
not just Web browsers.
License
Copyright © 2017 Hugo Locurcio and contributors
Files in this repository are licensed under CC0 1.0 Universal,
see LICENSE.md for more information.
-
Windows Support Forums
-
AntiVirus, Firewalls and System Security
You should upgrade or use an alternative browser.
Using RegEdit to disable Windows Defender in Windows 11
-
Thread starter
Thread starterAlanJr
-
Start date
Start date
- Local time
- 5:39 PM
- Posts
- 23
- OS
- Windows 11
-
-
#1
An alternative way to disable Windows Defender in Windows 10 or 11 is to use the registry. For this, you will also need to boot into safe mode. Follow step 1 from the previous chapter to boot into safe mode.
Once booted in Safe Mode: (Win key + R,,select Boot tab and then select safe boot)
- Press Windows key + R
- Type regedit <enter> to open the registry
- Use the «Find» feature and locate each folder below and click to change «start» from «3» to «4»
- Sense
- WdBoot
- WdFilter
- WdNisDrv
- WdNisSvc
- WinDefend
- Exit out of Safe Mode
Revert the change
If you no longer want to disable Windows Defender you can easily revert the change. You will need to restart into safe mode again and give System and Trusted Installer full access permission on the Platform folder.
When you used the registry method, then restore the values to:
HKLM\SYSTEM\CurrentControlSet\Services\Sense\Start 3
HKLM\SYSTEM\CurrentControlSet\Services\WdBoot\Start 0
HKLM\SYSTEM\CurrentControlSet\Services\WdFilter\Start 0
HKLM\SYSTEM\CurrentControlSet\Services\WdNisDrv\Start 3
HKLM\SYSTEM\CurrentControlSet\Services\WdNisSvc\Start 3
HKLM\SYSTEM\CurrentControlSet\Services\WinDefend\Start 2
My Computer
-
- OS
- Windows 11
- Computer type
- PC/Desktop
- Manufacturer/Model
- MSI Motherboard
- CPU
- AMD RYZEN 7
- Motherboard
- MSI
- Memory
- 32 GB
- Graphics Card(s)
- EVGA GEFORCE 3060 TI
- Sound Card
- Realtek
- Monitor(s) Displays
- 2 HP 24 inch
- Screen Resolution
- 1600 x 1280
- Hard Drives
- M.2 and SSD 2 TB total
- PSU
- REDRAGON 1000watt
- Case
- Microcenter
- Cooling
- watercooled
- Keyboard
- steel Gauges
- Mouse
- Logitech
- Internet Speed
- 1 Gigabit
- Browser
- chrome
- Antivirus
- Kaspersky
- Local time
- 1:39 AM
- Posts
- 254
- Location
-
Dubai
- OS
- Windows 11 Education
-
-
#2
1) Download ToggleDefender to fully disable Windows Defender and Smart Screen in one click
2) Download and run the Disable Defender.reg and all the services would be disabled
Windows Registry Editor Version 5.00

;Microsoft Defender Antivirus Service
[HKEY_LOCAL_MACHINE\SYSTEM\CurrentControlSet\Services\WinDefend]
"Start"=dword:00000004

;Microsoft Defender Antivirus Network Inspection Service
[HKEY_LOCAL_MACHINE\SYSTEM\CurrentControlSet\Services\WdNisSvc]
"Start"=dword:00000004

;Windows Defender Antivirus Network Inspection System Driver
[HKEY_LOCAL_MACHINE\SYSTEM\CurrentControlSet\Services\WdNisDrv]
"Start"=dword:00000004

;Windows Defender Advanced Threat Protection Service
[HKEY_LOCAL_MACHINE\SYSTEM\CurrentControlSet\Services\Sense]
"Start"=dword:00000004
Last edited:
My Computers
-
- OS
- Windows 11 Education
- Computer type
- Laptop
- Manufacturer/Model
- Razer Blade 16
- CPU
- AMD Ryzen AI 9 HX 370
- Motherboard
- Razer
- Memory
- 64 GB LPDDR5X 8000 MHz RAM
- Graphics Card(s)
- GeForce RTX 5090 24 GB GDDR7 VRAM
- Sound Card
- Six Speaker System THX Spatial Audio
- Monitor(s) Displays
- AOC Q27G3XMN 27″ QHD Mini LED Monitor
- Screen Resolution
- QHD (2560×1440)
- Hard Drives
- WD_BLACK SN850X 4TB+8TB SSD
- PSU
- 280W AC Power Adapter
- Cooling
- Noctua NT-H2 + Fujipoly Extreme Thermal Pads + Razer Laptop Cooling Pad
- Keyboard
- Razer BlackWidow V4 X
- Mouse
- Razer Basilisk V3 X HyperSpeed
- Internet Speed
- 1 GBPS Down / 330 MBPS Up
- Browser
- Google Chrome
- Antivirus
- McAfee AntiVirus
-
- Operating System
- Windows 11 Pro
- Computer type
- Laptop
- Manufacturer/Model
- Dell XPS 15 9500
- CPU
- Intel i7-10875H
- Memory
- Kingston FURY Impact 64 GB 3200 MHz DDR4 RAM
- Graphics card(s)
- nVIDIA GeForce GTX 1650 Ti Max-Q w/ 4 GB GDDR6
- Sound Card
- Realtek
- Monitor(s) Displays
- 15.6 UHD+ Touch, InfinityEdge, 500-nits, Anti-Reflecitve
- Screen Resolution
- 3840 x 2400
- Hard Drives
- Samsung 990 PRO 2TB + 4TB SSDs
- PSU
- Dell 130W Laptop Charger USB C Type C AC Adapter
- Cooling
- Noctua NT-H2 Thermal Paste on CPU + GPU
- Mouse
- Logitech MX Anywhere 3
- Internet Speed
- 1 GBPS Down / 350 MBPS Up
- Browser
- Google Chrome
- Antivirus
- Avast Free Antivirus
- Local time
- 10:39 PM
- Posts
- 11,577
- Location
-
Wiltshire UK
- OS
- Windows 11 Pro
-
-
#3
My Computers
-
- OS
- Windows 11 Pro
- Computer type
- Laptop
- Manufacturer/Model
- Alienware M18 R1
- CPU
- 13th Gen Core i9 13900HX
- Memory
- 32GB DDR5 @4800MHz 2x16GB
- Graphics Card(s)
- Geforce RTX 4090HX 16GB
- Sound Card
- Nvidia HD / Realtek ALC3254
- Monitor(s) Displays
- 18″ QHD+
- Screen Resolution
- 25660 X 1600
- Hard Drives
- C: KIOXIA (Toshiba) 2TB KXG80ZNV2T04 NVMe PCIe M.2 SSD
D: KIOXIA (Toshiba) 2TB KXG80ZNV2T04 NVMe PCIe M.2 SSD
- Case
- Dark Metallic Moon
- Keyboard
- Alienware M Series per-key AlienFX RGB
- Mouse
- Alienware AW610M
- Browser
- Chrome and Firefox
- Antivirus
- Norton
- Other Info
- Killer E3000 Ethernet Controller
Killer Killer AX1690 Wi-Fi Network Adaptor Wi-Fi 6E
Bluetooth 5.2
Alienware Z01G Graphic Amplifier
-
- Operating System
- Windows 11 Pro
- Computer type
- Laptop
- Manufacturer/Model
- Alienware Area 51m R2
- CPU
- 10th Gen i-9 10900 K
- Memory
- 32Gb Dual Channel DDR4 @ 8843MHz
- Graphics card(s)
- Nvidia RTX 2080 Super
- Sound Card
- Nvidia
- Screen Resolution
- 1920 x 1080
- Hard Drives
- Hard Drive C: Samsung 2TB SSD PM981a NVMe
Hard Drive D:Samsung 2TB SSD 970 EVO Plus
- Mouse
- Alienware 610M
- Browser
- Chrome
- Antivirus
- Norton
- Local time
- 1:39 AM
- Posts
- 254
- Location
-
Dubai
- OS
- Windows 11 Education
-
-
#4
I just let my AV program disable it automatically
That’s all fine but the service would always be running and it does affect CPU usage.
My Computers
-
- OS
- Windows 11 Education
- Computer type
- Laptop
- Manufacturer/Model
- Razer Blade 16
- CPU
- AMD Ryzen AI 9 HX 370
- Motherboard
- Razer
- Memory
- 64 GB LPDDR5X 8000 MHz RAM
- Graphics Card(s)
- GeForce RTX 5090 24 GB GDDR7 VRAM
- Sound Card
- Six Speaker System THX Spatial Audio
- Monitor(s) Displays
- AOC Q27G3XMN 27″ QHD Mini LED Monitor
- Screen Resolution
- QHD (2560×1440)
- Hard Drives
- WD_BLACK SN850X 4TB+8TB SSD
- PSU
- 280W AC Power Adapter
- Cooling
- Noctua NT-H2 + Fujipoly Extreme Thermal Pads + Razer Laptop Cooling Pad
- Keyboard
- Razer BlackWidow V4 X
- Mouse
- Razer Basilisk V3 X HyperSpeed
- Internet Speed
- 1 GBPS Down / 330 MBPS Up
- Browser
- Google Chrome
- Antivirus
- McAfee AntiVirus
-
- Operating System
- Windows 11 Pro
- Computer type
- Laptop
- Manufacturer/Model
- Dell XPS 15 9500
- CPU
- Intel i7-10875H
- Memory
- Kingston FURY Impact 64 GB 3200 MHz DDR4 RAM
- Graphics card(s)
- nVIDIA GeForce GTX 1650 Ti Max-Q w/ 4 GB GDDR6
- Sound Card
- Realtek
- Monitor(s) Displays
- 15.6 UHD+ Touch, InfinityEdge, 500-nits, Anti-Reflecitve
- Screen Resolution
- 3840 x 2400
- Hard Drives
- Samsung 990 PRO 2TB + 4TB SSDs
- PSU
- Dell 130W Laptop Charger USB C Type C AC Adapter
- Cooling
- Noctua NT-H2 Thermal Paste on CPU + GPU
- Mouse
- Logitech MX Anywhere 3
- Internet Speed
- 1 GBPS Down / 350 MBPS Up
- Browser
- Google Chrome
- Antivirus
- Avast Free Antivirus
- Local time
- 4:39 PM
- Posts
- 480
- OS
- Windows 11 Pro 24H2—Windows 10 Enterprise LTSC Build 19044.5737
-
-
#5
My Computer
-
- OS
- Windows 11 Pro 24H2—Windows 10 Enterprise LTSC Build 19044.5737
- Computer type
- PC/Desktop
- Manufacturer/Model
- Alienware PC
- CPU
- Intel i7 4790K
- Motherboard
- ASROCK Z97 EXTREME4
- Memory
- 32GB DDR3 1600 MHz
- Graphics Card(s)
- ATI Radeon HD 7770 2GB GDDR5
- Sound Card
- Onboard
- Monitor(s) Displays
- SAMSUNG UE57 Series 28-Inch 4K UHD
- Hard Drives
- SAMSUNG 970 EVO PLUS M.2
- PSU
- EVGA 850 watt
- Case
- Alienware Area 51 Black Tower Case
- Keyboard
- HyperX — Alloy Elite 2 Mechanical Gaming Keyboard.
- Mouse
- Microsoft Wireless
- Internet Speed
- 1.2 GHz
- Browser
- Chrome..Edge..Firefox
- Local time
- 1:39 AM
- Posts
- 254
- Location
-
Dubai
- OS
- Windows 11 Education
-
-
#6
My Computers
-
- OS
- Windows 11 Education
- Computer type
- Laptop
- Manufacturer/Model
- Razer Blade 16
- CPU
- AMD Ryzen AI 9 HX 370
- Motherboard
- Razer
- Memory
- 64 GB LPDDR5X 8000 MHz RAM
- Graphics Card(s)
- GeForce RTX 5090 24 GB GDDR7 VRAM
- Sound Card
- Six Speaker System THX Spatial Audio
- Monitor(s) Displays
- AOC Q27G3XMN 27″ QHD Mini LED Monitor
- Screen Resolution
- QHD (2560×1440)
- Hard Drives
- WD_BLACK SN850X 4TB+8TB SSD
- PSU
- 280W AC Power Adapter
- Cooling
- Noctua NT-H2 + Fujipoly Extreme Thermal Pads + Razer Laptop Cooling Pad
- Keyboard
- Razer BlackWidow V4 X
- Mouse
- Razer Basilisk V3 X HyperSpeed
- Internet Speed
- 1 GBPS Down / 330 MBPS Up
- Browser
- Google Chrome
- Antivirus
- McAfee AntiVirus
-
- Operating System
- Windows 11 Pro
- Computer type
- Laptop
- Manufacturer/Model
- Dell XPS 15 9500
- CPU
- Intel i7-10875H
- Memory
- Kingston FURY Impact 64 GB 3200 MHz DDR4 RAM
- Graphics card(s)
- nVIDIA GeForce GTX 1650 Ti Max-Q w/ 4 GB GDDR6
- Sound Card
- Realtek
- Monitor(s) Displays
- 15.6 UHD+ Touch, InfinityEdge, 500-nits, Anti-Reflecitve
- Screen Resolution
- 3840 x 2400
- Hard Drives
- Samsung 990 PRO 2TB + 4TB SSDs
- PSU
- Dell 130W Laptop Charger USB C Type C AC Adapter
- Cooling
- Noctua NT-H2 Thermal Paste on CPU + GPU
- Mouse
- Logitech MX Anywhere 3
- Internet Speed
- 1 GBPS Down / 350 MBPS Up
- Browser
- Google Chrome
- Antivirus
- Avast Free Antivirus
- Local time
- 5:39 PM
- Posts
- 33
- OS
- Windows 11 Pro
-
-
#7
I just let my AV program disable it automatically
This. As per Task Manager and Resource Monitor I don’t see Windows Defender using any CPU usage.
My Computer
-
- OS
- Windows 11 Pro
- Computer type
- PC/Desktop
- Manufacturer/Model
- My Build
- CPU
- AMD Ryzen 5 5600X
- Motherboard
- Asrock B550 Phantom Gaming 4
- Memory
- Corsair 32GB Vengeance DDR4 3600Mhz ram
- Graphics Card(s)
- Nvidia GTX Geforce 1660 Ti
- Monitor(s) Displays
- MSI 27″ Optix G27C4
- Local time
- 10:39 PM
- Posts
- 11,577
- Location
-
Wiltshire UK
- OS
- Windows 11 Pro
-
-
#8
That’s all fine but the service would always be running and it does affect CPU usage.
If it uses that much to cause you a problem there is something wrong, not necessarily defender causing it. Mine uses none I’m with @MadScientist on that one. One thing I have noticed many times in the past is programs being blamed for peoples computers, for example wrongly set up or not the best options selected for example it may well be something else on a system causing the AV to work harder than needed hence, using more resources. Not saying that is the problem here but it’s worth looking into why it is using more resources than you expect it to
My Computers
-
- OS
- Windows 11 Pro
- Computer type
- Laptop
- Manufacturer/Model
- Alienware M18 R1
- CPU
- 13th Gen Core i9 13900HX
- Memory
- 32GB DDR5 @4800MHz 2x16GB
- Graphics Card(s)
- Geforce RTX 4090HX 16GB
- Sound Card
- Nvidia HD / Realtek ALC3254
- Monitor(s) Displays
- 18″ QHD+
- Screen Resolution
- 25660 X 1600
- Hard Drives
- C: KIOXIA (Toshiba) 2TB KXG80ZNV2T04 NVMe PCIe M.2 SSD
D: KIOXIA (Toshiba) 2TB KXG80ZNV2T04 NVMe PCIe M.2 SSD
- Case
- Dark Metallic Moon
- Keyboard
- Alienware M Series per-key AlienFX RGB
- Mouse
- Alienware AW610M
- Browser
- Chrome and Firefox
- Antivirus
- Norton
- Other Info
- Killer E3000 Ethernet Controller
Killer Killer AX1690 Wi-Fi Network Adaptor Wi-Fi 6E
Bluetooth 5.2
Alienware Z01G Graphic Amplifier
-
- Operating System
- Windows 11 Pro
- Computer type
- Laptop
- Manufacturer/Model
- Alienware Area 51m R2
- CPU
- 10th Gen i-9 10900 K
- Memory
- 32Gb Dual Channel DDR4 @ 8843MHz
- Graphics card(s)
- Nvidia RTX 2080 Super
- Sound Card
- Nvidia
- Screen Resolution
- 1920 x 1080
- Hard Drives
- Hard Drive C: Samsung 2TB SSD PM981a NVMe
Hard Drive D:Samsung 2TB SSD 970 EVO Plus
- Mouse
- Alienware 610M
- Browser
- Chrome
- Antivirus
- Norton
-
-
#9
My Computer
-
- OS
- Win 11 Pro
- Computer type
- PC/Desktop
- Manufacturer/Model
- N/A
- CPU
- AMD Ryzen 5 5600x
- Motherboard
- ASUS Crosshair Viii Hero Wi Fi
- Memory
- 32 Gb DDR4 3600MHz GSkill
- Graphics Card(s)
- NVidia Geforce 950
- Sound Card
- USB Out NAD M51 DAC with Adams A8 powered speakers
- Monitor(s) Displays
- Dell 3219Q
- Screen Resolution
- 3840 x 2160
- Hard Drives
- Western Digital Black SSD SN770 1TB
Samsung EVO SSD 970 1TB
- PSU
- Fractal Design 1000W
- Case
- CoolerMaster ATCS 840
- Cooling
- Noctua NH-U12S Chromax
- Keyboard
- Razer Huntsman V2
- Mouse
- Razer Viper Ultimate
- Internet Speed
- Starlink 94Mbps down 20Mbps up
- Browser
- Brave
- Antivirus
- ESET
Try3
Well-known member
- Local time
- 10:39 PM
- Posts
- 3,343
- Location
-
CurrentCounty
- OS
- Windows 11 Home x64 Version 23H2 Build 22631.3447
-
-
#10
AV-Comparatives: Microsoft Defender has a large impact on system performance — gHacks Tech News
When they say
«large»
they mean
«larger than other security products»
All the best,
Denis
My Computer
-
- OS
- Windows 11 Home x64 Version 23H2 Build 22631.3447
- Local time
- 5:39 PM
- Posts
- 84
- OS
- Windows 11
-
-
#11
My Computer
-
- OS
- Windows 11
- Computer type
- Laptop
- Manufacturer/Model
- HP
- CPU
- AMD Rizen 5
- Memory
- 8gb
- Screen Resolution
- 1080 UHD
- Hard Drives
- SSD
- Browser
- FF
- Antivirus
- Defender
- Local time
- 1:39 AM
- Posts
- 254
- Location
-
Dubai
- OS
- Windows 11 Education
-
-
#12
IF I change… What do I go to? Panda? How’s the detection of other AVs?
Panda is my favorite AV even though I have a paid license for ESET NOD32 Antivirus. The reason I like it more, is just like ESET, it has no bloatware, no browser extensions, no driver updatersd or yada yada, just a powerful scanner that is light as heck. Just make sure when installing it to uncheck the button which says install Opera browser and in the settings, scroll down to the end in the general tab and disable the two checkboxes for Panda news.
See the latest AV-comparatives performance test = Comparison
My Computers
-
- OS
- Windows 11 Education
- Computer type
- Laptop
- Manufacturer/Model
- Razer Blade 16
- CPU
- AMD Ryzen AI 9 HX 370
- Motherboard
- Razer
- Memory
- 64 GB LPDDR5X 8000 MHz RAM
- Graphics Card(s)
- GeForce RTX 5090 24 GB GDDR7 VRAM
- Sound Card
- Six Speaker System THX Spatial Audio
- Monitor(s) Displays
- AOC Q27G3XMN 27″ QHD Mini LED Monitor
- Screen Resolution
- QHD (2560×1440)
- Hard Drives
- WD_BLACK SN850X 4TB+8TB SSD
- PSU
- 280W AC Power Adapter
- Cooling
- Noctua NT-H2 + Fujipoly Extreme Thermal Pads + Razer Laptop Cooling Pad
- Keyboard
- Razer BlackWidow V4 X
- Mouse
- Razer Basilisk V3 X HyperSpeed
- Internet Speed
- 1 GBPS Down / 330 MBPS Up
- Browser
- Google Chrome
- Antivirus
- McAfee AntiVirus
-
- Operating System
- Windows 11 Pro
- Computer type
- Laptop
- Manufacturer/Model
- Dell XPS 15 9500
- CPU
- Intel i7-10875H
- Memory
- Kingston FURY Impact 64 GB 3200 MHz DDR4 RAM
- Graphics card(s)
- nVIDIA GeForce GTX 1650 Ti Max-Q w/ 4 GB GDDR6
- Sound Card
- Realtek
- Monitor(s) Displays
- 15.6 UHD+ Touch, InfinityEdge, 500-nits, Anti-Reflecitve
- Screen Resolution
- 3840 x 2400
- Hard Drives
- Samsung 990 PRO 2TB + 4TB SSDs
- PSU
- Dell 130W Laptop Charger USB C Type C AC Adapter
- Cooling
- Noctua NT-H2 Thermal Paste on CPU + GPU
- Mouse
- Logitech MX Anywhere 3
- Internet Speed
- 1 GBPS Down / 350 MBPS Up
- Browser
- Google Chrome
- Antivirus
- Avast Free Antivirus
- Local time
- 10:39 PM
- Posts
- 11,577
- Location
-
Wiltshire UK
- OS
- Windows 11 Pro
-
-
#13
IF I change… What do I go to? Panda? How’s the detection of other AVs?
Search the web, there are many comparison and rating sites to give you a good picture of what will suit you the best
My Computers
-
- OS
- Windows 11 Pro
- Computer type
- Laptop
- Manufacturer/Model
- Alienware M18 R1
- CPU
- 13th Gen Core i9 13900HX
- Memory
- 32GB DDR5 @4800MHz 2x16GB
- Graphics Card(s)
- Geforce RTX 4090HX 16GB
- Sound Card
- Nvidia HD / Realtek ALC3254
- Monitor(s) Displays
- 18″ QHD+
- Screen Resolution
- 25660 X 1600
- Hard Drives
- C: KIOXIA (Toshiba) 2TB KXG80ZNV2T04 NVMe PCIe M.2 SSD
D: KIOXIA (Toshiba) 2TB KXG80ZNV2T04 NVMe PCIe M.2 SSD
- Case
- Dark Metallic Moon
- Keyboard
- Alienware M Series per-key AlienFX RGB
- Mouse
- Alienware AW610M
- Browser
- Chrome and Firefox
- Antivirus
- Norton
- Other Info
- Killer E3000 Ethernet Controller
Killer Killer AX1690 Wi-Fi Network Adaptor Wi-Fi 6E
Bluetooth 5.2
Alienware Z01G Graphic Amplifier
-
- Operating System
- Windows 11 Pro
- Computer type
- Laptop
- Manufacturer/Model
- Alienware Area 51m R2
- CPU
- 10th Gen i-9 10900 K
- Memory
- 32Gb Dual Channel DDR4 @ 8843MHz
- Graphics card(s)
- Nvidia RTX 2080 Super
- Sound Card
- Nvidia
- Screen Resolution
- 1920 x 1080
- Hard Drives
- Hard Drive C: Samsung 2TB SSD PM981a NVMe
Hard Drive D:Samsung 2TB SSD 970 EVO Plus
- Mouse
- Alienware 610M
- Browser
- Chrome
- Antivirus
- Norton
- Local time
- 5:39 PM
- Posts
- 84
- OS
- Windows 11
-
-
#14
Oops… now I read this over at PCmag website about Panda… (I don’t know what to do)
My Computer
-
- OS
- Windows 11
- Computer type
- Laptop
- Manufacturer/Model
- HP
- CPU
- AMD Rizen 5
- Memory
- 8gb
- Screen Resolution
- 1080 UHD
- Hard Drives
- SSD
- Browser
- FF
- Antivirus
- Defender
- Local time
- 10:39 PM
- Posts
- 870
- OS
- Windows 11, Windows 10, Linux Fedora Cinnamon
-
-
#15
These services should be able to be disabled and their start type changed from the services manager?
My Computer
-
- OS
- Windows 11, Windows 10, Linux Fedora Cinnamon
- Local time
- 5:39 PM
- Posts
- 23
- OS
- Windows 11
-
-
#16
I wouldn’t trust those AV comparison sites; they’re usually just paid to promote a certain product. You can find several AV «tests» which all contradict each other.These services should be able to be disabled and their start type changed from the services manager?
Windows will not allow your to disable Defender, the second you pause your current antivirus, windows see’s this as a time for vulnerability and has Defender stepping in to the task..This way I have posted is the most effective means to disable it via the Registry
My Computer
-
- OS
- Windows 11
- Computer type
- PC/Desktop
- Manufacturer/Model
- MSI Motherboard
- CPU
- AMD RYZEN 7
- Motherboard
- MSI
- Memory
- 32 GB
- Graphics Card(s)
- EVGA GEFORCE 3060 TI
- Sound Card
- Realtek
- Monitor(s) Displays
- 2 HP 24 inch
- Screen Resolution
- 1600 x 1280
- Hard Drives
- M.2 and SSD 2 TB total
- PSU
- REDRAGON 1000watt
- Case
- Microcenter
- Cooling
- watercooled
- Keyboard
- steel Gauges
- Mouse
- Logitech
- Internet Speed
- 1 Gigabit
- Browser
- chrome
- Antivirus
- Kaspersky
- Local time
- 5:39 PM
- Posts
- 23
- OS
- Windows 11
-
-
#17
Also, do you happen to have other advice on configuring/disabling in Windows? I mead another post asking for help on thorough configuration since I still am not really familiar with the current version — W11.
what do you mean?
My Computer
-
- OS
- Windows 11
- Computer type
- PC/Desktop
- Manufacturer/Model
- MSI Motherboard
- CPU
- AMD RYZEN 7
- Motherboard
- MSI
- Memory
- 32 GB
- Graphics Card(s)
- EVGA GEFORCE 3060 TI
- Sound Card
- Realtek
- Monitor(s) Displays
- 2 HP 24 inch
- Screen Resolution
- 1600 x 1280
- Hard Drives
- M.2 and SSD 2 TB total
- PSU
- REDRAGON 1000watt
- Case
- Microcenter
- Cooling
- watercooled
- Keyboard
- steel Gauges
- Mouse
- Logitech
- Internet Speed
- 1 Gigabit
- Browser
- chrome
- Antivirus
- Kaspersky
- Local time
- 10:39 PM
- Posts
- 814
- Location
-
Sutton Coldfield England
- OS
- Win 11 x 64 Home on PC . Pro Win 11 x 64 on Surface 9.
-
-
#18
Copy of Review:
Microsoft’s history of providing antivirus protection goes all the way back to DOS, but it’s never seemed to harm the third-party antivirus industry. In Windows 10, Microsoft Defender Antivirus not only protects against all types of malware, but it also manages numerous other security features. Microsoft Defender turns on to protect systems that have no other antivirus. As soon as you install a third-party solution, it goes into suspended animation to avoid conflict. By making sure that every Windows installation has protection against malware, Microsoft helps contribute to a kind of herd immunity. Defender does a decent job, too, but the best competitors, including free ones, do even better.
Last edited:
My Computer
-
- OS
- Win 11 x 64 Home on PC . Pro Win 11 x 64 on Surface 9.
- Computer type
- Laptop
- Manufacturer/Model
- Defiance Series 16″ Matte QHD+ 240 Hz sRGB 100% LED Widescreen (2560 x 1600)
- CPU
- Intel Core i7 126 core 14650HX (5.2Ghz Turbo
- Motherboard
- Unknown
- Memory
- 32GB PCSSODIMMDDR% 480Mhz (2 x16GB)
- Graphics Card(s)
- Nvidia Geforce RTX 4070 — 8GB GDDDR6 Video RAM — Direct X 12.1
- Sound Card
- 2 channel HD Audio + Mic/Hphone jack
- Monitor(s) Displays
- MSI 27 inch
- Screen Resolution
- 1920 x 1080
- Hard Drives
- 2TB Samsung 990 PRO m.2, PCle 4.0 MNMe (up to 7450MB/R 6900 MB/W And several plug in drives
BT?wifi.
- Case
- laptop
- Cooling
- Trust Quno GXT1125 Laptoip cooler, up to 17.3 inch
- Keyboard
- Logi K270 & Logitech gamer G213
- Mouse
- Tecknet TK MS317
- Internet Speed
- 1GB
- Browser
- Chrome & Firefox
- Antivirus
- Kaspersky Total
- Other Info
- WIRELESS 802.11 AC1300 867Mbps/5GHz, 400Mbps/2.4GHz PCI-E CARD
Logitech L202 Speakers
Asus DRW-14D5MT x48
Net via Virgin Media hub 3 (using RJ45 cable). Plus MS surface 9 tablet (win 11). Amazon Fire 10.
Win 11 Home Insider Preview. Build 26100.ge_release 240331-1435
- Local time
- 9:39 PM
- Posts
- 4,987
- Location
-
Hafnarfjörður IS
- OS
- Windows XP,7,10,11 Linux Arch Linux
-
-
#19
Why bother with all this stuff
Just turn off the actions by bringing up the security dashboard.
I can’t currently think of ANY domestic (i,e Home computer) security package that is anywhere as near as good as WD on latest versions of W11 (and WD gets updated often several times a week) unless one wants to bypass security in installing stuff designed to prevent activation / bypass activation of products by things like «Fake KMS servers» or downloading (aka «torrenting») copyrighted material from — well we all know where those sites are.
You can create a script that runs at startup to disable it if you have to but why would you want to.
Cheers
jimbo
My Computer
-
- OS
- Windows XP,7,10,11 Linux Arch Linux
- Computer type
- PC/Desktop
- CPU
- 2 X Intel i7
- Local time
- 5:39 PM
- Posts
- 8
- OS
- Windows 11 Pro, 21H2, 22000.675
-
-
#20
I’m new to the forum here so don’t beat me up too bad for my two cent.
In my experience (and you can test this yourself) Windows Defender Firewall actually slows down the overall performance of Windows 7, 8, 10, and 11 in a noticeable way. While it may seem counter-intuitive to install a 3rd party AV and FW based on the general effectiveness of Windows Defender, the performance issues it creates and the offline detection vulnerabilities it has make reputable 3rd party apps worth the swap where performance gain is a concern.
However, with Windows 11 does come an issue with disabling Windows Defender Firewall. Even after installing a 3rd party FW like Comodo or any other, and despite the service provider list showing your preferred FW as active, it also shows in the provider list that Windows FW is also on. I even had a few Windows FW prompts pop up asking me to allow other programs including my 3rd party FW.
If you go into Windows Security and choose FW & Network Protection and then click each of Domain, Private, and Public, it will show you that no action is needed and that your 3rd party app is actively handling the duties while at the same time telling you that Windows Defender FW is not active. So, there is clearly a discrepancy in the information Win 11 is providing concerning the active/inactive status of Windows Defender FW.
As such, it seems that the methods outlined for disabling Windows Defender FW services by registry tweaking or other means appears valid and exactly what I have been looking for to combat this weird dual status of active/inactive. Everything else in Win 11 seems to work perfectly fine for me.
One other thing I will add is that disabling the services for Windows Search and for SysMain (Win 10, 11) will also make a noticeable impact on how quickly your system will load its startup items after a boot or reboot and allow the CPU to quickly get to an idle state. Of course, if you’re still using WMP for anything you may want to hold off on disabling Windows Search service.
I’ve attached some screen shots of my system and the FW issue I’m experiencing. I hope this helps someone else down the road.
Attachments
My Computer
-
- OS
- Windows 11 Pro, 21H2, 22000.675
- Computer type
- PC/Desktop
- Manufacturer/Model
- Custom AMD
- CPU
- AMD FX-8350 Eight-Core Processor 4.01GHz
- Motherboard
- ASUS Sabertooth 990FX R2.0
- Memory
- G Skill Ripjaw 32GB
- Graphics Card(s)
- Sapphire NITRO+ RX 480 OC 8 GB Radeon
- Sound Card
- ASUS Xonar THX/Dolby Certified
- Monitor(s) Displays
- 65″ Vizio 4K
- Screen Resolution
- 4K
- Hard Drives
- Samsung 850 EVO 500GB SSD x2
- PSU
- Corsair RM-1000 watt 80 PLUS® Gold Certified Fully Modular
- Case
- Corsair Obsidian Series 450D
- Cooling
- Arctic Liquid Freezer 360
- Keyboard
- Logitech MX Keys
- Mouse
- Logitech MX Master
- Internet Speed
- 400MBps
- Browser
- Comodo Dragon
- Antivirus
- MalwareBytes Premium
- Other Info
- Logitech Z906 500W 5.1 THX/Dolby Certified Surround Sound Speaker System
Similar threads
-
Windows Support Forums
-
AntiVirus, Firewalls and System Security
Quick Tips
- Disabling your antivirus leaves your computer vulnerable to malware, viruses, and other online threats.
- Access Windows Security settings and temporarily disable Real-time protection by switching off. This allows essential scans to run while pausing continuous monitoring.
- For more granular control, utilize the Group Policy Editor or Registry Editor. However, these methods can leave your system vulnerable—consider a third-party antivirus instead.
Method 1: Using Command Prompt
Step 1: Press the Windows key on your keyboard, type Command Prompt, and click Run as administrator.
Step 2: Type or copy the below command and press Enter.
REG ADD "hklm\software\policies\microsoft\windows defender" /v DisableAntiSpyware /t REG_DWORD /d 1 /f

Method 2: Using the Settings App
Step 1: Press the Windows key on your keyboard, type Settings, and click Open.
Step 2: Go to Privacy & security settings.
Step 3: In Privacy & security settings, under Security, click on Windows Security.

Step 4: Go to the Virus & threat protection option.
Step 5: Under the ‘Virus & threat protection settings’ section, click on Manage settings.
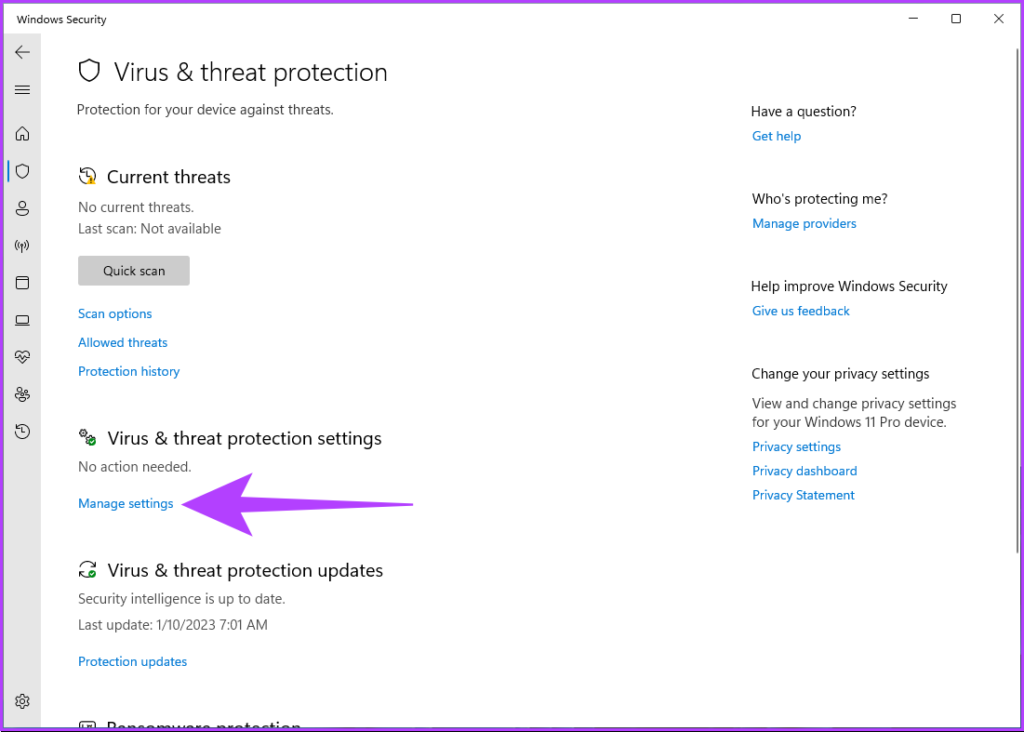
Step 6: Now, disable the Real-time protection toggle and other toggles on this page.
Note: If prompted, click Yes.

If you want Windows Defender to stay disabled, you must keep toggling off the settings every time Windows resets it. However, if you want to disable Windows Defender permanently, jump to the next method.
Method 3: Using Registry Editor
Before you proceed with the steps, you must disable Windows Defender Tamper Protection.
Step 1: Press the Windows key on your keyboard, type Settings, and click Open.
Step 2: Go to Privacy & security settings.
Step 3: In Privacy & security settings, under Security, click on Windows Security.
Step 4: Under Protection areas, select Virus & threat protection.

Step 5: Select Manage settings.

Step 6: Toggle off Tamper Protection.

Now, let’s go to Registry settings. Because we will be using Registry Editor, we strongly advise you to back up the Windows Registry and follow the steps below.
Step 7: Press the Windows key on your keyboard, type Registry Editor, and click Run as administrator.
In the prompt, select Yes.
Step 8: In the top address bar, enter the mentioned address and press Enter.
HKEY_LOCAL_MACHINE\SOFTWARE\Policies\Microsoft\Windos Defender

Step 9: Under the Windows Defender folder, right-click, select New, and choose DWORD (32-bit) Value.
Step 10: Type DisableAntiSpyware in the name field.
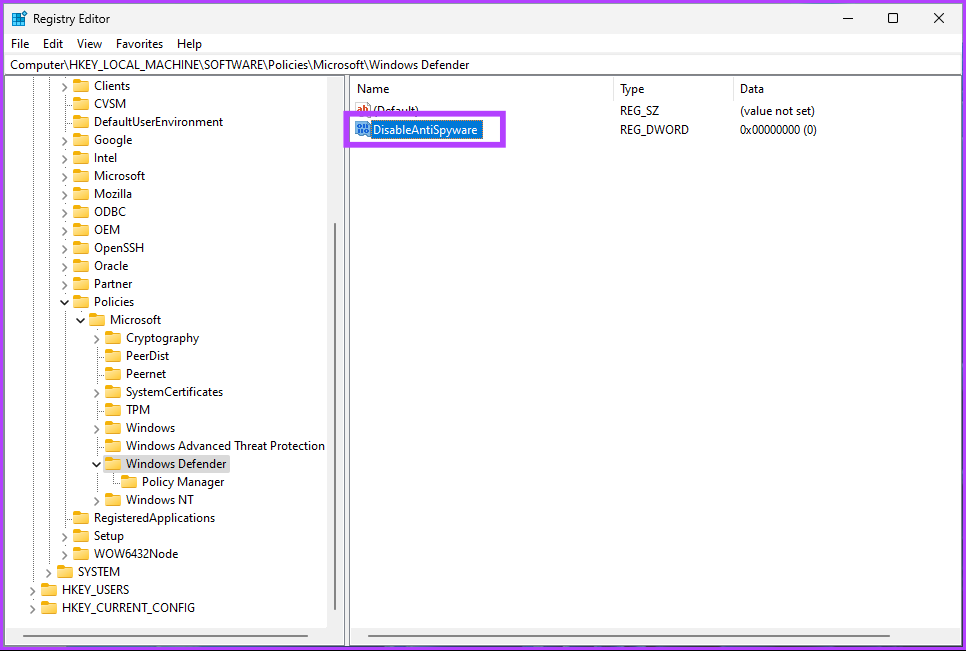
Step 11: Double-click the new value, type 1 in the Value Data field, and press OK.
Finally, reboot the system to implement the changes. When the system boots back and you try to load Windows Defender, you will see an error message saying, ‘This application is turned off by group policy.’
Method 4: Using Group Policy Editor
The Group Policy Editor is exclusive to Windows 11 Pro and Enterprise versions. If you are using Windows 11 Home Edition, you can skip this method.
Step 1: Press the Windows keys on your keyboard, type gpedit, and click Open.
Step 2: In the left pane, under Local Computer Policy, select Computer Configuration.

Step 3: In the right pane, double-click on Administrative Templates.
Step 4: Select Windows Components.
Step 5: Under Windows Components, select Microsoft Defender Antivirus.

Step 6: Under the Microsoft Defender Antivirus, locate and double-click on the Turn off Windows Defender Antivirus option on the right.
Step 7: In the new window, select Enabled. Finally, click on Apply > OK.
There you go. Now, all you need to do is restart Windows. And once it boots back up, Windows Defender would have been disabled. Whenever you try to open it, an error message will pop up.
If you want to roll back any time in the future, go under the Turn off Windows Defender policy > select Disabled > click Apply > OK.
Method 5: Using a Third-Party Antivirus
There are many antivirus programs for Windows. If you choose to use any, Windows Defender automatically gets disabled. This is, by far, the easiest way to disable Windows Defender.
Here’s how to check if the third-party antivirus is correctly installed. Follow the instructions below.
Step 1: Press the Windows key on your keyboard, type Settings, and click Open.
Step 2: Go to Privacy & security settings.
Step 3: In Privacy & security settings, under Security, click on Windows Security.
Step 4: Under Protection areas, select Virus & threat protection.
Step 5: Select Manage providers in the far right.

Under security providers, you will see that third-party antivirus is turned on. In contrast, Microsoft Defender is turned off.

You may see that the Windows Firewall is still active. It happens when the antivirus doesn’t have a firewall. If it does, Microsoft Defender’s firewall gets turned off automatically.
Was this helpful?
Thanks for your feedback!
The article above may contain affiliate links which help support Guiding Tech. The content remains unbiased and authentic and will never affect our editorial integrity.