
Applies ToWindows 11 Windows 10
Брандмауэр Windows помогает защитить устройство, фильтруя сетевой трафик и блокируя несанкционированный доступ. Он снижает риск угроз сетевой безопасности, ограничивая или разрешая трафик на основе различных свойств, таких как IP-адреса, порты или пути к программе.
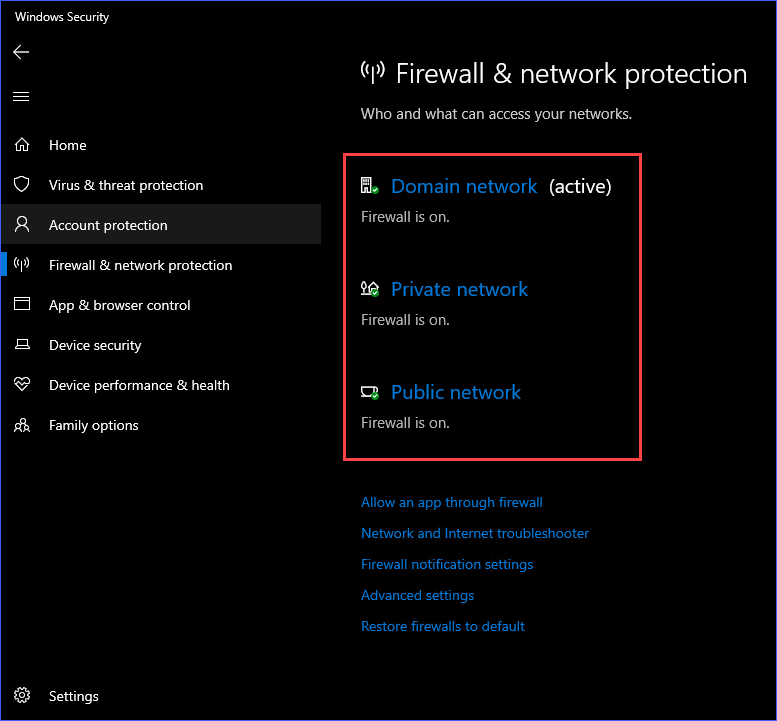
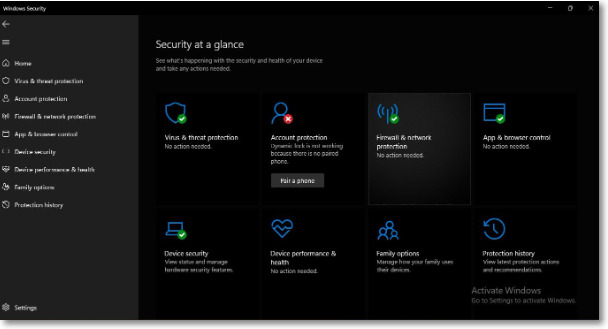
Вы можете использовать приложение Безопасность Windows для просмотра состояния брандмауэра Windows и управления им. Вы можете включить или отключить брандмауэр, а также получить доступ к дополнительным параметрам для различных типов сетей, включая доменные (рабочие), частные (доверенные) и общедоступные (ненадежные) сети.
Частные и общедоступные сети
Можно указать, что определенная сеть, к которую подключается устройство, является частной или общедоступной. Ключевое различие заключается в том, разрешено ли другим устройствам в той же сети видеть ваше устройство и, возможно, подключаться к нему.
Ваша домашняя сеть может быть примером частной сети. Теоретически единственными устройствами в ней являются ваши устройства и устройства, принадлежащие вашей семье. Вы в порядке с другими устройствами, которые могут видеть ваши, потому что вы доверяете этим устройствам.
Однако Wi-Fi в вашем местном кафе является общедоступной сетью. Большинство других подключенных к нему устройств принадлежат незнакомым людям, и вы, вероятно, предпочитаете, чтобы они не могли видеть или подключаться к вашему устройству.
Как правило, вы будете иметь более строгие средства контроля безопасности в общедоступной сети, чем в частной сети, просто из-за уровня доверия к другим пользователям и устройствам в этой сети.
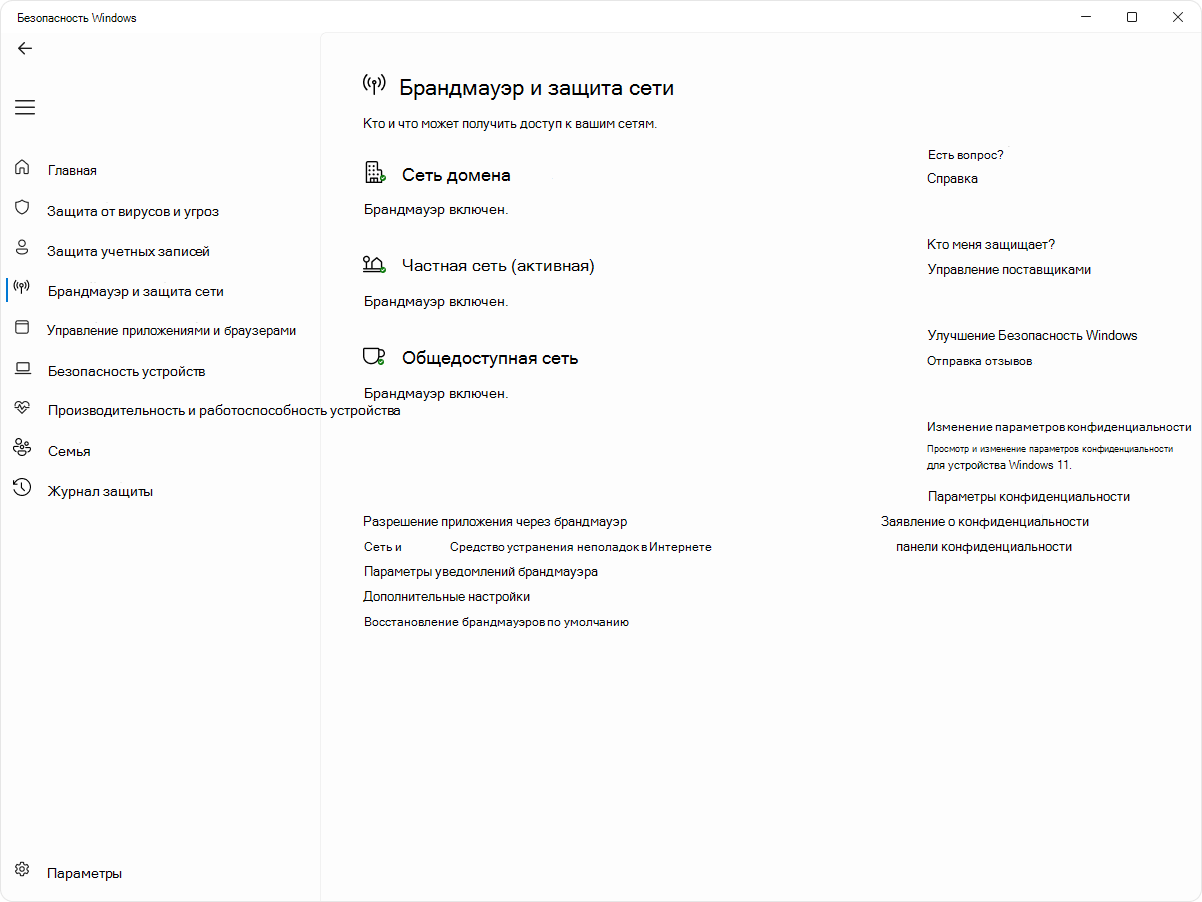
Настройка брандмауэра Windows в Безопасность Windows
-
В приложении «Безопасность Windows» на компьютере, выберите Брандмауэр & защиты сети или используйте следующий ярлык:
Брандмауэр & защиты сети
-
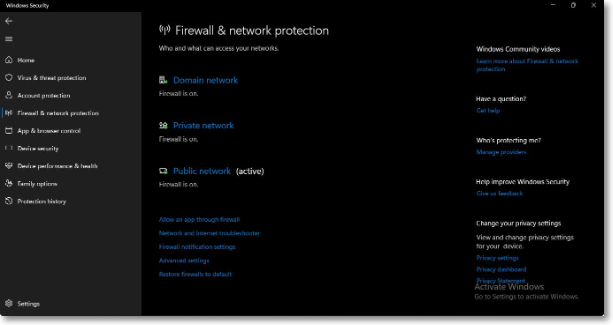
Безопасность Windows показывает, к какому типу сети вы подключены в данный момент. Как правило, устройство будет подключено только к одной сети за раз. Выберите профиль сети: Доменная сеть, Частная сеть или Общедоступная сеть
-
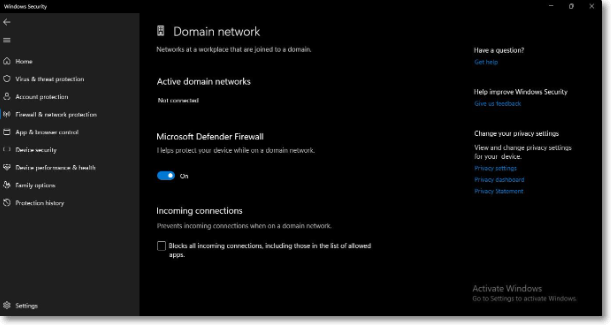
В разделеMicrosoft Defender Брандмауэр переключите параметр на Включено , чтобы включить брандмауэр Windows. Для выключения переключите этот параметр в положение Выкл. Отключение брандмауэра Windows может сделать ваше устройство более уязвимым для несанкционированного доступа. Если вам нужно использовать приложение, которое заблокировано, вы можете разрешить его через брандмауэр, а не выключать брандмауэр.
-
В разделе Входящие подключения установлен флажок Блокировать все входящие подключения, в том числе в списке разрешенных приложений. Установка этого флажка указывает брандмауэру Windows игнорировать список разрешенных приложений и блокировать все. Включение этого параметра повышает безопасность, но может привести к прекращению работы некоторых приложений.
Примечание: Если устройство управляется организацией, параметры политики могут препятствовать изменению конфигурации брандмауэра Windows. Для получения дополнительных сведений обратитесь к администратору.
Дополнительные параметры
Ниже приведен список дополнительных параметров, доступных на странице брандмауэра и защиты сети:
-
Разрешить приложению через брандмауэр
. Если брандмауэр блокирует нужное приложение, можно добавить исключение для этого приложения или открыть определенный порт. Дополнительные сведения об этом процессе (и о том, почему вы не захотите) см. в статье Риски, связанные с разрешением приложений через брандмауэр Windows. -
Средство устранения неполадок с сетью и Интернетом: Если у вас возникли общие проблемы с сетевым подключением, вы можете использовать это средство устранения неполадок, чтобы попытаться автоматически диагностировать и устранить их.
-
Параметры уведомлений брандмауэра: Хотите получать больше уведомлений, когда брандмауэр блокирует что-то? Меньше? Узнайте, как настроить уведомления
-
Дополнительные параметры: Откроется классический брандмауэр Защитника Windows, который позволяет создавать правила для входящего или исходящего трафика, правила безопасности подключения и просматривать журналы мониторинга брандмауэра. Большинство людей не хотят копаться в нем, что глубоко; неправильное добавление, изменение или удаление правил может привести к тому, что система станет более уязвимой или может привести к тому, что некоторые приложения не будут работать.
-
Восстановление брандмауэров по умолчанию . Если кто-то или что-то внес изменения в параметры брандмауэра Windows, что приводит к неправильной работе, вы просто в два щелчка от сброса параметров, как они были, когда вы впервые получили компьютер. Если ваша организация применила какие-либо политики для настройки брандмауэра, они будут применены повторно.
Нужна дополнительная помощь?
Нужны дополнительные параметры?
Изучите преимущества подписки, просмотрите учебные курсы, узнайте, как защитить свое устройство и т. д.
Во все современные версии Windows встроен брандмауэр Windows Defender Firewall. Это встроенный программный межсетевой экран, который защищает Windows от несанкционированного внешнего доступа к компьютеру и запущенным на нем службам. По умолчанию брандмауэр Windows включен и защищает все сетевые интерфейсы компьютера. Брандмауэр блокирует все входящие подключения и разрешает все исходящие.
Содержание:
- Отключить/включить брандмауэр из панели управления Windows
- Отключить Windows Firewall через GPO
- Как отключить или включить брандмауэр Windows с помощью PowerShell?
В подавляющем большинстве случае Windows Firewall должен быть включен. Если вам нужно разрешить доступ к компьютеру для определенной службы или IP адреса, просто создайте разрешающее правило. Однако в некоторых ситуациях администратору нужно полностью отключить Windows Defender Firewall для проверки сетевых подключений. В этой статье мы покажем несколько способов, как отключить и включить встроенный брандмауэр Windows.
Отключить/включить брандмауэр из панели управления Windows
В современных версиях Windows 10 и 11 для управления брандмауэром используется панель Безопасность Windows (Windows Security).
Если панель Windows Security не открывается или повреждена, вы можете восстановить ее.
- Перейдите в меню Параметры (Settings -> Update & Security -> Windows Security) или выполните команду
windowsdefender://network/
; - Выберите раздел Firewall and network protection;

- По очереди щелкните по каждому из трех сетевых профилей (Domain, Private и Public) и отключите Microsoft Defender Firewall;
,
- Подтвердите отключение в окне User Account Control.
В Windows для каждого сетевого подключения используется один из трех сетевых профилей:
- Domain – применяется для компьютеров, которые добавлены в домен AD
- Private – для небольших офисных LAN, рабочих групп и домашней сети
- Public – для общественных сетей (кафе, аэропорты)
В зависимости от типа сети к сетевому интерфейсу применяются различные правила брандмауэра и настройки обнаружения Windows в сетевом окружении. Вы можете изменить профиль сети подключения как описано тут.
В предыдущих версиях Windows и в Windows Server 2012R2/2016/2019 можно отключить брандмауэр через классическую панель управления «Windows Firewall with Advanced Security«:
- Откройте консоль
firewall.cpl
; - Щелкните по Turn Windows Defender Firewall on or off;
- Отключите Windows Defender firewall для всех типов сетей.
Если на компьютере есть несколько сетевых интерфейсов, вы можете отключить файервол только для некоторых из них.
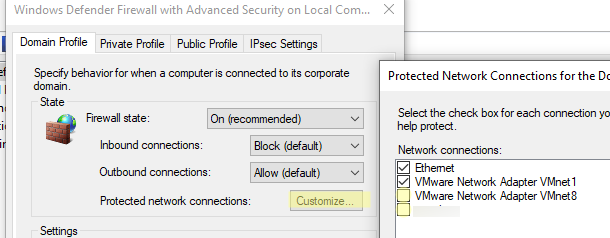
- Нажмите кнопку Advanced Settings -> Windows Defender Firewall properties;
- В настройках каждого сетевого профиля есть раздел Protected network connections. Нажмите кнопку Customize;
- Снимите галки с тех сетевых интерфейсов, для которых нужно отключить брандмауэр.
- Аналогичным образом отключите защиту сетевых интерфейсов брандмуэром в настройках других сетевых профилей.
Когда вы отключаете брандмауэр, в трее начнет отображаться соответствующее уведомление.
Чтобы скрыть это всплывающее уведомление, добавьте следующий параметр реестра:
reg add "HKLM\Software\Microsoft\Windows Defender Security Center\Notifications" /v "DisableNotifications" /t REG_DWORD /d "1" /f
Обратите внимание, что в Windows есть отдельная системная служба Windows Defender Firewall (
mpssvc
). Если вы отключите или приостановите эту службу, это не отключит брандмауэр до тех пор, пока вы сами не отключите защиту для сетевых профилей.
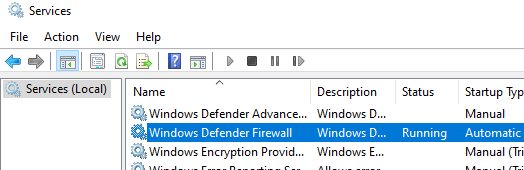
Однако через остановку служб вы можете отключить встроенный антивирус Защитник Windows.
Отключить Windows Firewall через GPO
Вы можете отключить Windows Firewall с помощью групповых политик.
На отдельном компьютере нужно использовать консоль редактора локальной групповой политики (
gpedit,msc
), а в доменной среде нужно создать новую GPO с помощью консоли управления GPMC.
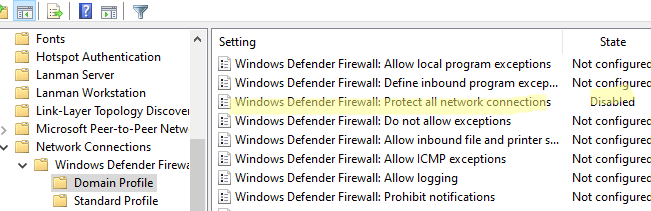
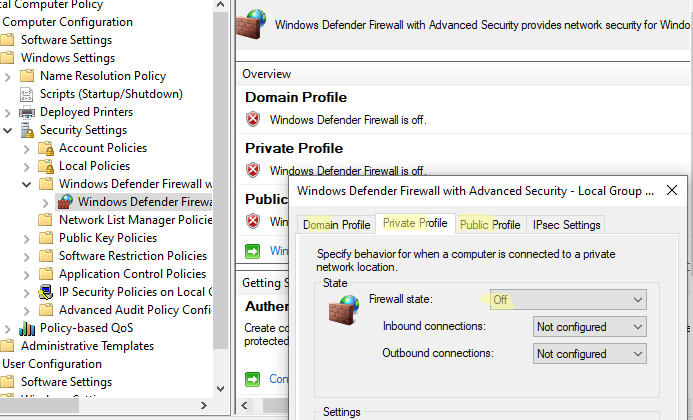
- Откройте GPO и перейдите в раздел Computer Configuration -> Administrative Templates -> Network -> Network Connections -> Windows Firewall -> Domain Profile.
- Откройте параметр “Windows Firewall: Protect all network connections” и измените значение на Disabled;
- Аналогичным образом измените параметр в секции Standard Profile;
- Обновите настройки GPO на компьютере и проверьте, что брандмауэр для доменного профиля отключен;
- Если компьютер будет подключен к сети, отличной от доменной, Windows Firewall будет защищать такое подключение.
- Если вы хотите отключить брандмауэр для всех сетевых профилей, перейдите в раздел GPO Computer Configuration -> Windows Settings -> Security Settings -> Windows Firewall with Advanced Security. Отключите файервол на вкладках всех трех сетевых профилей.
После того, как вы отключили Windows Firewall через GPO, пользователь не сможет включить его вручную через панель управления.
Как отключить или включить брандмауэр Windows с помощью PowerShell?
Для управления Windows Firewall из командной строки можно использовать PowerShell.
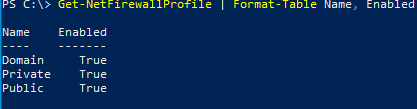
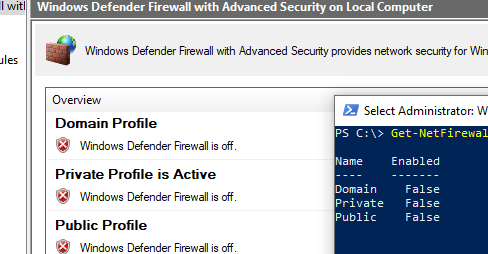
Проверьте, что брандмауэр включен для всех трех сетевых профилей:
Get-NetFirewallProfile | Format-Table Name, Enabled
Можно отключить брандмауэр только для одного сетевого профиля:
Set-NetFirewallProfile -Profile Domain -Enabled False
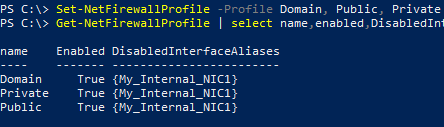
Или отключить firewall сразу для всех сетевых профилей:
Set-NetFirewallProfile -Profile Domain, Public, Private -Enabled False
Чтобы включить Windows Defender, выполните команду:
Set-NetFirewallProfile -Profile Domain, Public, Private -Enabled True
Вы можете отключить защиту брандмауэра для конкретного сетевого подключения. Чтобы узнать имя сетевого подключения, выведите их список:
Get-NetAdapter
Теперь можно отключить файервол для выбранного интерфейса:
Set-NetFirewallProfile -Profile Domain, Public, Private -DisabledInterfaceAliases "My_Internal_NIC1"
Вывести список сетевых адаптеров, которые исключены из файервола:
Get-NetFirewallProfile | select Name,Enabled,DisabledInterfaceAliases
Очистить список исключений:
Set-NetFirewallProfile -Profile Domain,Public,Private -DisabledInterfaceAliases @()
“Why would you disable or turn off the Windows Firewall?”
Not a reader? Watch this related video tutorial!
Not seeing the video? Make sure your ad blocker is disabled.
There are many reasons one would disable the firewall in Windows. Not every reason is sound, of course, but there are legitimate ones.
In this article, you will learn the many ways to disable the Windows firewall. Whether you’re in a single-machine setup, home network, or a corporate environment, this article is for you.
You’re going to learn how to turn off the software firewall in Windows in just about every way possible!
- Using the Windows firewall management console
- The command-line (cmd.exe)
- PowerShell
- Group policy
- Even Azure Custom Script extension if you’re on an Azure virtual machines
Let’s dig in!
Prerequisites
Since this article is a how-to, there are some requirements that you need to follow along with the instructions. Some examples involve domain and non-domain environment.
For a Non-Domain Environment
- One or more computers that are running on Windows 10. You can do the examples here in just one computer, but some instructions are specific to remoting.
- And you must have administrator permissions on those Windows 10 computers.
For a Domain Environment
- A Windows 2019 server that is also a domain controller. A Windows 2016 server should also work.
- One or more Windows 10 computers in the same network and joined to the domain.
Using the GUI
Probably the quickest way to disable the firewall is using the included GUI tools in Windows. Using the GUI is probably the easiest way to turn off the Windows firewall for home users.
Using the Windows Security App
The first GUI tool to manage is the Windows Security App. The Windows Security app is available on Windows 10, version 1703, and later.
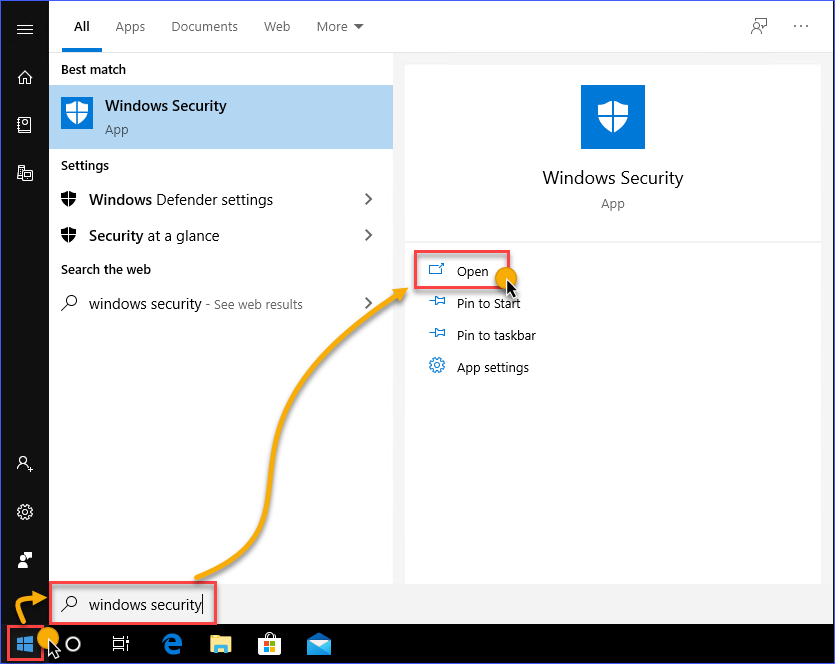
- Launch the Windows Security app by clicking on the Start button, and start typing Windows Security. The search result would show the Windows Security app, click on Open.
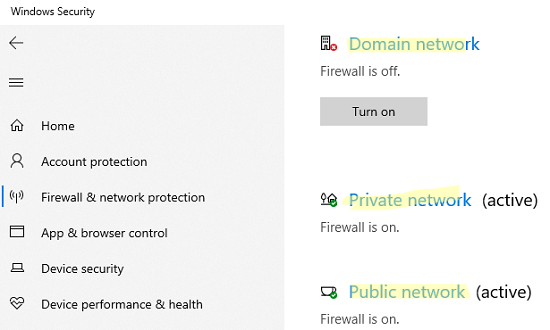
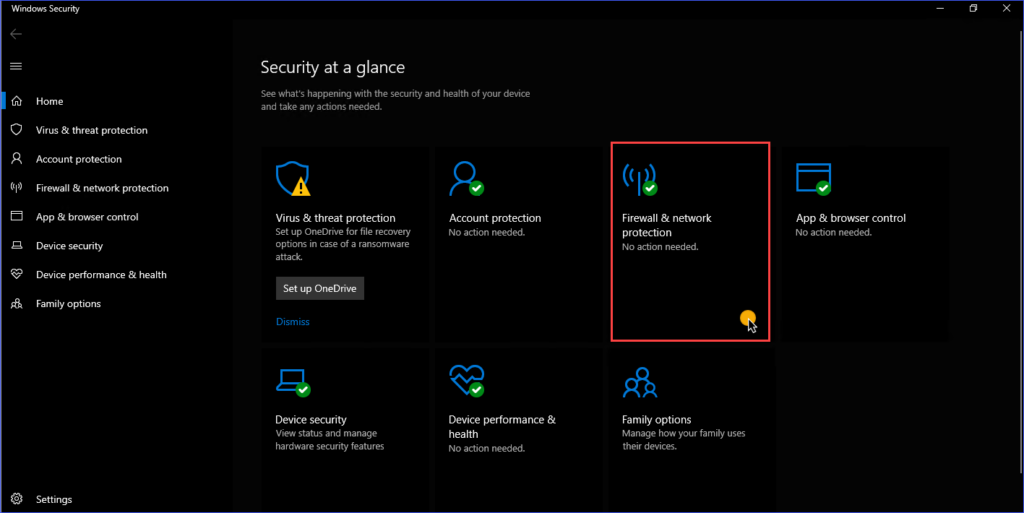
2. You will see different menu items in the Windows Security app home. Look for Firewall & network protection and click to open it.
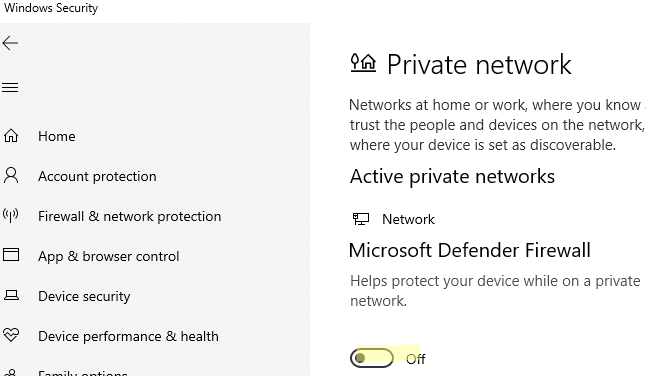
3. On the Firewall & network protection page, you should see the different network profiles listed. These network profiles are Domain Network, Private Network, and Public Network. You can turn off the firewall for each of these network connection locations individually. In this example, you need to select the Private Network profile.
4. In this example, the Private Network profile is selected. Once inside the Private Network settings, click on the switch to turn off the Windows Defender Firewall.
Repeat the same steps for the other network profiles if you prefer.
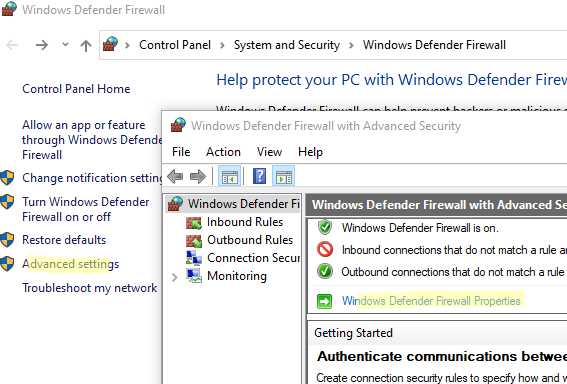
Disable Windows Firewall Using the Windows Defender Firewall Control Panel
Another GUI tool is the Windows Defender Firewall Control Panel. As opposed to the Windows Security App which has the modern interface of a Windows 10 App, the Windows Defender Firewall Control Panel sports the same look of classic control panel items.
Below are several ways to launch the Windows Defender Firewall Control Panel
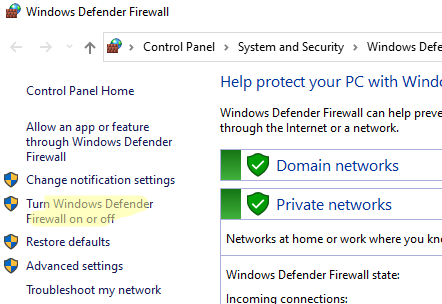
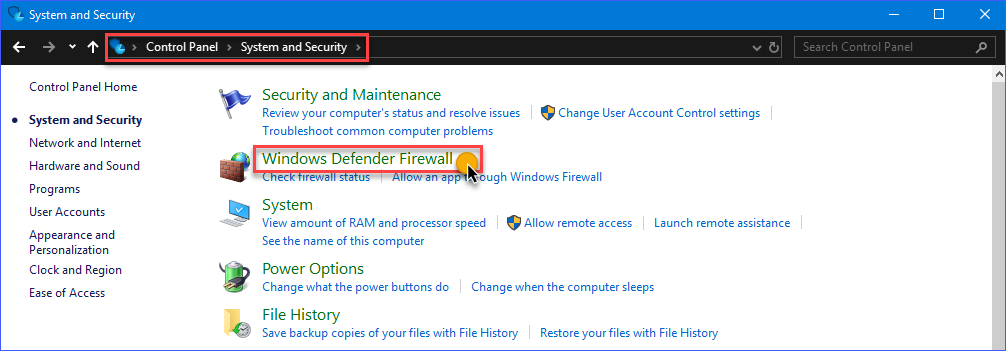
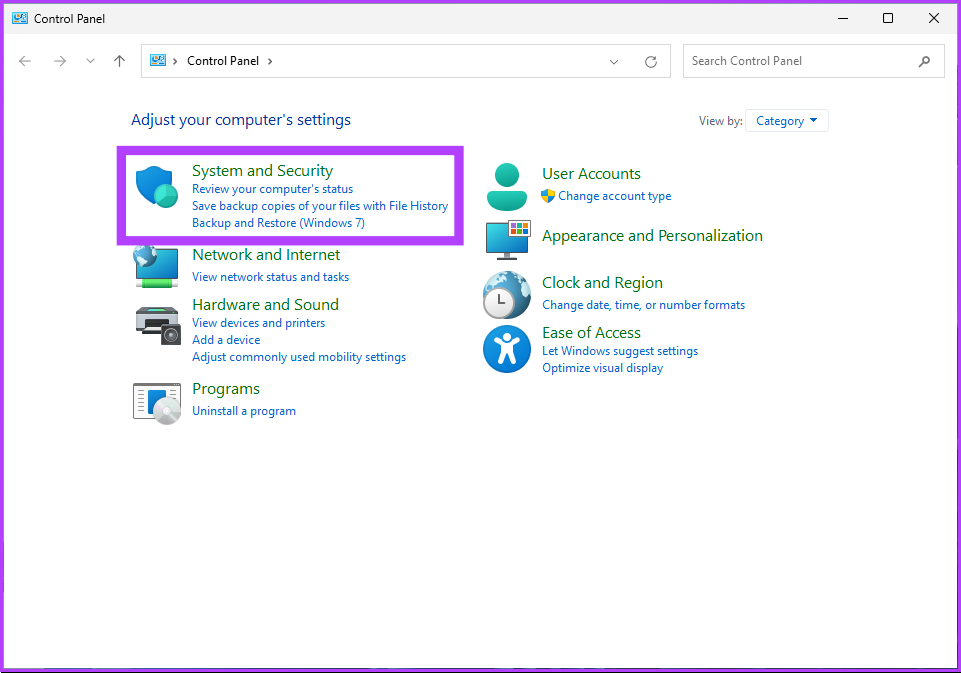
Method 1: Go to Control Panel —> System and Security —> Windows Defender Firewall.
Method 2: Open the Start menu and type windows defender firewall. Click on the Windows Defender Firewall link.

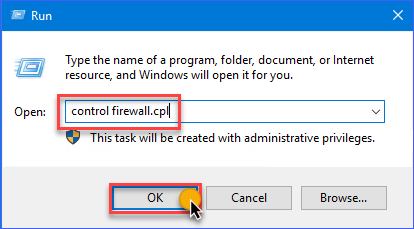
Method 3: Open the Run dialog box and type in the command control firewall.cpl and click OK.
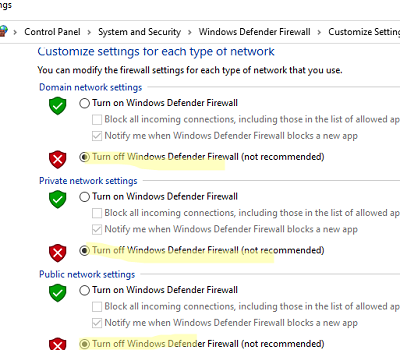
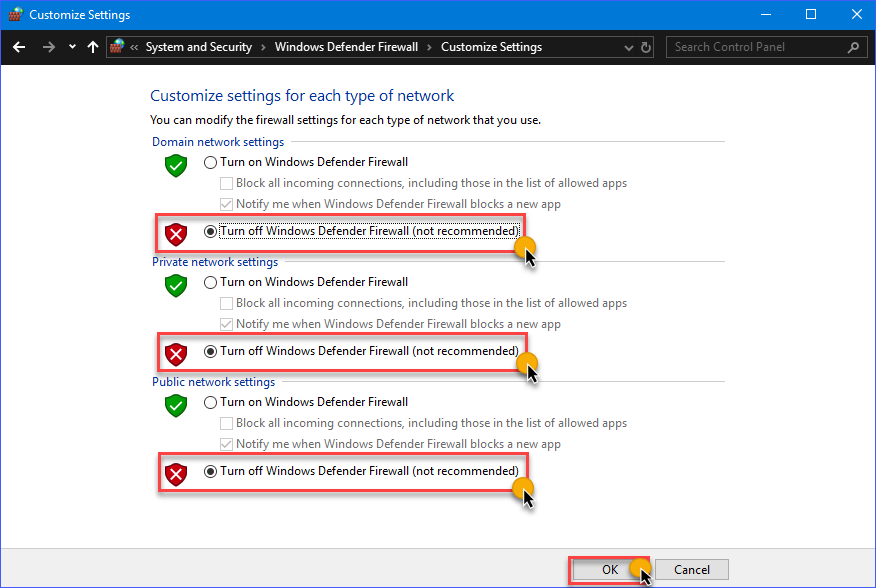
In the Windows Defender Firewall Control Panel, you should see a familiar list of network profiles; Domain networks, Private networks, and Guest or public networks. On the left-hand side, click on the Turn Windows Defender on or off link.
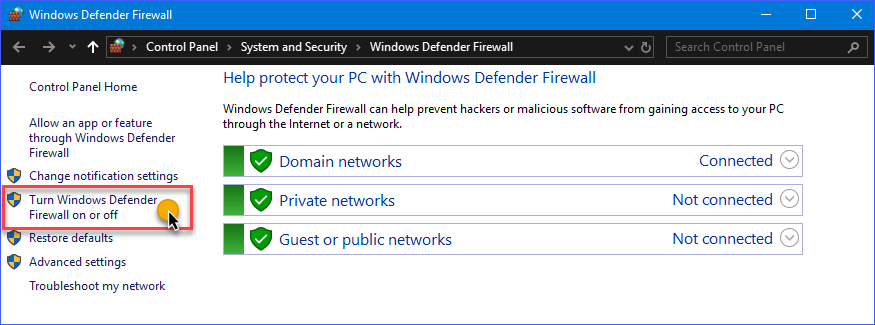
On the Customize Settings page, you’ll have the option to disable the Windows firewall for each network profile. In the example below, the Windows Firewall is turned off on all network profiles.
Using the Command-Line
As you may already know, most, if not all, of the GUI operations in Windows, have a command-line counterpart. Using the command-line is at times quicker, as opposed to going to different windows location when using the GUI options.
Additionally, the command-line options enable users to script or automate the task.
Turning off the Windows Firewall with the NETSH Command
An old but useful handy utility called netsh s ready for use to manage network configurations on a computer, or in this case, to disable the Windows Firewall.
Using netsh advfirewall set c you can disable the Windows Firewall individually on each location or all network profiles.
netsh advfirewall set currentprofile state off– this command will disable the firewall for the current network profile that is active or connected. For example, suppose the currently active network profile is Domain network. In that case, this command will the Firewall for that network profile.netsh advfirewall set domainprofile state off– disables on the Domain network profile only.netsh advfirewall set privateprofile state off– disables on the Private network profile only.netsh advfirewall set publicprofile state off– this command will disable on the Public network profile only.netsh advfirewall set allprofiles state off– this command will disable on all network profiles at once.
The demonstration below shows each of the commands above in action.

Learn more about Netsh Command Syntax, Contexts, and Formatting
Using the Set-NetFirewallProfile PowerShell Cmdlet
The NetSecurity PowerShell module is built-in to Windows 10, as well as Windows Server 2012, and above. This NetSecurity PowerShell module contains cmdlets related to network and network security configuration. One of these cmdlets is the Set-NetFirewallProfile which can be used to disable Windows Firewall.
The Set-NetFirewallProfile syntax is shown below.
# Disable Windows Firewall for each specified network profile
Set-NetFirewallProfile -Profile <PROFILE NAME> -Enabled False

# Disable Windows Firewall for ALL network profiles
Set-NetFirewallProfile -All -Enabled False
The command below will turn off the firewall on the Public, Private, and Domain network profiles.
Set-NetFirewallProfile -Profile Domain,Private,Public -Enabled False
The demonstration below shows how the Set-NetFirewallProfile works to disable Windows Firewall using the command above.

Without specifying any profile names, the example below shows how to disable Windows Firewall on all network profiles by using the -All parameter switch.

Turning off the Windows Firewall Remotely Using PowerShell
When you need to disable the firewall on many computers, it would be inefficient to manually login to each computer and run the commands. Especially in a network environment, you could disable remotely using PowerShell.
Note: This procedure requires that WinRM is already enabled on the target computer. In most cases, WinRM is already set up for domain-joined computers for remote management purposes.
Learn more: How to enable Windows Remote Shell
If you plan to disable Windows Firewall on one remote computer at a time, you can use the Enter-PsSession cmdlet to issue the commands to the remote computer.
In the example below, the command will be issued from the server named dc, and the remote computer name is desktop1. The command that will be used is shown below.
Enter-PsSession -ComputerName desktop1
Set-NetFirewallProfile -All -Enabled False
Running the code above in PowerShell would result in a similar output, as the demo below.

The above process is good only if you are working on a few remote computers. But, if you have a bulk of computers where you need to disable it, you will need an approach that is more adapted to scripting. For that, you can use the Invoke-Command cmdlet.
$computers = @('desktop1')
$computers | ForEach-Object {
	Invoke-Command -ComputerName $_ {
		Set-NetFirewallProfile -All -Enabled False
	}
}
As you can see from the above code, the name of the remote computers is stored in the $computers variable as an array. Then, PowerShell loops through each of the remote computers to run the Invoke-Command cmdlet and issue the Set-NetFirewallProfile -All -Enabled False command. Refer to the demo below for the expected result.

Using Group Policy
By deploying a GPO, systems admins can turn off the Windows Firewall for selected or all computers in the domain. Once deployed, disabling Windows Firewall will be automated as the configuration enforces it via policy on all computers that are in scope.
Creating the GPO
To create a GPO, you need to launch the Group Policy Management Console on the server. To do so, run gpmc.msc command in the Run dialog.
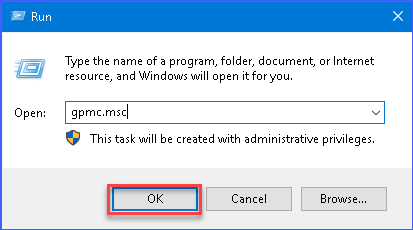
gpmc.msc command in the Run dialogIn the Group Policy Management console, expand the forest and then select the domain where you will create the GPO. In the image below, the GPO is created in the xyz.int domain. Right-click on the domain and click Create a GPO in this domain, and Link it here…
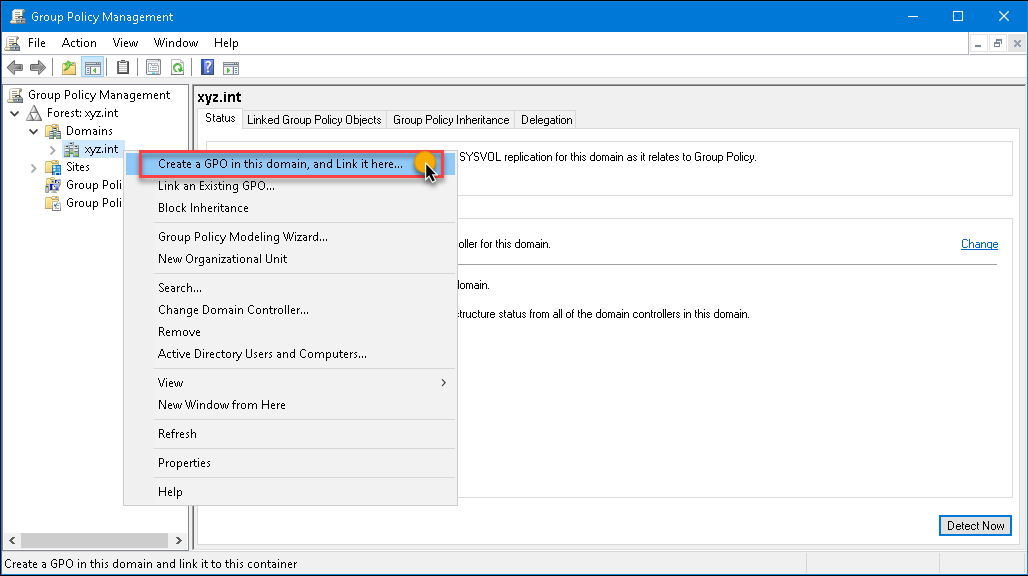
The New GPO dialog box will pop up. Type in Disable Windows Firewall in the Name box, then click on the OK button.
Next, right-click on the new GPO and click Edit. The GPO will open in the Group Policy Management Editor. Then, expand these folders Computer Configuration —> Policies —> Administrative Templates —> Network —> Network Connections —> Windows Defender —> Firewall —> Domain Profile.
In the settings list on the right pane, double-click on Windows Defender Firewall: Protect all network connections to open its properties.
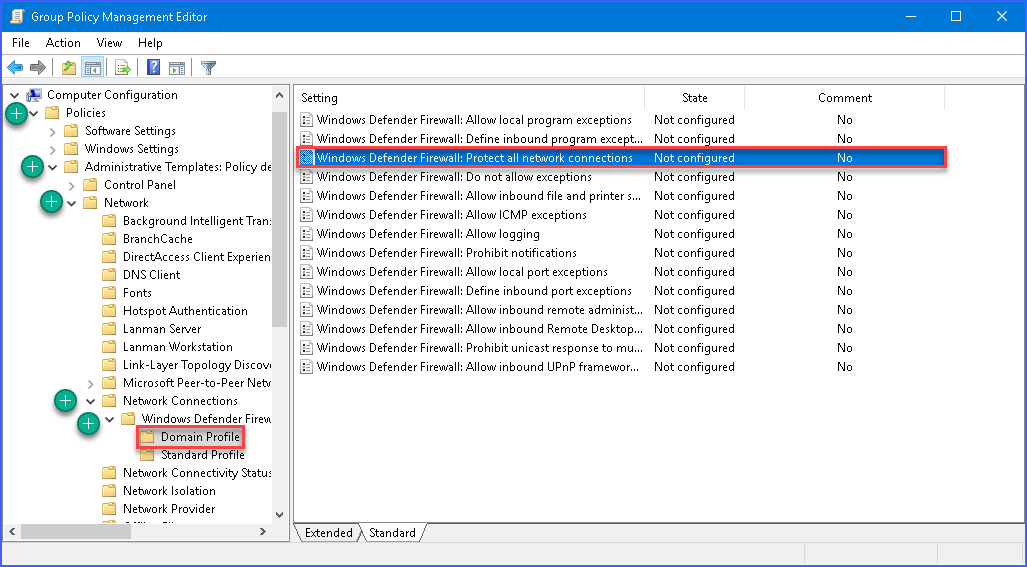
Once the settings property is open, change the value by selecting Disabled, then click OK.
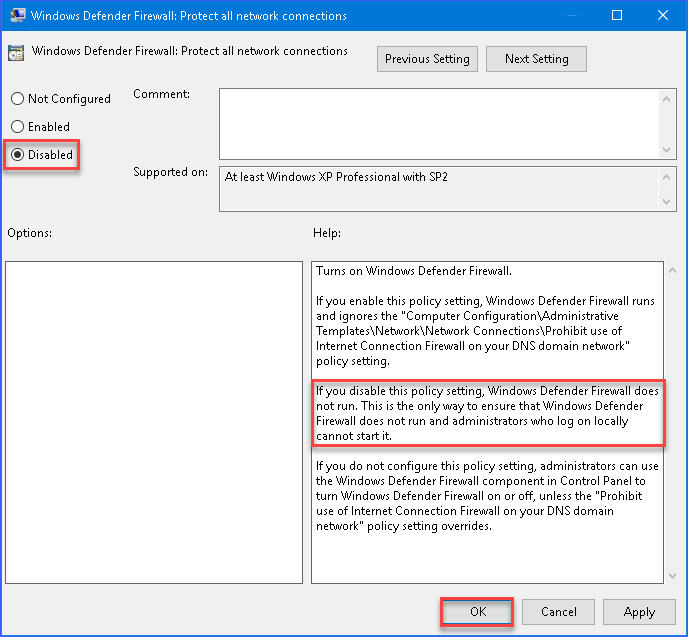
Repeat and apply the same option to the Standard Profile settings. Then, you can now exit the Group Policy Management Editor window.
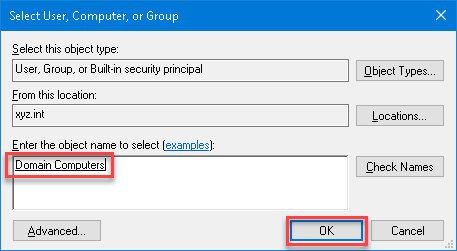
Deploying the GPO to All Domain Computers
Now that you’ve created the GPO, you now need to deploy the GPO to the domain computers.
To apply the GPO, in the Group Policy Management, select the Disable Windows Firewall GPO. Then, in the Scope tab, click on Add button under the Security Filtering section.
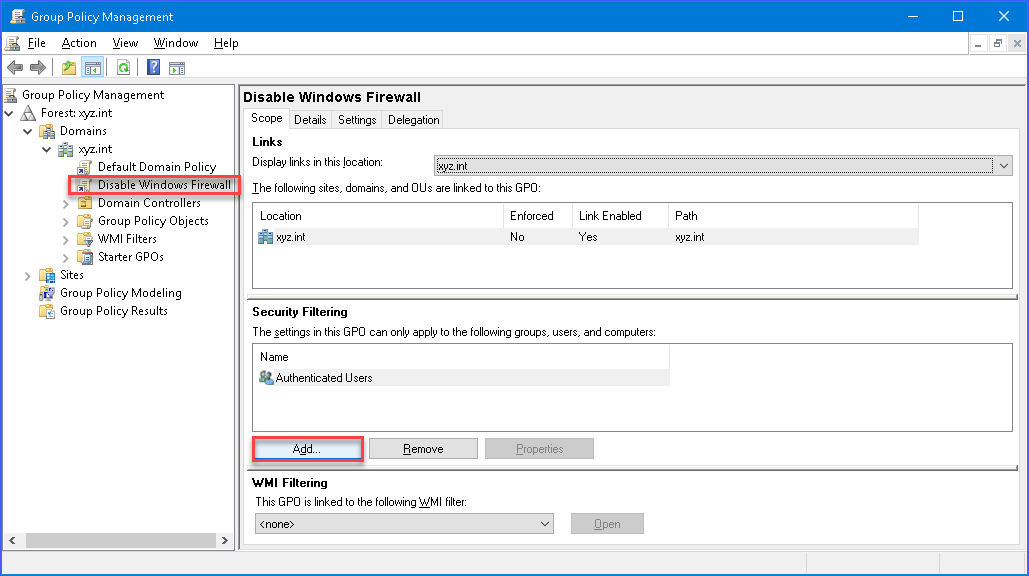
In the Select User, Computer, or Group dialog box, search for Domain Computers and click OK. Doing so will ensure that the GPO is applied to all computers that are members of the Domain Computers group.
And that’s it! The next time that the client computers get the policy update, the firewall will be turned off on those computers.
Now that the GPO has been created and deployed, you can test whether the GPO is working by forcing a policy update. Run the gpupdate /force on the client computer to test the policy update.

As you can see from the result above, as soon as the policy was applied on the client computer. The configuration to disable Windows Firewall was applied. Additionally, there is an information box saying that the settings are managed by the system administrator.
Note: The automatic update interval for Group Policy is every 90 minutes for regular users and computers. Additionally, Group Policy is also updated when the computer is started, or a user logs in.
Using The Custom Script Extension to Disable Windows Firewall on Azure Virtual Machines
If you have an Azure VM that you suddenly cannot access anymore because the Windows Firewall is blocking traffic, including RDP. Maybe you made changes to the Windows Firewall and inadvertently locked yourself out!
If you’ve tried all the ways previously discussed in this article and still no luck, there’s still hope. You can disable Windows Firewall inside an Azure VM’s guest OS by utilizing the Azure Custom Script Extension. The Azure Custom Script Extension works executing a script hosted in Azure Storage or GitHub against your Azure VM’s guest OS.
The high-level steps involve:
- Create a PowerShell script (*.PS1) containing commands to disable Windows Firewall.
- Install the Custom Script Extension on your Azure VM using the Azure Portal.
- Upload the PowerShell script to Azure Storage.
- The script will run automatically on the Azure VM’s guest OS one time only.
In this example, the test VM is named devmachine1 with the Windows Firewall in an enabled state.
Note: Before you proceed, make sure that you have the proper Azure RBAC role in your account.
Creating the Disable-Windows-Firewall.ps1 Script
In the previous sections, you’ve learned which commands are available to disable Windows Firewall. In this example, the netsh utility will be used.
Using the code or text editor of your choice, create a new file with name Disable-Windows-Firewall.ps1. Edit the script and add this line of code: netsh advfirewall set allprofiles state off. Save the script when done. Below is how to quickly do it in PowerShell.
'netsh advfirewall set allprofiles state off' | Out-File .\\Disable-Windows-Firewall.ps1
Installing the Custom Script Extension and Uploading the PowerShell Script
Now that your script is ready, the next step is to install the Custom Script Extension and upload the script to an Azure Storage location. And once the extension is installed, the script will automatically run against the Azure VM.
- First, log in to the Azure Portal and locate the Azure VM resource and open it. In this example, the Azure VM name is devmachine1. Then, go to the Extensions blade and click the Add button.
- In the New Resource page, locate and click on Custom Script Extension. Then, click on Create. In the Install extension page, click the Browse button next to the Script file (required) box.
- Select the Storage Account from the list. In this example, the storage account name is storagexyz01. Then a list of containers will be shown; click on the container where the script file will be uploaded. In this example, the container name is cont1.
Note: If you do not have an Azure storage account or container yet and need to create one, visit Create an Azure Storage account to learn how.
- After selecting the container, click on Upload and browse for the disable-windows-firewall.ps1 file that you created on your computer. Once you’ve selected the file, click the Upload button.
- You should see that disable-windows-firewall.ps1 file is now available inside the container. Click on disable-windows-firewall.ps1 from the list and click on Select. You will be brought back to the Install extension page, and you must click on OK to finally begin installing the extension.
At this point, you only need to wait for the extension to be deployed, which will also automatically execute the script that you uploaded. Refer to the demonstration below to see the whole process in action.

Summary
In this article, you’ve learned how to disable Windows Firewall using the built-in, available GUI tools in Windows. You’re also learned how to use commands using netsh and PowerShell to disable Windows Firewall locally or remotely.
Also, you’ve learned how to create and deploy a Group Policy Object that would disable Windows Firewall for domain computers. Lastly, you’ve learned how to use the Azure Custom Script Extension to disable Windows Firewall in Azure VM’s guest OS.
There surely are many different ways to disable Windows Firewall. Some of those methods were covered in this article. However, there are still other methods that you could explore on your own, such as using PsExec to remotely disable it.
Further Reading
- How to Generate an Azure SAS Token to Access Storage Accounts
- How To Manage Files Between Local And Azure Storage With AZCopy
- Using the Azure custom script extension Windows
Quick Tips
- To disable the Firewall, go to Windows Security > toggle Microsoft Defender Firewall off for public or private networks.
- Another way? Go to System and Security > Windows Firewall > choose Turn off Windows Defender Firewall (not recommended) for relevant networks.
- To disable the Windows firewall, use the Command Prompt, PowerShell, Registry Editor, or Group Policy Editor.
Method 1. Using Windows Security
Step 1: Press the Windows key, type Windows Security, and click Open.
Step 2: Navigate to the Firewall & network protection settings.
Step 3: Select a Private network or Public network.
Note: We are going with a Public network.

Step 4: Toggle off the Microsoft Defender Firewall option. In the prompt, select Yes.

Now, follow the same steps to disable the firewall from the Private network or vice versa. That’s it. You successfully disabled Windows Firewall.
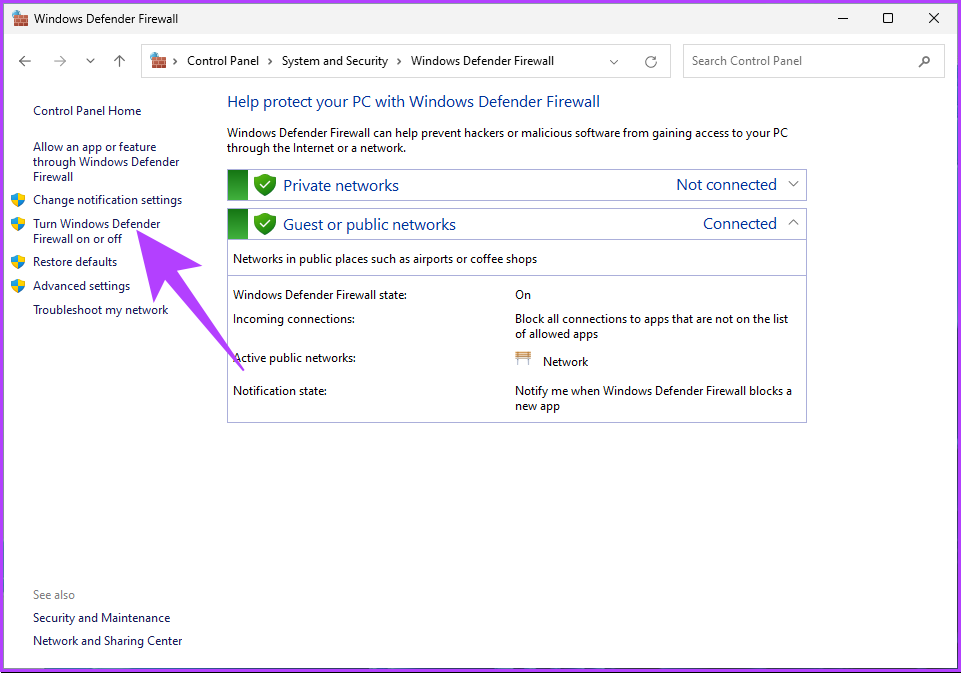
Method 2. Using Control Panel
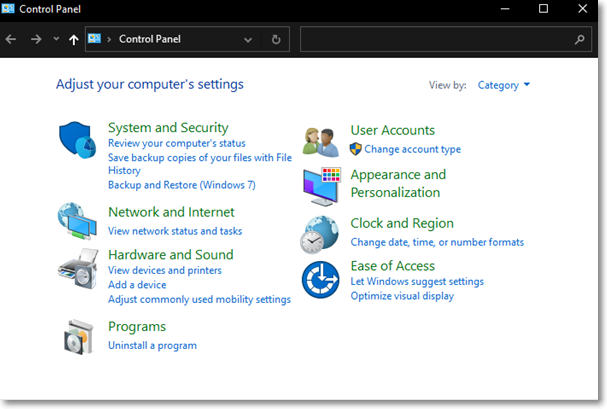
Step 1: Press the Windows key, type Control Panel, and click Open.
Step 2: Go to the System and Security option.
Step 3: Click on Windows Defender Firewall.
Step 4: In the left pane, click on Turn Windows Defender Firewall on or off.
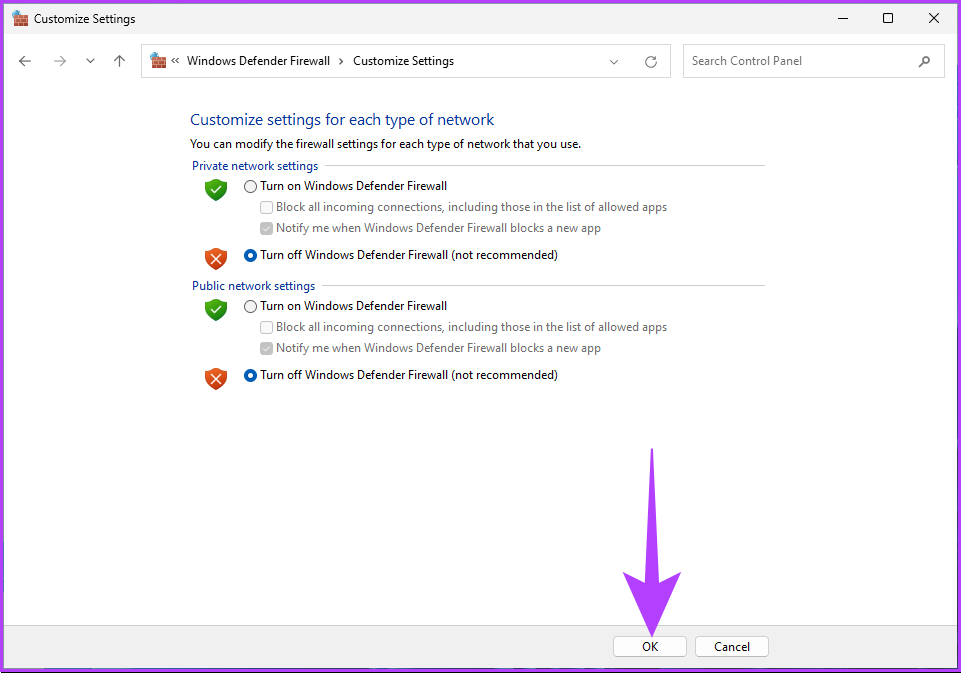
Step 5: Now, under Customize settings for each type of network, choose the Turn off Windows Defender Firewall (not recommended) option in Private network settings and Publick network settings.
Step 6: Click on OK to apply the changes.
Method 3. Using Command Prompt
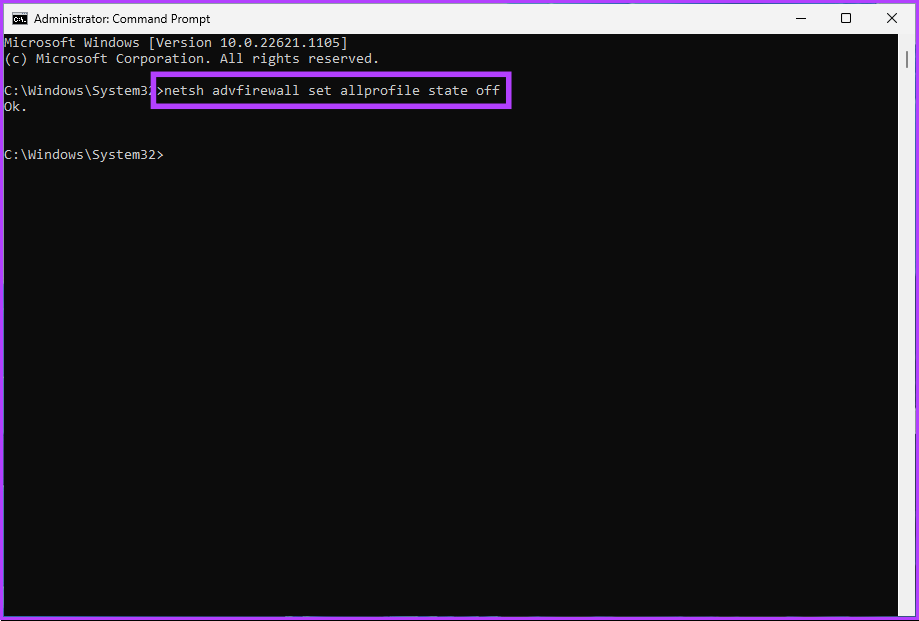
Step 1: Press the Windows key, type Command Prompt, and click Run as administrator.
Step 2: Type the below command and hit Enter.
netsh advfirewall set allprofile state off
Note: This command will turn off the firewall for all the network profiles.
If you want to disable it for the public network profile, type the below command and press Enter.
netsh advfirewall set publicprofile state off
If you want to disable it for the private network profile, type the below command and press Enter.
netsh advfirewall set privateprofile state off
If you want to disable it for the domain network profile, type the below command and press Enter.
netsh advfirewall set privateprofile state off
You can disable Windows firewalls with any of the selected commands mentioned above. If you don’t want to do it through Command Prompt, use PowerShell.
Method 4. Using PowerShell
Step 1: Press the Windows key, type Windows PowerShell, and click Run as Administrator.
Step 2: Type the below command and press Enter.
Set-NetFirewallProfile -Profile Domain,Public,Private -Enabled False

Method 5. Using Registry Editor
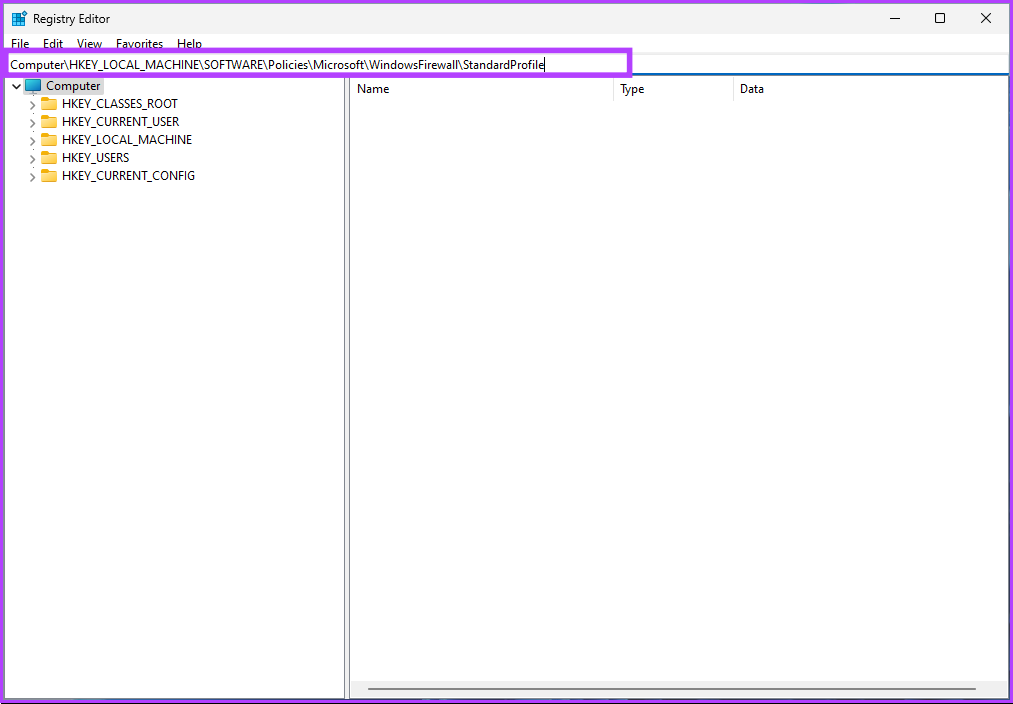
Step 1: Press the Windows key, type Registry Editor, and click Open. In the prompt, select Yes.
Step 2: In the top bar, enter the below-mentioned address.
HKEY_LOCAL_MACHINE\SOFTWARE\Policies\Microsoft\WindowsFirewall\StandardProfile
Step 3: Under the StandardProfile folder, right-click, select New, and choose DWORD (32-bit) Value.
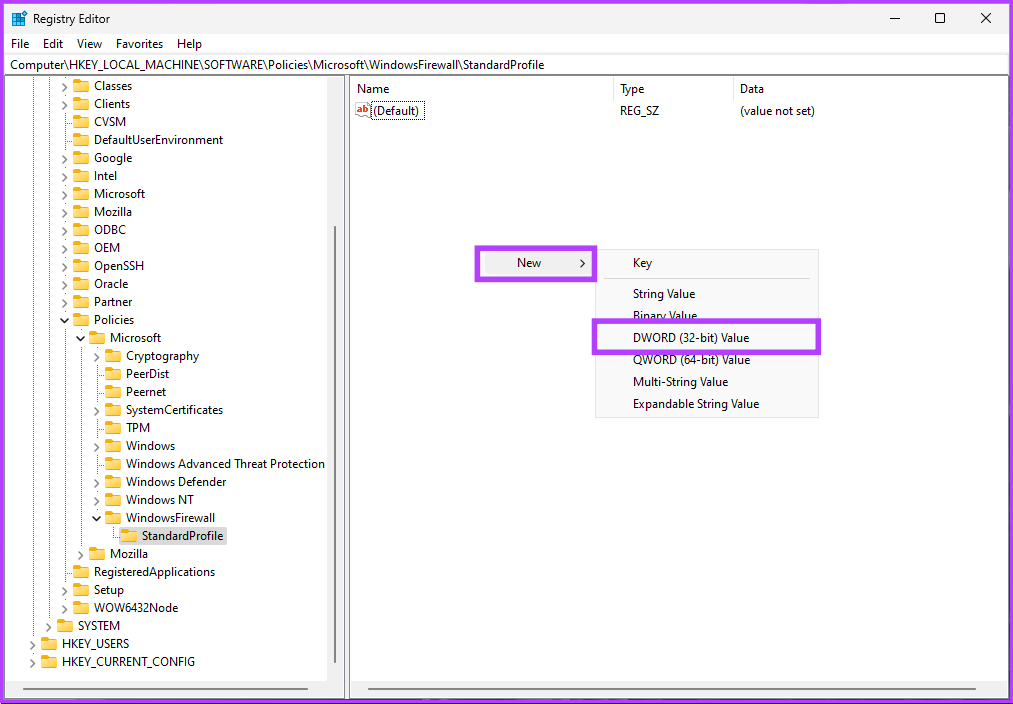
Step 4: Type EnableFirewall in the name field.
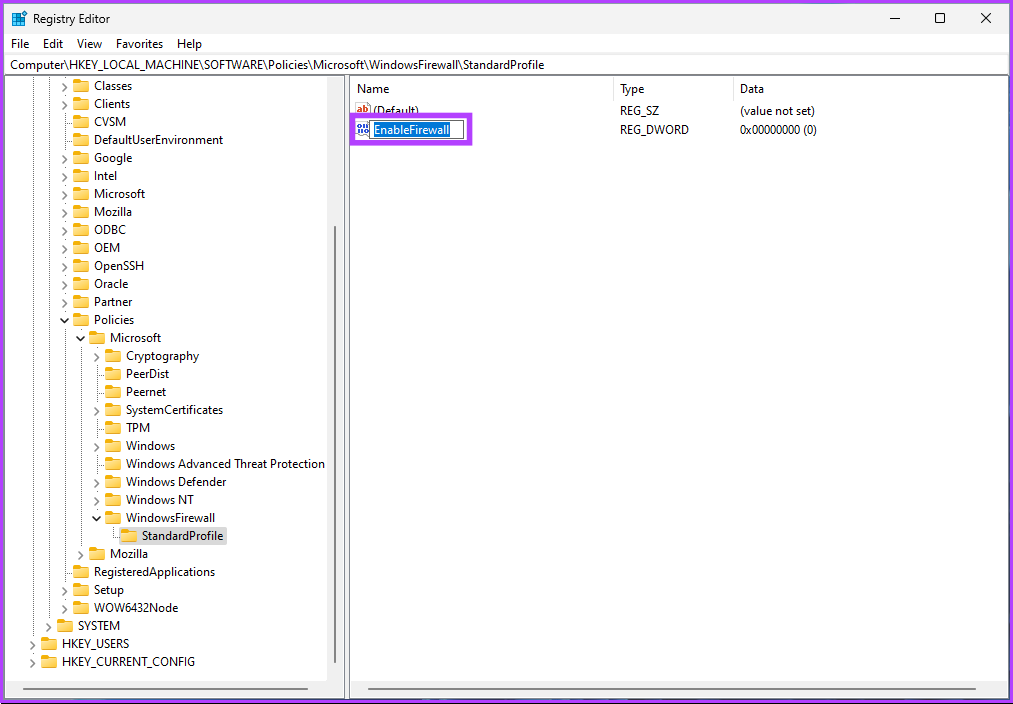
Step 5: Double-click the new value, type 0 in the Value Data field, and press OK.
Finally, reboot the system to implement the changes. And that’s it! When the system boots back up, the firewall on Windows will be disabled. If you don’t want to disable the firewall from the registry, you can use the Group Policy editor.
Method 6. How to Turn Off Firewall Using Group Policy Editor
Group Policy Editor is only available in the Windows 11 Pro and Enterprise versions. If you are using Windows 11 Home Editor, you cannot use this method.
Step 1: Press the Windows keys, type gpedit, and click Open.
Step 2: In the left pane, under Local Computer Policy, select Computer Configuration.

Step 3: In the right pane, double-click on Administrative Templates.
Step 4: Select Network.

Step 5: Under the Network option, locate and click on Network Connections.
Step 6: Navigate to Windows Defender Firewall.

Step 7: Select Standard Profile.
Step 8: In the right pane, select Windows Defender Firewall: Protect all network connections.

Step 9: Select Disabled > click on Apply > OK.
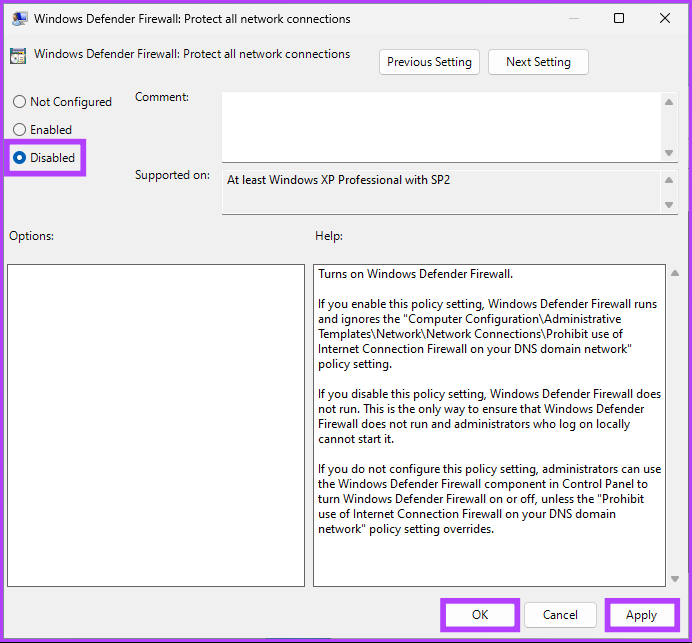
There you go. Now, all you need to do is reboot Windows. And once it boots back up, the Windows Firewall will be disabled.
FAQs
1. Does disabling the firewall increase speed?
Firewall software monitors and controls incoming and outgoing network traffic. It runs in the background and consumes minimal resources, so disabling the firewall may not affect your system performance or internet speed.
2. Is it better to have the firewall on or off?
A firewall is generally recommended for better security, as it helps protect your computer or network from unauthorized access, hackers, and malware. However, in some cases, it may cause connectivity issues. Before disabling the firewall settings, it is recommended that you check the firewall settings.
3. How to disable the firewall for Minecraft?
Here’s how to disable the firewall for Minecraft: Press the Windows key, type Windows Defender Firewall > select Allow an app or feature through Windows Defender Firewall > select Change Settings > under Allow apps to communicate through Windows Defender Firewall, check the box for Minecraft.
Was this helpful?
Thanks for your feedback!
The article above may contain affiliate links which help support Guiding Tech. The content remains unbiased and authentic and will never affect our editorial integrity.
The Microsoft Defender Firewall is a security feature in Windows 10 that monitors all network traffic, both incoming and outgoing, and either allows or blocks it based on a set of rules designed to keep your system safe from hackers. Although it is advised that the firewall always be active, there are times when turning it off is necessary, such as if you need to test an app connection or if you wish to utilize a different firewall solution.
However, if you don’t know how to Turn Off Firewall Windows 10 and looking for a way to do it, you’ve come to the right spot. In this article, you’ll discover the finest ways to turn off Windows 10 firewalls. Let’s get going!

Method 1. Turn off The Firewall in Windows 10 using Control Panel
The first and the most direct method to turn off the firewall in Windows 10 is Control Panel. The Control Panel in Microsoft Windows is where you can modify the operating system’s settings. It’s a collection of software applications that enable you to install and uninstall programs, manage user accounts, change accessibility settings, and tweak your network configuration.
To turn off the firewalls on your Windows 10 PC using Control Panel, follow the steps below:
Step 1. In the Search menu, search Control Panel, and launch it by clicking on it.
Step 2. Now, click on the «System and Security» option, and go to Windows Defender Firewall
Step 3. Next, you’ll need to click the «Turn Windows Firewall on or off» option to proceed.

Step 4. To turn off the firewall for the private network, go to the Private network settings section, and check the Turn off Microsoft Defender Firewall checkbox. Moreover, to deactivate the firewall for the public network, check the Turn off Microsoft Defender Firewall checkbox that is located under the Public network settings section of the Customize Settings window.
Note: It is not necessary to disable both firewalls; you can select according to your needs.

Step 5. Once you’re done selecting the boxes, click «OK» to disable the firewall and apply the settings.
Method 2. Turn off The Firewall in Windows 10 with Windows Security
Another method for turning off the firewall of your Windows 10 PC is by using Windows Security. Windows 10 comes with Windows Security, an antivirus program that offers the most recent antivirus protection. When you start Windows, your device will be actively secured against potential threats because of Windows Security. It is integrated to perform routine scans to look for malware, viruses, and other potential security risks. In addition to this protection in real-time, updates will be downloaded automatically to assist in maintaining the security of your device and warding off any dangers with Windows Security.
To turn off Windows Firewall via Windows Security, follow the steps below:
Step 1. Go to the Search menu on your Windows 10, and type Windows Security. Click on it to open the tool.
Step 2. Select Firewall & network protection either from the sidebar or the front menu.
Step 3. Now, you will see three different types of Windows firewalls, i.e. Domain network, Public network, and Private network.
Step 4. Now, click on the firewall you wish to disable. After that, toggle the switch to OFF under the Microsoft Defender Firewall option. You can do it for any of the three types.
Note: if you wish to turn off the firewall from your Windows 10 PC completely, you need to turn off each of the three firewalls by following the above guideline.
Method 3. Turn off The Firewall in Windows 10 with The Command
The last and a little complicated method for people who are not tech-savvy to turn off the Windows 10 firewall is by using the Command Prompt. It’s a program included in Windows 10 that acts as an interpreter for commands. One uses it to get their commands carried out on Windows PC. Most of these commands automate routine work in Windows through scripts and batch files, carry out complex administrative tasks, or investigate and resolve certain Windows problems.
To turn off the Windows 10 firewall via Command Prompt, follow the steps below:
Step 1. Go to the Search menu, type either CMD or Command Prompt and launch this Windows terminal by clicking on it.
Step 2. Type netsh advfirewall set domainprofile state off on your Command Prompt, and press Enter to disable the Domain Network Firewall. You can run the same command by typing publicprofile or privateprofile instead of domainprofile to disable the Public or Private Network Firewall.
Step 3. You can turn off all the firewalls on Windows 10 at one go by typing netsh advfirewall set allprofiles state off and pressing Enter.

Conclusion
Microsoft integrated a firewall in Windows 10 to protect your system from viruses, third-party malware, and other security risks. Although it is not recommended that you turn off the firewall on Windows PC, there are situations when you need to. However, some people are unaware of it. To help them out, we provided three built-in methods to Turn Off Firewall Windows 10 in this article. So, disable your firewall today and start testing your network connections!