
Все способы:
- Вариант 1: Панель быстрого доступа «Проводника»
- Вариант 2: Главное меню
- Способ 1: Системные «Параметры»
- Способ 2: Редактирование реестра
- Способ 3: Групповая политика
- Вопросы и ответы: 1
Вариант 1: Панель быстрого доступа «Проводника»
По умолчанию в штатном «Проводнике» отображается панель быстрого доступа, где можно увидеть недавние файлы и часто используемые папки. Если это доставляет неудобство, то можно вручную отключить последние данные в Windows 10:
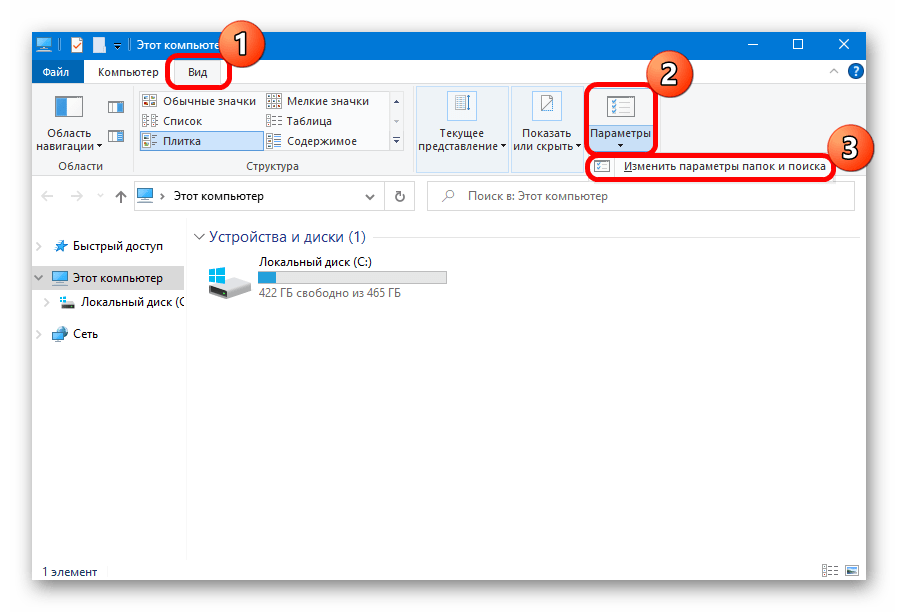
- Через верхнюю панель с инструментами «Проводника» перейдите на вкладку «Вид», затем нажмите на плитку «Параметры» и выберите «Изменить параметры папок и поиска».
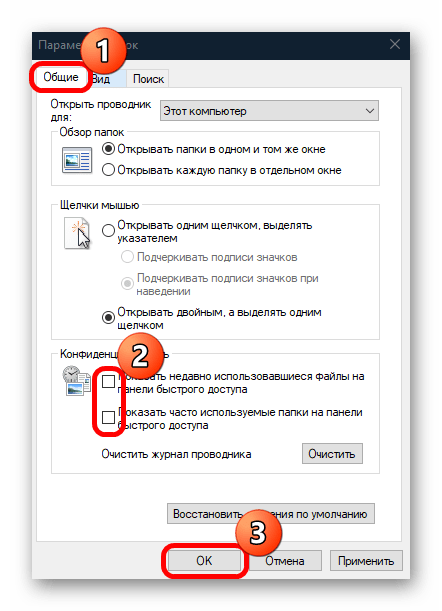
- На вкладке «Общие» в блоке «Конфиденциальность» снимите галочки у обеих опций и сохраните настройки. При желании можно еще очистить журнал «Проводника», кликнув по соответствующей кнопке.
Как только настройки будут применены, перейдя в панель быстрого доступа, вы увидите, что список последних файлов пропал.
Если нужно, чтобы в перечне недавно используемых данных не было конкретных файлов, то убрать их оттуда можно через контекстное меню: кликните по нему правой кнопкой мыши и выберите пункт «Удалить из панели быстрого доступа».
Вариант 2: Главное меню
При поиске программы в главном меню Windows 10 может отображаться список последних файлов, которые были открыты или отредактированы через это приложение. Но существует несколько способов отключить последние файлы в меню «Пуск».
Все методы подойдут и для Варианта 1, поскольку с их помощью еще и убираются файлы из панели быстрого доступа «Проводника».
Способ 1: Системные «Параметры»
В первую очередь проверьте настройки персонализации. Здесь можно настроить внешний вид главного меню:
- Кликните по кнопке «Пуск» и выберите «Параметры».
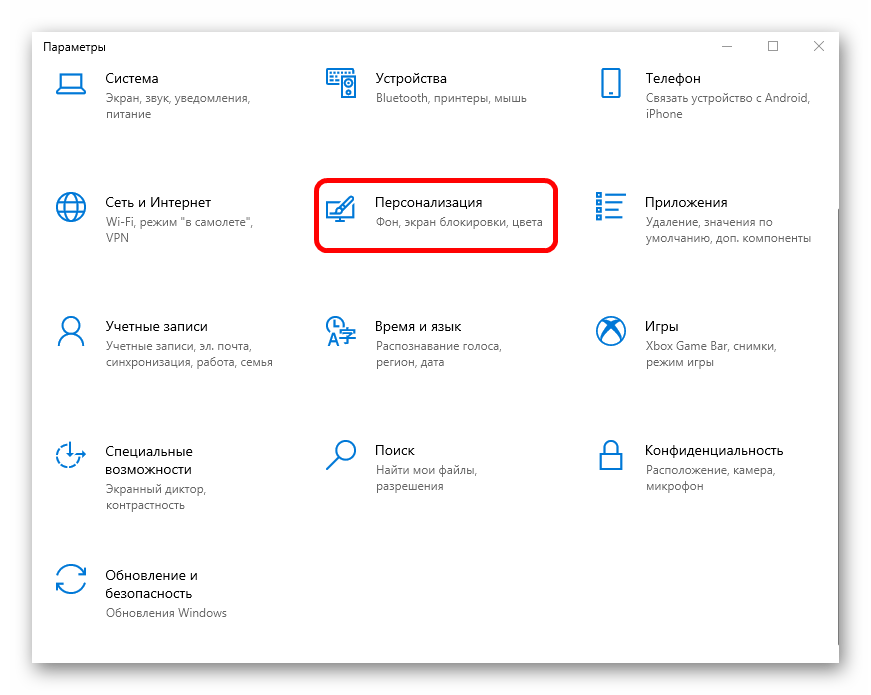
- Перейдите в раздел «Персонализация».
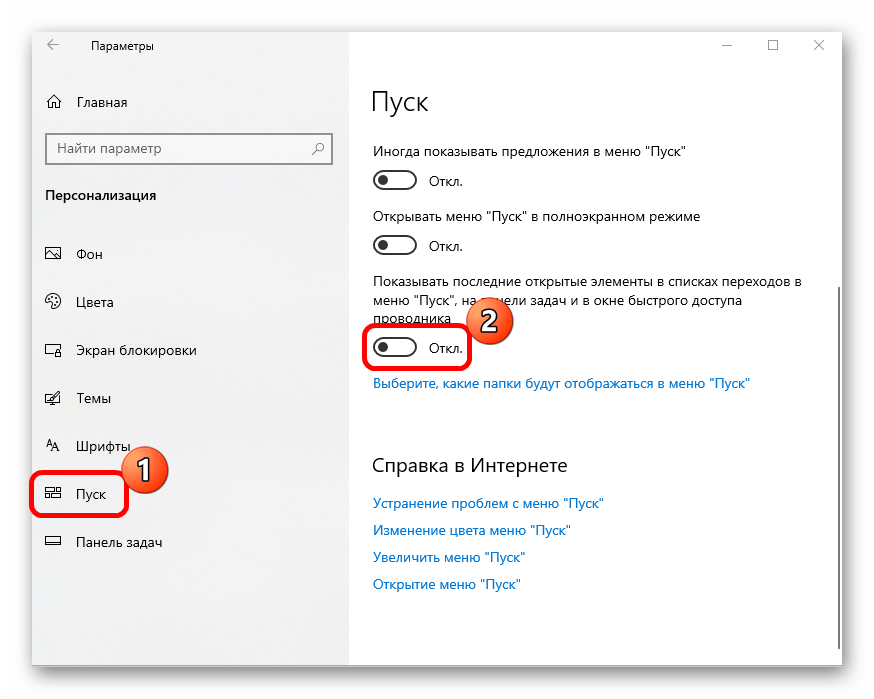
- На панели слева переключитесь на вкладку «Пуск», затем в центральной части окна переведите тумблер в состояние «Откл.» у опции показа последних файлов в меню «Пуск» и «Проводнике».
Следует отметить, что раздел «Персонализация» не доступен в неактивированной версии Windows 10.
Читайте также: Активация операционной системы Windows 10
Способ 2: Редактирование реестра
Если предыдущие способы не подходят, попробуйте изменить ключ в системном реестре, который отвечает за эту возможность.
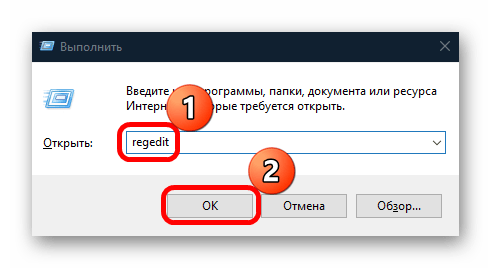
- Нажмите на клавиши «Win + R», затем введите команду
regeditи нажмите на кнопку «ОК», чтобы запустить штатный «Редактор реестра». - Разверните ветку
HKEY_CURRENT_USER\Software\Microsoft\Windows\CurrentVersion\Explorer\Advanced, вставив в адресную строку путь. Дважды кликните по параметру «Start_TrackDocs», расположенный правее. - В появившемся окне измените значение на «0» и сохраните новые свойства ключа.
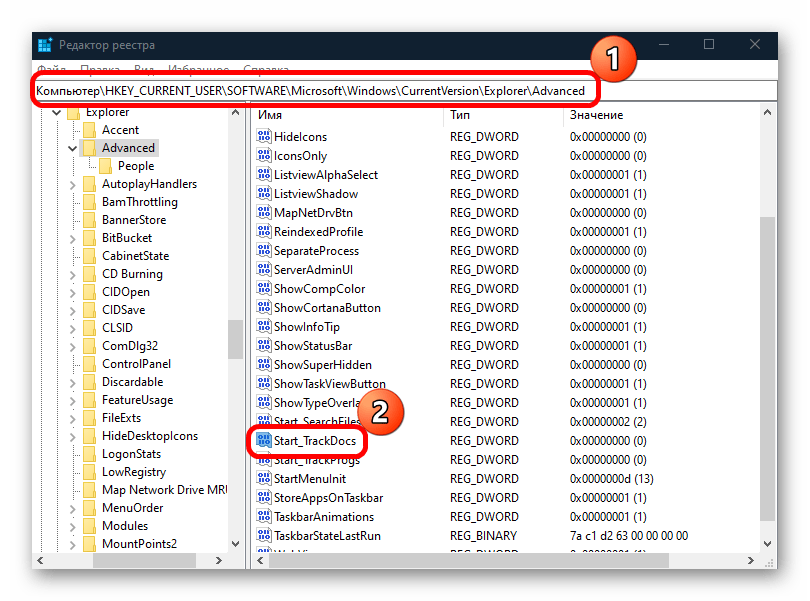
После процедуры перезагрузите компьютер, затем проверьте, отображаются ли последние файлы в главном меню или «Проводнике».
Способ 3: Групповая политика
Этот вариант подойдет для владельцев Windows 10 редакций Professional или Enterprise, потому как в них реализован удобный инструмент для управления и редактирования различных параметров системы компьютеров в рамках приложения «Редактор локальной групповой политики».
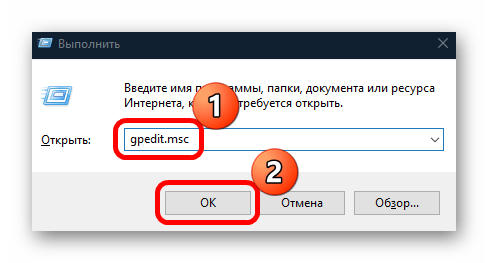
- Запустите окно инструмента, выполнив в оснастке «Выполнить» команду
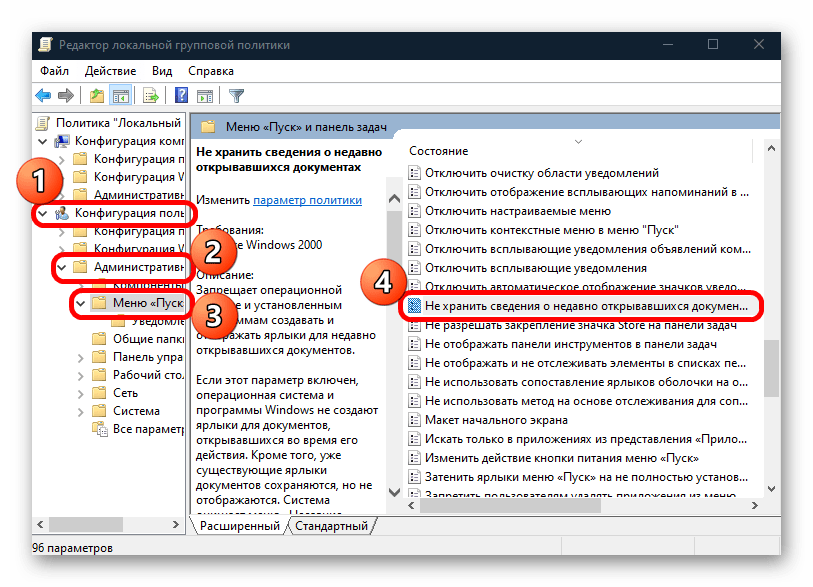
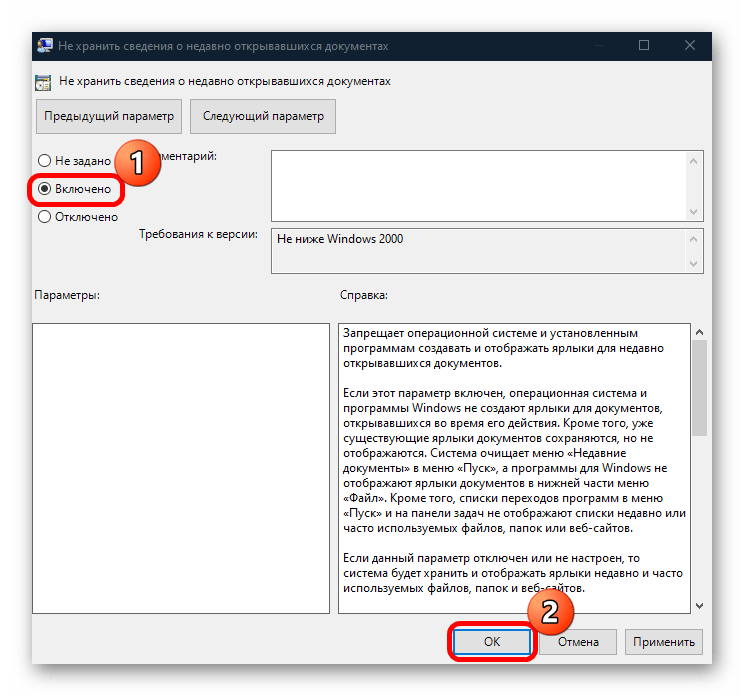
gpedit.msc. - В меню «Конфигурация пользователя» разверните список «Административные шаблоны», затем «Меню «Пуск»». В центральной части окна дважды кликните по пункту «Не хранить сведения о недавно открывавшихся документах».
- Далее отметьте пункт «Включено», затем нажмите на кнопку «ОК».
Читайте также: Почему не открывается «Редактор локальной групповой политики» в Windows 10
Наша группа в TelegramПолезные советы и помощь
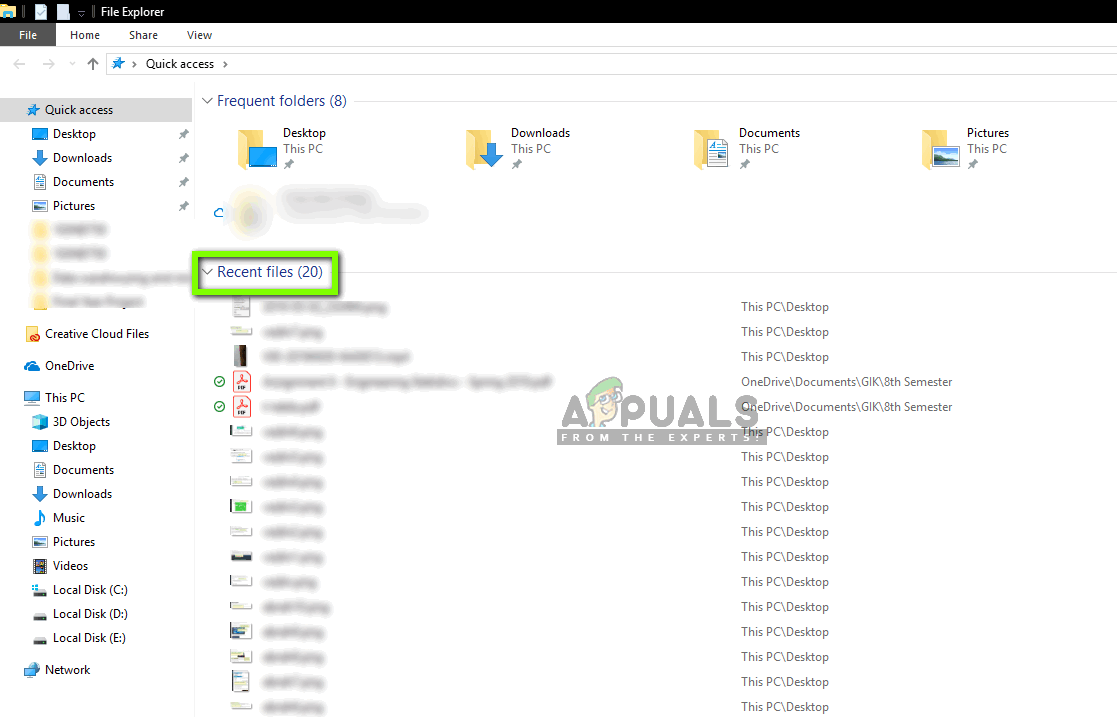
Windows 10 comes with an easy to use interface and better security features than its predecessors. One of the new features added in it is the “Recently Opened Files” feature that displays the user’s recently opened files in the File Explorer. However, this feature generates some privacy concerns if more than one person uses the same Computer. Therefore, in this article, we will guide you with the methods to disable this feature.
The “Recent Files” feature might be a privacy concern for some people and here we will teach you how to disable it permanently. In order to disable it, you can apply three methods that are listed below.
Method 1: Clear Recent Files Manually
Information about the recently opened files is stored in the form of cached data. You can locate this data and manually delete it from time to time. In order to do that:
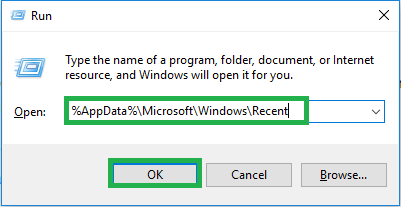
- Press the “Windows” + “R” key simultaneously to open the “Run” Prompt.
Opening Run Prompt - Copy the following address into it
%AppData%\Microsoft\Windows\Recent

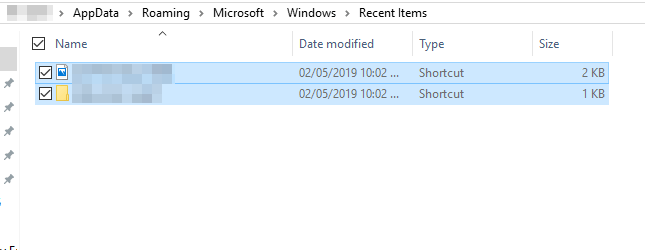
Typing the Address in the Run prompt - Click on “OK“, press “Ctrl” + “A” and then press “Shift” + “Delete” simultaneously.

Pressing “Ctrl” + “A” to select all the files - Click on “Yes” in the prompt.
- All the “Recent Files” displayed in the File Explorer will now be gone.
Method 2: Disabling through the Group Policy Editor
If you are using the “Pro” version of Windows 10, then you can access the Group Policy Editor. The Group Policy Editor can be used to modify any type of settings for your Windows 10. In this method, we will be disabling the history of recently open files through the Group Policy Editor. Follow the below steps:
If you are using Windows Home Edition, then skip this method. Check the Registry Editor method, it will work similarly to this method.
- Press “Windows” + “R” on your keyboard to open the “Run” Prompt.
Opening Run Prompt - Type in the following command in it and click on “OK”
gpedit.msc
Typing “gpedit.msc” in the Run prompt - Click on the “User Configuration” option and then on the “Administrative Templates” one.
Clicking on “User Configuration” and then on “Administrative Templates”. - Select the “Start menu and Taskbar” option and in the right pane select the “Don’t keep the history of recently opened documents” option.
Selecting “Start Menu and Taskbar”. - Double click on it and check the “Enabled” option.

Selecting “Enabled” - Click on “Apply” and then on “OK“.

Method 3: Disabling through Control Panel
Another way to disable the recent files panel is through the Control Panel. In order to disable them from the Control Panel:
- Click on the “Start Menu” button and select the “Settings” icon.
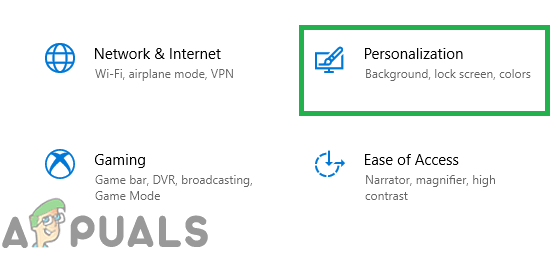
Clicking on the start menu and selecting the settings icon - Click on “Personalization” and then on “Start” in the left pane.

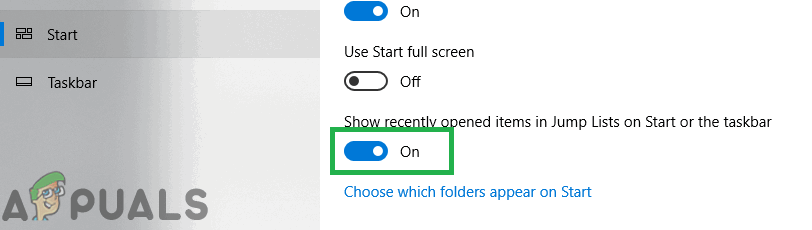
Clicking on “Personalization” - Scroll to the bottom and click on the “Show recently opened items in Jump Lists on the Start or the Taskbar” toggle to turn it off.

Clicking on the toggle to turn it off
Method 4: Disabling through the Registry Editor
You can also disable the history of the recent files through the Registry Editor. If you used the Group Policy Editor method, then your Registry will automatically update the values for this. However, if you are using this without configuring Group Policy Editor, then you need to create the missing key/value for it to work.
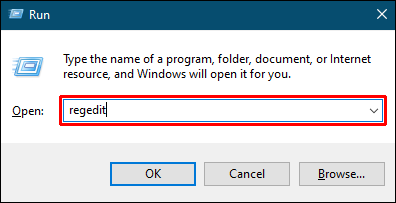
- Press “Windows” + “R” keys on your keyboard to open the Run dialog. Then type “regedit” and click on “Ok” to open Registry Editor.
Note: Choose “Yes” for the UAC (User Account Control) prompt.Opening the Registry Editor - Navigate to the following key in the Registry Editor window:
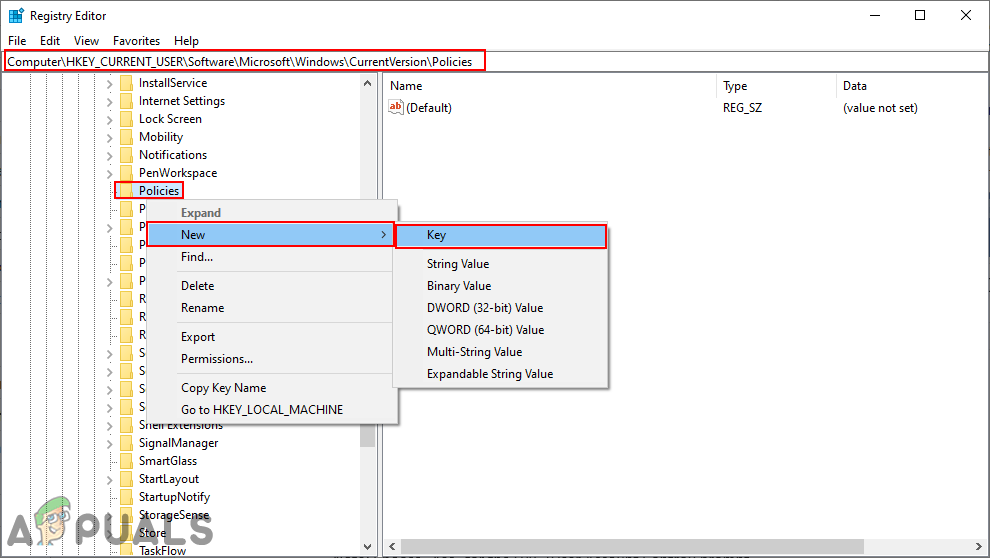
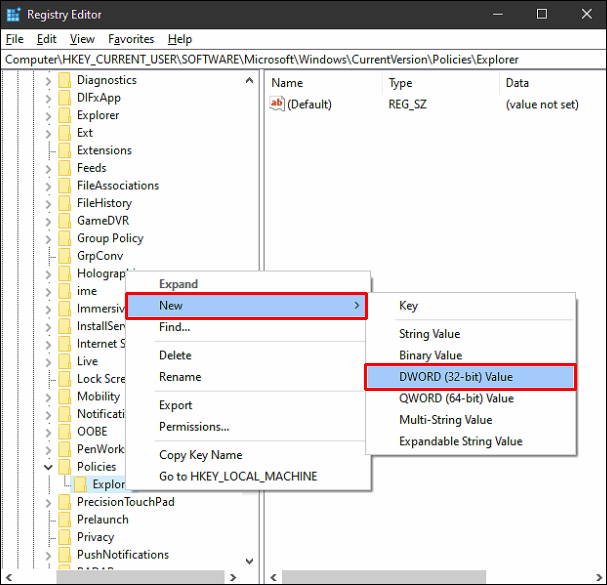
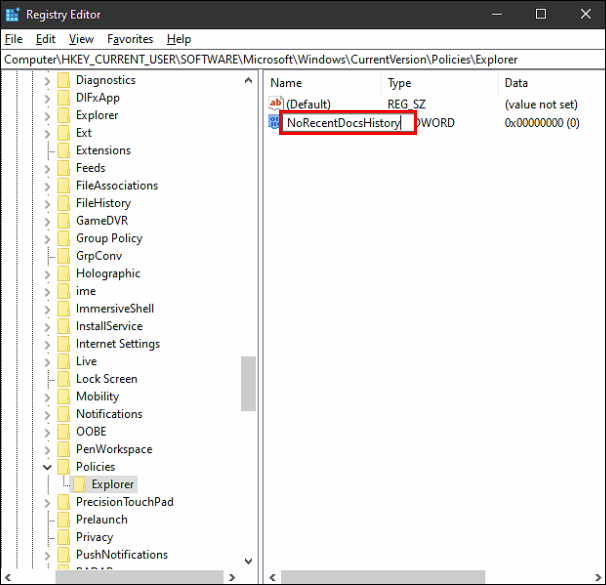
HKEY_CURRENT_USER\Software\Microsoft\Windows\CurrentVersion\Policies\Explorer
- If the “Explorer” key is missing, you can simply create it by right-clicking on the Policies key and choosing New > Key. Name the key as “Explorer“.

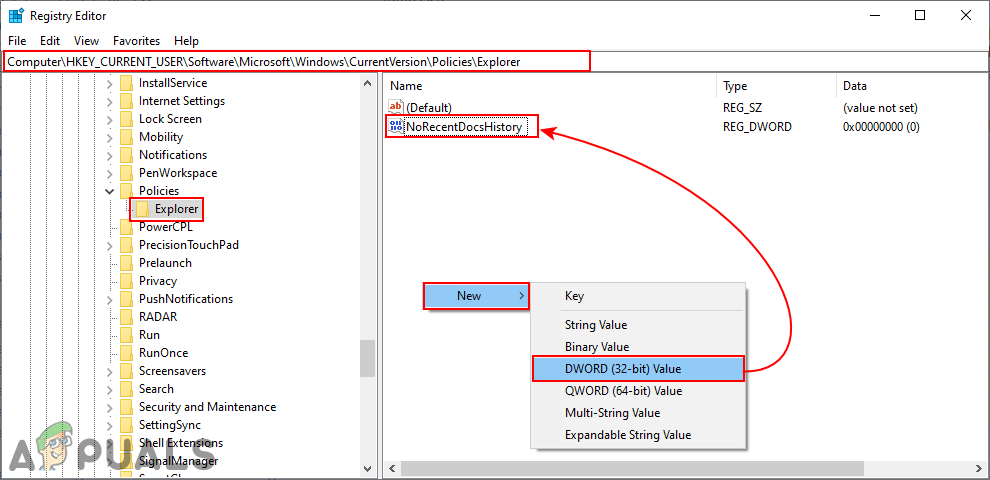
Creating a missing key - Select the Explorer key, right-click on the right pane and choose New > DWORD (32-bit) Value. Name this value as “NoRecentDocsHistory“.

Creating a new value - Double-click on the value and set the value data to “1“.
Note: Value data 1 is for enabling a value and value data 0 is for disabling value.Enabling the value - After all the modifications, make sure to restart your computer to apply the newly created settings.
Kevin Arrows
Kevin Arrows is a highly experienced and knowledgeable technology specialist with over a decade of industry experience. He holds a Microsoft Certified Technology Specialist (MCTS) certification and has a deep passion for staying up-to-date on the latest tech developments. Kevin has written extensively on a wide range of tech-related topics, showcasing his expertise and knowledge in areas such as software development, cybersecurity, and cloud computing. His contributions to the tech field have been widely recognized and respected by his peers, and he is highly regarded for his ability to explain complex technical concepts in a clear and concise manner.
[symple_box color=”blue” fade_in=”false” float=”center” text_align=”left” width=””]An updated guide can be found by clicking here. This guide is still accurate but has not been updated for the latest Windows 10 version.[/symple_box]
Windows 10 saves by default 20 recent files in your home folder when using your system. However if you’re keen to your privacy you might not like it that Windows does this. We’ll explain you how you can disable it.
1. Right-click the Start icon in your task bar and then Click on Control Panel
2. Then Click on Appearance and Personalization
3. Then Click on Taskbar and Navigation
4. Click on the Tab Start Menu
5. Uncheck the Boxes under Privacy.
That’s all. You should no longer see a history under applications and within File Explorer.
Windows 10 has many advanced features for day-to-day use designed to improve your productivity. One of these is the “Recent Files” section, which stores information about recently used documents and folders.
If you’re the sole user of your PC, you’ll probably find this quick access folder quite convenient. You’ll be able to quickly carry on from where you left off before you last shut down your device. You don’t have to open specific folders to view the files you opened last. But if you share your PC with your family, friends, or colleagues at work, you probably won’t be too comfortable sharing what you’ve been working on with everyone.
The good news is that you can clear or turn off Recent Files in just a few clicks. This article will show you how to go about it.
The Recent Files menu is a simple, yet powerful and convenient Windows feature that enables quick access to your most recently used items. It also allows you to quickly open any one of those items again without having to go through the normal process for opening an item. If you’re working on multiple documents each day, this will save time when trying to find what you need to work with next.
To further increase the efficiency of your computer, you may opt to pin specific files that are frequently accessed. Pinned files will always be part of the Recent Files list, no matter how long you go without accessing them.
Most applications in Windows also display a list of the most recently used or the most recently created items as soon as you open them. For example, Microsoft Word will show all recent documents, Microsoft Excel will show all recent worksheets, and Internet Explorer will display all the websites you’ve visited recently.
The Windows 10 algorithm behind the Recent Files menu is designed to work as follows:
- Files are ordered in chronological order, with the most recently used file appearing at the top of the list.
- The default number of items listed is 10, but the user can increase this number by adjusting markup.
- Over time, older items will move down the list as newer items take up positions at the top of the list.
- If you open an item that’s already on the list, then that item will move back to the top of the list.
- Pinned items will move up and down the list like any other items, but they will never vanish.
- If the number of items you’ve pinned to the list equals the maximum number specified in markup, there will be no new additions to the list until some items are unpinned.
How to Clear Recent Files in Windows 10
There are several ways to clear your Recent Files history in Windows 10:
(a) Using the File Explorer Icon in the Task Bar
- Launch File Explorer on your computer. By default, the File Explorer icon is pinned to your taskbar. The icon itself is shaped like a suitcase with a pale blue handle.

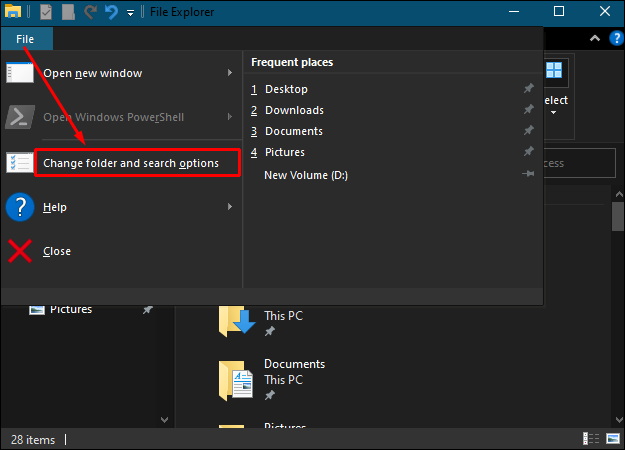
- Once the File Explorer window opens, click on File in the top left corner and then select Change folder and search options.

- Under Privacy, click on Clear. This will immediately clear your Recent Files history, and you’ll now start populating the list afresh.


Unlike most commands in Windows 10, clearing Recent Files doesn’t come with a confirmation dialog box. Your recent files are cleared immediately without any further action.
(b) Clearing Recent Files Manually
Any files you open on your PC are automatically stored in the form of cached data. If you want to wipe clean your Recent Files menu, you can find this information and safely delete it. Here’s how:
- Open the Run window by typing “run” in the search bar in the bottom left corner of your screen. Alternatively, press the Windows key + R simultaneously.

- Type the following command in the Run prompt:
%AppData%\Microsoft\Windows\Recent\
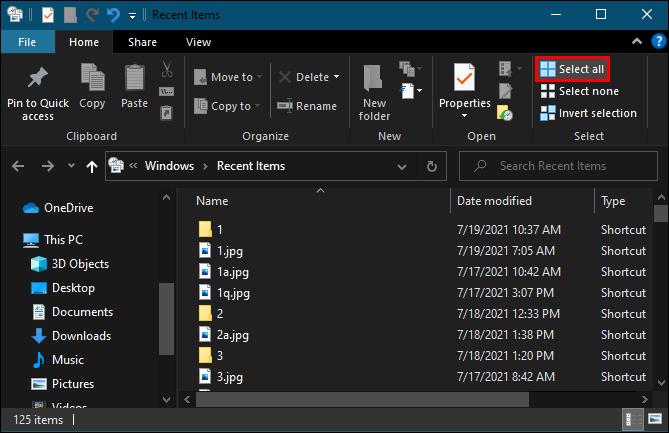
- Click on Select all in the menu bar.

- Once you’ve selected all the items in the list, click on Delete and then select Permanently delete from the dropdown menu. At this point, all the files you’ve accessed recently will disappear from File Explorer.
How to Disable Recent Files in Windows 10
Recent Files is undoubtedly a nifty feature that allows you to quickly jump back to your most recently used documents or folders. However, this feature also comes with more clutter. There will be more and more items in your File Explorer as you continue using your computer. If you’d rather start with a clean slate every time you log on, you need to disable Recent Files permanently. There are several ways to do it. Let’s see how each works:
(a) Disabling Through the Group Policy Editor
If your computer runs on the “Pro” version of Windows 10, you can use the Group Editor Policy to modify various settings on your system.
The Group Policy Editor is a tool that can be used to manage policies and settings within Windows configuration. It’s most commonly used to manage password policies, controls for system security, or account-related options on computers in an organizational domain. It may also be possible to use this tool with your home computer. However, you should consult the documentation for your device before attempting any changes.
Here’s how you can clear your Recent Files history using the Group Editor Policy:
- Open the Run window by typing “run” in the search bar in the bottom left corner of your screen. Alternatively, press the Windows key and “R” simultaneously.
- Type the following command in the Run prompt:
gpedit.msc - Click on OK to run the command. This should launch the “Local Group Policy Editor” window.
- Under User Configuration, click on Administrative templates.
- Double click on Start Menu and Taskbar.
- Double click on Remove recent items menu from Start Menu.
- From the resulting window, select the Enabled option and then click on OK.
(b) Disabling Through the Control Panel
The control panel can help you to tweak your system so that it will never keep track of your files history no matter how often you use a program or application. To disable Recent Files using this approach:
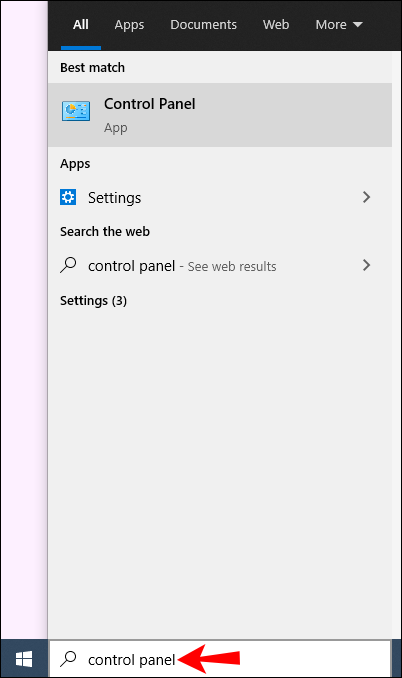
- Type “
control panel” in the windows search bar.
- Once the control panel opens, click on Appearance and Personalization.

- Click on Taskbar and Navigation.
- Click on Start.

- Turn off the button next to Show recently opened items in Jump Lists on the Start or the Taskbar.


(c) Disabling Through the Registry Editor
To disable Recent Files through the Registry Editor:
- Open the Run window by typing “run” in the search bar in the bottom left corner of your screen. Alternatively, press the Windows key + R simultaneously.
- Type the following command in the Run prompt:
regedit
- Click on OK to run the command. This should launch the “Registry Editor” window.
- Open the following key:
HKEY_CURRENT_USER\Software\Microsoft\Windows\CurrentVersion\Policies\Explorer
- Right-click on the right pane, click on New >DWORD (32-bit) Value from the dropdown. This will instantly create a new value named “New Value #1.”

- Rename the name as “NoRecentDocsHistory.”

- Right-click on the new value and then click Modify.

- Enter 1 under Value data and then click OK.
- Restart your computer.


After restarting your computer, Windows will no longer display your Recent Files menu in File Explorer.
Additional FAQs
1. Why should I clear recent files from time to time?
Clearing Recent Files frequently comes with several benefits. First, you’re able to declutter your system and ensure that important documents do not accidentally get deleted or overwritten. Second, no one will be able to track your Windows usage history if you share your computer with others. In addition, a packed File Explorer can slow down your computer and make it take much longer to start up. It can also lead to other problems, such as out-of-memory errors or error messages that pop up when you work with certain programs, slowing your overall PC performance.
2. How can I delete individual files from recent files?
If you want to clear some items and keep others:
1. Open the Run window by typing “run” in the search bar in the bottom left corner of your screen. Alternatively, press the Windows key + R simultaneously.

2. Type the following command in the Run prompt:
%AppData%\Microsoft\Windows\Recent\

This should launch a new window with a list of your entire Recent Files history.
3. Click on the specific item you’d like to delete.
4. Click on Delete and then select Permanently delete from the dropdown menu. At this point, the item you’ve selected will no longer be in the Recent Files window.

3. How can I hide recent files in File Explorer?
If you want to get rid of the Recent Files list without tweaking your system too much, you may be better served by hiding the list altogether. Here’s how:
1. Launch File Explorer on your computer.

2. Click File in the top left corner and then select Change folder and search options.
3. Under Privacy, uncheck the boxes next to Show recently used files in Quick access and Show frequently used folders in Quick access.

4. Click OK to save your new settings.

Keep Your History Private
Windows 10 is designed with privacy in mind. If you don’t want others viewing what you have been writing or using recently, you should either clear or turn off Recent Files on your computer. In this article, we’ve shown you how to go about it.
Why do you like clearing your Recent Files history from time to time? How exactly do you do it?
Let us know in the comments section below.
Disabling Recent Files in Windows 10 can help you maintain privacy and keep your Start Menu and Quick Access clutter-free. All you need to do is tweak a few settings in the Windows 10 interface. Here’s a straightforward guide to get you through it.
We’ll walk you through the steps to disable recent files in Windows 10. These simple steps will prevent your recent files from showing up in the Start Menu and the Quick Access section of File Explorer.
Step 1: Open File Explorer
First, open File Explorer by clicking on its icon on the taskbar or pressing the Windows key + E.
This will open a new File Explorer window, which is crucial for changing the settings we need to adjust.
Step 2: Access Folder Options
Next, click on the “View” tab at the top of the File Explorer window. Then, select “Options” on the right side of the toolbar to open the Folder Options dialog.
Folder Options allow you to customize how your files and folders are displayed and managed in Windows.
Step 3: Navigate to the Privacy Section
In the Folder Options dialog, go to the “Privacy” section located at the bottom.
This section contains settings specifically related to the display of recent files and folders.
Step 4: Uncheck Recent Files Options
Uncheck both “Show recently used files in Quick access” and “Show frequently used folders in Quick access” options.
By unchecking these boxes, you prevent Windows from displaying your recent files and frequently used folders.
Step 5: Apply and Save Changes
Finally, click “Apply” and then “OK” to save your changes.
This will ensure your settings are updated, and recent files will no longer appear in Quick Access.
After completing these steps, you will no longer see recent files in the File Explorer and Start Menu. Your recent activities will remain private and your Quick Access section will be less cluttered.
Tips for Disabling Recent Files in Windows 10
- Clear File Explorer History: Before changing settings, clear current history by clicking «Clear» in the Privacy section of Folder Options.
- Restart Your PC: Sometimes, changes take full effect after a system reboot.
- Check Other Accounts: If multiple accounts are on your PC, ensure each account has the same settings.
- Use Group Policy Editor (Pro users): For more granular control, you can use the Group Policy Editor if you have Windows 10 Pro.
- Stay Updated: Keep Windows updated to ensure all settings are applied correctly.
Frequently Asked Questions
What happens to my recent files after disabling them?
They won’t be displayed in Quick Access or the Start Menu, but they will still be available in their respective folders.
Can I still access recent files if I need to?
Yes, you can navigate to the individual folders where the files are stored or use search.
Does this setting affect all users on my PC?
No, you need to change the settings for each user account individually.
Will this impact system performance?
No, disabling recent files does not affect system performance.
Can I re-enable recent files later?
Yes, just follow the steps again and check the boxes you unchecked earlier.
Summary
- Open File Explorer.
- Access Folder Options.
- Navigate to the Privacy section.
- Uncheck recent files options.
- Apply and save changes.
Conclusion
Disabling recent files in Windows 10 is a simple yet effective way to maintain your privacy and keep your interface tidy. This guide has walked you through the process step-by-step, ensuring you can easily make these changes. By following these steps, you ensure a more private and organized system environment. Remember, you can always revert these changes if needed. For further reading, you might want to explore more advanced privacy settings in Windows 10. Happy computing!
Matt Jacobs has been working as an IT consultant for small businesses since receiving his Master’s degree in 2003. While he still does some consulting work, his primary focus now is on creating technology support content for SupportYourTech.com.
His work can be found on many websites and focuses on topics such as Microsoft Office, Apple devices, Android devices, Photoshop, and more.