
Desktop composition is a visual user experience feature that was first introduced in Windows Vista. To disable the desktop composition on Windows 7 follow the tutorial below.
How to disable desktop composition on Windows 7?
- Click on Start > Control Panel > System and Security > System
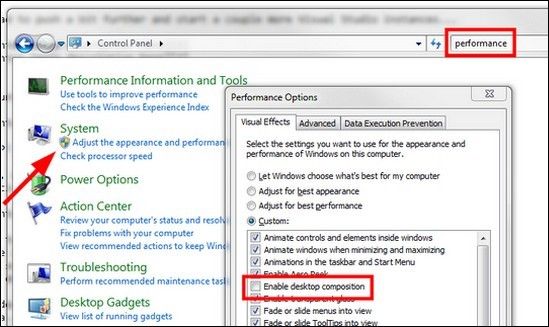
- Click on the «Advanced system settings»
- In the System Properties window, go to the Advanced tab and click on the Settings button (Performance section)
- Uncheck «Enable desktop composition»
- Click on Apply and then on OK.
visit our forum for more windows 7 related tips
You are here: Home / Windows / What Is Desktop Composition – How To Enable Or Disable It?
What is Desktop composition you ask? Well, Desktop composition is a visual experience feature, which was first introduced in Vista. This feature has completely changed the way pixels are displayed on the screen by the different applications. In this article we will discuss what desktop composition is and how to enable or disable them.
Also, check out this article on how to calibrate laptop screen on Windows 10.
So what is desktop composition, and what it means to have it enabled? Having the desktop composition enabled means that individual windows will not draw to the primary display directly as it was used to happen in earlier Windows.
The drawing of the screen is actually redirected to the off-screen surfaces in video memory. This drawing is then rendered as a desktop image and presented for us on the display.
The Desktop Window Manager (DWM) is the service behind the Desktop composition. This DWM service then enables the visual effects and the features like the Aero theme on the desktop using the Desktop composition.
How To Enable Desktop Composition?
There are a few ways you can enable the Desktop Composition in Windows 7 and Vista, which are given below. Read them carefully and you will know how to enable desktop composition.
Method 1: Enable Through The Visual Effects Settings
The first method is to enable from the Visual effects settings. Follow the steps given below to do it:
- Right-click on This PC and select the Properties option from the pop-up menu.
- Select the Advanced system settings option. System Properties app will open on your screen.
- Click on the Advanced tab and select the Settings option in the Performance section.
- Now in the Visual Effects tab, locate and check the Enable desktop composition box.
Similarly, disable desktop composition by unchecking that box.
Method 2: Enable From Services
The second method to enable it is through the Services. Follow the steps given below to do it:
- Type services.msc in the Windows search bar and select the top option to open the Services app on your screen.
- Locate the Desktop Window Manager Session Manager service and double-click on it.
- In the General tab, click on the drop-down menu beside the Startup Type and select the Automatic
- Then, click on the Start option and finally click on Apply and OK to save the changes.
Changing the Startup type to Disable will disable it.
Method 3: Enable Through Registry Editor
In the 3rd method, you will have to manually enable it through the Registry Editor. To do it, follow the steps given below:
- Type regedit in the Windows search bar and select the appropriate option.
- Navigate to the location given below:
HKEY_CURRENT_USER\Software\Microsoft\Windows\DWM - Now, double-click on the CompositionPolicy DWORD in the right pane.
- Enter 0 in the Value Data section and click on OK.
- Finally, close the Registry Editor and restart your computer.
Enter the value 1 if you want to disable it.
Method 4: Enable From The Local Group Policy Editor
In the 4th method, you will have to use the Local Group Policy Editor. To do it, follow the steps given below:
- Type gpedit.msc in the Windows search bar and select the appropriate option.
- In the left panel, first expand the User configuration option, next expand the Administrative Templates option and then expand the Windows Components.
- Now, click on the Desktop Window Manager in the left pane.
- Right-click on the Do not allow desktop composition option in the right pane and click on the Edit option from the pop-up menu.
- Select the Not Configured or Disabled option to enable Desktop composition.
- Finally, click on Apply and OK to save the changes.
Restart the computer and the desktop composition will be enabled. To disable it, select the enabled option.
How To Disable Desktop Composition In Windows 10?
The most asked questions online about Desktop composition is if it can be disabled in Windows 10. Well, there is no setting that you can use to disable Desktop Composition in Windows 10. Neither one can disable the DWM from the methods that work in Windows 7 and Vista.
From Windows 8, Microsoft has removed the ability to disable desktop composition. However, there is a way you can force close it, although we don’t recommend you trying it as many mishaps can occur trying to disable a Windows service that isn’t supposed to be disabled in Windows 10.
Steps To Disable Desktop Composition
To disable Desktop Composition in Windows 10, follow the steps given below:
- Press the Ctrl + Shift + Esc keys to open the Task Manager on your screen.
- In the Performance tab, select click on the Open Resource Monitor option.
Resource Monitor will now open on your screen.
- In the CPU section, locate the winlogon.exe and right-click on it.
- Select the Suspend process option and immediately click on the Monitoring tab and then select the Stop monitoring option. If you don’t do it quickly, then winlogon.exe can disappear and you will have to restart to get it back.
- Now, open the Task Manager again and locate the Windows Explorer in the Processes tab.
- Right-click on it and click on the End task option.
- Similarly, End task Application Frame Host, Search, Shell Experience Host, and all the other modern apps or UWP.
Note: If you don’t end the modern apps, then you will have a black screen once you end DWM later. So, you will have to blindly resume winlogon.exe, which is not an option, or restart your computer.
- Now, locate the Desktop Window Manager (DWM) in the Processes tab and also End task it.
- Next, select the File option in Task Manager and click on the Run new task option.
- Type explorer.exe and press Enter.
Now, if you want the DWM back, then you will just have to resume the winlogon.exe from the Resource monitor.
This method of disabling the Desktop composition in Windows 10 may or may not work for you. However, this method did work for us.
Wrapping Up
So, now you have the answer to “What is Desktop composition?” and also how you can enable/disable it in Windows 7 and Vista and also how to disable desktop composition in Windows 10. Follow the above steps very carefully, and we again recommend you not to try disabling the desktop composition in Windows 10. Leave your comments below in the comment section sharing your views on this article.

Disable Desktop Composition On Windows 7 Ccm This video show how to disable or enable desktop composition in microsoft windows 7 ultimate more. This will show you how to enable or disable desktop composition using different options in windows 7 and vista.
What Is Desktop Composition How To Enable Or Disable It Solved Applying the basic theme will disable desktop composition and applying your favorite theme will enable it, assuming you have it enabled in your favorite, with just a single click. How to disable desktop composition on windows 7? click on apply and then on ok. desktop composition is a visual user experience feature that was first introduced in windows vista. to disable the desktop composition on windows 7 follow the tutorial below. How to enable or disable desktop composition in windows 7 and vista the desktop composition visual experience feature, introduced since vista, fundamentally changed the way applications display pixels on the screen. when desktop composition is enabled, individual windows no longer draw directly. Method 2: disable desktop composition: a. press windows key pause break key, it will show you the system windows. b. click on advanced system settings on left pane. d. click on settings under performance. e. under visual effects, select custom, uncheck the enable desktop composition. f. click on apply and then ok. g. reboot the computer.
What Is Desktop Composition How To Enable Or Disable It Solved How to enable or disable desktop composition in windows 7 and vista the desktop composition visual experience feature, introduced since vista, fundamentally changed the way applications display pixels on the screen. when desktop composition is enabled, individual windows no longer draw directly. Method 2: disable desktop composition: a. press windows key pause break key, it will show you the system windows. b. click on advanced system settings on left pane. d. click on settings under performance. e. under visual effects, select custom, uncheck the enable desktop composition. f. click on apply and then ok. g. reboot the computer. About press copyright contact us creators advertise developers terms privacy policy & safety how works test new features nfl sunday ticket press copyright. How to enable desktop composition? there are a few ways you can enable the desktop composition in windows 7 and vista, which are given below. read them carefully and you will know how to enable desktop composition. method 1: enable through the visual effects settings. the first method is to enable from the visual effects settings. Open control panel. click performance information and tools. select adjust visual effects. check enable desktop composition. note: after enabling desktop composition, there may be a transparent effect. if the operating system is windows 7 home basic, use the following steps to enable the function. Through desktop composition, dwm enables visual effects on the desktop as well as various aero features such as thumbnail previews, aero themes, glass window frames (transparency), 3 d window transition animations, windows flip and windows flip3d, and high resolution support.
What Is Desktop Composition How To Enable Or Disable It Solved About press copyright contact us creators advertise developers terms privacy policy & safety how works test new features nfl sunday ticket press copyright. How to enable desktop composition? there are a few ways you can enable the desktop composition in windows 7 and vista, which are given below. read them carefully and you will know how to enable desktop composition. method 1: enable through the visual effects settings. the first method is to enable from the visual effects settings. Open control panel. click performance information and tools. select adjust visual effects. check enable desktop composition. note: after enabling desktop composition, there may be a transparent effect. if the operating system is windows 7 home basic, use the following steps to enable the function. Through desktop composition, dwm enables visual effects on the desktop as well as various aero features such as thumbnail previews, aero themes, glass window frames (transparency), 3 d window transition animations, windows flip and windows flip3d, and high resolution support.
What Is Desktop Composition How To Enable Or Disable It Solved Open control panel. click performance information and tools. select adjust visual effects. check enable desktop composition. note: after enabling desktop composition, there may be a transparent effect. if the operating system is windows 7 home basic, use the following steps to enable the function. Through desktop composition, dwm enables visual effects on the desktop as well as various aero features such as thumbnail previews, aero themes, glass window frames (transparency), 3 d window transition animations, windows flip and windows flip3d, and high resolution support.
Enable or Disable Desktop Composition in Windows 7
Information
The desktop composition feature was introduced in Vista, it fundamentally changed the way applications display pixels on the screen. When desktop composition is enabled, individual windows no longer draw directly to the screen or primary display device as they did in previous versions of Windows. Instead, their drawing is redirected to off-screen surfaces in video memory, which are then rendered into a desktop image and presented on the display.
Desktop composition is performed by the Desktop Window Manager Session Manager (DWM) service. Through desktop composition, DWM enables visual effects on the desktop as well as various Aero features such as thumbnail previews, Aero themes, glass window frames, 3-D window transition animations, Windows Flip and Windows Flip3D, and high resolution support.
This will show you how to enable or disable Desktop Composition using different options in Windows 7 and Vista.
Note
Windows 7 Starter and Home Basic editions do not have the Aero feature included.
OPTION ONE
Through Visual Effects Settings
1. Open the Visual Effects settings window in Performance Options.
2. To Enable Desktop Composition
A) Check the Enable desktop composition box, and click on OK. (see screenshot below)
NOTE:
This is the default setting.

3. To Disable Desktop Composition
A) Uncheck the Enable desktop composition box, and click on OK. (see screenshot above)
OPTION TWO
Through Services
NOTE:
This option will affect all users on the computer.
1. Open the Services window, and select the Desktop Window Manager Session Manager service. (see screenshot below)

2. Right click on Desktop Window Manager Session Manager, and click on Properties. (see screenshot above)
3. To Enable Desktop Composition
A) Set the Desktop Window Manager Session Manager service to Automatic and Start it. (see screenshot below)
NOTE:
This is the default setting.

B) Check to make sure that you also have desktop composition enabled using one of the other options in this tutorial as well. Both are required to be enabled.
4. To Disable Desktop Composition
A) Stop and set the Desktop Window Manager Session Manager service to Disabled. (see screenshot above)
OPTION THREE
Manually Through Registry Editor
1. Open the Start Menu, then type regedit in the search boxand press Enter.
2. If prompted by UAC, then click on Yes (Windows 7) or Continue (Vista).
3. In regedit, navigate to the location below. (see screenshot below)
HKEY_CURRENT_USER\Software\Microsoft\Windows\DWM

4. In the right pane, double click on CompositionPolicy. (see screenshot above)
5. To Enable Desktop Composition
A) Type in 0, and click on OK. (see screenshot below)
NOTE:
This is the default setting.

B) Go to step 7.
6. To Disable Desktop Composition
A) Type in 1, and click on OK. (see screenshot above)
7. Close regedit.
8. Log off and log on, or restart the computer to apply the changes.
Quick Links
You know your computer isn’t cutting edge, but there’s no need for Windows 7 to constantly remind you. Read on to see how you can disable its constant nagging to adjust your color scheme to improve performance.
Today’s Question & Answer session comes to us courtesy of SuperUser—a subdivision of Stack Exchange, a community-drive grouping of Q&A web sites.
The Question
SuperUser reader William Stewart is sick of Windows 7 nagging him:
Sometimes this dialog box will pop up (see screenshot above). Every time it appears I select «Keep the current color scheme, and don’t show this message again». Windows then reminds me again — either the next day or after reboot, or sometimes another 5 minutes later
Do you want to change the color scheme to improve performance?
Windows has detected your computer’s performance is slow. This could be because there are not enough resources to run the Windows Aero color scheme. To improve performance, try changing the color scheme to Windows 7 Basic. Any change you make will be in effect until the next time you log on to Windows
- Change the color scheme to Windows 7 Basic
- Keep the current color scheme, but ask me again if my computer continues to perform slowly
- Keep the current color scheme, and don’t show this message again
Is there some reason why Windows is ignoring/forgetting my attempts to suppress the dialog? I’d love to never ever see it again, it’s annoying, and it alt-tabs me out of fullscreen applications.
If it matters, I’m running Windows 7 x64 Professional. I believe the dialog appears because I’m forcing Vsync and Triple Buffering for DirectX applications.
Clearly William needs a new plan of attack since Windows is ignoring his requests to remember his selection.
The Answers
SuperUser contributor A Dwarf offers a quick and dirty solution for William’s problem:
Assuming you realize this message is informing you your system is low on resources and is asking you to disable Aero so it can keep performing at optimum speed,
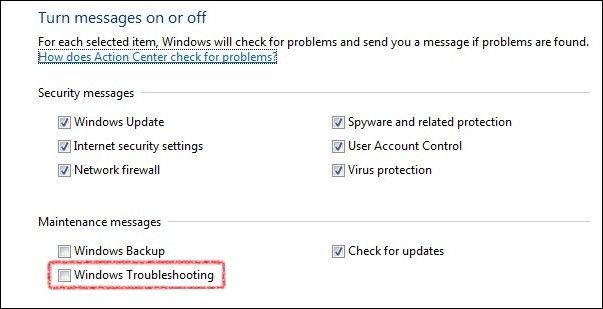
- Go to the Start Menu and type Action Center on the Search box
- Start it (it should be the top entry, under the «Control Panel» group)
- On the left sidebar, click
Change Action Center settings- Untick the
Windows Troubleshootingcheckbox, under «Maintenance Messages».
- Click the
Okbutton and you are done.
Here is a screenshot of the setting screen:

Alternatively:
- You can try and keep this setting just as it is and switch to Basic desktop mode before launching the applications that usually fire up this Action Center notification. Or,
- You can right click the icons you use to fire up these full screen applications, clicking properties and under the Compatibility tab tick
Disable desktop composition. This will disable the Desktop Window Manager Session Manager service during execution of this application which will increase system and video memory and avoid some application incompatibilities. A likely cause for your Action Center message if you have enough system and video memory but are stuill getting this message with certain games or full screen applications.
Another contributor, Oliver Salzburg, delves into the Disable Desktop Composition solution A Dwarf highlights at the end. He writes:
I’m constantly in a similar situation even though I never get that exact same message, and have done a bit of testing around.
To my understanding, the core resource that is under stress here, is the GPU memory. But this doesn’t necessarily indicate that you’re running out of this resource in general. It might just mean the Desktop Window Manager has detected that you’re running so low that one specific feature of this service could be disabled to free up more memory.
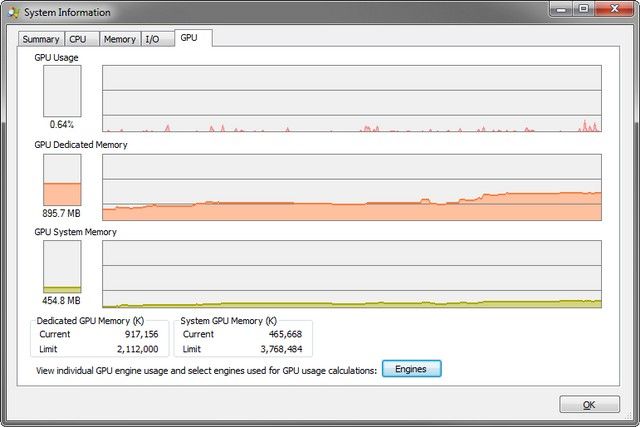
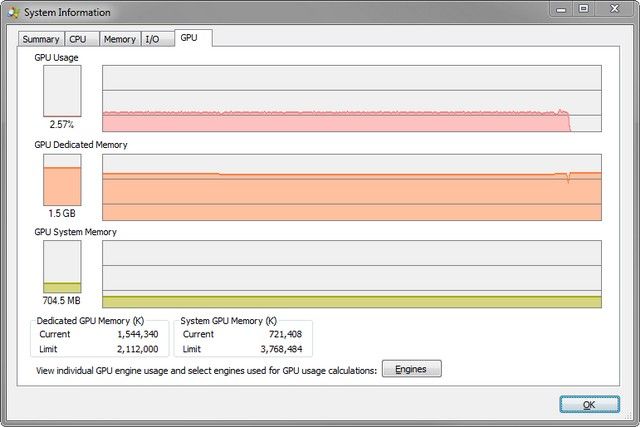
To test this, I started opening up GPU memory intensive applications:

This is somewhat above average use on my triple-screen setup with a few key players running (Visual Studio 2012 (hardware acceleration enabled), PhpStorm, Aptana Studio, Chrome, Firefox, IE, …). So, yeah, if you only have a 1 GB card and this would be your usual usage scenario, you’d already have a problem.
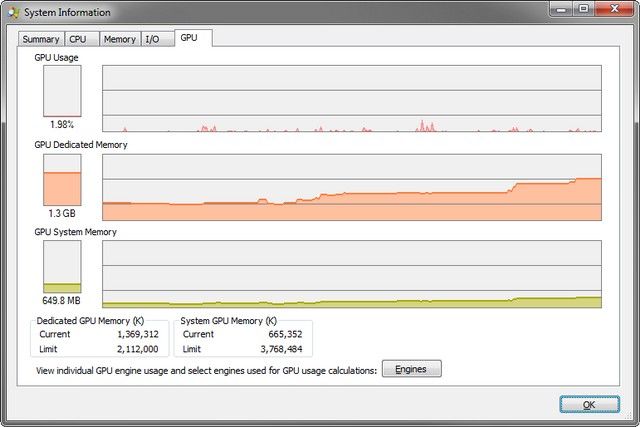
I had to push a bit further and start a couple more Visual Studio instances…

…until it was nearing the 1.5 GB mark and…
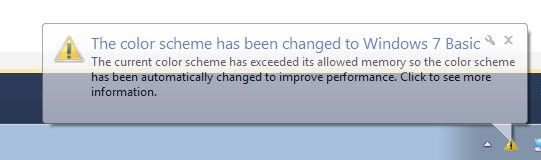
SNAP! This caused Windows to kill desktop compositing completely (and free up some precious resources).
Now, when I’m already at a critical level, and I start an application that uses excessive amounts of GPU memory in fullscreen, I can even go beyond this critical limit. Here’s the result after running Black Mesa for a while on 2560×1440 at max details:
So, two things can be deducted from this. While going over the 75% mark on the desktop can force Windows to disable desktop composition, when reaching the same limit in a fullscreen application (and, optionally exiting that application) desktop composition is not disabled.
The second thing is, while you’re in your game, you can get the idea «Hey, I have enough resources to run this game, why don’t I have enough resources for the desktop?». The reason is, both require memory at the same time.
Windows might only be able to tell you about the memory situation after you exited the game. So, when I start another Visual Studio after exiting Black Mesa…

So, what can we do about this?
Get more GPU memory
Sweet and simple.
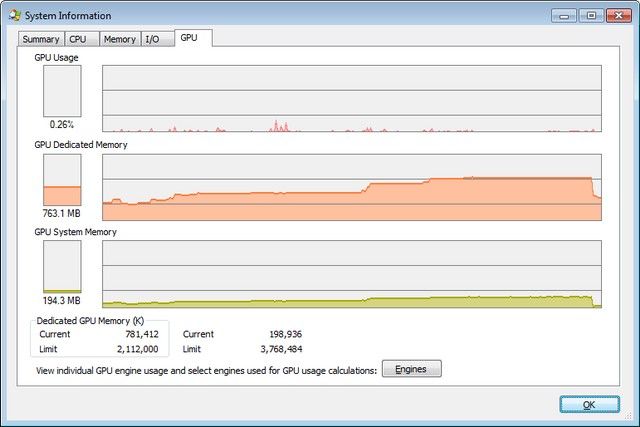
Disable Desktop Composition (per process)
As was already suggested, you can disable desktop composition for a single executable. This has the effect that desktop composition is temporarily disabled while the executable is being executed. This drastically reduced the overall memory consumption while the application is executed in my tests:
The bounty notice mentions that this is undesirable, as this is potentially a lot of work.
Disable Desktop Composition (globally)
I wouldn’t consider this a solution as desktop composition is usually desired. But this is where to disable it:

I just want to get rid of the annoying message!
Just because you remove the warning «Your battery is almost empty! You can only talk for 10 more minutes!» does not mean you can talk for longer than 10 minutes. In fact, your phone will most likely simply shut off and that’s it. Now how’s that for an improvement?
I never assumed the message can be turned off and I don’t see how that could be considered a benefit.
You might think you know better, but you don’t. If the system is telling you it’s running out of resources, it is.
But it isn’t! I know!
Ok, let’s assume Windows is just not smart enough to detect the special situation you’re in and the warning message is simply an annoying inconvenience. What now?
The thing is, me personally, I’m also affected by this and it’s annoying the hell out of me. Because I don’t even get that warning message. Windows simply switches my color profile and that’s it. And I like that actually.
When it happens I usually quickly run a script that calls
net stop uxsms & net start uxsmsThis restarts the Desktop Window Manager and brings me back to my composited desktop (and it frees up lots of resources in the process, yay).
Knowing this, you can also construct yourself a special gaming environment where you stop the service before starting the game to combat this whole behavior. However, this will cause identical behavior to disabling desktop composition for a single executable through the file properties.

Have something to add to the explanation? Sound off in the the comments. Want to read more answers from other tech-savvy Stack Exchange users? Check out the full discussion thread here.