
DirectX is an Application Programming Interface (API) for creating and managing graphic images and multimedia effects in applications such as games or active web pages that run on the Microsoft Windows operating system. Earlier DirectX was limited to certain fields like DirectSound, DirectPlay but with the upgraded Windows 10, DirectX has also been upgraded to DirectX 13, 12 and 10 as a result of which, it has become an essential part of Microsoft Windows operating system. However, if you’re unable to install DirectX on Windows 10 then don’t worry as today we are going to discuss how to fix this issue.

Table of Contents
DirectX has its Software Development Kit (SDK), which consists of runtime libraries in binary form, documentation, and headers used in coding. These SDK are free to download and use. But sometimes, when you try to install these SDKs or DirectX on your Windows 10, you face errors. The most common cause of the issue seems to be .NET Framework might be interfering with the installation of DirectX. This guide lists several methods using which you may be able to Install DirectX on Windows 10 without any errors.
1.Make Sure All the System requirements are Met
DirectX is an advanced feature, and all the computers may not be able to install it correctly. To install the DirectX properly on your computer, your computer needs to meet some mandatory requirements.
Given below are the requirements to install DirectX on your computer:
- Your Windows system must be at least 32-bit operating system
- The graphics card must be compatible with your DirectX version you are installing
- RAM and CPU must have enough space to install DirectX
- NET Framework 4 must be installed in your PC
If any of the above requirements are not fulfilled, you will not be able to install DirectX on your computer. To check these properties of your computer, follow the steps mentioned below:
1.Right click on the This PC icon. A menu will pop-up.
2.Click on the Properties option from the right-click context menu.

3.The system properties window will show up.
After completing the steps mentioned above, you will get to know if all the basic requirements to install DirectX on your computer are met or not. If all the requirements are not met, then fulfill all the basic requirements first. If all the basic requirements are met, then try other methods to fix Unable To Install DirectX on Windows 10 issue.
2.Check DirectX Version on Windows 10 is Latest
Sometimes, when you try to install DirectX on Windows 10, you are unable to do so as DirectX12 comes pre-installed on most of Windows 10 PC.
To check if DirectX is pre-installed on your Windows 10 and if installed then which version of DirectX is there, you need to follow the below steps:
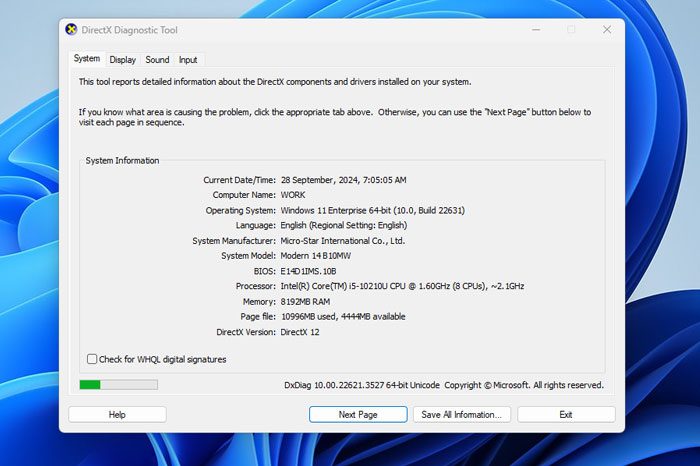
1.Open dxdiag on your computer by searching for it using search bar.
2.If you find the search result, it means DirectX is installed on your computer. To check its version, hit the enter button at the top result of your search. DirectX diagnostic tool will open up.

3.Visit System by clicking on the System tab available at the top menu.

4.Look for the DirectX version where you will find the DirectX version installed on your computer. In the above image DirectX 12 is installed.
3.Update Graphics Card Driver
It is possible that unable to install DirectX on your Windows 10 problem is arising because of outdated or corrupt Graphics card drivers, as you know DirectX is related to multimedia and any problem in Graphics card will lead to installation error.
So, by updating the Graphics card driver, your DirectX installation error may be resolved. To update the Graphics card driver follow the below steps:
1.Open Device Manager by searching for it using the search bar.
2.Hit the enter button at the top result of your search. Device Manager will open up.

3.Under Device Manager, locate and click on Display Adapters.
4.Under Display adapters, right-click on your Graphics card and click on Update driver.

5.Choose Search automatically for updated driver software option so that your windows can search for updates available automatically for the selected driver.

6.Your Windows will start searching for the updates.

7.If the Windows finds any update, it will start updating it automatically.

8.After the Windows has successfully updated your driver, the dialog box shown below will appear displaying the message that Windows has successfully updated your drivers.

9.If no update is available for the driver, then the dialog box shown below will appear displaying the message that the best drivers for your device are already installed.

10.Once the graphic card driver will update successfully, restart your computer.
4.Reinstall Graphics Card Driver
After completing the above-mentioned steps, when your computer restarts try to install DirectX on your Windows 10 again. If it doesn’t work, try unsintalling and then installing drivers.
5. Reinstall Previous Windows Updates
Sometimes, previous updates cause a problem while installing DirectX on your Windows 10. If this is the case, then you need to uninstall the previous updates and then re-install it again.
To uninstall the previous updates follow the steps mentioned below:
1.Press Windows Key + I to open Settings and click on Update & Security option.
2.From the left hand menu click on Windows update option.
3.Then under the Update status click on View installed update history.

4.Under View update history, click on Uninstall updates.
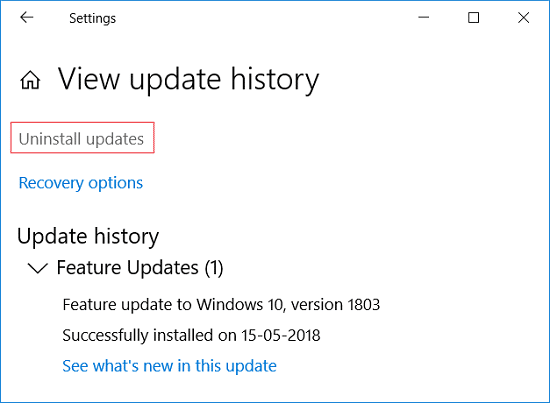
5.A page will open up that has all the updates. You have to search for the DirectX update, and then you can uninstall it by right-clicking on that update and choosing the uninstall option.

6.Once the update is uninstalled, restart your computer.
After completing the above steps, once the computer restarts, your previous update will be uninstalled. Now try to install DirectX on Windows 10 and you might be able to do so.
6. Download Visual C++ Redistributable
Visual C++ redistributable is a vital component of DirectX Windows 10. So, if you are facing any error while installing DirectX on your Windows 10, it may be connected to Visual C++ redistributable. By downloading & reinstalling Visual C++ redistributable for Windows 10, you may be able to fix unable to install the DirectX issue.
To download and reinstall visual C++ redistributable, follow the steps mentioned below:
1.Go to the Microsoft site to download the Visual C++ redistributable package.
2.The screen shown below will open up.

3.Click on the Download button.

4.The page shown below will open up.

5.Choose the download according to your operating system that is if you have a 64-bit operating system then check the checkbox next to x64.exe and if you have a 32-bit operating system then check the checkbox next to vc_redist.x86.exe and click Next button available at the bottom of the page.
6.Your selected version of visual C++ redistributable will start downloading.

7.Once the download is completed, double-click on the downloaded file.

8.After completing the above steps, try to reinstall DirectX on your Windows 10 and it might be installed without creating any error.
7. Install .Net Framework using Command Prompt
.Net Framework is also one of the important parts of DirectX, and you may be facing an error in installing DirectX because of .Net Framework. So, try to resolve your issue by installing the .Net Framework. You can install the .Net Framework easily using the Command prompt.
To install the .Net Framework using the command prompt, follow the steps mentioned below:
1.Search for command prompt using the Start Menu search.
2.Right-click on Command Prompt from the search result & select Run as administrator option.
3.Click on Yes when asked for confirmation and the Administrator command prompt will open up.
4.Enter the command mentioned below in the command prompt and press Enter button.
DISM /Online /Enable-Feature /FeatureName:NetFx3 /All /LimitAccess /Source:D:sourcessxs

6.The .Net Framework will start downloading. The installation will start automatically.
8.Once the installation is completed, restart your computer.
After completing the above steps, the .Net Framework will be installed, and the DirectX error may also disappear.
Recommended: How to Re-Install DirectX in Windows 10
Hopefully, using any one of the mentioned methods, you may be able to fix Unable to Install DirectX on Windows 10 issue, but if you still have any questions regarding this tutorial then feel free to ask them in the comment section.
Некоторые пользователи Windows 11 и 10, устанавливающие недостающие библиотеки DirectX с помощью веб-установщика от Майкрософт, могут получить сообщение об ошибке «Произошла внутренняя системная ошибка, посмотрите файлы DXError.log и DirectX.log в папке Windows».
В этой инструкции подробно о том, чем может быть вызвана такая ошибка при установке DirectX и как её исправить.
Версии Windows с ограниченным набором компонентов
Одна из самых частых причин ошибки установки DirectX «Произошла внутренняя системная ошибка, посмотрите файлы DXError.log и DirectX.log в папке Windows» (An internal system error occurred в англоязычных версиях ОС) — использование версии системы, в которой по умолчанию отсутствуют некоторые системные компоненты.

Речь идёт о компонентах для работы с мультимедиа (Media Feature Pack). Среди таких версий ОС:
- Windows 11 и 10 N и KN
- Варианты Windows LTSC и LTSB
- Некоторые «сборки» Windows
Информацию о системе можно получить в Параметры — Система — О системе в Windows 11, где в поле «Выпуск» будет указано, какая именно версия у вас установлена.
Решение для данного случая — попробовать установить Media Feature Pack (Компоненты для работы с мультимедиа):
- Включить соответствующие компоненты в Панель управления — Программы и компоненты — Включение или отключение компонентов Windows:

- Для N и KN редакций последних версий Windows 11/10 — установить компоненты в Параметры — Система — Дополнительные компоненты (в Windows 11) или Параметры — Приложения — Приложения и возможности — Дополнительные компоненты (в Windows 10).
- Скачать и установить Media Feature Pack вручную (подходит не для любых версий Windows)

После установки рекомендую выполнить перезагрузку компьютера, после чего снова попробовать выполнить установку DirectX.
Другие варианты
Если у вас установлена «обычная» версия Windows 11/10 — Домашняя или Pro, указанные выше компоненты включены, при этом вы всё равно получаете рассматриваемое сообщение об ошибке:
- Изучите содержание файлов журналов DXError.log и DirectX.log, возможно, их содержимое (в частности, сообщения об ошибках и сбоях) позволят разобраться, на каком этапе и почему возникает ошибка.

- Попробуйте использовать оффлайн-установщик предыдущих версий библиотек DirectX вместо Веб-установщика или наоборот.
- По некоторым отзывам может помочь запуск установщика в режиме совместимости с предыдущими версиями Windows, что можно сделать, открыв свойства исполняемого файла (правый клик по файлу — свойства) и настроив режим совместимости на соответствующей вкладке.

- Потенциальной причиной может оказаться повреждение или изменение системных файлов, можно попробовать их восстановить. Запустите командную строку от имени администратора и по порядку выполните команды
dism /online /cleanup-image /restorehealth
sfc /scannow
- Есть непроверенная лично рекомендация (создайте точку восстановления, если решите попробовать): зайти в редактор реестра в раздел
HKEY_LOCAL_MACHINE\SOFTWARE\Microsoft\DirectX
и изменить значение параметра InstalledVersion: удалить первые «00», ввести 08 08 (появится вторая строка с двумя 0), а значение Version — на 4.09.00.0904, сохранить изменения и перезагрузить компьютер.


И, наконец, в крайнем случае можно попробовать выполнить «Обновление на месте» (опять же, при условии, что у вас установлена «обычная» потребительская версия Windows), после чего вновь попробовать установить DirectX.
Если один из способов помог решить проблему в вашем случае, буду благодарен комментарию о том, какой именно — это может пригодиться другим пользователям, столкнувшимся с той же ошибкой.
While starting a game or application on Windows 11/10, if you see an error message saying DirectX 12 is not supported on your system or DX12 is not supported on your system, here is how you can fix the error. As there could be several reasons why you might encounter this problem, we have consolidated all the possible reasons along with solutions to get rid of this problem.

Fix DirectX 12 is not supported on your system error in Windows 11
To fix the DirectX 12 is not supported on your system error in Windows 11/10, follow these solutions:
- Check hardware requirements
- Update DirectX
- Update Graphics driver
- Turn off Compatibility mode
- Repair .NET Framework
To learn more about these solutions, continue reading.
1] Check hardware requirements
It is the most important thing you should remember when encountering the error mentioned above. DirectX is directly dependent on the graphics card. If your graphics card doesn’t support the version of DirectX, you cannot install it anyway. As a result, you will keep finding the error above when you try to open any game or program.
2] Update DirectX
You can try updating the DirectX manually. However, there is no standalone installer that you can use to update the existing version. In other words, you need to install a separate version of DirectX if you have an older version installed on your computer.
Before that, you must check the existing version of DirectX. To do so, click on the Taskbar search box and search for dxdiag. Then, click the individual search result to open the DirectX Diagnostic Tool wizard. From here, check the DirectX Version.
If it displays as DirectX 11 or an older version, visit Microsoft.com and download the DirectX web installer. Then, follow the installation process to complete the job.
3] Update Graphics driver
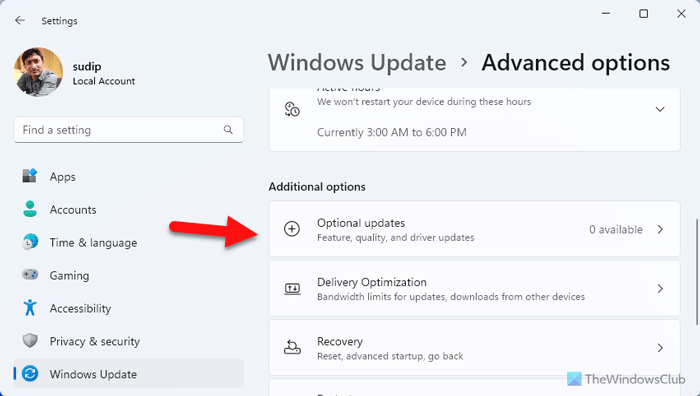
Earlier, updating the graphics driver was possible using Device Manager. However, now you can do it using the Windows Update option in the Windows Settings panel. To do so, open the Windows Settings panel and go to Windows Update > Advanced options > Optional updates.
If an update is available, you can find it here. If so, you can tick the respective checkbox to download the update and install it accordingly.
Alternatively, you can also go to the official website of your graphics card manufacturer to find out if there is an update. If yes, you can choose your graphics card and download it according to your requirements.
4] Turn off Compatibility mode
If you have been using compatibility mode to open a game, it is time to disable it. Let’s say that your game requires DirectX 12 and cannot run in the background because you enabled compatibility mode. There is a high chance of getting the error while opening that game in such a situation.
That is why it is suggested that you turn off the compatibility mode to check if it fixes the problem. To disable the compatibility mode, right-click on the game icon and select Properties. Then, go to the Compatibility tab and head to the Compatibility mode section.
After that, remove the tick from the Run the program in compatibility mode for checkbox and click the OK button.
Read: How to change Compatibility Mode settings in Windows 11
5] Repair .NET Framework
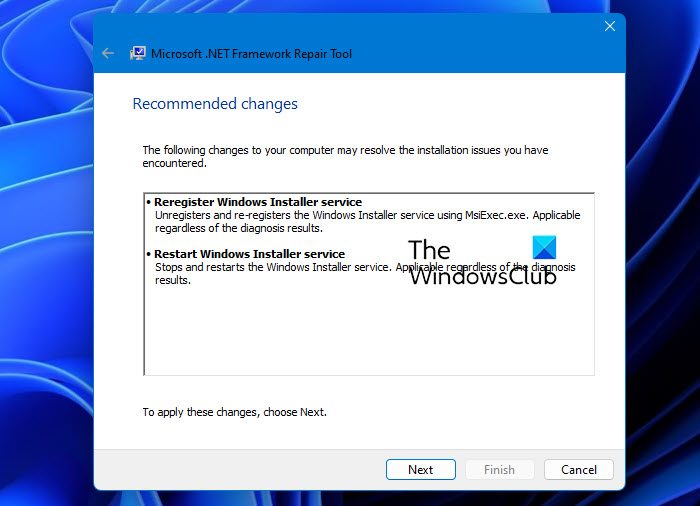
This problem may arise due to a corrupt .NET Framework. If so, you can fix it using the Microsoft .NET Framework Repair Tool. This free utility can be downloaded from Microsoft’s official website and fixes almost all common problems by repairing some of the new versions of .NET Framework.
I hope this guide helped you.
Read: DirectX Errors when downloading, installing, upgrading, updating or running
How do I fix DX12 is not supported on my system?
To fix DX12 is not supported on your system error in Windows 11/10, you need to check the system requirements first. However, if your system complies with DirectX 12, you need to update the existing version of DirectX and the graphics driver. On the other hand, you can also disable the compatibility mode.
Why doesn’t my PC support DirectX 12?
There could be numerous reasons why your PC doesn’t support DirectX 12. The most common reason is the graphics card installed on your computer. If your graphics card doesn’t support it or it is pretty old, you cannot use DirectX 12 on your computer.
Read: Unsupported DirectX version, No supported DirectX version found when launching a game.
Автор
Taker1993
Добрый день. Борюсь с этим майнером уже приличное время, пробовал разные антивирусы и думал что он пропал, так как используя несколько разных антивирусов от основной части майнера я вроде избавился, но заметил ещё тогда что много ошибок в системе 0xc0000017 при исполнении команд dism в командной строке (которую я вчера исправил), при обновлении всех компонентов windows и т.п. (пробовал откатывать удаляя по гайдам папку с апдейтами используя утилиты для активации обнов — но безрезультатно), также есть ошибка с безопасностью, в начале была проблема с целостностью ядра и я удалил два мешающих файла исправив проблему, но ошибка с этим так до конца и не решилась и он пишет про отсутствие TPM — а конкретно NET HELPMSG 2182 Problem with BITS; также есть проблема с невозможностью запуска диспетчера устройств и других подобных окон и некоторых команд в комбинации Win+R. Почему я думал, что избавился от майнера полностью: грузить систему перестало на постоянке и сильных нагрузок не было, а с остальным думал уже ничего не сделаешь и нужно переустанавливать Windows, оставил на потом, так как есть немало сторонних лицензионных программ,, которые шли вместе с ноутбуком и я боялся к ним потерять доступ, ну и так как не было точек восстановления и если даже они были я не могу к ним получить доступ, а оказывается всё-таки нет майнер на месте.
Несколько месяцев спустя заметил, а конкретно вчера: что изменилась возможность администрирования и я не могу получить доступ к системным файлам, не мог удалить, изменять, переименовывать файлы которые вызывали нарушение целостности ядра (xusb21.sys и STTub30.sys), но по итогу через стороннюю утилиту я их удалил (один из них STTub30.sys я потом воcстановил найдя на github). Вернул также сегодня в ночь через реестр доступ к DISM и сделал успешный запуск и восстановление по команде Dism /Online /Cleanup-Image /RestoreHealth, а SFC и прежде работала, но это ничего не поменяло; вообще все последние именно операции делал по одному гайду и там после восстановления DISM советовали воспользоваться Farbar Recovery Scan Tool 64-бит, но наткнулся поздновато и это не помогло, так как нужен составленный fixlist.txt, да и Fabar раз 6 выдал ошибку при сканировании bcdedit.exe (в процессе написания текста сделал повторное сканирование c Fabar и ошибок было уже штуки 3-4 bcdedit.exe, а результаты этого сканирования прикрепил в качестве файлов Addition.txt и FRST.txt вдруг пригодятся).
Сегодня заметил, что даже с включённым лицензионным Касперычем майнер снова поменял и ограничил что-то там в брандмауэре Windows — было уведомление (понимаю, что он уже давно в исключениях, но всё же). Ни Kaspersky Virus Removal Tool, ни Dr.Web Cruelt! ни нашли ничего, вероятно майнер добавил их уже в исключения, так как при удалении основных компонентов майнера я уже пользовался ими раньше, но до этого я пользовался AV block Remover и он удалял майнер, но спустя время он появляется снова.
Был бы очень рад если бы получилось решить данную проблему, Windows лицензионный шедший вместе с ноутом переустанавливать всё же не хочется и я не уверен что и там не будет ошибок в процессе.
Заранее всем откликвнушимся большое спасибо и с пасхой!
CollectionLog-2025.04.20-14.19.zip Addition.txt FRST.txt