
В Windows одновременно можно одновременно установить и запустить несколько версий .NET Framework. При разработке или развертывания нового приложения, основанного на библиотеках .NET, иногда нужно предварительно узнать какие версии и пакеты обновления .Net Framework уже установлены на компьютере пользователя или на сервере. Вы можете получить список версий .NET Framework, установленных на компьютере, несколькими способами.
Содержание:
- Информация об установленных версиях .NET Framework в реестре
- Как узнать версию .NET Framework с помощью PowerShell?
- Проверить версию .Net Framework на удаленных компьютерах
- Вывести версии .NET Framework в командной строке
Информация об установленных версиях .NET Framework в реестре
При установке или обновлении любой версии .NET Framework, изменения записываются в реестр Windows.
Откройте редактор реестра (regedit.exe) и перейдите в раздел HKLM\ SOFTWARE\Microsoft\NET Framework Setup\NDP. В этой ветке хранится информация обо всех версиях .NET на компьютере. Разверните любой раздел и обратите внимание на следующие параметры (для .Net 4.x нужно развернуть ветку Full):
- Install — флаг установки (если равен 1, значит данная версия .Net установлена на компьютере);
- Install Path — каталог, в который установлена данная версия .Net;
- Release — номер релиза .Net;
- Version — полный номер версии .Net Framework.

Примечание. Для .NET 4.0 и выше, если подраздел Full отсутствует, это значит, что данная версия Framework на компьютере не установлена.
К примеру, в данном примере видно, что на компьютере установлены .NET Framework v2.0.50727, 3.0, 3.5 и 4.7 (релиз 460805).
Обратите внимание, что в серверных ОС начиная с Windows Server 2012, все базовые версии .Net (3.5 и 4.5) является частью системы и устанавливаются в виде отдельного компонента (Установка .NET Framework 3.5 в Windows Server 2016, в Windows Server 2012 R2), а минорные (4.5.1, 4.5.2 и т.д.) устанавливаются уже в виде обновлений через Windows Update или WSUS.
С помощью следующей таблицы вы можете установить соответствие между номером релиза и версией .NET Framework (применимо к .NET 4.5 и выше).
| Значение DWORD параметра Release | Версия .NET Framework |
| 378389 | .NET Framework 4.5 |
| 378675 | NET Framework 4.5.1 на Windows 8.1 / Windows Server 2012 R2 |
| 378758 | .NET Framework 4.5.1 на Windows 8, Windows 7 SP1, Windows Vista SP2 |
| 379893 | .NET Framework 4.5.2 |
| 393295 | .NET Framework 4.6 на Windows 10 |
| 393297 | .NET Framework 4.6 |
| 394254 | .NET Framework 4.6.1 на Windows 10 1511 |
| 394271 | .NET Framework 4.6.1 |
| 394802 | .NET Framework 4.6.2 на Windows 10 1607 |
| 394806 | .NET Framework 4.6.2 |
| 460798 | .NET Framework 4.7 на Windows 10 1703 |
| 460805 | .NET Framework 4.7 |
| 461308 | .NET Framework 4.7.1 на Windows 10 1709 |
| 461310 | .NET Framework 4.7.1 |
| 461808 | .NET Framework 4.7.2 на Windows 10 1803 |
| 461814 | .NET Framework 4.7.2 |
| 528372 | .NET Framework 4.8 на Windows 10 2004, 20H2, и 21H1 |
| 528040 | .NET Framework 4.8 на Windows 10 1903 и 1909 |
| 528449 | .NET Framework 4.8 в Windows Server 2022 и Windows 11 |
| 528049 | .NET Framework 4.8 (остальные версии Window) |
.NET Framework 4.8 сегодня — самая последняя доступная версия .NET Framework.
Как узнать версию .NET Framework с помощью PowerShell?
Можно получить информацию об установленных версиях и релизах NET Framework на компьютере с помощью PowerShell. Проще всего получить эти данные напрямую из реестра с помощью командлетов
Get-ChildItem
и
Get-ItemProperty
(подробнее о работе с записями реестра из PowerShell).
Чтобы вывести таблицу по всем версиям .Net Framework на компьютере, выполните команду:
Get-ChildItem ‘HKLM:\SOFTWARE\Microsoft\NET Framework Setup\NDP’ -Recurse | Get-ItemProperty -Name version -EA 0 | Where { $_.PSChildName -Match ‘^(?!S)\p{L}’} | Select PSChildName, version
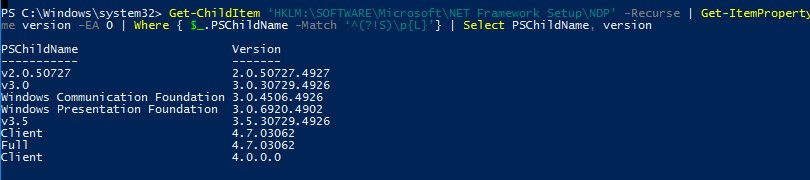
На этом компьютере установлены версии .Net 2.0, 3.0, 3.5 и 4.7.
Начиная с версии .Net v4.0 более новая версия Framework перезаписывает (заменяет) старую версию. Т.е. если на компьютере был установлен .NET Framework 4.7, то при установке .NET Framework 4.8, старая версия пропадет.
Можно вывести только номер релиза (для версий .Net 4.x):
(Get-ItemProperty ‘HKLM:\SOFTWARE\Microsoft\NET Framework Setup\NDP\v4\Full’ -Name Release).Release

Согласно таблице, номер 528449 соответствует версии .Net Framework 4.8 в Windows 11.
Проверить версию .Net Framework на удаленных компьютерах
Вы можете удаленно получить список версий .Net Framework, установленных на компьютерах в вашей сети помощью PowerShell.
Ниже представлен небольшой PowerShell скрипт, который получает список компьютеров из текстового файла и проверяет на всех версию .Net Framework. Для запуска команд на удаленных компьютерах используется WinRM командлет Invoke-Command.
Function GetNetFramework {
Get-ChildItem 'HKLM:\SOFTWARE\Microsoft\NET Framework Setup\NDP' -recurse |
Get-ItemProperty -name Version,Release -EA 0 |
Where { $_.PSChildName -match '^(?![SW])\p{L}'} |
Select PSChildName, Version, Release, @{
name="Product"
expression={
switch -regex ($_.Release) {
"378389" { [Version]"4.5" }
"378675|378758" { [Version]"4.5.1" }
"379893" { [Version]"4.5.2" }
"393295|393297" { [Version]"4.6" }
"394254|394271" { [Version]"4.6.1" }
"394802|394806" { [Version]"4.6.2" }
"460798|460805" { [Version]"4.7" }
"461308|461310" { [Version]"4.7.1" }
"461808|461814" { [Version]"4.7.2" }
"528040|528049|528449|528372" { [Version]"4.8" }
{$_ -gt 528449} { [Version]"Undocumented version (> 4.8)" }
}
}
}
}
$result=@()
$servers= Get-Content C:\PS\servers.txt
foreach ($server in $servers)
{
$result+=Invoke-Command -ComputerName $server -ScriptBlock $function:GetNetFramework
}
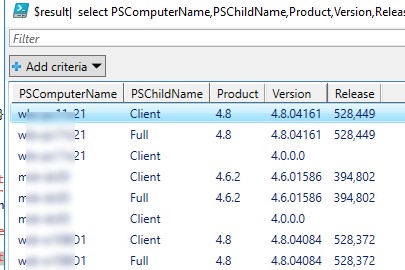
$result| select PSComputerName,@{name = ".NET Framework"; expression = {$_.PSChildName}},Product,Version,Release| Out-GridView
Скрипт выводит табличку (через Out-GridView) со списком версий .Net Framework, установленных на удаленных компьютерах.
Также вы можете задать список компьютеров, на которых нужно проверить .NET так:
$servers= @("pc1","pc2","pc3","pc4","pc5")
Или выбрать список компьютеров из домена с помощью командлета Get-ADComputer из модуля AD PowerShell. Следующая команда выберет все активные хосты Windows Server в домене:
$servers= Get-ADComputer -Filter 'operatingsystem -like "*Windows server*" -and enabled -eq "true"'
Вывести версии .NET Framework в командной строке
Все версии.NET Framework устанавливаются в следующие каталоги Windows:
-
%SystemRoot%\Microsoft.NET\Framework -
%SystemRoot%\Microsoft.NET\Framework64
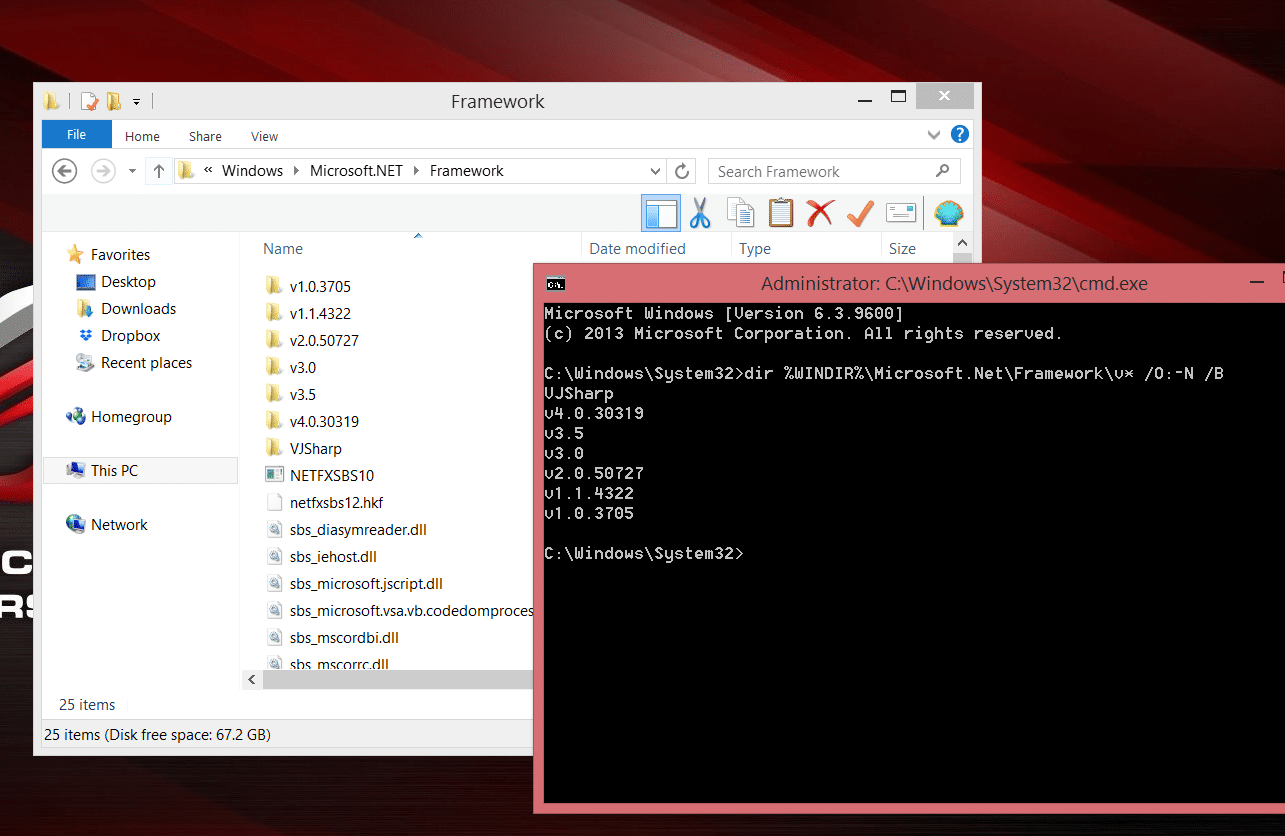
Вы можете просто открыть этот каталог и увидеть список установленных версий .NET. Каждой версии соответствует отдельный каталог с символом v и номером версии в качестве имени папки. Можно вывести список установленных версий .NET Framework из команды строки:
dir %WINDIR%\Microsoft.Net\Framework\v* /O:-N /B

Команда выведет все установленные версии кроме 4.5, т.к. .NET Framework 4.5 устанавливается в подкаталог v4.0.xxxxx.
Microsoft .NET Framework is a software development platform developed by Microsoft. Every software or Software developed using .NET required .net Framework installed in the System to run the application. And when you install a new application developed on .Net on a computer/server, it is sometimes necessary to know in advance which versions and service packs of the .Net Framework are already installed. Windows 11 and windows 10 2022 update has .NET Framework 4.8.1 installed by default, here is How to check which versions of .NET Framework are installed on your Windows system.
Contents
- 1 Microsoft .NET Framework Versions
- 2 Check .NET Framework Version
- 3 Check .NET Framework version using the registry editor
Microsoft .NET Framework Versions
There are several versions of .NET Framework available, Some are included in some Windows OS by default and all are available to download at the Microsoft website as well.
Here is list of all released versions of .NET Framework (Till 13/11/2022):
- .NET Framework 1.0 (comes pre-installed in Windows XP)
- .NET Framework 1.1 (comes with pre-installed in Windows Server 2003)
- .NET Framework 2.0 (comes with pre-installed in Windows Server 2003, 2003 R2, 2008 SP2 and 2008 R2 SP1)
- .NET Framework 3.0 (Bundled in Windows Vista and Windows Server 2008 SP2, 2008 R2 SP1)
- .NET Framework 3.5 (comes pre-installed in Windows 7, 8/8.1, Windows 10 and Windows Server 2008 R2 SP1)
- .NET Framework 4.0
- .NET Framework 4.5 (By default installed in Windows 8 and Windows Server 2012)
- .NET Framework 4.5.1 (comes with pre-installed in Windows 8.1 and Windows Server 2012 R2)
- .NET Framework 4.5.2
- .NET Framework 4.6 (comes installed in Windows 10)
- .NET Framework 4.6.1 (comes installed in Windows 10 version 1511)
- .NET Framework 4.6.2 (comes installed in Windows 10 version 1607 and Windows Server 2016)
- .NET Framework 4.7 (comes installed in Windows 10 version 1703)
- .NET Framework 4.7.1 (comes installed in Windows 10 version 1709)
- .NET Framework 4.7.2 (comes installed in Windows 10 version 1803/1809)
- .NET Framework 4.8 (the latest Windows 10 version 1903, the May 2019 Update version of the operating system, includes version 4.8 of the .NET Framework already.
- NET Framework 4.7.2 (comes preinstalled on windows 11 and windows 10 version 20H2 and later)
All versions of the .NET Framework are installed into the folders:
- %SystemRoot%\Microsoft.NET\Framework
- %SystemRoot%\Microsoft.NET\Framework64
And to display the list of .Net installed versions open this folder Here Each version corresponds to a separate directory with the v characters at the beginning and the version number as the folder name.
Alternatively, you can open the command prompt with administrative privileges and run the following command, which displays the installed .NET Framework directories (versions).
dir %WINDIR%\Microsoft.Net\Framework\v* /O:-N /B
Check .NET Framework version using the registry editor
- Press Windows + R, type regedit and ok to open the windows registry editor.
- Then navigate to the following path :
- HKEY_LOCAL_MACHINE\SOFTWARE\Microsoft\NET Framework Setup\NDP
- When you expend NDP subkey you’ll see separate keys for each .NET Framework version installed in your system.
to know more about the installed version, Expend any of them for example when you expend v4 and select full or client you found the following registry parameters:
- Install — version installation flag (if equal to 1 – this version of .Net is installed on the computer);
- Install Path — the directory where this .Net version is installed;
- Release — .Net current release number;
- Version — the full version number of .Net Framework.
Here .NET Framework versions and their associated release DWORD values
| Version | Value of the Release DWORD |
|---|---|
| .NET Framework 4.5 | 378389 |
| .NET Framework 4.5.1 installed with Windows 8.1 | 378675 |
| .NET Framework 4.5.1 installed on Windows 8, Windows 7 SP1, or Windows Vista SP2 | 378758 |
| .NET Framework 4.5.2 | 379893 |
| .NET Framework 4.6 installed with Windows 10 | 393295 |
| .NET Framework 4.6 installed on all other Windows OS versions | 393297 |
| .NET Framework 4.6.1 installed on Windows 10 | 394254 |
| .NET Framework 4.6.1 installed on all other Windows OS versions | 394271 |
| .NET Framework 4.6.2 installed on Windows 10 Anniversary Update and Windows Server 2016 | 394802 |
| .NET Framework 4.6.2 installed on all other Windows OS versions | 394806 |
| .NET Framework 4.7 installed on Windows 10 Creators Update | 460798 |
| .NET Framework 4.7 installed on all other Windows OS versions | 460805 |
| .NET Framework 4.7.1 installed on Windows 10 Fall Creators Update | 461308 |
| .NET Framework 4.7.1 installed on all other Windows OS versions | 461310 |
| .NET Framework 4.7.2 installed on Windows 10 October 2018 Update | 461814 |
| .NET Framework 4.7.2 installed on Windows 10 April 2018 Update | 461808 |
| .NET Framework 4.7.2 installed on Windows 10 Fall Creators Update and earlier OS versions | 461814 |
The following example checks the Release value in the registry to determine whether the .NET Framework 4.5 or a later version of the .NET Framework is installed.
Also, read:
- How to Install net framework 3.5 on windows 10 and 8.1
- Fix NET Framework 3.5 installation Error 0X800F081F in Windows 10
- How to fix Error Code 0x800f0950 in Windows 10 (.Net Framework 3.5)
Are you wondering what version of .NET Framework comes with Windows 10 system or how to check .NET Framework version in Windows 10 computer? Let’s find out.
Have you ever felt the need to check .NET Framework version running on your Windows 10 computer or laptop? Or, Do you want to know what version of .NET comes with Windows 10 systems? If your answer is “Yes” then you are landed in the right article today.
Many programs on the Microsoft Windows operating systems use the .NET framework to function correctly. The .NET Framework, developed by Microsoft, is a collection of technologies that enables developers and helps them build functional apps for Windows, Mac, Linux, Android, and iOS.
Most Windows installations come with .NET on them and if you wish to check .NET framework version on your system but don’t know how to do that then worry not. In this guide, I’ll teach you how to check .NET framework version in Windows 10 operating systems and what are the best ways to check .NET version running on your Windows computer or laptop.

(Disclosure: This post contains affiliate links and images. I earn advertising/referral fees if you make a purchase by clicking them. There is no extra cost to you. See our full disclosure here. )
So, without further ado, let’s dive right in and learn how to check .NET Framework version installed in Windows 10 PC.
What .NET Framework Comes with Windows 10?
All editions of Windows 10 include the .NET Framework 4.6 as an OS component and it is installed by default on every standard Windows 10 installation. Windows 10 editions also include the .NET Framework 3.5 SP1 as an OS component that is not installed by default. The .NET Framework 3.5 SP1 can be added (if required) or removed by visiting the Programs and Features section in the Control Panel.
Older versions of Windows such as Windows XP, Windows 7 and Windows 8 or 8.1 ships with .NET Framework 1.0, .NET Framework 3.5 and .NET framework 4.5 respectively.
According to an official guide (.NET Framework versions and dependencies) published by the Microsoft:
Each new version of .NET Framework adds new features but retains features from previous versions. The CLR (common language runtime) is identified by its own version number. The .NET Framework version number is incremented at each release, but the CLR version is not always incremented.
And since now we got the basic knowledge of what version of .NET Framework comes with Windows 10 operating systems, it’s time to learn how to check .NET Framework version installed in Windows 10 PC.
There are several versions of .NET Framework available for Windows operating systems, few of them (.NET Frameworks) are included in some Windows OS by default (as we have already discussed earlier) and all .NET Framework versions are available for free official downloads at Microsoft website as well.
If you wish to see all the available Microsoft .NET Framework versions, just go to the Download .NET Framework page and you will be able to see the recommended version, released date, and all the details you need.
Although, there are plenty of ways to determine which .net framework versions are installed on any Windows computer. But when it comes to Windows 10 operating systems, some of the best methods to check .NET Framework version in Windows 10 are through the Windows Explorer, Windows Registry Editor, and Command Prompt or Windows PowerShell.
And today here in this guide, we are going to explain each of them step by step. So let’s begin and discover how to check .NET Framework version in Windows 10 laptops or desktop computers. Here we go:
Method 1: Check .NET Framework Version Manually
Windows Explorer and Control Panel – These are the two very basic and manual ways of checking which version of Microsoft .net framework is installed in your Windows 10 computer. But here we are going to proceed with the method that includes Windows Explorer (because of its accuracy in the result).
So, just follow these steps and learn how to check .NET Framework version installed in Windows 10 using the Windows Explorer:
First of all, open the File Explorer and navigate to these folder locations one by one:
- C:\Windows\Microsoft.NET\Framework
- C:\Windows\Microsoft.NET\Framework64

All the .NET Framework versions are installed into these two folders. Here each .NET version corresponds to a separate directory with the v characters at the beginning and the version number as the folder name. From here, you can easily find out which versions are installed on your system.
Alternative solution: In case, if you are feeling confused after seeing plenty of files and folders available under the Framework and Framework64 folder then you can follow these steps:
- At first, right-click on the Start menu and then select the Command Prompt (Admin) option.

- Once the Command Prompt with administrator privileges is opened, simply run the following command:
dir %WINDIR%\Microsoft.Net\Framework\v* /O:-N /B
- Once the command is executed, it will display all the installed .NET Framework directories (versions).

This is the quick and simple way to manually check .NET Framework version in Windows 10 operating systems. If this seems too cumbersome then worry not, we have a couple more .NET Framework version check methods that should definitely help you.
Method 2: Check .NET Version using the Registry Editor
As we all know, the registry contains a list of the .NET Framework versions installed on a computer. So, you can easily check .NET framework version using the Windows Registry Editor. Simply, follow all these steps precisely and learn how to determine which .net framework versions are installed on your Windows 10 PC. Here we go:
Warning and Disclaimer: Tinkering with the Windows Registry can be very dangerous if you don’t have the proper knowledge. So try it at your own risk, ZeroDollarTips is not liable for any damages. We would recommend you back up the registry for restoration in case it gets corrupted.
- At first, press Windows + R keys together to open the Run dialog box.
- On the Run dialog box, type regedit and then press Enter key to open the Registry Editor.
- In the Registry Editor, navigate to the following subkey:
HKEY_LOCAL_MACHINE\SOFTWARE\Microsoft\NET Framework Setup\NDP\v4\Full
Important note: If the “Full” subkey isn’t available in the registry editor, it means, you don’t have the .NET Framework 4.5 or later versions installed.
- Now in the right pane, check the value of the Release entry. Its value corresponds to a particular version of the .NET Framework.

For example: Here in my case, the value of the Release entry is 528040, which is the release key for .NET Framework 4.8. It means the 4.8 version of .NET Framework is running on my Windows 10 computer.
Hence, by checking the Release REG_DWORD value in the registry editor, you can easily determine which .NET Framework versions are installed on your system.
Detect .NET Framework Version
As we know, the Release REG_DWORD value in the registry represents the version of .NET Framework installed on a Windows computer. So here is the list of .NET Framework versions and their associated Release REG_DWORD values:
| Value of the Release REG_DWORD | .NET Framework Version |
| 378389 | .NET Framework 4.5 |
| 378675 and 378758 | .NET Framework 4.5.1 |
| 379893 | .NET Framework 4.5.2 |
| 393295 and 393297 | .NET Framework 4.6 |
| 394254 and 394271 | .NET Framework 4.6.1 |
| 394802 and 394806 | .NET Framework 4.6.2 |
| 460798 and 460805 | .NET Framework 4.7 |
| 461308 and 461310 | .NET Framework 4.7.1 |
| 461808 and 461814 | .NET Framework 4.7.2 |
| 528040, 528209 and 528049 | .NET Framework 4.8 |
Method 3: Check .NET Framework Version using PowerShell
In case, if you think that other .NET Framework version check methods are complex and giving you incomplete results then you should use the Windows PowerShell for quick and accurate results.
This is one of the easiest ways to check .NET Framework version on your system. And we personally recommend this method as it is the fastest and one of the safest. To check .NET framework version in Windows 10 using Windows PowerShell:
- At first, go to the Windows 10 Start Menu Search box and search for PowerShell.
- From the search result, right-click on the Windows PowerShell and then select the Run as administrator option.

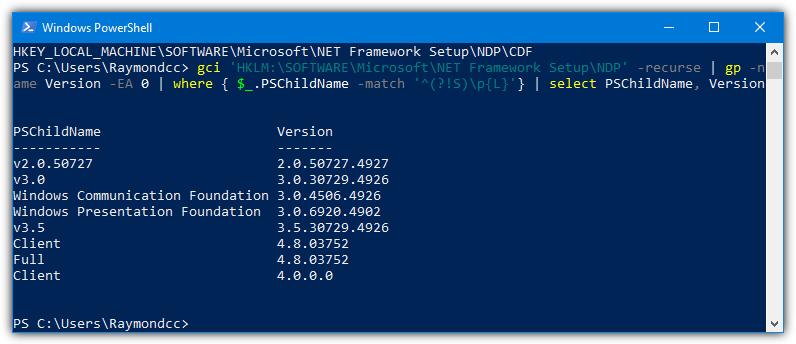
- Once the Windows PowerShell with administrator privileges is opened, type the following command and then press the Enter key:
gci ‘HKLM:\SOFTWARE\Microsoft\NET Framework Setup\NDP’ -recurse | gp -name Version -EA 0 | where { $_.PSChildName -match ‘^(?!S)\p{L}’} | select PSChildName, Version

As soon as you give this command, it will display all the installed .NET Framework versions. It could be a bit hard to understand but you will know all the versions installed on your system from the results.
Conclusion – Check .NET Framework Version
If you are not an experienced computer user and don’t’ want to proceed with the method of checking .NET Framework version using the Windows Registry Editor then we recommend you try the first (Method 1) or the third (Method 3) solution as these are the methods that work best, are safe and don’t cause any sort of harm to your system. None of the methods on this list will cause any issues if they are followed to the tee.
We are certain by now all your questions (How to check .NET Framework version in Windows 10 PC? And which .Net version does Windows 10 have built-in?) have been answered satisfactorily.
If you have still any more questions for us related to Microsoft .NET Framework for Windows 10 or want any other sort of help then reach out via our Contact us page or through the comments below. We will respond to you as quickly as possible.
You may also be interested in checking out:
- How to Check Windows version, Build and Edition from ISO or DVD
- How to Check Your CPU Temperature in Windows 10
- 14 Best Free Windows 10 Product Key Finder Software
- How to Check for Windows Updates in Windows 10
- How to Fix Windows 10 Update Stuck at Checking for Updates
The other day, I wanted to install a new app and stumbled upon several versions—some requiring the .NET Framework. That left me wondering: What .NET Framework version do I have?
Turns out, it’s pretty easy to find out, and I’ll show you a few ways in which you can do it.
Besides helping you run compatible apps, knowing your .NET version can also come in handy when troubleshooting errors, developing software, or keeping your system secure and up to date.
Here’s how you check:
- Use PowerShell
- Checking Manually Through Windows Features
- Use .NET Version Detector
- Try NET Version Check
- Use the Registry Editor
- Use the Command Prompt
- Check Using Visual Studio
How to Detect .net Version
1. Use PowerShell to Detect .NET Versions
If you’re comfortable using PowerShell, here’s a simple command to list installed .NET Framework versions:
gci 'HKLM:\SOFTWARE\Microsoft\NET Framework Setup\NDP' -recurse | gp -name Version -EA 0 | where { $_.PSChildName -match '^(?!S)\p{L}'} | select PSChildName, Version
This command will show you a basic version list, but it won’t detect versions 1.0 or 1.1 and doesn’t display service pack info.
If you want something more user-friendly, try using a ready-made PowerShell script that clearly displays all versions, from .NET 1.0 to 4.8.
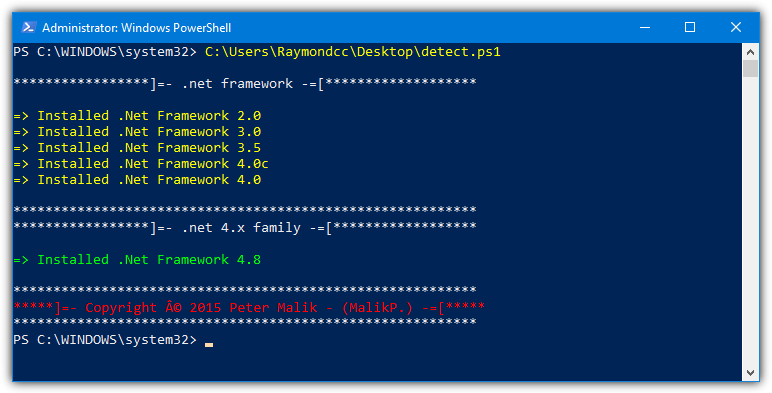
Download .NET Framework Installed Versions Getter
2. Checking Manually Through Windows Features
You can manually check the installed versions of Microsoft .NET Framework in a few ways.
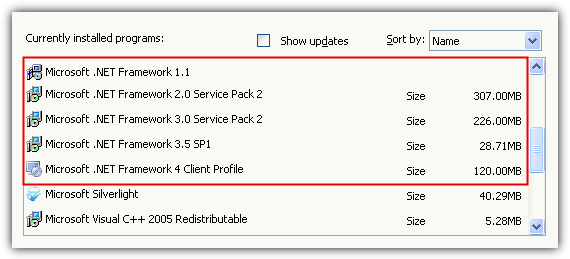
One method is by going to “Programs and Features” or Add and Remove Programs in the Control Panel. However, this method might not always be accurate, as uninstall entries could be removed from the registry, or old versions might be left over. Additionally, built-in versions of .NET that come with the OS won’t show here.
Another manual way is by checking the folders where the .NET program files are stored. These folders are usually found in C:\Windows\Microsoft.NET\Framework and C:\Windows\Microsoft.NET\Framework64 for 64-bit systems. Hovering over the folders shows their size (we used Free Commander below to check sizes easily).
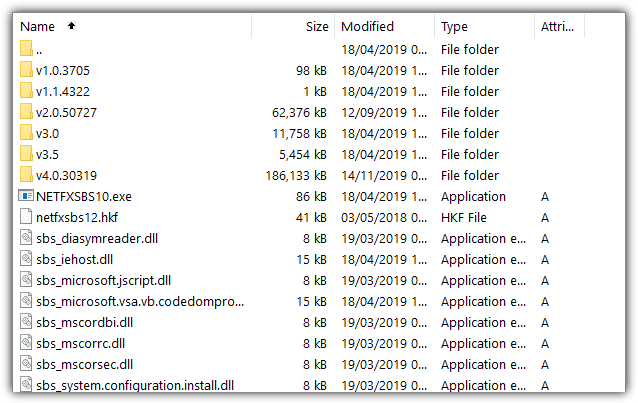
The folder for version 1.0 and 1.1 might be empty, meaning they aren’t installed. The v4.0.30319 folder can be tricky because it could contain any .NET 4 version from 4.0 to 4.8. To find the exact version, open the folder and hover over a DLL or executable to see its info tip with the installed version.
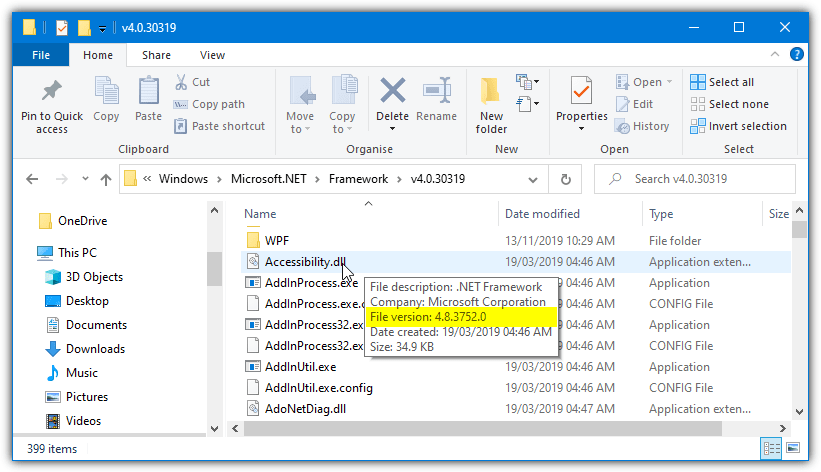
While this method isn’t the most precise, it gives you a rough idea of what .NET versions are installed using just Windows File Explorer.
3. Use .NET Version Detector
ASoft .NET Version Detector is a small and lightweight portable tool that shows all the different versions of the .NET Framework installed on your machine. If a version isn’t installed, the program provides easy links to download the missing version from Microsoft’s website, as well as the Software Development Kit (SDK) for each version.
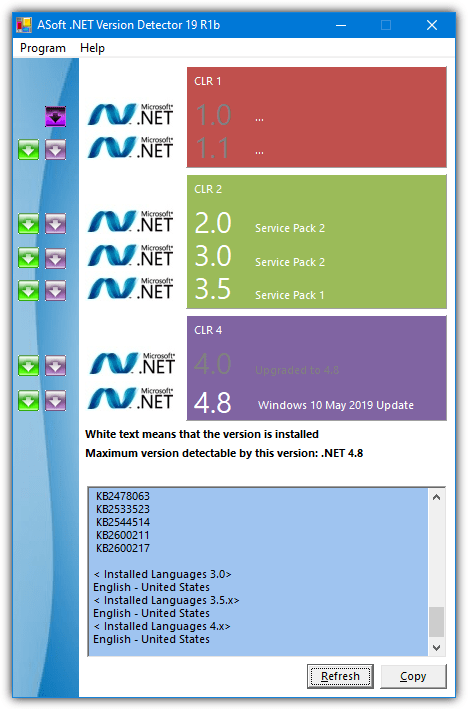
The tool shows installed versions with white text. You can click the logo next to each version to open its install directory. The log box at the bottom displays the versions, updates, and their folder locations, including 32bit/64bit. You can copy all this information to your clipboard by using the copy button.
To see which versions are standard for each operating system, go to Help > .NET Version History. ASoft .NET Version Detector checks versions 1.0 to 4.8 and works on Windows 2000 and later.
Download .NET Version Detector
4. Try NET Version Check
Though a bit outdated, NET Version Check is still effective. When tested, it detected the latest .NET Framework 4.8. Make sure to run it as Administrator, even if you already have admin rights, or it won’t show the version numbers.
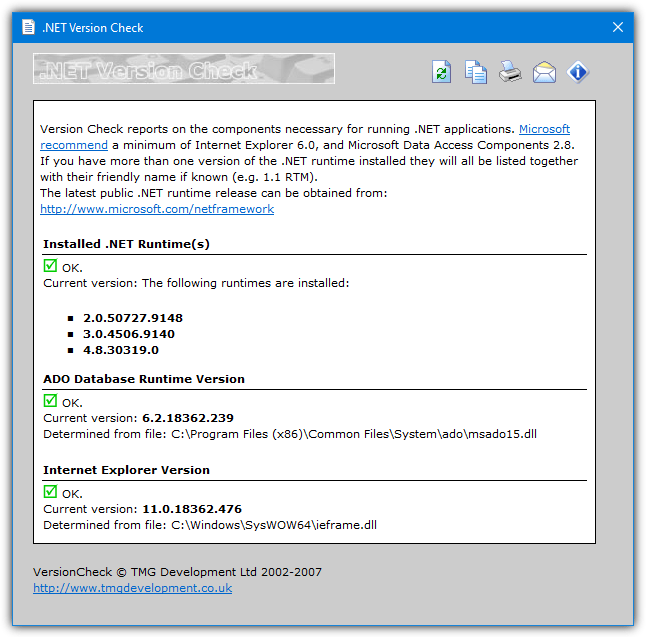
This tool also checks the version of Internet Explorer, which can be useful for older systems. It offers options to copy the info to the clipboard, print it, or email it. Inside the zip file, there’s a command-line version that can be used in batch files and doesn’t require administrative privileges.
The GUI and command-line versions provide a version number, which might not be as easy to read. However, it still gives you useful info for troubleshooting and identifying installed versions.
Download .NET Version Checker
5. Use the Registry Editor
You can check the installed .NET versions through the Windows registry. This method can show you the exact version numbers of the installed frameworks.
To do this:
- Press Win + R, type regedit, and press Enter.

- Navigate to the following path: HKEY_LOCAL_MACHINE\SOFTWARE\Microsoft\NET Framework Setup\NDP
- Under this registry key, you’ll find subkeys for each version of .NET installed on your system. For example, v4 for .NET 4.x or v3.5 for .NET 3.5.


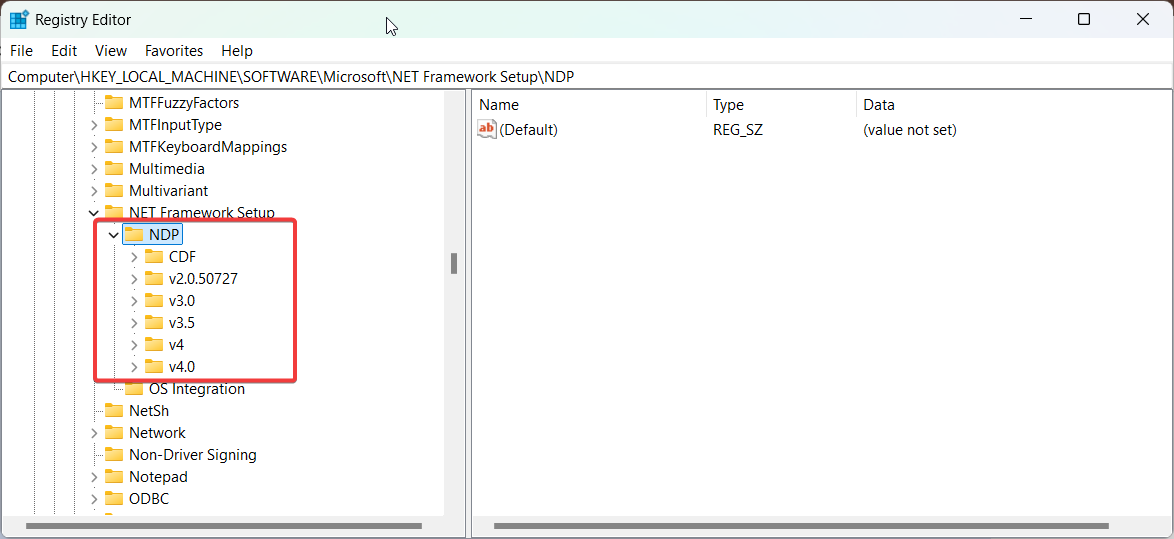
This method requires caution since making changes to the registry can cause system issues. Only read the information without making any changes.
6. Use the Command Prompt
If you’re comfortable with command-line tools, you can use the Command Prompt to check for installed .NET versions:
- Open Command Prompt with Admin privileges.
- Type the following command: dir /b /ad C:\Windows\Microsoft.NET\Framework This will list all directories corresponding to installed versions of .NET Framework.
- If you have a 64-bit system, use: dir /b /ad C:\Windows\Microsoft.NET\Framework64

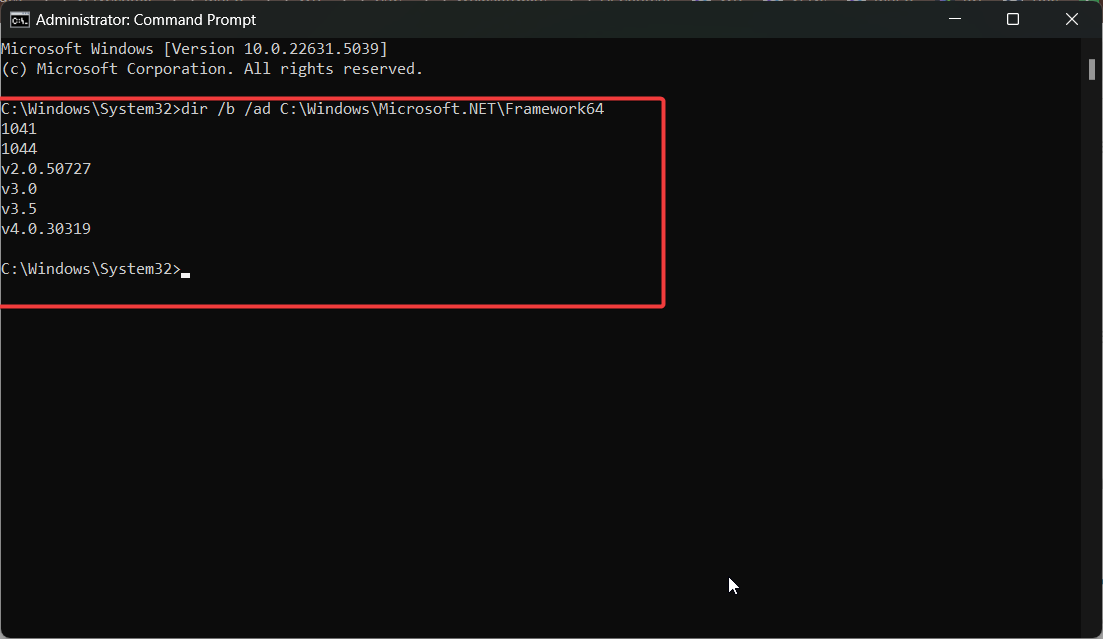
This method is quick but only shows the folders associated with installed versions, so it’s less detailed compared to other methods.
7. Check Using Visual Studio
If you have Visual Studio installed, it also offers a way to check which .NET versions are available on your system:
- Open Visual Studio.
- Go to Tools > Options.
- Navigate to Projects and Solutions.
- Create a new project.
- You’ll see the installed versions of .NET Framework and .NET Core.

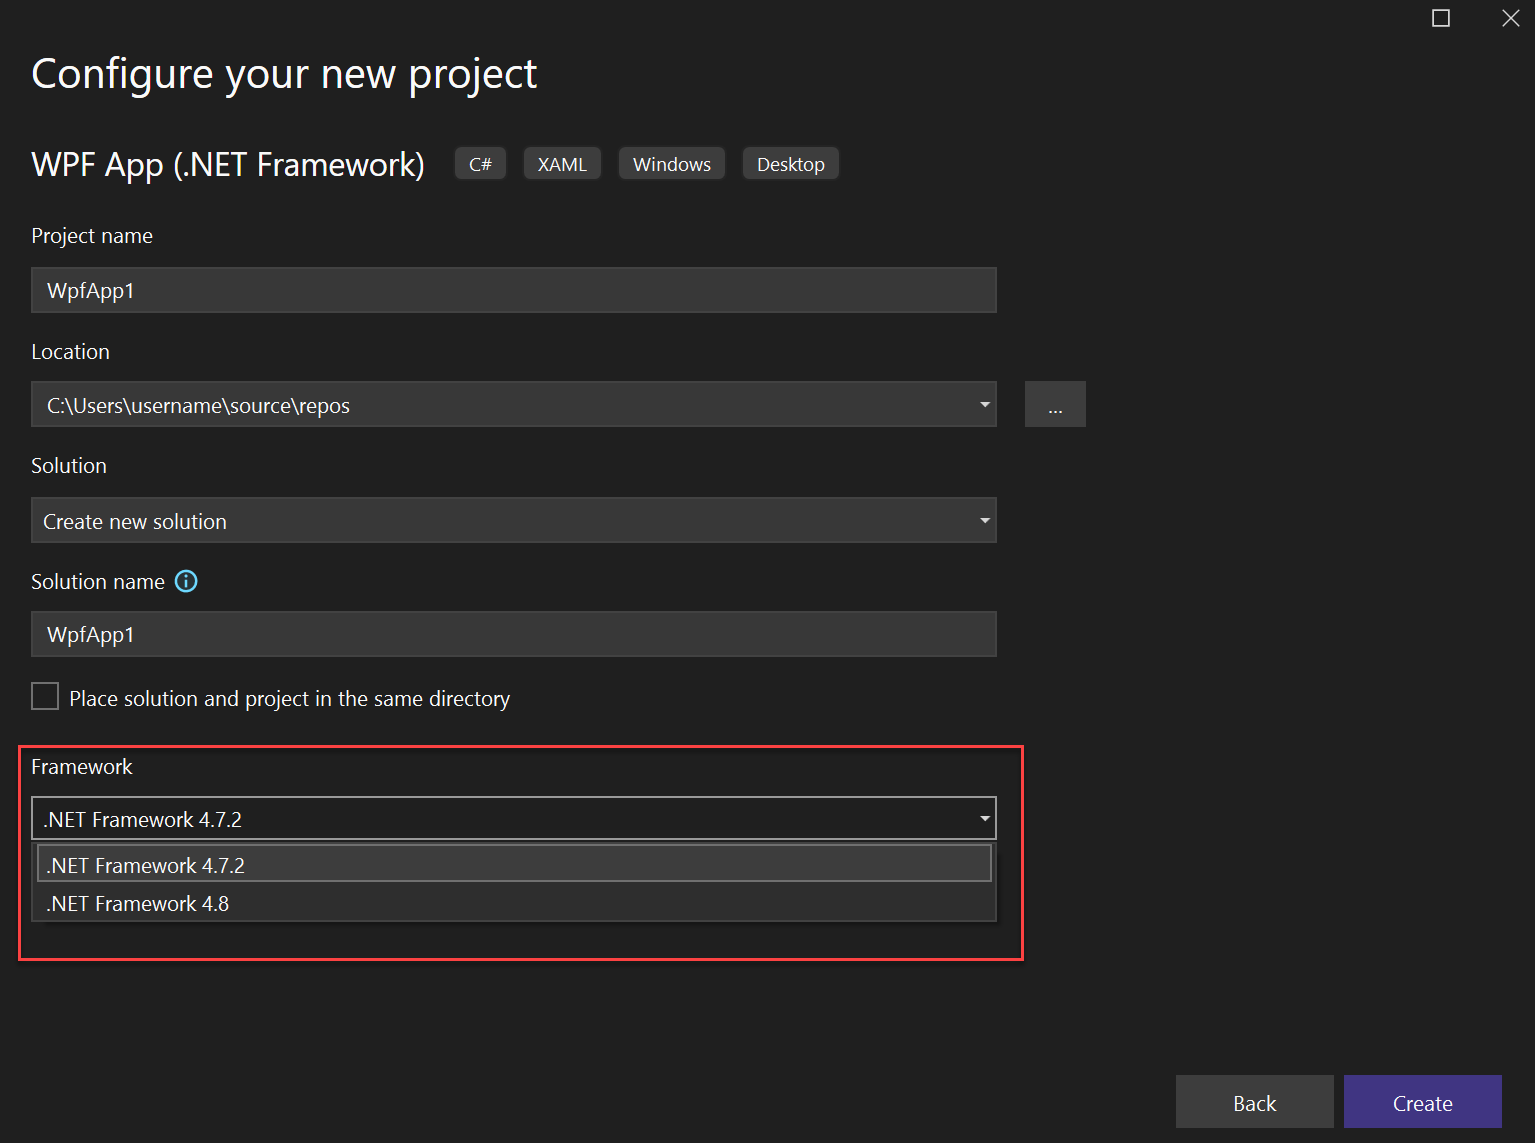
This method is particularly useful if you’re a developer or using .NET for software development.
Knowing which .NET version is on your system is key to making sure apps run smoothly and fixing any issues that pop up. If you’re dealing with multiple versions or need to uninstall .NET, tools like Aaron Stebner’s Cleanup Tool can help. Check out how to uninstall .NET Framework if you’re having trouble with that.
If you’re seeing a bunch of versions in “Add or Remove Programs,” find out how to manage multiple .NET versions.
And if you’re not sure your installation is right, try the .NET Framework Setup Verification Utility. Keeping everything updated will save you a lot of headaches down the road!
On Windows, multiple versions of the .NET Framework can be installed simultaneously. When installing on a computer a new application developed on .Net, it is sometimes necessary to know in advance which versions and service packs of the .Net Framework are already installed on the user’s computer or on the server. There are several ways to get a list of installed versions of the .NET Framework.
List the installed versions of the .NET Framework on the command line
All versions of the .NET Framework are installed in directories:
% SystemRoot% \ Microsoft .NET \ Framework
% SystemRoot% \ Microsoft.NET \ Framework64
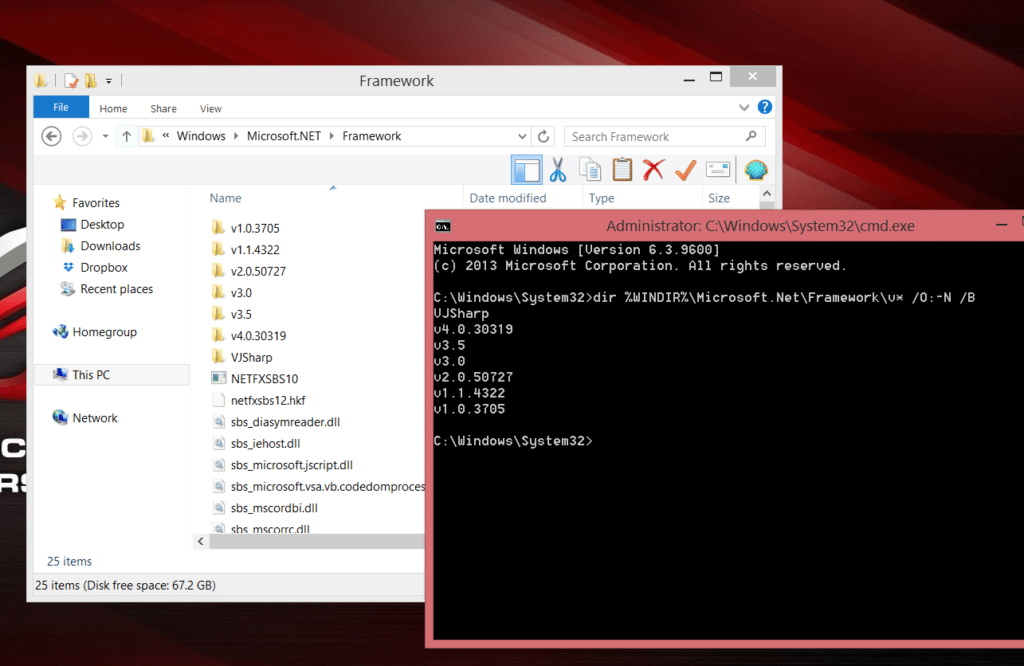
Therefore, the easiest way to display the list of installed versions of .Net is to open this folder. Each version corresponds to a separate directory with the v characters at the beginning and the version number as the folder name. Alternatively, you can list the .NET Framework directories (versions) on the command line like this:
dir% WINDIR% \ Microsoft.Net \ Framework \ v * / O: -N / B
Related post : How to Create A Virtual Hard Disk in Windows 7,8,10
Back to top button