
Одна из самых частых проблем пользователей всех версий Windows, и 11-я здесь не исключение — отсутствие звука: простое его исчезновение без видимых причин, нет звука после обновления системы или чистой установки, в колонках или наушниках.
В этой инструкции пошагово о том, что делать, если нет звука в Windows 11, независимо от того, в какой момент он пропал, способы от простых к более сложным.
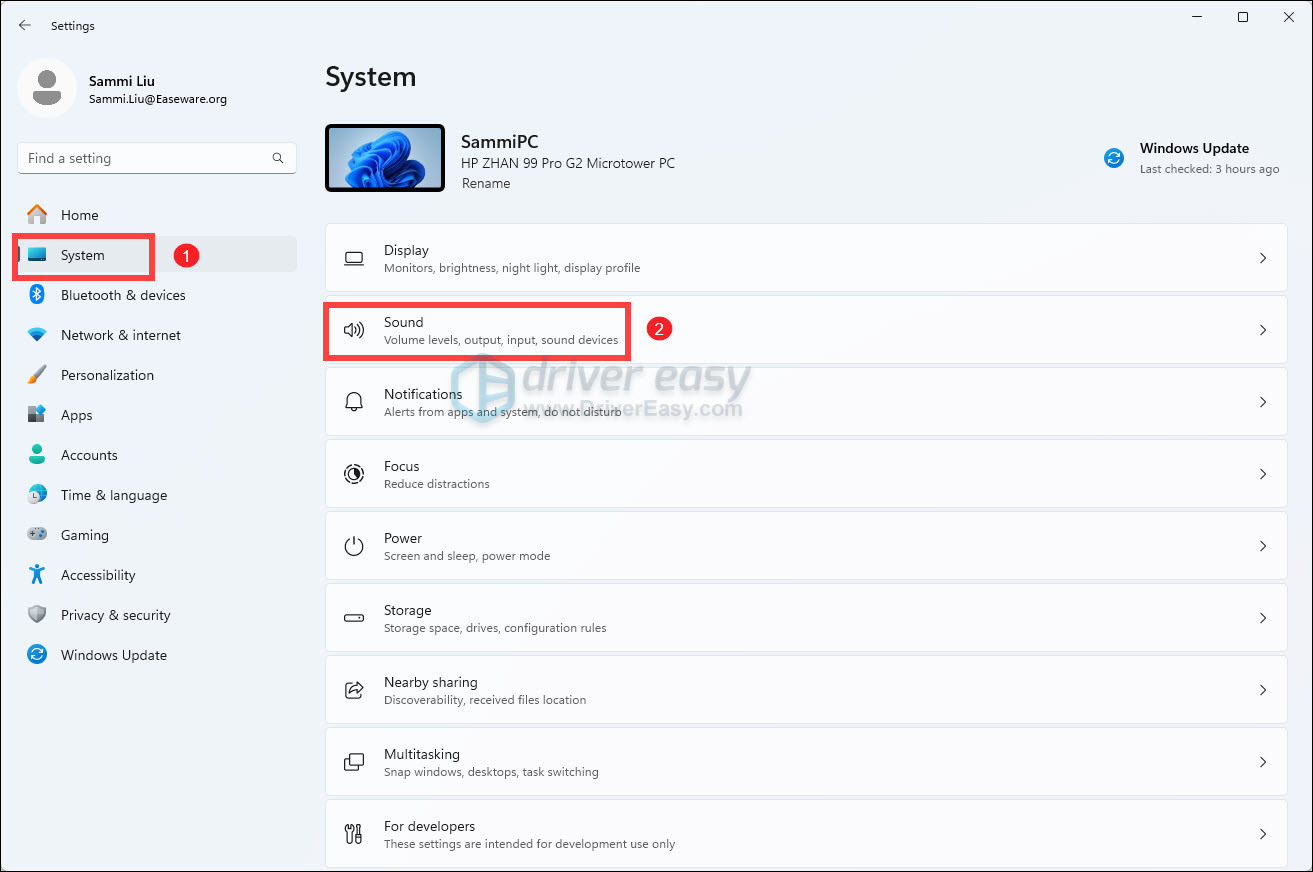
Первое, что стоит проверить если нет звука
Некоторые пренебрегают простыми шагами для первоначальной проверки причин отсутствия звука на ПК или ноутбуке, будучи уверенными, что проблема не в этом.
Я бы настойчиво рекомендовал начать со следующих шагов, чтобы не потерять время:
- Проверьте подключение коннектора ваших колонок к соответствующему (и правильному) выходу на звуковой плате: иногда он может сидеть не плотно и отключаться при простом перемещении системного блока.
- Подключение кабеля к колонкам тоже стоит проверить: ситуация здесь аналогична, а с учетом того, что часто используются «тюльпаны», даже более вероятна.
- Нажмите правой кнопкой мыши по значку динамика в области уведомлений и выберите «Микшер громкости». Убедитесь, что выбрано правильное устройство вывода, а громкость не равна нулю (в том числе и для отдельных приложений). Здесь может оказаться что устройств вывода нет в списке, либо ни одно не соответствует нужной звуковой плате: это нормально и далее в статье попробуем решить эту проблему.

- Про питание колонок и регулятор громкости на них тоже не забывайте.

Если в этой части всё в полном порядке, можно переходить к следующим шагам.
Драйверы аудио для звуковой карты
Самая распространенная причина проблем со звуком в Windows 11 — отсутствие или установка не тех драйверов аудио, что и приводит к проблемам со звуком. В некоторых случаях может случиться, что система сама обновила их, после чего звук пропал.
Рекомендую следующие шаги, чтобы решить проблему:
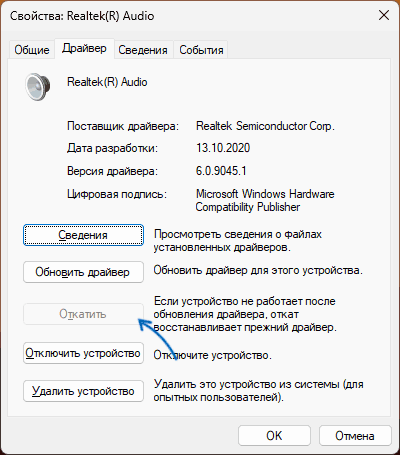
- Если до недавнего времени звук работал, система не переустанавливалась, может помочь откат драйвера: откройте диспетчер устройств (через меню по правому клику на кнопке «Пуск» или с помощью клавиш Win+R и ввода devmgmt.msc), дважды нажмите по вашей звуковой карте в разделе «Звуковые, игровые и видеоустройства», проверьте: есть ли кнопка «Откатить» на вкладке «Драйвер», если есть — используйте её.

- Обновите драйвер. Речь не об обновлении в диспетчере устройств: там вы увидите стандартное сообщение «Наиболее подходящие драйверы для данного устройства уже установлены», хотя с большой вероятностью это не так. Оптимальный метод: найти страницу поддержки вашей модели материнской платы ПК или ноутбука на официальном сайте производителя и скачать драйвер аудио оттуда, затем установить его. Внимание: на официальном сайте может не быть драйверов для Windows 11, но в большинстве случаев драйверы для предыдущих версий системы исправно работают (но их может потребоваться запустить в режиме совместимости). На изображении — пример, как драйвер звука может выглядеть на официальном сайте.

- При обновлении и установке драйверов учитывайте, что, если в диспетчере устройств вы видите «Устройство с поддержкой High Definition Audio» в списке — драйвер не установлен, точнее установлен стандартный драйвер Windows, который она устанавливает на все звуковые карты, для которых не может найти более подходящих драйверов. А звуковые устройства NVIDIA и AMD, которые вы также можете увидеть там — это не звуковая карта, они относятся к выводу звука по HDMI.

- При отсутствии звуковой карты в диспетчере устройств, но наличии «Неизвестных устройств», учитывайте, что и они также могут быть ею. Здесь может помочь: Как установить драйвер неизвестного устройства.
- Может иметь смысл проверить наличие драйверов в Центре обновлений: зайдите в Параметры — Центр обновления Windows — Дополнительные параметры — Необязательные обновления. Раскройте пункт «Обновления драйверов» и посмотрите, нет ли среди доступных драйвера аудио.

- В крайнем случае, если вы не можете найти драйверы самостоятельно, можно попробовать использовать Snappy Driver Installer.


И ещё один вариант, если скачать какие-либо драйверы не получается:
- Нажмите правой кнопкой мыши по звуковой карте в диспетчере устройств и выберите «Обновить драйвер».

- Нажмите «Найти драйверы на этом компьютере».

- Нажмите «Выбрать драйвер из списка доступных драйверов на компьютере».
- Если в списке совместимых драйверов помимо установленного сейчас драйвера (отображается вверху) есть другие, попробуйте установить их и проверить, решило ли это проблему со звуком.


Если ваша звуковая карта в диспетчере устройств отображается с восклицательным знаком, дважды нажмите по ней и посмотрите код ошибки, а затем выполните поиск именно по этому коду (в том числе в поиске на этом сайте), чтобы найти варианты решения.
Устройства записи и воспроизведения
Если правильный драйвер установлен, при этом звука всё так же нет, можно проверить настройки в старом интерфейсе устройств записи и воспроизведения, который сохранен в Windows 11:
- Нажмите правой кнопкой мыши по кнопке «Пуск», выберите пункт «Выполнить», введите mmsys.cpl и нажмите Enter.
- Убедитесь, что нужное вам устройство используется как устройство по умолчанию и устройство связи по умолчанию (нажимаем правой кнопкой мыши по устройству и если там есть пункты «Сделать устройством по умолчанию — выбираем). Например, если одно устройство сделать устройством по умолчанию, а второе — устройством связи по умолчанию, то звук из первого может пропадать при использовании мессенджеров и других инструментов общения на компьютере.

- Выберите нужное устройство вывода звука и нажмите кнопку «Настроить». Окно настройки может отличаться для разных звуковых плат и подключенной аудио аппаратуры, но иногда в этом окне можно исправить воспроизведение, например, выбрав стереозвук вместо многоканального.

- Выбрав нужное устройство вывода, нажмите кнопку «Свойства». В следующем окне на разных вкладках вы можете попробовать отключить пространственный звук и эффекты, отключить дополнительные средства звука, запретить приложениям использовать устройство в монопольном режиме — иногда это помогает решить проблему. Также может помочь снижение разрядности и частоты дискретизации в пункте «Формат по умолчанию».

- На вкладке «Связь» в окне управления устройствами записи и воспроизведения попробуйте выбрать отметку «Действие не требуется» и применить настройки.


Параметры звуковой карты в БИОС/UEFI
На некоторых компьютерах и ПК есть возможность отключения звуковой карты в БИОС/UEFI. Зайдите в БИОС и проверьте, присутствует ли где-либо возможность переключения звука AC97, HD Audio, On Board Audio Device, Realtek HD Audio и, при наличии, установите его в Enabled (включено).

Сам пункт может располагаться в разных разделах: Configuration, Onboard devices, Peripherals, Advanced.
На некоторых старых ПК в БИОС может настраиваться режим работы звуковой карты — AC97 или HD Audio: если при выбранном режиме возникают проблемы с воспроизведением звука, попробуйте его изменить на другой.

Если предложенные выше способы не вернули звук в Windows 11, далее — ещё несколько вариантов, которые могут сработать:
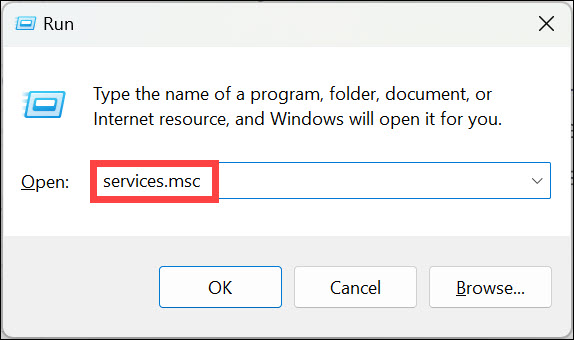
- Откройте «Службы» — нажмите клавиши Win+R и введите services.msc. Проверьте состояние службы Windows Audio в списке служб: она должна выполняться, а тип запуска — «Автоматически». Если это не так, дважды нажмите по службе, измените тип запуска, примените настройки, а затем запустите её.

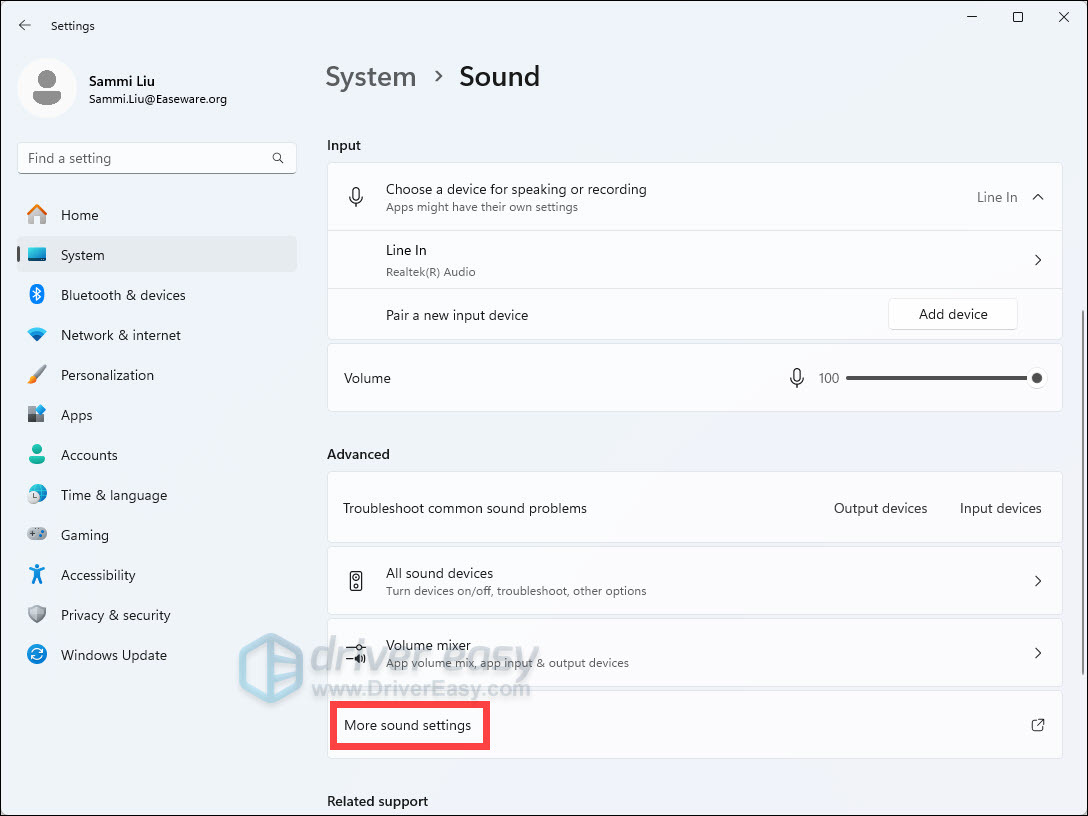
- Зайдите в Параметры — Система — Звук, нажмите по нужному устройству вывода звука (например, Динамики) и внизу окна настроек проверьте, чтобы не были включены какие-то дополнительные средства звука, такие как «Пространственный звук».

- Зайдите в Параметры — Система — Устранение неполадок — Другие средства устранения неполадок или нажмите правой кнопкой мыши по значку динамика и выберите пункт «Устранение неполадок со звуком». Запустите средство устранения неполадок при воспроизведении звука.

- Если недавно звук работал, теперь перестал, при этом система не переустанавливалась, можно использовать точки восстановления системы на дату, когда проблем не наблюдалось.
- При наличии ПО от производителя звуковой карты или компьютера (Realtek Audio Console, Nahimic, Maxx Audio и другие), проверьте настройки звука в соответствующей утилите: попробуйте изменить количество каналов, отключить эффекты выполнить другие настройки, проверяя результат.


Также могут помочь дополнительные инструкции (написанные для Windows 10, но подойдут и для 11), если у вас возникла описанная в них ситуация:
- Что делать, если нет звука по HDMI
- Устройства вывода не найдены — как исправить
- Выходное аудио устройство не установлено
- Пропал звук в браузере — возможные решения
- Это устройство уже используется при выводе звука по HDMI
No sound after updating Windows! Don’t be upset; follow the best fixes listed below & troubleshoot Realtek HD audio manager problems.
For Windows users, encountering audio issues is not new. After each Windows update, some or the other user faces audio-related issues. This leaves users with no sound; if you can relate to it and are looking for ways to fix the Realtek audio driver problem, you are right.
Quick Tip- When manually downloading the latest Realtek audio driver from the official website, ensure your operating system’s correct name and version is selected. Realtek high-definition audio comes preinstalled on Windows 11 and 10, but this doesn’t mean Realtek audio is not working issue cannot be encountered. If you are facing the issue, here are the best ways to fix sound and not working issues.
Common Realtek Audio Issues
- Missing Audio Manager Icon
- Conflicts with preinstalled Microsoft Drivers
- Windows 11, 10, no audio devices are installed
- The audio service is not responding
- No sound
Besides, there are other sound problems that Windows users face. This troubleshooting guide will cover all this and the best ways to fix these issues.
Download and Install Advanced Driver Updater.
Why is there a Realtek High Definition Audio on My PC?
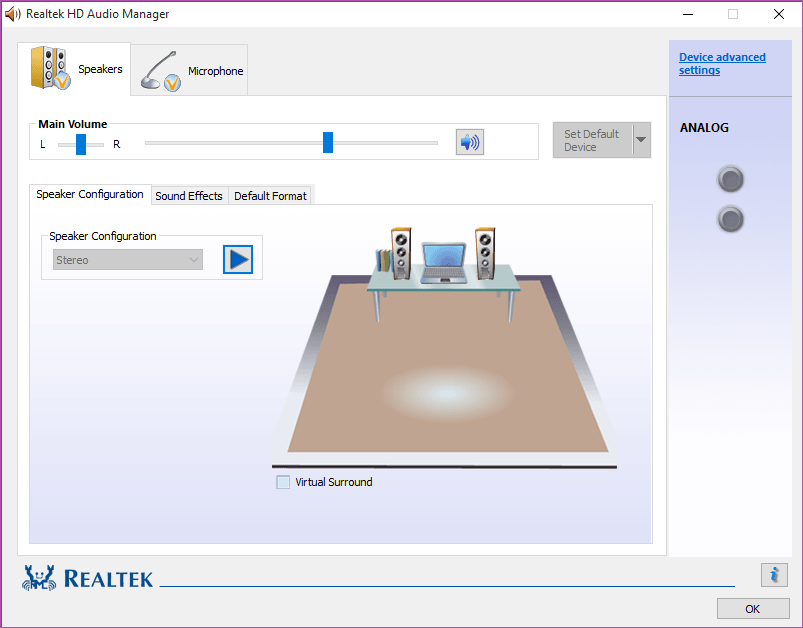
The Realtek HD Definition Audio is the popular sound driver for Windows. It helps choose the audio configuration for the speaker system, and the software also allows adjusting the volume for individual speakers.
However, due to certain reasons, you may face issues with Realtek High Definition Audio.
6 Common Reasons That Cause Realtek Audio Problems
1. Outdated Realtek audio driver.
2. There is a conflict between installed Microsoft and Realtek audio drivers.
3. Audio service is either not running or responding.
4. Misconfigured audio settings.
5. Incorrect output device for audio is selected.
6. Disable audio service.
How to Fix Realtek Audio Issues in Windows 11, 10
Whether you face audio problem issues after installing the latest Windows update or uninstalling a driver, try these 8 ways to troubleshoot the issue.
Basic Troubleshooting
You should always check the device and cable connections before updating the drivers and trying other technical fixes.
- Check the output audio device whether working or not.
- Ensure the output device is receiving power.
- Correct output should be selected on Windows 11 and 10.
- Use the volume controls to ensure the sound is not muted.
- Disconnect and reconnect the output device, and also use the alternate port to ensure the connection is proper.
After following these steps, try the following methods if the audio is still not there.
1. Update Realtek High-Definition Audio on Windows 11 and 10
Common sound problems on Windows are outdated, corrupt, or missing drivers. To fix this issue, downloading and installing the latest driver is recommended. This can be done either manually or automatically.
To download and update the latest driver manually, visit the sound card manufacturer and look for the right driver download. Before this, you must collect information about the operating system’s version, your motherboard’s model, or the sound card. Once you have, only then can you download the correct driver.
Update Audio Drivers using Manufacturer website –
- Search for the audio driver’s manufacturer website on a browser. Click on it.
- Enter your device’s serial number.
- Click the ‘Detect’ button for automatic identification.
- Select your product manually from the list.
- Browse products for general information or resources.
- Download the audio driver on your computer.
Update Audio Drivers using Device Manager –
Another way to update drivers on your computer is to use the Device Manger.
- Open Device Manager.
- Right click on the device, in this case, audio device.
- Select ‘Update Driver’.
- Choose “ Search automatically for updated driver software”.
- Now follow the on-screen instructions to complete the update.
Suppose this sounds like too much work, or you don’t have the technical expertise to collect all this information. In that case, you can try Advanced Driver Updater, a third-party driver updating utility.
This tool lets you download and install compatible drivers without collecting system or device information. Not only this, but Advanced Driver Updaters also keep a backup of old drivers for security reasons. It is easier to use as you have to click Start Scan Now, wait for the scanning to finish, and update the driver.
Also Read: Advanced Driver Updater Review
Here are the detailed steps on how to use Advanced Driver Updater
1. Download and install Advanced Driver Updater

2. Run the professional tool and click Start Scan Now to perform the scanning for outdated Realtek sound drivers.

3. Wait for the scanning to finish.

4. After that, click the Update driver option and update the driver.
Note : If you are using a trial version of the product, you will have to update each driver by clicking the Update driver option. However, if you want to update all drivers in a go, you need to upgrade to the Pro version as it offers an Update All feature. Not only this, but the excellent driver updating utility also comes with a money-back guarantee.
Read more at the official website
5. After updating the driver, restart the system to apply changes.
Now try to play a video or song; the Realtek sound not working issues should not be fixed.
See This- How To Update And Download Realtek 802.11 N WLAN Adapter Driver- Windows 11, 10
Method 2. Disable Audio Enhancement
Changes made to Audio Enhancements might conflict with sound on Windows 11 and 10. Therefore, it is recommended to disable audio enhancement. To do so, follow the steps below:
1. Right-click the Volume icon present in System Tray.
2. Select Open Sound settings > Device properties > Additional device properties.
3. This will open a new window; click the Enhancements tab and uncheck the box next to Disable all enhancements > Apply > Ok

This should troubleshoot Realtek audio problems on your PC.
3. Enable/ Restart Windows Audio Service
Ensure Windows Audio service is enabled to fix high-definition audio devices not working. To do so, follow the steps below:
1. Press Windows + R to open the Run window
2. Type services.msc > Ok
3. Look for Windows Audio service > right-click > Properties

4. Click the down arrow next to Startup type and select Automatic > Start > Apply > Ok
Note: If the service is already running and set to Automatic, you need to restart it. To do so, look for Windows Audio service > right-click > Restart.

Now try to play the sound; this should fix Realtek audio speakers’ not working issues.
Also, Read- How To Update Realtek Bluetooth Driver – Windows 11,10
Method 4. Disable Microsoft UAA Bus Driver
Usually, when two high-definition audio drivers run on the system, a conflict occurs. Therefore, to fix the issues with Realtek audio speakers not working, we must disable Microsoft UAA Bus Driver. To do so, follow the steps below:
1. In the Windows search bar, type Device Manager
2. Look for System Devices > double click to expand it
3. Select Microsoft UAA Bus Driver for High Definition Audio.
Note: If it is not on the list, it is already disabled. This means you can skip this step and move to the next one.
4. If you see it > right-click > Disable device.
5. Restart the system to apply changes; now, try to play the sound. Realtek audio driver issues should be fixed.
Method 5. Use a Generic high-definition Audio Device Driver
You can fix Realtek audio driver issues by switching to a generic driver. To learn how to do that, follow the steps below:
1. In the Windows search bar, type Device Manager
2. Search for Audio inputs and outputs
3. Double-click to expand all the audio drivers
4. Right-click the Realtek audio device > select Update driver from the list
5. Next, select Browse my computer for driver software

6. After that, choose Let me pick from a list of available drivers on my computer

7. Select High Definition Audio driver from the list > Next > follow on-screen instructions.
This will load the default sound driver, and the problem with the Realtek audio driver will be solved.
Check This- How to Download Realtek Ethernet Controller Driver
Method 6. Change Default Sound Format
By altering the default sound format, you can fix high-definition audio devices not working. To do so, follow the steps below:
1. Right-click the sound icon present in the system tray.
2. Select Open Sound settings
3. In the new window that opens, click Device Properties.

4. Click the Additional device properties option

5. This will open a new pop-up window here; click the Advanced tab
6. Next, click the down arrow and select the following depending on the speaker configuration:
24bit/44100 Hz
24bit/192000Hz
7. Click Apply > Ok to save changes.
This should fix Realtek audio speakers not working problems. If this doesn’t work, let’s move to the next step.
Method 7. Reinstall Sound Driver
1. Type Device Manager in the Windows search bar
2. Look for audio inputs and outputs. Double-click to expand it.
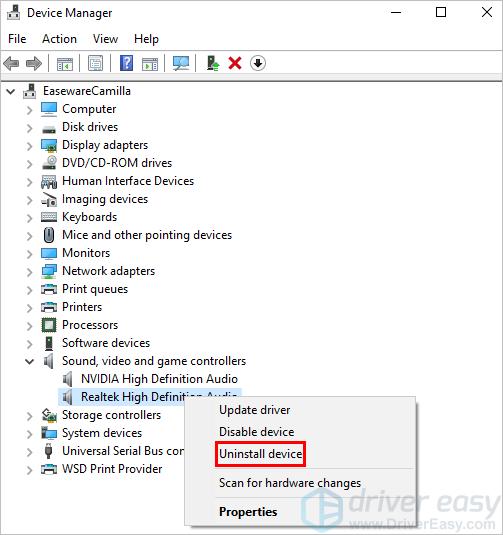
3. Right-click the sound driver > select Uninstall device from the context menu

4. Once done, click the computer icon with lens (Scan for hardware changes)

5. Now, restart the system. Windows will automatically install the default driver.
This should fix the issue, and the speaker Realtek audio not working problem should be resolved.
Method 8. Select the Correct Output Device
When an incorrect output device is selected, you might face Realtek audio driver problems. We need to switch to the correct output device to fix it. To do so, follow the steps below:
1. Right-click the volume icon present in System Tray.

2. Select Open Sound settings from the context menu.
3. Set Speakers or Headphones as the output device

Now, check your system, the Realtek audio speakers are not working, and the problem should be resolved. If you still face the issue, try updating Windows. If you are using an older version, there are chances that you are facing the issue due to some bug. Updating Windows will help resolve it. Press Windows + I to open Windows Settings > Click Windows Update > Check for updates > Download & Install and restart the PC.
See Also-How to Fix Microsoft Teredo Tunneling Adapter Missing
Frequently Asked Questions
Q1. How do I fix Realtek’s no sound?
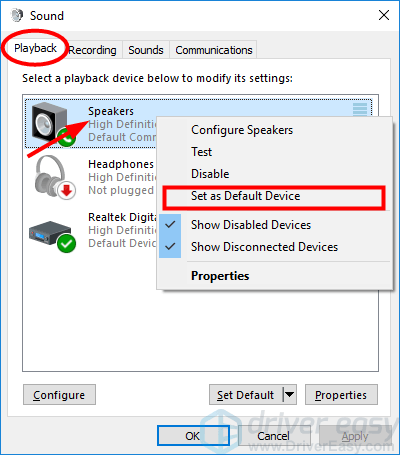
To fix Realtek’s no sound issue, set the speakers as default. To do so, follow these steps:
1. Press Windows + R and open the Run window.
2. Type mmsys.cpl > press enter.
3. Click the Playback tab > right-click Speakers > Set as Default Device > Apply > Ok.
4. Exit the Sound Settings window and reboot the PC.
Now check you should not face an audio issue.
If this doesn’t help, automatically update the Realtek Audio driver using Advanced Driver Updater.
Q2. How do I repair and fix Realtek audio driver Windows 10?
To repair and fix Realtek Audio Driver try the following fixes:
1. Check cables, volume, speaker, and headphone connections
2. Update Realtek High-Definition Audio.
3. Disable Audio Enhancement.
4. Enable/Restart Windows Audio Service.
5. Disable Microsoft UAA Bus Driver.
6. Use a Generic High-Definition Audio Device Driver.
7. Change Default Sound Format.
8. Reinstall Sound Driver.
9. Select Correct Output Device.
10. Run the Audio Troubleshooter.
Q3. How do I get my sound back on Windows 10?
Use a generic driver to get the sound back and fix Realtek audio driver issues.
1. Right-click the Windows Start icon,> select Device Manager
2. Go to Audio inputs and outputs> double-click on it.
3. Right-click the Realtek audio device > select Update driver from the list
5. Choose the second option, “Browse my computer for driver software.”
6. Select, “Let me pick from a list of available drivers on my computer.”
7. Select High Definition Audio driver from the list > and follow on-screen instructions.
Q4. Why is there no sound on my Windows 10?
There are chances that the audio device is muted, has been disabled, or the driver is outdated. To fix the problem, unmute the audio device, enable it and update the driver through Device Manager or Advanced Driver Updater.
Q5. How do I fix a corrupted Realtek driver?
The easiest way to fix a corrupted Realtek driver is to reinstall and update the driver. You can do it manually through Device Manager or use Advanced Driver Updater, a driver updating tool, to update corrupt and problematic drivers.
Q6. How do I fix my Realtek audio?
To fix issues with Realtek audio, you can try the following techniques:
1. Update Realtek driver
2. Disable Audio-Enhancement
3. Restart Windows Audio Service
4. Disable Microsoft UAA Bus Driver
5. Modify Default Sound Format
Fix – Realtek Audio Driver Problems
You can quickly troubleshoot Realtek audio problems on your system using these fixes. Alongside these fixes, we suggest checking whether the speakers are correctly connected. Also, ensure that the speaker is not muted. This will help resolve Realtek speakers not working.
We hope using these steps, you can fix the problem with sound. To keep drivers updated and avoid facing such issues in the future, use Advanced Driver Updater, the best driver updater to update outdated drivers in a go. We’d love to hear from you; please share your feedback in the comments section. If you have any product-related queries, contact the support team.
Recommended :
12 Best (Free & Paid) Driver Updater Software To Fix Driver Issues on Windows
How to Download & Update Realtek PCIe GbE Family Controller Driver
How To Download & Update Realtek Audio Driver on Windows 11/10
Audio problems can be one of the most frustrating issues on a computer. Imagine watching a movie or a video, only to be left with no sound and no idea how to fix it!
Many Windows users have reported that after upgrading to Windows 11 from Windows 10, their Realtek audio stopped working. If you’re experiencing this issue with your Realtek audio on Windows 11, don’t worry; fortunately, there are a few fixes.
In this article, we will show you how to fix the Realtek audio not working in Windows 11. We will also provide some tips to avoid audio problems on Windows 11.
Why Is Realtek Audio Not Working in Windows 11?
If the Realtek audio drivers are not functioning on your Windows 11 device, it could be due to any of the following reasons:
- Outdated or corrupted Realtek audio drivers: If the sound driver is outdated or corrupted, it may not work correctly on your device.
- Incorrect audio settings: If you have selected incorrect audio settings on your device, the audio may not work correctly.
- Hardware compatibility: If you are using hardware that is not compatible with the Windows 11 operating system, it may not work correctly.
- Changes in Windows settings: If you have changed certain Windows settings, it may cause the audio to not work properly.
- Wrong connections: If you have connected your device to the wrong audio port, it may cause the audio to not work properly.
- Audio service stopped working: If the audio service on your device has stopped working, it may cause the audio to not work.
Fix Realtek Audio Driver Not Working on Windows 11
Now you know the reasons why your Realtek audio may not be working on Windows 11. Here are various fixes that you can apply.
1. Check Your Connection and Audio Source
The first thing you should do is check the connections between your device and the audio source. Make sure that you have connected your device to the right port and that it is adequately secured. Also, make sure that you are using the correct audio source.
2. Update Realtek Audio Driver
If your Realtek audio driver is outdated or corrupted, it may cause the audio to not work. To fix this issue, you need to update your Realtek audio driver.
You can do this manually by visiting the website of Realtek and downloading the latest drivers for your device. Or, if you can update the Realtek audio drivers through Device Manager:
1. Press the Windows + X keys at the same time and click on Device Manager.
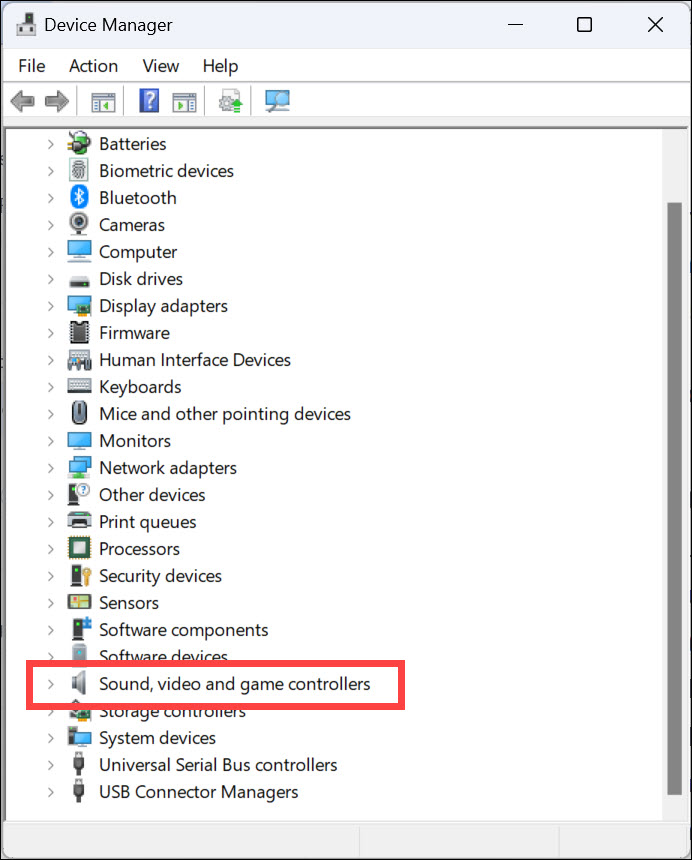
2. Expand the Sound, video, and game controllers option by clicking on it.
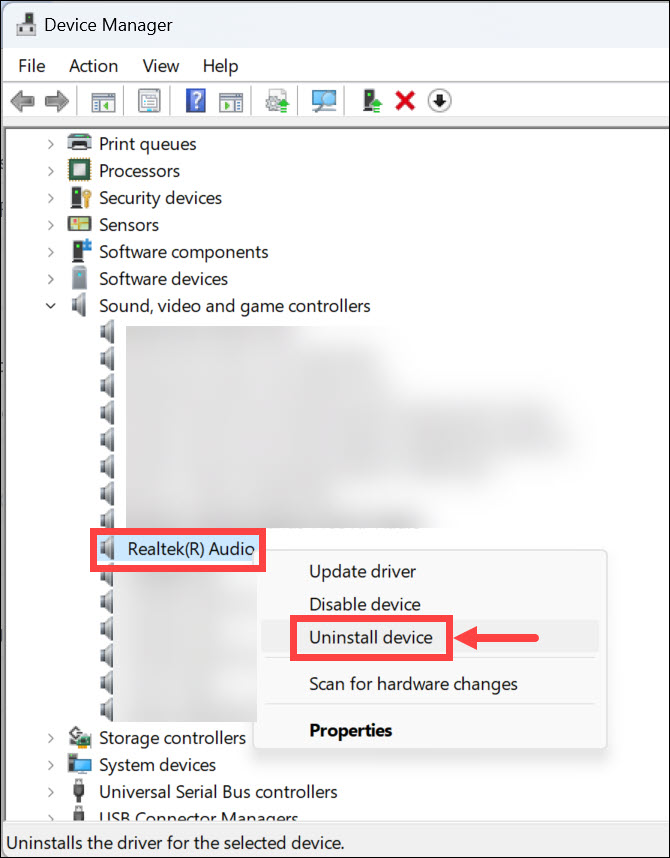
3. Right-click on Realtek(R) audio and select Update driver.

4. Choose “Search Automatically for Updated Driver Software” from the options available and wait for Windows to finish the process.
3. Re-Install Realtek Audio Drivers
If updating the audio drivers doesn’t help, you may need to re-install them. You can do this by following these steps:
1. Press Windows + X keys at the same time and click on Device Manager.
2. Expand the Sound, video, and game controllers option by clicking on it.
3. Right-click on Realtek(R) audio and select Uninstall device.
4. Restart your device, and Windows will automatically install the latest Realtek driver. If not, you can manually re-install the latest version of the drivers from the website of Realtek.
4. Verify Audio Settings
If you have selected incorrect audio settings, it may cause the audio to not work correctly. To fix this issue, verify your audio settings and make sure that they are correct:
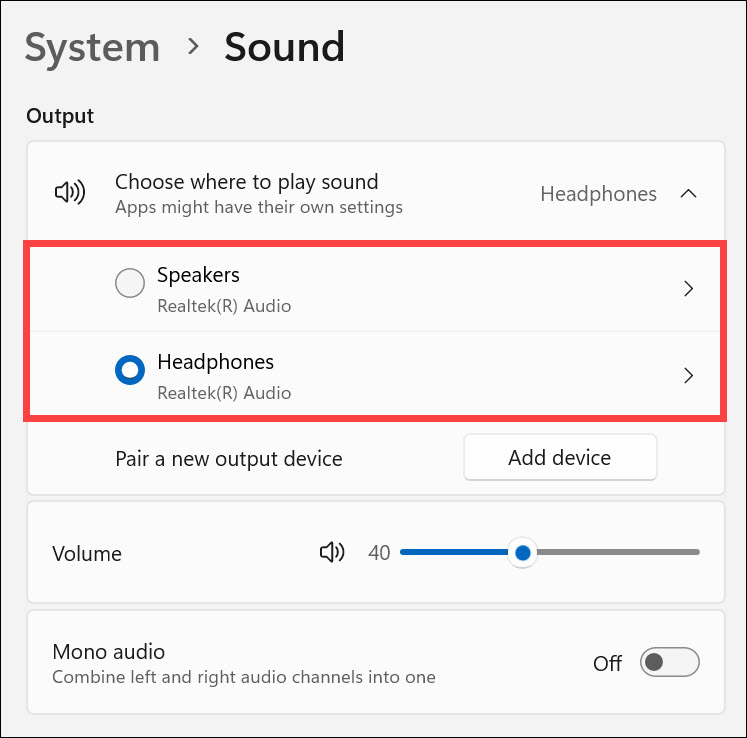
1. Right-click on the “speaker icon” in the taskbar and select Sound settings from the context menu.
2. Under the Output heading, click Choose where to play sound.
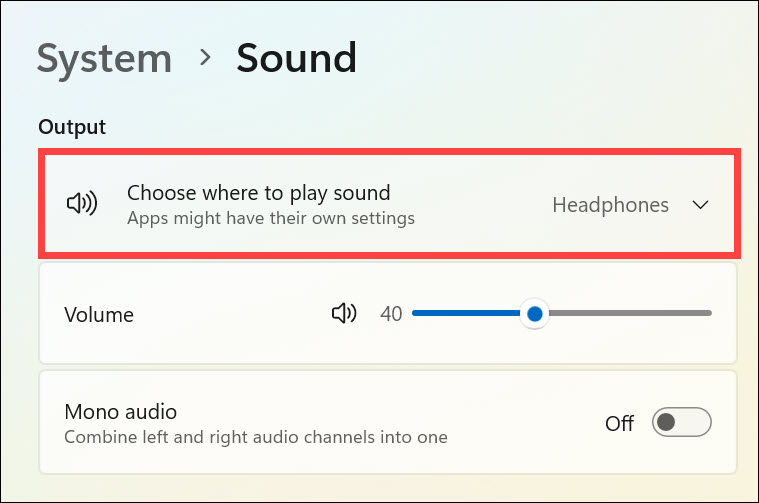
3. Select the correct audio source from the list. Also, adjust the volume as per your preference.
5. Run Windows 11 Audio Troubleshooter
You can also run the Windows 11 audio troubleshooter to detect and fix any audio-related issues on your device. It can help you resolve any conflicts or incorrect settings causing the Realtek audio not working problem.
Here are the steps to run Windows audio troubleshooter:
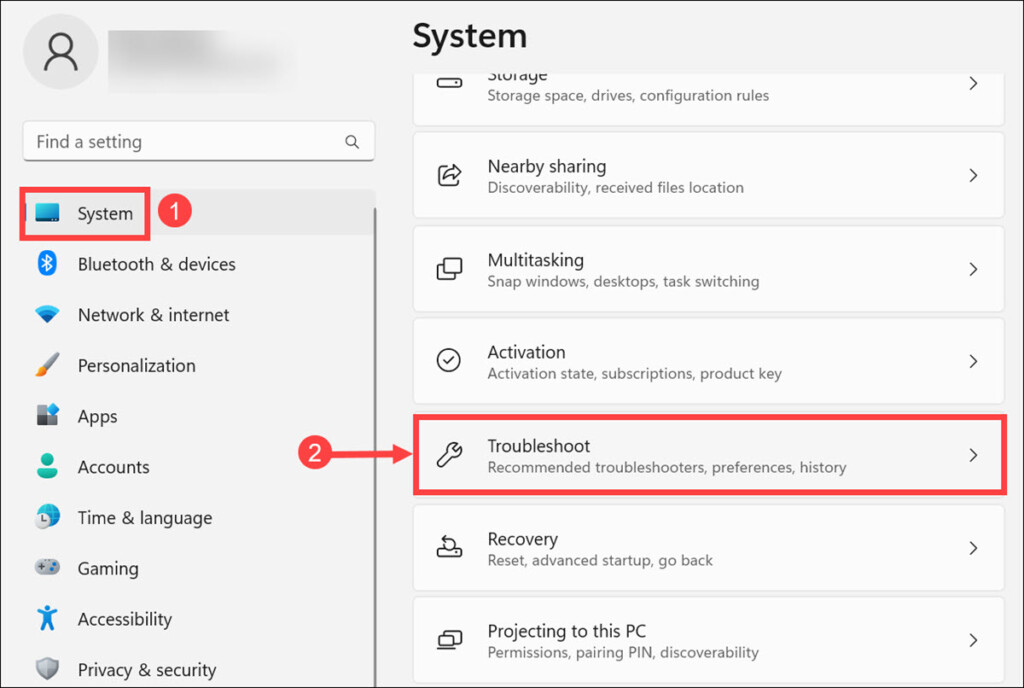
1. Launch Windows Settings by pressing the Windows + I keys at the same time.
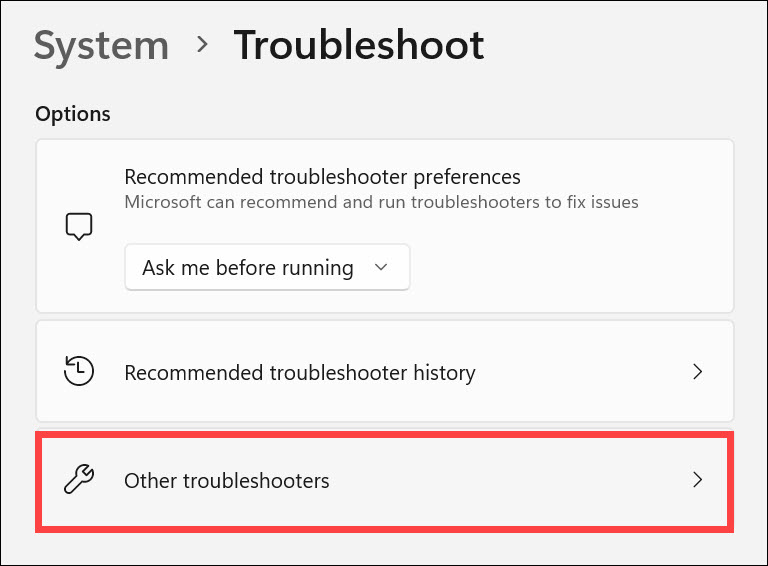
2. On the left pane, remain on the System tab and select Troubleshoot on the right.
3. Under the Troubleshoot settings, select Other troubleshooters.
4. Click the Run button next to “Playing Audio” to begin troubleshooting.

5. Follow the on-screen instructions to fix any audio-related issues on your device.
6. Restart Realtek Audio Service
Realtek audio service is responsible for running the audio on your device. If it has stopped working, it can cause the audio to not work. To fix this issue, you need to restart Realtek audio service.
Here is how to restart Realtek Audio Service:
1. Press Windows + R keys at the same time and type “services.msc” into the Run box. Press Enter to launch the Services window.
2. Locate Realtek Audio Universal Service or RtkAudioService in the list, right-click on it, and select Start.

3. Wait for Windows to finish the process and verify that your Realtek audio is now working correctly.
7. Disable Audio Enhancements
It is possible that any audio enhancements enabled on your device can interfere with the Realtek audio and cause it to not work correctly. To fix this issue, you need to disable all audio enhancements. Here is how to do that:
1. Click the ‘search icon’ on the taskbar, type Change system sounds on the Windows search box, and click on its icon to launch.

2. Now switch to the Playback tab, select your Speaker, and click Properties at the bottom.

3. Under the Speaker Properties window, switch to the Advanced tab and uncheck Enable audio enhancements.

Now check if the Realtek audio is working correctly on your device. If it still doesn’t work, try the next solution.
8. Restore Windows 11 to a Previous State
Windows 11 automatically creates restore points every time you install an app or make any major changes to the system. If any app or recent changes are causing the problem, restoring your PC to a previous state can help fix it.
However, remember that restoring Windows to a previous state would delete all the recent applications and restore all the changes you have made to the system. Here are the steps to run the system restore:
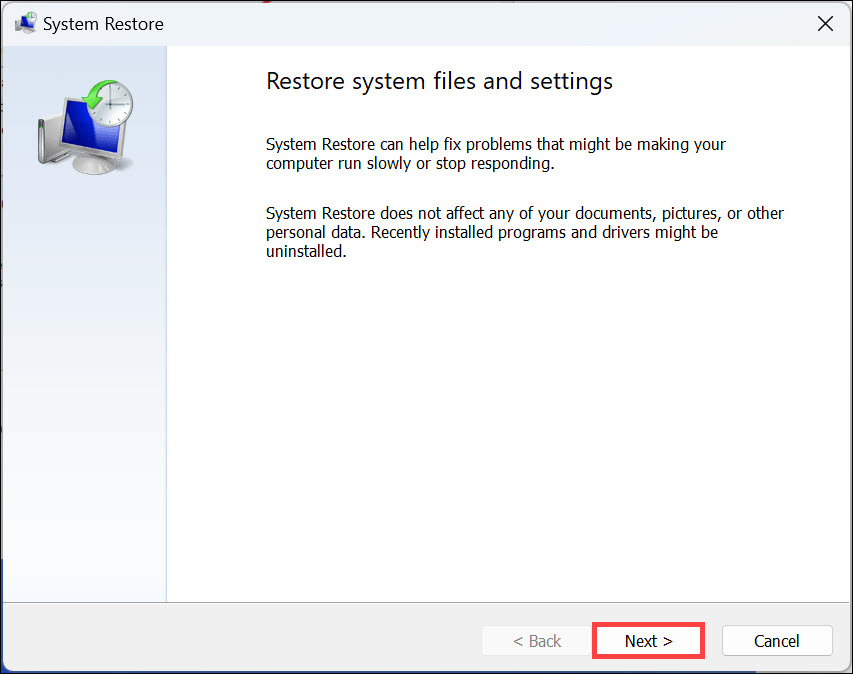
1. Press Windows + R to launch the “Windows Run Command.”
2. Type this command to open the “System Restore” Window: rstrui

3. Under the “System Restore” window, click Next.
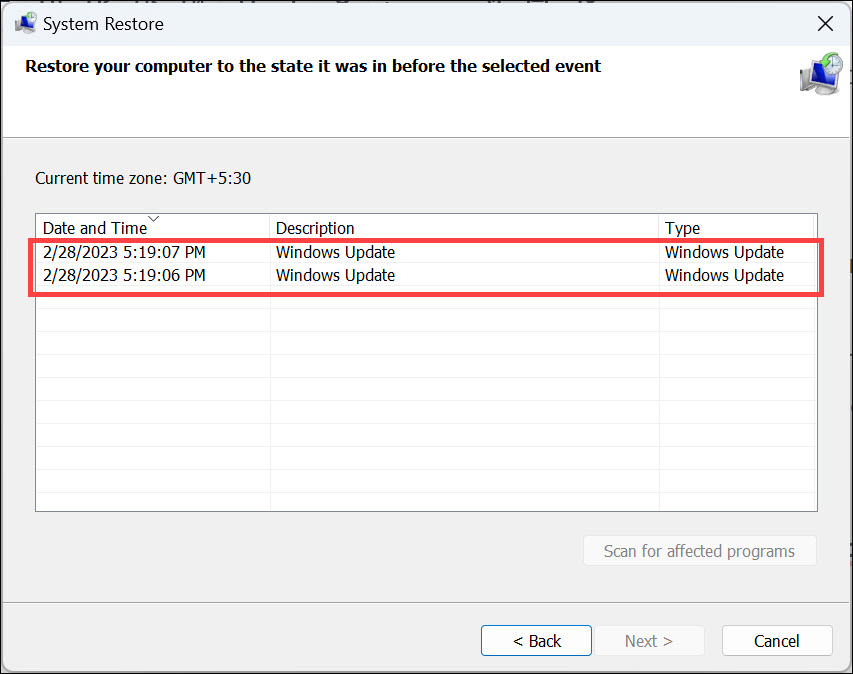
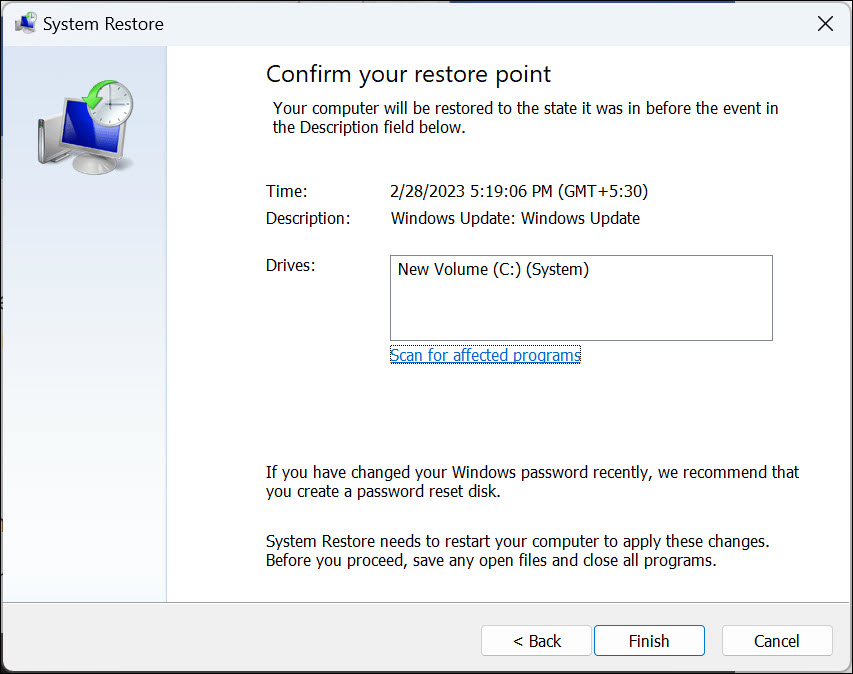
4. Select an appropriate system restore point from the list where Realtek audio was working fine and click Next.
5. Finally, click Finish to restore the system to its previous state.
9. Update Windows 11
Finally, if none of the above methods have helped you fix the Realtek audio not working issue, try updating your computer. It might be possible that the Realtek audio driver is incompatible with the current version of Windows.
Updating Windows 11 to the latest version can help fix most of the sound-related issues on your device. You can check for any available updates and install them using Windows Settings. Here is how to do that:
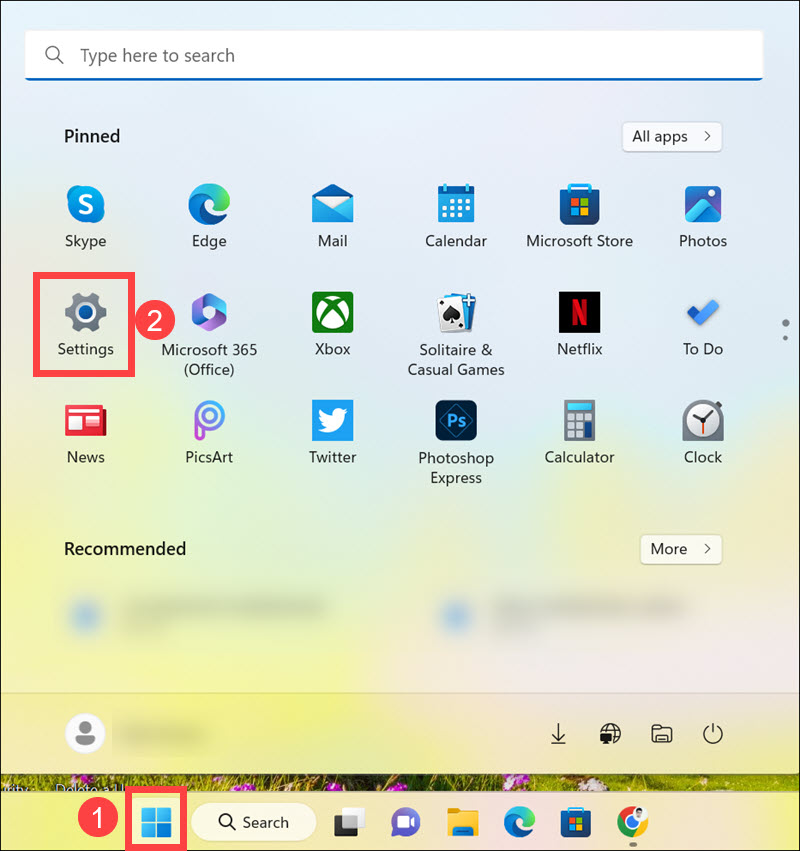
1. Click the Start button and launch Settings from the Start menu.
2. Switch to the Windows Update tab on the left, and on the right, click on Check for Updates.
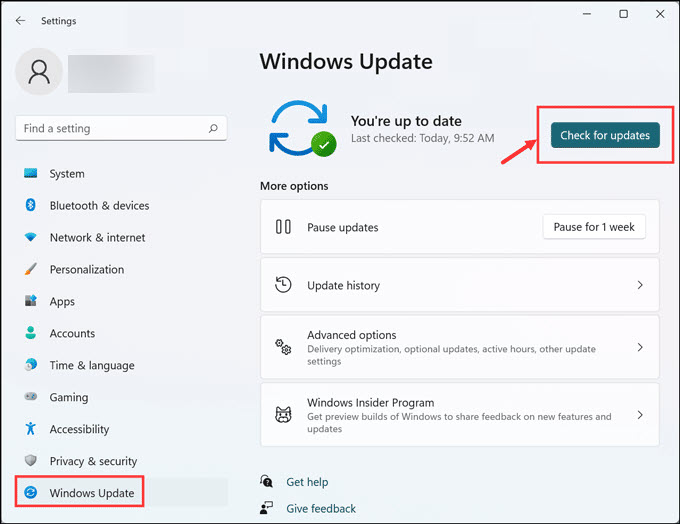
3. Windows will now check for available updates and download them.
4. Finally, click on the Install all button to install all the available updates.
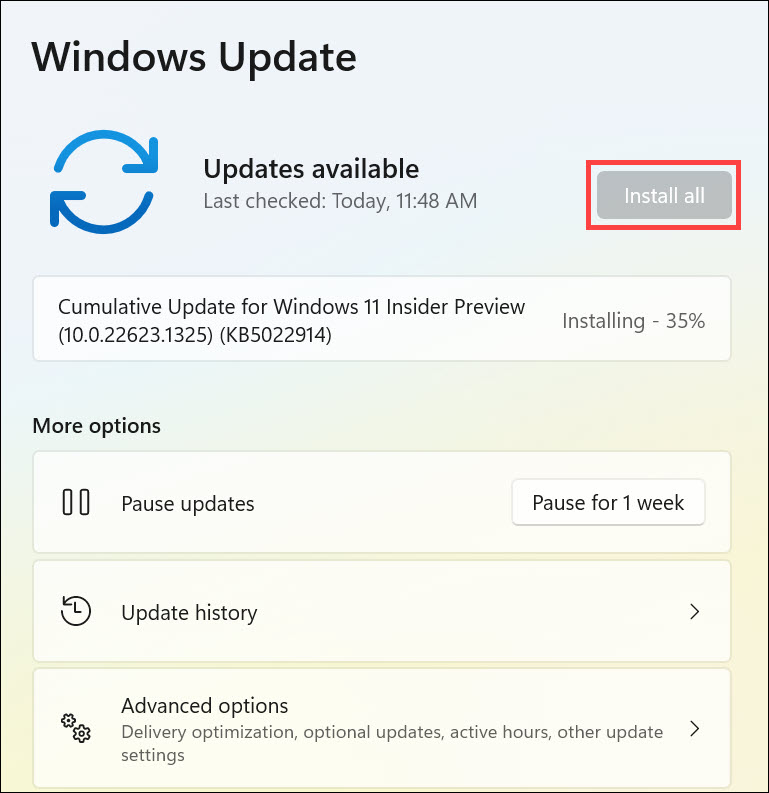
Restart the system and check if the problem is solved.
Summing Up
Realtek audio not working can be frustrating, but luckily you can usually fix it easily. In this article, we have discussed 9 solutions that you can use to fix the Realtek audio not working issue on your device. We hope these steps have helped you resolve any conflicts or incorrect settings causing the Realtek audio not working problem.
We have listed some of the most effective methods to resolve this issue; still, if none of these methods help, we suggest you contact customer support for further assistance with this problem.
Many Realtek audio device users are having problems with producing sound through the Realtek Digital Output. When it is set as the default device, the sound from the speakers connecting to their computer cannot work properly.
If you are having this issue, don’t worry. The following methods can help you bring the sound of your speakers back.
- Set the Speakers as Default Device
- Disable audio enhancements
- Reinstall the Realtek audio driver
- Update the Realtek audio driver
1. Set the Speakers as Default Device
It may not be necessary for you to use Realtek Digital Output. Digital Outputs refer to high-definition digital audio devices, which do not use regular (analog) cables to connect to computers. For example, a TV with an HDMI connection, or a high-definition audio system, like a home theater system, uses the digital output.
So if you are using regular speakers and you (or your computer) have set Realtek Digital Output as Default Device, the sound of your computer may not be able to play normally. You should set the Speakers as Default Device to get the normal sound. To do so:
on Windows 10
- Right-click on the speaker icon on your taskbar, and then select Playback devices.
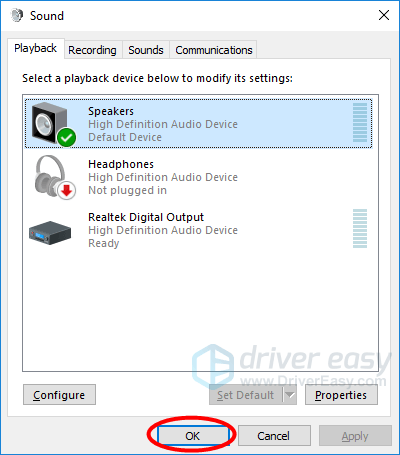
- In the Sound window, select the Playback tab, right-click on Speakers, and then select Set as Default Device.
- Hit OK.
on Windows 11
- On your keyboard, press the Windows logo + I keys simultaneously to open Settings.
- From the left navigation panel, select System, then click Sound from the right.

- Scroll down and click More sound settings.

- Under the Playback tab, right-click your speaker and select Set as Default Device.

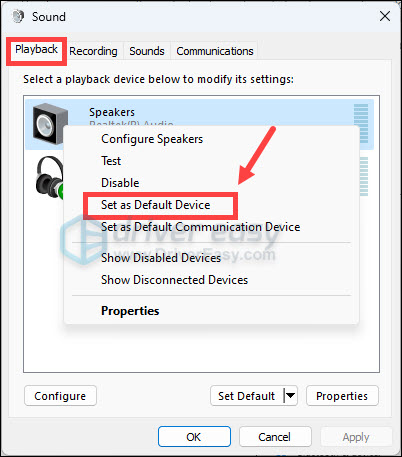
Your speakers are now set as the default audio output device. If this method works for you, you will hear the sound of your computer from your speakers again.
2. Disable audio enhancements
Audio enhancement packages are aimed at enhancing your audio performance. But this feature can sometimes cause some problems. When your Realtek digital output has no sound, try disabling audio enhancements to see if it helps. Here’s how to do this:
- On your keyboard, press the Windows logo key and R at the same time. Type in mmsys.cpl and press Enter.
- Navigate to the Playback tab. Right-click your default sound device here and choose Properties.
- Navigate to the Enhancements tab, then tick the box for Disable all sound effects. Then click OK to save the change.
- For some sound cards, the options may differ. So you can try to see if there’s an Advanced tab, where you can untick the box for Enable audio enhancements.
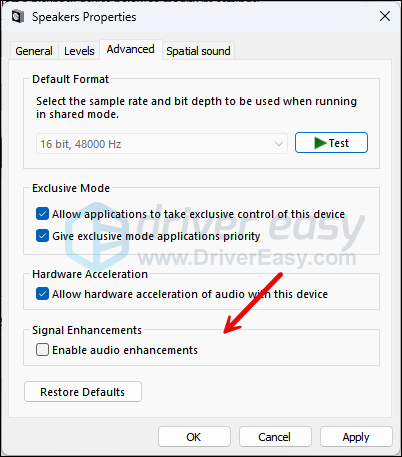
Now do a test to check if disabling audio enhancements helped you solve the issues. If not, please move on.
3. Reinstall the Realtek audio driver
A wrong or incorrect Realtek audio driver could also be the culprit to the Realtek digital output not working problem. If this is your case, you can reinstall the Realtek audio driver to see if it helps. To do so:
- On your keyboard, press the Windows key and the R key at the same time, then type devmgmt.msc and hit Enter.

- Double-click to expand the Sound, video and game controllers category, then right-click your sound card and select Uninstall device.

- Tick the box for Delete the driver software for this device if you’re on Windows 10, 8.1 and 7.
- Tick the box for Attempt to remove the driver for this device and click Uninstall if you’re on Windows 11.
- Restart your computer for the last working audio driver to be installed by Windows automatically.

If this doesn’t work for you, please move on to the next fix below.
4. Update the Realtek audio driver
You may be using a wrong or outdated audio driver if there is no sound from your Realtek Digital Output. You should update the Realtek audio driver to see if this fixes the problem.
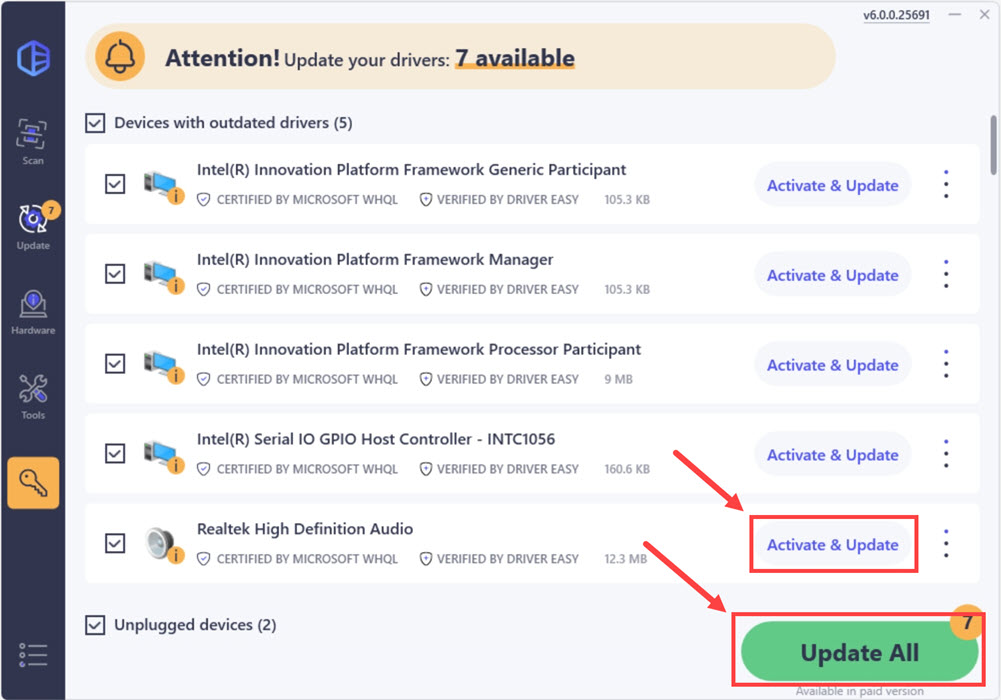
One easy and credible way to do so is to use Driver Easy.
Driver Easy will automatically recognize your system and find the correct drivers for it. You don’t need to know exactly what system your computer is running, you don’t need to risk downloading and installing the wrong driver, and you don’t need to worry about making mistakes when installing.
You can update your drivers automatically with either the 7 days free trial or the Pro version of Driver Easy. It takes just 2 clicks, and you get full support and a 30-day money-back guarantee with the Pro version:
- Download and install Driver Easy.
- Run Driver Easy and click the Scan Now button. Driver Easy will then scan your computer and detect any problem drivers.

- Click the Activate & Update button next to the flagged device to automatically download and install the correct version of this driver.
Or click Update All to automatically download and install the correct version of all the drivers that are missing or out of date on your system (You’ll need the Pro version for this – when you select Update All, you’ll get a prompt to upgrade. If you’re not prepared to purchase the Pro version yet, Driver Easy provides a 7-day trial at no cost, granting access to all Pro features like fast downloads and easy installation. No charges will occur until after your 7-day trial period ends.)

- After updating, restart your computer to take effect.

If you need assistance, please contact Driver Easy’s support team at support@drivereasy.com.
80
80 people found this helpful
Quick Tips
- It’s best to install the Realtek driver using the OEM driver setup.
- If you can’t hear anything, chances are that the Realtek Audio Universal Service is not running.
- Ensure to enable the playback device if you don’t have any other speaker on your laptop or PC.
Fix 1: Check for Realtek HD Audio Manager in Apps
Step 1: Open Windows Settings (Win + I) and navigate to Apps > Installed Apps.
Step 2: In the search bar, type Realtek. If the Realtek app is installed, it will show up. If it doesn’t, download and install it again.

It is available on Intel’s website and Dell.
Fix 2: Add Realtek HD Audio to Windows Startup
If you have the Realtek HD audio driver installed on your PC, it also registers the Realtek Audio Universal Service.
Step 1: Type services.msc in the Run prompt (Win + R) and press Enter.
Step 2: In the Services Snap-in, locate and double-click the Realtek Audio Universal Service and open its Properties.

Step 3: Select Automatic from the drop-down next to Startup type. Click on OK to save the changes.
Next time you restart the PC, the Realtek services and app launch will automatically be ensured.
Fix 3: Enable Realtek Audio for Playback Devices
Windows sometimes disable devices for no reason, or if you have been experimenting and have accidentally disabled the speaker, then you need to enable it.
Step 1: Open the Control Panel by typing control in the Run prompt (Win + R) and pressing Enter.
Step 2: Locate and click the sound icon to open the Sound settings.
Step 3: Find the Realtek speaker, right-click, and click on Enable. Now, play an audio file to check if you can hear it.

Fix 4: Troubleshoot Audio Driver Issues
Windows 11 packs a bunch of troubleshooters that diagnose and automatically fix some of the common issues on a computer. Here’s how to run an audio-specific troubleshooter to detect and fix the issue:
Step 1: Open the Get Help app on Windows by searching it on the Windows Start menu.
Step 2: Type Audio troubleshooter in the search box and press enter.

Step 3: You should see a Welcome to Windows audio or sound troubleshooter message and a confirmation prompt. Here, you give your consent to proceed with the diagnostics and try automated steps to fix the problem.
Step 3: Click on Yes, and the audio troubleshooter will run. It will diagnose and apply fixes for your computer’s audio problem.
Fix 5: Uninstall Buggy Realtek HD Audio Driver
A corrupt or buggy driver can make the device visible in the system, but it may not work as expected. Device Manager can help you uninstall the device and then add it again. The best part is that you have the option to delete the driver along with the uninstallation.
Step 1: Right-click on the Start button, and from the menu that opens, select Device Manager.
Step 2: When the Device Manager window opens, expand the Sound, video, and game controllers section.
Step 4: Right-click on the Realtek High Definition Audio and select Uninstall.
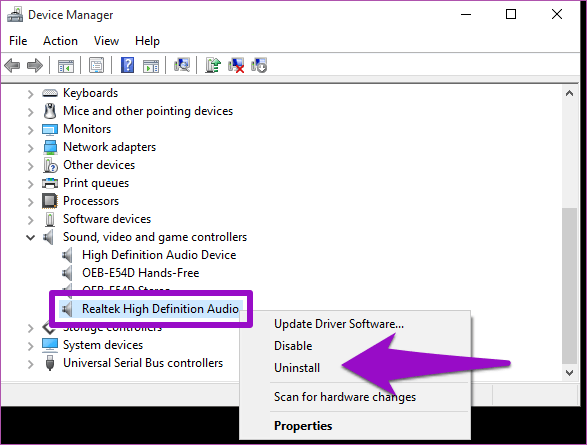
Step 3: Check the Delete the driver for this software option and tap on OK to proceed with the uninstallation.

Ensure to restart the PC for the final cleanup. Once done, you can install the driver again. This will ensure that all corrupted existing drivers are fixed.
Fix 6: Create Realtek HD Audio Driver Shortcut
To ensure the Realtek HD Audio Manager works, you can create a shortcut of the app’s display icon on the desktop of your Windows computer.
Step 1: Press the Windows + E keys to launch File Explorer and navigate to this location:
C:\Program Files\Realtek\Audio\HDAStep 2: Right-click RAVCpl64, click on Send to, and select Desktop (create shortcut).
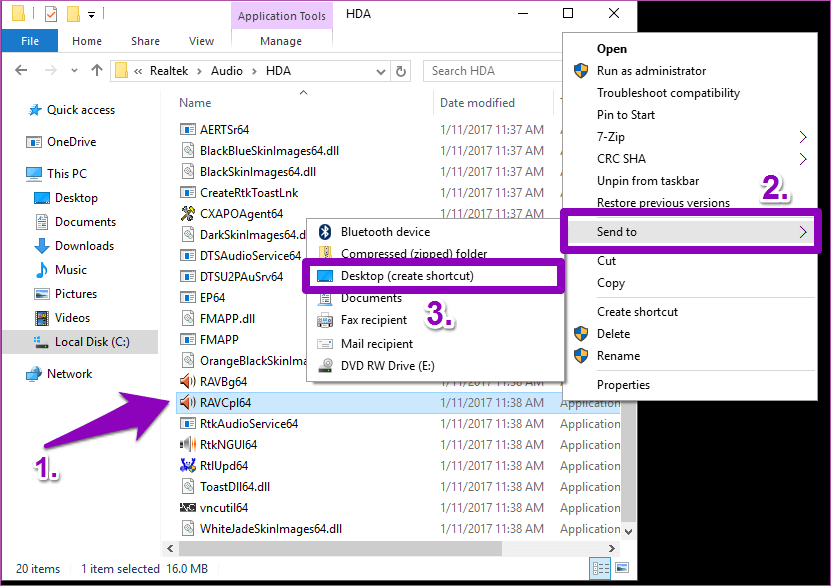
Step 3: Go to the desktop and double-click the shortcut to launch it if it is not running in the background.
FAQs
Why Is Realtek Not Showing Up in Device Manager?
One of the primary reasons for it to be missing is disabled status. You need to go to the Sound section of the Device Manager, and if the Realtek device is disabled, enable it.
What Is an Alternative for Realtek HD Audio Manager?
If your PC only supports Realtek devices, you don’t have an option. However, if your configuration supports Dolby, it is an excellent alternative to Realtek Audio HD Manager. It features automatic audio control and enhances the overall quality.
Was this helpful?
Thanks for your feedback!
The article above may contain affiliate links which help support Guiding Tech. The content remains unbiased and authentic and will never affect our editorial integrity.