
No sound after updating Windows! Don’t be upset; follow the best fixes listed below & troubleshoot Realtek HD audio manager problems.
For Windows users, encountering audio issues is not new. After each Windows update, some or the other user faces audio-related issues. This leaves users with no sound; if you can relate to it and are looking for ways to fix the Realtek audio driver problem, you are right.
Quick Tip- When manually downloading the latest Realtek audio driver from the official website, ensure your operating system’s correct name and version is selected. Realtek high-definition audio comes preinstalled on Windows 11 and 10, but this doesn’t mean Realtek audio is not working issue cannot be encountered. If you are facing the issue, here are the best ways to fix sound and not working issues.
Common Realtek Audio Issues
- Missing Audio Manager Icon
- Conflicts with preinstalled Microsoft Drivers
- Windows 11, 10, no audio devices are installed
- The audio service is not responding
- No sound
Besides, there are other sound problems that Windows users face. This troubleshooting guide will cover all this and the best ways to fix these issues.
Download and Install Advanced Driver Updater.
Why is there a Realtek High Definition Audio on My PC?
The Realtek HD Definition Audio is the popular sound driver for Windows. It helps choose the audio configuration for the speaker system, and the software also allows adjusting the volume for individual speakers.
However, due to certain reasons, you may face issues with Realtek High Definition Audio.
6 Common Reasons That Cause Realtek Audio Problems
1. Outdated Realtek audio driver.
2. There is a conflict between installed Microsoft and Realtek audio drivers.
3. Audio service is either not running or responding.
4. Misconfigured audio settings.
5. Incorrect output device for audio is selected.
6. Disable audio service.
How to Fix Realtek Audio Issues in Windows 11, 10
Whether you face audio problem issues after installing the latest Windows update or uninstalling a driver, try these 8 ways to troubleshoot the issue.
Basic Troubleshooting
You should always check the device and cable connections before updating the drivers and trying other technical fixes.
- Check the output audio device whether working or not.
- Ensure the output device is receiving power.
- Correct output should be selected on Windows 11 and 10.
- Use the volume controls to ensure the sound is not muted.
- Disconnect and reconnect the output device, and also use the alternate port to ensure the connection is proper.
After following these steps, try the following methods if the audio is still not there.
1. Update Realtek High-Definition Audio on Windows 11 and 10
Common sound problems on Windows are outdated, corrupt, or missing drivers. To fix this issue, downloading and installing the latest driver is recommended. This can be done either manually or automatically.
To download and update the latest driver manually, visit the sound card manufacturer and look for the right driver download. Before this, you must collect information about the operating system’s version, your motherboard’s model, or the sound card. Once you have, only then can you download the correct driver.
Update Audio Drivers using Manufacturer website –
- Search for the audio driver’s manufacturer website on a browser. Click on it.
- Enter your device’s serial number.
- Click the ‘Detect’ button for automatic identification.
- Select your product manually from the list.
- Browse products for general information or resources.
- Download the audio driver on your computer.
Update Audio Drivers using Device Manager –
Another way to update drivers on your computer is to use the Device Manger.
- Open Device Manager.
- Right click on the device, in this case, audio device.
- Select ‘Update Driver’.
- Choose “ Search automatically for updated driver software”.
- Now follow the on-screen instructions to complete the update.
Suppose this sounds like too much work, or you don’t have the technical expertise to collect all this information. In that case, you can try Advanced Driver Updater, a third-party driver updating utility.
This tool lets you download and install compatible drivers without collecting system or device information. Not only this, but Advanced Driver Updaters also keep a backup of old drivers for security reasons. It is easier to use as you have to click Start Scan Now, wait for the scanning to finish, and update the driver.
Also Read: Advanced Driver Updater Review
Here are the detailed steps on how to use Advanced Driver Updater
1. Download and install Advanced Driver Updater

2. Run the professional tool and click Start Scan Now to perform the scanning for outdated Realtek sound drivers.

3. Wait for the scanning to finish.

4. After that, click the Update driver option and update the driver.
Note : If you are using a trial version of the product, you will have to update each driver by clicking the Update driver option. However, if you want to update all drivers in a go, you need to upgrade to the Pro version as it offers an Update All feature. Not only this, but the excellent driver updating utility also comes with a money-back guarantee.
Read more at the official website
5. After updating the driver, restart the system to apply changes.
Now try to play a video or song; the Realtek sound not working issues should not be fixed.
See This- How To Update And Download Realtek 802.11 N WLAN Adapter Driver- Windows 11, 10
Method 2. Disable Audio Enhancement
Changes made to Audio Enhancements might conflict with sound on Windows 11 and 10. Therefore, it is recommended to disable audio enhancement. To do so, follow the steps below:
1. Right-click the Volume icon present in System Tray.
2. Select Open Sound settings > Device properties > Additional device properties.
3. This will open a new window; click the Enhancements tab and uncheck the box next to Disable all enhancements > Apply > Ok

This should troubleshoot Realtek audio problems on your PC.
3. Enable/ Restart Windows Audio Service
Ensure Windows Audio service is enabled to fix high-definition audio devices not working. To do so, follow the steps below:
1. Press Windows + R to open the Run window
2. Type services.msc > Ok
3. Look for Windows Audio service > right-click > Properties

4. Click the down arrow next to Startup type and select Automatic > Start > Apply > Ok
Note: If the service is already running and set to Automatic, you need to restart it. To do so, look for Windows Audio service > right-click > Restart.

Now try to play the sound; this should fix Realtek audio speakers’ not working issues.
Also, Read- How To Update Realtek Bluetooth Driver – Windows 11,10
Method 4. Disable Microsoft UAA Bus Driver
Usually, when two high-definition audio drivers run on the system, a conflict occurs. Therefore, to fix the issues with Realtek audio speakers not working, we must disable Microsoft UAA Bus Driver. To do so, follow the steps below:
1. In the Windows search bar, type Device Manager
2. Look for System Devices > double click to expand it
3. Select Microsoft UAA Bus Driver for High Definition Audio.
Note: If it is not on the list, it is already disabled. This means you can skip this step and move to the next one.
4. If you see it > right-click > Disable device.
5. Restart the system to apply changes; now, try to play the sound. Realtek audio driver issues should be fixed.
Method 5. Use a Generic high-definition Audio Device Driver
You can fix Realtek audio driver issues by switching to a generic driver. To learn how to do that, follow the steps below:
1. In the Windows search bar, type Device Manager
2. Search for Audio inputs and outputs
3. Double-click to expand all the audio drivers
4. Right-click the Realtek audio device > select Update driver from the list
5. Next, select Browse my computer for driver software

6. After that, choose Let me pick from a list of available drivers on my computer

7. Select High Definition Audio driver from the list > Next > follow on-screen instructions.
This will load the default sound driver, and the problem with the Realtek audio driver will be solved.
Check This- How to Download Realtek Ethernet Controller Driver
Method 6. Change Default Sound Format
By altering the default sound format, you can fix high-definition audio devices not working. To do so, follow the steps below:
1. Right-click the sound icon present in the system tray.
2. Select Open Sound settings
3. In the new window that opens, click Device Properties.

4. Click the Additional device properties option

5. This will open a new pop-up window here; click the Advanced tab
6. Next, click the down arrow and select the following depending on the speaker configuration:
24bit/44100 Hz
24bit/192000Hz
7. Click Apply > Ok to save changes.
This should fix Realtek audio speakers not working problems. If this doesn’t work, let’s move to the next step.
Method 7. Reinstall Sound Driver
1. Type Device Manager in the Windows search bar
2. Look for audio inputs and outputs. Double-click to expand it.
3. Right-click the sound driver > select Uninstall device from the context menu

4. Once done, click the computer icon with lens (Scan for hardware changes)

5. Now, restart the system. Windows will automatically install the default driver.
This should fix the issue, and the speaker Realtek audio not working problem should be resolved.
Method 8. Select the Correct Output Device
When an incorrect output device is selected, you might face Realtek audio driver problems. We need to switch to the correct output device to fix it. To do so, follow the steps below:
1. Right-click the volume icon present in System Tray.

2. Select Open Sound settings from the context menu.
3. Set Speakers or Headphones as the output device

Now, check your system, the Realtek audio speakers are not working, and the problem should be resolved. If you still face the issue, try updating Windows. If you are using an older version, there are chances that you are facing the issue due to some bug. Updating Windows will help resolve it. Press Windows + I to open Windows Settings > Click Windows Update > Check for updates > Download & Install and restart the PC.
See Also-How to Fix Microsoft Teredo Tunneling Adapter Missing
Frequently Asked Questions
Q1. How do I fix Realtek’s no sound?
To fix Realtek’s no sound issue, set the speakers as default. To do so, follow these steps:
1. Press Windows + R and open the Run window.
2. Type mmsys.cpl > press enter.
3. Click the Playback tab > right-click Speakers > Set as Default Device > Apply > Ok.
4. Exit the Sound Settings window and reboot the PC.
Now check you should not face an audio issue.
If this doesn’t help, automatically update the Realtek Audio driver using Advanced Driver Updater.
Q2. How do I repair and fix Realtek audio driver Windows 10?
To repair and fix Realtek Audio Driver try the following fixes:
1. Check cables, volume, speaker, and headphone connections
2. Update Realtek High-Definition Audio.
3. Disable Audio Enhancement.
4. Enable/Restart Windows Audio Service.
5. Disable Microsoft UAA Bus Driver.
6. Use a Generic High-Definition Audio Device Driver.
7. Change Default Sound Format.
8. Reinstall Sound Driver.
9. Select Correct Output Device.
10. Run the Audio Troubleshooter.
Q3. How do I get my sound back on Windows 10?
Use a generic driver to get the sound back and fix Realtek audio driver issues.
1. Right-click the Windows Start icon,> select Device Manager
2. Go to Audio inputs and outputs> double-click on it.
3. Right-click the Realtek audio device > select Update driver from the list
5. Choose the second option, “Browse my computer for driver software.”
6. Select, “Let me pick from a list of available drivers on my computer.”
7. Select High Definition Audio driver from the list > and follow on-screen instructions.
Q4. Why is there no sound on my Windows 10?
There are chances that the audio device is muted, has been disabled, or the driver is outdated. To fix the problem, unmute the audio device, enable it and update the driver through Device Manager or Advanced Driver Updater.
Q5. How do I fix a corrupted Realtek driver?
The easiest way to fix a corrupted Realtek driver is to reinstall and update the driver. You can do it manually through Device Manager or use Advanced Driver Updater, a driver updating tool, to update corrupt and problematic drivers.
Q6. How do I fix my Realtek audio?
To fix issues with Realtek audio, you can try the following techniques:
1. Update Realtek driver
2. Disable Audio-Enhancement
3. Restart Windows Audio Service
4. Disable Microsoft UAA Bus Driver
5. Modify Default Sound Format
Fix – Realtek Audio Driver Problems
You can quickly troubleshoot Realtek audio problems on your system using these fixes. Alongside these fixes, we suggest checking whether the speakers are correctly connected. Also, ensure that the speaker is not muted. This will help resolve Realtek speakers not working.
We hope using these steps, you can fix the problem with sound. To keep drivers updated and avoid facing such issues in the future, use Advanced Driver Updater, the best driver updater to update outdated drivers in a go. We’d love to hear from you; please share your feedback in the comments section. If you have any product-related queries, contact the support team.
Recommended :
12 Best (Free & Paid) Driver Updater Software To Fix Driver Issues on Windows
How to Download & Update Realtek PCIe GbE Family Controller Driver
How To Download & Update Realtek Audio Driver on Windows 11/10
We all have the experience when we want to throw our computer away, and this feeling becomes so much stronger when we lose the sound: we can’t hear music, we can’t watch videos, we can’t play games with our friends with the mic on, we can’t Skype with our families… it’s a long list.
And the annoyance just keeps coming. At the bottom-right corner of the PC desktop, we see a red X next to the volume icon. When we toggle our mouse over, it says “No Audio Output Device is installed“.
When right-click the volume icon and click Playback devices, we see a message saying No audio devices are installed. And there is no playback device here to be found.
If this is what’s bothering you, sign out a relief, because it’s not at all a hard problem to fix. In many cases, the sound problem is usually caused by faulty drivers. As a mater of fact, you can easily fix it by yourself following the solutions below.
Here are 3 of the most effective fixes for you to try. You may not have to try them all; just work your way down until you find the one works for you.
Method 1: Reinstall Audio Driver
Method 2: Restart Windows Audio Services
Method 3: Update Audio Driver
Note: The following screen shots are shown on Windows 10, but the fixes work for Windows 7 and Windows 8 as well.
Method 1: Reinstall Audio Driver
In some cases, automatic Windows Update might mess up with your original audio card driver settings, for instance, the update might change your audio card to the generic one, thus disable your sound. Here is how you can fix it:
Note: This cause is more common in new computers or ones that have recently done some changes.
1) On your keyboard, press the Windows logo key and R at the same time, then type devmgmt.msc in and press Enter.
2) Expand Sound, video and game controllers. Then right-click your audio device driver and click Update driver. The Realtek Audio here is just an example on our computer, yours could be diffident.
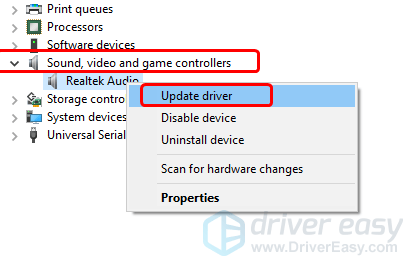
Note: If you can’t see this category, you may need to check if you can see the Other devices category. Your audio driver might be listed under the Other devices category instead.
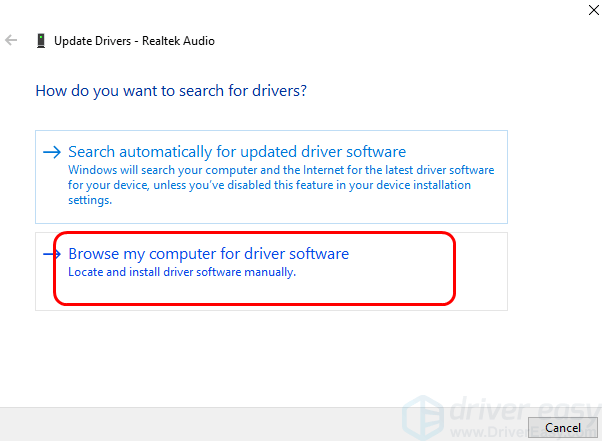
3) Click Browse my computer for driver software.
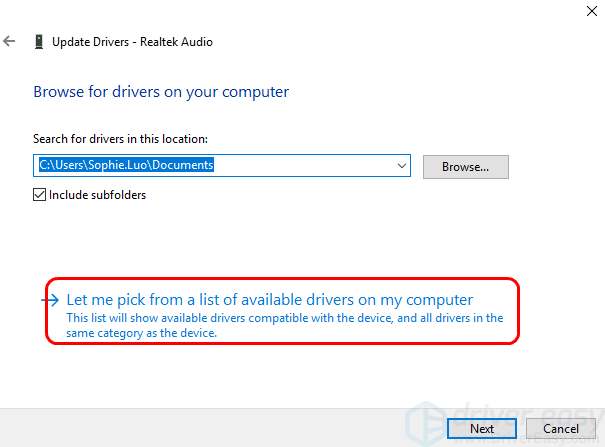
4) Click Let me pick from a list of available drivers on my computer.
5) Make sure the box for Show compatible hardware is ticked. Then click the one that is different from what you see at the moment. In the screen shot below, we will go with Realtek High Definition Audio. Then click Next.
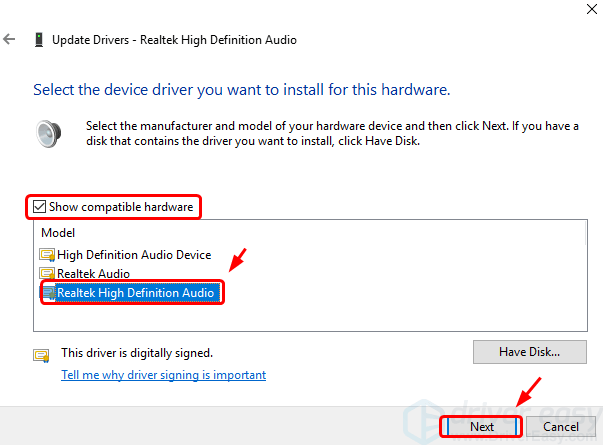
Note: The devices listed here might be different from what you see in your computer. You should choose accordingly the device you have.
6) You should see that Windows will help you with the update automatically from here.
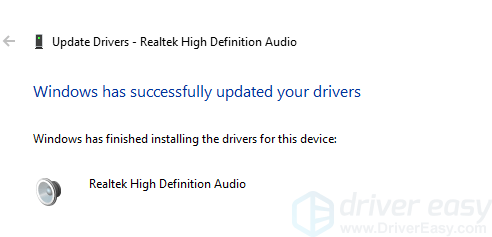
7) Wait for the update to finish. Then restart your PC and see if your sound is back.
If you still can’t hear sound coming out from your PC, go to the next method.
Method 2: Restart Windows Audio Services
You won’t be able to hear anything form your computer if the Window audio services are off. They are the very basic services for your sound to work. You should check their status, and restart them when needed:
1) On your keyboard, press the Windows logo key and R at the same time, type services.msc and press Enter.
2) On your keyboard, press the W key to faster locate the Windows Audio service and the Windows Audio Endpoint Builder service. See if their status are set as Running.
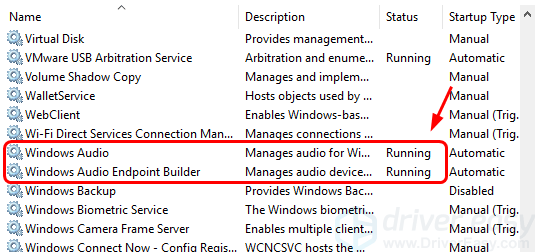
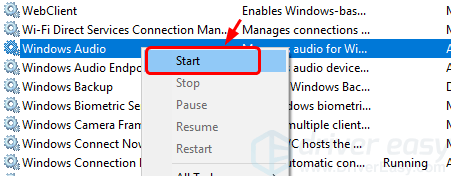
3) If the Status column for the Windows Audio service is blank, that means this service is off. You should right-click it and click Start.
4) You should see the Windows Audio Endpoint Builder is running once you start the Windows Audio service.
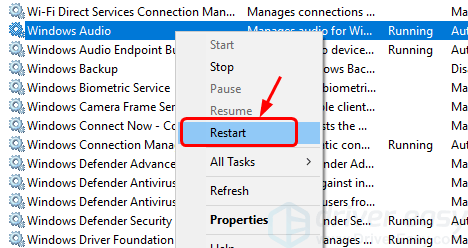
5) If these two services are already running, right-click Windows Audio and click Restart.
6) Check if you can hear any sound now. If the problem remains, go to the next method below.
Method 3: Update Audio Driver
If you’ve been using the same audio driver for a rather long time and the sound not working problem just happened all of a sudden, you need to consider getting your audio driver updated.
You can go to the manufacturer website and search for the driver for your PC, but you should be clear what operating system and what model your audio card is. Sometimes, you need to find out what hardware ID your audio card has as well.
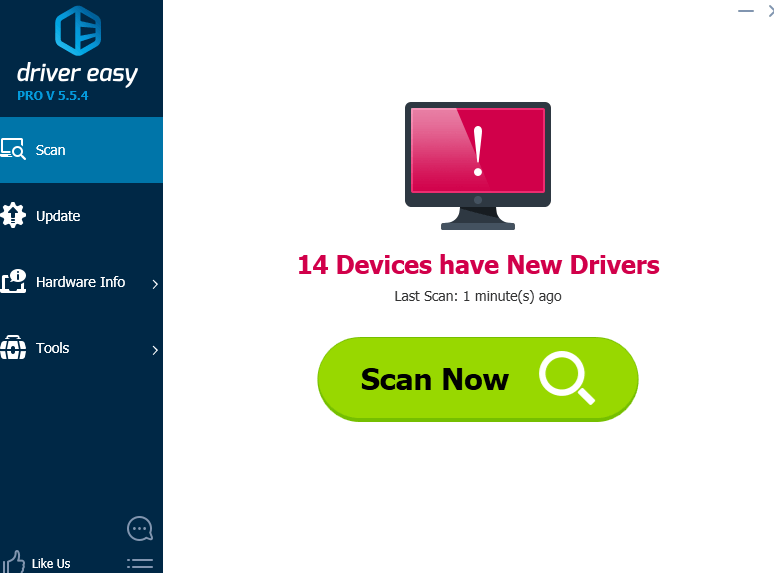
If you don’t have the time, patience or computer skills to update your drivers manually, you can do it automatically with Driver Easy.
Driver Easy will automatically recognize your system and find the correct drivers for it. You don’t need to know exactly what system your computer is running, and you don’t need to risk downloading and installing the wrong driver.
The FREE or the Pro version of Driver Easy are equally capable of helping you update drivers. But with the Pro version it takes just 2 clicks (and you get full support and a 30-day money back guarantee):
1) Download and install Driver Easy.
2) Run Driver Easy and click the Scan Now button.
3) Click the Update button next to the flagged audio device to automatically download and install the correct version of its driver (you can do this with the FREE version).
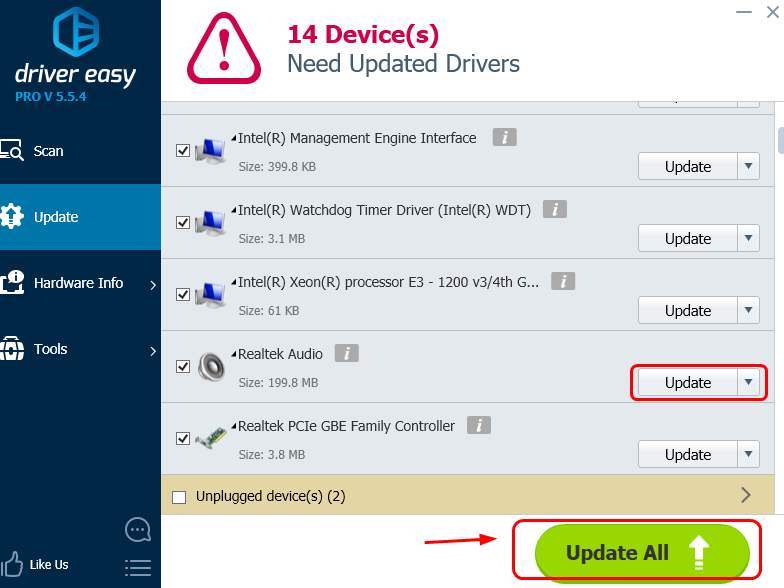
If you want to update all the available drivers for all your devices, just click the Update All button (this requires Pro version – you’ll be prompted to upgrade when you click Update All). No worry to try it as it comes with a no-questions-asked 30-day money-back guarantee and professional tech support 24/7.
Feel free to let us know which method helps you solve the problem, or whether your problem remains after the methods above by leaving us comments, we will see what more we can do to help.
Среди прочих проблем со звуком в Windows 10, 8.1 и Windows 7 можно столкнуться с красным крестиком на значке динамика в области уведомлений и сообщением «Выходное аудио устройство не установлено» или «Наушники или динамики не подключены», при этом, чтобы устранить эту проблему иногда приходится помучиться.
В этой инструкции подробно о наиболее часто встречающихся причинах ошибок «Выходное аудио устройство не установлено» и «Наушники или динамики не подключены» в Windows и о том, как исправить ситуацию и вернуть нормальное воспроизведение звука. Если проблема возникла после обновления Windows 10 до новой версии, рекомендую сначала попробовать методы из инструкции Не работает звук Windows 10, а затем вернуться к текущему руководству. Схожая проблема может быть и в Windows 11, подробнее в статье Устройства вывода не найдены в Windows 11 и 10 — как исправить?
Проверка подключения выходных аудио устройств
В первую очередь при появлении рассматриваемой ошибки стоит проверить фактическое подключение динамиков или наушников, даже если вы уверены, что они подключены и подключены правильно.
Сначала убедитесь, что они действительно подключены (так как бывает, что кто-то или что-то случайно выдергивает кабель, а вы об этом не знаете), далее учитывайте следующие моменты
- Если вы впервые подключили наушники или динамики к передней панели ПК, попробуйте подключить к выходу звуковой карты на задней панели — проблема может заключаться в том, что разъемы на передней панели не подключены к материнской плате (см. Как подключить разъемы передней панели ПК к материнской плате).
- Проверьте, что устройство воспроизведения подключено к нужному разъему (обычно — зеленого цвета, если все разъемы одного цвета, то выход для наушников/стандартрых динамиков обычно бывает выделен, например, обведён).
- Поврежденные провода, штекер на наушниках или колонках, поврежденный разъем (в том числе в результате разрядов статического электричества) могут быть причиной проблемы. Если есть подозрения на это — попробуйте подключить любые другие наушники, в том числе от вашего телефона.
Проверка аудиовходов и аудиовыходов в диспетчере устройств
Возможно, этот пункт можно было поставить и первым в теме про «Выходное аудио устройство не установлено»
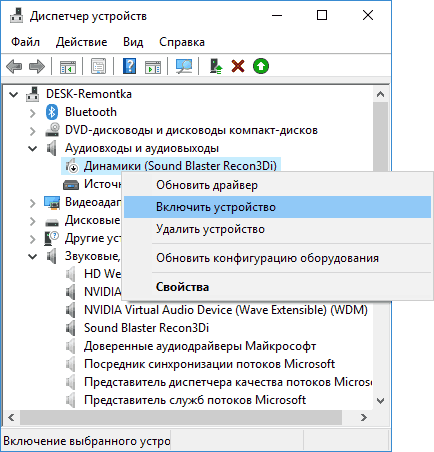
- Нажмите клавиши Win+R, введите devmgmt.msc в окно «Выполнить» и нажмите Enter — это откроет диспетчер устройств в Windows 10, 8 и Windows
- Обычно при появлении проблем со звуком, пользователь смотрит на раздел «Звуковые, игровые и видеоустройства» и ищет там наличие своей звуковой карты — High Definition Audio, Realtek HD, Realtek Audio и др. Однако, в контексте проблемы «Выходное аудио устройство не установлено» более важным является раздел «Аудиовходы и аудиовыходы». Проверьте, есть ли этот раздел в наличии и присутствуют ли там выходы на динамики и не отключены ли они (для отключенных устройство отображается стрелочка «вниз»).
- При наличии отключенных устройств — нажмите правой кнопкой мыши по такому устройству и выберите пункт «Включить устройство».

- Если в списке в диспетчере устройств есть какие-либо неизвестные устройства или устройства с ошибками (отмечены желтым значком) — попробуйте удалить их (правый клик — удалить), а затем в меню диспетчера устройств выбрать «Действие» — «Обновить конфигурацию оборудования».
Драйверы звуковой карты
Следующий шаг, который следует попробовать — убедиться, что установлены необходимые драйверы звуковой карты и они работают, при этом начинающему пользователю следует учитывать такие моменты:
- Если в диспетчере устройств в разделе «Звуковые, игровые и видеоустройства» вы видите только пункты наподобие NVIDIA High Definition Audio, AMD HD Audio, Аудио Intel для дисплеев — по всей видимости, звуковая карта или отключена в БИОС (на некоторых материнских платах и ноутбуках это возможно) или на нее не установлены необходимые драйверы, а то, что вы видите — это устройства для вывода звука по HDMI или Display Port, т.е. работающие с выходами видеокарты.
- Если вы нажали правой кнопкой мыши по звуковой карте в диспетчере устройств, выбрали «Обновить драйвер» и после автоматического поиска обновленных драйверов вам сообщили, что «Наиболее подходящие драйверы для данного устройства уже установлены» — это не дает полезных сведений о том, что установлены правильные драйверы: просто в центре обновлений Windows не нашлось других подходящих.
- Стандартные драйверы аудио Realtek и прочие могут успешно устанавливаться из различных драйвер-паков, но не всегда адекватно работают — следует использовать драйверы производителя конкретного оборудования (ноутбука или материнской платы).
В общем случае, если звуковая карта отображается в диспетчере устройств, самые верные шаги по установке правильного драйвера на нее будут выглядеть следующим образом:
- Зайдите на официальную страницу вашей материнской платы (как узнать модель материнской платы) или вашей модели ноутбука и в разделе «поддержка» найдите и загрузите имеющиеся драйверы для звука, обычно отмечены как Audio, могут — Realtek, Sound и т.п. Если, к примеру, у вас установлена Windows 10, а на оф. сайте драйверы только для Windows 7 или 8, смело скачивайте их.
- Зайдите в диспетчер устройств и удалите в разделе «Звуковые, игровые и видеоустройства» вашу звуковую карту (правый клик — удалить — установить отметку «Удалить программы драйверов для этого устройства», если таковая появится).
- После удаления запустите установку драйвера, который был скачан на первом шаге.
По завершении установки, проверьте, была ли решена проблема.
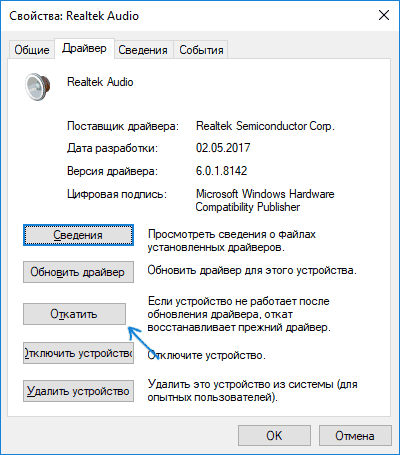
Дополнительный, иногда срабатывающий метод (при условии, что «только вчера» всё работало) — заглянуть в свойства звуковой карты на вкладку «Драйвер» и, если там активна кнопка «Откатить», нажать её (иногда Windows может автоматически обновить драйверы не на те, что нужно).
Примечание: если в диспетчере устройств нет ни звуковой карты, ни неизвестных устройств, есть вероятность, что звуковая карта отключена в БИОС компьютера или ноутбука. Поищите в БИОС (UEFI) в разделах Advanced/Peripherals/Onboard Devices что-то связанное с Onboard Audio и убедитесь, что оно включено (Enabled).
Настройка устройств воспроизведения
Настройка устройств воспроизведения также может помочь, особенно часто, если у вас к компьютеру монитор (или ТВ) подключены по HDMI или Display Port, особенно, если через какой-либо адаптер.
Обновление: В Windows 10 версии 1903, 1809 и 1803 для того, чтобы открыть устройства записи и воспроизведения (первый шаг в инструкции ниже), зайдите в Панель управления (можно открыть через поиск на панели задач) в поле просмотр установите «Значки» и откройте пункт «Звук». Второй способ — правый клик по значку динамика — «Открыть параметры звука», а затем пункт «Панель управления звуком» в правом верхнем углу (или внизу списка настроек при изменении ширины окна) параметров звука.
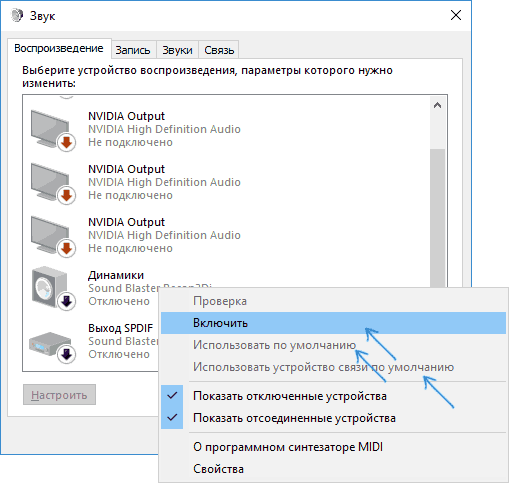
- Нажмите правой кнопкой мыши по значку динамика в области уведомлений Windows и откройте пункт «Устройства воспроизведения».
- В списке устройств воспроизведения нажмите правой кнопкой мыши и отметьте пункты «Показать отключенные устройства» и «Показать отсоединенные устройства».
- Убедитесь, что в качестве устройства вывода аудио по умолчанию выбраны нужные динамики (не HDMI выход и т.п.). При необходимости изменить устройство по умолчанию — нажмите по нему и выберите «Использовать по умолчанию» (также разумно включить «Использовать устройство связи по умолчанию»).

- Если необходимое устройство отключено, нажмите по нему правой кнопкой мыши и выберите пункт контекстного меню «Включить».
Дополнительные способы исправить проблему «Выходное аудио устройство не установлено»
В завершение — несколько дополнительных, иногда срабатывающих, методов исправить ситуацию со звуком, если предыдущие способы не помогли.
- Если в диспетчере устройств в «Аудиовыходах» отображаются выходные аудиоустройства, попробуйте их удалить, а затем в меню выбрать Действие — Обновить конфигурацию оборудования.
- Если у вас звуковая карта Realtek, загляните в раздел «Динамики» приложения Realtek HD. Включите правильную конфигурацию (например, стерео), а в «дополнительные настройки устройства» установите отметку на «Отключить определение гнезд передней панели» (даже если проблемы возникают при подключении к задней панели).
- Если у вас какая-то особенная звуковая карта с собственным ПО для управления, проверьте, нет ли в этом ПО каких-то параметров, которые могут вызывать проблему.

- Если у вас более одной звуковой карты, попробуйте отключить в диспетчере устройств неиспользуемую
- Если проблема появилась после обновления Windows 10, а варианты решения с драйверами не помогли, попробуйте выполнить восстановление целостности системных файлов с помощью dism.exe /Online /Cleanup-image /RestoreHealth (см. Как проверить целостность системных файлов Windows 10).
- Попробуйте использовать точки восстановления системы, если ранее звук работал исправно.
Примечание: в инструкции не описывается метод автоматического устранение неполадок Windows со звуком, поскольку, вероятнее всего вы и так его попробовали (если нет — попробуйте, оно может сработать).
Устранение неполадок автоматически запускается по двойному нажатию на значке динамика, перечёркнутому красным крестиком, также можно запустить его и вручную, см., например, устранение неполадок Windows 10.
Realtek High Definition Audio Issue is a common issue that several Windows 10 users face now and then. This trouble arises primarily when you are playing Audio on your System. In general, the no sound bug appears due to a corrupt or incompatible device driver.
Hence, the first thing you need to do is to update any obsolete/ outdated drivers that exist inside your System. A yellow exclamation mark next to any driver indicates that it has become corrupt. Here, in this article, we will discuss some easy tips to solve this issue on Windows 10. They are- update sound drivers, run troubleshooter, and modify speaker properties. Let’s explore them in detail-
Note: If you experience a similar issue on your HP computer, read this article to solve the problem.
Here, we explain three different ways to encounter this Realtek High Definition Audio Issue on Windows 10 PC. They are-
1. Update obsolete Sound driver
Most of the time, a malfunctioning Audio driver is the root cause behind Realtek’s High Definition Audio Issue. Hence, before proceeding any further, you should first check the running status of the installed Audio driver. Here are the steps-
- Press Win & R altogether, to invoke Run dialog.
- In the void box, type
devmgmt.mscthen hit Enter to open Device Manager. - On the next window, expand the Sound, video, and game controllers driver.
Note: If you see any yellow exclamation mark next to the device driver, it indicates the problem lies in that particular section. Therefore, you should update the same.

If you follow the above steps and found a yellow warning message along with the Realtek High Definition Audio driver, you should update this too.
- Make a right-click on it and select Update Driver on the context menu.
- Succeeding after, select Search automatically for updated driver software followed by Next.

- Now go through onscreen instructions to complete the whole process.
Once finished, Reboot your system so that changes made so far come into effect. After the restart, try playing audio on your device and see whether it works or not. We hope it does, however in case it doesn’t, move forward to the next fix.
2. Use the Windows Troubleshooter Tool
Windows Troubleshooter is yet another in-built diagnostic tool that can solve many hitches on your system. In case, you don’t know how to proceed, here are the steps-
- At first, open Control Panel then click Troubleshooting on the current window.
Note: Select large icons in view by category using the top-right drop-down menu.
- Again under Hardware and sound item, select Troubleshoot audio recording.
- If a new window pops up, click Next to start this process.
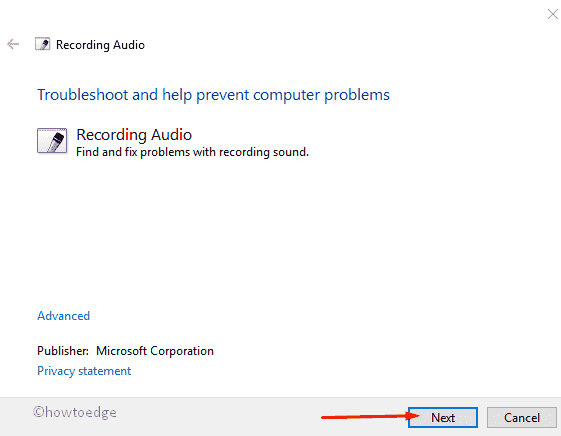
This will detect the problem in sound automatically and repair the same if possible. In case, the issue still persists, changing speaker properties might solve this bug.
3. Change in Speakers Properties
If you continue struggling with no sound issue even after updating the driver, you should configure the Audio services. You can adjust settings inside the properties section by following these steps –
- Press Win logo & S shortcut keys together to launch Cortana, type Sound followed by the Enter key.
- Under the Playback tab, click Speakers (connected at present), and then the properties button.
- On the succeeding window, tap the Advanced tab and select a bit rate 24bit/44100 Hz or 24bit/192000Hz (as per your speaker’s configuration) using the drop-down menu.
- At last, hit Apply next OK to confirm the changes.
After the task is over, Reboot your system, this will make the necessary changes.
Note: While trying the above fixes, make sure that you don’t mute the High Definition Audio device accidentally on your Windows 10 machine.
Wrapping…
I hope, this article helps you to fix the Realtek Audio High Definition issue on Windows 10 while playing audio. If you have any queries related to this post, do ask us in the below comment section.