
Applies ToWindows 11 Windows 10
Частота обновления экрана — это количество обновлений изображения на экране в секунду. Например, экран с частотой 60 Гц будет обновляться 60 раз в секунду.
Каковы преимущества изменения частоты обновления дисплея?
Преимущества изменения частоты обновления дисплея зависят от типа просматриваемого содержимого и возможностей дисплея. Ниже приведены некоторые преимущества.
-
Игры: более высокая частота обновления может улучшить игровой процесс, уменьшив размытие движения и разрыв экрана. Это может дать вам конкурентное преимущество в быстро развивающихся играх, уменьшая задержку ввода и повышая скорость реагирования.
-
Просмотр и рукописный ввод. Более высокая частота обновления может сделать прокрутку и использование цифрового пера более плавной и естественной. Это также может уменьшить напряжение глаз и усталость путем минимизации мерцания и призрака.
-
Срок службы батареи. Снижение частоты обновления может сэкономить заряд батареи, уменьшив количество потребляемой дисплеем энергии. Это может быть полезно, если вы используете ноутбук или планшет и хотите продлить время работы батареи.
Изменение частоты обновления
Изменения частоты обновления дисплея можно изменить в параметрах дополнительного дисплея:
-
Выберите Параметры > Системный > Дисплей > Дополнительно .
На панели Сведений о отображении отображается текущее разрешение и частота обновления для выбранного дисплея, а также указано, поддерживает ли дисплей переменную частоту обновления (VRR).
Если ваша мотивация для изменения частоты обновления дисплея заключается в улучшении игрового процесса, это может оказаться ненужным, если ваш дисплей поддерживает VRR, так как многие популярные игры автоматически используют VRR для динамической адаптации частоты обновления, чтобы обеспечить лучший игровой интерфейс.
Чтобы изменить частоту обновления на странице Дополнительные параметры отображения, выполните следующие действия.
-
Выберите нужную частоту рядом с пунктом Выберите частоту обновления.
Частота обновления зависит от вашего дисплея и поддерживаемых им показателей. Выбор ноутбуков и внешних дисплеев будет поддерживать более высокую частоту обновления.
Важно: Раскрывающийся список частоты обновления отображает звездочку (*) рядом с частотой обновления, которая не поддерживает текущее разрешение. Если выбрать одну из этих частот, разрешение экрана изменится, чтобы достичь выбранной частоты обновления.
Что такое динамическая частота обновления (DRR)?
Windows 11 представляет новую функцию под названием Динамическая частота обновления (DRR), которая автоматически настраивает частоту обновления в зависимости от того, что вы делаете в данный момент. Это поможет вам получить все возможное из обоих миров: плавный опыт, когда он вам нужен для игр, просмотра или рукописного ввода, и более длительное время автономной работы, когда вы не делаете эти типы вещей.
Чтобы включить или отключить DRR, выполните приведенные далее действия.
-
Выберите Пуск > Параметры > Системный > Дисплей > Дополнительно .
-
Используйте переключатель Динамической частоты обновления , чтобы включить или выключить DRR. Примечание. Включить DRR можно только в том случае, если ваше оборудование поддерживает DRR.
Важно: DrR требует, чтобы дисплей поддерживал VRR и частоту обновления не менее 120 Гц. DRR не должен влиять на игры, предназначенные для VRR, но может ограничить максимальную частоту обновления других игр. Если вы включите DRR и обнаружите, что любимая игра работает с более низкой частотой обновления, лучше всего отключить DRR.
Нужна дополнительная помощь?
Нужны дополнительные параметры?
Изучите преимущества подписки, просмотрите учебные курсы, узнайте, как защитить свое устройство и т. д.
Но лишь в определённых программах
В Windows 11 будет ещё одна функция, которая отсутствует в Windows 10. Как оказалась, новая ОС получит поддержку динамической частоты обновления дисплея.
Эта функция позволит Windows 11 изменять частоту обновления экрана в зависимости от задач. Сделано это будет для экономии энергии, то есть будет иметь смысл только на мобильных ПК.
Само собой, работать это будет на ноутбуках, оснащённых дисплеями с повышенной кадровой частотой. Сама Microsoft приводит в пример переключение между режимами 60 и 120 Гц, но в требованиях указано, что частота экрана устройства должна быть не ниже 120 Гц, то есть и с более высокими значениями всё должно работать нормально.
Зато известно, что уже сейчас в сборке Windows Insider функция доступна для ряда приложений, включая Microsoft Office, Microsoft Edge, Microsoft Whiteboard, Microsoft Photos, Snip & Sketch, Drawboard PDF, Microsoft Sticky Notes, Adobe Acrobat, Adobe Illustrator, Microsoft To Do и Inkodo. Со временем компания будет расширять список приложений.
30 июня 2021 в 11:07
| Теги: Microsoft, Windows
| Источник: Microsoft
Microsoft has released a new feature on Windows 11 known as Dynamic Refresh Rate (DRR). This feature is intended to improve the battery life of laptops. If your monitor supports high refresh rates of at least 120Hz and a GPU with a variable refresh rate (VRR), you will have the option to turn on the setting in Windows 11. After turning on this feature, DRR will actively and automatically swap between a 60Hz refresh rate and the higher 120Hz refresh rate depending on the task you perform.
While performing the tasks like typing out an email or reading a PDF file could run at the lower 60Hz refresh rate without issue, browsing through a social media app or watching a video, DRR will switch up to a higher refresh rate for a better experience.
This gearupwindows article will guide us on enabling and disabling the DRR feature on Windows 11. Here is what you can do.
How to know if our PC support DDR?
Before moving with the steps, you need to ensure that your display supports the DRR feature or not. Apart from that, your laptop must have WDDM 3.0. To check that, do the following:-
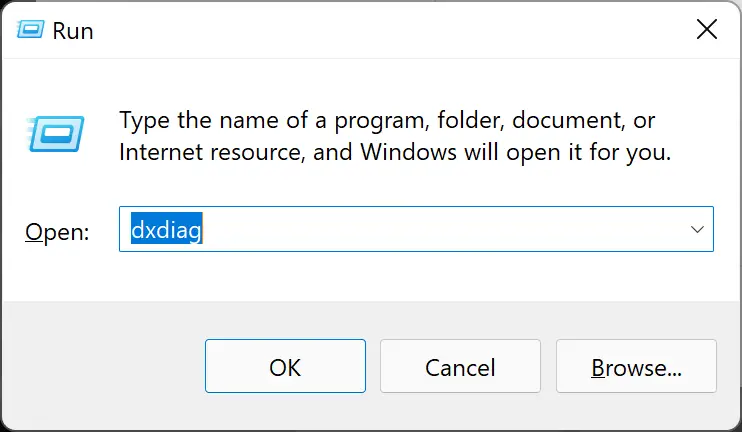
Step 1. Launch the Run dialog box by pressing Windows + R keys from the keyboard.
Step 2. Type the following command and hit Enter from the keyboard:-
dxdiag
Step 3. In the DirectX Diagnostic Tool window, switch to the first Display tab (if more than one display), and under Drivers, check the Driver Model. If it is lower than WDDM 3.0, for instance, my laptop has WDDM 2.7, so I can not turn on Dynamic DDR on Windows 11.
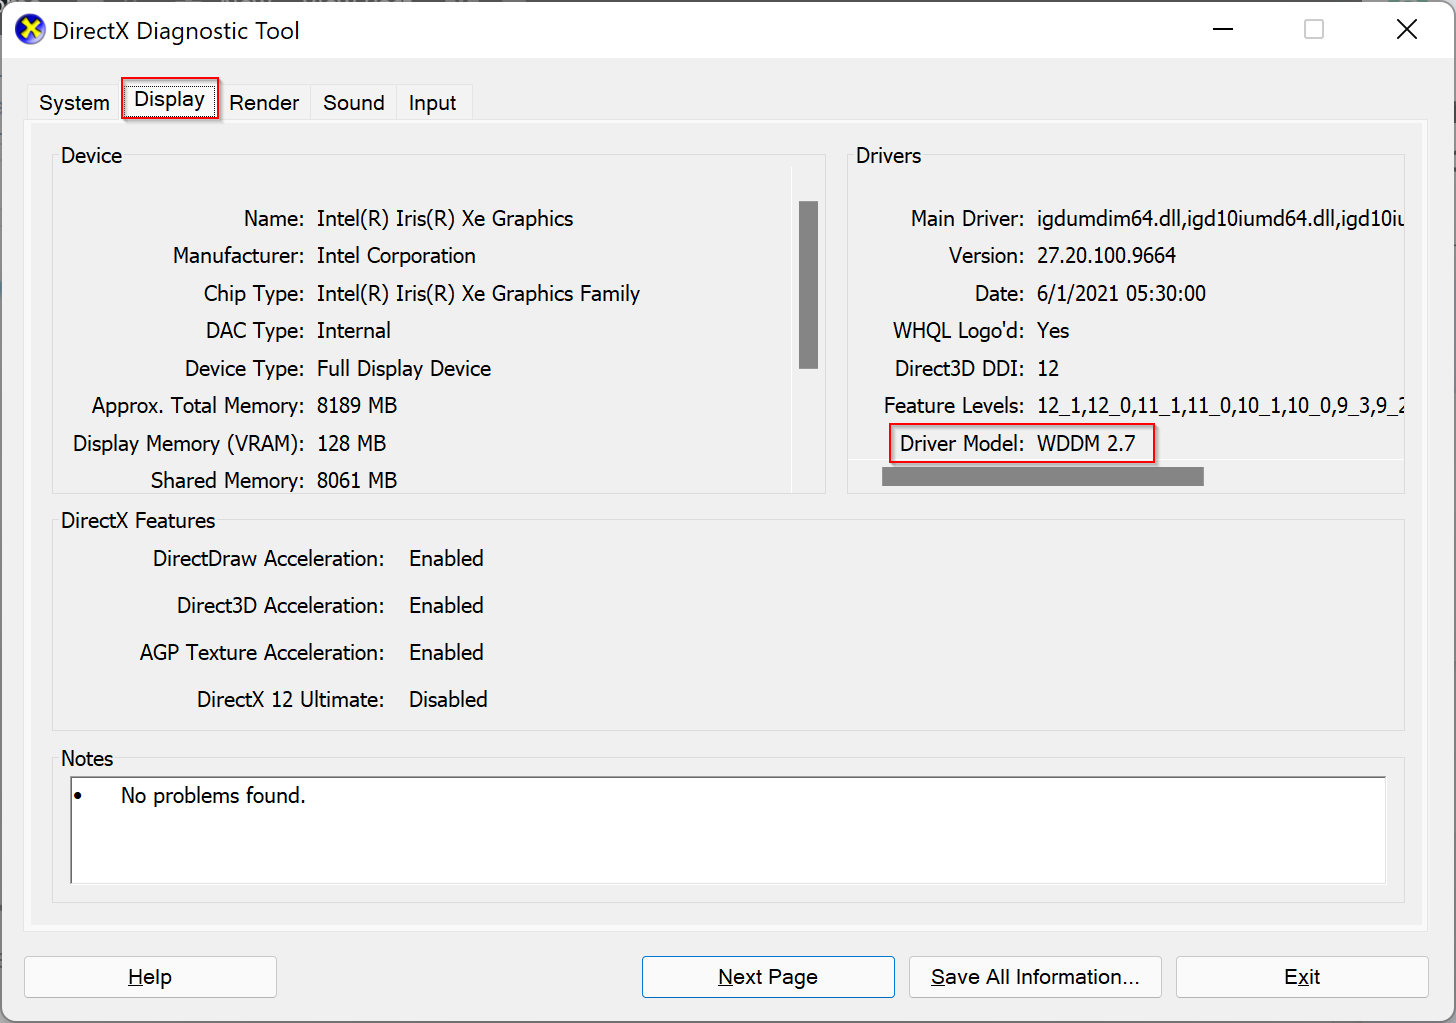
If your laptop supports WDDM 3.0 or higher, you can proceed with the next steps. Your laptop may support DDR, but drivers are not updated; still, you can not use this feature. You need to wait to release updated drivers from the manufacturer for your PC.
How to Enable or Disable Dynamic Refresh Rate (DRR) in Windows 11?
Follow these steps to turn on or off Dynamic Refresh Rate (DRR) in Windows 11:-
Step 1. Open the Settings app by pressing Windows + I keys from the keyboard.
Step 2. Click on the System category from the left side pane in the Windows Settings.

Step 3. Click the Display tab on the right-side pane.
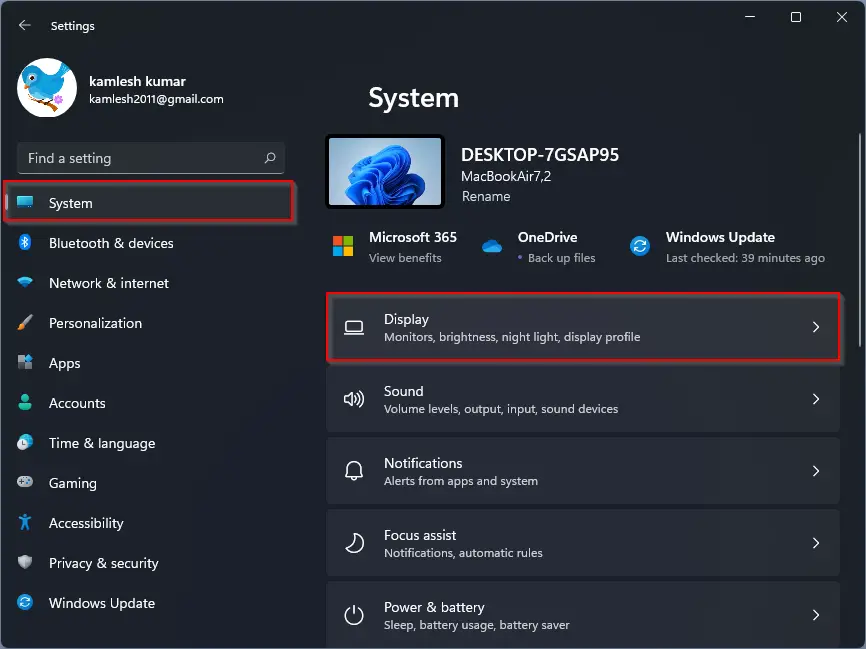
Step 4. Click on the Advanced display.

Step 5. Select the Dynamic option from the drop-down menu of “Choose a refresh rate.”
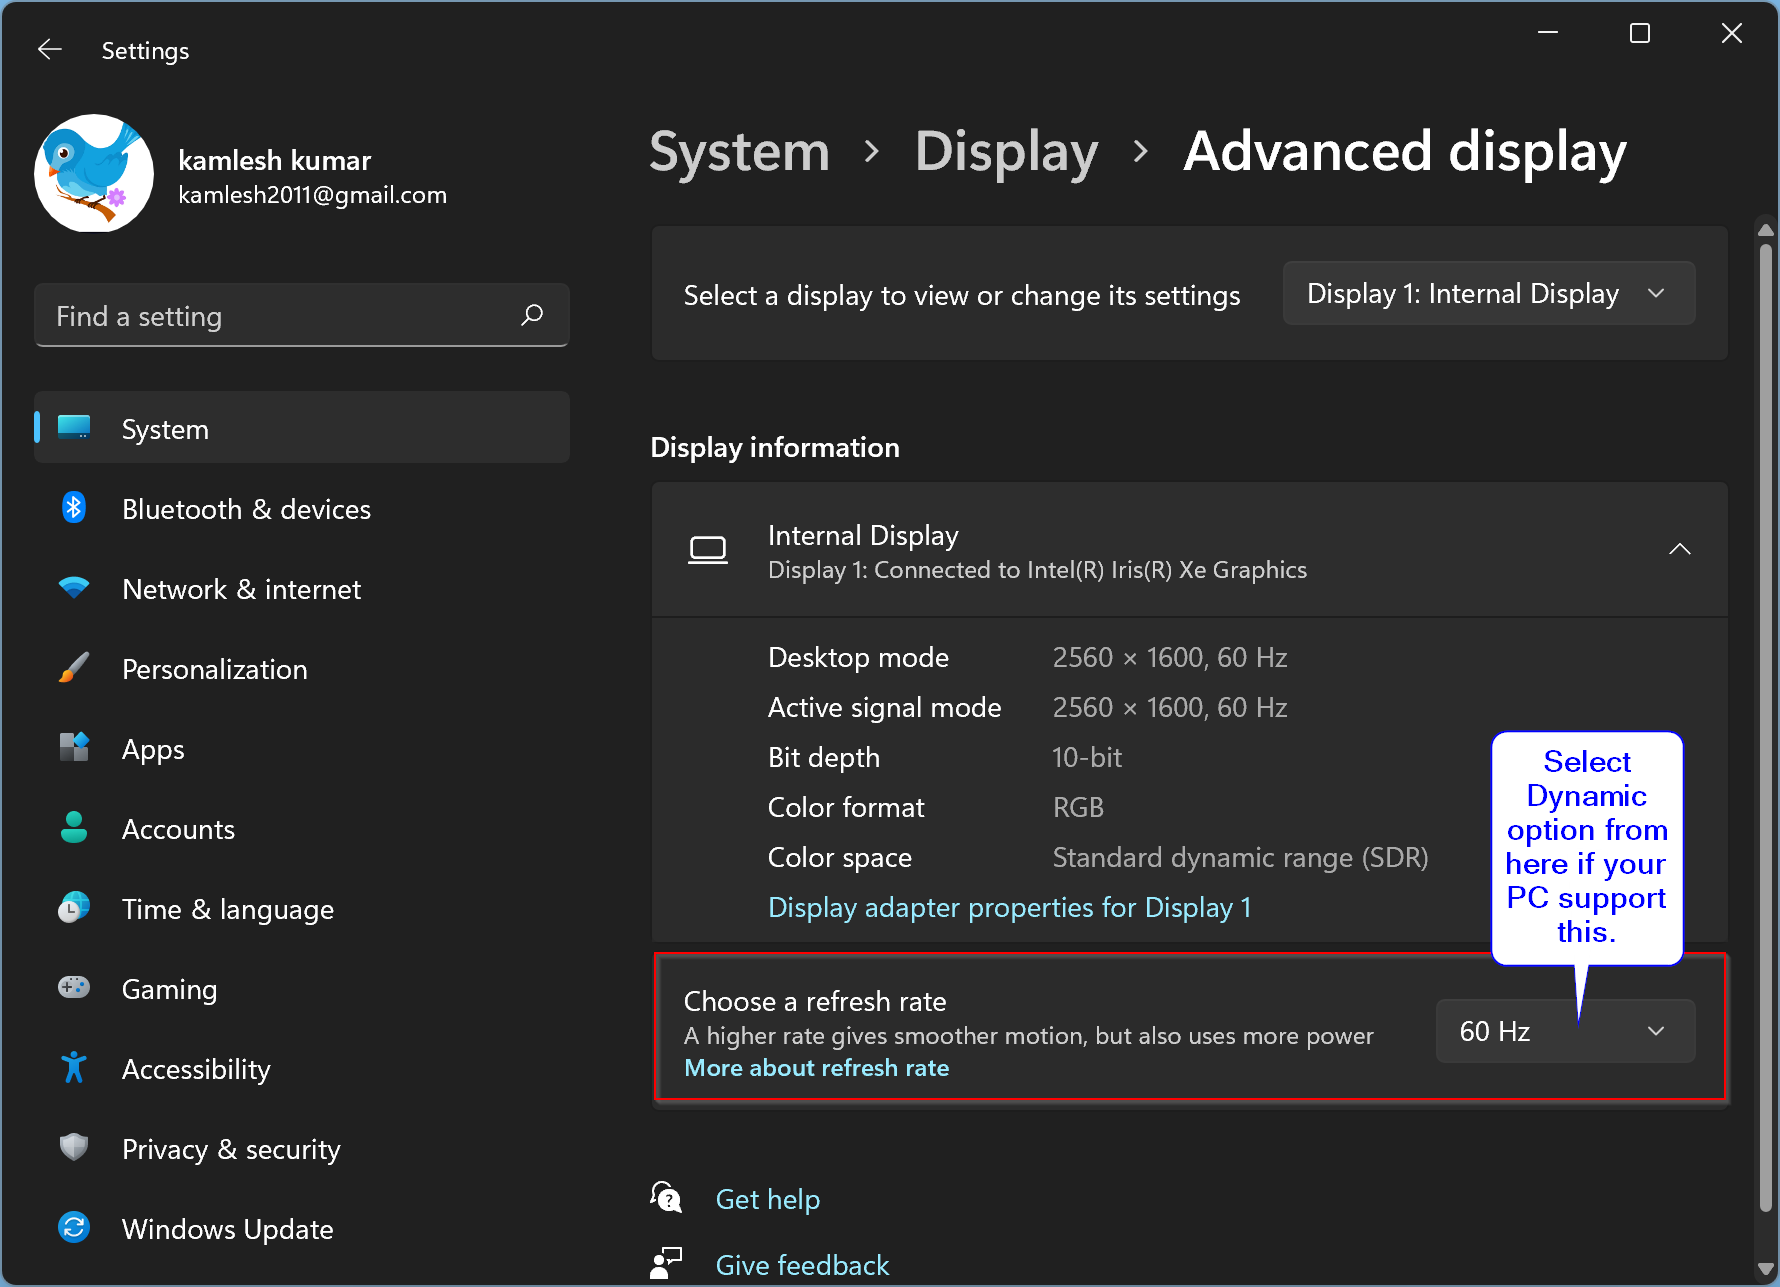
That’s it. You can close the Settings app safely. From now onward, your Windows 11 laptop will change the refresh rate automatically.
To disable the dynamic refresh rate, repeat the above steps, and in step 5, select 60 Hz, 48.01 Hz, 120 Hz, or whatever is available.
Conclusion
In conclusion, Microsoft has added a new feature called Dynamic Refresh Rate (DRR) to Windows 11. DRR allows laptops to switch between a 60Hz refresh rate and a higher 120Hz refresh rate automatically, depending on the task you are performing. This feature can significantly improve the battery life of laptops that support it. However, before enabling DRR, you need to make sure that your display supports it and that your laptop has WDDM 3.0 or higher. If you meet these requirements, you can easily enable or disable DRR by following the steps mentioned in this article. By taking advantage of this feature, you can enhance your Windows 11 experience and enjoy improved battery life on your laptop.
- To enable DRR on Windows 11, open Settings > System > Dispaly > Advanced display, and choose the “Dynamic” option from the “Choose a refresh rate” setting for version 23H2.
- On version 24H2 and higher releases, open Settings > System > Dispaly > Advanced display, and turn on the “Dynamic refresh rate” toggle switch.
Windows 11 has a “Dynamic Refresh Rate” (DRR) feature, allowing laptops and desktops computers to lower their refresh rate to save battery. You will be trading off some display quality, but it will enable you to use the device longer without recharging.
In a nutshell, refresh rate describes how often the screen refreshes the content per second. It is referred to as frames per second, and the standard is 60 frames per second. However, some displays support higher refresh rates to allow content on the screen to feel smoother.
The problem is that increasing the refresh rate also increases power usage, reducing laptops’ battery life. To address this issue, Windows 11 (via DirectX Developer Blog) has a Dynamic Refresh Rate (DRR) setting to seamlessly switch between a lower refresh rate and a higher refresh rate based on what you’re doing on the device, helping to balance performance and power consumption.
Dynamic Refresh Rate is available on laptops with displays that support variable refresh rate (VRR) and a refresh rate of at least 120 Hz. Also, the feature requires a graphics driver (WDDM 3.0) to support it.
In this guide, I will teach you the steps to manage the Dynamic Refresh Rate feature on Windows 11 23H2, 24H2, and higher releases.
- Enable Dynamic Refresh Rate (DRR) on Windows 11
- Disable Dynamic Refresh Rate (DRR) on Windows 11
To enable DRR on Windows 11, use these steps:
-
Open Settings on Windows 11.
-
Click on System.
-
Select the Display tab on the right side.
-
Click the Advanced display setting under the “Related settings” section.

-
Choose the monitor from the “Select a display to view or change settings” section if you have a multi-monitor setup.
-
(Windows 11 23H2) Use the “Choose a refresh rate” option and select the Dynamic option to enable the DRR feature.
-
(Windows 11 24H2) Turn on the “Dynamic refresh rate” toggle switch to enable the DRR feature.


Once you complete the steps, your computer will lower the refresh rate automatically to save power, reducing the quality of your overall experience.
If the device doesn’t support the feature, you won’t find the option in the “Choose a refresh rate” setting, or the toggle switch will be grayed out.
In addition to enabling Dynamic Refresh Rate, you can also improve energy consumption while preserving battery life by turning on “Battery Saver” mode and changing the system power mode. It’s important to note that starting with Windows 11 24H2 and higher releases, Battery Saver is being replaced by the new Energy Saver mode.
Disable Dynamic Refresh Rate (DRR) on Windows 11
To disable DRR, use these steps:
-
Open Settings.
-
Click on System.
-
Select the Display tab on the right side.
-
Under the “Related settings” section, select the Advanced display tab.
-
Choose the monitor from the “Select a display to view or change settings” section if you have a multi-monitor setup.
-
(Windows 11 23H2) To disable the feature, use the “Choose a refresh rate” option to select another regular rate, such as 60Hz, 120Hz, or the highest rate supported by the display.
-
(Windows 11 24H2) Turn off the “Dynamic refresh rate” toggle switch to disable the feature.
After you complete the steps, Windows 11 will no longer automatically increase or lower the display’s refresh rate for higher performance but at the cost of higher power usage.
Update April 17, 2024: This guide has been updated to ensure accuracy and reflect changes to the process.
Why You Can Trust Pureinfotech
The author combines expert insights with user-centric guidance, rigorously researching and testing to ensure you receive trustworthy, easy-to-follow tech guides. Review the publishing process.
Guide to Enabling Variable Refresh Rate in Windows 11/10
Published
7 min read
Enable Variable Refresh Rate for Games in Windows 11/10
In the world of competitive gaming, every millisecond counts. Gamers are always looking for ways to enhance their experience, increase performance, and minimize latency. One crucial feature that has been gaining traction among gamers is Variable Refresh Rate (VRR). VRR technology allows a display to synchronize its refresh rate with the frame rate output of the graphics card, resulting in smoother gameplay and a more responsive feel. This article delves deep into what VRR is, why it is important, and how to enable it on Windows 10 and Windows 11 for the best gaming experience.
What is Variable Refresh Rate (VRR)?
Variable Refresh Rate is a technology that dynamically adjusts the refresh rate of a monitor to match the frame rate output of the graphics card (GPU). Traditional monitors have a fixed refresh rate—often 60Hz, 120Hz, or 144Hz. This can lead to experiences like screen tearing, stuttering, or input lag when the frame rate fluctuates.
When the GPU produces frames at a rate that doesn’t match the monitor’s refresh rate, you may experience:
-
Screen Tearing: This occurs when two or more frames are shown in a single screen draw. The monitor displays aspects of different frames, resulting in a mismatched image.
-
Stuttering: Inconsistencies in frame timing can lead to noticeable stutters in gameplay. For example, when a game renders at low frame rates, the experience becomes less fluid.
-
Input Lag: This phenomenon can be detrimental in competitive gaming scenarios, where every millisecond can mean victory or defeat. Input devices like your mouse and keyboard may feel unresponsive if the frame rate doesn’t sync with the refresh rate.
VRS addresses these issues by allowing the monitor to adjust itself dynamically, leading to an overall improvement in performance and feel for gamers.
Benefits of VRR in Gaming
-
Smoother Gameplay: By preventing screen tearing and reducing stuttering, VRR offers seamless visuals and an uninterrupted gaming experience.
-
Improved Responsiveness: With lower input lag, gamers can respond more quickly to in-game events, providing a competitive edge.
-
Enhanced Visual Quality: VRR can make games appear more visually appealing because the synchronization creates a more consistent image without distortion.
-
Comfort during Long Sessions: The steady frame output and reduced stuttering can lower eye strain and fatigue during extended gameplay.
Understanding VRR Technologies
VRR is often branded under different terms by various companies. Here are a few notable technologies that utilize the core concept of VRR:
-
NVIDIA G-Sync: Developed by NVIDIA, G-Sync synchronizes the monitor’s refresh rate with the frame rate of NVIDIA’s compatible graphics cards for a smoother performance. G-Sync monitors come with proprietary hardware that allows this synchronization.
-
AMD FreeSync: Similar to G-Sync, AMD’s FreeSync technology synchronizes the refresh rate of the display with the GPU’s output but operates without proprietary hardware. FreeSync is generally more affordable and supported by a broader range of monitors.
-
VESA Adaptive-Sync: This is a standard established by VESA (Video Electronics Standards Association) for adaptive refresh rates. This technology is widely supported by both NVIDIA and AMD graphics cards, allowing for seamless performance.
Are You Eligible for VRR?
Before you can enable Variable Refresh Rate in Windows 10 or Windows 11, check if the following criteria are met:
-
Hardware Support: Ensure that your monitor supports VRR technologies like G-Sync or FreeSync. You may have to check the manufacturer’s website or product specifications.
-
Graphics Card: A VRR-compatible graphics card is essential. NVIDIA and AMD cards from recent generations generally support these technologies.
-
Cables: Make sure you use high-quality display cables that support high bandwidths, such as DisplayPort or HDMI 2.0 and higher. DVI cables do not support VRR.
-
Drivers: Keeping your graphics card drivers up to date is crucial for the best compatibility and performance. Confirm that you are using the latest drivers from either NVIDIA or AMD.
How to Enable Variable Refresh Rate on Windows 11
To enable Variable Refresh Rate in Windows 11, follow these steps:
-
Open Windows Settings: Click on the Start menu and select «Settings,» or use the shortcut
Windows + I. -
Select System: In the left-hand sidebar, find and click on «System.»
-
Go to Display Settings: Scroll down and choose «Display.» Under the display settings, click on «Advanced display» settings.
-
Choose the Correct Display: If you have multiple monitors, ensure you select the correct one from the dropdown menu.
-
Refresh Rate: Look for the option that shows «Refresh Rate.» Click on it, and if your monitor supports it, you’ll see a selection for lower refresh rates supported by VRR. Make sure to set it to the highest available refresh rate that supports VRR.
-
Graphics Card Control Panel: Open the specific control panel for your GPU (NVIDIA Control Panel or AMD Radeon Settings). You may need to enable VRR options there as well. For NVIDIA:
- Right-click on the desktop and select «NVIDIA Control Panel.»
- Under «Display,» select «Set up G-SYNC.» Check «Enable G-SYNC» or «Enable G-SYNC for windowed and fullscreen mode» based on your preference.
For AMD:
- Right-click on the desktop and select «AMD Radeon Settings.»
- Go to «Display» and look for «Radeon FreeSync.» Toggle it to «Enabled.»
-
Adjust in Games: Some games may have their own settings for VRR. Ensure in-game settings align with your preferences, and switch on VRR options if available.
-
Test VRR in Action: To confirm that VRR is working, run a game that you know has frame rate fluctuations. Use software like MSI Afterburner or other overlays to monitor frame rates and confirm smooth performance.
How to Enable Variable Refresh Rate on Windows 10
For users still on Windows 10, the steps to enable VRR are similar but might differ slightly in navigation. Here’s a step-by-step guide:
-
Open Settings: Press
Windows + Ior click on the Start button and select «Settings.» -
Select System: Choose «System» from the options.
-
Go to Display: Click on «Display.» Scroll down to «Advanced display settings.»
-
Choose Your Display: If multiple displays are connected, select the one you want to adjust.
-
Refresh Rate Settings: Click on the «Display adapter properties for Display X» option where X is the selected monitor.
-
Monitor Tab: In the pop-up window, navigate to the «Monitor» tab, then select the highest refresh rate available.
-
Enable Via Graphics Panel: As with Windows 11, check the NVIDIA Control Panel or AMD Radeon Settings to enable G-Sync or FreeSync.
-
Gameplay Testing: Similar to Windows 11, test your relationship with VRR while gaming to ensure everything is working properly.
Troubleshooting Common Issues
If you encounter issues when trying to enable or use Variable Refresh Rate in Windows, consider the following troubleshooting steps:
-
Ensure Compatibility: Make sure both your display and GPU support VRR. Refer to your manufacturer’s specifications.
-
Check Cables: Sturdy, high-quality cables are essential. If you are using HDMI, it needs to be version 2.0 or above, or DisplayPort 1.2 or higher.
-
Update Drivers: Always ensure your graphics drivers and Windows have the latest updates installed.
-
Monitor Refresh Rates: Confirm that you have selected the appropriate refresh rate (e.g., 120Hz or 144Hz) within Windows settings.
-
Game Settings: Verify game settings for VRR compatibility. Some titles may have VRR settings that need to be manually enabled.
-
Check Gaming Mode: If using Windows 10, enabling Gaming Mode can sometimes improve performance and resolve issues.
-
Reboot: After making changes, reboot your PC to ensure updates take effect automatically.
-
Monitor Test: Use tools like «Nvidia Frame View» or «Continue Testing» in AMD to evaluate how well VRR is functioning.
-
Seek Community Help: If you continue facing issues, consider looking for specific solutions in gaming community forums like Reddit or official support pages.
Conclusion
In the fast-paced world of gaming, ensuring that you have the best possible setting for your graphics is crucial. Variable Refresh Rate technology provides a noticeable improvement in not just performance but also overall enjoyment of gaming. Whether you are battling foes in a competitive first-person shooter or exploring vast worlds in open-world titles, enabling VRR gives you the seamless experience that enhances your capabilities.
Whether you’re on Windows 10 or Windows 11, the steps to enable VRR are straightforward. By ensuring your hardware is compatible, installing the latest drivers, and following the outlined instructions, you’re on your way to enjoying the smoother gameplay experience that VRR has to offer. So, take the time to adjust your settings—your future gaming sessions will thank you!