
Digital Microscope – это программа, которая состоит из утилит и драйверов для обеспечения работы с микроскопом «CoolingTech», который подключается по USB-интерфейсу 500X. В состав установочного пакета входят вспомогательные компоненты, которые обеспечивают работу этого устройства.
Этот софт инсталлирует драйверы и инструменты, активирующие работу цифрового микроскопа. Digital Microscope распространяется на официальной основе. Закачав архив с этой программой, вы не обнаружите библиотеки .NET Framework для обладателей старых сборок OS Windows. В состав программы входит подробная справка, но драйверы созданы без русского языка.
Об устройстве
Digital Microscope, не относится к разряду профессионального оборудования, но в этом микроскопе есть множество функций. Он оснащен CMOS сенсором высокого уровня, который работает на фокусном расстоянии от 0 до 40 мм.
Кроме того, аппарат оснащён LED-подсветкой, уровень «света» которой, вы настраиваете самостоятельно. В аппарате есть такие плюсы, как увеличение цифрового масштаба в пять раз и функция «захвата» картинки в разрешении до 640 на 480.
Питание к микроскопу поставляется от USB-порта. Создатели программы и оборудования заявили о поддержке интерфейса USB версии 1.1 и 2.0. Если на вашем компьютере есть 3.0 версия, то вы можете столкнуться с проблемами. Установив соответствующий драйвер, вы подключите микроскоп к компьютеру, который обнаружится в автоматическом режиме.
Установка драйверов
Распаковав закачанный архив, запустите файл autorun.exe. В практичном меню вы можете выбрать необходимый драйвер, саму программу и вспомогательные утилиты. Не забывайте о том, что эта программа работает с неполадками на новых OS Windows. Запускайте инсталлятор, используя режим совместимости или под «Администратором».
Ключевые особенности
- инсталлирует нужный софт для микроскопа U500X;
- в драйверах удобное меню автозагрузки;
- программное обеспечение состоит из справки и вспомогательных инструментов;
- драйверы доступны бесплатно;
- на новых OS Windows программа работает с неполадками;
- графический интерфейс программы создан в простом оформлении и не содержит сложных функций;
- драйверы работают через интерфейс USB 1.1 и 2.0 версии, а на 3.0 микроскоп работает только после установки специального драйвера в операционную систему.
| Platform | Important Notes | Date | Version and Download |
|---|---|---|---|
| Windows 11, 10, 8.x, 7, Vista, and XP (for both 32-bit and 64-bit) | Digital Viewer 3.1.07 | ||
| macOS 10.13.x and Above | Digital Viewer 3.3.30 | ||
| macOS 10.5.x to 10.13.3 | Digital Viewer 3.1.08 | ||
| Linux |
We have tested our microscope with many Linux distros utilizing either the Cheese app or GTK+ UVC Viewer. These can either be installed by searching by app name through the app store in your Linux distro (if available), or by using the following terminal commands. GTK+ UVC Viewer Cheese |
||
| Chrome OS |
No additional software is needed. Please see Google’s guide to capturing photos and video, just use the microscope as your source. |
To ensure that the latest driver is installed, please download and install directly from this page. Some CD-ROM drivers are not the latest drivers, which may cause the microscope to become unusable on computer equipment. If your microscope is not working, please visit our blog www.jiusion.com/blog to find a solution or contact us at jiusion@outlook.com.
Quick Access
Windows
Mac
Chrome OS
Linux
Android
iPhone/iPad
Update driver in Windows
Windows
Since Jiusion microscopes use a standard webcam chipset, they will automatically install default webcam (UVC) drivers when plugged into a host device. They can be used with any webcam apps. User can select one or more to install.
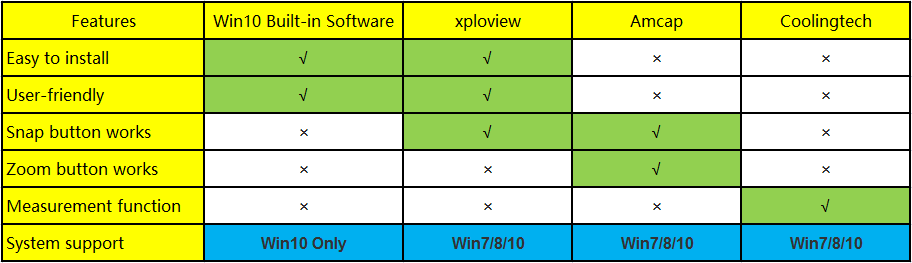
| Win10/11 built-in camera app | xploview | Amcap | Coolingtech | |
| Easy to install | √ | √ | × | × |
| User Friendly | √ | √ | × | × |
| Snap button works | × | √ | √ | × |
| Zoom button works | × | × | √ | × |
| Measure function | × | × | × | √ |
| Support | Win10/11 Only | Win7/8/10/11 | Win7/8/10/11 | Win7/8/10/11 |
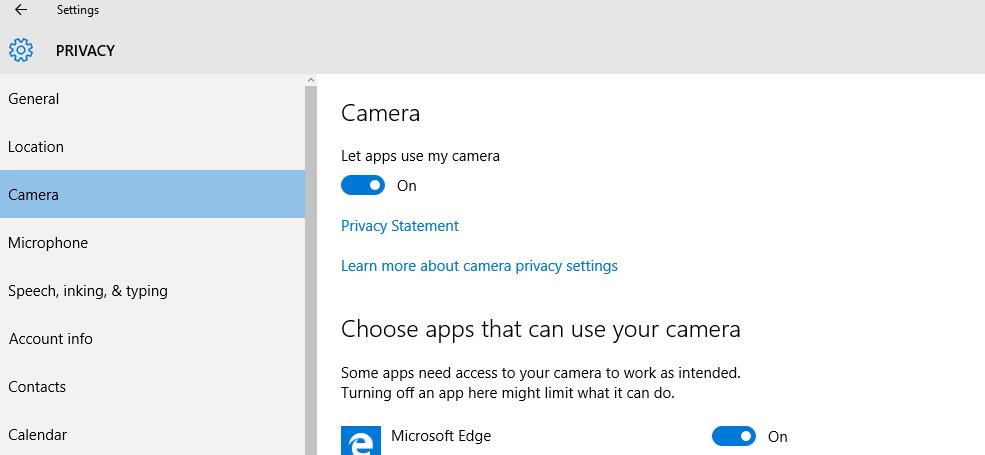
Windows 10/11 user please make sure the «Camera» in privacy settings is on.
1) Win10/11 built-in camera app
If you are Win10/11 user, you can plug the microscope to the Win10/11 computer and open this app to use the microscope directly. You can click «Windows» logo on the left and find the «Camera» app. The downside is that you can’t use the snap and zoom buttons in this app.
2) xploview
2.1 Download the xploview
xploview.exe(3.87MB) Windows XP, Vista, 7, 8, 10, 11 | 32 or 64 bit
2.2 Install the xploview
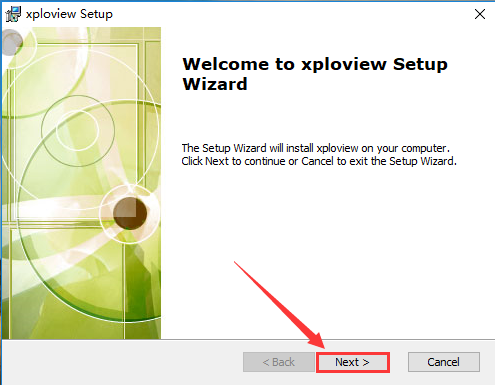
Double click the “xploview” to start installation. Select your first language and click “Next”.
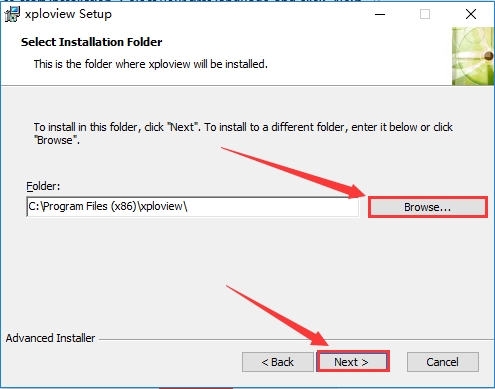
Click “Browse” if you want to install to other fodders. Click “Next”.
Click “Install”.

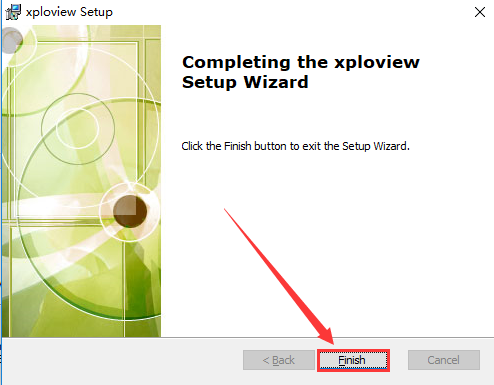
Wait for the installation to complete. Click «Finish» to complete the installation.
2.3 Remove the microscpe lens cover and connect it to the computer

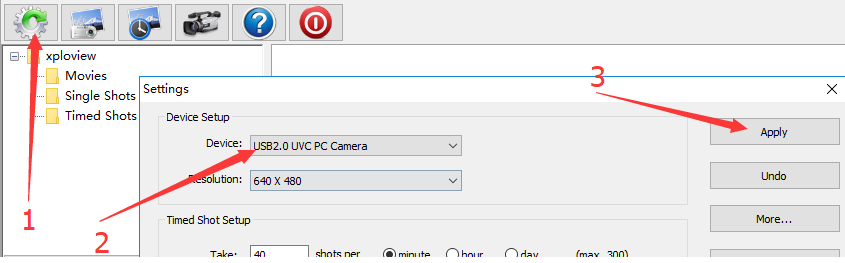
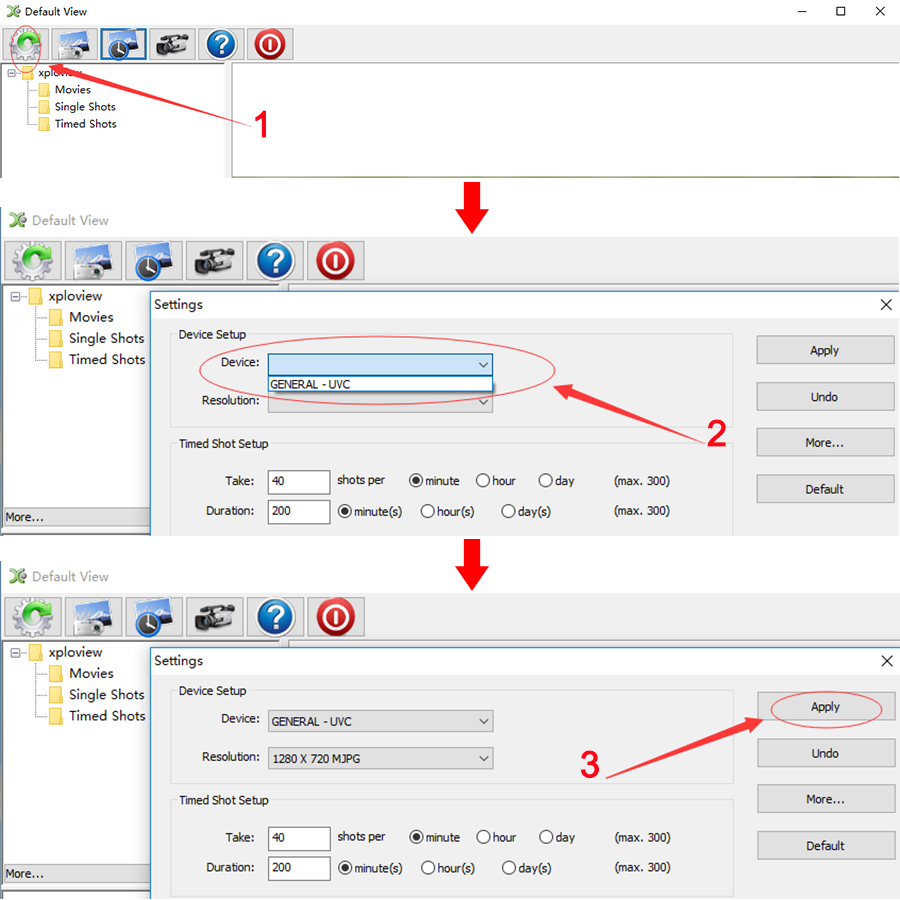
2.4 Open the xploview
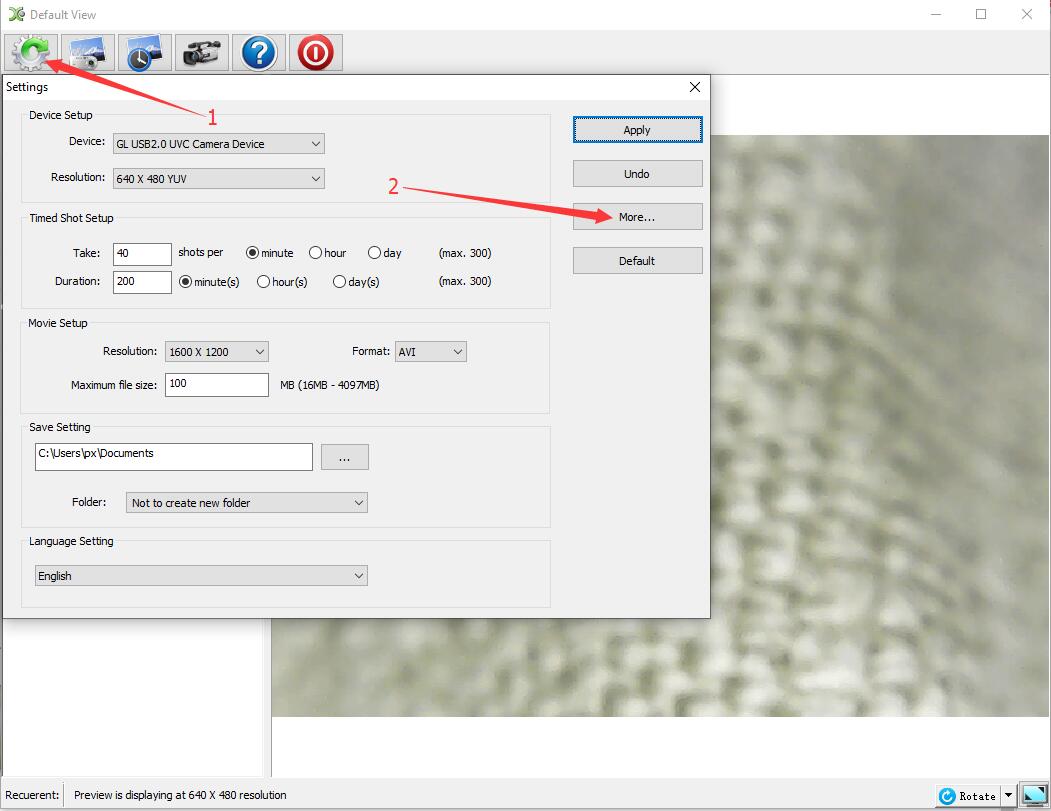
Click ①»Settings» –② «Device» to select «USB2.0 UVC PC Camera» on the dropdown. Click «Apply». Note the zoom button doesn’t work on this software.

3) Amcap
3.1 Download the Amcap
Amcap is a custom Windows (XP and above) software package designed specifically to work with the microscope.
Amcap.zip(3.38MB) Windows XP, Vista, 7, 8, 10, 11| 32 or 64 bit
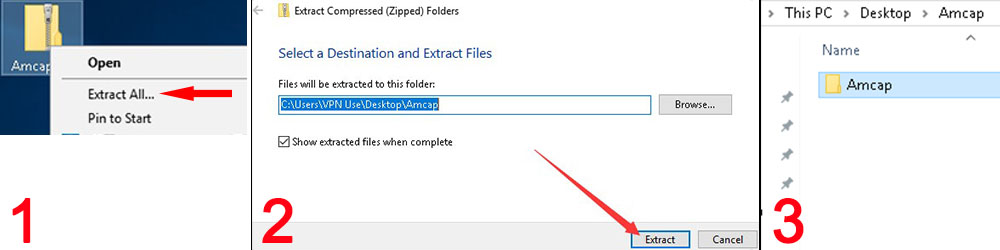
3.2 Extract the Amcap.zip
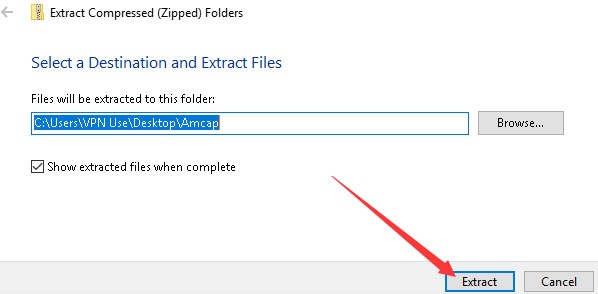
Step 1: Right Click the Amcap.zip and select «Extract All«. Step 2: Click «Browser» to select a location to save the Amcap and click «Extract». Step 3: Double click the extracted folder «Amcap» to open it.
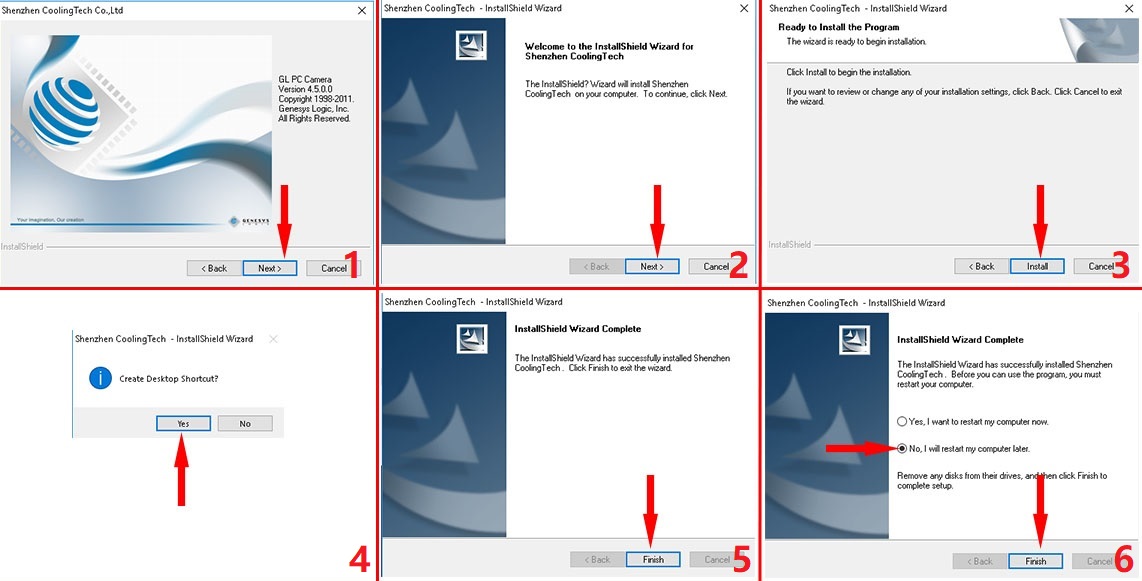
3.3 Install the Amcap
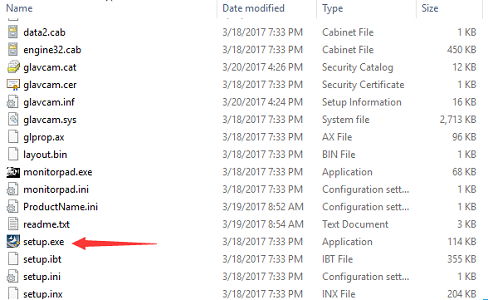
Double click the “setup.exe” to install the Amcap. Select ①Next — ②Next — ③Install — ④Yes — ⑤Finish — ⑥No, I will restart my computer later and Finish.

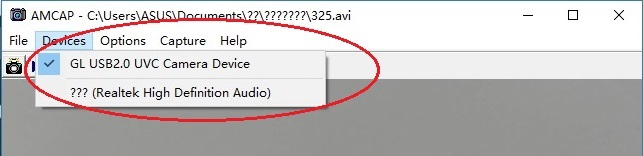
3.3 Remove the microscope lens cover, plug the microscope and open the Amcap
Connect the microscope to the computer. Right click the Amcap and select «Run as administrator» to open the Amcap software. Click «Devices» to select the «GL USB2.0 UVC Camera Device». If you can’t make the zoom button to work, please click Update Driver for Windows computer to set up.
Remove the microscpe lens cover
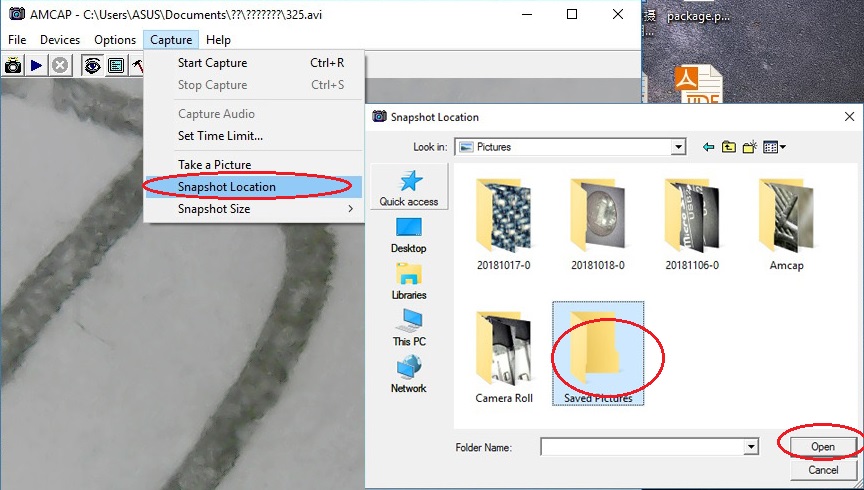
3.4 Setup the location to save pictures and videos
Pictures: Select “Capture” – Snapshot Location – Find or new a folder and click “Open”. You can double click the Snap button to take a picture.
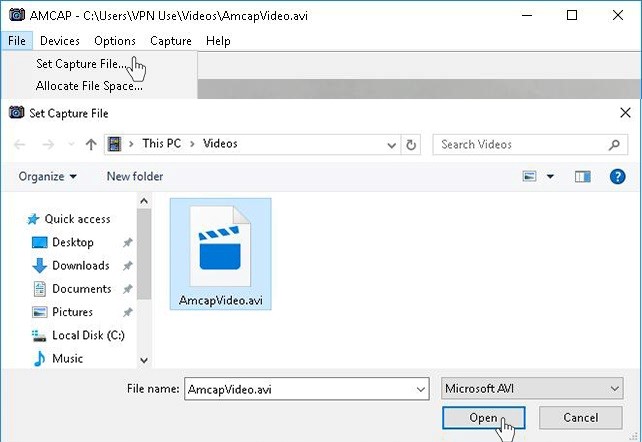
Videos: Click “File” – “Set Capture File”. Find and select an avi format video file. Click “Open”.
4) CoolingTech
Coolingtech measurement software is compatible with Windows 7 8 10 11.
4.1 Download the CoolingTech
What we provided in this link is a installation-free green version. You can delete directly if you want to uninstall it. Click link as below to download the Coolingtech.zip.
Coolingtech.zip(2.55MB) Windows XP, Vista, 7, 8, 10, 11 | 32 or 64 bit
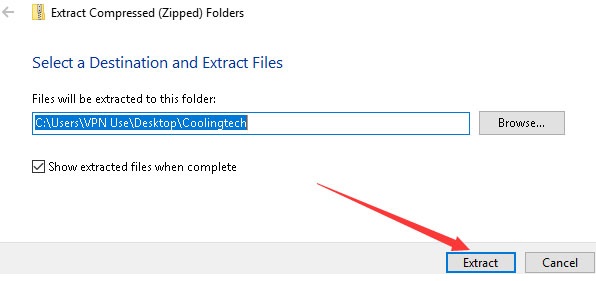
4.2 Extract the Coolingtech.zip
Once the download is finished, right click the «Coolingtech.zip» to select «Extract All…» to extract files out.

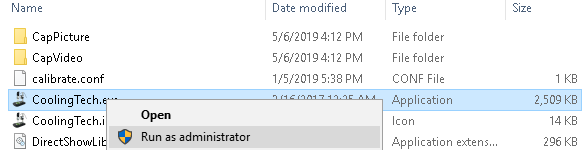
4.3 Open the CoolingTech software
Please ritght click the CoolingTech.exe to select «Run as administrator» to open the CoolingTech.exe. As it is a installation-free version, you can open the Coolingtech folder and run the “CoolingTech.exe” as admin to use the Coolingtech measurement software. Close other webcam software like camera app, xploview and Amcap if you can’t see anything in this software. Please note the snap and zoom buttons don’t work in this software. If the software occur errors, please install the backup measurement software:
S-EYE.exe(3.87MB) Windows XP, Vista, 7, 8, 10 , 11| 32 or 64 bit
Mac
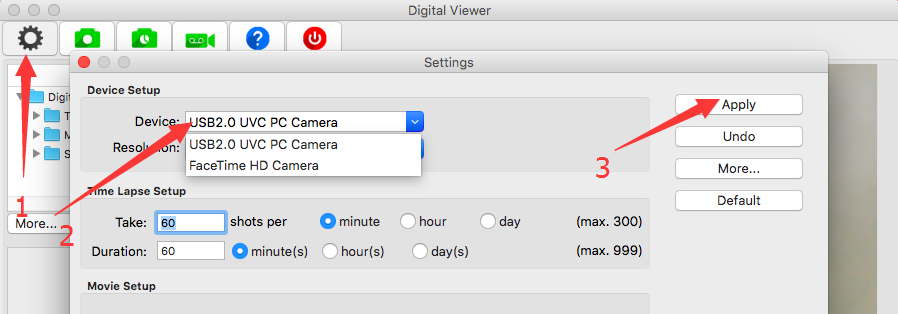
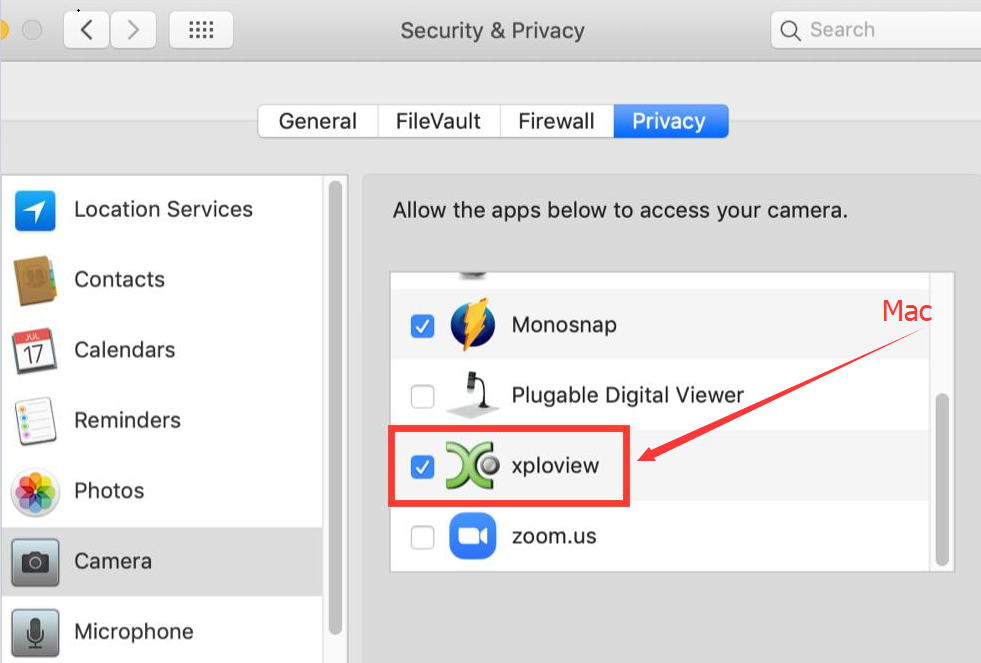
Digital Viewer App is compatible with general purpose Mac microscope software from Plugable Technologies company. Install the app as below and open it. Plug the microscope to the Mac. Open the app («Finder» — «Application» — «Digital Viewer») and click “Settings” – “Device” to select “USB2.0 UVC PC Camera” on the dropdown to make the microscope work. MacOS10.14 and above users and need to allow the «Digital Viewer» app to access camera in «System Preferences» — «Security & Privacy». Note the zoom button doesn’t work on this software. Please tap this email to contact us if you can’t use the microscope on Mac jiusion@outlook.com
Digital_Viewer_3.3.30.pkg(8.66MB) macOS (10.5 and later) | 32 or 64 bit
Remove the microscpe lens cover

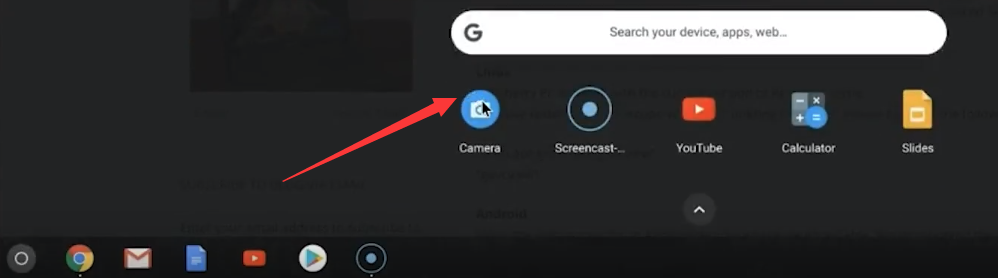
Chrome OS
We don’t have drivers for Chrome OS as Jiusion microscopes can be used with the default Camera app that comes with Chrome. Go to Settings > Advanced Settings > Privacy > Content Settings > Camera, and change the device in the dropdown to “USB Microscope”. Access your camera and your magnified object should appear on the screen.
Remove the microscpe lens cover
Linux
Search for the application Cheese and click install. Once the installation is completed, open the application cheese. If the program displays your other camera, click on the word cheese in the top bar to access you preferences. In the webcam tab click on the dropdown menu and select USB Microscope.
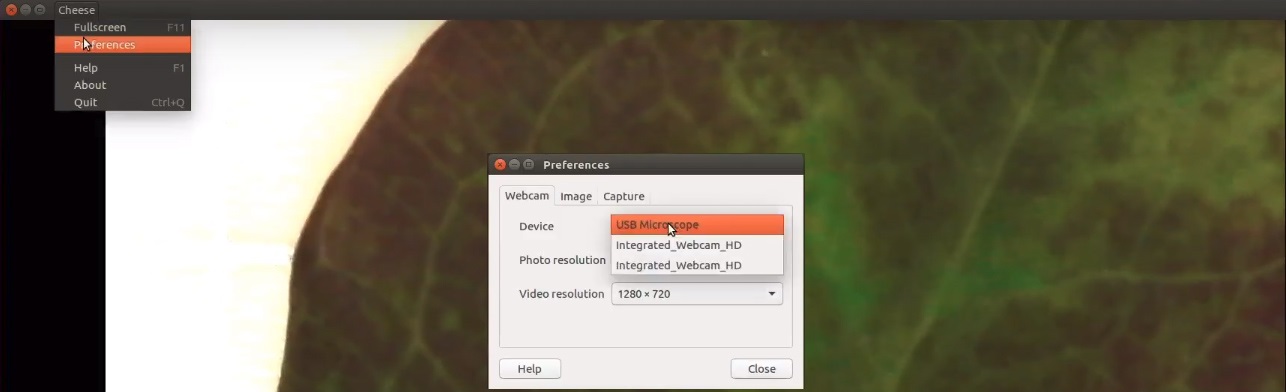
Remove the microscpe lens cover
Android
Please note that Android support is on a case-by-case basis. Device manufacturers must have support for USB Video Class devices built in or this will not work.
Step 1: Install app
You can install the 3rd party camera app like “OTG View”, “inskam” “AN98” as below or install from Google Play. Note it may report unsafe as you didn’t install from Google Play. You can choose to continue with the installation or install it from the Google Play. If the app crashes or can’t save pictures, please install the backup apps or tap this email link jiusion@outlook.com to send an email to us to get the suitable Android app version.
Download the installation package directly:
OTG View.apk(17.52MB) Android 4.4 and above
inskam.apk(85.88MB) Android 4.4 and above
AN98.apk(14.01.MB) Android 4.0 and above
Download from Google Play:
OTG View, inskam, USB Endoscope
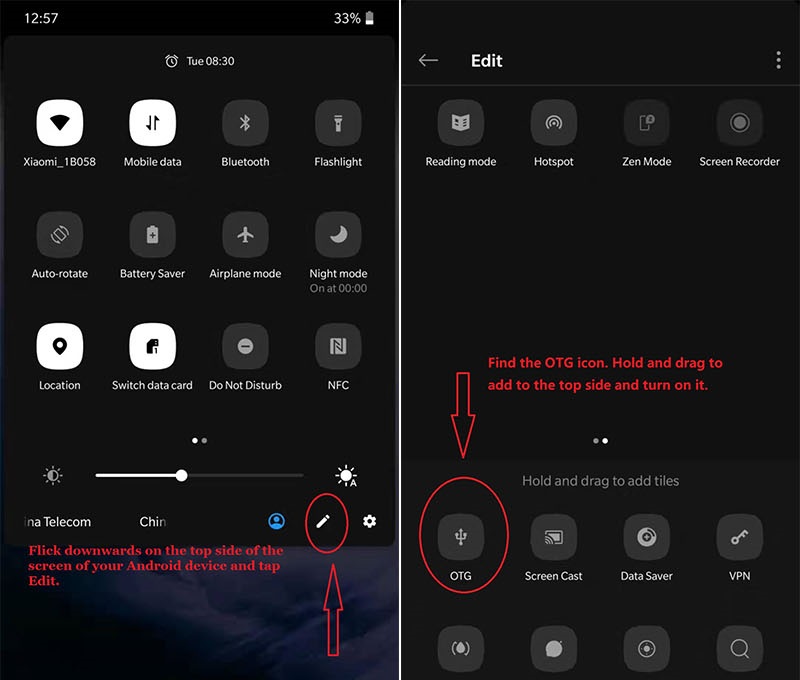
Step 2: Turn on the OTG function
Some phones may need to turn on the OTG manually by flicking downwards on the top side of the screen(Oneplus brand) or tapping Setting — Additional Settings – OTG(Oppo or Vivo brand). Please skip to step 3 if you can’t find these options.
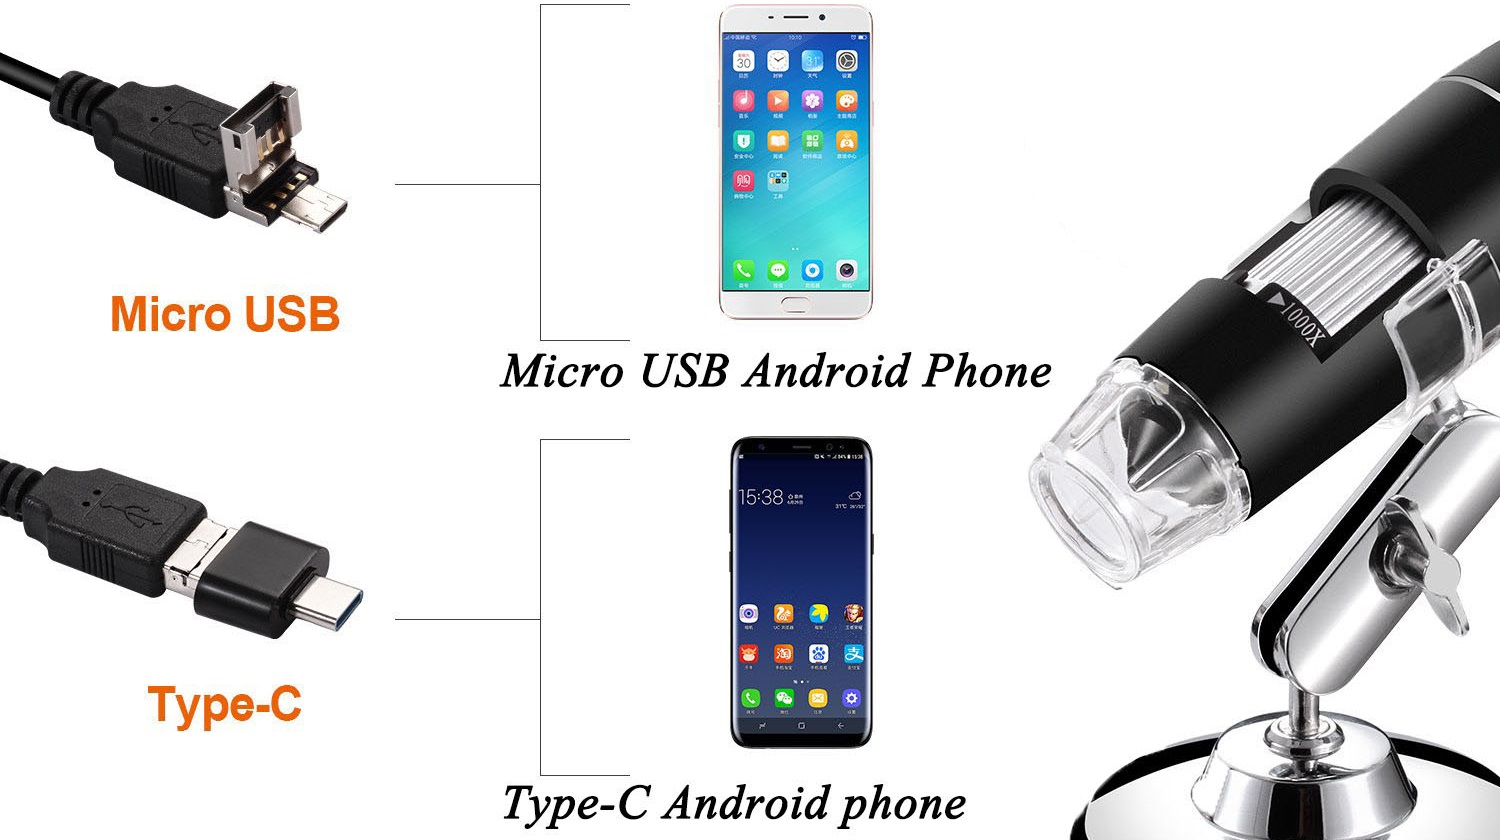
Step 3: Connect the microscope to the Android phone
Micro USB phone user please flip a piece on the USB plug from the microscope and plug the micro usb to the phone. Type C phone user please use the type c adapter to connect the microscope to the type c phone. Open the app (OTG View/inskam/AN98) to use the microscope.
1)If the microscope LED doesn’t light up, before contacting us, please check the led dial on the cable and make sure it is on. Please tap this email link jiusion@outlook.com to send us email. It is micro usb or type c connection problem. We will exchange the adapter to you.
2)If the microscope LED lights up but no images on app, please install another 2 apps or tap this email jiusion@outlook.com and email to us. It might be app version or microscope problem. We will send the app suitable for your phone. If it is a microscope problem, we will replace it for you free of charge.
Remove the microscpe lens cover
iPhone/iPad
Since Apple Company blocked the data transfer, the microscope can’t work with iPhone/iPad.
Drivers for Bysameyee USB Digital Microscope
Quick Access
Windows
Mac
Chrome OS
Linux
Android
Windows
Use a standard webcam chipset, Bysameyee USB Microscope will automatically install default webcam (UVC) drivers when plugged into a host device. So it’s compatible with any webcam apps, you can choose one or more to install on your PC.
Software Comparision:
1) Win10 Built-in Software
If you are a Win10 user, you can plug the microscope into the Win10 computer and open this app to use the microscope directly. You can click the «Windows» logo on the left and find the «Camera» app.
Please note that you can’t use the snap and zoom buttons in this app.
2) xploview
Download xploview.exe via this link:
xploview.exe(3.87MB) | Windows XP, Vista, 7, 8, 10 | 32/64 bit
And then double-click the xploview.exe to install the app. Plug the USB microscope into your computer. Run the xploview app and click “Settings” – “Device” to select “USB2.0 UVC PC Camera” on the dropdown list, finally remember to click «Apply».
*Note: Zoom button doesn’t work on this software.
3) Amcap
Amcap is a custom Windows (XP and above) software package designed specifically to work with the microscope.
Download here:
Windows XP/Vista/7/8/10/11: Amcap.zip(3.34MB) | Windows XP, Vista, 7, 8, 10, 11 | 32/64 bit
Once the download is finished, right-click the «Amap.zip» to select Extract All… to extract files out.
We recommend you to extract the files package into C drive of your computer:
Open the Amcap folder and double click the “setup.exe” to install the Amcap app.
Select «No, I will restart my computer later».
Plug the microscope into the computer.
Open the Amcap app and click “Device” on the top menu to select «GL USB2.0 UVC Camera Device».

You need to set up the snapshot location for pictures on Amcap when you first use it. Select “Capture” – Snapshot Location – Find or new a folder and click “Open”.
The pictures/videos you take will be saved here.

Please email us if Amcap occurs errors. We have several free microscope software that is easier to install and use, even without installation. Please email bysameyee@outlook.com to get further assistance.
4) CoolingTech
Coolingtech measurement software is compatible with Windows 7 8 10.
Download link:
Coolingtech.zip(2.55MB) | Windows XP, Vista, 7, 8, 10 | 32 or 64 bit
Once the download is finished, right-click the «Coolingtech.zip» to select «Extract All…» to extract files out.
We recommend you to extract the files package into C drive of your computer:
Open the Coolingtech folder and double click the “CoolingTech.exe” to use the Coolingtech measurement software.
Note: Please close the other webcam software like the camera app, xploview, and Amcap first, otherwise you can’t see anything in this software.
Please note the snap and zoom buttons don’t work in this software. If the software occurs errors or wants to get a different measurement software, please contact us via our customer service email bysameyee@outlook.com
Mac
xploview App is compatible with a general-purpose Mac microscope.
Download:
xploview.pkg(9.73MB) macOS (10.13.4 and later) | 32 or 64 bit
Step1, Double click the “xploview” to start the installation. Select your first language and click “Next”.
Step2, Click “Browse” if you want to install it to other folders. Click “Next”.
Wait for the installation to complete. Click “Finish” to complete the installation.
Step3, connect the Microscope to the computer via the USB cable
Step4, Open the xploview
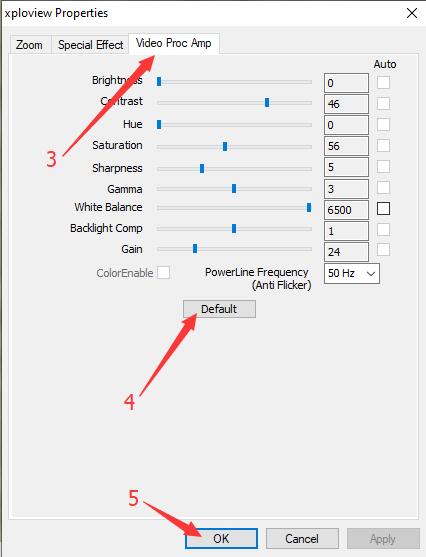
Click ①»Setting» – ②»Device» to select the microscope «GENERAL — UVC» under the «Device» menu. Click ③»Apply».
Note: The zoom button doesn’t work on this software.
Privacy Setting:
Chrome OS
Bysameyee USB Digital microscope can be used with the default Camera app that comes with Chrome.
Go to Settings > Advanced Settings > Privacy > Site Settings > Camera, and change the device in the dropdown list to “USB Microscope”. Run the camera and your magnified object should appear on the screen.
Open the Camera app on your Chromebook. You’ll find it under the launcher menu. Tap the “Search” button on the keyboard and search for “Camera”. Alternatively, click the “All Apps” button and look for the camera icon.

Linux
On Ubuntu, search for the application «cheese» and click install. Once the installation is completed, open the application cheese. If the program displays your other camera, click on the word cheese in the top bar to access your preferences. In the webcam tab click on the dropdown menu and select USB Microscope.

Android
Please note that Android support is on a case-by-case basis. Device manufacturers must have support for USB Video Class devices built-in otherwise this will not work. You can install the 3rd party camera app like “USB Camera”, «OTG View» as below or install from Google Play. Note: it may report unsafe as you don’t install it from Google Play. You can choose to continue the installation or install it from Google Play.
Step1: Download and install App:
Google Play link: USB Camera, OTG View, AN98
USB Camera: USBCAMERA.apk(5.42MB) Android 4.4 and above
OTG View: OTG View.apk(17.52MB) Android 4.4 and above
AN98: AN98.apk(14.01.MB) Android 4.0 and above
Step2: Connect the microscope to the Android phone
Micro USB phone user please flip a piece on the USB plug from the microscope and plug the micro USB to the phone. Type C phone user please use the type c adapter to connect the microscope to the type c phone. Open the app (USB Camera/OTG View/AN98) to use the microscope. If the microscope LED doesn’t light up, or the App recognizes the microscope but shows a black screen, please tap this email link bysameyee@outlook.com to contact us. It is a micro USB or type c connection problem. We will exchange the adapter with you.
Q&A
Q1, Why the color viewing on the screen is different from its real color?
Answer: You may install the unsuggested 3-party app, please reset the microscope to the default color.
We need to do it with the help of a pc, and the amcap or xploview software:
Amcap:
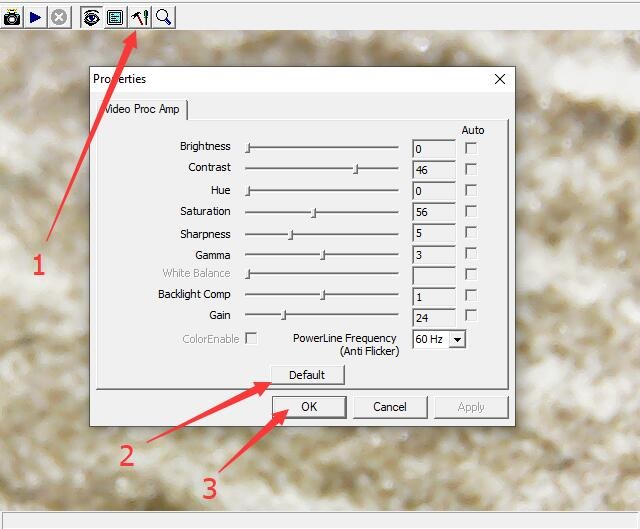
xploview:
Any other unclear, welcome to email us: bysameyee@outlook.com
Драйвер для цифрового USB микроскопа(Китай)
Папка с файлами была скопирована с установочного диска, идущего в комплекте к цифровому микроскопу.
Все файлы проверены актуальным антивирусом Касперский и Dr. Web.
Описание цифрового микроскопа здесь — Обзор микроскопа
Устройство цифрового микроскопа здесь — Внутри цифрового микроскопа
Руководство пользователя можно скачать на этой странице
В архиве папка Driver с установочными файлами