
In this easy-to-follow guide, you’ll discover how to Install and Configure DHCP Server on Windows Server 2019 to dynamically allocate IP addresses to the devices on your network.
The Dynamic Host Configuration Protocol (DHCP) is crucial for the smooth operation of both small and large networks. It simplifies network management by automatically providing IP addresses, along with essential network settings like subnet masks, default gateways, and DNS server details.
This service, along with Active Directory Domain Services (AD DS) and Domain Name Service (DNS), is fundamental to the infrastructure of networks running on Windows Server.
We’re going to explore how to implement and adjust the basic configurations of the DHCP service.
Keep in mind, that the instructions provided in this guide (Install and Configure DHCP Server) are based on Windows Server 2022. However, the setup process remains consistent for earlier versions, including Windows Server 2016 and 2019.
Step 1: Adding the DHCP Server Role
Begin by launching the Server Manager, then navigate to Manage and select the option to ‘Add roles and features’.
Upon initiating the Add Roles and Features Wizard, the first page you encounter will be the welcome screen.
Skipping this screen is an option, though it’s not advised. Foregoing the welcome doesn’t speed up the process, and having a starting point for the installation can be helpful.
This screen includes several suggestions and best practices that are beneficial to review before proceeding.
After reviewing the recommendations, proceed by clicking “Next”.
Now, you’ll be presented with two different installation choices:
- Role-based or feature-based installation: This is used for setting up a single server.
- Remote Desktop Services installation: Ideal for implementing a Virtual Desktop Infrastructure (VDI).
Opt for the first option and then proceed by selecting “Next”.
Next up, pick the server on which you’ll install the DHCP server role. Start by choosing “Select a server from the server pool”. You’ll see a list of available servers. Select the server where you want the DHCP role to be installed, and then click “Next”.
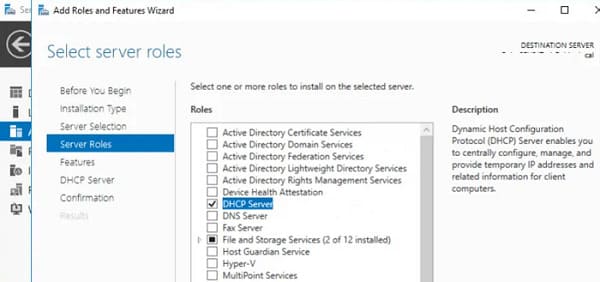
Now, it’s time to pick the specific server role you want to set up, which will be the DHCP service for our purposes.
Scroll through the available roles until you spot “DHCP Server.” Once found, mark it by ticking the checkbox next to it. A prompt will appear, inquiring if you want to add the necessary features for this role, along with a selection of features to consider.
Make sure you select “Include management tools (if applicable)”, then hit “Add features”. Afterward, you can proceed by clicking “Next”.
At the “Select features” screen, you can keep the current settings as they are (unless you have additional features in mind to include). Just click on “Next” to move forward.
On the DHCP Server role information page, there’s not much required from you. Just spend a moment to go through the extra details provided, and then proceed by clicking “Next”.
You’ve reached the “Confirm installation selections” step. My advice is to leave the “Restart the destination server automatically if required” option unticked, to maintain complete control over the process.
Review all your installation selections carefully, ensuring everything is set according to your requirements. Once satisfied, proceed by clicking “Install”.
The installation process kicks off now, and you’ll notice a progress bar appear. After the installation concludes, simply click on “Close” to wrap up.
Should you close the wizard before the installation wraps up, there’s no cause for alarm. You can keep an eye on the ongoing installation by selecting the Alert icon found in the menu (20).
After the installation is complete, it’s essential to click on “Complete DHCP configuration” (21) to adjust the fundamental settings of your DHCP server.
Setting Up Your DHCP Server
Once you select “Complete DHCP configuration,” the DHCP Post-Installation Configuration Wizard will appear. With the server role now installed, your next step is to set up the essential parameters to get your new DHCP server operational.
A welcome screen will greet you again, this time explaining the need to establish security groups for both administrators and users, which is essential for managing DHCP server administration rights. Additionally, it will guide you on authorizing the DHCP server on the designated computer.
After thoroughly reviewing this information, proceed by clicking “Next”.
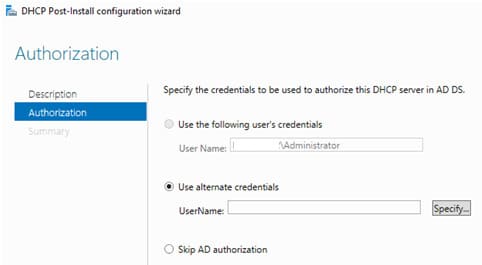
At the Authorization stage, it’s time to provide specific credentials for authorizing the DHCP server within Active Directory Domain Services (AD DS). You’ll encounter the following choices :
- Use the following user’s credentials: Here, input the username in the “Domain\User” format. This is the method we’re following in our guide.
- Use alternate credentials: This option requires you to input a different username.
- Skip AD authorization: Select this if you wish to bypass Active Directory authorization.
After selecting your preferred option and filling in the required details, click on “Confirm” to proceed.
You’ll now be directed to a summary page that outlines the steps you’ve completed:
- Creation of security groups.
- Authorization of the DHCP server.
If all procedures have been successfully executed, a “Done” status will be visible beside each task.
To conclude the setup, simply click on “Close”.
You can now find the DHCP tool within the Server Manager. To manage your newly established service, simply go to the Tools menu and select DHCP.
Finally, you’ll be brought to the DHCP management console. This is where you can carry out all tasks related to DHCP, including setting up scopes, allocating leases, establishing ranges, and configuring various settings for client devices, among others.
You succeeded! install and configure the DHCP server. There still remain tasks like configuring scopes and basic settings, but we will leave this for a future tutorial.
saniaowner
Блог электролампочного хамелеона
Windows
После прочтения названия статьи Вы спросите, мол зачем нам DHCP сервер на Windows ?
Ответов может быть несколько:
— Нет под рукой роутера
— Слишком далеко до роутера
— Я так захотел
Сферы применения данной программы решать Вам. От себя лишь добавлю что программа часто выручает когда нужно настроить камеру и протестировать устройства без дополнительного оборудования.
Скачать программу можно на оф.сайте или с моего сервера.
Краткий мануал по использованию
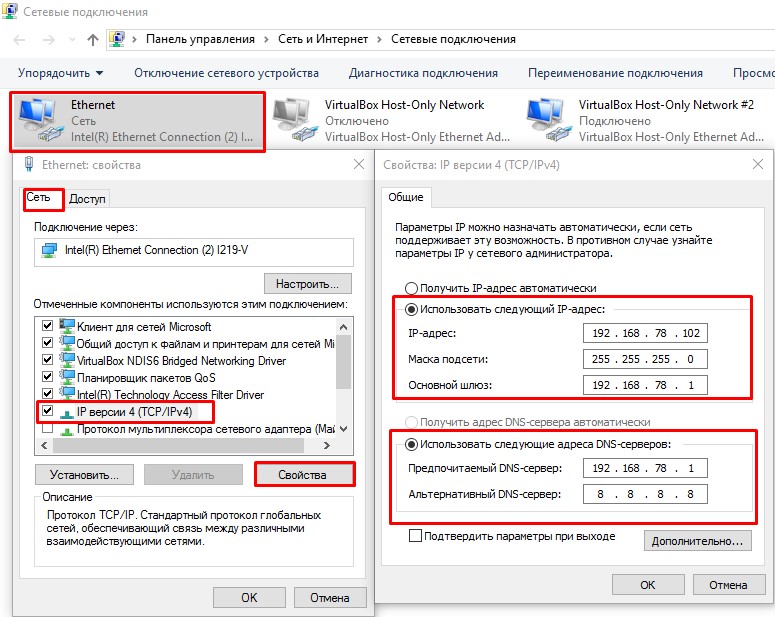
- Необходимо на интерфейсе Ethernet настроить статический IP адрес, который будет выступать в роли DHCP сервера и шлюза
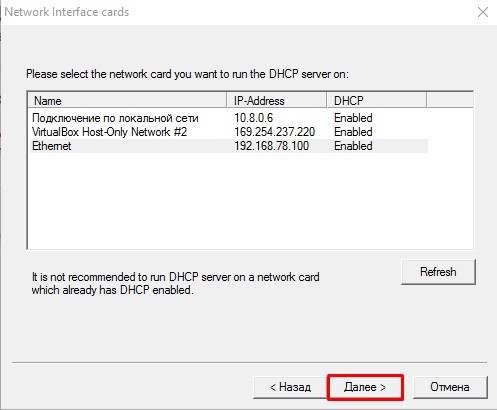
- Распаковываем программу, очень желательно не на системный диск. Находим файл с названием dhcpwiz.exe, это пошаговый настройщик DHCP сервера. Нажимаем
Далее - Выбираем сетевой интерфейс и нажимаем
Далее
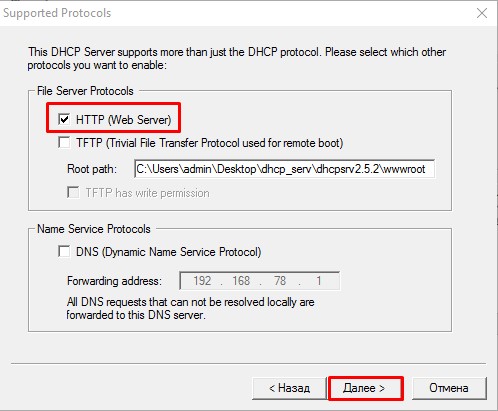
- Открывается новое окно, где нам предлагается дополнительно выбрать опцию загрузки WEB, TFTP сервера, и DNS. Выбираем HTTP (Web Server), это позволит просматривать список подключенных устройств к серверу. Затем нажимаем
Далее
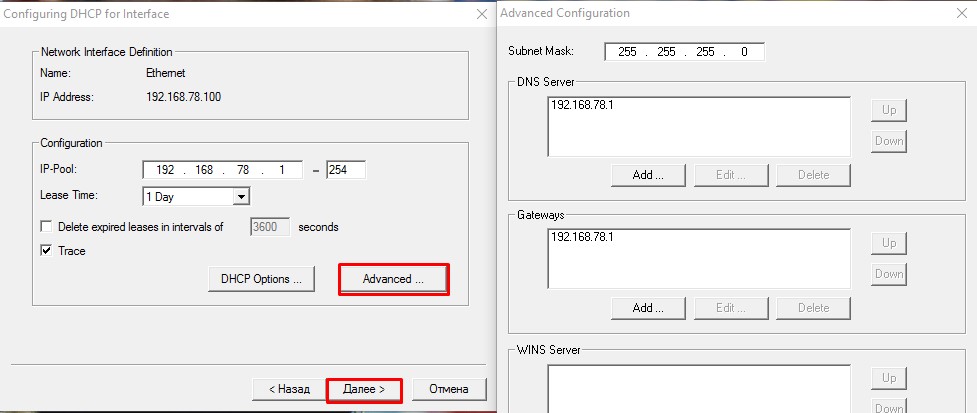
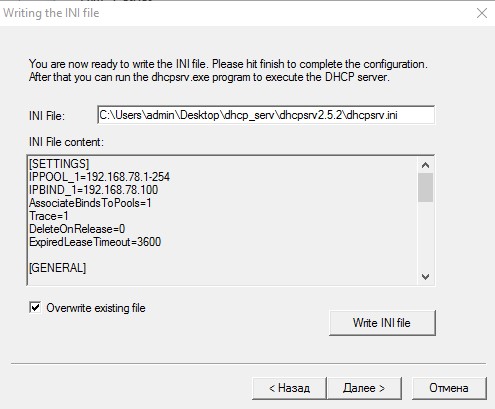
- Приступим к настройке DHCP сервера.
IP-Pool— количество IP адресов доступных для подключения. По умолчанию 253Lease Time— время жизни IP адреса. Включайте в зависимости от потребностей задачиTrace— системная трассировка
НажимаемAdvancedчтобы получить доступ к расширенной конфигурации. По умолчанию значения взяты с параметров сетевой карты ПК. НажимаемДалее
- Чтобы настройки применились отмечаем параметр
Overwrite existing file(перезаписать файл конфигурации) и подтверждаем перезапись кнопкойWrite INI file.
Снова нажимаемДалее
- Устанавливаем сервер нажатием
Installи запускаем всю эту радость кнопкойStart

- Список подключенных устройств можно посмотреть в браузере используй
localhostили127.0.0.1
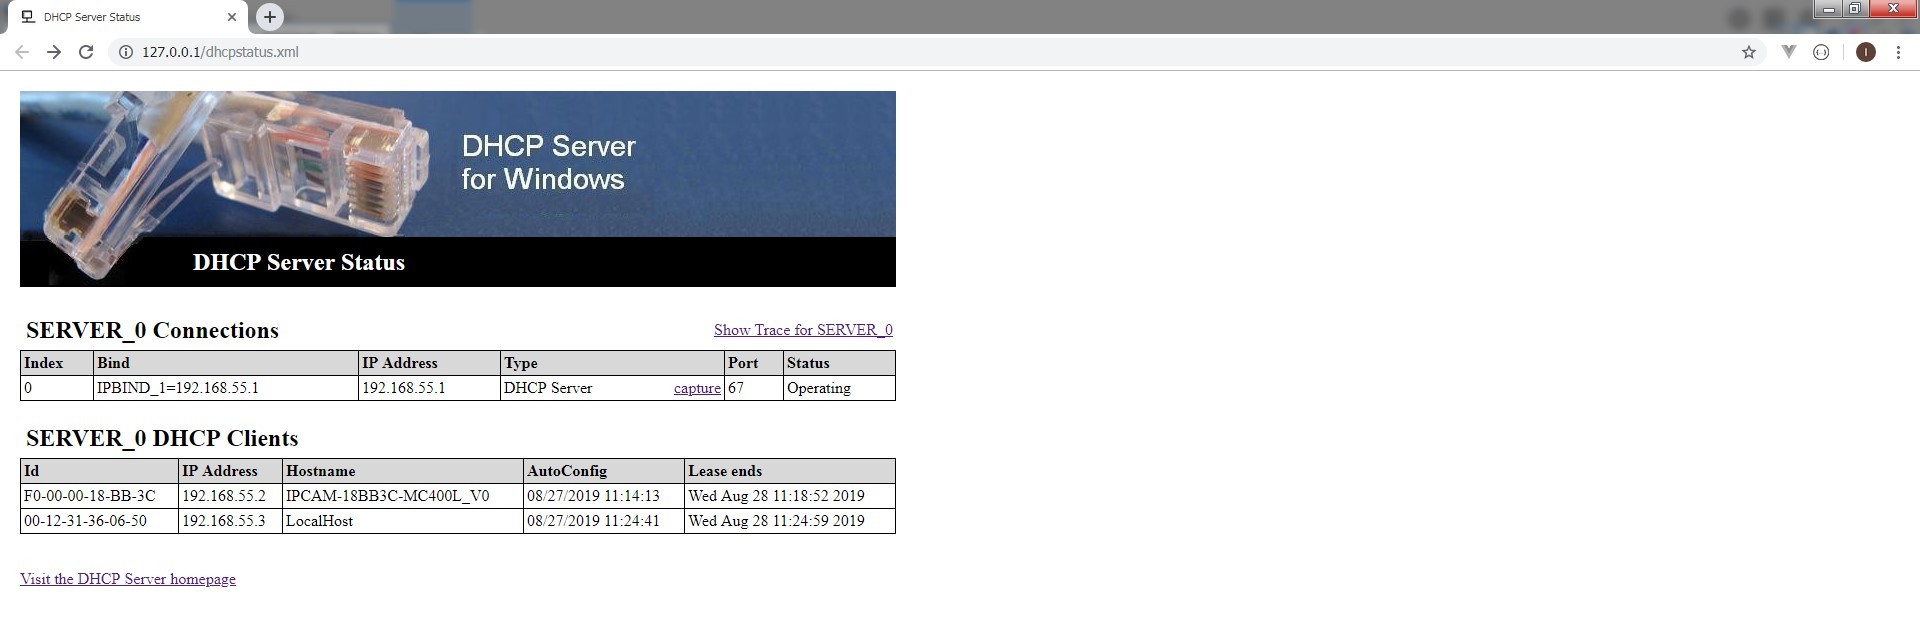
Такая вот цацка получилась:)
В этой статье рассмотрим полный процесс установки и настройки DHCP сервера на Windows Server 2019. Мы подробно опишем процесс установки роли DHCP, создание и настройку областей, а также резервирование статических IP-адресов. Покажем настройку DHCP через графическую консоль и PowerShell. Протокол DHCP (Dynamic Host Configuration Protocol) используется для автоматического назначения сетевых параметров, таких как IP-адреса, маска подсети, шлюз и DNS сервера. DHCP помогает централизованно управлять настройками сетевых устройств и избегать конфликта IP-адресов в сети.
Данная инструкция подойдет для Windows Server 2012 R2, Windows Server 2016, Windows Server 2019 и Windows Server 2022.
Приобрести Windows Server можно у нас в магазине от 1190 ₽.
Скачать оригинальные дистрибутивы Windows Server можно в нашем каталоге.
Установка роли DHCP сервера
Для начала, установим роль DHCP на сервере Windows Server 2019. В данном примере сервер будет иметь статический IP-адрес 192.168.13.4. Важно использовать статический IP для сервера с ролью DHCP, чтобы избежать проблем при выдаче адресов клиентам.
Процесс установки можно выполнить как через графическую консоль, так и через PowerShell. Важно, чтобы сервер имел статический IP-адрес перед установкой роли DHCP, иначе появится предупреждение:
WARNING: The following recommended condition is not met for DHCP: No static IP addresses were found on this computer.
1. Откройте консоль Server Manager, перейдите в раздел Add Roles and Features, выберите DHCP Server в списке ролей.
2. После завершения установки выполните Post-Deployment Configuration — щелкните по уведомлению и выберите Complete DHCP configuration.

3. На экране авторизации необходимо предоставить права учетной записи для авторизации сервера в Active Directory.
Если у вас нет прав на авторизацию DHCP в AD, вы можете указать, чтобы ваш DHCP сервер запускался без проверки авторизации в домене:
Set-ItemProperty -Path "HKLM:\SYSTEM\CurrentControlSet\Services\DHCPServer\Parameters" -Name DisableRogueDetection -Value 1 -Force
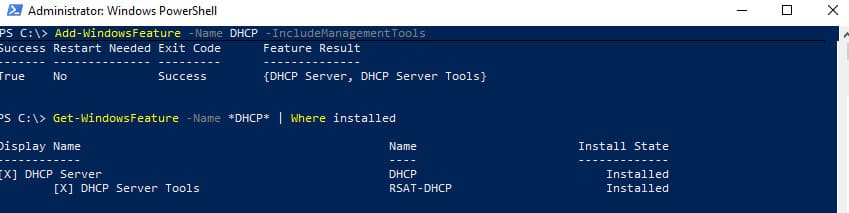
4. Установка роли через PowerShell выполняется командой:
Install-WindowsFeature DHCP –IncludeManagementTools
5. Чтобы убедиться, что роль установлена корректно, используйте:
Get-WindowsFeature -Name *DHCP* | Where Installed
6. Авторизуйте DHCP сервер в Active Directory (укажите DNS имя сервера и IP адрес, который будет использоваться DHCP клиентами):
Add-DhcpServerInDC -DnsName hq-dc01.contoso.com -IPAddress 192.168.13.4
7. Создайте локальные групп безопасности DHCP:
Add-DhcpServerSecurityGroup
8. После этого можно завершить настройку роли, выполнив команду:
Set-ItemProperty -Path HKLM:\SOFTWARE\Microsoft\ServerManager\Roles\12 -Name ConfigurationState -Value 2
9. Перезапустите службу DHCP:
Restart-Service -Name DHCPServer -Force
База данных и логи DHCP сервера по умолчанию находятся в каталоге %systemroot%\system32\dhcp. Важные файлы:
— dhcp.mdb — файл базы данных DHCP;
— j50.log — транзакционный журнал;
— j50.chk — файл контрольной точки;
— tmp.edb — временный рабочий файл.
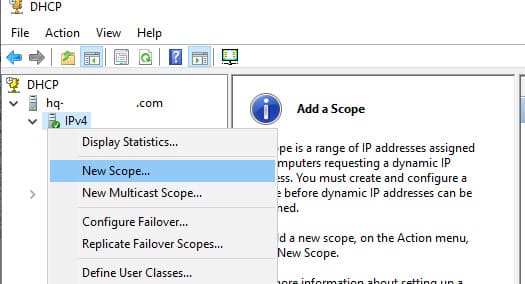
Создание и настройка DHCP областей
После установки роли DHCP необходимо создать одну или несколько областей (Scopes). Область определяет диапазон IP-адресов, которые сервер будет выдавать клиентам, а также другие сетевые настройки.
1. Откройте консоль dhcpmgmt.msc, разверните сервер и выберите IPv4.
2. Щелкните правой кнопкой мыши и выберите New Scope.
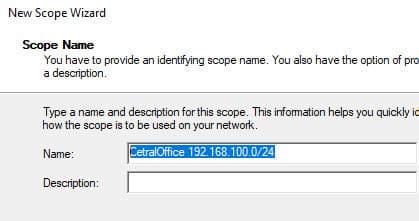
3. Укажите название области, например в нашем случае это CetralOffice.
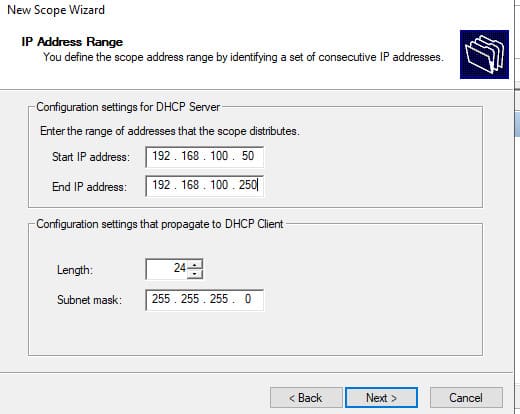
4. Установите диапазон IP-адресов. Например, для сети 192.168.100.0/24 можно указать диапазон 192.168.100.50 — 192.168.100.250.
5. Установите параметры исключений, если необходимо. Например, исключите диапазон 192.168.100.1 — 192.168.100.10, чтобы эти адреса не выдавались.
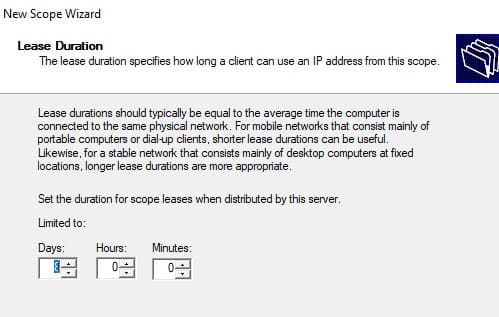
6. Укажите длительность аренды IP-адреса (по умолчанию 8 дней).
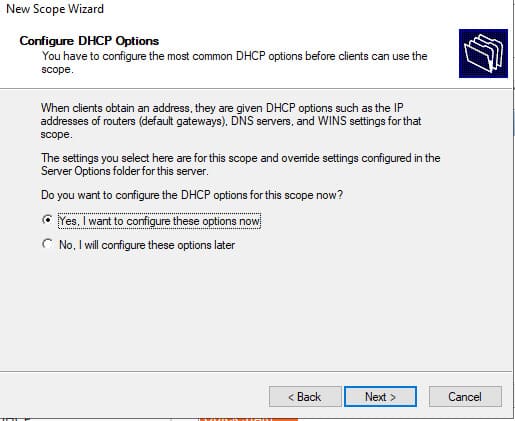
7. Укажите, что вы хотите настроить дополнительный параметры DHCP области.
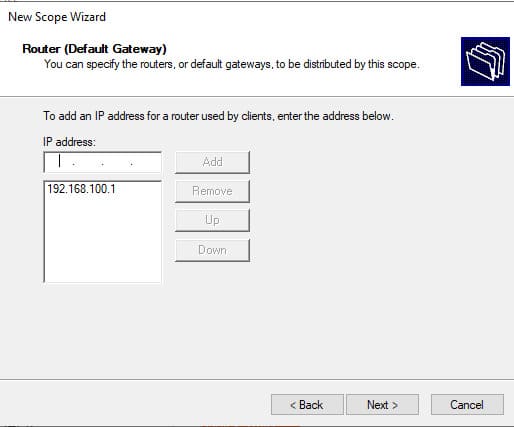
8. Укажите IP-адрес шлюза, который должен назначаться клиентам (например, 192.168.100.1).
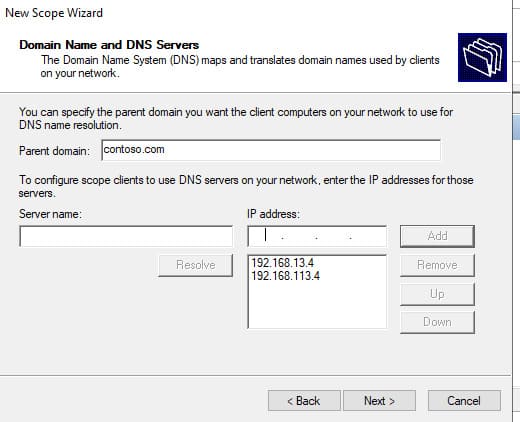
9. Затем укажите имя домена и адреса DNS серверов, которые будут назначены клиентам DHCP.
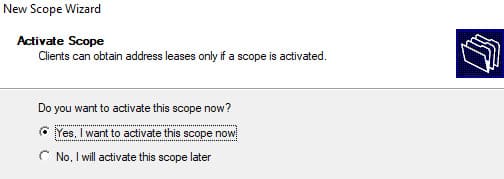
10. После завершения активируйте область.
DHCP сервер может выдавать различные параметры, такие как:
— 003 Router — шлюз;
— 006 DNS Server — DNS серверы;
— 015 DNS Domain Name — домен.
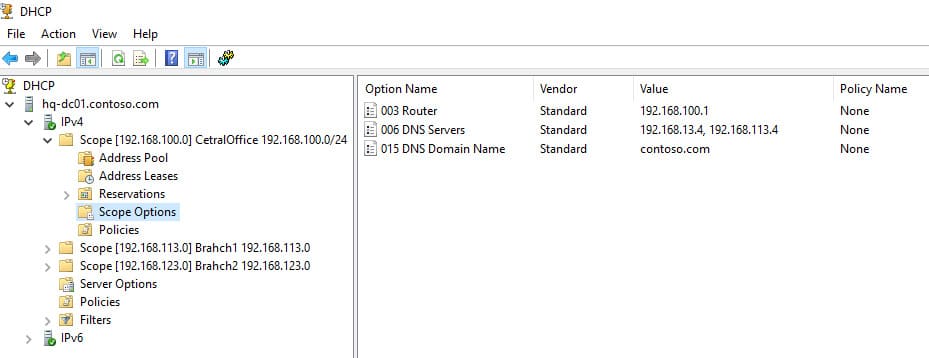
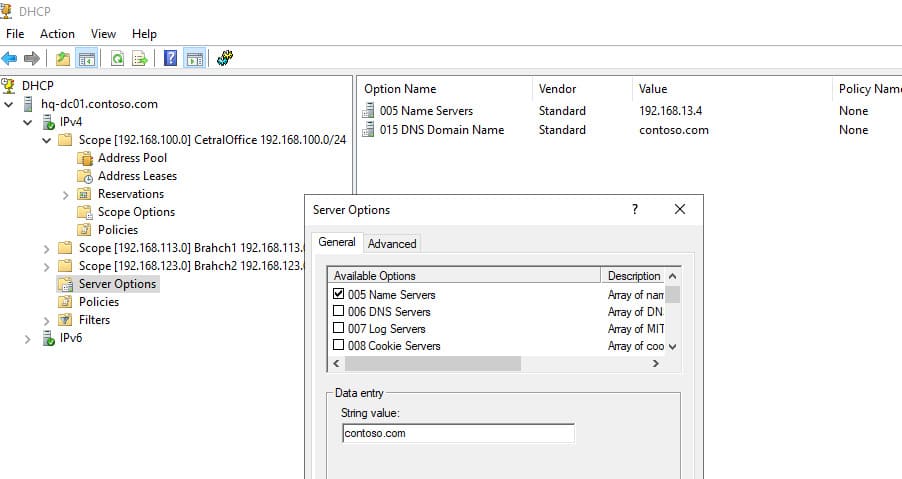
Эти параметры можно настроить как для каждой области (Scope Options), так и глобально для сервера (Server Options). Глобальные параметры будут применяться ко всем областям, но их можно переопределить для каждой области отдельно.
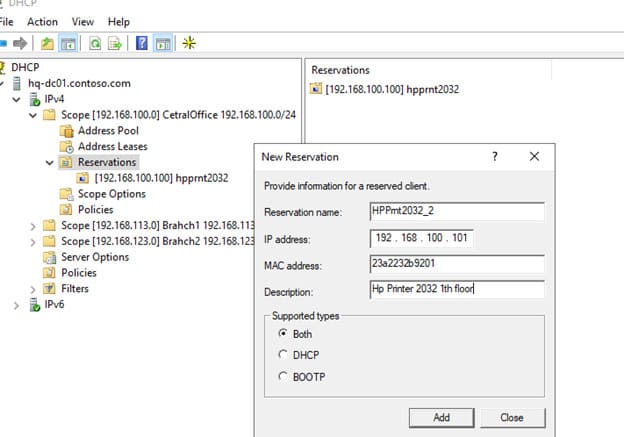
Резервация IP-адресов
По умолчанию DHCP сервер выдает динамические адреса, но для определенных устройств можно зарезервировать статические адреса. Это полезно для сетевых принтеров и других устройств, которым необходим постоянный IP-адрес.
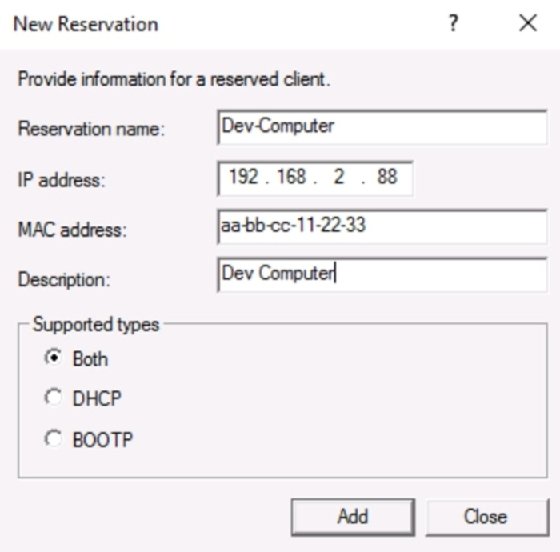
1. Откройте консоль DHCP, перейдите в раздел Reservations.
2. Выберите New Reservation.
3. Укажите IP-адрес, MAC-адрес устройства и его имя.
MAC-адрес устройства можно узнать с помощью команды:
ipconfig /all
Или через PowerShell:
Get-NetAdapter | Select-Object Name, MacAddress
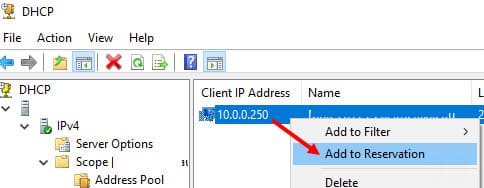
4. Чтобы зарезервировать текущий динамический адрес, найдите его в Address Leases и выберите Add to Reservation.
Настройка DHCP через PowerShell
Все настройки DHCP сервера можно выполнить через PowerShell с помощью модуля DHCPServer. Для начала необходимо импортировать модуль:
Import-Module DHCPServer
1. Для отображения списка доступных команд:
Get-Command -Module DHCPServer

— Следующая команда выведет список авторизованных DHCP серверов в Active Directory:
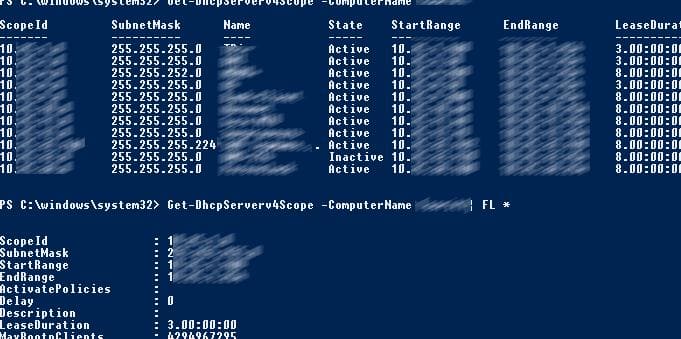
Get-DhcpServerInDC— Вывести список DHCP областей на указанном сервере:
Get-DhcpServerv4Scope –ComputerName msk-dhcp1— Если нужно показать все параметры области (Delay, Description, Name и т.д.):
Get-DhcpServerv4Scope –ComputerName msk-dhcp1| FL *
— Если нужно отобразить данные о IPv6 областях:
Get-DHCPServerv6Scope— Получить настройки для конкретной области:
Get-DhcpServerv4Scope –ComputerName msk-dhcp1 –ScopeID 10.10.1.0
2. Создание новой области:
Add-DhcpServerv4Scope -Name “Branch1 192.168.113.0” -StartRange 192.168.113.50 -EndRange 192.168.113.250 -SubnetMask 255.255.255.0 -State InActive
3. Настроить следующие параметры DHCP сервера: DNS сервер, домен и адрес шлюза по-умолчанию:
Set-DhcpServerv4OptionValue -ScopeID 192.168.113.0 -DnsDomain contoso.com -DnsServer 192.168.13.4 -Router 192.168.113.1
4. Добавление исключений:
Add-DhcpServerv4ExclusionRange -ScopeID 192.168.113.0 -StartRange 192.168.113.90 -EndRange 192.168.113.100
5. Активировать область можно с помощью команды:
Set-DhcpServerv4Scope -ScopeID 192.168.113.0 -State Active

Для удобства можно использовать хеш-таблицу аргументов:
$HashArgs = @{

'Name' = 'EKB Office Scope';

'Description' = 'workstations';

'StartRange' = '192.168.140.10';

'EndRange' = '192.168.140.200';

'SubnetMask' = '255.255.255.0';

'State' = 'Active';

'LeaseDuration' = '1.00:00:00';

}

Add-DhcpServerv4Scope @HashArgs
Опции для DHCP сервера добавляется так (к примеру, WPAD):
Add-DhcpServerv4OptionDefinition -ComputerName msk-dhcp1 -Name WPAD -OptionId 252 -Type StringВывести список настроенных опций DHCP сервера можно так:
Get-DHCPServerv4OptionValue -ComputerName msk-dhcp1 | Format-ListВыведем список настроенных параметров зоны:
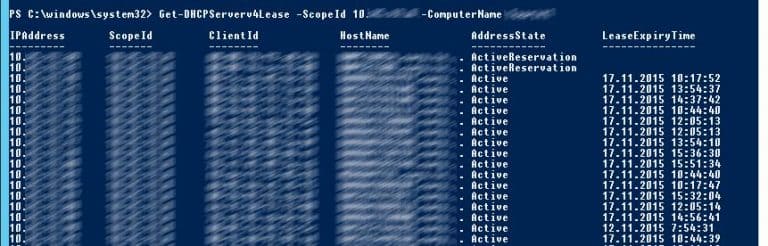
Get-DHCPServerv4OptionValue -ComputerName msk-dhcp1 -ScopeId 10.10.1.0 | Format-ListПоказать текущий список арендованных адресов для области 10.10.1.0:
Get-DHCPServerv4Lease -ScopeId 10.10.1.0 -ComputerName msk-dhcp1
Создать DHCP резервацию для клиента, которому назначен динамический IP адрес 10.10.1.88 (конвертировать выданный адрес в зарезервированный):
Get-DhcpServerv4Lease -ComputerName msk-dhcp1 -IPAddress 10.10.1.88| Add-DhcpServerv4Reservation -ComputerName msk-dhcp1
Можно массово зарезервировать IP адреса для компьютеров по списку из csv файла. Для этого создайте текстовый файл в формате:
ScopeId,IPAddress,Name,ClientId,Description

10.10.1.0,10.10.1.88,Client1,ba-ab-5c-3d-4e-6f,Reservation PC-msk-s1

10.10.1.0,10.10.1.89,Client2,ba-ab-5c-5d-2e-3f,Reservation PC-msk-s2
Сохраните файл с именем c:\dhcp\DHCPReservations.csv и запустите следующую команду, которая импортирует данные из csv файла и создаст DHCP резервации для клиентов:
Import-Csv –Path c:\dhcp\DHCPReservations.csv | Add-DhcpServerv4Reservation -ComputerName msk-dhcp1Отключить область на DHCP сервере:
Set-DhcpServerv4Scope -ComputerName msk-dhcp1-ScopeId 10.10.1.0-State InActiveУдалить область с DHCP сервера:
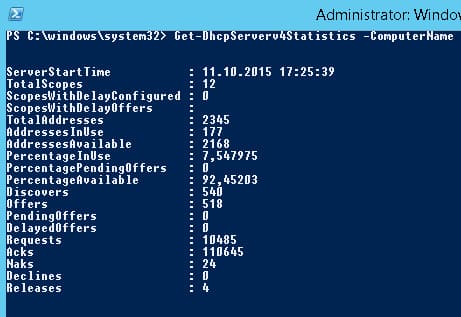
Remove-DHCPServerv4Scope -ComputerName msk-dhcp1-ScopeId 10.10.1.0 -ForceВозможно получить статистику DHCP сервера (количество областей, резерваций, процент использования адресов и пр.):
Get-DhcpServerv4Statistics -ComputerName msk-dhcp1
Экспорт и импорт конфигурации DHCP
Для регулярного резервного копирования конфигурации DHCP в указанный XML файл, можно использовать следующую команду:
Export-DhcpServer -ComputerName msk-dhcp1 -File C:\dhcp\dhcp-export.xml
В дальнейшем эти настройки DHCP сервера можно импортировать (перенести) на другой DHCP сервер:
Import-DhcpServer -ComputerName msk-dhcp2 -File C:\dhcp\dhcp-export.xml -BackupPath C:\dhcpbackup\
Настройка DHCP сервера на Windows Server 2019 позволяет автоматизировать управление IP-адресами в сети и облегчает централизованное управление сетевыми устройствами. Мы рассмотрели как установку и настройку через графический интерфейс, так и работу с DHCP с помощью PowerShell, что позволяет более гибко управлять сервером.
-

Необходимо использовать диапазон «частных» IP-адресов; в противном случае можно столкнуться с проблемами, связанными с неправильной маршрутизацией трафика в вашу сеть и из нее. Для простой локальной сети выберите IP-адрес 192.168.0.100, маску подсети 255.255.255.0 и размер пула адресов 50. В этом случае к сети можно подключить до 50 компьютеров.
-
В качестве IP-адреса компьютера установите 192.168.0.2 с маской подсети 255.255.255.0 (адрес в той же подсети, что и адреса в пуле, но не адрес в самом пуле).
-
-
-
-
-
В строке «IP pool starting address» (Начальный IP-адрес пула) введите адрес, который будет присвоен первому компьютеру DHCP-сервера (если не уверены, введите адрес 192.168.0.100).
-
Задайте размер пула адресов, который будет немного больше количества компьютеров и устройств, которые будут подключены к вашей сети (если сомневаетесь, укажите число 50).
-
-
10
Введите IP-адрес, присвоенный компьютеру (192.168.0.2), в строке «Def. Router (Opt 3)» (Маршрутизатор).
-
Если в сети есть DNS-сервер или он доступен компьютерам, подключенным к вашей сети, введите его IP-адрес в строке «WINS/DNS Server» (Сервер WINS/DNS). Если вы не знаете этот адрес, оставьте строку пустой.
-
Если вы не знаете, что это такое, введите 255.255.255.0 (если только вводили и другие рекомендованные адреса, приведенные выше).
-
В строках «Domain Name» (Имя домена) и «Additional Option» (Дополнительные параметры) ничего не меняйте.
-
DHCP-сервер настроен.
Реклама


Советы
- Чтобы создать большую сеть, используйте Windows Server 2008 или Windows Server 2012.
- Если вы не знаете, как присвоить IP-адрес компьютеру с DHCP-сервером, воспользуйтесь одной из следующих ссылок:
- XP http://www.portforward.com/networking/static-xp.htm
- Windows 2000 http://support.microsoft.com/default.aspx?scid=kb;en-us;308199&sd=tech
- Чтобы компьютер запрашивал IP-адрес по DHCP, запустите команды «ipconfig /release» > «ipconfig /renew» (Windows 2000 и XP) или «winipcfg» (Windows 95, 98 и ME), в меню выберите свою сетевую карту, а затем нажмите «Release» (Удалить) > «Renew» (Обновить).
- В Windows 98SE, ME или XP можно пользоваться службой «Общий доступ подключения к Интернету», которая включает DHCP-сервер.
- Если DHCP-сервером пользоваться вместе с прокси-сервером, например, с AnalogX Proxy, вы получите бесплатную и гибкую альтернативу Windows ICS.
Реклама
Предупреждения
- Если вы не знаете, что такое пулы частных адресов и маски подсетей, либо найдите и изучите дополнительную информацию, либо вводите адреса, рекомендуемые в этой статье. Неправильные адреса могут привести к проблемам.
Реклама
Об этой статье
Эту страницу просматривали 49 763 раза.
Была ли эта статья полезной?
Network nodes require an IP address configuration that usually comprises the IP address, subnet mask, default gateway IP for the router, name servers and other values.
Administrators can manually set this information, resulting in a static configuration. A Dynamic Host Configuration Protocol (DHCP) server can also dynamically provide the information.
Generally, servers, routers, network printers and other such devices have a static configuration. Workstations, laptops, phones, tablets and other end-user devices receive their configuration via DHCP.
Client devices lease their IP address configuration by using the following four-step DORA process:
- Discover. The client broadcasts an attempt to discover a DHCP server.
- Offer. DHCP servers that receive the client broadcast offer an IP address configuration.
- Request. The client formally requests the IP configuration from the first DHCP server to respond.
- Acknowledge. The DHCP server acknowledges the lease and doesn’t offer that same address to another client.
The lease must be renewed by the client periodically.
Now that we’ve briefly reviewed how IP addresses are allocated and the lease generation process, let’s delve into more detail about how to configure the Windows Server DHCP service.
1. Install DHCP on Windows Server 2019
The DHCP service is not automatically installed on Windows Server 2019. It is easy to add, however, using either Server Manager or Windows PowerShell.
To add DHCP using Server Manager, select Add Roles and Features, and then select DHCP in the Roles list.
To add the DHCP role using the command line, open Windows PowerShell (Admin), and type the following:
Install-WindowsFeature DHCP -IncludeManagementTools
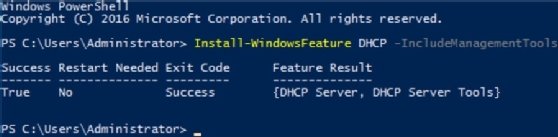
The installation takes about one minute to complete.
Once admins install the DHCP service, they can manage it by selecting Tools > DHCP.
2. Authorize DHCP in Active Directory
Windows-based DHCP servers must be registered with Active Directory (AD) before they begin offering IP address configurations to clients.
Right-click on the server node in the DHCP console, and select Authorize to accomplish this authorization. You need Enterprise Admin privileges to authorize DHCP.
3. Create a scope
Before building the first pool of available IP addresses, it’s critical to plan the deployment. Devices, such as servers, routers and even printers, may have static IP address configuration. Make sure you have identified these addresses and that you allow for them in scope. Many administrators place all statically assigned IP addresses at the front of the scope.
Here is a simple example design:
- Scope address range: 192.168.2.0/24
- Static IP addresses: 192.168.2.1 through 192.168.2.25 (be sure to leave some room for additional devices)
- Dynamic IP addresses: 192.168.2.26 through 192.168.2.254
You also need to gather additional configuration details, including the following:
- Name and description. The scope name and an optional description.
- Default gateway value. The IP address of the network interface card in the router attached to this network.
- Name resolution servers. The IP address of one or more DNS servers.
- Reservations. Any IP addresses that are dynamically allocated to specific clients, enabling those clients to acquire a consistent IP configuration from DHCP.
- Lease time. The time the IP address lease is valid. It needs to be renewed at the halfway point of the lease. The Windows Server DHCP default is eight days.
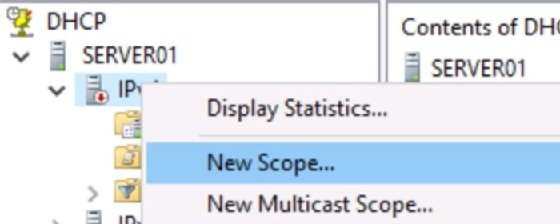
4. Configure and activate the scope
Once you have documented the above values, you can configure the scope. Right-click the server node in the DHCP console, and then select New Scope. A wizard prompts you for the information you collected above. These settings can be changed later.
Once activated, the DHCP server begins responding to DHCP client discover messages by offering IP addresses. The scope can be deactivated, the DHCP service can be stopped or restarted, and the DHCP server can be deauthorized in AD.
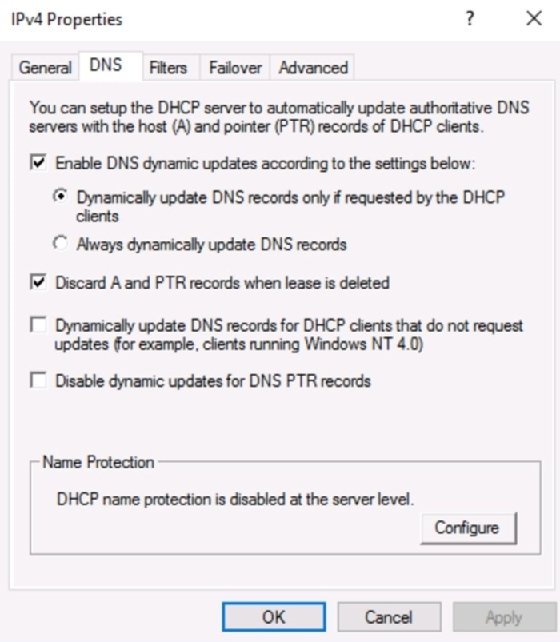
5. DNS registration
DNS relates easy-to-remember hostnames with difficult-to-remember IP addresses. This database can be populated in several ways.
One method is to configure the DHCP server to create resource records for the client. The DHCP server can be set to create A records (hostname to IP address), pointer (PTR) records (IP to hostname) or both.
The default is for DHCP to create the PTR record, while the client itself registers its record with DNS.
Administrative DHCP tasks
The DHCP service is simple to configure. But sys admins often find some additional settings to be useful.
Create reservation
In some cases, it’s useful to allow a client machine to maintain a consistent IP address. While you could set the IP address configuration statically, it’s often better to reserve the IP address for the client in DHCP. The client goes through the DORA process to receive its settings, so values, such as router and name resolution servers, can still be updated via DHCP.
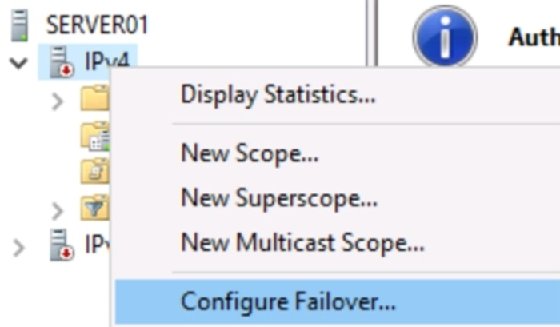
DHCP failover
With Windows Server 2012, Microsoft introduced DHCP failover. It seems many administrators are unaware of this capability. Configuration is straightforward and requires no special software.
To configure DHCP failover, use the following steps:
- Ensure the DHCP role is installed on both DHCP servers and that they have network connectivity with each other.
- Configure a DHCP scope on one of the servers.
- Right-click the scope, and select DHCP Failover from the context menu.
- Complete the wizard.
- Select the second DHCP server, and observe that the new scope appears.
Logs
Managing service log files is a standard function for sys admins. DHCP writes messages to Event Viewer and to text files.
Sys admins can check the system log for general DHCP and network messages. They can find DHCP entries by drilling down to Applications and Services > Microsoft > Windows > DHCP-Server > Microsoft-Windows-DHCP-Server-Events > Operational.
DHCP also generates text-based log files stored at C:\Windows\System32\dhcp. These logs are extremely useful for troubleshooting. They can display information for why the server was unable to lease configurations to clients.
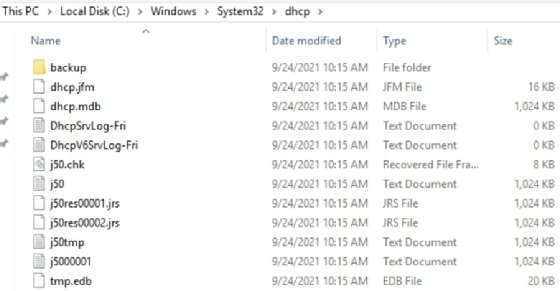
Note that the text file logs are named based on days of the week and are overwritten weekly. If you want to retain these logs, you must rename them before the upcoming day of the week can overwrite them.
The DHCP role is not installed by default, so the first step is to add it. From there, create a new scope based on your plan.
Be careful of conflicting scopes
As more subnets — and, therefore, more DHCP scopes — are added to the network, it’s imperative that sys admins accurately document the IP address ranges. Overlapping scopes, where two DHCP servers are offering the same IP addresses to clients, result in a variety of network communications issues.
This is part of the reason why Microsoft requires DHCP servers to be authorized in AD. That authorization can only be implemented by Enterprise Admins, who should have enough broad knowledge of network configuration to prevent conflicting scopes.
Avoid duplicate IP address offers
One of the most serious misconfigurations is a client computer configured with a static IP address that falls within the DHCP server’s scope. In that case, the server can offer the IP address to a client because it is unaware of the static IP. This results in an IP address conflict.
The Windows DHCP service can be configured to ping an IP address before offering it to a client. If the ping returns a response, the DHCP server knows the address is already in use and should not be offered. The server offers a different address to the client.
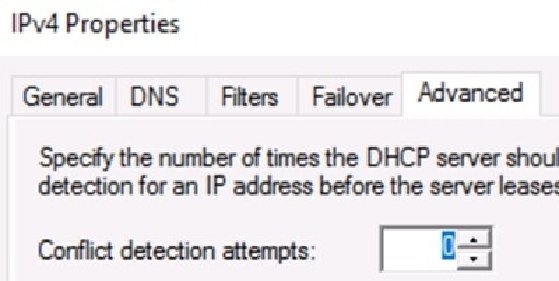
The ping request occurs between the Discover and Offer steps of the lease generation process. It introduces a significant delay, so only configure this setting if you have a real concern about undocumented static IP addresses on client devices.
Conclusion
Microsoft has made the configuration of a DHCP server straightforward. Make sure you have a solid understanding of the entire network’s IP address configurations before you begin and plan your scope around both dynamic and static IP address assignments.
The DHCP role is not installed by default, so the first step is to add it. From there, create a new scope based on your plan. Add any options, such as DNS and reserved addresses. Review log files regularly. DHCP is simple but critical for network communication.