
Протокол DHCP является широковещательным (FAQ по протоколу DHCP) и по умолчанию его пакеты не пересылаются маршрутизаторами из одной сети в другую (маршрутизатор разбивает на части широковещательный домен). Однако это не означает, что в каждой подсети должен находиться отдельный DHCP сервер. Ведь, согласитесь, было бы нелогично в сложных и распределенных сетях со множеством подсетей размещать в каждой подсети с клиентами отдельный DHCP сервер (это неудобно с точки зрения управления и лишнего количества администрируемых единиц оборудования). Гораздо более изящнее и удобнее было бы иметь в сети один DHCP сервер, который будет можно централизованно администрировать, и кроме того, обеспечить его высокую доступность за счет кластеризации.
Что такое DHCP relay и зачем он нужен?
Выходом из подобной ситуации является размещение в сети агента-ретранслятора DHCP (relay agent). Relay agent представляет собой некое промежуточное устройство, которое может пересылать широковещательные DHCP-запросы между клиентом и сервером DHCP, находящихся в различных широковещательных доменах. Т.е. DHCP relay agent получает от клиента (в этом же сегменте сети) широковещательный пакет на поиск и получение DHCP-адреса и пересылает этот запрос определенному DHCP серверу (указывается в настройках ретранслятора). Далее ответы от DHCP-сервера будут направлены ретранслятору, который передаст их конечному хосту. Технология DHCP Relay Agent определена в стандарте RFC 1542 («Clarifications and Extensions for the Bootstrap Protocol.»).
В качестве DHCP Relay Agent обычно используют маршрутизаторы (большинство современных маршрутизаторов совместимы с RFC 1542 и могут работать в качестве Relay агента). В том случае, если настроить Relay на маршрутизаторе по каким-либо причинам невозможно, в качестве Relay агента можно настроить компьютер с серверной ОС Windows. Попробуем настроить DHCP Relay Agent на Windows Server 2012.
Настройка DHCP Relay на Windows Server 2012
Несколько требований, которые необходимо учитывать при настройке агентов DHCP relay на базе Windows Server:
- Отдельный агент-ретранслятор DHCP необходимо размещать в каждой IP подсети.
- На центральном DHCP сервер нужно создать отдельную DHCP область (Scope) для каждой из обслуживаемых подсетей.

- DHCP relay agent нельзя установить на сервере Windows Server с ролью DHCP, ICS (Internet connection sharing) или c включенной в автоматическом режиме трансляции адресов NAT (Network Address Translation)

DCHP Relay Agent является одной из функций службы Routing and Remote Access (RRAS). Поэтому предварительно необходимо установите роль RRAS (с дефолтными настройками), после чего запустить MMC оснастку Routing and Remote Access.

В оснастке RRAS разверните ветку IPv4, щелкните правой кнопкой мыши по элементу General и в контекстном меню выберите пункт New Routing Protocol, выберите DHCP Relay Agent и нажмите ОК.

Щёлкните ПКМ по элементу DHCP Relay Agent и выберите пункт New Interface, укажите сетевой интерфейс, на котором будет слушать Relay –агент.

Затем откройте окно свойств DHCP Relay Agent и укажите ip адрес DHCP сервера, на который нужно перенаправлять все DHCP запросы от клиентов.

На этом настройка DHCP-ретранслятора закончена и можно переходить к тестированию его работы.
Назначение этой статьи – упростить настройку DHCP сервиса для фабрики VXLAN BGP EVPN and DFA с использованием Microsoft Windows Server 2016/2019.

В официальной документации DHCP сервис на базе Microsoft Windows Server 2012 для фабрики настраивается как SuperScope, содержащий пул Loopback (в данном пуле – изюминка это исключение из пула всех IP адресов пула (excluded IP address = pool)) и пулы выдачи IP адресов для реальный сетей (здесь изюминка – настраиваются policy – в которых фильтруются DHCP Relay Circuit ID и этот DHCP relay Circuit ID содержит VNI для сети, т. е. для другого пула этот DHCP Relay Circuit ID будет чуть другим).
To configure DHCP on Windows server.

1. Create a super scope. Within the super scope, create scope B, S1, S2, S3, …, Sn for the subnet B and the subnets for each segment.
2. In scope B,  specify the 'Exclusion Range' to be the entire address range (so that the offered address range must not be from this scope).
3. For every segment scope Si, specify a policy that matches on Agent Circuit ID with value of '0108000600XXXXXX', where '0108000600' is a fixed value for all segments, the 6 numbers "XXXXXX" is the segment ID value in hexadecimal. Also ensure to check the Append wildcard(*) check box.
4. Set the policy address range to the entire range of the scope.
Данная статья содержит ответы на следующие вопросы:
- Почему не поддерживаются Microsoft Windows Server 2000/2003/2008?
- Почему в Microsoft Windows Server 2012 настройка такая сложная?
- Как упрощается настройка в Microsoft Windows Server 2016/2019?
Содержание
- Введение
- Как настраивается DHCP Relay на фабрике VXLAN BGP EVPN
- RFC которые используются в DHCP Relay с фабрики VXLAN BGP EVPN
- Эволюция документации Cisco в части настройки DHCP на Microsoft Windows Server 2012
- DHCP в Microsoft Windows Server (superscope & policy)
- Основная часть
- Почему не поддерживается Microsoft Windows Server 2000/2003/2008?
- Почему в Microsoft Windows Server 2012 настройка такая сложная?
- Как упрощается настройка в Microsoft Windows Server 2016/2019?
- Пример
- Настройка DHCP сервиса на Microsoft Windows Server 2019
- Заключение
- Список источников
Введение
В этой части кратко перечислены все исходные данные: Инструкции по настройке сетевого оборудования, RFC используемые в DHCP пакетах в фабриках eVPN, справочно приведена эволюция настроек DHCP сервера на Microsoft Windows Server 2012 в документации Cisco. А также краткие сведения о Superscope и Policy в сервисе DHCP на серверах Microsoft Windows Server.
Как настраивается DHCP Relay на фабрике VXLAN BGP EVPN, DFA
Настройка DHCP Relay на фабрике VXLAN BGP EVPN не является основной темой этой статьи, т. к. она достаточно простая. Привожу ссылки на документацию и спойлер по настройкам на сетевом оборудовании.
- Nexus 9000 VXLAN Configuration Guide 7.X
- Nexus 9000 VXLAN Configuration Guide 9.3
- DFA (Cisco Dynamic Fabric Automation)
Пример настройки DHCP Relay на Nexus 9000V v9.2(3)
service dhcp
ip dhcp relay
ip dhcp relay information option
ip dhcp relay information option vpn
interface loopback10
  vrf member VRF1
  ip address 10.120.0.1/32 tag 1234567
interface Vlan12
  no shutdown
  vrf member VRF1
  no ip redirects
  ip address 10.120.251.1/24 tag 1234567
  no ipv6 redirects
  fabric forwarding mode anycast-gateway
  ip dhcp relay address 10.0.0.5
  ip dhcp relay source-interface loopback10
RFC которые реализованы в работе сервиса DHCP Relay в фабриках VXLAN BGP EVPN
- Список RFC, для Nexus 9000 v9.3
- Список RFC, Nexus 9000 v7.x
RFC#6607: Sub-option 151(0x97) — Virtual Subnet Selection
•	Sub-option 151(0x97) - Virtual Subnet Selection (Defined in RFC#6607)
Used to convey VRF related information to the DHCP server in an MPLS-VPN and VXLAN EVPN multi-tenant environment.
Передается «имя» VRF в котором находиться клиент.
RFC#5107: Sub-option 11(0xb) — Server ID Override
•	Sub-option 11(0xb) - Server ID Override (Defined in RFC#5107.)
The server identifier (server ID) override sub-option allows the DHCP relay agent to specify a new value for the server ID option, which is inserted by the DHCP server in the reply packet. This sub-option allows the DHCP relay agent to act as the actual DHCP server such that the renew requests will come to the relay agent rather than the DHCP server directly. The server ID override sub-option contains the incoming interface IP address, which is the IP address on the relay agent that is accessible from the client. Using this information, the DHCP client sends all renew and release request packets to the relay agent. The relay agent adds all of the appropriate sub-options and then forwards the renew and release request packets to the original DHCP server. For this function, Cisco’s proprietary implementation is sub-option 152(0x98). You can use the ip dhcp relay sub-option type cisco command to manage the function.
Опция используется для того, чтобы клиент посылал запрос о перепродлении аренды адреса на IP адрес используемый в этой опции. (В Cisco VXLAN BGP EVPN – это Anycast адрес шлюза по умолчанию для клиента.)
RFC#3527: Sub-option 5(0x5) — Link Selection
Sub-option 5(0x5) - Link Selection (Defined in RFC#3527.)

The link selection sub-option provides a mechanism to separate the subnet/link on which the DHCP client resides from the gateway address (giaddr), which can be used to communicate with the relay agent by the DHCP server. The relay agent will set the sub-option to the correct subscriber subnet and the DHCP server will use that value to assign an IP address rather than the giaddr value. The relay agent will set the giaddr to its own IP address so that DHCP messages are able to be forwarded over the network. For this function, Cisco’s proprietary implementation is sub-option 150(0x96). You can use the ip dhcp relay sub-option type ciscocommand to manage the function.
Адрес сети, из которой клиенту необходим IP адрес.
Эволюция документации Cisco в части настройки DHCP на Microsoft Windows Server 2012
Включил этот раздел потому, что прослеживается положительная тенденция со стороны вендора:
Nexus 9000 VXLAN Configuration Guide 7.3
В документации приведена только настройка DHCP Relay на сетевом оборудовании.
Для настройки DHCP на Windows Server 2012 использовалась другая статья:
Configuring Microsoft Windows Server 2012 to provide DHCP services in an eVPN Scenario (VXLAN, Cisco One Fabric, etc)
В этой статье указывается, что для каждой сети/VNI необходима своя связка SuperScope и свой собственный набор Loopback адресов:
If multiple DHCP Scopes are required for multiple subnets, you need to create one LoopbackX per subnet/vlan on all LEAFS and create a superscope with a loopbackX range scope and actual client IP subnet scope per vlan.Nexus 9000 VXLAN Configuration Guide 9.3
Добавили настройки Windows 2012 Server в документацию по настройке сетевого оборудования. Для всех используемых пулов адресов необходим один SuperScope на ЦОД и этот SuperScope является границей ЦОД:
Create Superscope for all scopes you want to use for Option 82-based policies.
Note
The Superscope should combine all scopes and act as the administrative boundary.
Cisco Dynamic Fabric Automation
Очень емко рассказано обо всем:
Let us assume the switch is using the address from subnet B (it can be the backbone subnet, management subnet, or any customer designated subnet for this purpose) to communicate with the Windows DHCP server. In DFA we have subnets S1, S2, S3, …, Sn for segment s1, s2, s3, …, sn.

To configure DHCP on Windows server.

1. Create a super scope. Within the super scope, create scope B, S1, S2, S3, …, Sn for the subnet B and the subnets for each segment.
2. In scope B,  specify the 'Exclusion Range' to be the entire address range (so that the offered address range must not be from this scope).
3. For every segment scope Si, specify a policy that matches on Agent Circuit ID with value of '0108000600XXXXXX', where '0108000600' is a fixed value for all segments, the 6 numbers "XXXXXX" is the segment ID value in hexadecimal. Also ensure to check the Append wildcard(*) check box.
4. Set the policy address range to the entire range of the scope.
DHCP в Microsoft Windows Server (superscope & policy)
SuperScope
Superscope is an administrative feature of a DHCP server that can be used to group multiple scopes as a single administrative entity. Superscope allows a DHCP server to provide leases from more than one scope to clients on a single physical network. Scopes added to a superscope are called member scopes.Что такое SuperScope – это функционал, позволяющий объединить несколько пулов IP адресов в одну административную единицу. Чтобы анонсировать пользователям в одной физической сети (в одном VLAN) ip адреса из нескольких пулов. Если запрос пришел к пулу адресов в составе SuperScope, то выдать клиенту адрес можно из другого Scope входящего в этот SuperScope.
Policy
The DHCP Server role in Windows Server 2012 introduces a new feature that allows you to create IPv4 policies that specify custom IP address and option assignments for DHCP clients based on a set of conditions.

The policy based assignment (PBA) feature allows you to group DHCP clients by specific attributes based on fields contained in the DHCP client request packet. PBA enables targeted administration and greater control of the configuration parameters delivered to network devices with DHCP.
Политики – позволяют назначать пользователям IP адреса в зависимости от типа пользователя или параметра. Инженеры Cisco используют политики в Windows Server 2012 для фильтрации по VNI (Virtual Network Identifier).
Основная часть
В данном разделены проведены результаты исследований, почему не поддерживается, как это работает (логика), что нового и как это новое нам поможет.
Почему не поддерживается Microsoft Windows Server 2000/2003/2008?
Microsoft Windows Server 2008 и более ранние версии не обрабатывают опцию 82 (Option 82) и обратный пакет отправляют без опции 82.
Win2k8 R2 DHCP problem with Option82
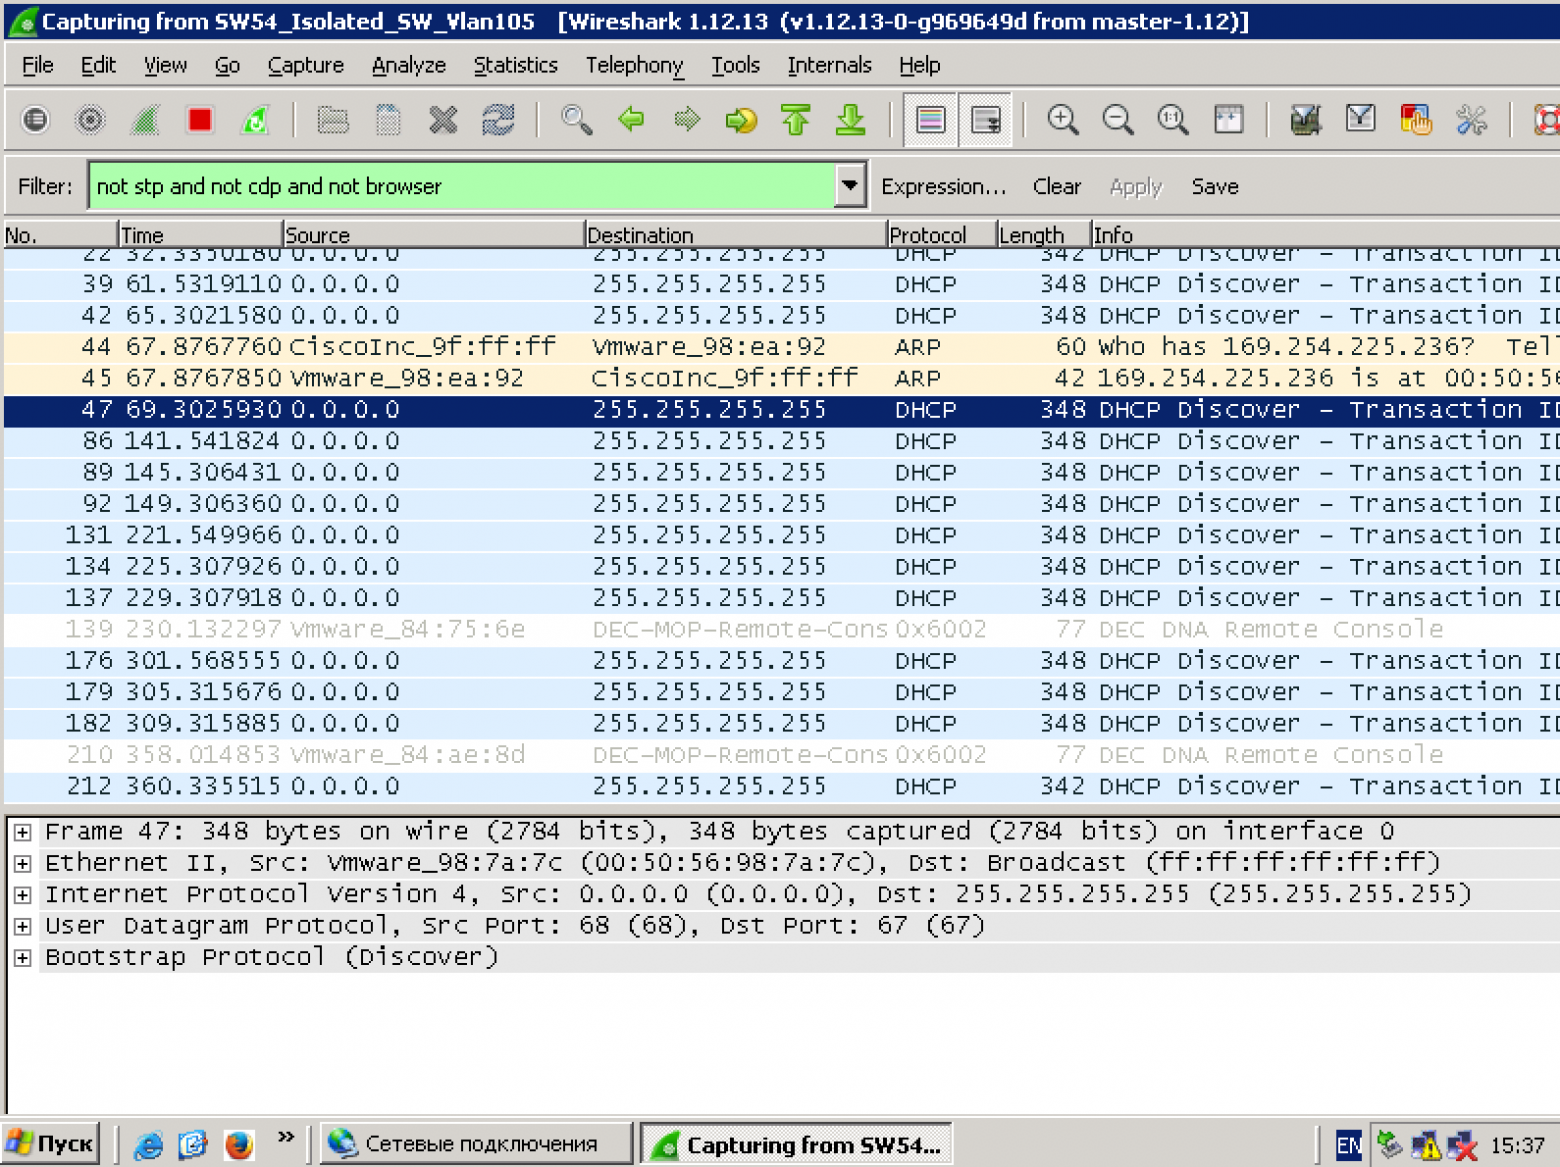
- Запрос от клиента отправляется Broadcast (DHCP Discover).
- Оборудование (Nexus) отправляет пакет к DHCP серверу (DHCP Discover + Option 82).
- DHCP Сервер принимает пакет обрабатывает, отправляет обратно, но без опции 82. (DHCP Offer – without option 82)
- Оборудование (Nexus) принимает пакет от DHCP сервера. (DHCP Offer) Но не отправляет этот пакет к конечному пользователю.
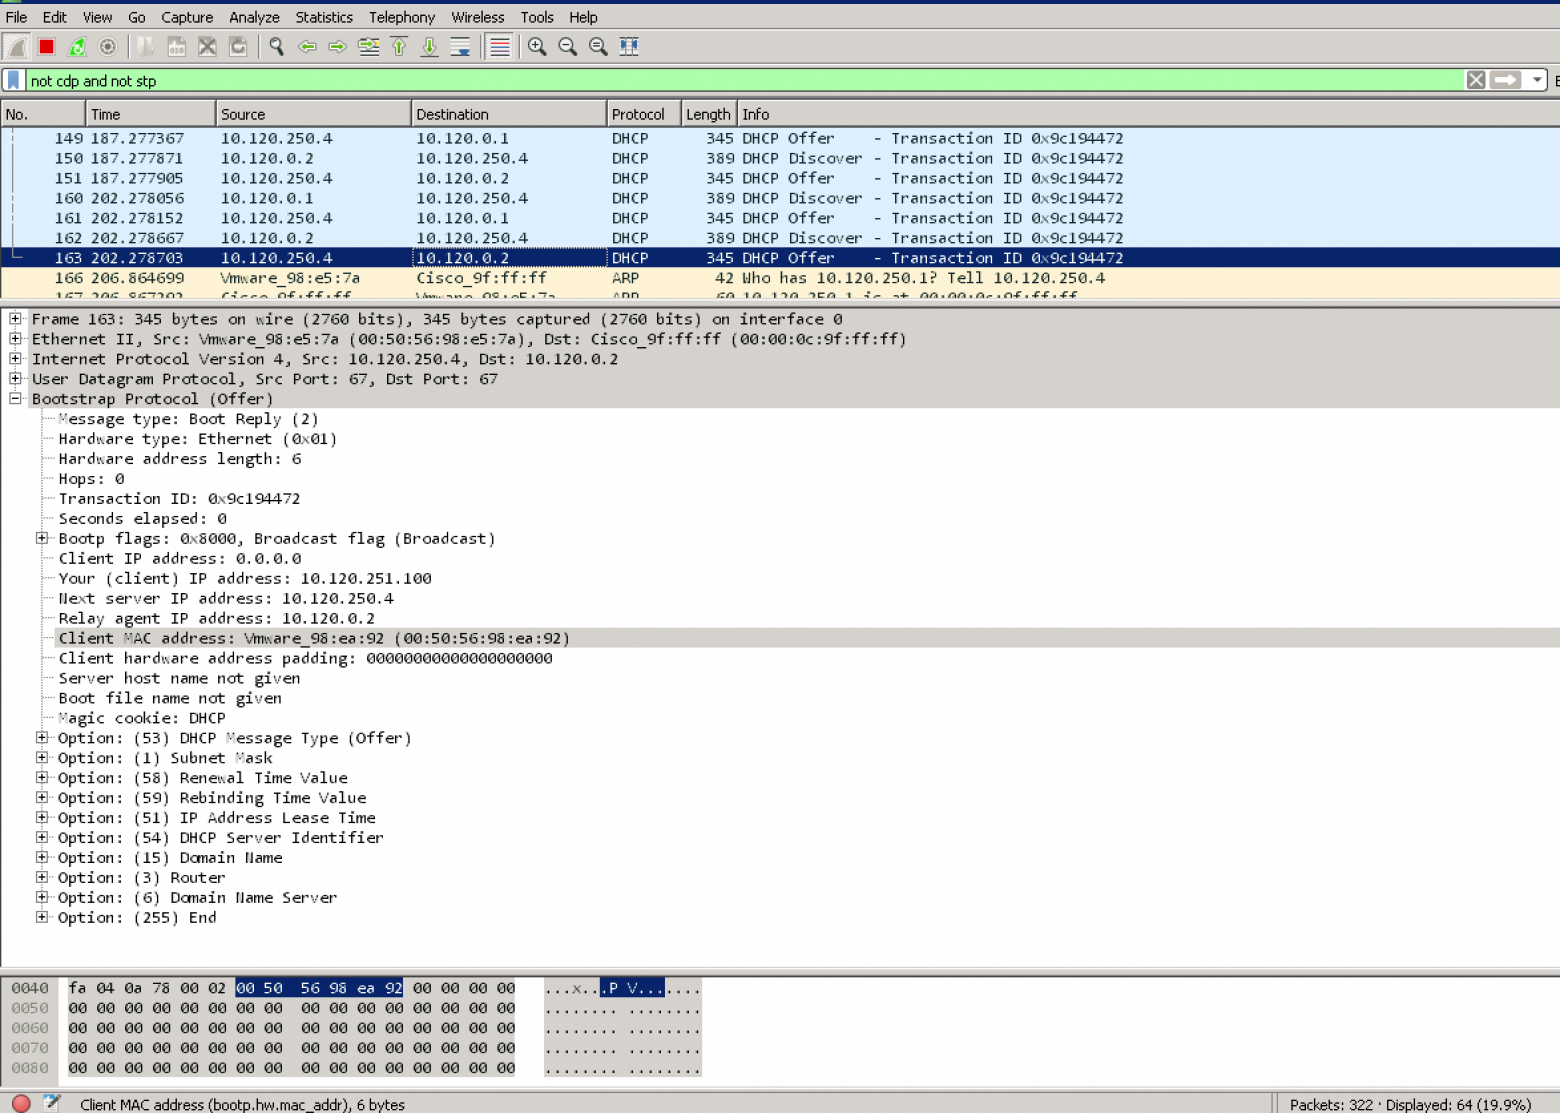
Данные снифера — на Windows Server 2008 и на клиенте DHCP
Windows Server 2008 получает запрос от сетевого оборудования. (Option 82 присутствует в списке)
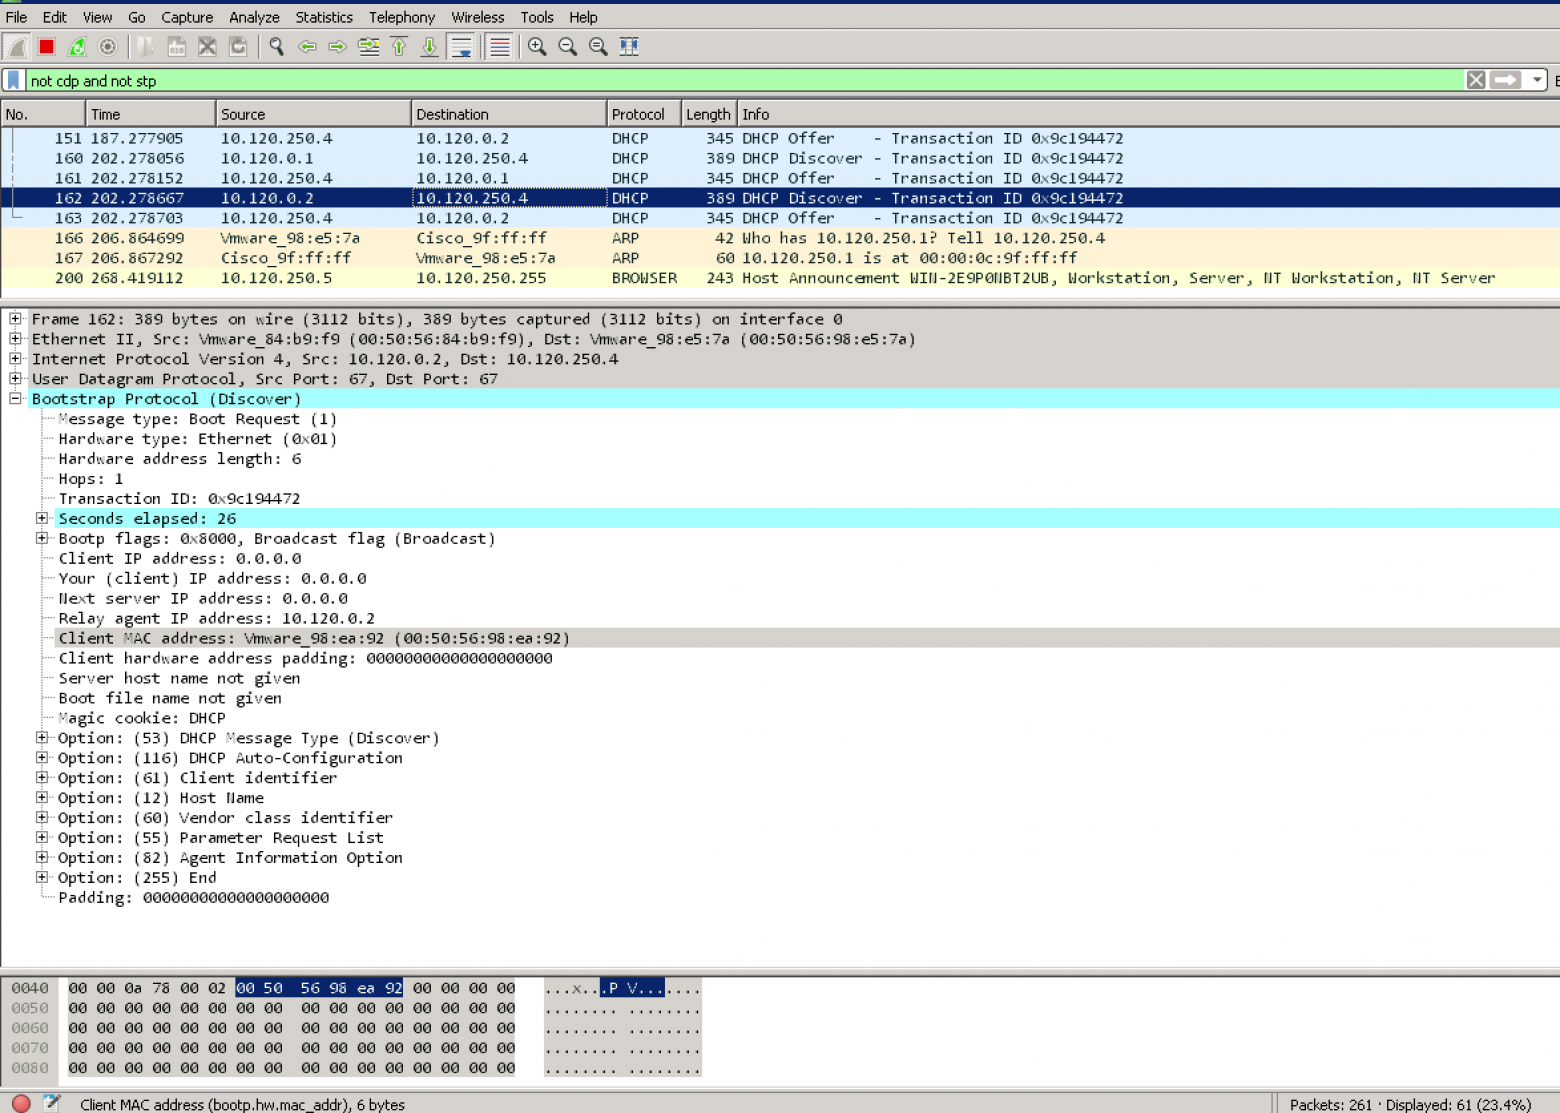
Windows Server 2008 отправляет ответ к сетевому оборудованию. (Option 82 отсутствует в списке опций в пакете)
Запрос от клиента – присутствуют DHCP Discover и отсутствуют DHCP Offer
Статистика на сетевом оборудовании:
NEXUS-9000V-SW-1# show ip dhcp relay statistics
----------------------------------------------------------------------
Message Type             Rx              Tx           Drops
----------------------------------------------------------------------
Discover                  8               8               0
Offer                     8               8               0
Request(*)                0               0               0
Ack                       0               0               0
Release(*)                0               0               0
Decline                   0               0               0
Inform(*)                 0               0               0
Nack                      0               0               0
----------------------------------------------------------------------
Total                    16              16               0
----------------------------------------------------------------------

DHCP L3 FWD:
Total Packets Received                           :         0
Total Packets Forwarded                          :         0
Total Packets Dropped                            :         0
Non DHCP:
Total Packets Received                           :         0
Total Packets Forwarded                          :         0
Total Packets Dropped                            :         0
DROP:
DHCP Relay not enabled                           :         0
Invalid DHCP message type                        :         0
Interface error                                  :         0
Tx failure towards server                        :         0
Tx failure towards client                        :         0
Unknown output interface                         :         0
Unknown vrf or interface for server              :         0
Max hops exceeded                                :         0
Option 82 validation failed                      :         0
Packet Malformed                                 :         0
Relay Trusted port not configured                :         0
DHCP Request dropped on MCT                      :         0
*  -  These counters will show correct value when switch
receives DHCP request packet with destination ip as broadcast
address. If request is unicast it will be HW switched
NEXUS-9000V-SW-1#
Почему в Microsoft Windows Server 2012 настройка такая сложная?
В Microsoft Windows Server 2012 еще не поддерживается RFC#3527 (Option 82 Sub-option 5(0x5) — Link Selection)
Но уже реализован функционал Policy.
Как это работает:
- Microsoft Windows Server 2012 есть супер-пул (SuperScope) в котором есть адреса Loopback и пулы для реальных сетей.
- Выбор пула для выдачи IP адреса попадает в SuperScope, т. к. ответ пришел от DHCP Relay с Source адреса Loopback, входящего в SuperScope.
- Используя Policy запрос выбирает из Superscope тот member scope, VNI которого содержится в Option 82 Suboption 1 Agent Circuit ID. (“0108000600”+ 24 бита VNI + 24 бита значения которых мне неизвестно, но сниффер показывает значения 0 в этом поле.)
Как упрощается настройка в Microsoft Windows Server 2016/2019?
В Microsoft Windows Server 2016 реализован функционал RFC#3527. Т. е. Windows Server 2016 умеет распознавать правильную сеть из атрибута Option 82 Sub-option 5(0x5) — Link Selection
Возникают сразу 3 вопроса:
- Можем ли обойтись без Superscope?
- Можем ли обойтись без Policy и перевода VNI в 16-тиричный вид?
- Можем ли обойтись без Scope для Loopback адресов DHCP Source?
Q. Можем ли обойтись без Superscope?
A. Да, scope можно создавать сразу в области IPv4 адресов.
Q. Можем ли обойтись без Policy и перевода VNI в 16-тиричный вид?
A. Да, выбор сети происходит на основе Option 82 Suboption 0x5,
Q. Можем ли обойтись без Scope для Loopback адресов DHCP Source?
A. Нет, не можем. Т. к. в Microsoft Windows Server 2016/2019 действует защита от злонамеренных DHCP запросов. Т. е. все запросы с адресов, которых нет в пуле DHCP сервера считаются злонамеренными.
DHCP Subnet Selection Options
 Note
All relay agent IP addresses (GIADDR) must be part of an active DHCP scope IP address range. Any GIADDR outside of the DHCP scope IP address ranges is considered a rogue relay and Windows DHCP Server will not acknowledge DHCP client requests from those relay agents.

A special scope can be created to "authorize" relay agents. Create a scope with the GIADDR (or multiple if the GIADDR's are sequential IP addresses), exclude the GIADDR address(es) from distribution, and then activate the scope. This will authorize the relay agents while preventing the GIADDR addresses from being assigned.
Т.е. для настройки на Microsoft Windows Server 2016/2019 DHCP пула для VXLAN BGP EVPN фабрики необходимо только:
- Создать пул для Source адресов Relay.
- Создать пул для клиентских сетей
Что не является необходимым (но можно настроить и это будет работать, и не будет мешать работать):
- Создавать Policy
- Создавать SuperScope
Пример
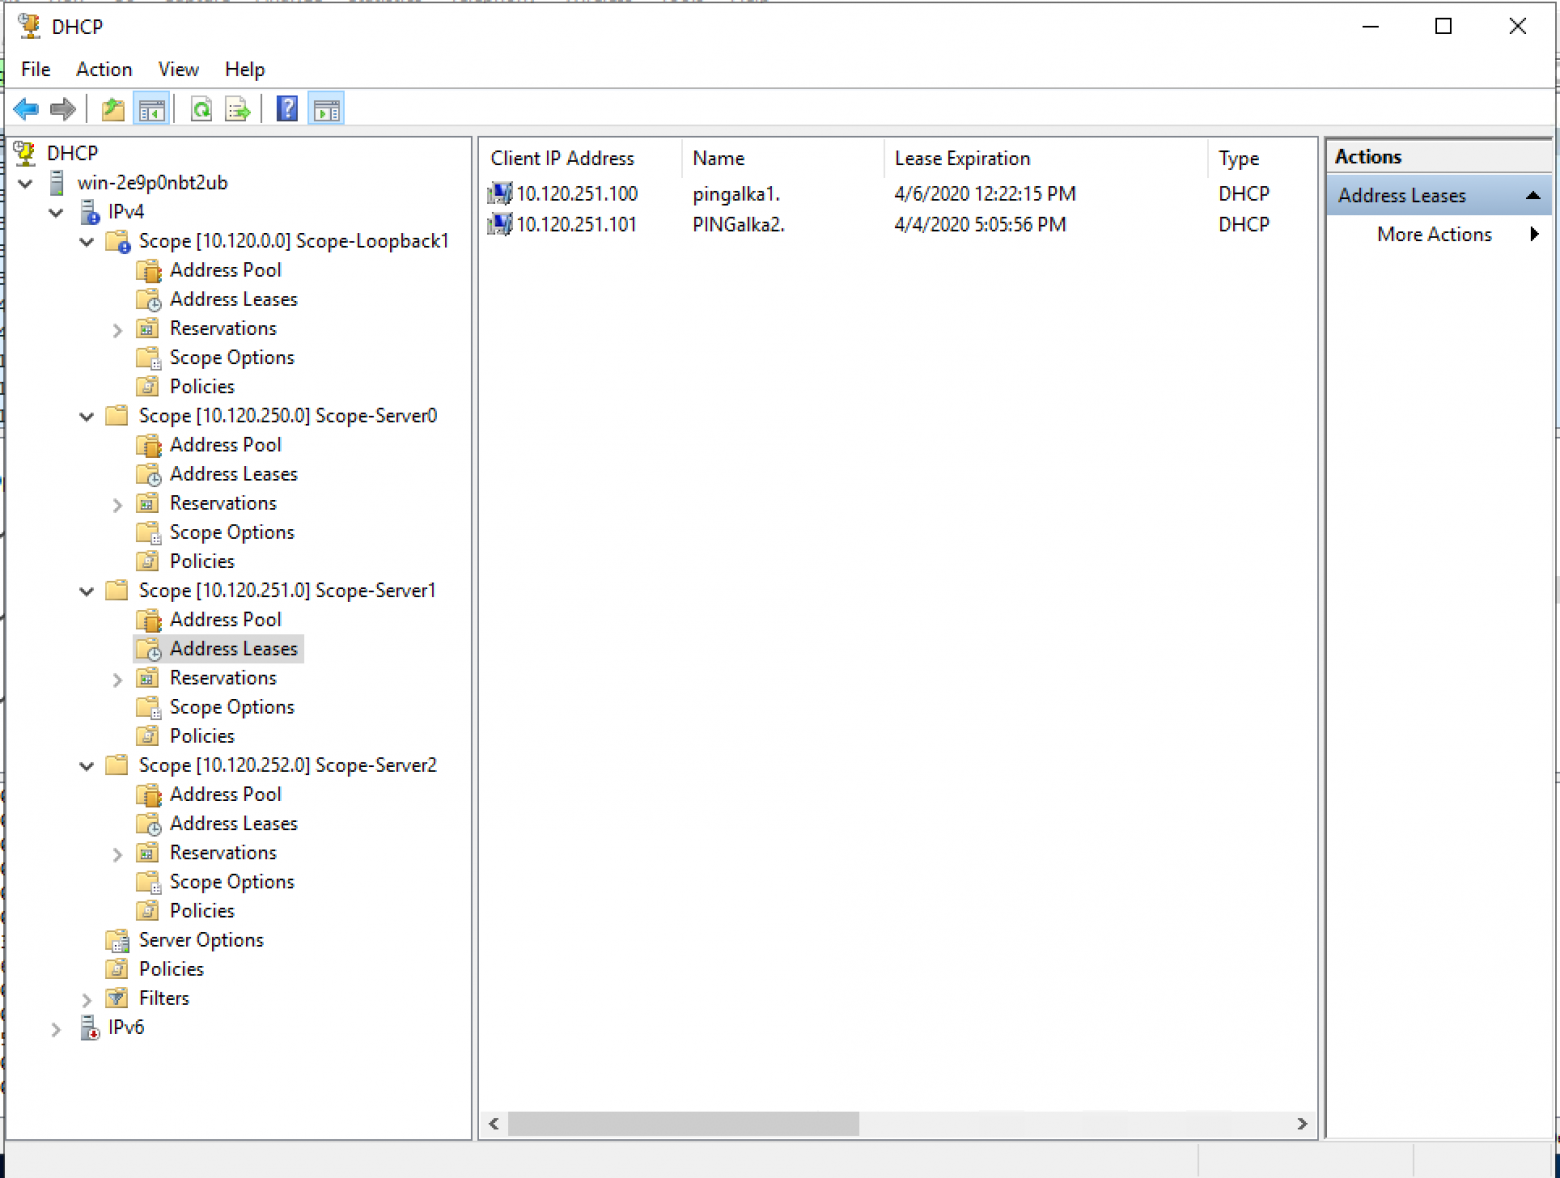
Пример настройки DHCP сервера (присутствуют 2 реальных клиента DHCP — клиенты подключены к VXLAN фабрике)
Пример настройки пользовательского пула:
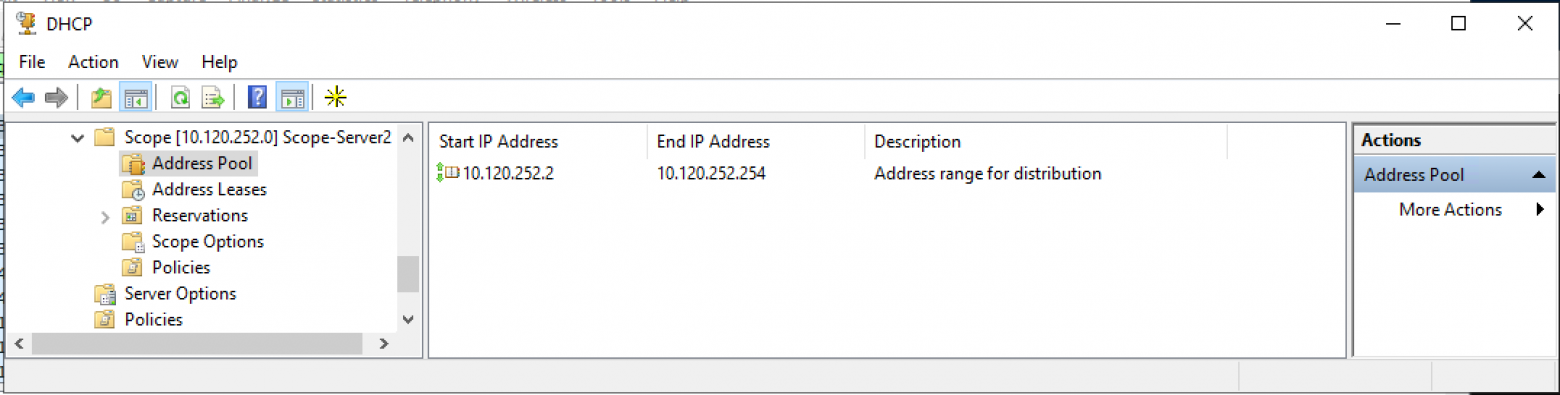
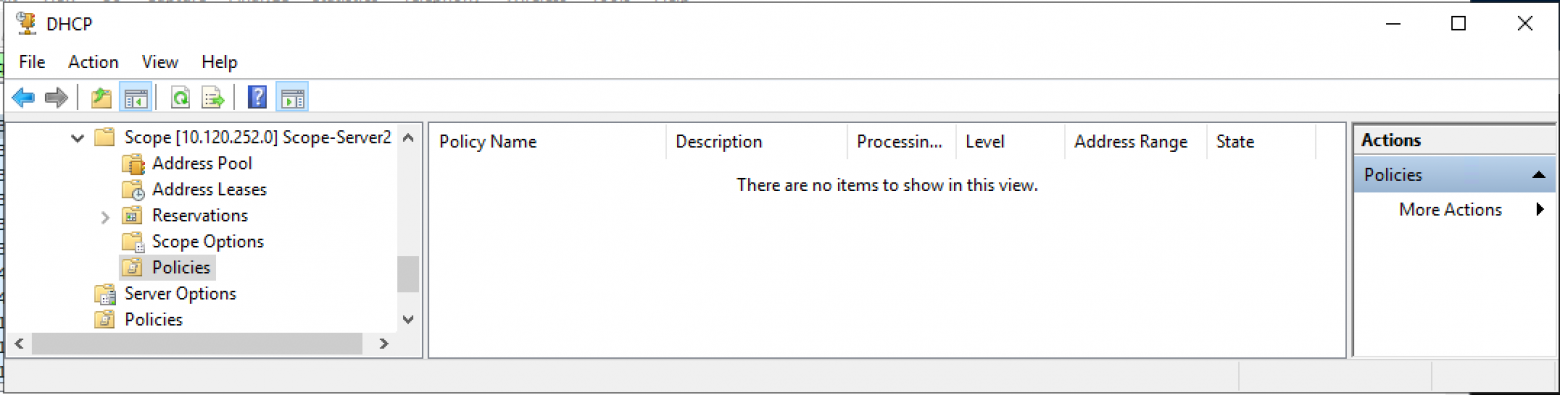
Пример настройки пользовательского пула (выбраны политики — для доказательства что политики не использовались для корректной работы пула):
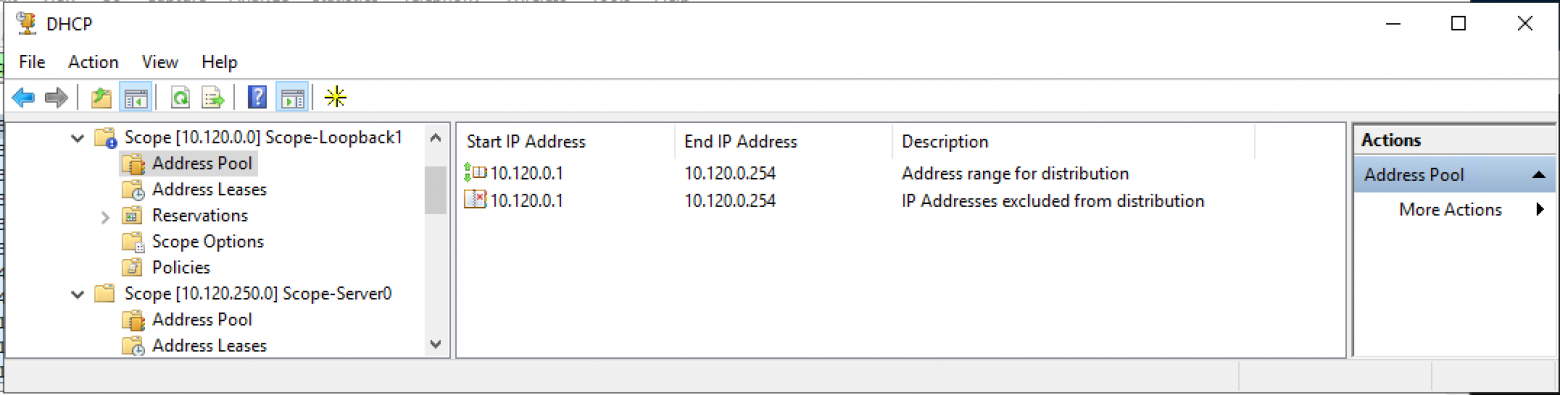
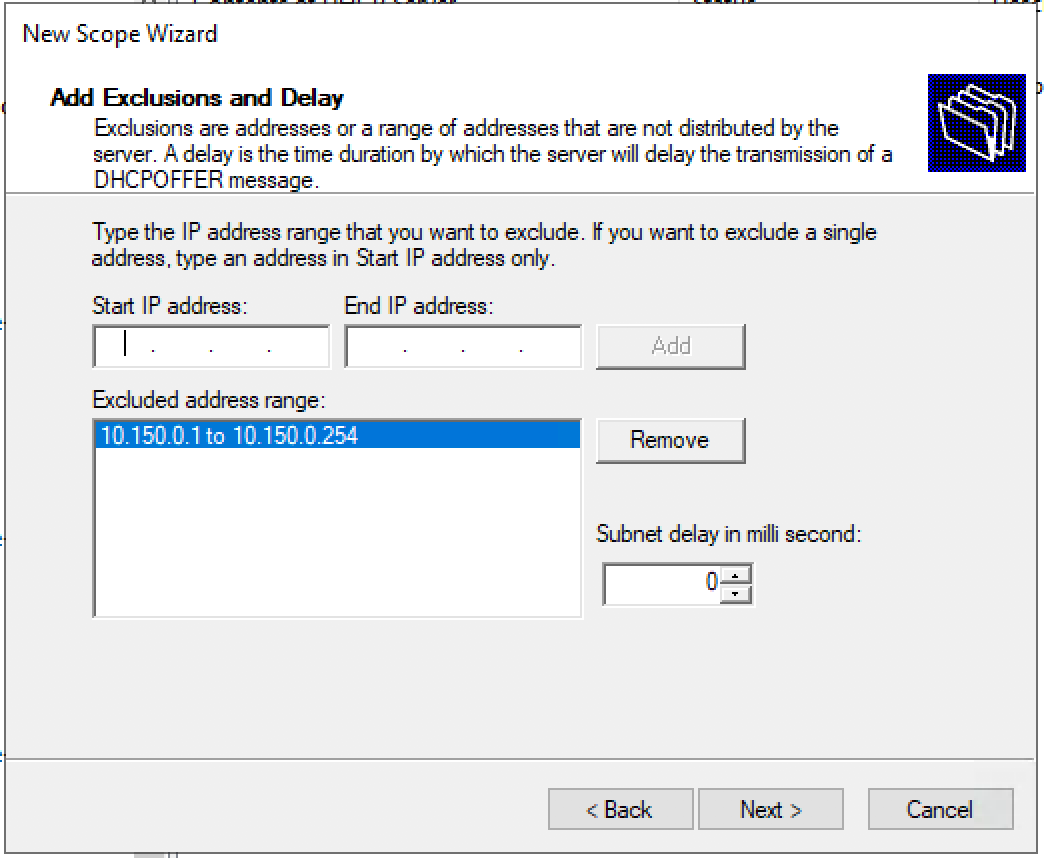
Пример настройки пула для Source адресов DHCP Relay (диапазон адресов для выдачи полностью соответствует исключению из пула адресов):
Настройка DHCP сервиса на Microsoft Windows Server 2019
Настройка пула для Loopback адресов (source) для DHCP Relay.
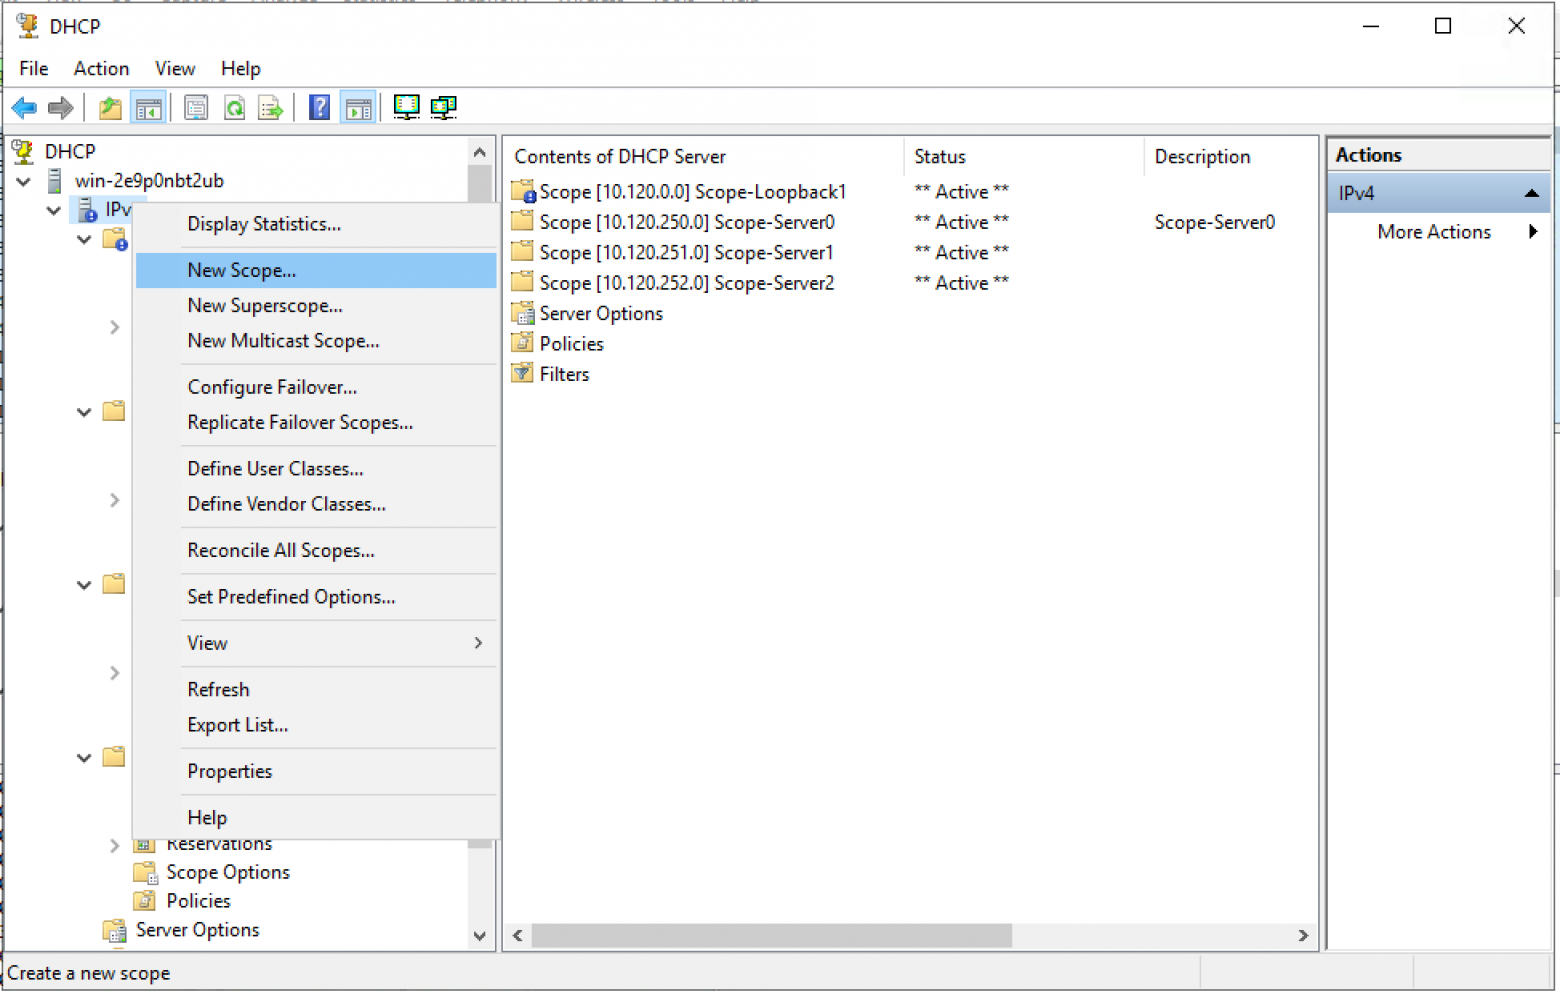
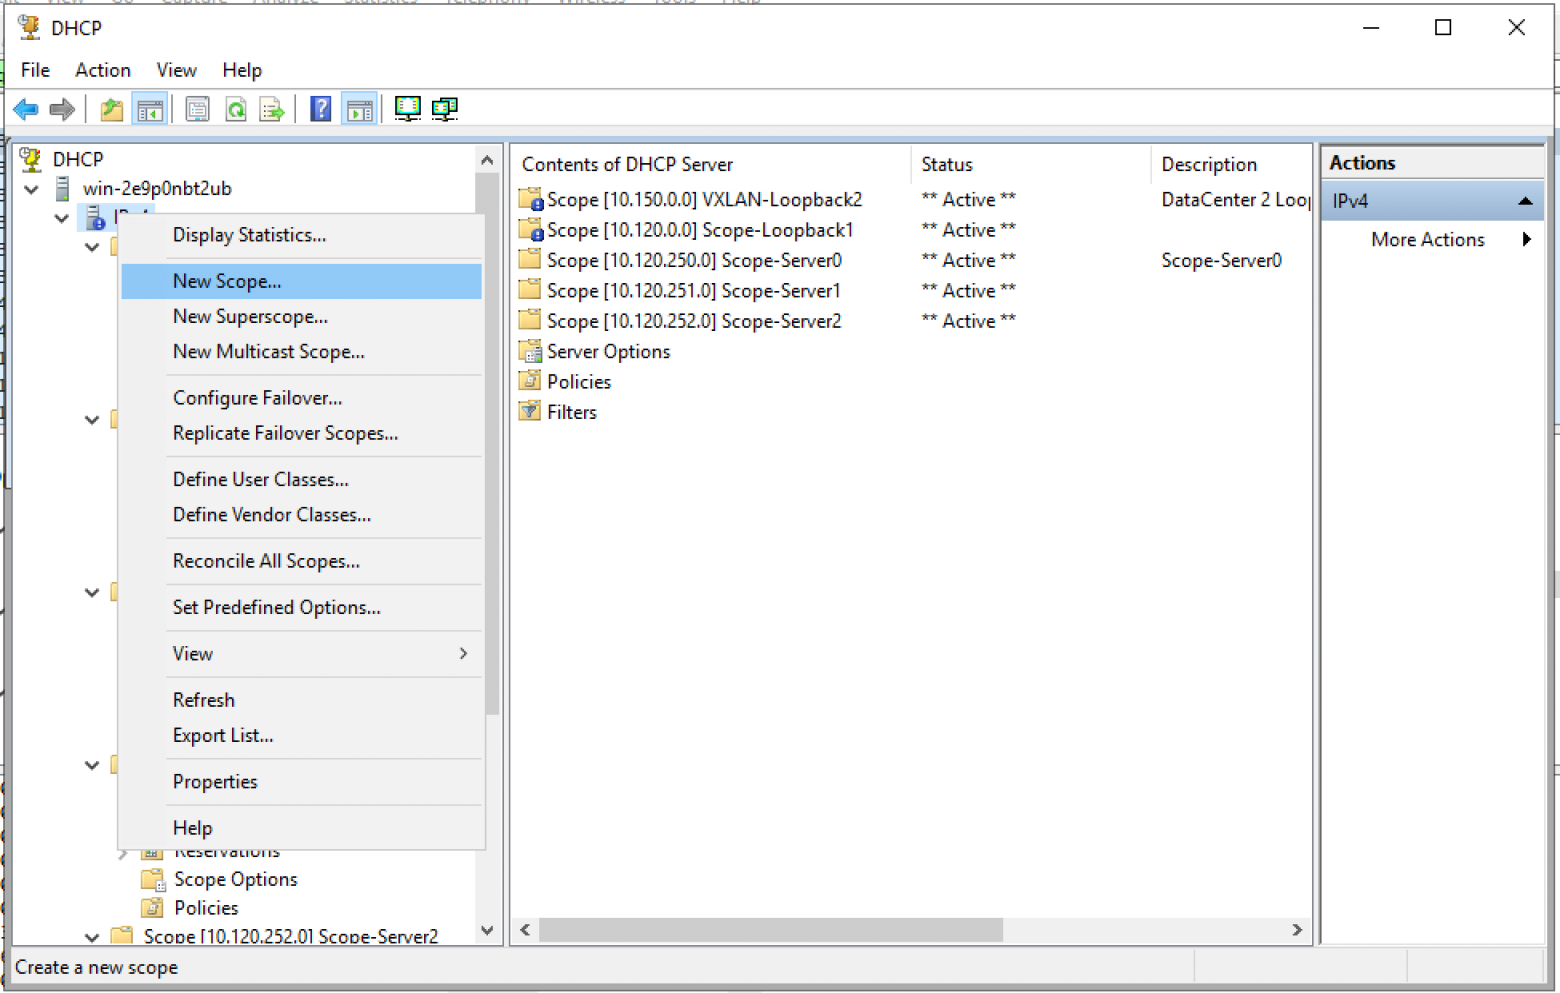
Создаем новый пул (Scope) в пространстве IPv4.
Мастер создания пула. «Next >»
Настраиваем имя пула и описание (Description) пула.

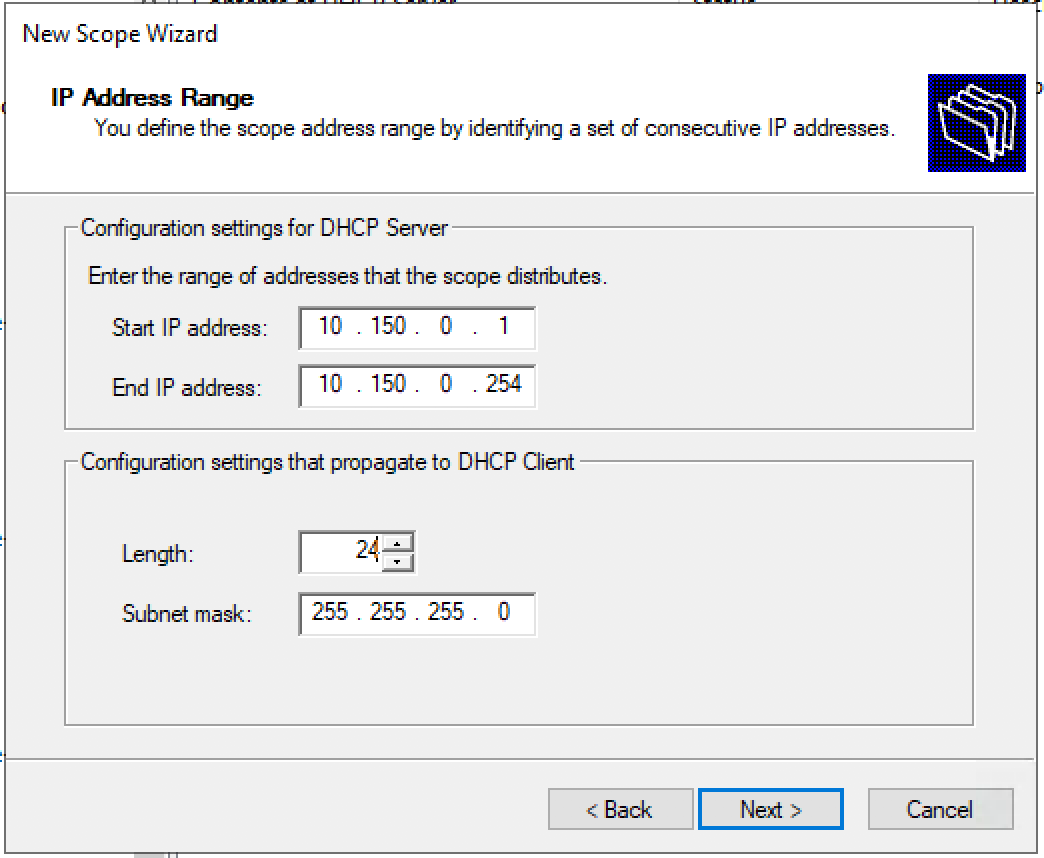
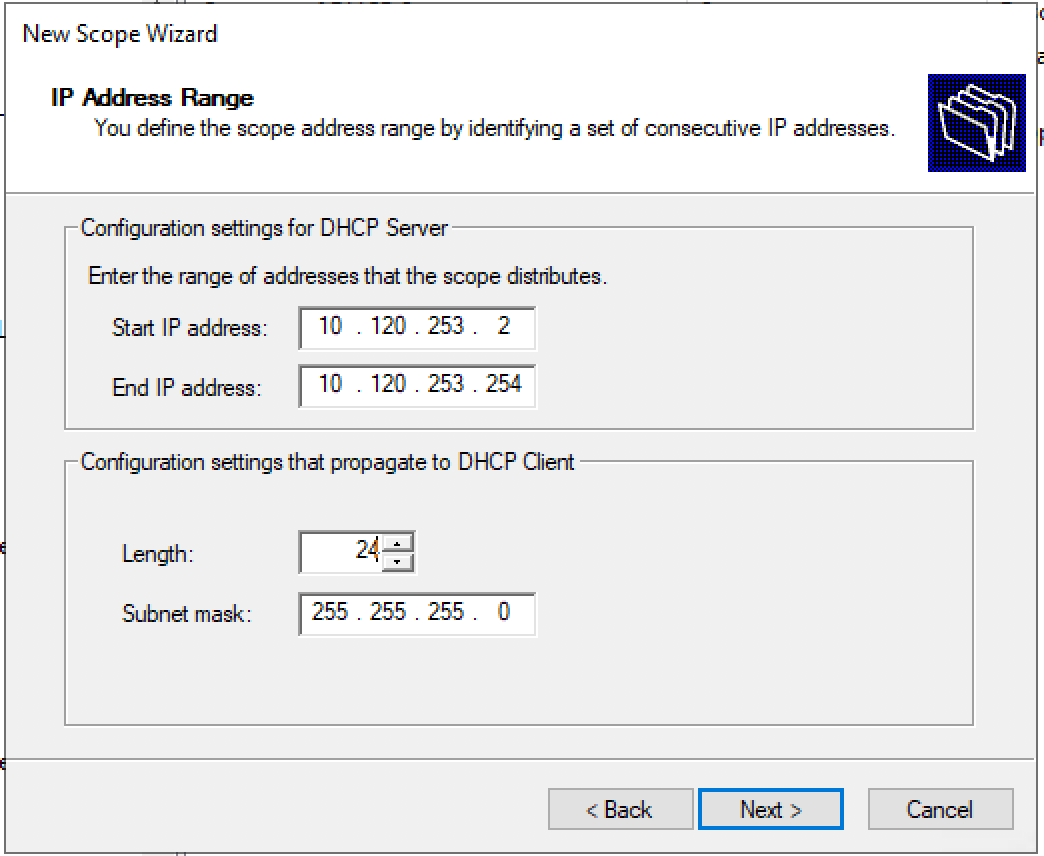
Задаем диапазон IP адресов для Loopback и маску для пула.
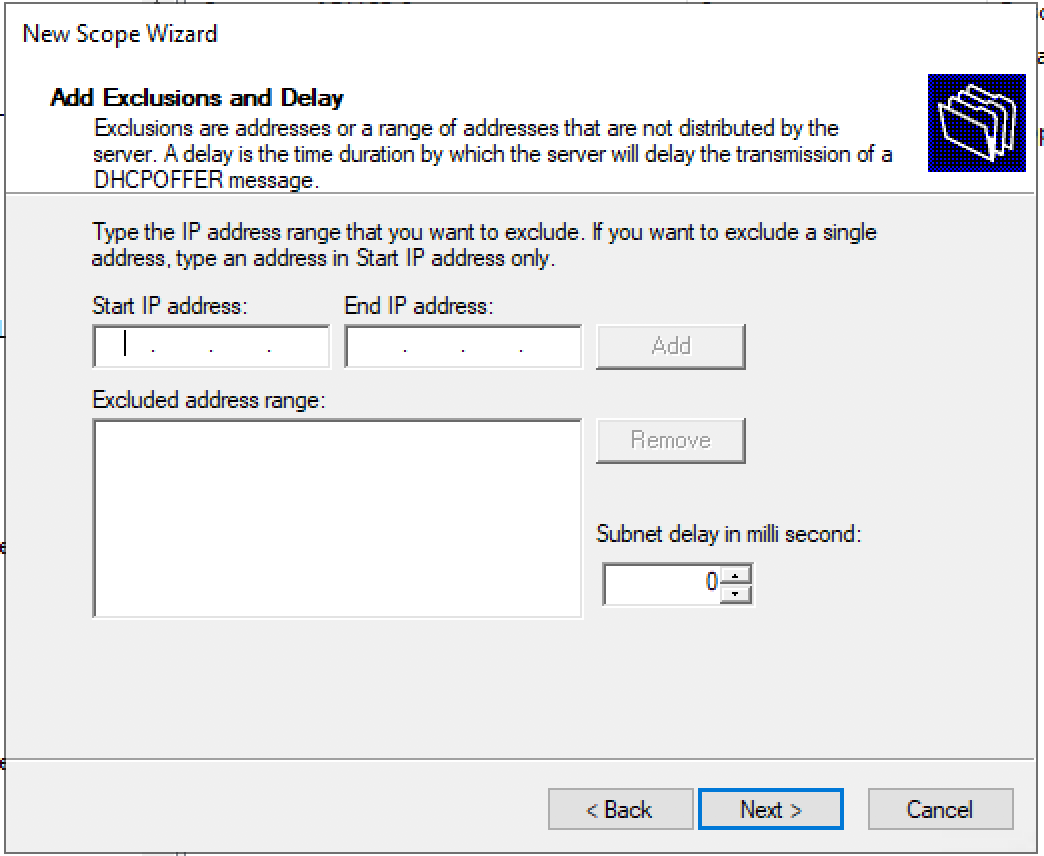
Добавляем исключения. Диапазон исключений должен полностью совпадать с диапазоном пула.
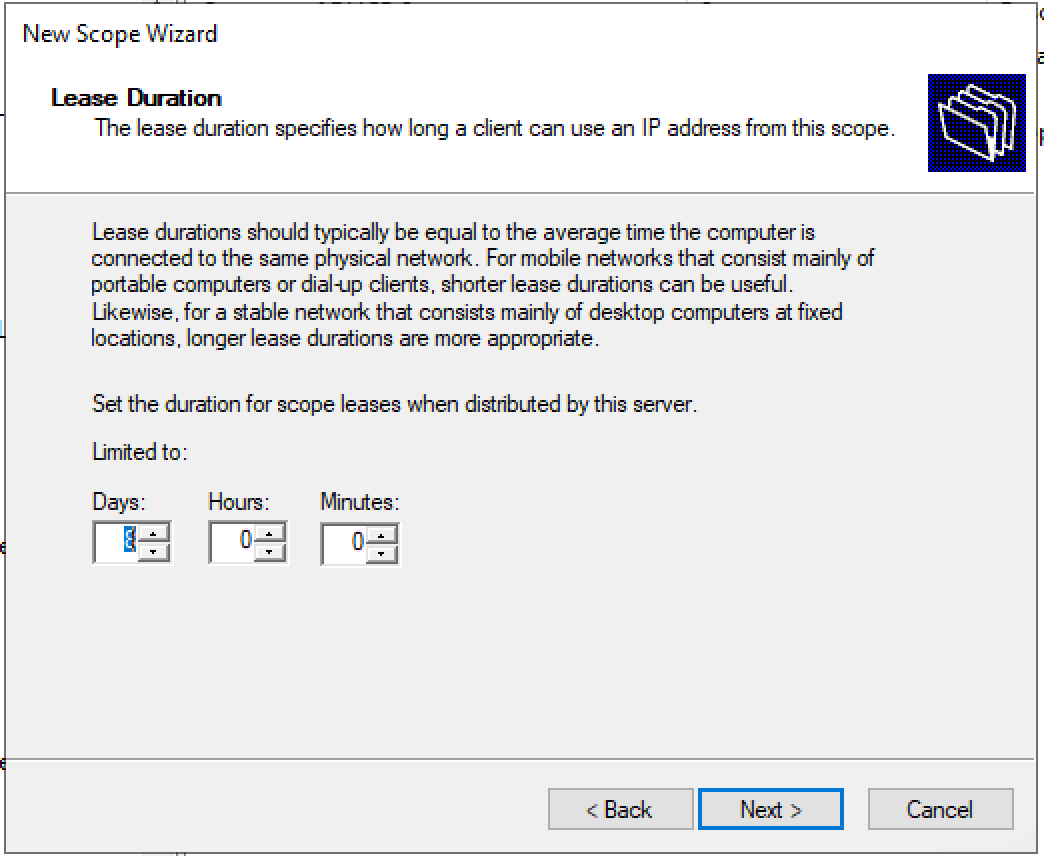
Время аренды. «Next >»

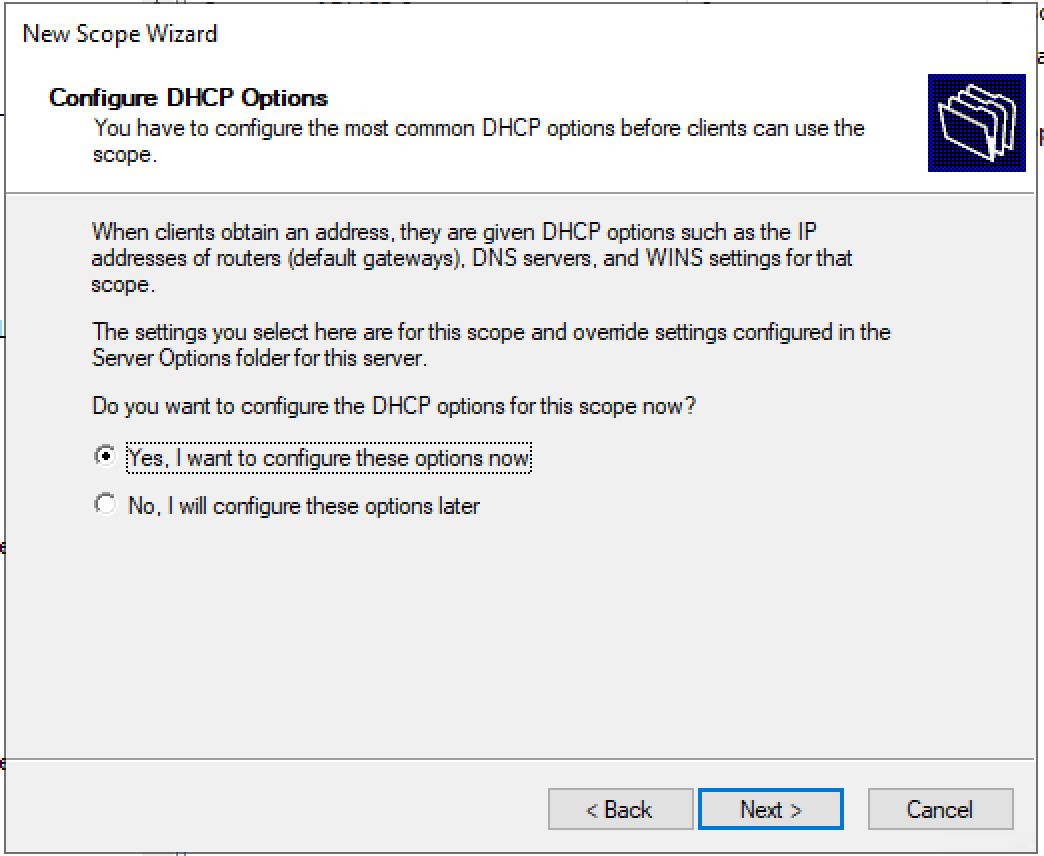
Запрос: Будете настраивать DHCP опции сейчас (DNS, WINS, Gateway, Domain) или сделаете это позже. Быстрее будет ответить нет, и после активировать пул вручную. Либо пройти до конца не заполняя ни какую информацию и в конце мастера активировать пул.
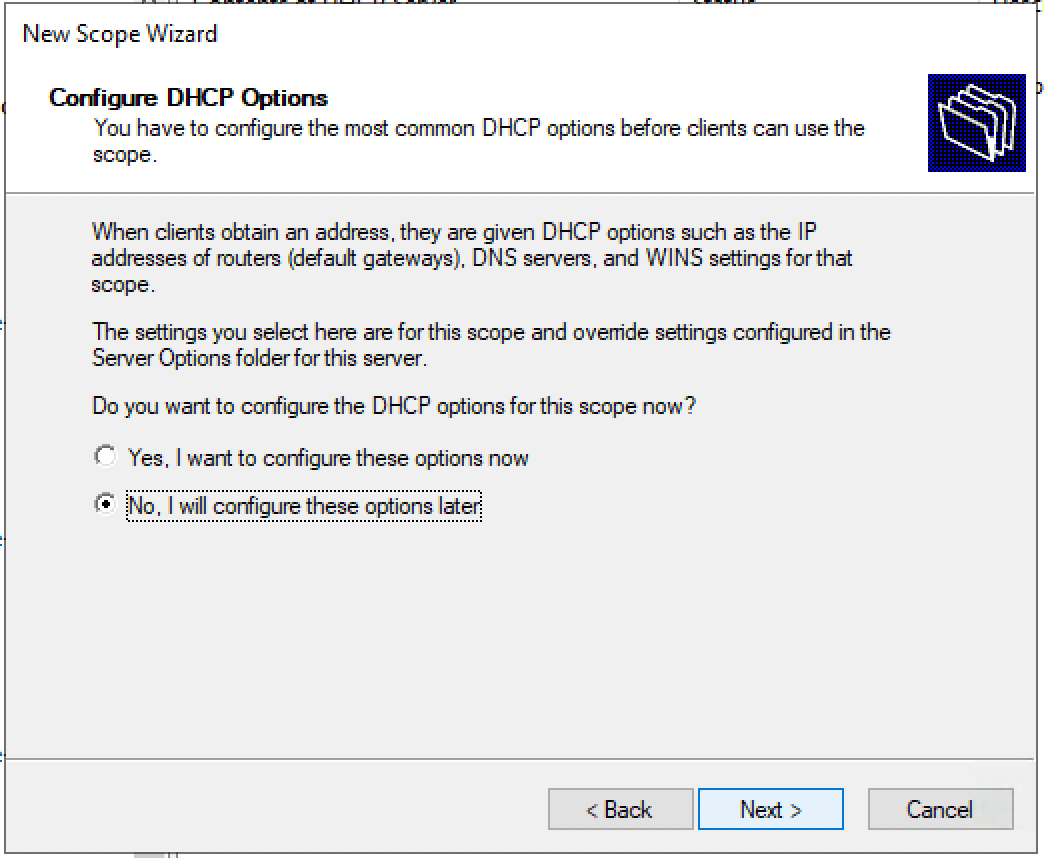
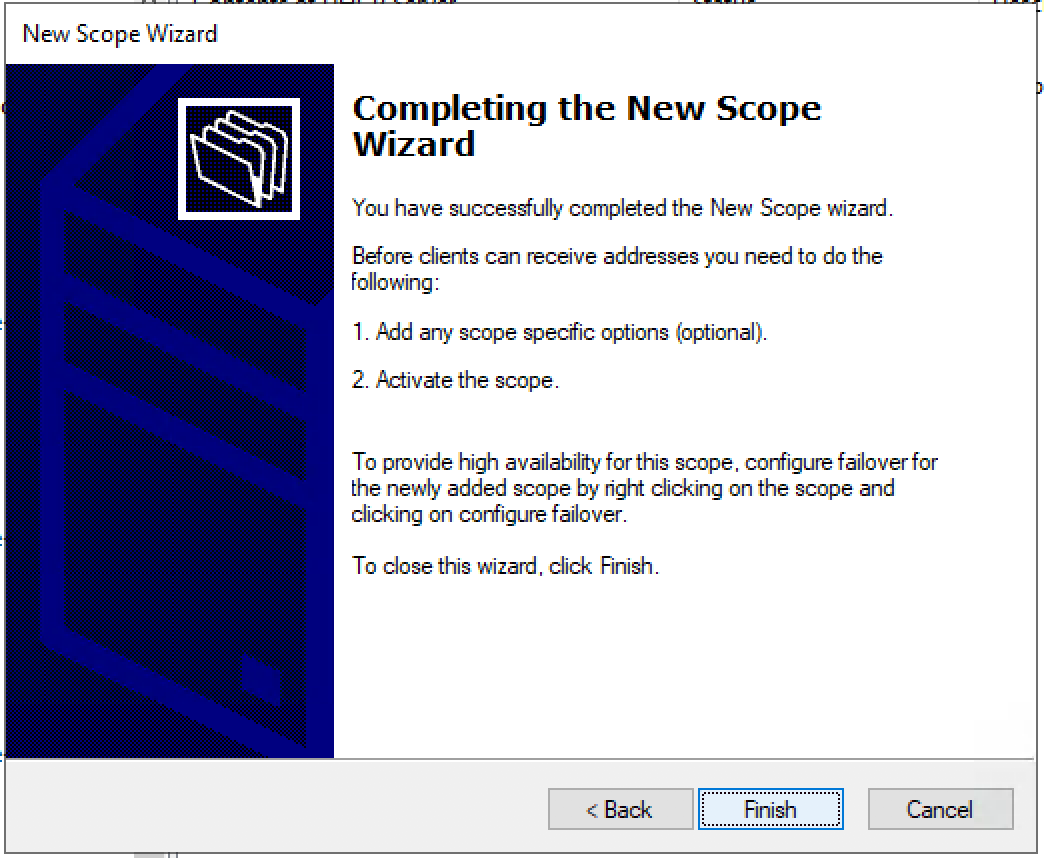
Подтверждаем, что опции не настроены, пул не активирован. «Finish»
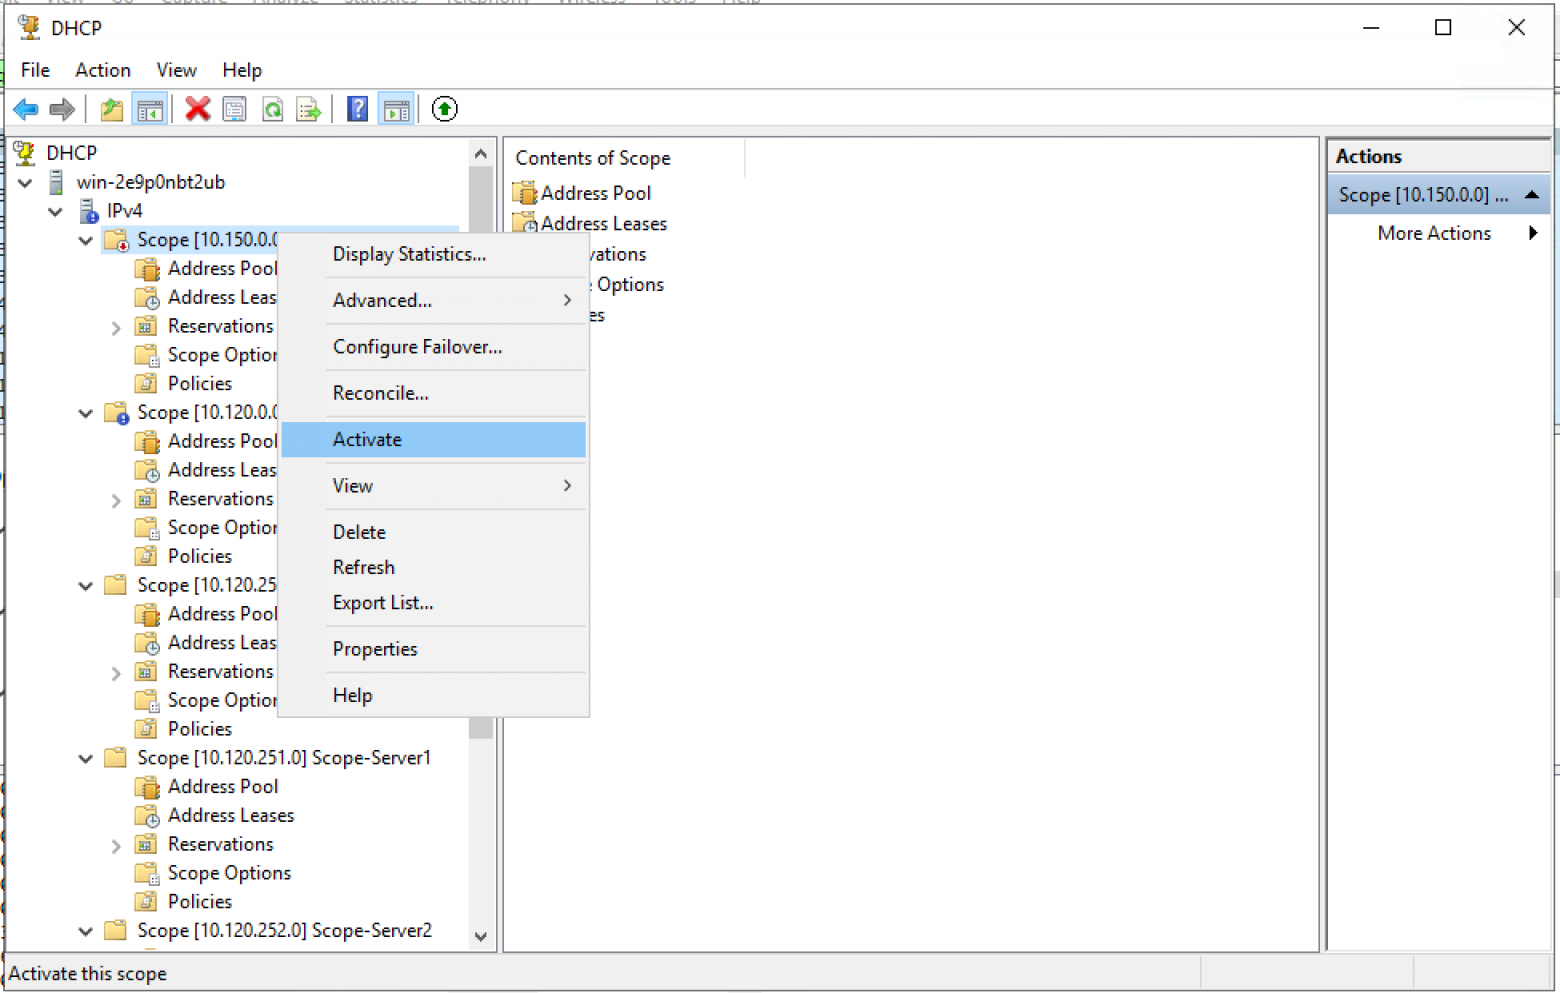
Активируем пул вручную. — Выбираем Scope и в контекстном меню — выбираем «Activate».
Создаем пул для пользователей/серверов.
Создаем новый пул.
Мастер создания пула. «Next >»
Настраиваем имя пула и описание (Description) пула.

Задаем диапазон IP адресов для Loopback и маску для пула.
Добавляем исключения. (По умолчанию исключений не требуется) «Next >»
Время аренды. «Next >»
Запрос: Будете настраивать DHCP опции сейчас (DNS, WINS, Gateway, Domain) или сделаете это позже. Да настроим сейчас.
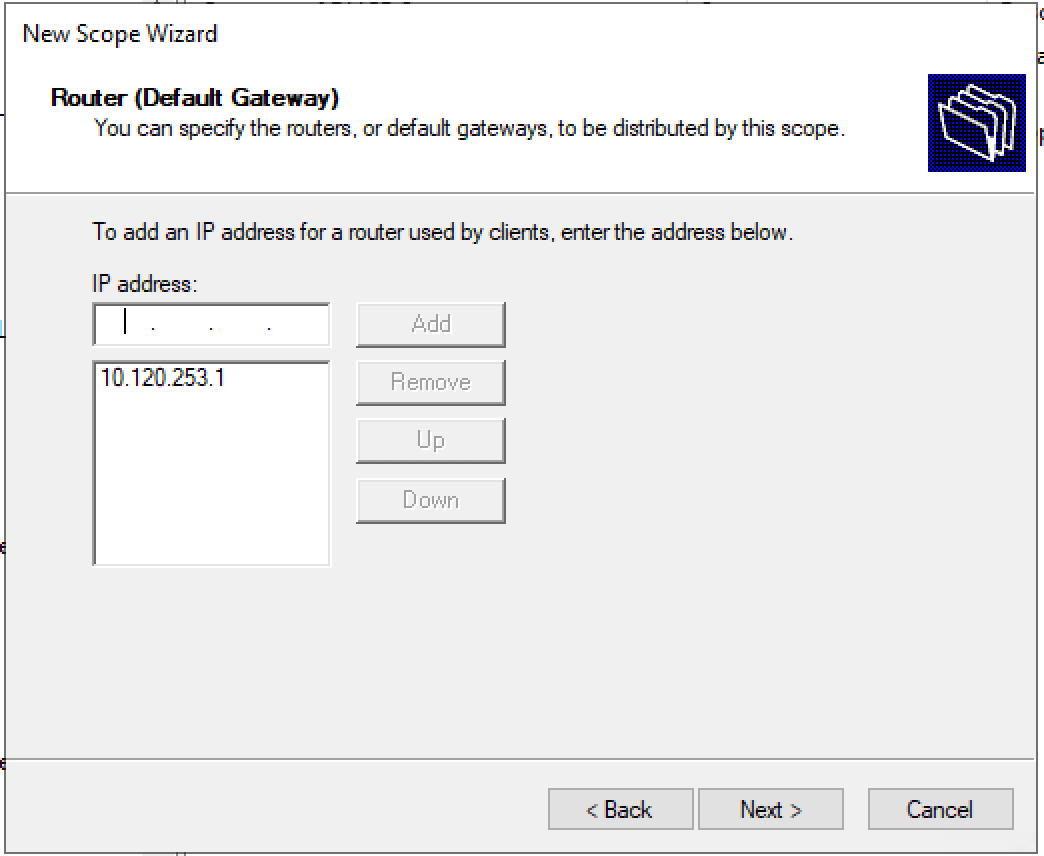
Настраиваем адрес шлюза по умолчанию.
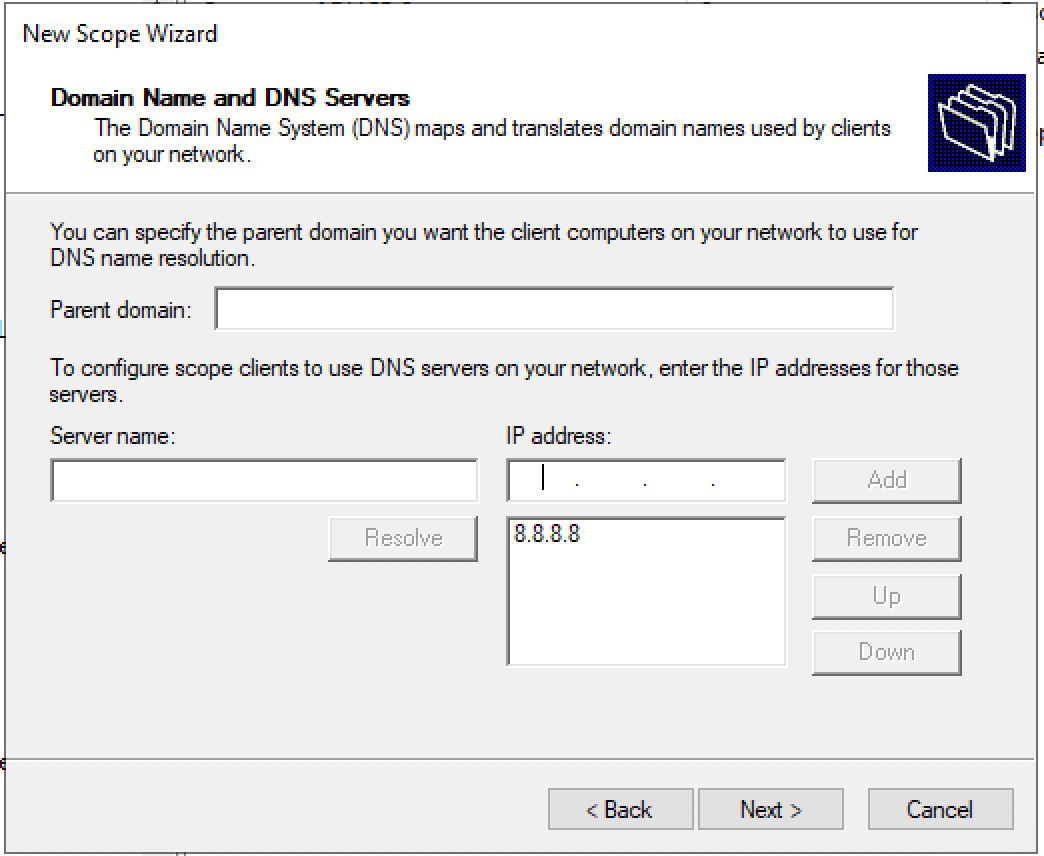
Настраиваем домен и адреса DNS серверов.
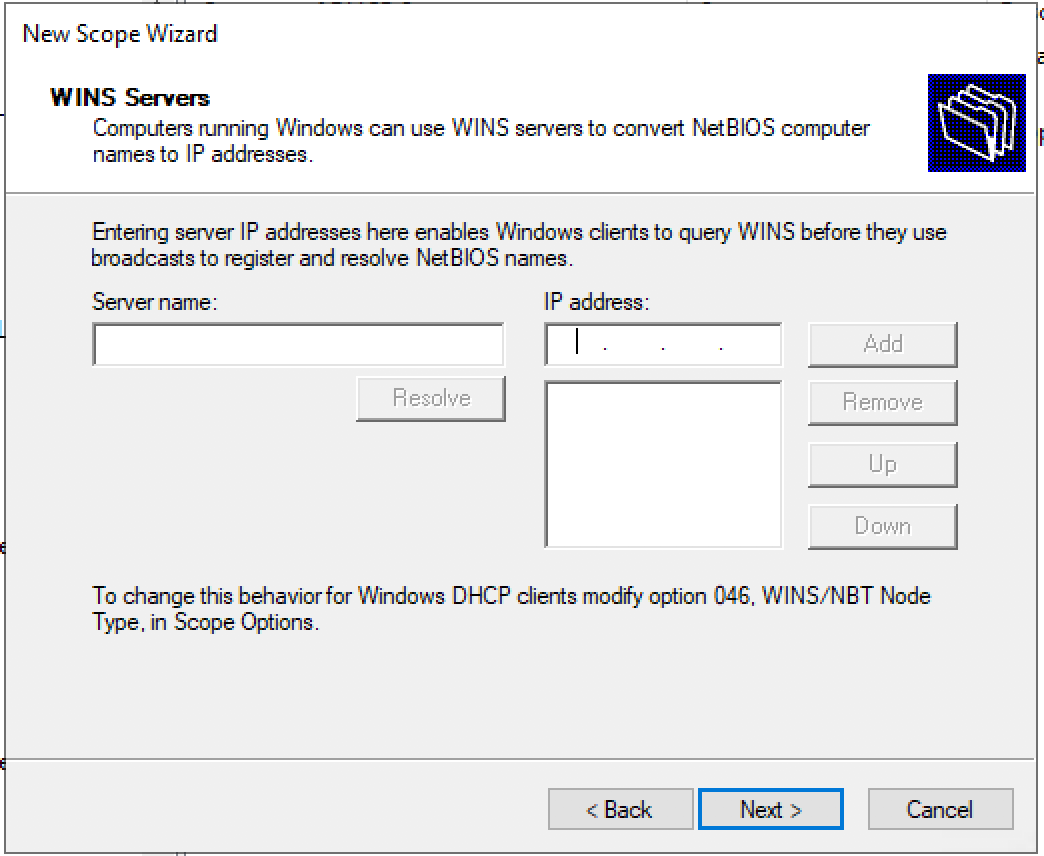
Настраиваем IP адреса WINS серверов.
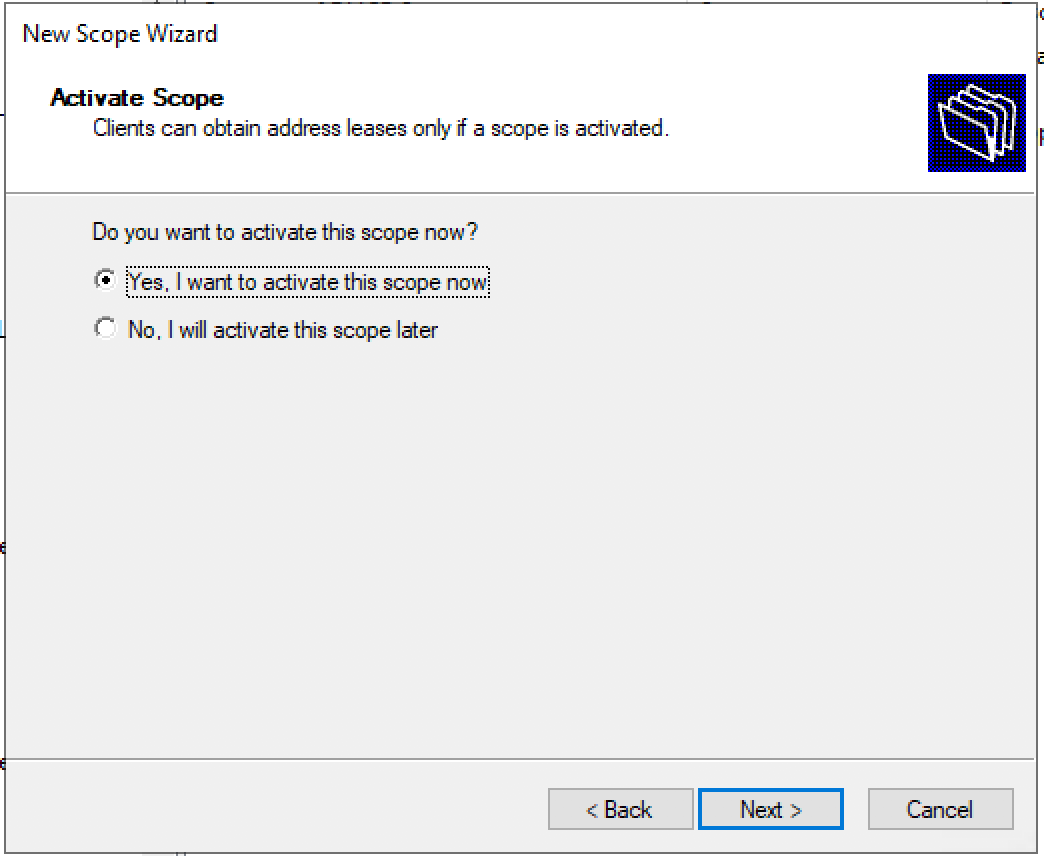
Активация Scope.
Пул настроен. «Finish»

Заключение
Использование Windows Server 2016/2019 уменьшает сложность настройки DHCP сервера для VXLAN фабрики (или любой другой фабрики). (Не требуется передача IT специалистам специальные связки: Network/Agent Circuit ID для прописывания фильтров.)
Будет ли работать конфигурация для Windows Server 2012 на новых серверах 2016/2019 – да будет работать.
В данном документе приведены ссылки на 2 версии: 7.X и 9.3. Это связано с тем, что версия 7.0(3)I7(7) — Cisco Suggested release, а версия 9.3 — является самой инновационной (вплоть до поддержки Multicast через VXLAN Multisite).
Список источников
- Nexus 9000 VXLAN Configuration Guide 7.x
- Nexus 9000 VXLAN Configuration Guide 9.3
- DFA (Cisco Dynamic Fabric Automation)
- Configuring Microsoft Windows Server 2012 to provide DHCP services in an eVPN Scenario (VXLAN, Cisco One Fabric, etc)
- 3.4 DHCP Superscopes
- Introduction to DHCP Policies
- Win2k8 R2 DHCP problem with Option82
- DHCP Subnet Selection Options
DHCP Management Part 2: DNS Updates, Relay Agents, and High Availability Options
When managing DHCP in Windows environments, there are a few advanced topics that are important to understand: how DNS records are updated, how DHCP works across different subnets, and how to keep your DHCP service highly available.
Let’s break each one down in simple terms.
DNS and DHCP: What’s the Connection?
When a Windows device (like Windows 11) gets its IP address from a DHCP server, it will usually register itself with the DNS server automatically. This process involves creating or updating two types of records:
- A Record (Host Record) – links a device name to its IP address.
- PTR Record (Pointer Record) – links an IP address to a device name (reverse lookup).
Windows supports Dynamic DNS Updates, which allows clients to update their own DNS records without admin help. Devices can only update records that belong to them. This keeps things secure.
Older systems (like Windows NT4) can’t do dynamic DNS updates. In these cases, the DHCP server can be configured to update records on their behalf—but honestly, you’ll probably never need this today.
DHCP Relay Agent: Working Across Subnets
DHCP uses broadcasts to find a server (UDP ports 67/68), but routers usually block broadcasts between subnets. This causes problems if a client is on a subnet that doesn’t have a DHCP server.
There are two ways to fix this:
- Deploy a DHCP server in every subnet (not ideal in larger networks).
- Use a DHCP Relay Agent.
A relay agent listens for DHCP requests on one subnet, then forwards them (as unicast traffic) to a DHCP server in another subnet. The server replies, and the relay agent sends the response back to the client as a broadcast.
This lets one DHCP server serve multiple subnets.
DHCP High Availability: What Are the Options?
DHCP is a critical service. If it fails, devices might not get IP addresses. Here are three ways to make DHCP highly available:
1. Server Clustering
- Uses Windows Server Failover Clustering.
- The DHCP role is installed on two or more servers in a cluster.
- DHCP scope data is stored in shared storage.
- If one server fails, the other continues serving clients.
- Also supports other roles (e.g., file sharing).
2. Split Scope (Legacy Option)
- Two DHCP servers handle the same subnet IP range but split it unevenly.
- Example: One server handles 80% of the range, the other handles 20%.
- This is often called the 80/20 rule.
- Each server has exclusions for the range the other uses.
- DHCP delay helps determine which server responds first.
- This method used to be done manually, but Windows Server now includes a Split-Scope Wizard.
3. DHCP Failover (Modern Option)
This is the most flexible and recommended method for DHCP redundancy.
- Built into the DHCP server role (no clustering needed).
- You set up a failover relationship between two DHCP servers.
- Two modes available:
- Load Balance: Both servers handle requests.
- Hot Standby: One is active; the other takes over if it goes down.
- Devices don’t lose connectivity immediately if the DHCP server goes offline. They’ll keep their lease (usually 8 days by default) until it expires.
- Setup is done via the Configure Failover Wizard:
- Choose scope(s)
- Define partner server
- Set options like load share %, role, switchover interval, and authentication
Final Thoughts
DHCP may seem like a “set it and forget it” service—but in production environments, DNS integration, cross-subnet support, and high availability are critical.
- Use DHCP Relay Agents in multi-subnet setups.
- Consider DHCP Failover as your go-to for redundancy.
- Know about split scopes and server clustering, but realize they’re less common in modern deployments.
PowerShell — Dhcp Across Networks
Written on June 30, 2019
With all the benefits that DHCP has to offer, it would be crazy if we needed to put a DHCP server in each network we setup. With this post, I will go through the steps of getting your Windows DHCP server working across whatever networks you want.
Prerequisites
To follow along with this guide you should have a setup with at least the following:
- Active Directory Forest
- 1 Domain Controller
- Guide
- Dhcp server role on a server
- Can be it’s own server, or on a DC
- Guide
- RRAS role installed on a server
- Should be on it’s own server
- Guide
- 1 test server on new network
My setup
2 networks:
- 10.0.0.0
- Has the Domain Controller (10.0.0.5)
- Has the Dhcp server (10.0.0.3)
- RRAS server:
- IP address: 10.0.0.1
- NetAdapter Name: Ethernet0
- 10.0.1.0
- Has the test server
- RRAS server:
- IP address: 10.0.1.1
- NetAdapter Name: Ethernet1
The Journey
The configuration can be broken down into 3 steps:
- Get information about the Dhcp server (IP address, DNS host name)
- Create Dhcp scope for the new network
- Install and configure the Dhcp relay agent
You can run all the code below directly from your RRAS server.
1. Get Dhcp server information
We need to know the hostname or IP address of the Dhcp server. We will also need to add a Dhcp scope for this new network (10.0.1.0 in this example).
# IP address or DnsHostName of your Dhcp Server
$dhcpServer = 'dhcp.codeAndKeep.com'

# Name of the network adapter to enable DHCP on
$routerNetAdapterName = 'Ethernet1'


$dhcpAddress = [Net.Dns]::GetHostEntry($dhcpServer)
if(!$dhcpAddress){
  Write-Warning "Unable to identify IP address of [$dhcpServer]"
  break
}else{
  $dhcpServerIP = $dhcpAddress.AddressList[0]
}
2. Create new Dhcp scope
We will need to create a new Dhcp scope for our second network. Be sure to change the IP addresses to what you want/have configured.
# If you have access to the dhcp server
## You can create your Dhcp scope remotely
$dhcpSession = New-PSSession -ComputerName $dhcpAddress.HostName
Import-PSSession -Session $dhcpSession -Module DhcpServer

# You can run the commands below directly on your DHCP Server
## If you don't want to use a PSSession

# Be sure to switch your Start and End Ranges if they are different
$newScope = Add-DhcpServerv4Scope -Name RemoteNet0 `
  -StartRange 10.0.1.20 `
  -EndRange 10.0.1.200 `
  -SubnetMask 255.255.255.0 `
  -State InActive `
  -PassThru

Set-DhcpServerv4OptionValue -ScopeID $newScope.ScopeId `
  -DnsDomain codeAndKeep.com `
  -DnsServer 10.0.0.5 `
  -Router 10.0.1.1

Set-DhcpServerv4Scope -ScopeId $newScope.ScopeID -State Active

# Not necessary if you ran this on directly on your Dhcp server
Remove-PSSession $dhcpSession
3. Install a Dhcp relay agent
This was the most difficult thing to figure out, as there is no PowerShell cmdlets to configure this. Having worked with netsh previously, I was able to find some documentation around configuring a relay agent.
In the code below, we will create a netsh script file to execute. This script will be populated with the IP address of the Dhcp server, as well as the interface alias that the relay agent will use.
$netshDhcpRelay=@"
pushd routing ip relay
install
set global loglevel=ERROR
add dhcpserver $($dhcpServerIP.IPAddressToString)
add interface name="$routerNetAdapterName"
set interface name="$routerNetAdapterName" relaymode=enable maxhop=6 minsecs=6
popd
"@

$netshDhcpRelayPath="$ENV:TEMP\netshDhcpRelay"

# Create netsh script file
New-Item -Path $netshDhcpRelayPath `
  -Type File `
  -ErrorAction SilentlyContinue | Out-Null

# Populate contents of the script
Set-Content -Path $netshDhcpRelayPath `
  -Value $netshDhcpRelay.Split("`r`n") `
  -Encoding ASCII

# run it
netsh -f $netshDhcpRelayPath
Test Dhcp on new network
Finally to ensure it is configured and working, we need a computer on the new network. If there is one already running you can restart the network adapter to start the Dhcp client. If it was configured with a static IP address, you should remove it.
Get-NetAdapter | Restart-NetAdapter
On your RRAS server, you can check the statistics of your relay agent. You can use this for troubleshooting or just to see some statistics.
netsh routing ip relay show ifstats
You should see something like this:
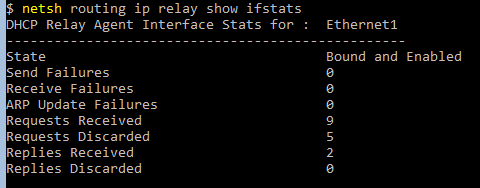
You can check your Dhcp server as well to see if a lease has been issued.
Get-DhcpServerv4ScopeStatistics -ScopeID $newScope.ScopeId
Thanks for readingPS> exit
Windows 7 / Networking
If you opt to create a centralized or hybrid DHCP infrastructure, you will need a DHCP relay agent on every subnet that does not have a DHCP server on it. Many routers are capable of
functioning as DHCP relay agents, but in situations where they are not, you can configure a Windows Server 2012 computer to function as a relay agent, using the following procedure.
- Log on to Windows Server 2012 using an account with Administrative privileges. The Server Manager window opens.
- Using the Add Roles and Features Wizard, install the Remote Access role, including the Routing role service.
- Click Open The Getting Started Wizard. The Configure Remote Access Getting Started Wizard opens.
- Click Deploy VPN Only. The Routing And Remote Access console appears.
- Right-click the server node and, on the shortcut menu, select Configure And Enable Routing And Remote Access. The Routing and Remote Access Server Setup Wizard appears.
- Click Next to bypass the Welcome page. The Configuration page opens.
- Select Custom Configuration and click Next. The Custom Configuration page appears.
- Select the LAN Routing check box and click Next. The Completing The Routing And Remote Access Server Setup Wizard page opens.
- Click Finish. A Routing and Remote Access message box appears, prompting you to start the service.
- Click Start Service.
- Expand the IPv4 node. Then, right-click the General node and, in the shortcut menu, select New Routing Protocol. The New Routing Protocol dialog box appears.
- Select DHCP Relay Agent and click OK. A DHCP Relay Agent node appears, subordinate to the IPv4 node.
- Right-click the DHCP Relay Agent node and, on the shortcut menu, select New Interface. The New Interface For DHCP Relay Agent dialog box appears.
- Select the interface to the subnet on which you want to install the relay agent and click OK. The DHCP Relay Properties sheet for the interface appears.
- Leave the Relay DHCP Packets check box selected, and configure the following settings, if needed.
- Hop-count threshold: Specifies the maximum number of relay agents that DHCP messages can pass through before being discarded. The default value is 4 and the
maximum value is 16. This setting prevents DHCP messages from being relayed endlessly around the network. - Boot threshold: Specifies the time interval (in seconds) that the relay agent should wait before forwarding each DHCP message it receives. The default value is 4
seconds. This setting enables you to control which DHCP server processes the clients for a particular subnet.
- Hop-count threshold: Specifies the maximum number of relay agents that DHCP messages can pass through before being discarded. The default value is 4 and the
- Click OK.
- Right-click the DHCP Relay Agent node and, on the shortcut menu, select Properties. The DHCP Relay Agent Properties sheet appears.
- Type the IP address of the DHCP server to which you want the agent to relay messages and click Add. Repeat this step to add additional servers, if necessary.
- Click OK.
- Close the Routing And Remote Access console.
At this point, the server is configured to relay DHCP messages to the server addresses you specified.