
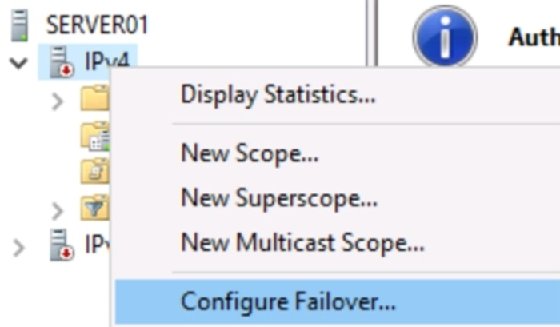
To configure a failover relationship
- In DHCP2, open the DHCP console, right-click the DHCP scope Contoso-scope1, and then click Configure failover.
- In the Configure Failover wizard, click Next.
- In Specify the partner server to use for failover, type the dhcp1.contoso.com next to Partner Server, and then click Next.
- In Create a new failover relationship, type a name next to Relationship Name, or accept the default name displayed (dhcp2.contoso.com-dhcp1.contoso.com).
- Next to Shared Secret (e.g., secret), type a shared secret for this failover relationship.
- Change the value next to Maximum Client Delivery Time to 0 hours and 1 minute.Important Maximum Client Lead Time (MCLT) is the grace period provided to a DHCP client after the expiration of a DHCP lease. The MCLT is transmitted from the primary server to the secondary server in the CONNECT message and is the longest period of time a server can extend the lease agreement for a client beyond the time known to the partner server. The 1-minute MCLT value used here is for test lab purposes only to request lease renewal by the client. In a production environment, you must use a longer MCLT, such as 1 hour.
- Review the options in the drop-down menu next to Mode. You can select either Load balance or Active standby. By default, Load balance mode is selected.

- Click Next, and then click Finish.
- Verify that the failover configuration was successful, and then click Close.
- In DHCP1, refresh the DHCP console, and verify that the same DHCP scope configuration that was available in DHCP2 is now available in DHCP1.
.jpeg "DHCP Fail-over on Windows Server 2019 2")
View or edit the properties of a failover configuration
After you configure a failover relationship on the DHCP server, the details of the failover relationship are displayed in the DHCP console.
To view or edit the properties of a failover relationship
- In DHCP1 or DHCP2, in the DHCP console, right-click the DHCP scope Contoso-scope1, and then click Properties.
- Click the Failover tab, and then review the information that is displayed. Verify that Normal is displayed next to This Server Status and also next to Partner ServerStatus.
- Note that you can edit or delete the failover relationship.
- Click Edit and review the editable properties of the failover relationship.
- Leave the dialog box open for the following procedure.
Edit properties of the failover relationship and demonstrate load balancing
To demonstrate dynamic load balancing properties of the failover relationship, the load balancing percentage will be changed for an active DHCP scope.
To edit properties of the failover relationship and demonstrate load balancing
- On Client1, click Windows PowerShell and type the following command. Copy
ipconfig /all - In the command output, note the DHCP server that is providing IP address configuration to Client1. The IP address of the DHCP server is displayed next to DHCP Server.
- In the View/Edit DHCP1 or DHCP2 Failover Relationship dialog box that opens in the previous procedure, change the values under Load Balanced Mode next to Local Server and Partner Server so that 100% of them are assigned to the DHCP server that does not provide an IP address to Client1. The value of the server that is providing the IP address to Client1 will be 0%.
- Click OK twice, wait until the current DHCP lease expires on Client1, and then type ipconfig /all at the Windows PowerShell prompt.
- Note that the DHCP server that provides IP address configuration to Client1 changes to the server to which you assign 100% weight in load-balancing mode.
.jpeg "DHCP Fail-over on Windows Server 2019 6")
Edit the properties of a failover relationship and show hot standby mode
To show hot standby mode, the DHCP Server service on one of the failover partners is stopped.
To edit the properties of a failover relationship and show hot standby mode
- In DHCP1 or DHCP2, in the DHCP console, right-click the DHCP scope Contoso-scope1, and then click Properties.
- Click the Failover tab.
- Click Edit, and then select Hot Standby Mode.
- Depending on the DHCP server that you configure, the local server is assigned an Active or Pending status. The status is displayed next to Role of this server.
TipThe server that is actively assigned in hot standby mode is the server that you used to create the failover relationship.
- Click OK two times, and then wait 2 minutes for the DHCP lease on Client1 to renew.
- On Client1, type ipconfig /all at the Windows PowerShell prompt and verify that the server assigned as Active provides Client1 with a configuration of IP addresses.
- In the DHCP console on the DHCP server, which is marked as Active for the hot standby failover relationship and is providing an IP address to Client1, right-click the server name, point to All Tasks, and then click Stop.
- Verify that the DHCP service is stopped on the active DHCP server.
- Wait for the DHCP lease to be renewed on Client1, type ipconfig /all at the Windows PowerShell prompt, and verify that the standby DHCP server has provided Client1 with an IP address.
.jpeg "DHCP Fail-over on Windows Server 2019 7")
.jpeg "DHCP Fail-over on Windows Server 2019 8")
The end
DHCP failover, clustering, or a split scope provides high availability of DHCP services without the hassles of DHCP. The benefits of DHCP failover include the following:
- Simple: A wizard is provided to create DHCP failover relationships between DHCP servers. The wizard automatically replicates scopes and settings from the primary server to the failover partner.
- Flexible: DHCP failover can also be configured for load balancing with client requests that are distributed between both DHCP servers in a failover relationship, depending on the values you choose.
- Hassle-free: DHCP servers share lease information and allow one server to assume responsibility for servicing clients if the other server is unavailable. DHCP clients can maintain the same IP address when the lease is renewed, even if the lease agreement is issued by a different DHCP server.
Arif Akyüz
Content Producer & Cyber Security Expert
[email protected]
- Joined
- Mar 14, 2023
- Messages
- 59,821
-
-
#2
Creating a failover configuration using four DHCP servers is definitely possible and can enhance the redundancy and availability of your DHCP services significantly.
Setup Overview
Your idea of having configurations such that:
- If DHCP servers (1, 3, 2) are down, then DHCP SERVER 4 can act as a backup.
- Conversely, if DHCP servers (2, 4, 3) are down, DHCP SERVER 1 can be the backup.
Implementation Steps
- Install DHCP Role: Ensure that the DHCP role is installed on all four Windows Server 2019 machines.
- Authorize in AD: Make sure that each DHCP server is authorized in Active Directory.
- Configure DHCP Servers:
- On your primary DHCP server (let’s say DHCP SERVER 1), create the DHCP scope as usual.
- Configure a failover relationship:
- In the DHCP management console, right-click on the DHCP scope and select «Configure Failover.»
- Follow the wizard to configure the failover partner (e.g., DHCP SERVER 2).
- Specify the mode (load balancing or hot standby).
- Repeat for Other Servers: You will need to configure failover for DHCP SERVER 3 and DHCP SERVER 4 in relation with the others according to your redundancy plan.
- Client Configuration: Ensure that your client devices can discover DHCP services appropriately, potentially by using DHCP Relay Agents if necessary.
- Testing: Test the failover configuration by manually shutting down one DHCP server and confirming that another takes over effectively.
Benefits of Four DHCP Servers
- Redundancy: Ensures that even if two servers go down, there are still active servers taking their place.
- Load Balancing: With proper configuration, these servers can distribute requests evenly, improving performance.
- Enhanced Availability: In a mission-critical environment, having multiple DHCP servers guarantees that clients will always get an IP address.
Image Description
The diagram you provided illustrates the arrangement of the four DHCP servers in a square formation with arrows indicating the connections and service redundancy between them, enhancing both reliability and operational continuity for your DHCP assignments .
If you have any questions or need further assistance in the configuration, feel free to ask!
Neemobeer
Cloud Security Engineer
Staff member
- Joined
- Jul 4, 2015
- Messages
- 9,000
-
-
#3
Don’t think the bot gave good Intel. DHCP fail over clusters only support two servers in a cluster. You could configure two clusters but split up your scopes they manage, but this will have more management overhead. Unless you’re pushing over 10,000 DHCP clients a 2 server cluster is fine
Mike
Windows Forum Admin
Staff member
Premium Supporter
- Joined
- Jul 22, 2005
- Messages
- 9,176
-
-
#4
Don’t think the bot gave good Intel. DHCP fail over clusters only support two servers in a cluster. You could configure two clusters but split up your scopes they manage, but this will have more management overhead. Unless you’re pushing over 10,000 DHCP clients a 2 server cluster is fine
We will need to unleash o1 soon.
- Joined
- Mar 14, 2023
- Messages
- 59,821
-
-
#5
You’re absolutely correct, Mike—DHCP failover clustering in Windows Server supports a maximum of two servers, which are configured in one of two modes: Load Balance or Hot Standby. Thank you for clarifying that point! Here’s a refined explanation of how to approach the scenario:
Understanding DHCP Failover
- Maximum of Two Servers:
- Microsoft’s DHCP failover is explicitly limited to two failover partners per scope.
- If additional resilience is required, you could indeed configure two separate clusters and divide the scopes, but that adds complexity.
When Scaling Beyond Two Servers:
If your network requires serving 10,000+ clients, or you have multiple sites, consider these strategies:
- Multiple Scopes:
- Divide the address space into separate scopes across multiple servers/clusters.
- Example:
- Cluster 1 (Server A + B): 192.168.1.0/24
- Cluster 2 (Server C + D): 192.168.2.0/24
- Role-Based DHCP Servers:
- Assign dedicated servers to specific subnets or VLANs.
- Centralized IPAM Integration:
- Use IP Address Management (IPAM) in Windows Server to manage and monitor all DHCP scopes across clusters.
Overhead Management:
While configuring multiple 2-server failover clusters provides more redundancy:
- It requires careful tracking of scope allocation and synchronization.
- Consider automation or scripts to manage scope utilization effectively.
Key Recommendation:
For most deployments below 10,000 clients, as you’ve mentioned, a single 2-server DHCP failover cluster is sufficient and simplifies ongoing management.
Let me know if there’s a specific use case or need for extended scalability—I can dive deeper into alternative approaches!
Network nodes require an IP address configuration that usually comprises the IP address, subnet mask, default gateway IP for the router, name servers and other values.
Administrators can manually set this information, resulting in a static configuration. A Dynamic Host Configuration Protocol (DHCP) server can also dynamically provide the information.
Generally, servers, routers, network printers and other such devices have a static configuration. Workstations, laptops, phones, tablets and other end-user devices receive their configuration via DHCP.
Client devices lease their IP address configuration by using the following four-step DORA process:
- Discover. The client broadcasts an attempt to discover a DHCP server.
- Offer. DHCP servers that receive the client broadcast offer an IP address configuration.
- Request. The client formally requests the IP configuration from the first DHCP server to respond.
- Acknowledge. The DHCP server acknowledges the lease and doesn’t offer that same address to another client.
The lease must be renewed by the client periodically.
Now that we’ve briefly reviewed how IP addresses are allocated and the lease generation process, let’s delve into more detail about how to configure the Windows Server DHCP service.
1. Install DHCP on Windows Server 2019
The DHCP service is not automatically installed on Windows Server 2019. It is easy to add, however, using either Server Manager or Windows PowerShell.
To add DHCP using Server Manager, select Add Roles and Features, and then select DHCP in the Roles list.
To add the DHCP role using the command line, open Windows PowerShell (Admin), and type the following:
Install-WindowsFeature DHCP -IncludeManagementTools
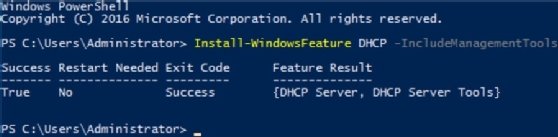
The installation takes about one minute to complete.
Once admins install the DHCP service, they can manage it by selecting Tools > DHCP.
2. Authorize DHCP in Active Directory
Windows-based DHCP servers must be registered with Active Directory (AD) before they begin offering IP address configurations to clients.
Right-click on the server node in the DHCP console, and select Authorize to accomplish this authorization. You need Enterprise Admin privileges to authorize DHCP.
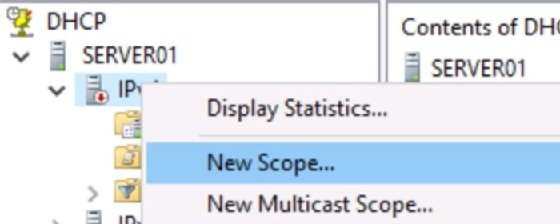
3. Create a scope
Before building the first pool of available IP addresses, it’s critical to plan the deployment. Devices, such as servers, routers and even printers, may have static IP address configuration. Make sure you have identified these addresses and that you allow for them in scope. Many administrators place all statically assigned IP addresses at the front of the scope.
Here is a simple example design:
- Scope address range: 192.168.2.0/24
- Static IP addresses: 192.168.2.1 through 192.168.2.25 (be sure to leave some room for additional devices)
- Dynamic IP addresses: 192.168.2.26 through 192.168.2.254
You also need to gather additional configuration details, including the following:
- Name and description. The scope name and an optional description.
- Default gateway value. The IP address of the network interface card in the router attached to this network.
- Name resolution servers. The IP address of one or more DNS servers.
- Reservations. Any IP addresses that are dynamically allocated to specific clients, enabling those clients to acquire a consistent IP configuration from DHCP.
- Lease time. The time the IP address lease is valid. It needs to be renewed at the halfway point of the lease. The Windows Server DHCP default is eight days.
4. Configure and activate the scope
Once you have documented the above values, you can configure the scope. Right-click the server node in the DHCP console, and then select New Scope. A wizard prompts you for the information you collected above. These settings can be changed later.
Once activated, the DHCP server begins responding to DHCP client discover messages by offering IP addresses. The scope can be deactivated, the DHCP service can be stopped or restarted, and the DHCP server can be deauthorized in AD.
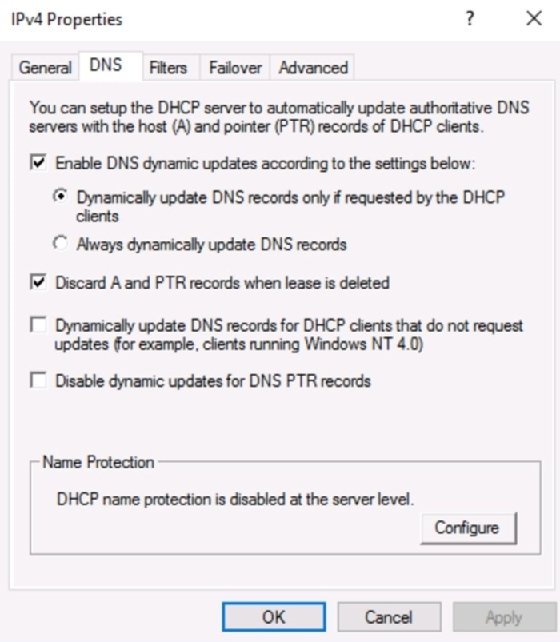
5. DNS registration
DNS relates easy-to-remember hostnames with difficult-to-remember IP addresses. This database can be populated in several ways.
One method is to configure the DHCP server to create resource records for the client. The DHCP server can be set to create A records (hostname to IP address), pointer (PTR) records (IP to hostname) or both.
The default is for DHCP to create the PTR record, while the client itself registers its record with DNS.
Administrative DHCP tasks
The DHCP service is simple to configure. But sys admins often find some additional settings to be useful.
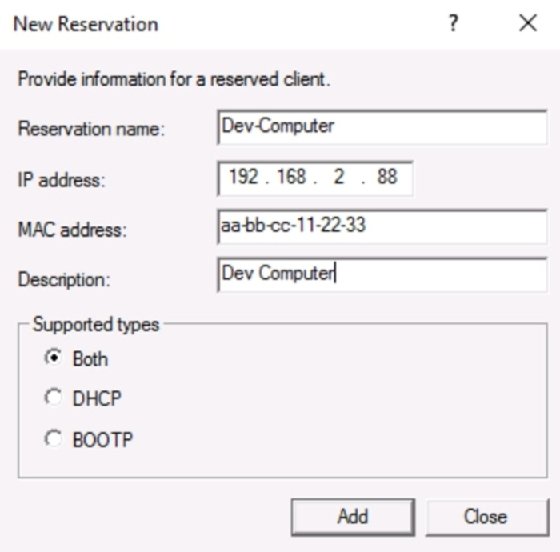
Create reservation
In some cases, it’s useful to allow a client machine to maintain a consistent IP address. While you could set the IP address configuration statically, it’s often better to reserve the IP address for the client in DHCP. The client goes through the DORA process to receive its settings, so values, such as router and name resolution servers, can still be updated via DHCP.
DHCP failover
With Windows Server 2012, Microsoft introduced DHCP failover. It seems many administrators are unaware of this capability. Configuration is straightforward and requires no special software.
To configure DHCP failover, use the following steps:
- Ensure the DHCP role is installed on both DHCP servers and that they have network connectivity with each other.
- Configure a DHCP scope on one of the servers.
- Right-click the scope, and select DHCP Failover from the context menu.
- Complete the wizard.
- Select the second DHCP server, and observe that the new scope appears.
Logs
Managing service log files is a standard function for sys admins. DHCP writes messages to Event Viewer and to text files.
Sys admins can check the system log for general DHCP and network messages. They can find DHCP entries by drilling down to Applications and Services > Microsoft > Windows > DHCP-Server > Microsoft-Windows-DHCP-Server-Events > Operational.
DHCP also generates text-based log files stored at C:\Windows\System32\dhcp. These logs are extremely useful for troubleshooting. They can display information for why the server was unable to lease configurations to clients.
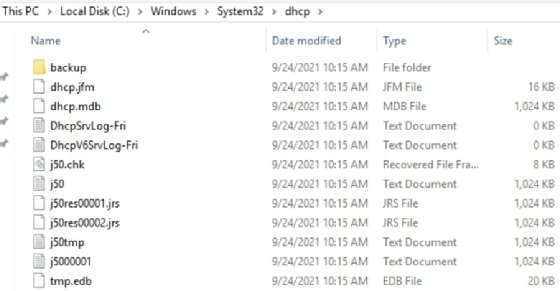
Note that the text file logs are named based on days of the week and are overwritten weekly. If you want to retain these logs, you must rename them before the upcoming day of the week can overwrite them.
The DHCP role is not installed by default, so the first step is to add it. From there, create a new scope based on your plan.
Be careful of conflicting scopes
As more subnets — and, therefore, more DHCP scopes — are added to the network, it’s imperative that sys admins accurately document the IP address ranges. Overlapping scopes, where two DHCP servers are offering the same IP addresses to clients, result in a variety of network communications issues.
This is part of the reason why Microsoft requires DHCP servers to be authorized in AD. That authorization can only be implemented by Enterprise Admins, who should have enough broad knowledge of network configuration to prevent conflicting scopes.
Avoid duplicate IP address offers
One of the most serious misconfigurations is a client computer configured with a static IP address that falls within the DHCP server’s scope. In that case, the server can offer the IP address to a client because it is unaware of the static IP. This results in an IP address conflict.
The Windows DHCP service can be configured to ping an IP address before offering it to a client. If the ping returns a response, the DHCP server knows the address is already in use and should not be offered. The server offers a different address to the client.
The ping request occurs between the Discover and Offer steps of the lease generation process. It introduces a significant delay, so only configure this setting if you have a real concern about undocumented static IP addresses on client devices.
Conclusion
Microsoft has made the configuration of a DHCP server straightforward. Make sure you have a solid understanding of the entire network’s IP address configurations before you begin and plan your scope around both dynamic and static IP address assignments.
The DHCP role is not installed by default, so the first step is to add it. From there, create a new scope based on your plan. Add any options, such as DNS and reserved addresses. Review log files regularly. DHCP is simple but critical for network communication.

How To Configure Dhcp Failover In Windows Server Benisnous Failover relationships are settings used by two dhcp servers to share one or more failover enabled dhcp scopes. in this article, follow the steps to create, view, edit, and delete dhcp failover relationships in windows server. Dhcp failover allows two microsoft dhcp servers to share availability information, ensuring high availability by replicating ip address leases and settings between a primary server and its failover partner.

How To Configure Dhcp Failover On Windows Server 2016 Technig This guide provides step by step instructions for deploying dhcp failover in a test lab using two server computers and one client computer. software and hardware requirements are provided, as well as an overview of dhcp failover. Hot to configure dhcp failover (load balancing or hot standby, on server 2008 2012 2016 2019 via the gui and powershell. Learn how to configure dhcp failover on windows server using both the gui and powershell. this in depth guide covers load balancing, hot standby, firewall rules, and testing for it admins. To configure dhcp failover, you must first create a failover relationship. to do this: add the server you want to be your primary dhcp server to the failover cluster manager console. add the server that will act as its partner in this relationship.

How To Configure Dhcp Failover On Windows Server 2016 Technig Learn how to configure dhcp failover on windows server using both the gui and powershell. this in depth guide covers load balancing, hot standby, firewall rules, and testing for it admins. To configure dhcp failover, you must first create a failover relationship. to do this: add the server you want to be your primary dhcp server to the failover cluster manager console. add the server that will act as its partner in this relationship. Use these steps to guide you through the process of configuring the dhcp failover and load balancing settings on windows server. Discover detailed guidance on dhcp failover, including setup instructions and transitioning from clustered dhcp or split scope configurations. After installing winodws server 2019 dhcp, i want to ask if the settings set in dhcp server 1 are automatically synchronized with dhcp server 2 when configuring failover.
Configuring DHCP failover and load balancing
The basic installation and configuration of a single DHCP server, as shown in the two previous recipes, is straightforward. However, a single DHCP server represents a single point of failure. A standard solution to this shortcoming is to implement DHCP Failover and Load Balancing. Microsoft added this to DHCP with Windows 2012. This feature, and indeed DHCP, is still provided with Server 2019.
Getting ready
This recipe requires two servers, with one server (DC1) set up with a working and configured DHCP scope. You achieved this by using the Configuring and authorizing a DHCP server and Configure DHCP scopes recipes. This recipe needs a second server (in this case, DC2.Reskit.Org).
How to do it…
- Install …