
Software Description: V6.1.9.4_build20220412
The device network SDK is developed based on private network communication protocol, and it is designed for the remote connection and configuration of embedded DVR, Encoder, IPC and the other IP devices.
The functions supported by the SDK
1. Live view, playback, remote file download, PTZ control, arm/disarm, voice talk, log query, decoding card function, etc.
2. Remote upgrade, remotely reboot, remotely shut down, remotely format hard disk, and device configuration (system configuration, channel configuration, serial port configuration, alarm configuration, users configuration), etc.
It applies to, but are not limited to the following product model:
1. Encoders or decoders
NVR: DS-9600, DS-9500, DS-7700, DS-7600 series;
HDVR: DS-9000, DS-8000-ST, DS-7600 series;
DVR: DS-9100, DS-8100, DS-8000-S, DS-8800, DS-7800, DS-7300, DS-7200, DS-7100, DS-7000 series;
Encoder: DS-6600, DS-6500(-JX), DS-6100, DS-6401HFH, DS-6000 series;
Decoder: DS-6300D(-JX), DS-6400HD(-JX/-T), DS-6500D series
Remarks: including the model of -ST, -SH, -SE, -SN, -RT, -RH, -XT
2. IP cameras or IP speed domes
IPC: standard definition, high definition, the infrared, the thermal, e.g. DS-2CD1xxx series, DS-2CD7xx, DS-2CD71xx, DS-2CD72xx, DS-2CD8xx, DS-2CD81xx, DS-2CD82xx, DS-2CD84xx, DS-2CD83xx, DS-2CD20xx, DS-2CD21xx, DS-2CD22xx, DS-2CD23xx, DS-2CD26xx, DS-2CD27xx, DS-2CD30xx, DS-2CD31xx, DS-2CD32xx, DS-2CD33xx, DS-2CD40xx, DS-2CD41xx, DS-2CD42xx, DS-2CD62xx, and so on
IPD: standard definition, high definition, the infrared, e.g. DS-2DE71xx, DS-2DM72xx, DS-2DF72xx, DS-2DF1-7xx, DS-2DF1-6xx, DS-2DE51xx, DS-2DM52xx, DS-2DF52xx, DS-2DF1-5xx, DS-2DF1-4xx, DS-2DM1-7xx, DS-2DM1-6xx, DS-2DM1-5xx, and so on
Zoom camera: DS-2DZ216MF, DS-2DZ2116, DS-2ZCN2006, DS-2ZCN2007, DS-2ZMN2007, DS-2ZMN2006, and so on
Intelligent traffic camera: (i)DS-2CD91xx、DS-2CD9xx, and so on
3. Intelligent devices
Behavior analysis, ATM protection, automatic tracking, passenger flow counting, face recognition, intelligent traffic event, and so on
4. Other IP devices
CVR, Alarm host, Multi-screen controller , IP module, and so on
Software Name:Device Network SDK (for Windows 64-bit)
Software Size:24.92M
Software Description:
Version: V5.3.1.35
The device network SDK is developed based on private network communication protocol, and it is designed for the remote connection and configuration of embedded DVR, Encoder, IPC and the other IP devices.
The functions supported by the SDK
1. Live view, playback, remote file download, PTZ control, arm/disarm, voice talk, log query, decoding card function, etc.
2. Remote upgrade, remotely reboot, remotely shut down, remotely format hard disk, and device configuration (system configuration, channel configuration, serial port configuration, alarm configuration, users configuration), etc.
It applies to, but are not limited to the following product model:
1. Encoders or decoders
NVR: DS-9600, DS-9500, DS-7700, DS-7600 series;
HDVR: DS-9000, DS-8000-ST, DS-7600 series;
DVR: DS-9100, DS-8100, DS-8000-S, DS-8800, DS-7800, DS-7300, DS-7200, DS-7100, DS-7000 series;
Encoder: DS-6600, DS-6500(-JX), DS-6100, DS-6401HFH, DS-6000 series;
Decoder: DS-6300D(-JX), DS-6400HD(-JX/-T), DS-6500D series
Remarks: including the model of -ST, -SH, -SE, -SN, -RT, -RH, -XT
2. IP cameras or IP speed domes
IPC: standard definition, high definition, the infrared, the thermal, e.g. DS-2CD1xxx series, DS-2CD7xx, DS-2CD71xx, DS-2CD72xx, DS-2CD8xx, DS-2CD81xx, DS-2CD82xx, DS-2CD84xx, DS-2CD83xx, DS-2CD20xx, DS-2CD21xx, DS-2CD22xx, DS-2CD23xx, DS-2CD26xx, DS-2CD30xx, DS-2CD31xx, DS-2CD32xx, DS-2CD33xx, DS-2CD40xx, DS-2CD41xx, DS-2CD42xx, DS-2CD62xx, and so on
IPD: standard definition, high definition, the infrared, e.g. DS-2DE71xx, DS-2DM72xx, DS-2DF72xx, DS-2DF1-7xx, DS-2DF1-6xx, DS-2DE51xx, DS-2DM52xx, DS-2DF52xx, DS-2DF1-5xx, DS-2DF1-4xx, DS-2DM1-7xx, DS-2DM1-6xx, DS-2DM1-5xx, and so on
Zoom camera: DS-2DZ216MF, DS-2DZ2116, DS-2ZCN2006, DS-2ZCN2007, DS-2ZMN2007, DS-2ZMN2006, and so on
Intelligent traffic camera: (i)DS-2CD91xx、DS-2CD9xx, and so on
3. Intelligent devices
Behavior analysis, ATM protection, automatic tracking, passenger flow counting, face recognition, intelligent traffic event, and so on
4. Other IP devices
CVR, Alarm host, Multi-screen controller , IP module, and so on
Hiwatch ds i110 прошивка
Скачать
Клиентское программное обеспечение iVMS-4200
iVMS-4200 3.9.0.4 для Windows 7/8/10/11 x64 NEW!
iVMS-4200 AC 1.9.0.4 для устройств контроля доступа
iVMS-4200 3.3.0.5 для устройств c термографией
iVMS-4200 2.0.0.12 для MacOSX
Утилиты для работы с устройствами по сети
SADP — сетевой сканер.
В этой версии для Windows появилась возможность самостоятельно отвязывать устройство от облачной учетной записи.
BatchConfigTool — утилита для пакетной настройки.
Remote Backup — утилита для резервного копирования архива. Windows 7/8/10
Работа с архивом
Local playback 3.0.1.2 — утилита для работы с накопителями которые были извлечены из устройства
Windows 7/8/10
VS Player — плеер для работы с видео файлами
Плагины и фильтры для просмотра в сторонних плеерах
Калькуляторы и инструменты
Калькулятор битрейта и глубины архива.
Утилита для подбора объективов. Windows 7/8/10
Прошивки для оборудования HiWatch
Системные компоненты
Обновления компонентов DirectX
Microsoft .NET Framework 4.5.1
Распространяемый компонент Microsoft Visual C++ для Visual Studio
Магазин мобильных приложений Hikvision
Device Network SDK (for Windows 32-bit)
V6.1.6.3_build20200925
Скачать
Device Network SDK (for Windows 64-bit)
V6.1.6.3_build20200925
Скачать
Device Network SDK (for Linux 32-bit)
V6.1.6.3_build20200925
Скачать
Device Network SDK (for Linux 64-bit)
V6.1.6.3_build20200925
Скачать
Подписаться на рассылку
Политика по обработке персональных данных
Информация на сайте не является публичной офертой.
Описание товара носит справочный характер.
Производитель оставляет за собой право изменять внешний вид и характеристики товара без предварительного уведомления.
Источник
Ссылки на прошивки для IP камер HikVision
IPC Type A (DM6441 Platform):(фактически бывший IPC Type E)
DS-2CD802PF(NF)(-E)(-W), DS-2CD802P(N)-IR1-5, DS-2CD702PF(NF)-E, DS-2CD812PF(NF)(-E) (-W), DS-2CD812P(N)-IR1-5, DS-2CD712PF(NF)-E, DS-2CD892PF(NF)(-E)(-W), DS-2CD892P(N)-IR1-5, DS-2CD792PF(NF)-E, DS-2CD832F(-E), DS-2CD802NF-E, DS-2CD802NF-E, DS-2CD802/812/892PF, DS-2CD802/812/892PF-D, DS-2CD802/812/892PF-E, DS-2CD812N, DS-2CD812NF, DS-2CD812NF-D, DS-2CD802(P)N-IR1(3.6mm), DS-2CD802(P)N-IR1(6mm), DS-2CD802(P)N-IR3(12mm), DS-2CD802(P)N-IR3(3.6mm), DS-2CD802(P)N-IR3(6mm), DS-2CD802(P)N-IR3(8mm)
IPC Type A V2.0 build 090522 Std H.264 type_A_V2.0_build_090522_Std_H.264.zip
IPC Type A V2.0 build 090715 Std MPEG4 type_A_V2.0_build_090715_Std_MPEG4.zip
IPC Type A V2.0 build 110301 HIK H.264 type_A_V2.0_build_110301_HIK_H.264.zip
IPC Type B (DM6446 Platform):
DS-2CD852F, DS-2CD752F-E, DS-2CD852MF-E, DS-2CD752MF-E, DS-2CD862MF-E, DS-2CD752MF-FB, DS-2CD752MF-FBH, DS-2CD752MF-IFB, DS-2CD752MF-IFBH, DS-2CD762MF-FB, DS-2CD762MF-FBH, DS-2CD762MF-IFB, DS-2CD762MF-IFBH
IPC Type B 2011.09.19 v2.0 build 110426 rtsp IPC Type B 2011.09.19 v2.0 build 110426 rtsp
IPC Type B 2011.11.30 v2.0 build 110426 STD_H264 IPC Type B 2011.11.30 v2.0 build 110426 STD_H264
IPC Type B 2011.12.07 v2.0 build 110902 for intellect IPC Type B 2011.12.07 v2.0 build 110902 for intellect
IPC Type C (DM365 Platform):
DS-2CD833F-E, DS-2CD733F-E, DS-2CD7133-E, DS-2CD8253F-EI, DS-2CD893PF-E, DS-2CD733F-E, DS-2CD7153-E, DS-2CD8253F-E, DS-2CD893NF-E, DS-2CD793PF-E, DS-2CD8133F-E, DS-2CD8254F-EI, DS-2CD893PFWD-E, DS-2CD793PF-EI, DS-2CD8153F-E, DS-2CD8254F-E, DS-2CD8264FWD-EI (S), DS-2CD893NFWD-E, DS-2CD793NF-E, DS-2CD853F-E(W), DS-2CD863PF-E, DS-2CD793NF-EI, DS-2CD863NF-E, DS-2CD793PFWD-E, DS-2CD853F-E, DS-2CD793PFWD-EI, DS-2CD854F-E, DS-2CD793NFWD-E, DS-2CD883F-E, DS-2CD793NFWD-EI, DS-2CD763PF-E, DS-2CD763PF-EI, DS-2CD763NF-E, DS-2CD763NF-EI, DS-2CD753F-E, DS-2CD753F-EI, DS-2CD754F-E, DS-2CD754F-EI, DS-2CD754FWD-E, DS-2CD754FWD-EI, DS-2CD783F-E, DS-2CD864FWD-E, DS-2CD7164-E
IPC Type C 2011.09.22 v3.0 build 110516 std IPC Type C 2011.09.22 v3.0 build 110516 std
IPC Type C 2011.11.17 v3.0 build 110921 std IPC Type C 2011.11.17 v3.0 build 110921 std
IPC Type C 2011.12.01 v3.0 build 110921 sub stream supports MJPEG IPC Type C 2011.12.01 v3.0 build 110921 sub stream supports MJPEG
IPC Type C 2011.12.29 v3.0 build 111130 supports http MJPEG IPC Type C 2011.12.29 v3.0 build 111130 supports http MJPEG
IPC Type C с поддержкой просмотра в разных браузерах
IPC Type C 2012.06.14 V4.0.1 build 120508 std IPC Type C 2012.06.14 V4.0.1 build 120508 std
sub stream supports MJPEG\H.264
IPC Type C 2012.09.04 V4.0.3 build 120821 std IPC Type C 2012.09.04 V4.0.3 build 120821 std
IPC Type C 2012.10.29 V4.0.3 build 121010 std ( cgi + psia + onvif ) IPC Type C 2012.10.29 V4.0.3 build 121010 std ( cgi + psia + onvif )
IPC Type C 2012.12.06 V4.0.3 build 121126 IPC Type C 2012.12.06 V4.0.3 build 121126
IPC Type C 2013.01.25 V4.1.0 build 130111 IPC Type C 2013.01.25 V4.1.0 build 130111
1 прошивка поддерживает русский язык интерфейса
2 исправлена ошибка xml при скачивании архива с флешки
3 добавлена возможность выбирать размер шрифта OSD
4 расширены возможности Up&P
5 добавлен визуальный анализатор в датчике движения
6 добавлена возможность «гостевого» просмотра камеры, без ввода логина\пароля
IPC Type C 2013.05.20 V5.0.0 build 130412 IPC Type C 2013.05.20 V5.0.0 build 130412
добавлен фильр шума для звука «Environmental Noise Filter»
IPC Type C 2013.10.30 V5.0.8 build 130930 IPC Type C 2013.10.30 V5.0.8 build 130930
IPC Type C 2014.01.15 v5.1.0 build 131202 IPC Type C 2014.01.15 v5.1.0 build 131202
описание нововведений, обратите внимание на примечания именно для данной платформы (*for DM365 platform Network Cameras) — Firmware 5.1.0 Release Note
IPC Type C 2015.02.03 v5.2.0 build 140721 IPC Type C 2015.02.03 v5.2.0 build 140721
IPC Type D:
DS-2CD886MF-E, DS-2CD876MF, DS-2CD886BF-E, DS-2CD876BF
type Raptor 2xxx:
все камеры DS-2CD2xxx относятся к данной платформе.
т.к. в линейке Raptor появились новые камеры произошло разделение прошивок. связано с оптимизацией кода для конкретной линейки камер. вся линейка разбита на данный момент по цифрам в названии модели:
type Raptor 2xx0, type Raptor 2xx2, type Raptor 2x10_2x14, type Raptor 2x22_2x42, type Raptor 24x2_25x2.
х означает произвольную цифру. при выборе прошивки нужна точная модель камеры. например для камеры DS-2CD2012-I подойдут прошивки type Raptor 2xxx и type Raptor 2x12_2x32.
type Raptor 2xxx v4.0.8 build 121109 type Raptor 2xxx 2012.12.06 v4.0.8 build 121109
type Raptor 2xxx V4.0.9 build 130106 type Raptor 2xxx 2013.02.20 V4.0.9 build 130106
type Raptor 2xxx V5.0.0 build 130412 type Raptor 2xxx 2013.05.03 V5.0.0 build 130412
прошивка поддерживает русский язык интерфейса
type Raptor 2xxx V5.0.2 build 130805 type Raptor 2xxx 2013.09.06 V5.0.2 build 130805
прошивка поддерживает русский язык интерфейса
ВНИМАНИЕ ! ОБЯЗАТЕЛЬНО ПРОЧЕСТЬ ! type Raptor V5.1.0 build 131202 type Raptor 2013.12.10 V5.1.0 build 131202
при смене прошивки меняется буква в серийном номере. при работе со сторонним ПО, лицензированным по серийному номеру камеры, будут проблемы с лицензией. в таком случае лучше не прошивать эту версию. подробности выясняются.
очень много нововведений в т.ч.:
выбор способа отображения видео:
пока не тестировал всё перечисленное
принудительное отключение ИК подсветки и telnet:
расширен список сервисов динднс:
добавлена функция ROI (regions of interest):
добавлено большое количество настроек изображения в.т.ч. изменение настроек по расписанию:
в настройках детектора движения появились расширенные настройки «эксперт»:
в управлении хранилищем появилась система квот:
описания изменений\доработок пока нет, это перечисление того, что встретилось при беглом изучении прошивки. всех функций протестировать возможности\времени нет, так что пробуем и по возможности отписываемся )
появилось описание нововведений — Firmware 5.1.0 Release Note
type Raptor 2xxx v5.1.2 build 140116 type Raptor 2xxx 2014.03.21 v5.1.2 build 140116
type Raptor 2xxx V5.2.0 build 140721 type Raptor 2xxx 2014.08.02 V5.2.0 build 140721
Firmware 5.2.0 Release Note
type Raptor 2xx0:
type Raptor 2xx0 V5.3.0 build 150513 type Raptor 2xx0 2015.05.13 V5.3.0 build 150513
Revision: V5.3.0 build150513 Release Note в архиве с прошивкой.
type Raptor 2xx2:
type Raptor 2xx2 V5.3.0 build 150327 type Raptor 2xx2 2015.03.28 V5.3.0 build 150327
Firmware V5.3.0 Release Note
Внимательно прочитайте файл с описанием изменений !! нет звука по Onvif !!
прошивку нельзя даунгрейдить средствами штатного ПО, только через TFTP и прошивку версии 5.1, у меня получилось с V5.1.0 build 131202 выложенной выше. дефолтовый адрес камеры изменён на 192.168.1.64.
type Raptor 2xx2 V5.3.0 build 150513 type Raptor 2xx2 2015.05.21 V5.3.0 build 150513
Revision: V5.3.0 build150513 Release Note в архиве с прошивкой.
в этой прошивке не работает воспроизведение записей с флешки в Local PlayBack.
type Raptor 2xx2 V5.3.0 build 151016 type Raptor 2xx2 2015.10.16 V5.3.0 build 151016
полного списка доработок не встречал, исправлена работа с Local PlayBack.
type Raptor 2×10 2×14:
type Raptor 2×10 2×14 V5.3.0 build 150513 type Raptor 2×10 2×14 2015.05.13 V5.3.0 build 150513
совпадает с прошивкой type Raptor 2xx0 V5.3.0 build 150513, но по какой-то причине выделена в отдельную группу. подробностей не знаю, возможно разделили на будущее.
Revision: V5.3.0 build150513 Release Note в архиве с прошивкой.
type Raptor 2×22 2×42:
type Raptor 2×22 2×42 V5.3.1 build 150410 type Raptor 2×22 2×42 2015.04.10 V5.3.1 build 150410
Revision: V5.3.0 build 150513 Release Note в архиве с прошивкой. по неизвестной причине именно это описание приложили к V5.3.1 build 150410.
type Raptor 4xxx:
DS-2CD4012FWD-A, DS-2CD4024F-A, DS-2CD4032FWD-A, DS-2CD4112FWD-IZ, DS-2CD4124F-IZ, DS-2CD4132FWD-IZ, DS-2CD4212FWD-IZ(H)(S), DS-2CD4224F-IZ(H)(S), DS-2CD4232FWD-IZ(H)(S), DS-2cD4312FWD-IZ(H)(S), DS-2CD4324F-IZ(H)(S), DS-2CD4332FWD-IZ(H)(S)
type Raptor 4xxx V5.2.0 build 140721 type Raptor 4xxx 2015.02.03 V5.2.0 build 140721
type Raptor 4xx5:
type Raptor 4xx5 V5.3.0 build 150326 type Raptor 4xx5 2015.03.27 V5.3.0 build 150326
Revision: V5.3.0 build150327 Release Note в архиве с прошивкой. по неизвестной причине именно это описание приложили к V5.3.0 build 150326.
type Raptor 4xx5 V5.3.0 build 150513 type Raptor 4xx5 2015.05.13 V5.3.0 build 150513
Revision: V5.3.0 build 150513 Release Note в архиве с прошивкой.
type Raptor 4xx2 4xx4 6412FWD:
type Raptor 4xx2 4xx4 6412FWD V5.3.0 build 150513 type Raptor 4xx2 4xx4 6412FWD 2015.05.13 V5.3.0 build 150513
Revision: V5.3.0 build 150513 Release Note в архиве с прошивкой.
type Raptor 4x24FWD 4x26FWD 6026FWD:
type Raptor 4x24FWD 4x26FWD 6026FWD V5.3.0 build 150513 type Raptor 4x24FWD 4x26FWD 6026FWD 2015.05.13 V5.3.0 build 150513
Revision: V5.3.0 build 150513 Release Note в архиве с прошивкой.
type Raptor 6xxx:
DS-2CD6332FWD-I(V)(S), DS-2CD6362F-I(V)(S)
type Raptor 6xxx V5.0.9 build 141009 type Raptor 6xxx 2015.02.03 V5.0.9 build 141009
английский язык интерфейса.
Источник
Как обновить ПО камер HiWatch для работы с TRASSIR Cloud?
Перед подключением камер HiWatch к облачному сервису TRASSIR Cloud убедитесь, что на них установлена актуальная версия ПО. При необходимости, обновите программное обеспечение камеры.
Cкачайте актуальную версию ПО.
Если Версия ПО вашей камеры ниже, то обновите ПО камеры по следующей инструкции.
Обновление ПО камер HiWatch
- Откройте в браузере Firefox web-интерфейс камеры.
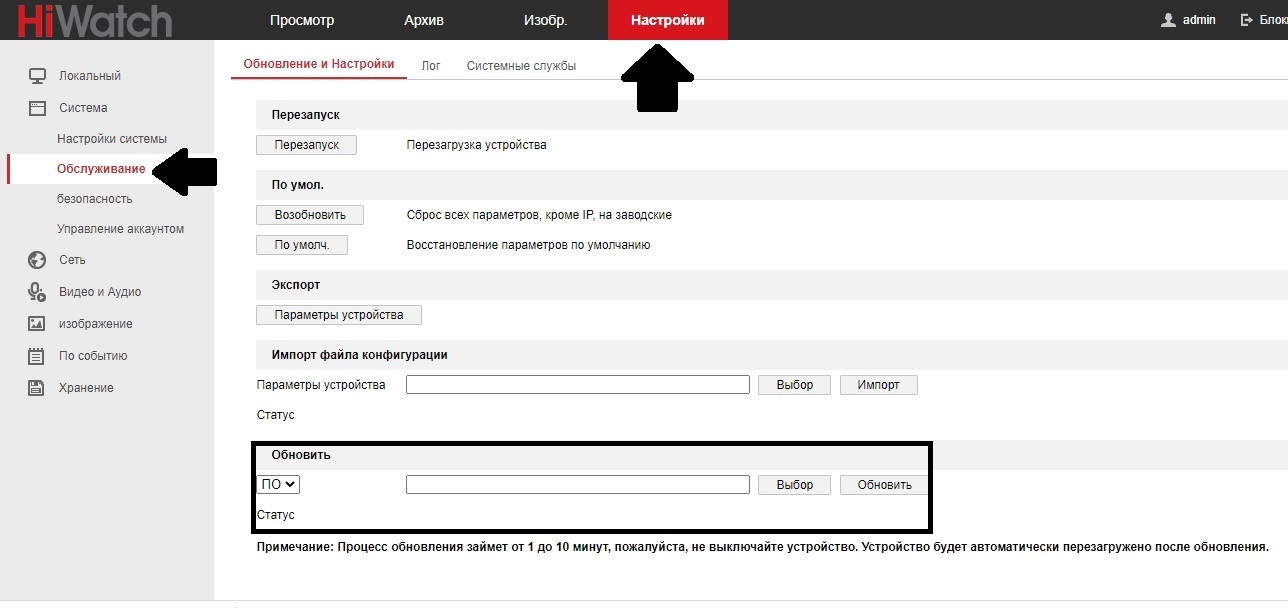
Примечание: обязательно установите новую версию плагина. - Перейдите на вкладку Настройки ->Система ->Обслуживание ->Обновление и Настройки
- В группе настроек Обновить нажмите кнопку Выбор и выберите из архива файл прошивки.

4. Для запуска обновления программного обеспечения IP-камеры нажмите кнопку Обновить.
После обновления программного обеспечения камера перезагрузится.
Источник
Настройка камеры HiWatch DS-I122 под Ростелеком: активация, сброс пароля, прошивка
Идём по пути наименьшего сопротивления
Если сложить все мануалы по настройке видеокамер в сети, то количеством букв в тексте можно было бы опоясать экватор около ста раз. А ведь нужен всего один, самый доступный и максимально понятный — как два байта переслать.
Одной из популярных моделей, устанавливаемых Ростелекомом является купольная IP-видеокамера HiWatch DS-I122. Несмотря на то, что она считается уличной, её вполне можно установить и внутри помещения. Из фишек — детектор движения, оповещение при несанкционированных действиях и механический ИК-фильтр
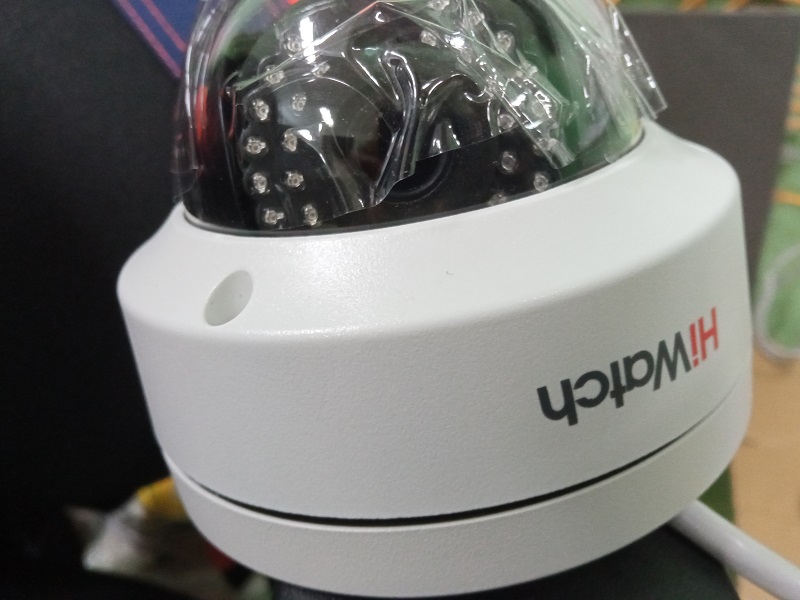
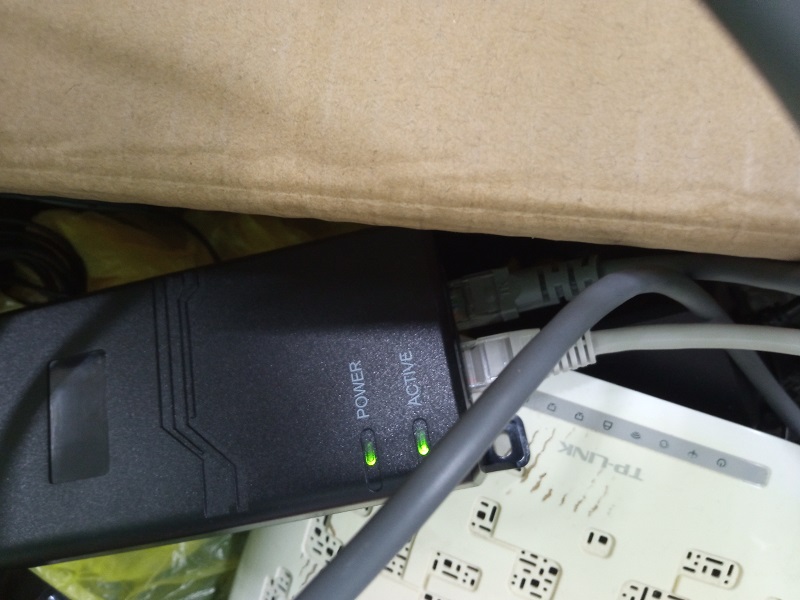
У камеры нет собственного питания, поэтому подключение производится через любой PoE-инжектор: разъем от камеры подключаете витой парой в разъем PoE инжектора. Ноутбук/ПК для настройки подключаете к инжектору к разъему LAN
Активация камеры
Через утилиту SADP
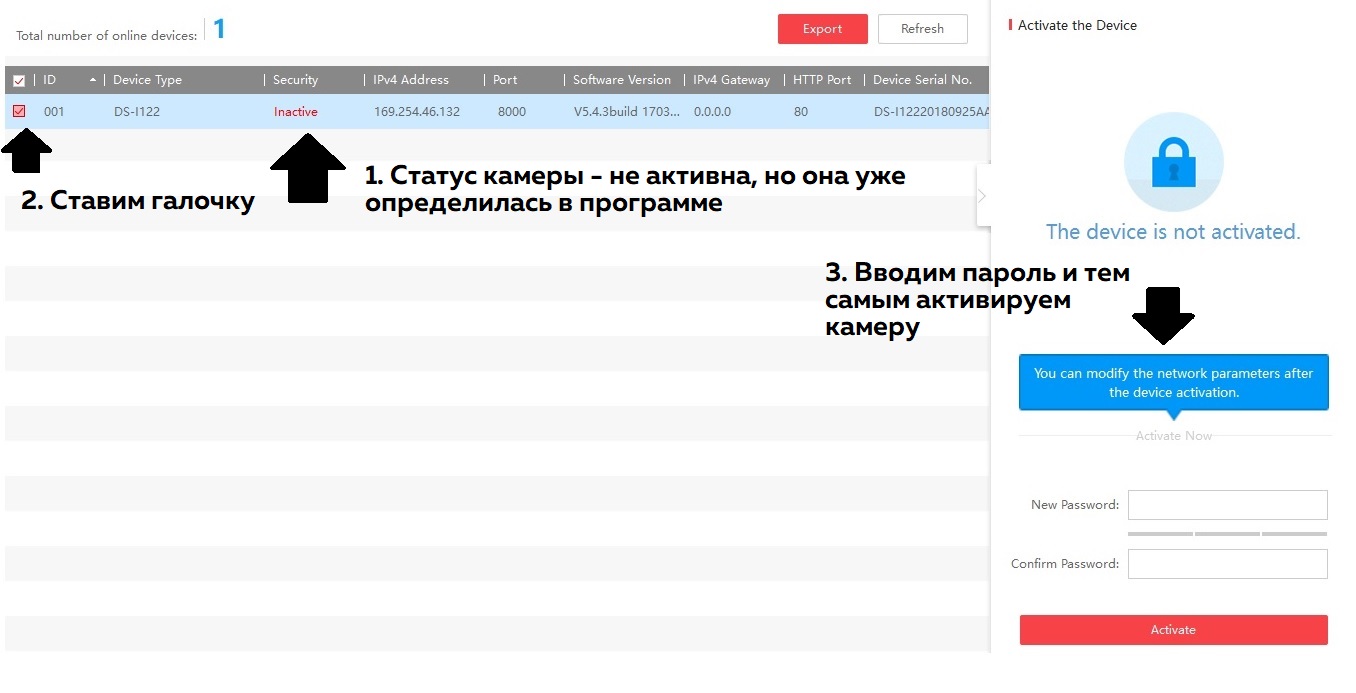
Самый простой способ активировать камеру — это установить инструмент для настройки устройств IP видеонаблюдения компании — сетевой сканер SADP. Скачать можно с нашего Яндекс.Диска. Суть проста: камеру нужно подключить к ноутбуку/ПК и подождать пока она определится в программе. После запуска программы, SADP автоматически сканирует локальную сеть в поисках подключенных устройств, которые затем отображаются в главном окне программы.
Начальный статус камеры — «Inactive«. Ставим галочку в первом столбике и справа появится окно, где мы должны ввести пароль для камеры (это не пароль для личного кабинета, а конкретно для доступа на камеру, в настройки).
Через веб-интерфейс
Самое важное открытие: заходить в веб-интерфейс нужно через IP-адрес, которая получила камера , а не через тот, который указан в инструкции в комплекте с камерой (в бумажной брошюре пишут 192.168.1.64).
Как только вы попадёте на начальный экран веб-интерфейса, вам будет предложено ввести новый пароль. Старый вводить не нужно, его и не должно быть, но если вдруг: по умолчанию для входа используется пара логин/пароль вида admin/admin54321. После того как вы введете новый пароль — камера будет активирована.
Привязка камеры к личному кабинету
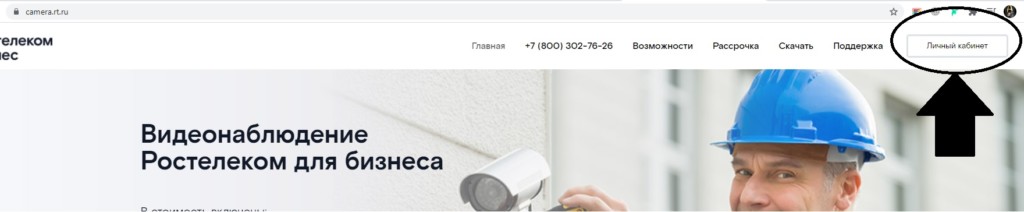
После того как камера активирована, можно привязать её к личному кабинету. Логин и пароль выдаёт оператор (в нашем случае — «Ростелеком»). Зайти в него можно через сайт camera.rt.ru. И нажать на «Личный кабинет» в правом верхнем углу.
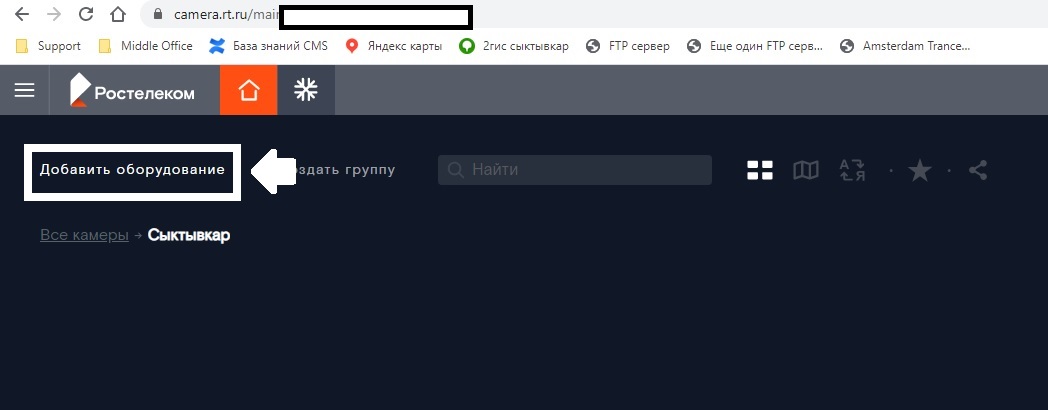
Нас перекинет на страницу «Ростелеком Паспорт«. Туда уже вводим логин и пароль, который предоставил Ростелеком:

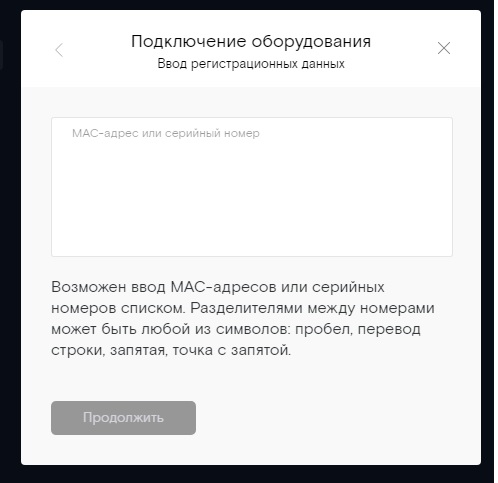
В ЛК нажимаем «Добавить оборудование»
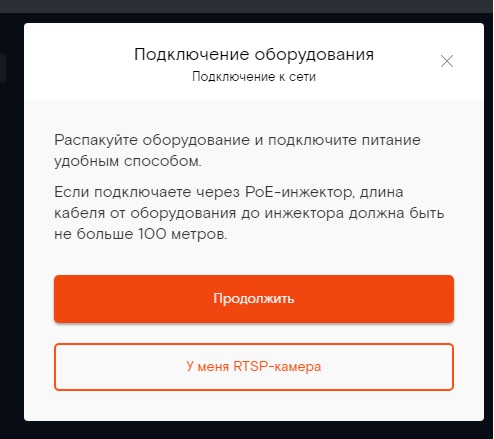
Во всплывающем сразу нажимаем «Продолжить»
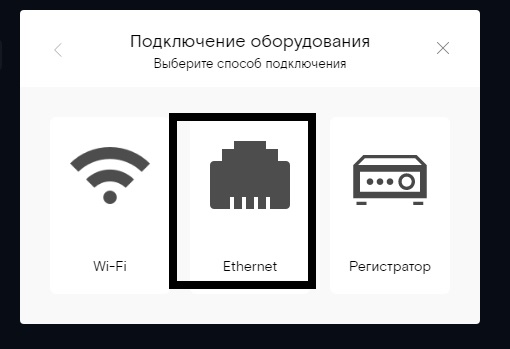
Выбираем способ подключения камеры. У нас это «Ethernet»
Далее вводим мак-адрес или серийный номер (можно посмотреть как в SADP или на корпусе камеры)
Далее пойдет привязка оборудования
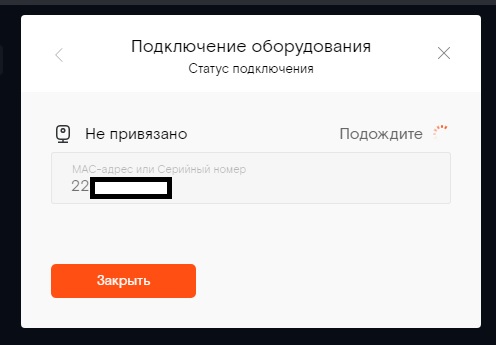
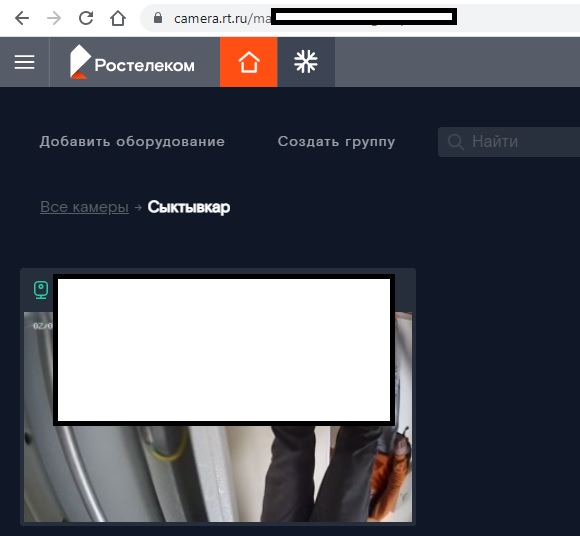
После данной непродолжительной операции, камера добавится в личный кабинет
Если привязка не проходит, первым делом нужно проверить подключение камеры к интернету. Привязка должна происходить, когда камера имеет доступ в интернет, а так же отсутствие блокировки (открытость) портов 80 и 443.
Как делается сброс пароля
Если пароль к камере не подходит, то, скорее всего, при активации камеры (если она была до этого) кто-то ввёл свой пароль. В сети можно много найти инструкций сброса пароля через утилиту SADP. Там действительно есть кнопка «Forgot Password«. Только вот дальше, по инструкции, потребуется отправлять XML-файлы в техподдержку, которая будет скидывать пароль в течение часа или даже дня (Что? Да!). В общем, этот вариант нам точно не подходит.
Мы прибегнем к старому и проверенному методу — хард резет. При резете камера сброситься в состояние «Inactive» (в SADP) и при новой активации вы сможете задать новый пароль
Как делается резет
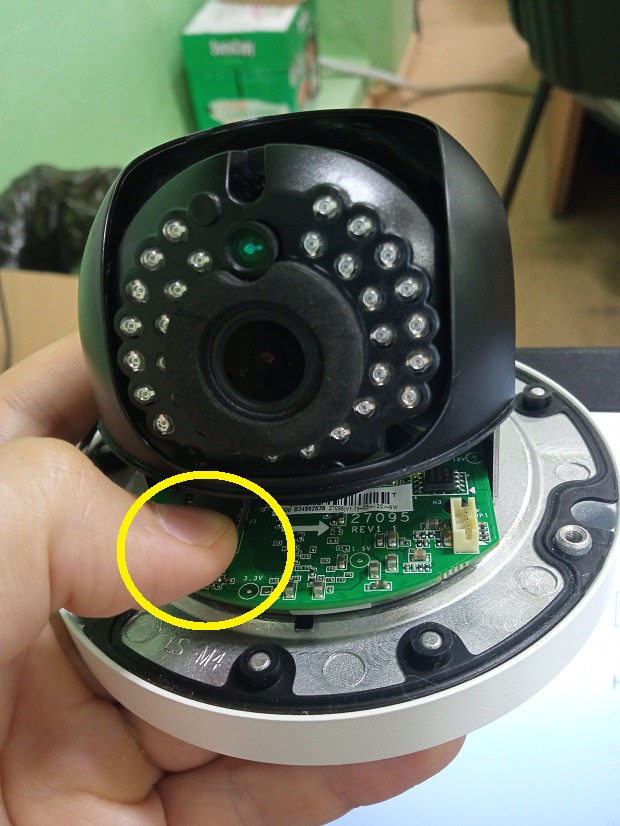
Чтобы сделать резет на конкретно этой модели, её нужно разобрать — кнопка сброса находится внутри корпуса.
- Отключаем питание
- Зажимаем кнопку резет
- Включаем питание, не отжимая кнопку резет
- Ждем 10-12 секунд и отпускаем кнопку
По индикации определять прошел ли сброс довольно проблематично, т.к. она ведёт себя рандомно. Но, как мы уже писали выше — при резете камера сброситься в состояние «Inactive». Если камера активирована и после резета осталась в статусе Active — пробуйте еще.
Прошивка камеры
В разделе «Активация» мы разобрались, что в «ростелекомовскую» камеру пускать через браузер не должно, но если веб-интерфейс открывается, то нужно залить прошивку. Как мы помним, по умолчанию для входа используется admin/admin54321. Но если вы уже активировали камеру через веб-интерфейс или как-то еще, то вы уже вводили «свой пароль» — — вводите его . На стартовом экране вы, изначально, не увидите изображение камеры. Нужно будет установить расширение, которое предложит браузер
Если браузер не предлагает установить нужный плагин, выберите его из меню ниже
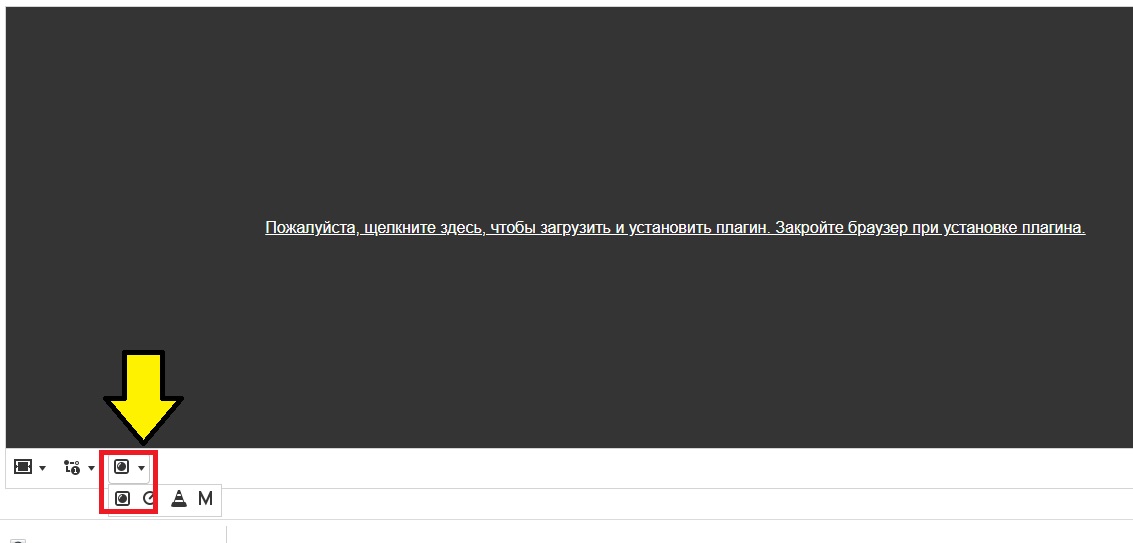
Без установки компонента браузер не даст выбрать файл прошивки: заходим в «Настройки» -> «Обслуживание»
Выбираем файл прошивки в строке «ПО» (если кнопка не реагирует, всё-таки установите расширение, которое предлагает браузер) нажимаем обновить и ждём, пока идёт прошивка. Это займет минут 5-7. Когда в конце будет сообщение о перезагрузки устройства — можете не ждать конца и сразу закрывать браузер, т.к. по текущему айпишнику вы уже до камеры не достучитесь (при резете и/или прошивке камера получает новый IP).
Чем будем прошивать? Всего есть два условия для прошивки:
- Версия прошивки может быть такой же, но билд (build) должен быть выше
- Версия прошивки желательно выше, чем текущая
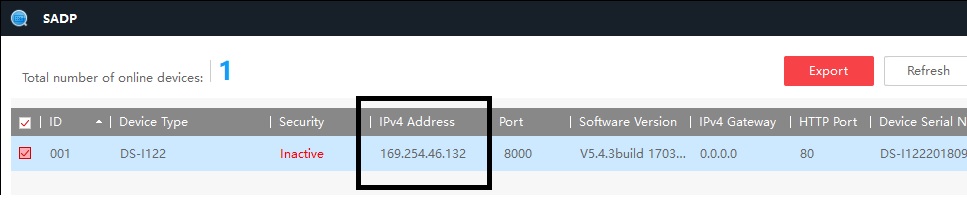
Текущая версия прошивки и её билд можно посмотреть, опять же, в SADP

Прошивки для HiWatch DS-I122
Данные прошивки так же подойдут для моделей DS-I114W, DS-I120, DS-I126, DS-I128, DS-I223, DS-N201, DS-N211, DS-N241, DS-N241W
- Версия 5.3.0 build 181217 — Скачать
- Версия 5.3.5 build 170123 — Скачать
- Версия 5.4.3 build 170519 — Скачать
После прошивки
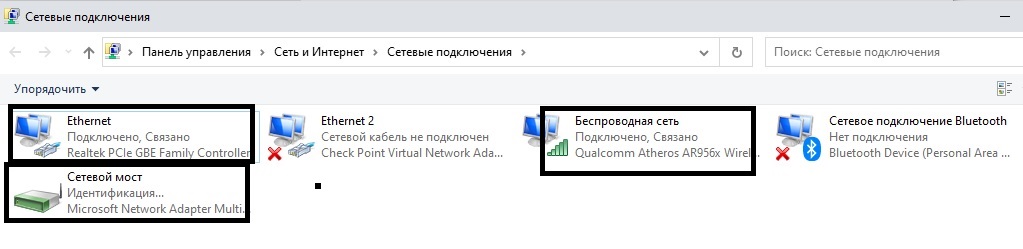
После процесса прошивки необходимо снова попробовать добавить камеру в личном кабинете РТК. Не забывайте, что камера должна иметь доступ в интернет в момент привязки. Есть один нюанс: если вы делаете привязку камеры через ноутбук (выходите в интернет через wi-fi), в то время, как камера подключена через ethernet-кабель в тот же ноутбук, то необходимо создать сетевой мост между беспроводным и проводным подключением, чтобы камера была доступна в сети (правой кнопкой на подключении «Настройка Моста»)
Сделайте мост между беспроводным и проводным подключением
Теперь камера будет доступна извне и привязка будет сделана. Проблема актуальна только если нет второго канала связи (роутера или маршрутизатора под рукой)
Источник
| Модель камеры | Актуальная версия ПО | Скачать |
|---|---|---|
| HiWatch DS-I120 HiWatch DS-I122 HiWatch DS-I114 HiWatch DS-I114W HiWatch DS-I126 HiWatch DS-I128 HiWatch DS-I220 HiWatch DS-I223 HiWatch DS-N201 HiWatch DS-N211 HiWatch DS-N241 HiWatch DS-N241W HiWatch DS-N291W |
The company’s project uses Hikvision’s camera monitoring equipment, and the project requires the integration of the camera’s playback screen in our B/S system. Therefore, through the communication with Hikvision staff and the articles of some people on the Internet, we realized preview and playback on our own webpage.
1. Hikvision SDK
Hikvision’s video surveillance equipment includes network cameras, network hard disk video recorders (NVR), etc. These devices all come with a small system, you can view the monitoring screen and modify the device information by entering the IP of the device on the browser.
as the picture shows.
In fact, Hikvision’s webcams have a lot of built-in functions, but it’s a little inconvenient to manage many webcams in batches, and they don’t meet project requirements, so you have to develop them yourself according to your needs.
The main function of NVR is to receive the digital video stream transmitted by IPC (network camera) equipment through the network, and to store and manage it, so as to realize the advantages of distributed architecture brought by network. Simply put, through Nvr, you can watch, browse, playback, manage, and store multiple network cameras at the same time. Get rid of the ties of computer hardware, and no longer have to face the cumbersome installation of software. If all cameras are networked, the only way is to have a centralized management core.
NVR has 16/32/64 channels, that is, it supports up to 64 channels of video and audio signal access. We connect the camera to the NVR through a network cable, and then the camera can be used as a signal input of the NVR by adding a device in the NVR, and the device will occupy a channel. So far we can realize the monitoring picture preview of the camera only through NVR. The output of the web camera is an analog signal, and the NVR converts the analog signal of the camera into a digital signal.
At this time, enter the NVR’s IP through the browser to enter the NVR system, you can see that the preview page and the playback page have a device list, and the selected device can be previewed or played back. There are more calendars on the playback page, and the green mark indicates that there is video information stored on the day and can be played.
To help customers realize the integration of customized surveillance video real-time preview function, Hikvision provides two SDKs for the development of C/S architecture and B/S architecture.
1 SDK of C/S architecture
Hikvision provides the SDK for C/S architecture in the official website [Download] -> [SDK Development]. I downloaded «Device Network SDK_Win64». It says on the download page:
The device network SDK is developed based on the device’s private network communication protocol. It is a supporting module for back-end devices (embedded network hard disk recorders, video servers), front-end devices (network cameras, network dome cameras, IP modules) and other product services. The secondary development of remote access and control equipment software.
In the decompressed folder, the library files are stored in Haikang’s packaged library files. These are imported into the project and are the conditions for the SDK to run. If these files are not imported, then the SDK files in the Demo program An error will be raised. For details, please refer to «HCNetSDKCom folder must be loaded into project.txt» in SDK
1.1 Use of SDK
There are demos of MFC, Java and C# in the package. I use C#, here is an introduction and summary of C#.
1. Log in to the camera for direct preview.
2. Log in to CVR, NVR, preview the input signal in this, etc.
……
For other functions, just take a look at the code. If the attributes or functions are not clear, you can check the development documentation and the SDK manual, which have instructions.
The basic usage of SDK is:
1. «CHCNetSDK.cs». Hikvision provides a static class «CHCNetSDK.cs», which contains various methods for various devices, as well as various data structures and attributes suitable for different methods.
2. How to use it in Winform background code (part of the code, only for interpretation)
`
    private uint iLastErr = 0; //error code
	 private Int32 m_lUserID = -1;//Login handle
	 private bool m_bInitSDK = false;//sdk initialization result
	 private bool m_bRecord = false;//Whether to record
	 private Int32 m_lRealHandle = -1;//Preview handle

 m_bInitSDK = CHCNetSDK.NET_DVR_Init(); // 1 initialization
 m_lUserID = CHCNetSDK.NET_DVR_Login_V30(DVRIPAddress, DVRPortNumber, DVRUserName, DVRPassword, ref DeviceInfo); // 2Login the device Login the device. Before login, define the parameters first. Among them, DeviceInfo is passed by reference. In this way, in the Login method, the device information is obtained and assigned to DeviceInfo. The information contained refers to the NET_DVR_DEVICEINFO_V30 structure; if the login is successful, it will return a value greater than zero, otherwise it will return -1.

	 if(m_lUserID <0) //not logged in
        {
            MessageBox.Show("Please login the device firstly");
            return;
        }

                 if (m_lRealHandle <0) //The initial value is -1, which means no preview
        {
            CHCNetSDK.NET_DVR_PREVIEWINFO lpPreviewInfo = new CHCNetSDK.NET_DVR_PREVIEWINFO();
                         lpPreviewInfo.hPlayWnd = RealPlayWnd.Handle;//Preview window
                         lpPreviewInfo.lChannel = Int16.Parse(textBoxChannel.Text);//Preview the device channel
                         lpPreviewInfo.dwStreamType = 0;//Stream type: 0-main stream, 1-sub stream, 2-stream 3, 3-stream 4, and so on
                         lpPreviewInfo.dwLinkMode = 0;//Connection mode: 0- TCP mode, 1- UDP mode, 2- multicast mode, 3- RTP mode, 4-RTP/RTSP, 5-RSTP/HTTP
                         lpPreviewInfo.bBlocked = true; //0- non-blocking access, 1- blocking access
                         lpPreviewInfo.dwDisplayBufNum = 15; //The maximum number of frames buffered in the playback buffer of the playback library

                         CHCNetSDK.REALDATACALLBACK RealData = new CHCNetSDK.REALDATACALLBACK(RealDataCallBack);//Preview real-time stream callback function
                         IntPtr pUser = new IntPtr();//User data

                         //Open the preview Start live view
            m_lRealHandle = CHCNetSDK.NET_DVR_RealPlay_V40(m_lUserID, ref lpPreviewInfo, null/*RealData*/, pUser);
            if (m_lRealHandle < 0)
            {
                iLastErr = CHCNetSDK.NET_DVR_GetLastError();
                                 str = "NET_DVR_RealPlay_V40 failed, error code = "+ iLastErr; //Preview failed, output error number
                MessageBox.Show(str);
                return;
            }
            else
            {
                                 //Preview successful
                btnPreview.Text = "Stop Live View";
            }
        }
        else
        {
                         //Stop preview Stop live view
            if (!CHCNetSDK.NET_DVR_StopRealPlay(m_lRealHandle))
            {
                iLastErr = CHCNetSDK.NET_DVR_GetLastError();
                str = "NET_DVR_StopRealPlay failed, error code= " + iLastErr;
                MessageBox.Show(str);
                return;
            }
            m_lRealHandle = -1;
            btnPreview.Text = "Live View";

        }
        return;
	}
`
The method «NET_DVR_RealPlay_V40» in the code is a real-time preview method for Hikvision cameras and supports multi-stream playback. Haikang provides this method call, and we only need to define the playback parameters when using it, such as which window to play in
lpPreviewInfo.hPlayWnd = RealPlayWnd.Handle;//Preview window live view window
It’s basically a logic above. It’s pretty simple. However, there may be different methods for different devices. You can refer to the development documentation and SDK manual to search for more. For example, I spent a long time looking for a method to call when obtaining the hard disk space of the NVR.
		//WorkStates is a structure defined by myself to easily get the results I want.
		WorkStates workStates = new WorkStates()
        { totalUsedSpace = 0,
            totalSpace = 0,
            HardDiskStatic = 0,
            AlarmOutStatic = 0,
            DeviceStatic = 0,
            iErrCode = 0,
            iLastErrStr = string.Empty
        };

        var result = new CHCNetSDK.NET_DVR_WORKSTATE();
        CHCNetSDK.NET_DVR_DISKSTATE[] struHardDiskStatic = new CHCNetSDK.NET_DVR_DISKSTATE[33];
        if (!CHCNetSDK.NET_DVR_GetDVRWorkState(m_lUserID, ref result))
        {
            iLastErr = CHCNetSDK.NET_DVR_GetLastError();
            workStates.iErrCode = iLastErr;
            workStates.iLastErrStr = FetchDescription((GlobalErrorCode)iLastErr);
            return workStates;
        }
1.2 Application of SDK in the project
The use of C/S architecture SDK is mainly used for the following tasks:
- Call the camera to take a picture when the system detects an abnormality
- Regularly check the hard disk storage space of the NVR device to ensure the storage of video files.
After analysis, the above two requirements must be implemented by means of background services.
However, Hikvision’s SDK is suitable for Winform controls. When writing WCF services, it cannot be called directly due to those external dll references. Therefore, we encapsulated Hikvision controls once and generated a dll. We use a user winform control in the dll to replace the winform form to call various methods of Haikang. Then in the project, a thread service was built, and colleagues referenced and called this dll. Realize the function of regularly obtaining the hard disk storage space of the NVR.
 public class NVRSpaceMonitorFactory
{
    public static void Start()
    {
        try
        {
                         List<NVR> nvrList = NVR.FindAllEnabled(); //Here NVR and Alarm are both EF entities in the project,
            if (nvrList != null && nvrList.Count > 0)
            {
                UCHKVideo ucVideo = new UCHKVideo();
                foreach (NVR nvr in nvrList)
                {
                    int nvrid = nvr.ID;
                    Alarm alarm = new Alarm()
                    {
                        DeviceID = nvr.ID,
                        BusinessType = 8
                    };
                    UCHKVideo.LoginState loginResult = ucVideo.NVRLogin(nvr.IPAddress, nvr.ClientPort.ToString(), nvr.UserName, nvr.Password);
                                         if (loginResult.bInitSDK != -1) //Plugin login failed
                    {
                        UCHKVideo.WorkStates result = ucVideo.GetNVRWorkState();
                        ucVideo.LogOut();
                                                 if (result.iErrCode == 0) //result.totalSpace!=0 means successful acquisition
                        {
                            NVRSpaceHistory nvrSpaceRecord = new NVRSpaceHistory();
                            nvrSpaceRecord.NVRID = nvrid;
                            nvrSpaceRecord.UsedSpace = result.totalUsedSpace;
                            nvrSpaceRecord.UpdateTime = DateTime.Now;
                            nvrSpaceRecord.Insert();
                            // if (nvr.TotalSpace != result.totalSpace)
                            {
                                                                 nvr.IsEnable = true; //If true is not set, it will be false off, and it will be processed temporarily
                                nvr.UsedSpace = result.totalUsedSpace;
                                nvr.TotalSpace = result.totalSpace;
                                nvr.AlarmOutStatic = (int)result.AlarmOutStatic;
                                nvr.DeviceStatic = (int)result.DeviceStatic;
                                nvr.HardDiskStatic = (int)result.HardDiskStatic;
                                nvr.Update();
                                                                 //Write information into the database alarm table (alarm from the system) IP, name, alarm information
                                                                 List<V_Alarm_Rule> alarmRuleList = V_Alarm_Rule.FindAllBySubSystemName("Video Monitoring");
                                if (alarmRuleList != null && alarmRuleList.Count > 0)
                                {
                                    foreach (V_Alarm_Rule ar in alarmRuleList)
                                    {
                                        double thresholdValue = 0;
                                        double.TryParse(ar.Value, out thresholdValue);
                                        if (!string.IsNullOrEmpty(ar.AlarmCondition) && thresholdValue != 0)
                                        {
                                            int compareResult = (nvr.UsedSpace / nvr.TotalSpace).CompareTo((decimal)thresholdValue);
                                            var comperaResultEnum = (CompareResult)compareResult;
                                            var comperaResultStr = UCHKVideo.FetchDescription(comperaResultEnum);
                                            if (ar.AlarmCondition.Contains(comperaResultStr))
                                            {
                                                                                                 alarm.Content = "NVR hard disk storage space is insufficient" + (thresholdValue * 100).ToString() + "%";
                                                alarm.AlarmTime = DateTime.Now;
                                                alarm.Insert();
                                            }
                                        }
                                    }
                                }
                            }
                        }
                        else
                        {
                                                         //If the acquisition fails, write the information into the database alarm table (alarm from the system) IP, name, alarm information
                                                         Log4netHelper.Error(nvr.Name + "_" + nvr.IPAddress + "_" + result.iLastErrStr); //Test
                            alarm.Content = result.iLastErrStr;
                            alarm.AlarmTime = DateTime.Now;
                            alarm.Insert();

                        }
                    }
                    else
                    {
                                                 //If the login fails, write the information into the database alarm table (alarm from NVR) IP, name, alarm information
                                                 Log4netHelper.Error(nvr.Name+"_"+nvr.IPAddress+"_"+ loginResult.iLastErrStr); //Test
                        alarm.Content = loginResult.iLastErrStr;
                        alarm.AlarmTime = DateTime.Now;
                        alarm.Insert();
                    }
                }
            }
        }
        catch (Exception ex)
        {
            Log4netHelper.Error(ex.Message);
        }
    }
}
Regarding the background service, I will make a special summary later, so stay tuned. In short, Haikang’s C# SDK is quite simple. Refer to the SDK and development documents to achieve the functions you want. The place where there is a pitfall is the instantiation of some method parameters. Because you don’t know how to set the parameters, it will always cause an exception when calling the method. You need to know more about the information related to this method.
The following is an example of using MFC.
Secondary development (run) of Demo in Hikvision webcam SDK-Tyrant gold’s blog-CSDN blog https://blog.csdn.net/qq_15029743/article/details/79733960
SDK for B/S architecture
There are several ways to preview the camera screen in real time in the browser.
You can refer to the following blog post (only added to make the article look complete).
Capture rtsp stream camera to browser real-time playback program-write life-CSDN blog
Capture rtsp stream camera to browser real-time playback solution
What we did in the project was to integrate Hikvision’s real-time preview and playback in the WEB system. Therefore, after some research on Hikvision equipment, we found that Hikvision has a JS language SDK. After consulting, Haikang Kangwei’s technicians provided this SDK.
docSDK documentation is placed in the folder. It is recommended to learn about the SDK documentation first.
DemoThere are examples.webVideoCtrl.jsIt is the API of Hikvision’s plug-in WebComponentsKit.exe to control hardware devicesdemo.jsInside is the encapsulated method, import this file, you can use it directly. Hikvision’s API functions are quite complete, just need to install plug-ins. Installing the plug-in means you need to use the IE browser (Trident kernel). This is very uncomfortable. Chrome believes that the plug-in is insecure and has completely stopped the installation of the plug-in, so it is impossible to use the Chrome browser to preview the live image.
Hikvision cameras can be previewed on Chrome by logging in to the IP. I think this should be a video stream conversion. But I haven’t studied this method.
The calling sequence of the entire api is shown in the figure below.
var iRet = WebVideoCtrl.I_CheckPluginInstall();// 1 Check if it is installed

 // 2. Initialize the plug-in parameters and insert the plug-in. I put a return result in it, and make a judgment when calling
function clickInitPlugin(iWndowType, divPlugin) {
         var isSuccess = false; //The result used to return
    WebVideoCtrl.I_InitPlugin("100%", "100%", {
                 bWndFull: true, // Whether to support single-window double-click full screen, the default support true: support false: not support
        iPackageType: 2,    // 2:PS 11:MP4
        iWndowType: iWndowType,
        bNoPlugin: true,
        cbSelWnd: function (xmlDoc) {
          ……
        },
        cbDoubleClickWnd: function (iWndIndex, bFullScreen) {
          ……
        },
        cbEvent: function (iEventType, iParam1, iParam2) {
            ……
        },
        cbRemoteConfig: function () {
          ……
        },
        cbInitPluginComplete: function () {
            WebVideoCtrl.I_InsertOBJECTPlugin(divPlugin);

                         // Check if the plugin is up to date
            if (-1 == WebVideoCtrl.I_CheckPluginVersion()) {
                                 alert("A new player version is detected, please install the latest WebComponentsKit.exe upgrade!");
                return isSuccess;
            }
            isSuccess = true;
        }
    });
    return isSuccess;
}
 ///3, login
var iRet = WebVideoCtrl.I_Login(szIP, 1, szPort, szUsername, szPassword, {
    success: function (xmlDoc) {
                 showOPInfo(szDeviceIdentify + "Login successfully!");

        $("#ip").prepend("<option value='" + szDeviceIdentify + "'>" + szDeviceIdentify + "</option>");
        setTimeout(function () {
            $("#ip").val(szDeviceIdentify);
                         getChannelInfo();//Get channel
                         getDevicePort();//Get the port
        }, 10);
    },
    error: function (status, xmlDoc) {
                 showOPInfo(szDeviceIdentify + "Login failed!", status, xmlDoc);
    }
});
 // 4 Preview by IP and port number
function clickStartRealPlay(szIP, szPort, iChannelID) {
var oWndInfo = WebVideoCtrl.I_GetWindowStatus(g_iWndIndex),
    szDeviceIdentify = szIP,
    iRtspPort = szPort,
    bZeroChannel = false,
    szInfo = "",
         iStreamType = 1;// main stream
if ("undefined" === typeof iStreamType) {
    iStreamType = parseInt($("#streamtype").val(), 10);
}
var startRealPlay = function () {
    WebVideoCtrl.I_StartRealPlay(szDeviceIdentify, {
        iRtspPort: iRtspPort,
        iStreamType: iStreamType,
        iChannelID: iChannelID,
        bZeroChannel: bZeroChannel,
        success: function () {
         ……
        },
        error: function (status, xmlDoc) {
           ……
        }
    });
};
if (oWndInfo != null) {// Already playing, resume; this place can control the logic by itself. If it is playing, stop the play window and play again.
     WebVideoCtrl.I_Stop({
         success: function () {
             startRealPlay();
         }
     });
} else {
    startRealPlay();
}
}
}
For other methods, you can look at the documentation and demo.
The final result I made. Preview and playback can be achieved. The replayed calendar is written by imitating Haikang’s system. It will query whether there is video data in the last month by default, and mark the green triangle if there is.
Say some sdk problems in js language:
- Because the XActive plug-in needs to be installed, the ZIndex of the player window after initialization is the highest. Any controls on the browser will be under it.
- It is a version issue. A webVideoCtrl.js has a version number, which must be the same version as the WebComponentsKit plugin. Currently, Haikang does not provide the latest version of api.
- Only one player page can be initialized on the same page. Therefore, if there is a play window on the original page, it cannot be initialized again by the modal method. The characteristic of the modal box is to share a page with the original page.
- safe question. At present, many surveillance pictures are installed in the local area network of the security department, and only the security department can see the video data. After the video playback function is integrated into the Web system, it realizes remote monitoring and can be checked at any time. Now if this system is connected to the security system of the Security Branch, if security is not paid enough attention to, some people can view the video screen by means of caching, stealing passwords, etc.
- When the method is called, the methods of checking whether the plug-in is installed and whether it is initialized can be encapsulated once. The true/false method can optimize the code streamlining when the code is called.
- In addition, when calling login and other methods, it will take a long time to get the «failure» message back if you cannot successfully log in. Should make a «xx please wait» mask to improve user experience.
How to check the IP of Hikvision camera and reset password
Hikvision provides an application to query the connected video surveillance equipment. Through this application, all Hikvision video devices under the same local area network as the host computer can be searched.
You can see the model and parameters of each device on the page. The key parameters are: IP, client port number, HTTP port number (used by the browser). If you forget your account and password, you can reset it by entering the administrator password on the right, or modify other parameters. The account is usually «Admin».
After selecting the device, you can click [Forgot Password] in the lower right corner -> [Official Official Account to Obtain Secret Key] -> [Import and Reset]
1 keyi chongfu denglu
2 bixu xian denglu caineng yulanhuozhehuifang
Hikvision Headquarters
No.555 Qianmo Road, Binjiang District, Hangzhou 310051, China
+86-571-8807-5998
Hikvision Africa
Building 2, Waverley Office Park, 39 Scott Street, Bramley, Johannesburg, South Africa
+27 877018113 / +27 877018111
Hikvision Azerbaijan LLC
Landmark III Building, 90A Nizami Street, Baku, Azerbaijan
+994 12 310 13 33
Hikvision Czech Republic
BETA Building, Vyskočilova 1481/4, Prague 4, Czech Republic
+420 29 6182640
Hikvision Canada
4848 Levy Street, Saint-Laurent, Quebec H4R 2P1, Canada
+1-855-655-9888 (Toll-free)
Hikvision Europe
Dirk Storklaan 3, 2132 PX Hoofddorp, The Netherlands
+31-23-5542770
Hikvision France
6 Rue Paul Cézanne, 93360 Neuilly-Plaisance, France
+33(0)1-85-330-450
Hikvision Germany
Flughafenstrasse 21, 63263 Neu-Isenburg(Zeppelinheim), Deutschland.
sales.dach@hikvision.com
Hikvision Hong Kong Sales Office
Room 1702, Tower 2, Enterprise Square, 9 Sheung Yuet Road Hong Kong,Kowloon Bay
sales.hk@hikvision.com; support.hk@hikvision.com
Hikvision Hungary KFT.
1031 Budapest, Reichl Kálmán utca 8.
Graphisoft Park, South Park, Block C, 1st Floor.
info.hu@hikvision.com
Hikvision India
Head Office
Prama Hikvision India Pvt. Ltd.
Oberoi Commerz 2, International Business Park, 18th Floor,
Near Oberoi Mall, Off W. E. Highway, Goregaon (East), Mumbai – 400 063.
Manufacturing Facility
Prama Hikvision India Pvt. Ltd.
Hira Industrial Park, Lotus Building, Off Nh — 8, Vasai Phata, Pelhar,
Vasai East, Palghar, Maharashtra, 401208
+91-22-6855 9944 (Sales); +91-22-6822 9999, 3322 6060, 2846 9999 (Technical Support)
Hikvision Indonesia
APL Tower Floor 22nd Unit 9
Jl. Letjend S. Parman Kav. 28
West Jakarta 11470 — Indonesia
+6221 2933 9366 / +6221 2933 7659
Hikvision Israel
1st. Hasadna St. Or Yehuda Israel
+972-79-5555590
Hikvision Italy
Via Abruzzo 12, 31029 Vittorio Veneto Treviso, Italy
+39-0438-6902
HIKVISION JAPAN株式会社
東京都港区港南3-8-1 森永乳業港南ビル4F
SALES.JP@HIKVISION.COM
Hikvision Kazakhstan
050010 Kazakhstan, Almaty, Dostyk ave. 38, of. 303c
+7 (727) 291-75-88, 973-06-67
Hikvision Korea
14-1, Pangyoyeok-ro 192beon-gil, Bundang-gu, Seongnam-si, Gyeonggi-do, Korea
+82-1661-8138
Hikvision Latam
Praça Professor José Lannes, 40 — 15º andar
Cidade Monções, São Paulo — SP
latam.sales@hikvision.com; latam.support@hikvision.com
Hikvision Malaysia
301, Level 3 of Menara LGB,No. 1 Jalan Wan Kadir, Taman Tun Dr. Ismail, 60000 Kuala Lumpur
+60327224000
Hikvision Middle East & North Africa
52nd floor, Almas Tower, Jumeirah Lakes Towers, Dubai, UAET
+971-4-4432090/ +971-4-8816057
Hikvision Oceania
Sydney Unit 14a, 2 Eden Park Dr, Macquarie Park NSW 2113 Melbourne Unit 12, 475 Blackburn Rd, Mt Waverley, VIC 3149
salesau@hikvision.com
Hikvision Philippines
37th Floor, Joy Nastalg Center, No.17 ADB Avenue, Ortigas Center, Pasig City, Metro Manila, Philippines
sales.ph@hikvision.com
Hikvision Poland
Hikvision Poland, Business Garden, Żwirki i Wigury 16B, 02-092 Warsaw
+48 22 460 01 50
Hikvision Romania
Riverside Tower, Splaiul Independentei 291-293, District 6, 060204 Bucharest
marketing.ro@hikvision.com
Hikvision Russia
125315, Russian Federation, Moscow, Leningradsky prospect, 72, building 4, floor 9.
125315 г. Москва, Ленинградский пр-т, д.72, корп. 4, этаж 9.
+7-495-669-67-99
Hikvision Singapore
438B ALEXANDRA ROAD, #06-04, ALEXANDRA TECHNOPARK TOWER B, SINGAPORE 119968
+65 6684 4718
Hikvision Spain
Almazara, 928760 Tres Cantos (Madrid), Spain
+34 91 737 16 55Fax: +34 918 058 717
Hikvision Thailand
202 Le Concorde Building , 8th floor , Room no. 804 , Ratchadapisek Road, Huaykhwang , Huaykhwang , Bangkok 10310 , Thailand
sales.thailand@hikvision.com
Hikvision Turkey
İSTANBUL MERKEZ:
Fatih Sultan Mehmet Mah. Poligon Cad. Buyaka 2 Sitesi, 3 Blok, 8C 102, ÜMRANİYE / İSTANBUL / TÜRKİYE.
ANKARA ŞUBESİ:
Mustafa Kemal Mah. Tepe Prime İş Merkezi, No.: 266, B Blok Kat:18 Kapı No: 132-133, ÇANKAYA / ANKARA / TÜRKİYE.
+90 216 521 70 70 (71/72/73/74); +90 312 220 34 25
Hikvision Uzbekistan
107 B, Amir Temur street, Yunusabad district, Tashkent city, Uzbekistan
+998-71-233-55-50
Hikvision UK & Ireland
4 The Square, Stockley Park, Uxbridge, UB11 1ET
+44(0)1628 902 140 or info.uk@hikvision.com
Hikvision USA
18639 Railroad Street, City of Industry, California 91748
+1-909-895-0400
Hikvision Vietnam
38th Floor, Keangnam Hanoi Landmark Tower, Me Tri Ward, Nam Tu Liem District, Ha Noi City
+84 24 7300 7586