
Если понадобилось удалить встроенный защитник Windows, например он удаляет кряк и не дает активировать систему или просто хотим установить свой любимый антивирус которому мы доверяем больше и лишних процессов нагружающих систему нам не нужно.
Что нам даст удаление Защитника Windows? Удалив защитник мы освобождаем системные ресурсы, решим вопрос с удалением фалов без спроса, а также избавимся от “дырявого” антивируса, главное не забыть заменить его на надежный.
И так удалив Windows Defender Мы:
- – Ускорим работу компьютера так как освободим ресурсы процессора и оперативную память, это особенно актуально для старых ПК да и новым не помешает.
- – Решим вопрос с активаторами системы и удалением файлами, которые перестанут бесследно пропадать без вашего ведома.
- – Освободим примерно 600 Мб., дискового пространства, немного, но возможно для кого-то и это хорошо.
Назвать защитника надежным нельзя, особенно вспоминая случай заражения хостинга сайта вредоносом который был замечен защитой самого хостинга. А чем был занят антивирус Windows в это время, наверное, отсылал отчеты в Microsoft.
Удалить защитник windows средствами самой системы не получиться, так как его удаление не предполагается. Для удаления защитника воспользуемся программой от стороннего разработчика.
Ссылка на официальный сайт утилиты вот тут.
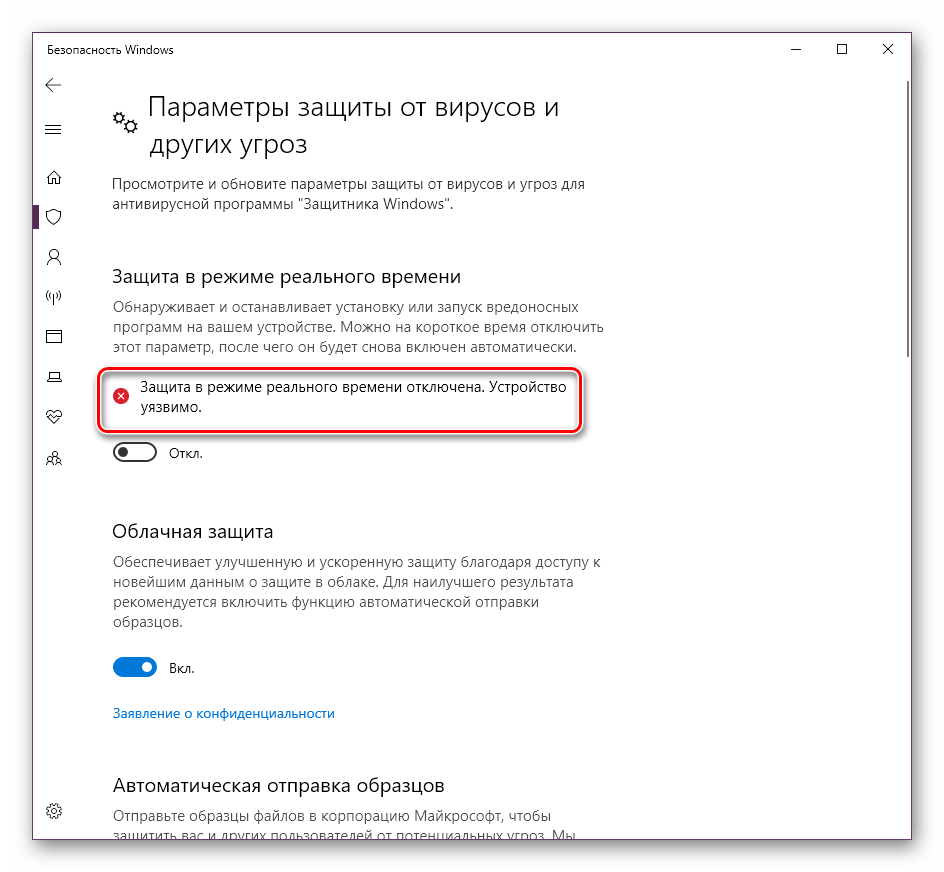
Перед началом удаления нам нужно отключить функцию “Защита от подделки”.
Кликнув по защитнику, попадаем в главное окно “Кабинет”, жмем по иконке со щитом “Защита от вирусов и угроз”.

Пункт “Параметры защиты от вирусов и угроз”, под ним – Управление настройками, кликаем по нему.

Четвертый пункта “Защита от подделки”, перетягиваем ползунок в положение откл.

Соглашаемся с предупреждением системы безопасности.

Все готово, теперь можно приступать к удалению защитника.

Распаковываем наш архив прямо на рабочий стол.

Нам нужно запустить файл DefenderKiller и нажать Да когда система безопасности попросит подтвердить действие.

Программа запустилась, интерфейс у нее довольно простой, нам нужно первое действие, поэтому жмем на клавиатуре 1 и Enter.

Программа проверила отключена ли защита от подделок, и предложила сделать резервную копию файлов антивируса на случай если мы передумаем. Нужна ли копия для восстановления решаем для себя сами.

Процесс запущен, программа удаляет службы, драйвера и папки, ждем завершения процесса удаления windows defender и перезагружаем систему.


Защитник может не удалиться с первого раза, утилита нам об этом сообщит и предложит сделать перезагрузку системы и повторить, поэтому жмем Нет на окне предупреждения и перезагружаемся.

После перезагрузки и повторного запуска утилиты мы видим что все прошло успешно, программа показывает список удаленных служб и папок защитника. Теперь можно установить свой любимый антивирус.

Как видите процесс удаления защитника windows довольно прост и не занимает много времени к тому же все изменения при наличии бэкапа можно откатить обратно. На этом все. Всем успехов!
❌️ Defender Remover / Defender Disabler

❓️ What does the app do?
This application removes / disables Windows Defender, including the Windows Security App, Windows Virtualization-Based Security (VBS), Windows SmartScreen, Windows Security Services, Windows Web-Threat Service, Windows File Virtualization (UAC), Microsoft Defender App Guard, Microsoft Driver Block List, System Mitigations and the Windows Defender page in the Settings App on Windows 10 or later.
❓️ What components are removing?
Removing Security Components
This script removes/disables following security components:
    - support for Windows Security Center including Windows Security Center Service (wscsvc), Windows Security Service (SgrmBroker, Sgrm Drivers) which are needed to run Windows Security App.
    - virtualization support.
        - Hypervisor startup (this fixes disablation of Virtualization Based Security, this will auto enable if you use Hyper-V and/or WSL (Windows Subsystem for Linux), WSA (Windows Subsystem for Android))
        - LUA (disables File Virtualization and User Account Control, which will run all apps as administrator priviliges (also fixes old app errors))
        - Exploit Guard (something about Exploits)
        - Windows Smart Control
        - Tamper Protection (for Windows 11 21H2 or earlier)
    - SecHealthUI (Windows Security UWP App)
    - SmartScreen
    - Pluton Support and Pluton Services Support
    - System Mitigations
      - "Services Mitigations" (search on admx.help for more informations, its policy)
      - Spectre and Meltdown Mitigation (for get +30% performance on old Intel CPUs)
    - Windows Security Section from Settings App.
Removing Antivirus Components
This script forcily removes following antivirus components:
  - Windows Defender Definition Update List (this will disable updating definitions of Defender because its removed)
  - Windows Defender SpyNet Telemetry
  - Antivirus Service
  - Windows Defender Antivirus filter and windows defender rootkit scanner drivers
  - Antivirus Scanning Tasks
  - Shell Associations (Context Menu)
  - Hides Antivirus Protection section from Windows Security App.
📃 Instructions
Note
A system restore point is recommended before you run the script. (if you don’t know what are you doing)
- Download the packed script from Releases
- Run the «.exe» as administrator
- Follow the instructions displayed
OR
you can use git
git clone https://github.com/ionuttbara/windows-defender-remover.git
cd windows-defender-remover
Script_Run.bat
OR
you can use download entire source code
- Download the source code from Releases.
- Choose the file Source Code(.zip) from last version and download it.
- Unarchive the file into a folder and run the Script_Run.bat.
You can file an issue if you experience any problems.
📃 Automation of the script
You can remove Defender with arguments.
Removing
# Removal
Defender.Remover.exe /r <# or /R #>
Disable or Remove Windows Defender Application Guard Policies (advanced)
If you have any problems when opening an app (extremely rare) and get the message «The app can not run because Device Guard» or «Windows Defender Application Guard Blocked this app», you have to remove 4 files with the same name, from different locations.
- In EFI Partition
Remove-Item -LiteralPath "$((Get-Partition | ? IsSystem).AccessPaths[0])Microsoft\Boot\WiSiPolicy.p7b"
- In Code Integrity Folder
Remove-Item -LiteralPath "$env:windir\System32\CodeIntegrity\WiSiPolicy.p7b"
- In Windows Folder
Remove-Item -LiteralPath "$env:windir\Boot\EFI\wisipolicy.p7b"
- In WinSxS Folder
Remove-Item -Path "$env:windir\WinSxS" -Include *winsipolicy.p7b* -Recurse
Creating an ISO with Windows Defender and Services disabled
You can create an ISO with Windoows Defender and Security Services Disabled. It’s easy, so this is a fiie which it can helps you.
Here are the rules:
- Mount the ISO and extract it into location.
- Open the sources folder and create the $OEM$ folder. (this is needed to run the DefenderRemover part in OOBE).
- Open the $OEM$ folder and create the folder with $$ name.
- Open the $$ folder and create the folder with Panther name.
- Open the Panther folder.
The path it shown like to
*%location of extracted ISO%\sources$OEM$$$\Panther* - Download the unnatended.xml file from repo in ISO_Maker folder and put it in Panther folder.
- Save this as bootable ISO. (for now the script can’t do this automaticly, but it will do in next version).
❓ Frequently Asked Questions
⭕ How to remove Windows Security Center / Windows SecurityApp from PC without downloading Script?
Paste this code into a powershell file and after Run as Administrator.
$remove_appx = @("SecHealthUI"); $provisioned = get-appxprovisionedpackage -online; $appxpackage = get-appxpackage -allusers; $eol = @()
$store = 'HKLM:\SOFTWARE\Microsoft\Windows\CurrentVersion\Appx\AppxAllUserStore'
$users = @('S-1-5-18'); if (test-path $store) {$users += $((dir $store -ea 0 |where {$_ -like '*S-1-5-21*'}).PSChildName)}
foreach ($choice in $remove_appx) { if ('' -eq $choice.Trim()) {continue}
  foreach ($appx in $($provisioned |where {$_.PackageName -like "*$choice*"})) {
    $next = !1; foreach ($no in $skip) {if ($appx.PackageName -like "*$no*") {$next = !0}} ; if ($next) {continue}
    $PackageName = $appx.PackageName; $PackageFamilyName = ($appxpackage |where {$_.Name -eq $appx.DisplayName}).PackageFamilyName
    ni "$store\Deprovisioned\$PackageFamilyName" -force >''; $PackageFamilyName
    foreach ($sid in $users) {ni "$store\EndOfLife\$sid\$PackageName" -force >''} ; $eol += $PackageName
    dism /online /set-nonremovableapppolicy /packagefamily:$PackageFamilyName /nonremovable:0 >''
    remove-appxprovisionedpackage -packagename $PackageName -online -allusers >''
  }
  foreach ($appx in $($appxpackage |where {$_.PackageFullName -like "*$choice*"})) {
    $next = !1; foreach ($no in $skip) {if ($appx.PackageFullName -like "*$no*") {$next = !0}} ; if ($next) {continue}
    $PackageFullName = $appx.PackageFullName;
    ni "$store\Deprovisioned\$appx.PackageFamilyName" -force >''; $PackageFullName
    foreach ($sid in $users) {ni "$store\EndOfLife\$sid\$PackageFullName" -force >''} ; $eol += $PackageFullName
    dism /online /set-nonremovableapppolicy /packagefamily:$PackageFamilyName /nonremovable:0 >''
    remove-appxpackage -package $PackageFullName -allusers >''
  }
}
⭕ Why is the downloaded executable being flagged as a virus?
That is a false positive.
Some security apps flag this app as a virus because of the way the «.exe» files are created. Download with git or source code .zip will indicate virus-free.
Starting with Defender 12.6.x , some versions are considered as virus, some are not (its a bug from me, so do not file for this).
⭕ Why is the patch not working when Windows is updated?
Windows Update includes a Intelligence Update which blocks certain actions and modifies Windows Defender/Security policies.
If the script is not working for you, check if you have the Windows Security Intelligence Update installed. If you do, disable tamper protection, and re-run the script.
⭕ How to use the package remover without downloading the executable from the release?
Run the desired «.bat» file from cmd with PowerRun (by dragging to the executable). You must reboot for the changes to take effect.
⭕ How to disable VBS if the removal script does not work
Disable with this command and reboot.
bcdedit /set hypervisorlaunchtype off
,
The «MoUsoCoreWorker.exe» process (also known as «MoUso Core Worker» process), is a part of the Windows Update client and is responsible for waking up your system to check and install the available updates. So, if your PC is waking up from sleep in random times the MoUsoCoreWorker.exe is the culprit.

What is MoUSOCoreWorker.exe?
The MoUsoCoreWorker or USOCoreWorker.or USO (Update Session Orchestrator), is a Windows OS component that orchestrates the sequence of downloading and installing various update types from Windows Update.
FIX: MoUsoCoreWorker.exe Preventing Sleep in Windows 10.
If you want to stop MoUsoCoreWorker process from waking up your PC, apply one of the methods below:
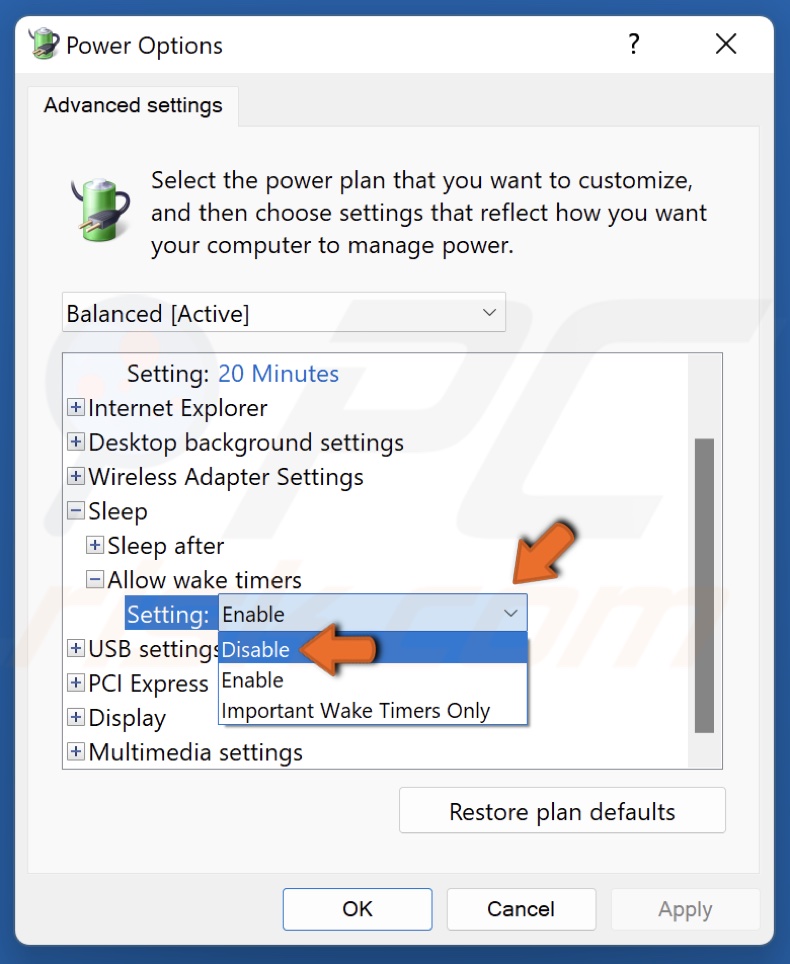
Method 1. Stop MoUsoCoreWorker by Disabling Wake Timers.
The first method to stop MoUsoCoreWorker.exe from preventing your computer from sleeping, is to disable the Wake Timers.
1. Navigate to Control Panel and open Power Options, or right-click on the Start menu, select Power Options and click Additional Power Settings.
2. Click at Change plan settings.

3. Then select Change Advanced Power Settings.

4. Expand Sleep, set the Allow wake times to Disable and click OK. *
* Note: If you own a laptop, apply the setting to both Battery and Plugged-in options.
.5. Perform the same steps and apply the same setting to all Power Plans.
Method 2. Stop MoUsoCoreWorker.exe in Task Scheduler.
To disable the wake from sleep to install updates, in Task Scheduler:
1. Open Task Scheduler. If you don’t know how to do that, then…
1. At the search box type Task or Task Scheduler.
2. Open the ‘Task Scheduler’ from the search results.
2. In Task Scheduler go to:
- Task Scheduler Library -> Microsoft -> Windows -> Install Service.
3. Right-click and Disable the following two (2) tasks.
- WakeUpAndContinueUpdates
- WakeUpAndScanForUpdates

Method 3. Stop MoUsoCoreWorker.exe to Wake your System using PowerShell.
The final method to prevent MoUSO Core Worker Process (MoUsoCoreWorker.exe) to constantly wake your computer from sleep, is to ignore the MoUsoCoreWorker «wake up» requests in power plan. To do that:
1. Open PowerShell with Administrator permissions. To do that:
- In search box, type powershell
- Right click on Windows PowerShell result and select Run as administrator.
2. In PowerShell, copy/paste the following command and press Enter:
- powercfg /requestsoverride process MoUsoCoreWorker.exe execution

3. That’s it. From now on MoUsoCoreWorker will not wake up your computer to check for updates.*
* Note: If you want to remove the restriction on the future, just give this command in PowerShell (Admin):
- powercfg /requestsoverride process MoUsoCoreWorker.exe
That’s all folks! Did it work for you? Please leave a comment in the comment section below or even better: like and share this blog post in the social networks to help spread the word about this solution.
If this article was useful for you, please consider supporting us by making a donation. Even $1 can a make a huge difference for us.
- Author
- Recent Posts
Konstantinos is the founder and administrator of Repairwin.com. Since 1995 he works and provides IT support as a computer and network expert to individuals and large companies. He is specialized in solving problems related to Windows or other Microsoft products (Windows Server, Office, Microsoft 365, etc.).
How to Fix MoUSO Core Worker Process (MoUsoCoreWorker.exe) Preventing Sleep on Windows 11
Many users have complained that their computers won’t sleep because MoUsoCoreWorker.exe is keeping the PC awake. This article will discuss this problem in more detail and provide several ways to fix it.
Upon running the POWERCFG -requests report, users see that it’s the MoUsoCoreWorker.exe process that keeps their computers awake. For some users, the computer keeps cycling between sleep and waking up.
MoUsoCoreWorker.exe preventing sleep is a problem that goes back to Windows 10 and is carried over to Windows 11. Unfortunately, Microsoft never fixed this bug.
What is MoUSO Core Worker Process?
MoUSO Core Worker Process is an Update Session Orchestrator (USO) that manages update sessions. It decides which updates must be installed first and which can be done later. It protects Windows from potential threats when updating and resolves issues that may prevent Windows from updating.
Depending on your system’s power configuration, it will appear as either MoUsoCoreWorker.exe or USOCoreWorker.exe.
Why Is MoUsoCoreWorker.exe Keeping My Computer Awake?
Since MoUsoCoreWorker.exe is responsible for managing system updates, it will prevent your PC from going to sleep unless all pending updates are installed.
In addition, misconfigured power settings and third-party applications (like GoodSync) may also trigger this issue.
Before trying our fixes, here are some tips:
- Update your Windows 11/10 operating system to the latest build.
- Run the Windows Update troubleshooter and Power troubleshooter.
- Restart the Windows Update Service.
- Close or uninstall third-party apps (particularly syncing applications like GoodSync) that interfere with MoUsoCoreWorker.exe.
If none of our tips resolve the issue, close Microsoft Edge and make sure that no processes related to it are running. You can check for and close Microsoft Edge-related processes using Task Manager. Then, try the methods below.
Video Tutorial on How to Fix MoUsoCoreWorker.exe Preventing Sleep
Table of Contents:
- Introduction
- Method 1. Restore System Power Settings to Default
- Method 2. Disable Wake Timers in Power Settings
- Method 3. Override the MoUsoCoreWorker.exe Request
- Method 4. Disable the Update Session Orchestrator (USO) Service
- Method 5. Disable Update Session Orchestrator (USO) Scheduled Task
- Video Tutorial on How to Fix MoUsoCoreWorker.exe Preventing Sleep
Download Computer Malware Repair Tool
It is recommended to run a free scan with Combo Cleaner — a tool to detect viruses and malware on your device. You will need to purchase the full version to remove infections. Free trial available. Combo Cleaner is owned and operated by Rcs Lt, the parent company of PCRisk.com read more.
Method 1. Restore System Power Settings to Default
If your system power settings are misconfigured, your system won’t go into sleep mode. Restoring system power settings to default may fix the issue.
1. Hold down Windows+R keys to open Run.
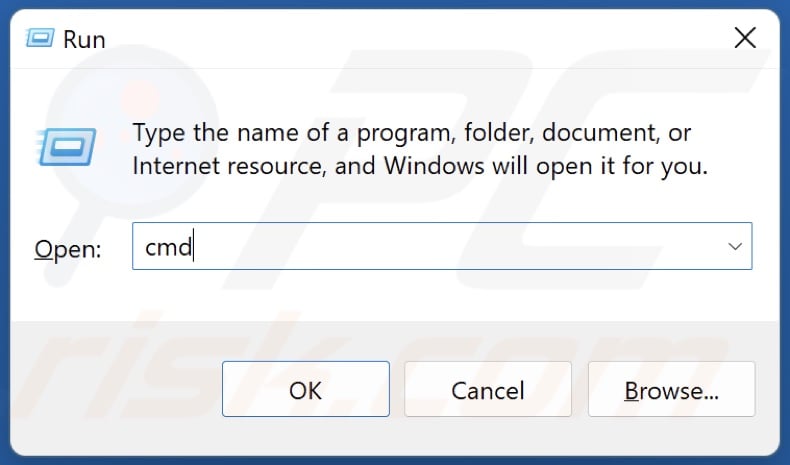
2. In the Run dialog, type in CMD and hold down Ctrl+Shift+Enter keys to open Command Prompt as an administrator.
3. In the Command prompt window, type in:
powercfg -restoredefaultschemes
4. Press Enter to execute the command.
5. Close the Command Prompt and restart your PC.
[Back to Table of Contents]
Method 2. Disable Wake Timers in Power Settings
A wake timer can automatically wake your system to perform tasks at a defined time. However, it can disturb your system in sleep mode and cause MoUsoCoreWorker.exe to prevent your system from going into sleep mode. Disabling wake timers may fix the issue.
1. Hold down Windows+R keys to open Run.
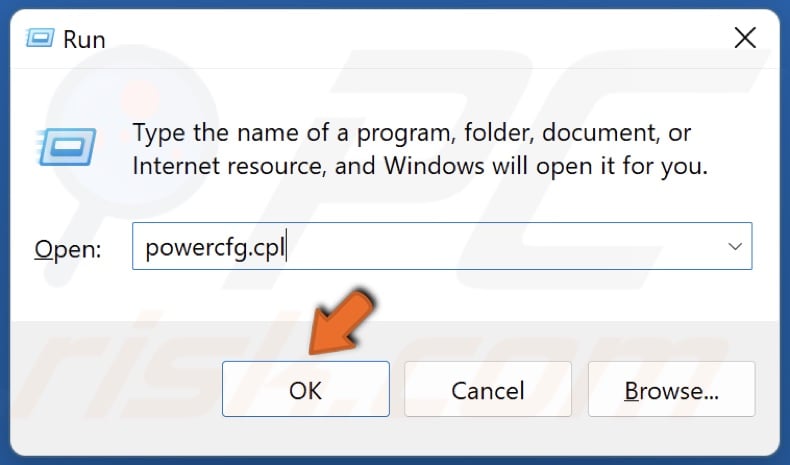
2. In the Run dialog, type in powercfg.cpl and click OK.
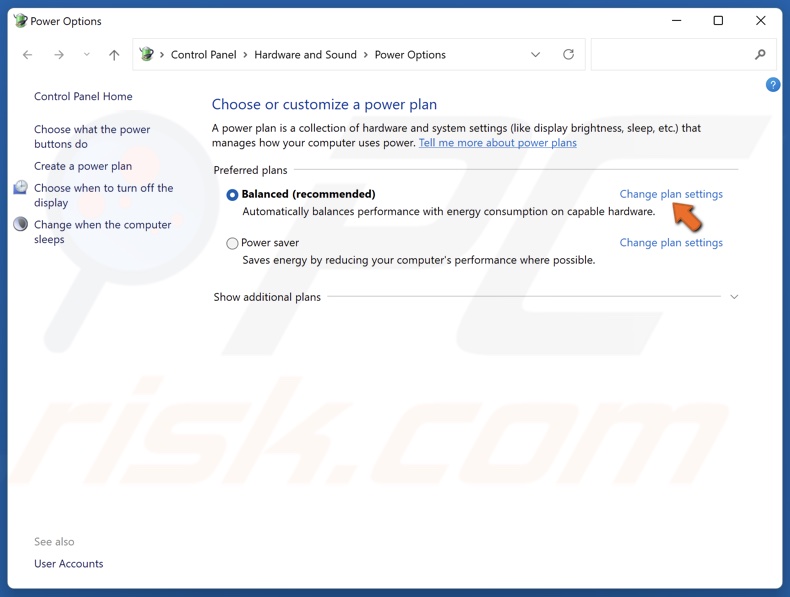
3. Click Change plan settings for the plan you use.
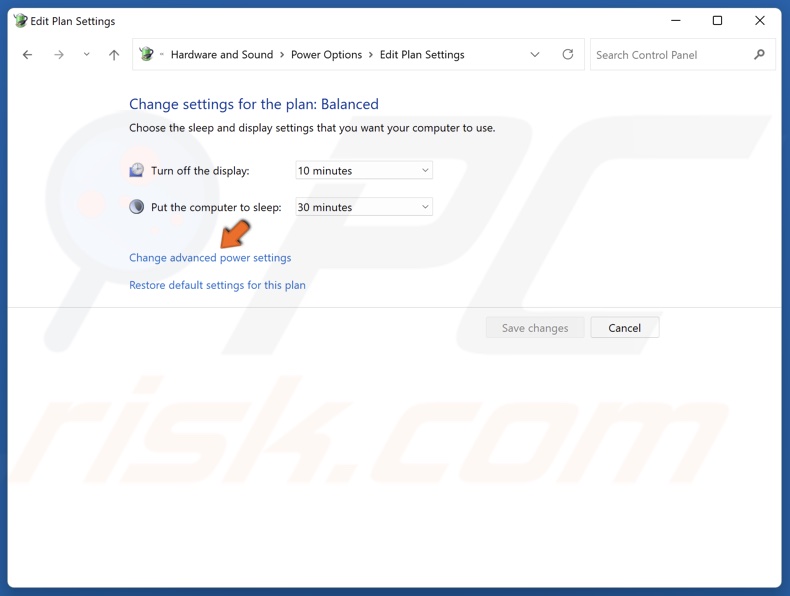
4. Click Change advanced power settings.
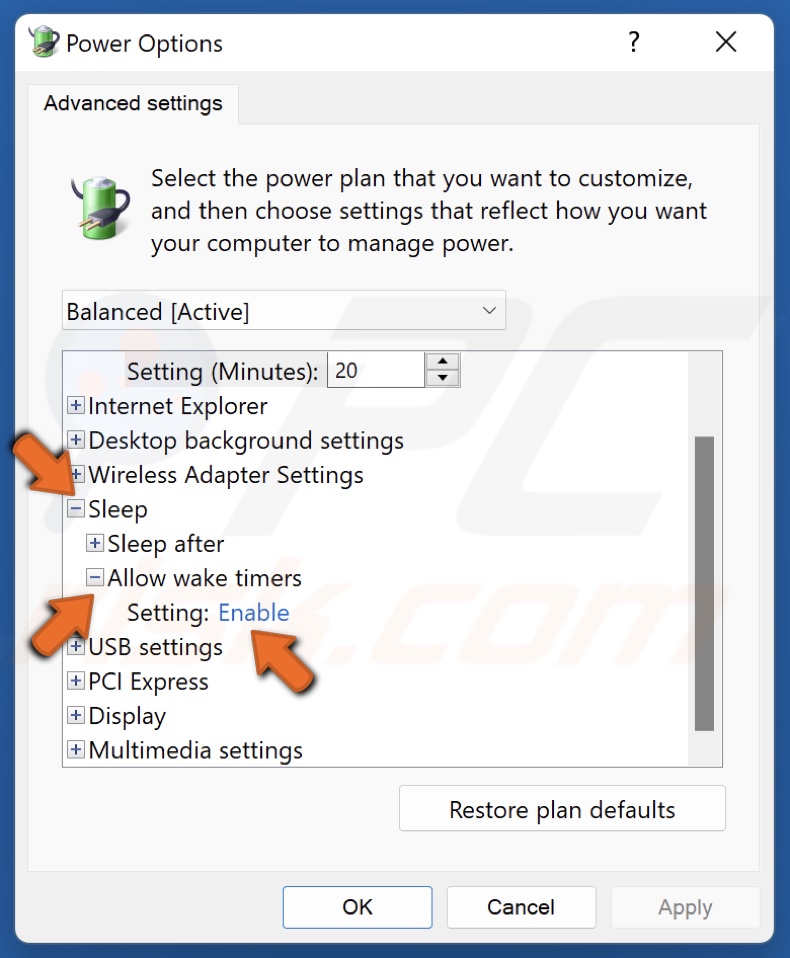
5. In the Power Options window, expand the Sleep settings.
6. Expand the Allow wake timers settings.
7. Open the Setting menu and select Disable. Disable the wake times for On battery and Plugged in settings.
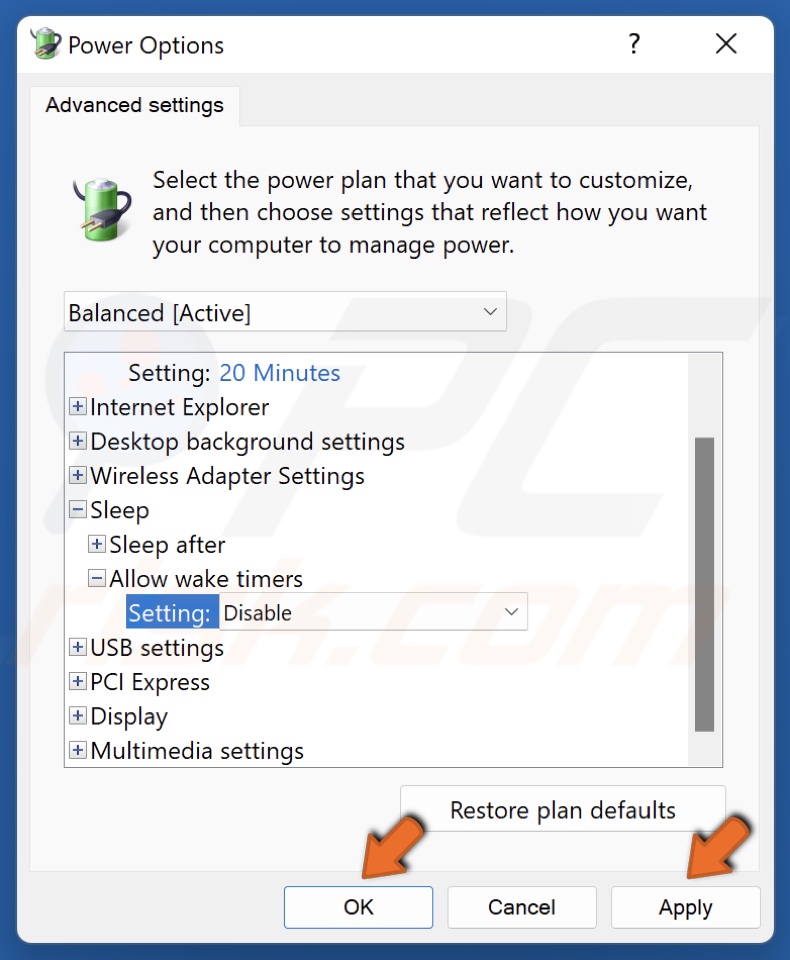
8. Click Apply and click OK.
9. Restart your PC.
[Back to Table of Contents]
Method 3. Override the MoUsoCoreWorker.exe Request
If MoUsoCoreWorker.exe is preventing sleep, you can configure your system’s power settings to override the requests of MoUSO Core Worker Process, which won’t allow it to wake up your PC.
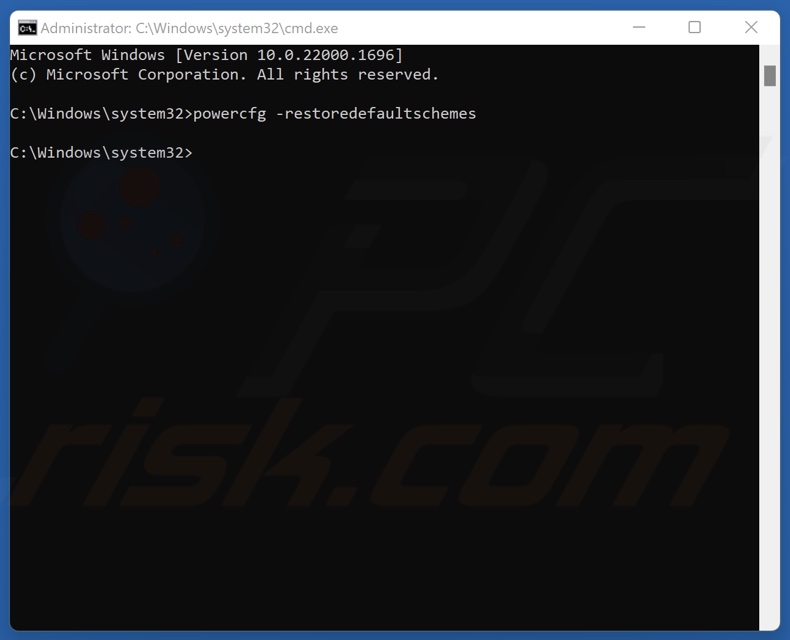
1. Hold down Windows+R keys to open Run.
2. In the Run dialog, type in CMD and hold down Ctrl+Shift+Enter keys to open Command Prompt as an administrator.
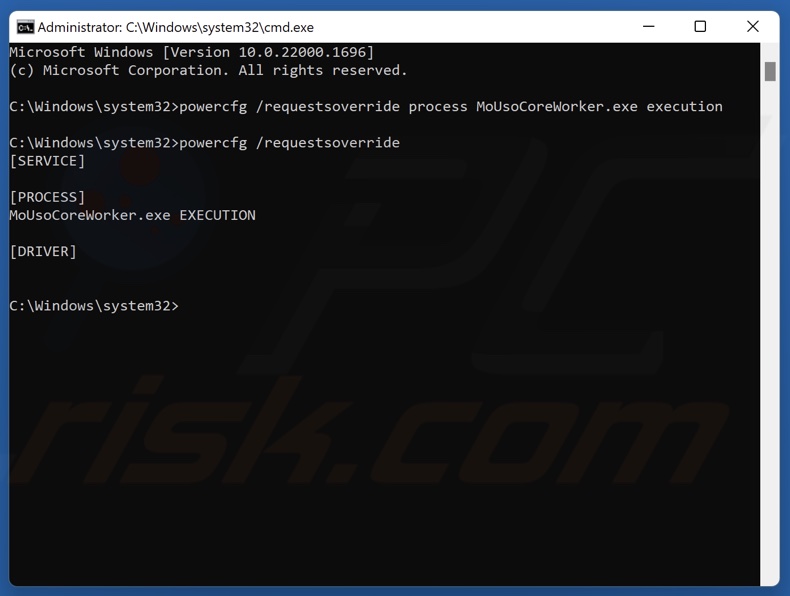
3. In the Command prompt window, type in:
powercfg /requestsoverride process MoUsoCoreWorker.exe execution
4. Press Enter to execute the command.
5. To verify that the MoUsoCoreWorker.exe process was overridden, type in:
powercfg /requestsoverride
6. Press Enter to execute the command.
7. Close the Command Prompt and restart your PC.
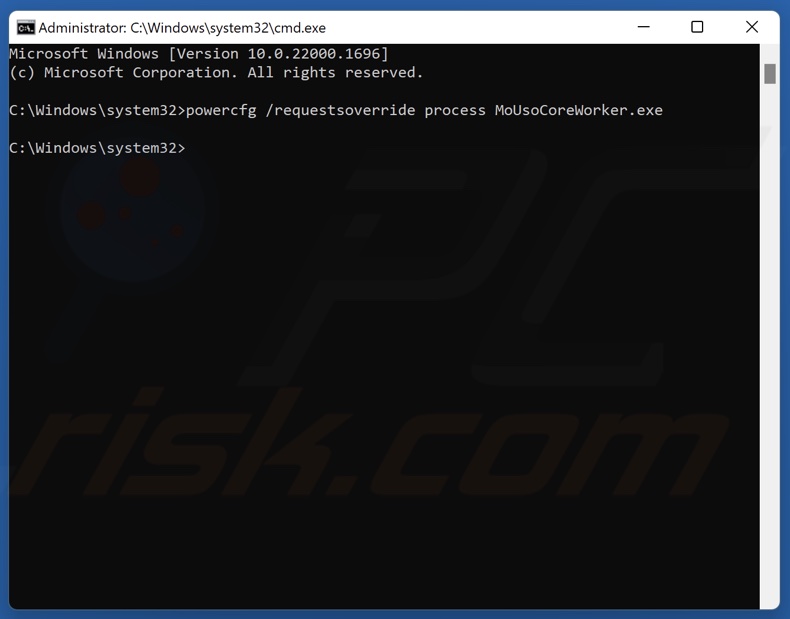
8. To remove the override later, run the powercfg /requestsoverride process MoUsoCoreWorker.exe command in Command Prompt.
[Back to Table of Contents]
Method 4. Disable the Update Session Orchestrator (USO) Service
MoUsoCoreWorker.exe belongs to the Update Session Orchestrator (USO) service. Disabling Update Session Orchestrator should fix MoUsoCoreWorker.exe preventing sleep or keeping your computer awake.
1. Hold down Windows+R keys to open Run.

2. In the Run dialog, type in services.msc and click OK.

3. In the Services window, scroll down and locate Update Orchestrator Service.
4. Right-click Update Orchestrator Service and click Properties.
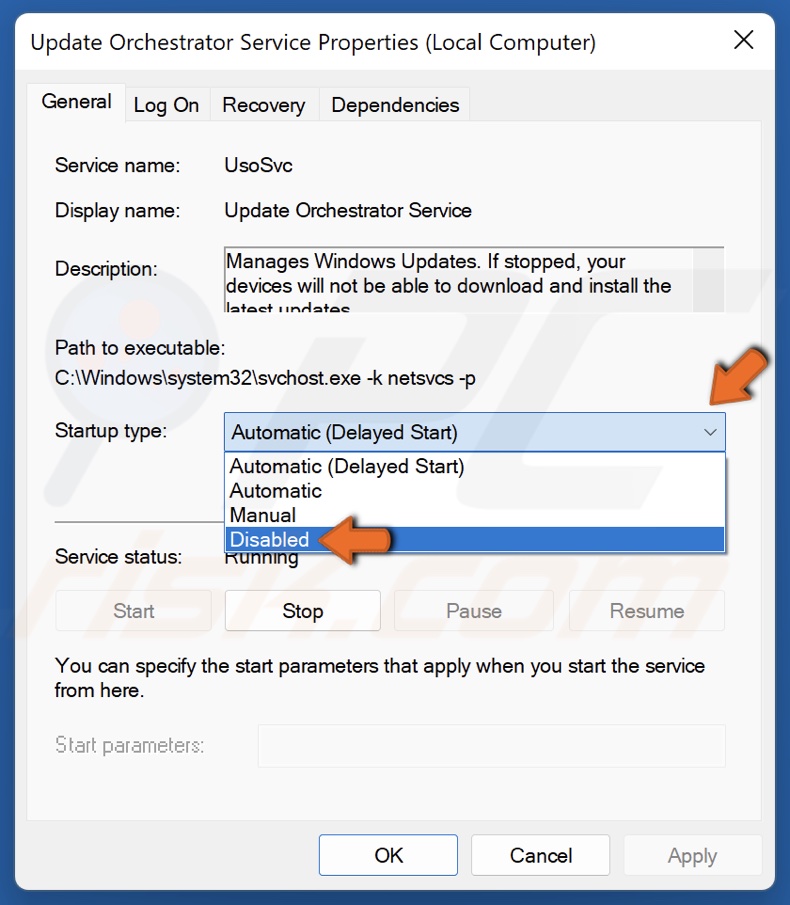
5. Open the Startup type menu and select Disabled.
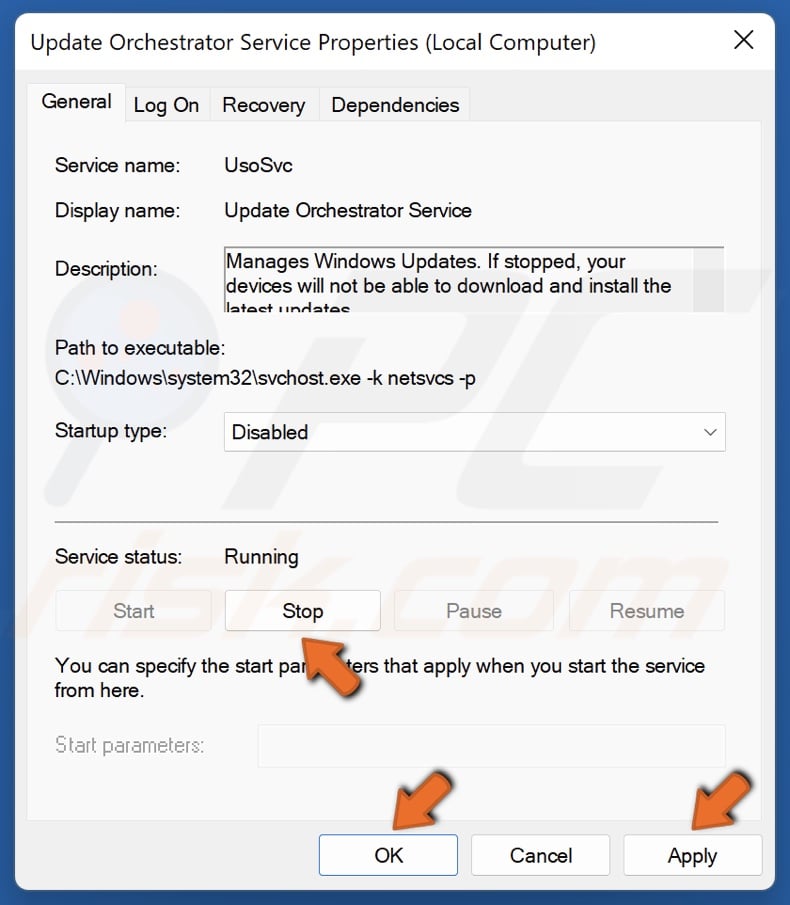
6. Click Stop in the Service status section.
7. Click Apply and click OK.
8. Close the Services window.
[Back to Table of Contents]
Method 5. Disable Update Session Orchestrator (USO) Scheduled Task
The Task Scheduler schedules and executes tasks automatically. As a result, an automated task will allow MoUsoCoreWorker.exe to wake up your PC. Disabling the Update Session Orchestrator (USO) scheduled task may fix this problem.
1. Open your web browser and go to the PsTools download page.
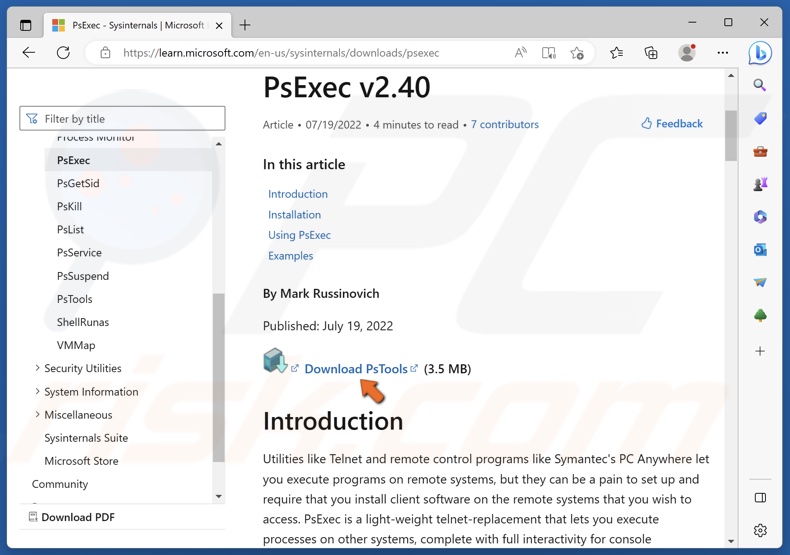
2. Click Download PsTools.

3. Go to your Downloads folder. Right-click PSTools and click Extract all.
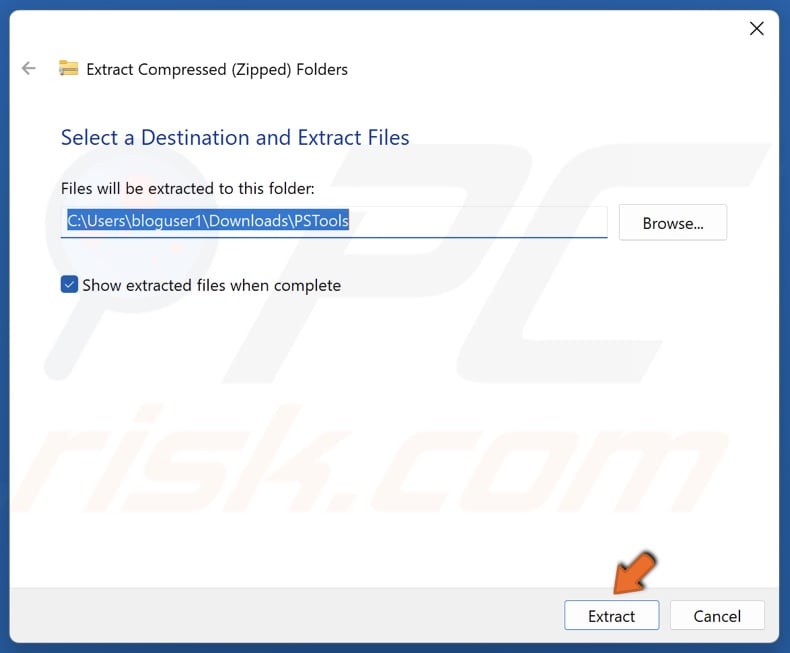
4. Then, click Extract.
5. Hold down Windows+R keys to open Run.
6. In the Run dialog, type in CMD and hold down Ctrl+Shift+Enter keys to open Command Prompt as an administrator.
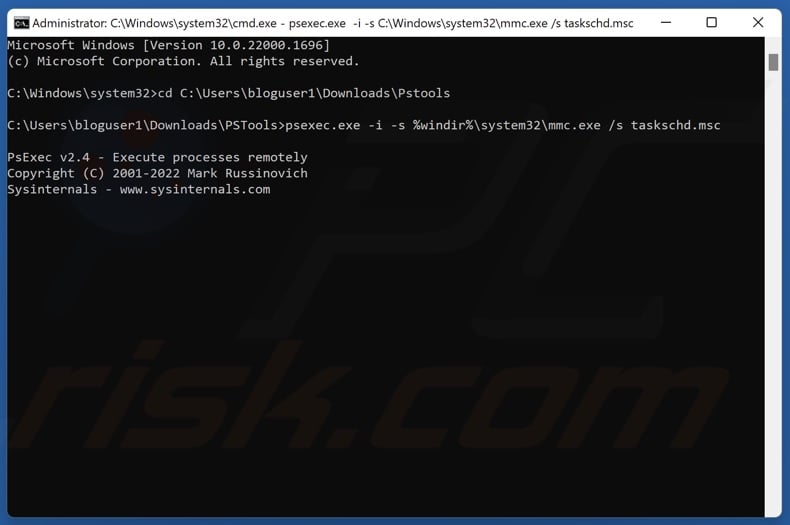
7. In the Command prompt window, type in:
cd C:\Users\Username\Downloads\Pstools
8. Press Enter. Replace Username with your username.
9. Then, type in:
psexec.exe -i -s %windir%\system32\mmc.exe /s taskschd.msc
9. Press Enter.
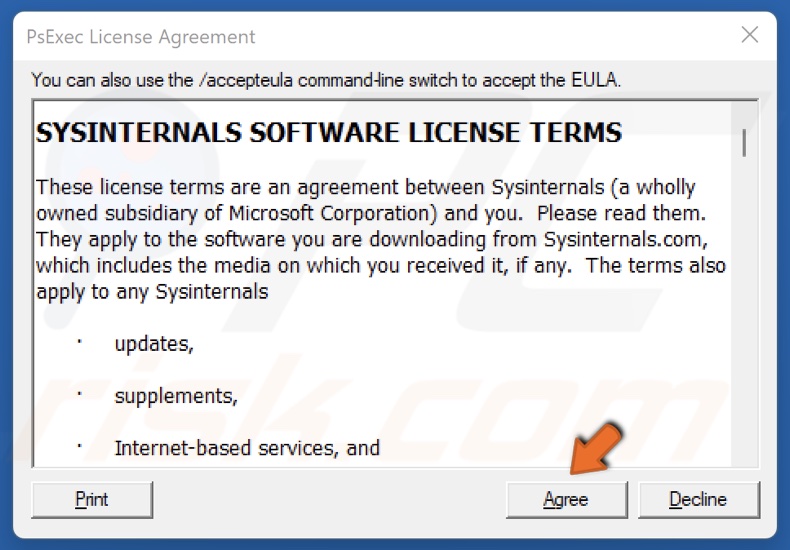
10. The PsTools installer will open. Click Agree.
10. The Task Scheduler will open automatically. If it doesn’t, hold down Windows+R keys to open Run, type in taskschd.msc and click OK.
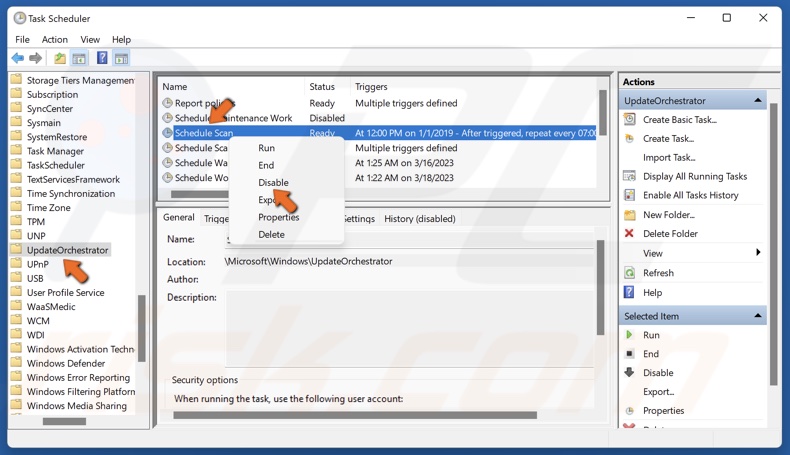
13. In the Task Scheduler, navigate to Microsoft > Windows > UpdateOrchestrator.
14. Select UpdateOrchestrator, and in the right pane, right-click Schedule Scan and click Disable.
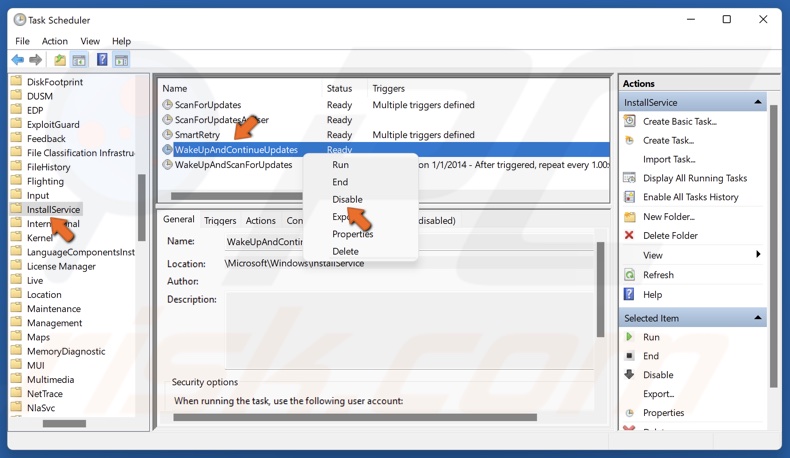
15. Then, navigate to Microsoft > Windows > InstallService.
16. Select Install Service, and in the right pane, right-click WakeUpAndContinueUpdates and click Disable.
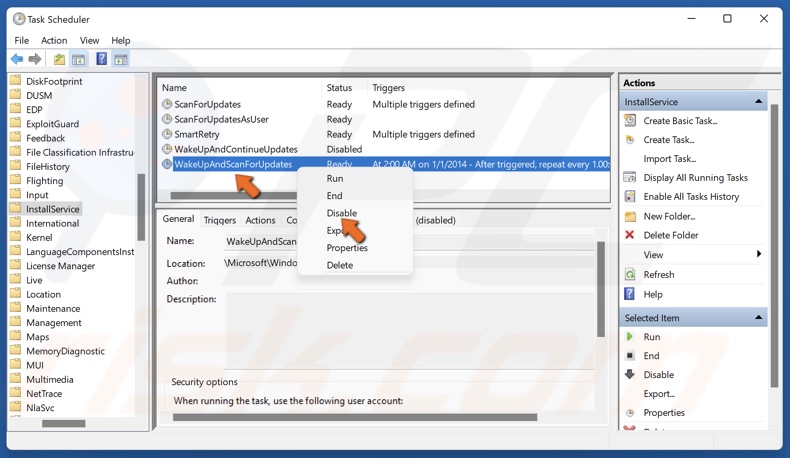
17. Then, right-click WakeUpAndScanForUpdates and click Disable.
18. Close the Task Scheduler and restart your PC.
Did this article help you fix MoUsoCoreWorker.exe preventing sleep on your PC? Let us know in the comments below. If you know other ways to fix this issue, please share them as well.
Все способы:
- Удаление Windows Defender
- Windows 10
- Windows 7
- Заключение
- Вопросы и ответы: 12
Встроенный в операционную систему Windows Защитник в некоторых случаях может мешать пользователю, например, конфликтовать со сторонними защитными программами. Другой вариант — он может быть попросту не нужен юзеру, так как тот привык и использует в качестве основного стороннее антивирусное ПО. Чтобы избавиться от Защитника, потребуется воспользоваться или системной утилитой, если удаление будет происходить на компьютере под управлением Виндовс 10, или сторонней программой, в случае использования 7 версии ОС.
Удаление Windows Defender
Удаление Защитника в Виндовс 10 и 7 происходит двумя разными способами. В более современной версии этой операционной системы нам с вами потребуется внести определенные правки в ее реестр, предварительно деактивировав работу антивирусного ПО. А вот в «семерке», напротив, необходимо воспользоваться решением от стороннего разработчика. В обоих случаях процедура не вызывает особых сложностей, в чем вы можете убедиться лично, ознакомившись с нашей инструкцией.
Важно: Удаление интегрированных в систему программных компонентов может повлечь за собой всевозможные ошибки и сбои в работе ОС. Поэтому прежде чем приступить к выполнению описанных ниже действий, следует обязательно создать точку восстановления, к которой можно будет откатиться в случае некорректной работы компьютера. О том, как это сделать, написано в представленных по ссылке ниже материалах.
Читайте также: Как создать точку восстановления системы на Windows 7 и на Windows 10
Windows 10
Защитник Windows является стандартной антивирусной программой для «десятки». Но несмотря на тесную интеграцию с операционной системой, его все же можно удалить. Со своей же стороны мы рекомендуем ограничиться обычным отключением, о чем мы ранее рассказывали в отдельной статье. Если же вы решительно настроены избавиться от столь важного программного компонента, выполните следующие действия:
Читайте также: Как отключить Защитник в Виндовс 10
- Деактивируйте работу Защитника, воспользовавшись представленной по ссылке выше инструкцией.
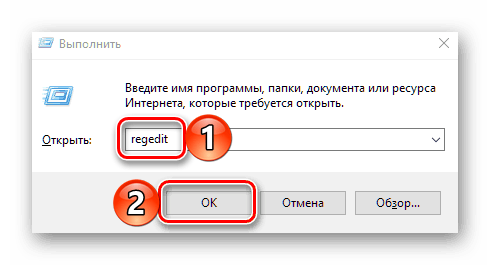
- Откройте «Редактор реестра». Проще всего это сделать через окно «Выполнить» («WIN+R» для вызова), в которое потребуется ввести следующую команду и нажать «ОК»:
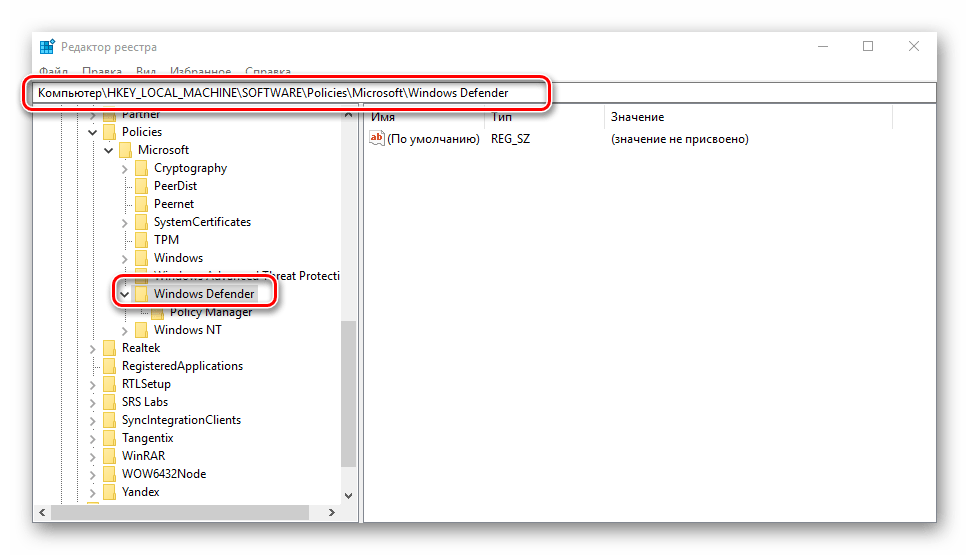
regedit - Используя область навигации слева, перейдите по представленному ниже пути (как вариант, его можно просто скопировать и вставить в адресную строку «Редактора», после чего нажать «ENTER» для перехода):
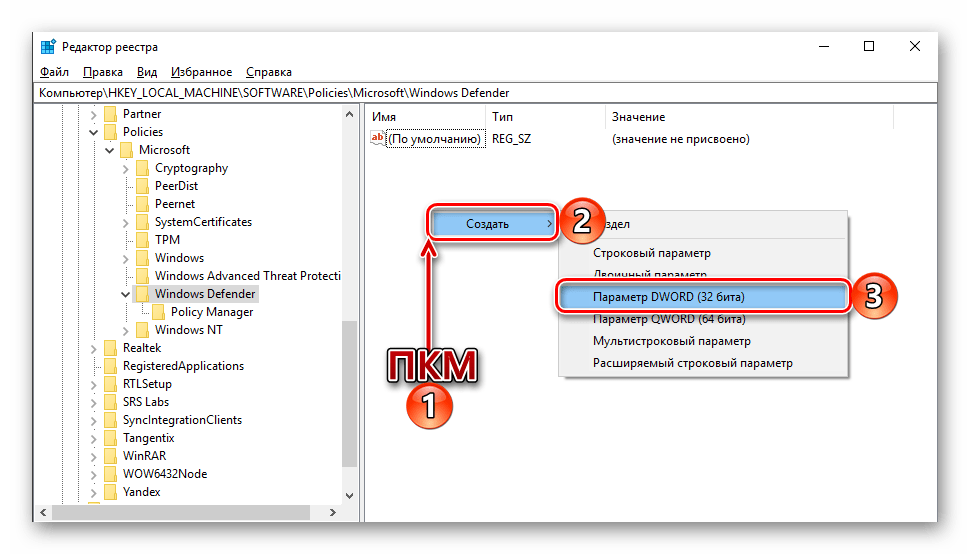
Компьютер\HKEY_LOCAL_MACHINE\SOFTWARE\Policies\Microsoft\Windows Defender - Выделите папку «Windows Defender», кликните правой кнопкой мышки в ее пустой области и выберите в контекстном меню пункты «Создать» — «Параметр DWORD (32 бита)».
- Назовите новый файл «DisableAntiSpyware» (без кавычек). Для переименования просто выделите его, нажмите клавишу «F2» и вставьте или введите указанное нами наименование.
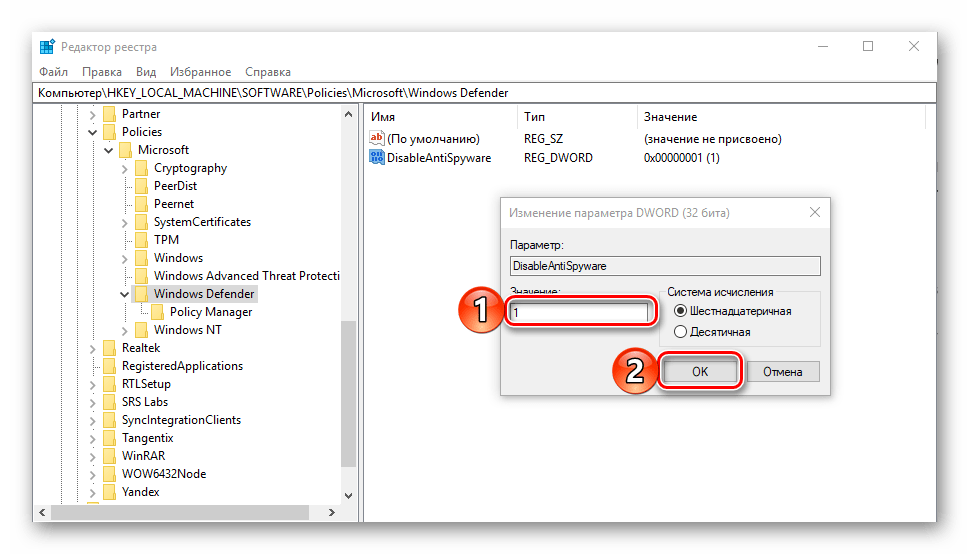
- Двойным кликом откройте созданный параметр, задайте для него значение «1» и нажмите «ОК».
- Перезагрузите компьютер. Защитник Windows будет окончательно удален из операционной системы.
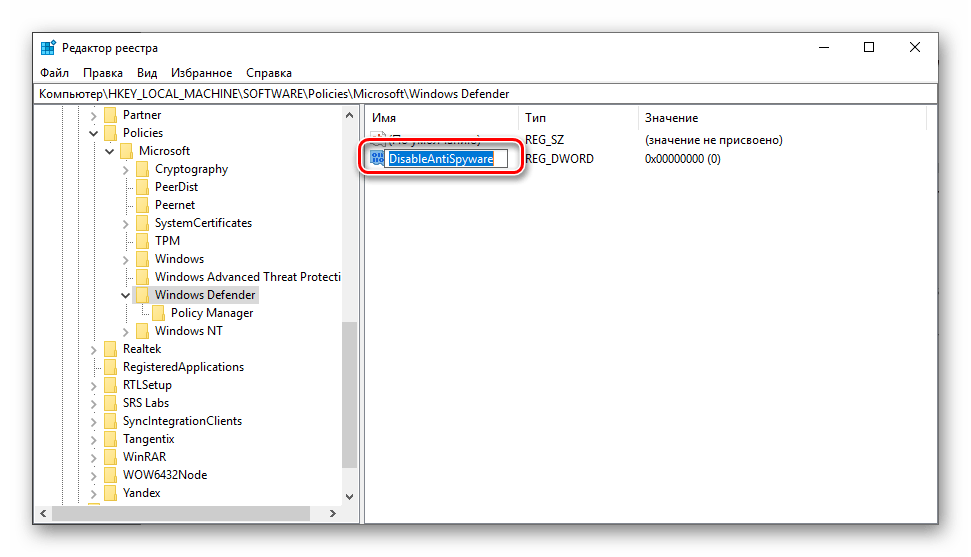
Примечание: В некоторых случаях в папке «Windows Defender» изначально присутствует параметр DWORD (32 бита) с названием DisableAntiSpyware. Все что от вас потребуется для удаления Защитника – изменить его значение с 0 на 1 и перезагрузится.
Читайте также: Как откатить Windows 10 к точке восстановления
Windows 7
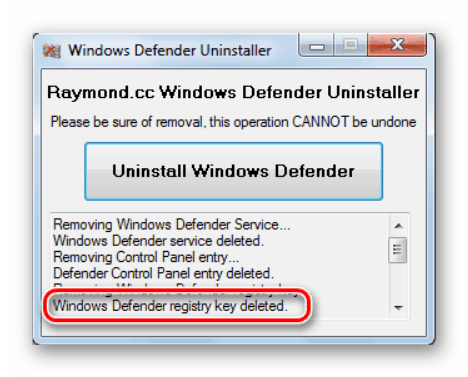
Чтобы удалить Защитник в этой версии операционной системы от Майкрософт, необходимо воспользоваться программой Windows Defender Uninstaller. Ссылка на её скачивание и подробная инструкция по использованию находится в статье ниже.
Подробнее: Как включить или отключить Защитник Windows 7
Заключение
В этой статье мы рассмотрели метод удаления Защитника в Виндовс 10 и предоставили краткий обзор на деинсталляцию этого компонента системы в предыдущей версии ОС со ссылкой на подробный материал. Если острой необходимости в удалении нет, а Defender всё так же необходимо отключить, ознакомьтесь с представленными ниже статьями.
Читайте также:
Отключение Защитника в Windows 10
Как включить или отключить Защитник Windows 7
Наша группа в TelegramПолезные советы и помощь