
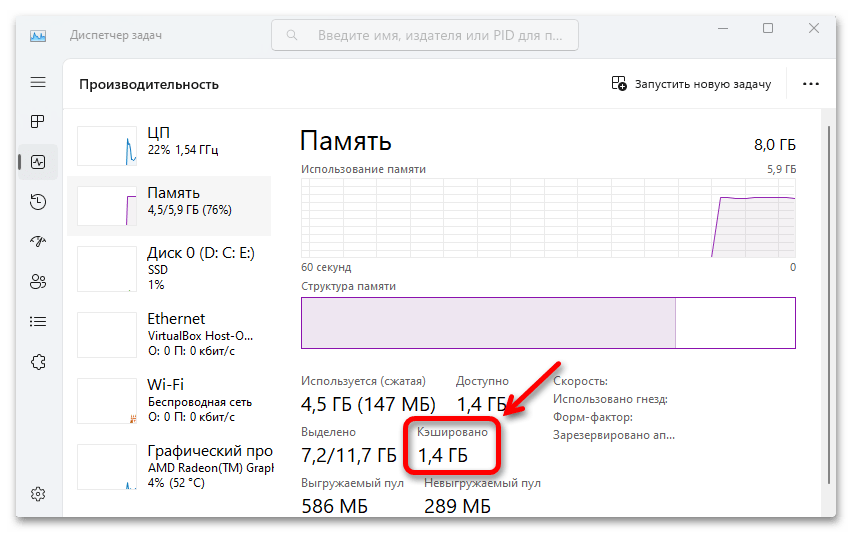
Desktop Window Manager (DWM) is a crucial Windows process that renders items to display on your system’s desktop. Though, it uses a minimal system’s graphics resources to work properly. But sometimes, it suddenly starts using an extensive amount of GPU power, which hampers the system’s performance. Sadly, the same is happening with many Windows 11 users.
If you also notice that the DWM process is using so much of the system’s GPU resources and making it sluggish, try the fixes listed in this in-depth guide. Here in this guide, we’ve shared several fixes to eliminate the Desktop Window Manager high GPU usage issue.
Why Is Desktop Window Manager Using So Much GPU?
These are the most common reasons for the Desktop Window Manager high GPU usage issue in Windows 11:
- Outdated or Corrupt Graphics Driver
- Outdated Windows Firmware
- Enabled GPU Hardware Acceleration
- Misconfigured NVIDIA Control Panel Settings
- Corrupted System Files
- Malware & Viruses
- Third-Party Antivirus Program
- Enabled HDR
- Enabled Fast Startup
Fix the Desktop Window Manager High GPU Usage Issue in Windows 11
So, here are some solutions to fix the Desktop Window Manager high GPU usage issue in Windows 11:
1. Restart Your Computer
The first and most common way to overcome the high GPU usage problem with Desktop Window Manager is to reboot the PC. Doing so will refresh the entire system and, most probably, fix the issue if it appears because of a third-party app. So, follow the listed steps to restart your PC:
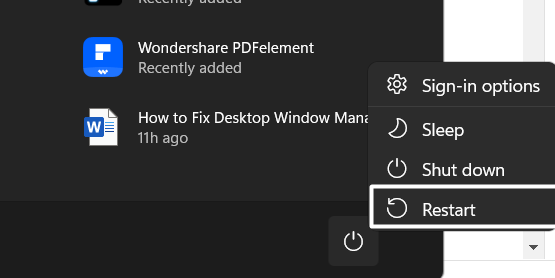
1. Press the Windows key to open the Start Menu, and right-click on the Power icon in the bottom right corner.
2. Select the Restart option from the menu to restart your Windows 11 PC and check the issue’s status.
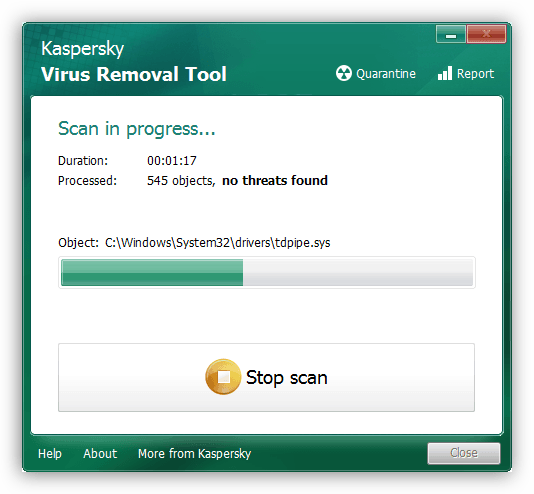
2. Scan for Malware & Viruses
One of the most prevalent causes of the Desktop Window Manager high GPU usage issue is the trojan or malicious files. You could have mistakenly gotten some malicious files on your PC, which raised the Desktop Window Manager’s GPU usage to this extreme level.
Due to this, we suggest you run a quick virus scan on your Windows 11 PC to remove all the malicious files. You can follow the below steps to execute a virus scan on your system:
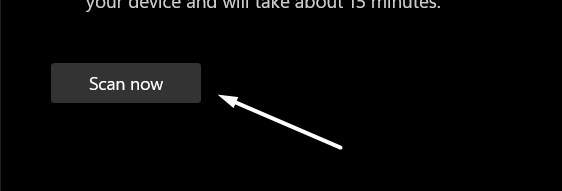
1. Use the Windows + S shortcut to open the Windows Search Box and type Virus and threat protection in it.

2. Select Virus and threat protection from the Best match section and click the Scan now button to start the scan.
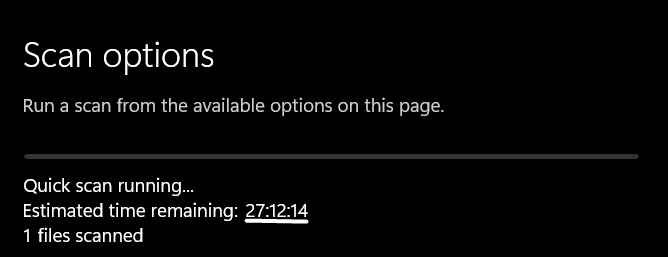
3. Now, wait for the estimated remaining time for the virus scan to complete and display the results.
3. Disable Third-Party Antivirus
If the malicious files aren’t the reason for this issue, then the third-party antivirus installed on your system could be. Considering this, we suggest you turn off all the security shields from your PC’s third-party antivirus and then check the Desktop Window Manager high memory issue status.
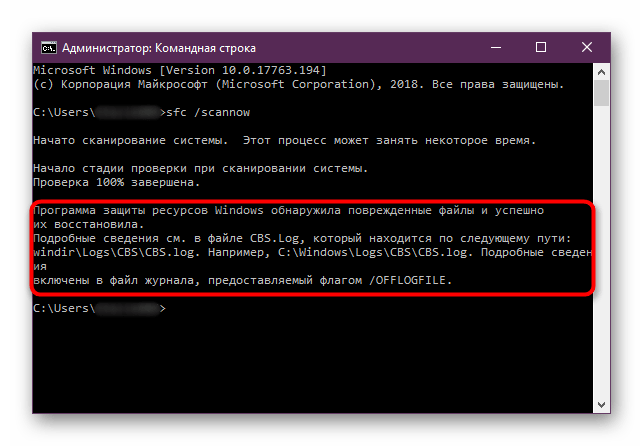
4. Run DISM, SFC, and CHKDSK Scans
One of the possible reasons behind this issue is the corrupted or damaged system files. To check whether it’s the same in your case, we suggest you run DISM, SFC, and CHKDSK scans. The DISM scan will restore your system’s image. Whereas the SFC scan will replace all the corrupted system files. And the CHKDSK scan will repair the bad physical sectors on your system’s secondary storage.
So, follow the below-mentioned instructions to run all three scans in the stated sequence:
1. Right-click on the Windows logo in your system’s taskbar and select Terminal (Admin) from it.

2. Copy-paste the below-listed command into the console and press the Enter key to run the DISM scan.
DISM/Online/Cleanup-Image/RestoreHealth
3. Once the DISM scan is completed, execute the below command in the same console to start the SFC scan.
sfc /scannow
4. Execute the below command in the console to run the CHKDSK scan to find and fix disk-related errors.
Chkdsk /F
5. Finally, press Y on your keyboard to schedule the CHKDSK scan the next time you reboot your PC.
So, restart your Windows 11 PC to start the CHKDSK scan and find & fix issues with your system’s disk.
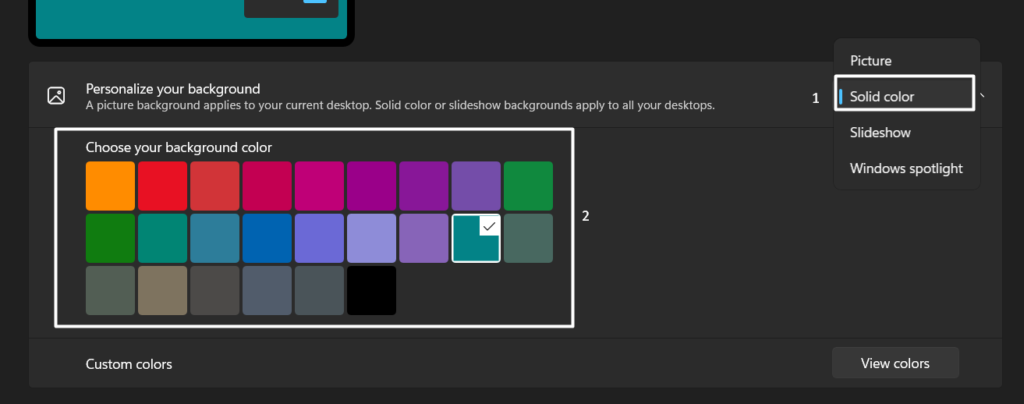
5. Change Personalization Settings
If you’ve set live wallpaper on Windows PC’s desktop, then it could be possible that it’s the main culprit. This is because live wallpaper requires high GPU resources to run properly.
Considering this, we suggest you change your Windows 11 PC’s desktop background to any solid color. Follow the below-mentioned steps to do the same:
1. Use the Windows + I keys combination to open the Settings app and move to the Personalization section.
2. Click on Background on the next screen, and then set the Personalize your background option to Solid color.
6. Turn Off HDR in Windows’ Display Settings
If you have enabled High Dynamic Range (HDR) on your Windows 11 PC, it’s possible that it’s causing this issue. This is because HDR uses extensive GPU resources to play videos at high resolution.
Due to this, we suggest you disable HDR on your PC and then check the issue’s status. So, check the mentioned steps to turn off HDR on your PC:
1. Open the Settings app on your Windows PC with the Windows + I shortcut and expand the Display section.
2. Click on the HDR option under Brightness & color and turn off the HDR video streaming toggle.

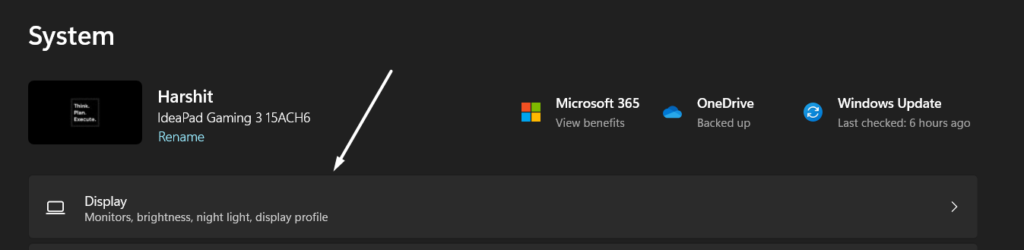
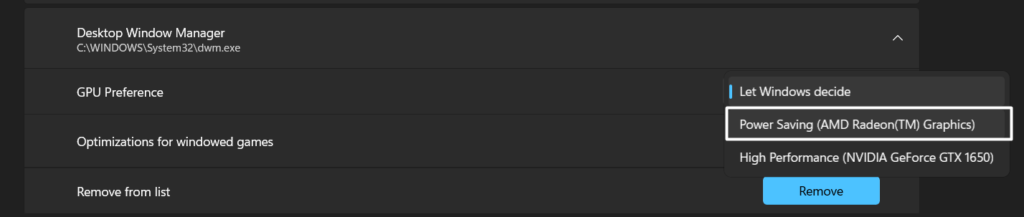
7. Set Desktop Window Manager to Power Saving
You may have permitted the Desktop Window Manager process to run to its full potential and use as many GPU resources as it wants. Hence, it’s causing this issue. In that case, we recommend you put the Desktop Window Manager process to Power Saving to get rid of the Desktop Window Manager high memory issue. Here’s how you can do so with ease:
1. Launch the Settings app on your PC and head to the Display section from the System category.

2. Click on Graphics in the Related settings section and click the Add desktop app button.

3. Navigate to the below path in the File Explorer, search for dwm.exe, and then click Add to add it.
C:/Windows/System32
4. Click on Desktop Window Manager to expand the section and select the Power Saving option from the GPU Preference dropdown.
8. Disable Hardware Accelerated GPU Scheduling (HAGS)
Hardware Accelerated GPU Scheduling (HAGS) is a performance enhancement feature that enhances your graphic card’s performance and reduces latency. Some users said that the issue with DWM.exe got fixed after disabling the above function on their Windows 11 PC. We also suggest you do the same on your Windows PC by following the listed steps:
1. Right-click on the blank space on your desktop and select Display settings from the right-click menu.
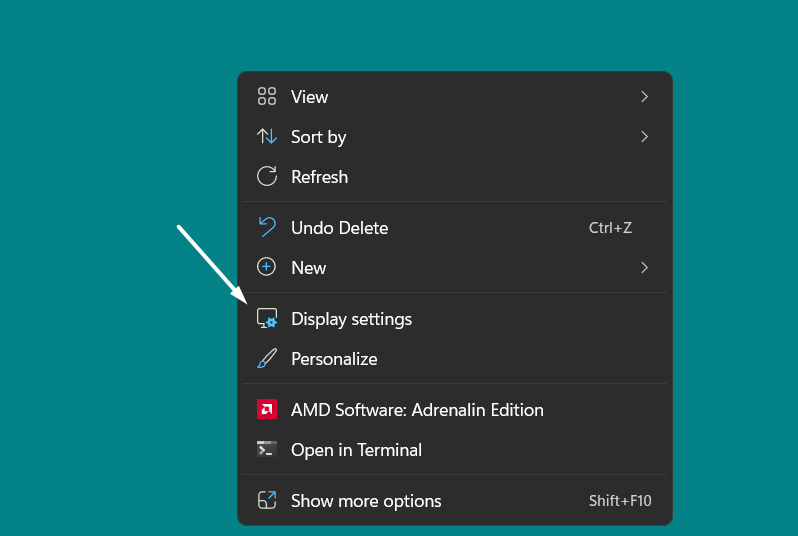
2. Click on Graphics under Related settings and expand the Hardware-accelerated GPU scheduling section.

3. Lastly, turn off the toggle next to Hardware-accelerated GPU scheduling to turn off the feature.

9. Use Recommended Display Resolution & Scaling Settings
Some users said that the incorrect system’s display resolution and scaling settings could also cause this issue. Keeping this in mind, we suggest you make sure that your Windows 11 PC’s display resolution and scaling settings are correct. Below are the steps to check the same:
1. Open the Settings app on your Windows 11 PC and head to the Display section from the System category.
2. Select the recommended option from the Scale and Display resolution dropdown in the Scale & layout section.

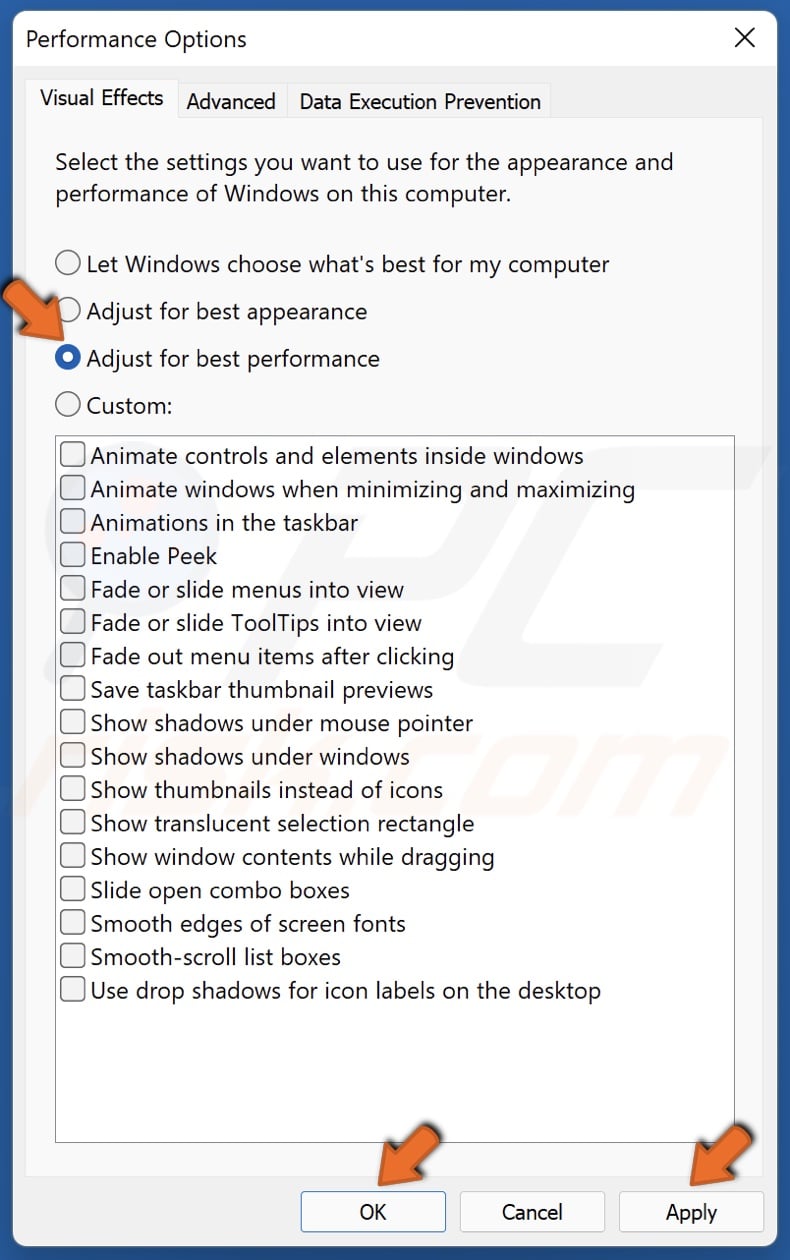
10. Correct Your System’s Visual Effects Settings
Another possible way to fix the Desktop Window Manager high memory issue is to modify the Windows system’s visual effects settings. It could be possible that the settings aren’t properly configured, which is causing this issue. You can check the below-mentioned steps to do the same:
1. Use the Windows + I shortcut to open the Settings app, scroll down to the end, and click on About.

2. Click the Advanced system settings option on the System window and then navigate to the Advanced tab.
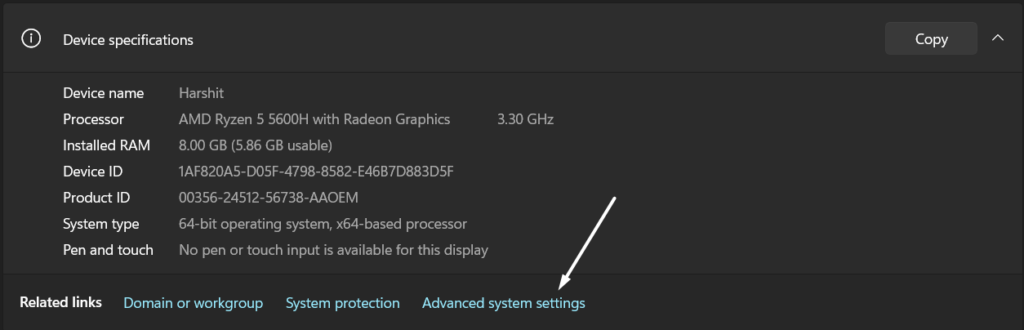
3. Click the Settings button in the Performance section and choose the Adjust for best performance option.
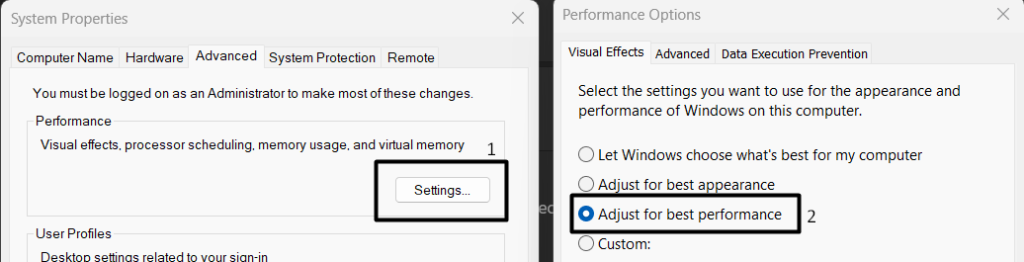
4. Lastly, click on the OK option to save all the recently made changes and reboot your Windows system.

11. Update, Re-enable, & Reinstall Your System’s GPU Driver
If you’re still experiencing Desktop Window Manager high GPU usage issues on your Windows 11 PC, it could be possible that your system’s GPU driver isn’t working properly due to some bugs.
Due to this, we suggest you update your Windows 11 PC’s GPU driver. So, check the below-mentioned instructions to know how to do the same on your system:
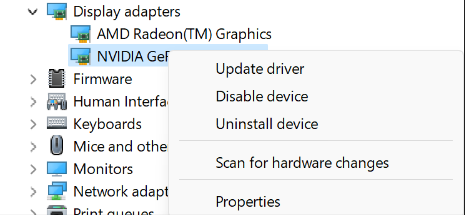
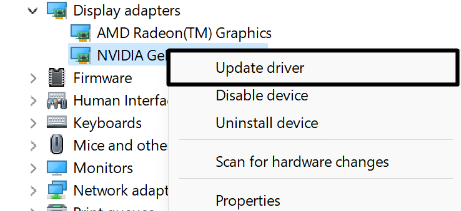
1. Press the Windows and R keys concurrently to open Run, type Devmgmt.msc in it, and press Enter.

2. Expand the Display adapters section by clicking on the arrow next to it and right-click on the GPU driver.
3. Select the Update driver option from the menu and then choose the Search automatically for drivers option.
Re-enable the GPU Driver
If updating the system’s GPU driver doesn’t fix the issue, you can try re-enabling it following the below steps:
1. Right-click on the GPU driver in the Display adapters section and choose Disable device from it.
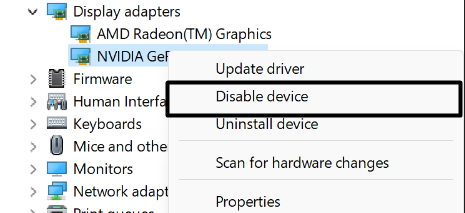
2. Once the GPU driver is disabled, select the Enable device option from the menu to re-enable it.
Reinstall the GPU Driver
If neither updating nor re-enabling the GPU driver fixes the issue, then you can consider reinstalling it:
1. Right-click on the GPU driver, and select the Uninstall device option from the right-click menu to uninstall it.
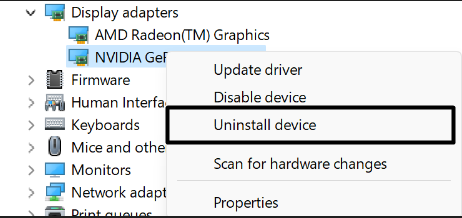
2. Click on the Action option in the top menu and select the Scan for hardware changes option from the dropdown.

Once the GPU driver is reinstalled, check if the Desktop Window Manager high GPU usage is fixed.
12. Change the Power Management Mode in the NVIDIA Control Panel
It could be possible that your Windows system’s graphic card settings aren’t properly configured, which is why this issue is appearing. Keeping this in mind, we recommend you follow the below steps to correct the improperly configured graphic card settings:
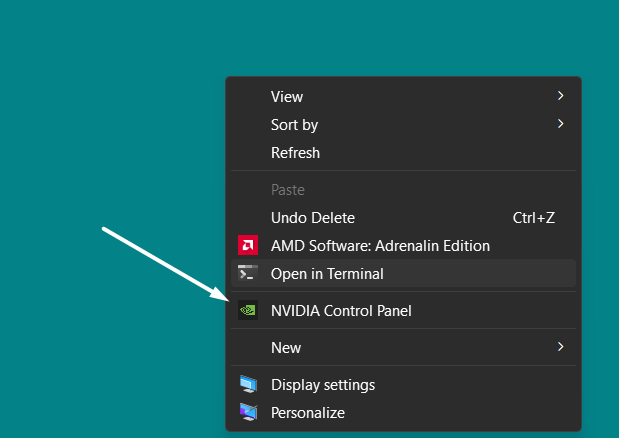
1. Right-click on your desktop in the blank space and select the NVIDIA Control Panel option from it.
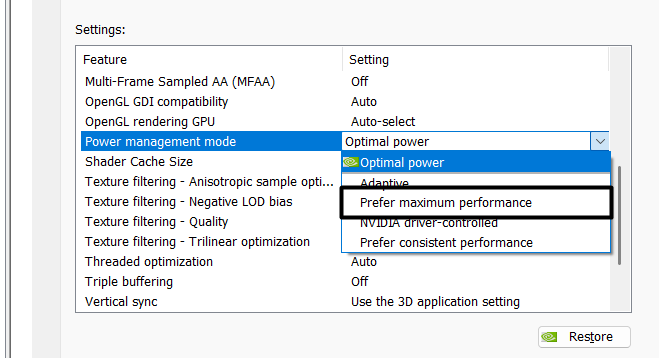
2. Click on the Manage 3D settings option in the left sidebar and then move to the Global Settings section.
3. Search for Power management mode in the Settings: box and select the Prefer maximum performance option from the dropdown.
4. Close the NVIDIA Control Panel tab and restart your Windows PC to eliminate the issue.
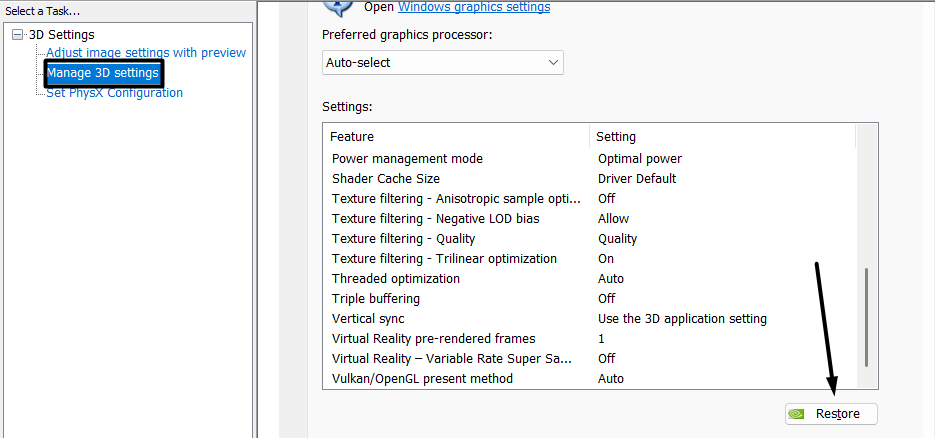
13. Restore NVIDIA Control Panel’s Global Settings
Some affected users mentioned that they fixed the issue with Desktop Window Manager by reverting the NVIDIA Control Panel’s Global Settings to default. We’ve mentioned the instructions below to reset the Global Settings of the NVIDIA Control Panel:
1. Right-click on your desktop in the blank space and select Show more options from the context menu.
2. Select NVIDIA Control Panel from the contextual menu to open the NVIDIA Control Panel on your system.
3. Navigate to the Manage 3D settings section from the left navigation pane and click the Restore button at the bottom.
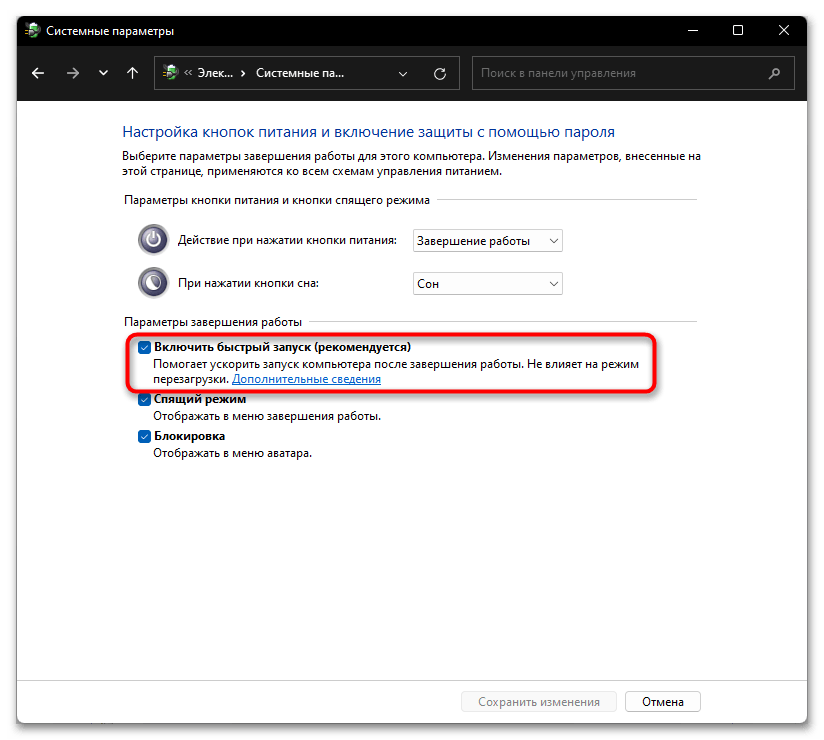
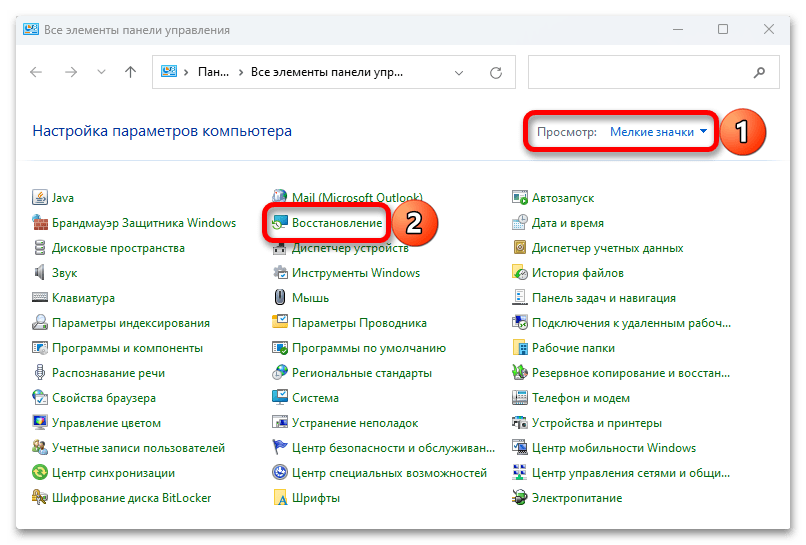
14. Disable Fast Startup
Most Windows 11 PCs come with Fast Startup pre-enabled, which helps the system boot faster by preventing unnecessary apps and services from starting at the system’s boot. It could be possible that Fast Startup is preventing necessary apps and services from starting at the system’s startup, which could be the same in this case.
To check whether it’s true, we suggest you disable Fast Startup on your system. So, follow the below steps to turn off Fast Startup on your PC:
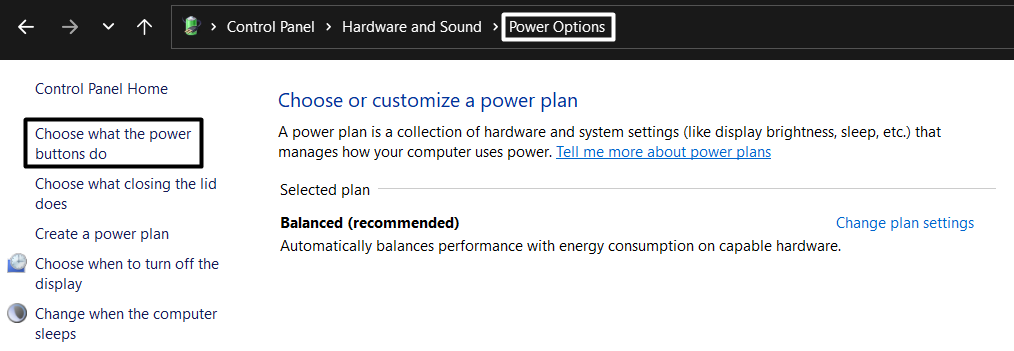
1. Open the Control Panel utility on your Windows 11 PC and navigate to the System and Security section.
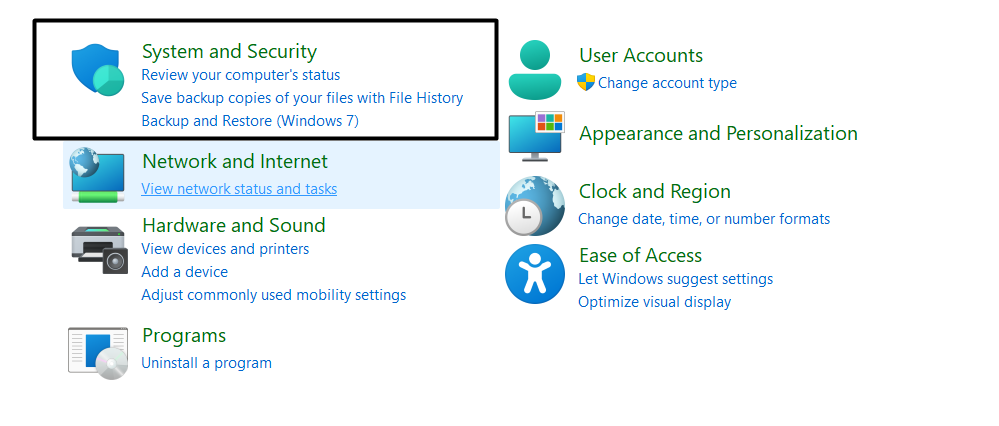
2. Click on Power Options on the next window and then select Choose what the power buttons do from the left sidebar.
3. Click on Change settings that are currently unavailable at the top and then uncheck the Turn on fast startup (recommended) checkbox.
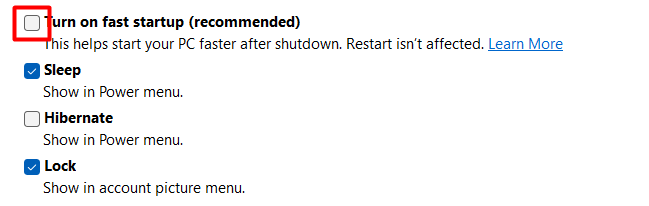
4. In the end, click the Save changes button to save all the changes and fix the issue.
15. Disable Unnecessary Startup Apps
One of the most common reasons for this issue is the unnecessary startup apps and non-Microsoft-related services. Considering this, we suggest you prevent all the irrelevant startup apps and services from starting at the system boot. You can follow the below steps to do the same:
1. Press the Windows key to open the Windows Search Box, type Startup Apps, and select the same from the search results.

2. Search for all the unnecessary programs and services on the next screen that are allowed to start at the system’s startup, and stopping them won’t affect the system’s functioning.
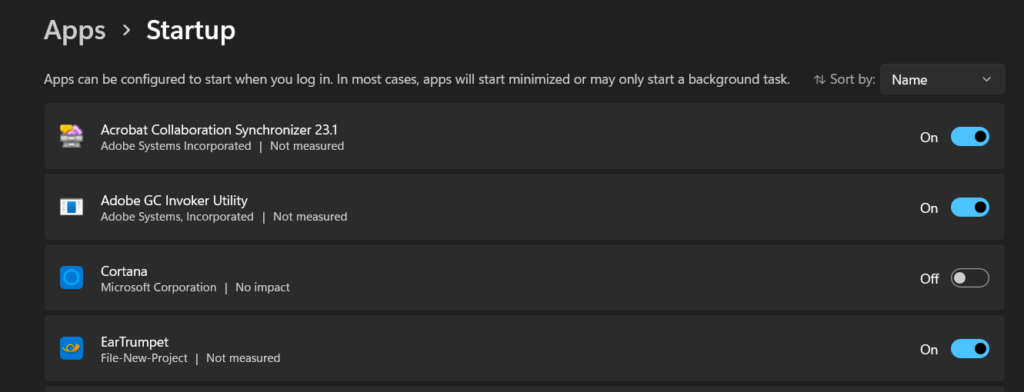
3. Finally, disable the switch next to all the unnecessary programs and services to prevent them from booting at your system’s startup.

16. Download the Latest Windows Updates
If you’re still facing the same issue, then it could be possible that your Windows 11 PC has some bugs and glitches which are causing this issue. In that case, we suggest you update your Windows 11 PC to the latest build to eliminate those bugs and glitches from the system.
You can follow the below-mentioned instructions to update your Windows 11 PC:
1. Press the Windows and I keys combination to open Settings and move to the Windows Update section.

2. Click on the Check for updates button at the top to search for new available Windows updates.

3. If the OS displays some new updates to install, click the Download & install all button next to the updates to install them.

17. Reset Your PC
If none of the above-mentioned workarounds fixes the Desktop Window Manager high GPU usage issue, then the last workaround is to factory reset your PC. Doing so will remove all the data, including all files and programs, from your Windows 11 system and revert all the settings to the default state.
As a result, the issue will get fixed automatically. So, reset your Windows 11 PC by following the below steps:
1. Open the Settings app on your Windows 11 system and navigate to the Recovery section from the System category.

2. Click on the Reset PC button next to Reset this PC in the Recovery options section.
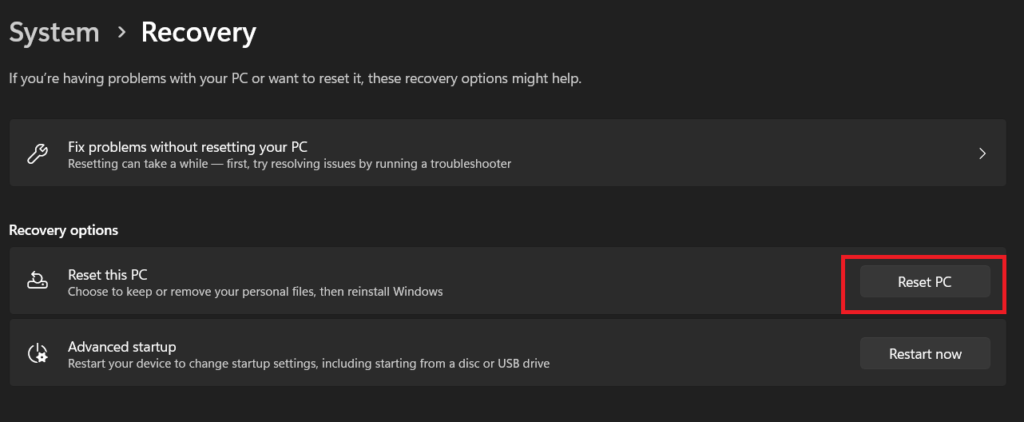
3. Select the Remove everything option on the next prompt and then choose the Cloud download option.

4. Finally, click on the Next button and then Reset to start the factory reset process.

FAQs
How Do I Fix High GPU Usage on Windows 11?
You can easily resolve the high GPU usage issue on Windows 11 by force closing all unnecessary apps and services running in the system’s background. If this doesn’t fix the issue, try restarting the PC.
How Do I Fix Desktop Window Manager in Windows 11?
If the Desktop Window Manager process uses a lot of your system’s resources while running, try upgrading your Windows 11 PC’s GPU driver. If this doesn’t fix the issue, consider disabling Hardware Accelerated GPU Scheduling (HAGS) on your PC.
Does Windows 11 Affect GPU?
Some users said their system’s GPU performance dropped a bit after upgrading to the latest Windows 11.
Can I Disable Desktop Window Manager Windows 11?
You can disable the Desktop Window Manager process on your Windows 11 PC without any issues.
How Do I Reduce Desktop Window Manager Usage?
If the Desktop Window Manager process is consuming an extensive amount of your system’s resources, we suggest you execute a detailed virus scan on your Windows 11 PC, as malware and viruses could also be the reason behind this instance.
Desktop Window Manager High GPU Usage Issue Is Fixed Now
Desktop Window Manager is a crucial Windows process that plays an important role in our system’s functioning. This process usually requires a minimal amount of our system’s graphic resources to function. But, for some users, it’s using a lot of their system’s GPU resources and ruining their experience with their Windows 11 PC.
If you were also facing the Desktop Window Manager high GPU usage issue on your Windows 11 PC, then we hope it got fixed after trying the workarounds we shared in this detailed guide. If yes, then do let us know which workaround fixed the issue for you.
Desktop Window Management makes your Windows device appealing with all the visual effects you see on the Operating system. However, for some users, this feature has turned out to become troublesome as it overkills GPU usage.
This is possible if the device is loaded with heavy visual effects and the background process priority for the Desktop Window environment is set high. A bug in the operating system also appears to be contributing to this issue. Taking these factors into account, we will offer some solutions for fixing this problem in this article today.
What Causes Desktop Window Manager to Use High GPU
Desktop Window Manager (DWM) is a Windows application that handles the function of personalization. The themes you get to see on windows, including the animations, wallpapers, transparent windows, and other such visual elements, are handled by the DWM.
DWM’s executable file dwm.exe resides in the windows\system32 directory and runs on the system processes the whole time you use your Windows device. If you see its process in the task manager, you might find its CPU and GPU utilization very high.
Some of the reasons why this might be happening are listed here.
- Heavy visual effects
- Malware and Viruses mimicking
dwm.exe - High priority set for
dwm.exeprocess - Issues with Graphic Drivers
- Task Manager reporting wrong GPU utilization data
How to Fix Desktop Window Manager High GPU
It is possible that the GPU usage might be shown high for the DWM due to some temporary glitches in the task manager or the system. Start by restarting the computer and checking if the problem exists as earlier. Also, ensure that a few processes that use DWM are running in the background.
Change Priority for DWM process
You may choose to run the applications on your Windows system with varying priorities. Setting it for a high priority will consume high GPU and CPU resources. It is possible that the Desktop Window Manager is set to a high-priority mode. You can configure it to run low-key from the Task Manager to fix it.
- Press Ctrl + Shift + Esc to launch the Task Manager.
- Go to the Details tab.
- Find
dwm.exeand right-click it. - Go to Set Priority and select Normal.


Configure the Visual Effects
It is no wonder that if your device is running with high visual effects, it will consume a greater proportion of the GPUs capacity. This might be the reason that you are seeing a high GPU utilization by dwm.exe. You can configure the visual effects and tone them down for best performance and lower GPU usage.
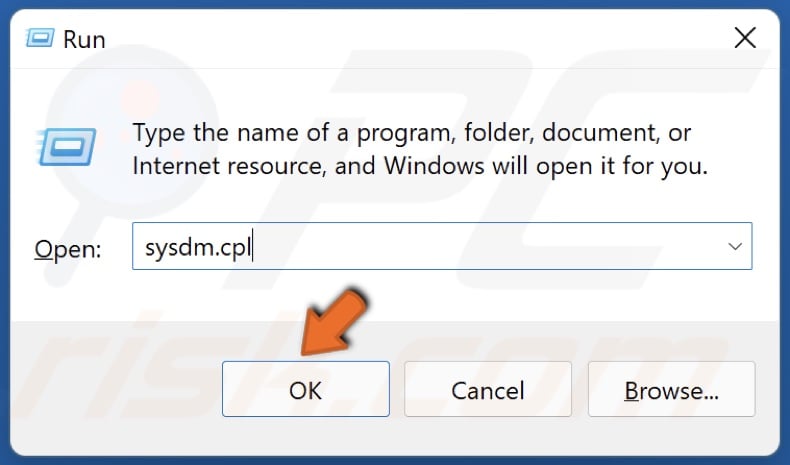
- Press Windows Key + R, type
sysdm.cpl, and hit enter. - Go to the Advanced tab.
- Go to Settings, under the Performance section.

- Choose the Adjust for best Performance option.
- Click on Apply to save changes.


Turn off Transparency Effects
This effect makes the start menu, taskbar, and windows transparent to enhance the aesthetics of the Windows OS. However, it is also using a lot of system resources through Desktop Window Management. As reported by some users, disabling the transparency effects resolved this issue for them. Here’s how you too can disable it.
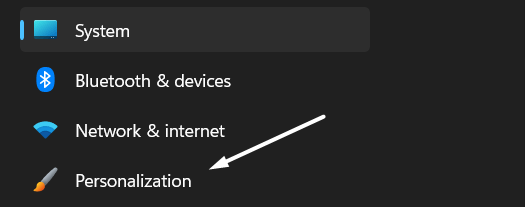
- Press Windows + I to launch the Settings.
- Go to Personalization > Colors.

- Click on the Transparency effects slider to turn off the feature.


Disable Hardware Acceleration
If you have hardware acceleration enabled, the DWM might get to utilize the excess of the GPU resources. The hardware acceleration feature consumes a higher proportion of GPU and extracts much from the CPU as well. To disable it,
- Press Windows Key + I to open up settings.
- Go to System > Display > Graphics.

- Under Default Settings, select the Change Default graphic settings.

- Click on the slider to disable the Hardware-accelerated GPU scheduling.

- Restart the computer to apply the changes.


Decrease Power Limit Throttling
If the heavy visual settings are incorporated into the Windows, which is a graphically intensive task, it can add stress to the GPU and ultimately result in throttling. To resolve this, you can decrease the Power throttling using the CPU tuning application.
In the case of Intel CPUs with Integrated GPUs, you can use the Intel Extreme Tuning Utility to control the Power Limit Throttling.
- Download the Intel Extreme Tuning Utility and install it.
- Launch the application, and go to the Advanced Tuning section.
- Drag the slider of the Turbo Boost Short Power Max to match the value of the Turbo Boost Power Max.
- Click on the Apply button to save the changes.


Note: You can also control the power level throttling by undervolting the CPU or GPU . However, undervolting can cause the system to crash if not performed correctly. Therefore, it is recommended to undervolt the components with extreme caution and precision.
Update/Rollback the Graphic Drivers
If the Graphic card drivers are outdated or have some issues with them, it can generate such problems. Updating the drivers works most of the time. You can update the drivers from the Device manager or manually install the latest ones from the GPU manufacturers.
- Press Windows Key + X and click on Device Manager.
- Click on Display Adapters to expand the list of GPU drivers.
- Right-click on the Graphic card and click on Update Driver.

- You will now have two options to choose from. Select the Search Automatically for drivers to make the Windows itself search for the drivers in the device.
- If you choose to Browse my Computer for drivers, select Let me pick from the list of available drivers.

- Follow the prompts and update the graphic drivers to their latest version.


You can also manually install the updates by downloading the installers from the manufacturer’s website. You can check out this article which deals with updating the graphic drivers on Windows.
If you have been experiencing this issue after updating the graphic drivers, you can even roll back to the previous stable version of the driver.
- Right-click on the Graphic driver and select Properties.
- Go to the Driver tab.
- Click on Roll back driver. This option will be greyed out if there is no roll-back possible for the selected driver.

- Restart the computer once the driver gets reverted to the previous version.

Scan for Malware
Malware is well known to hog the system resources for some unauthorized tasks without the user’s approval or knowledge. It is possible that malware has disguised its process as the Desktop Window Manager and raised the GPU utilization index.
Therefore, it’s ideal for running a malware scan to remove any sort of troublemakers from the system.
- Press Windows Key + X, type windowsdefender://threat/ and hit enter.
- Click on the Scan options.

- Choose Full Scan option and Click on Scan now button to start the process.


Perform windows update
This issue of the DWM using a high GPU can very well be due to the issues in the operating system. It is also seen that on the latest builds of Windows 10 and 11, this problem seems to have been fixed. In order to update the Windows,
- Press Windows + R to launch Run.
- Type control update and hit enter.
- Click on Check for Updates.

- If it finds new updates, Click on Install now button.
- After the update is completed, boot the device and check if the issue persists.

How to Fix Desktop Window Manager High GPU and Memory Usage in Windows 11
Sometimes Desktop Window Manager (dwm.exe) starts hogging Graphics Processing Unit (GPU) or memory (RAM) resources when it shouldn’t. This article will show you how to fix this problem.
Desktop Window Manager is responsible for rendering the Windows desktop environment, which is a significant part of the GUI. Usually, wdm.exe doesn’t use much of the GPU’s processing power, but it ends up causing high GPU usage due to some arbitrary reasons.
Many users reported that GPU usage by Desktop Window Manager spikes to 70% or even 100% when running an app and its main window is visible or a video game. This problem is known to occur in Windows 11 and Windows 10.
Why Is Desktop Window Manager Using So Much GPU?
The issue can be caused by outdated GPU drivers or overloading the Desktop Window Manager process with many desktop processes and activities that require more resources than normal.
Some have noticed that Desktop Window Manager started causing high GPU or memory (RAM) usage after a Windows update. It has been said that an update might contain bugs that cause dwm.exe to overuse GPU resources.
In some cases, the Xbox Game Bar causes Desktop Window Manager to use more GPU/Memory than normal. We suggest uninstalling the Xbox Game Bar and checking if that fixes the issue.
Video Guide on How to Fix Desktop Window Manager High GPU/Memory Usage
Table of Contents:
- Introduction
- Method 1. Update the Graphics Card Driver
- Method 2. Run the Hardware and Devices Troubleshooter
- Method 3. Set Desktop Window Manager Priority to Normal
- Method 4. Turn Off Visual Effects
- Video Guide on How to Fix Desktop Window Manager High GPU/Memory Usage
Download Computer Malware Repair Tool
It is recommended to run a free scan with Combo Cleaner — a tool to detect viruses and malware on your device. You will need to purchase the full version to remove infections. Free trial available. Combo Cleaner is owned and operated by Rcs Lt, the parent company of PCRisk.com read more.
Method 1. Update the Graphics Card Driver

1. Right-click the Start menu button and select Device Manager.

2. Expand the Display adapters list.
3. Select your display adapter (graphics card), right-click it, and click Update driver.

4. Select Search automatically for drivers.
5. Windows will download and install the drivers.
You can also manually download the graphics card drivers for Intel, Nvidia, and AMD from their respective websites.
[Back to Table of Contents]
Method 2. Run the Hardware and Devices Troubleshooter
1. Hold down Windows+R keys to open Run.
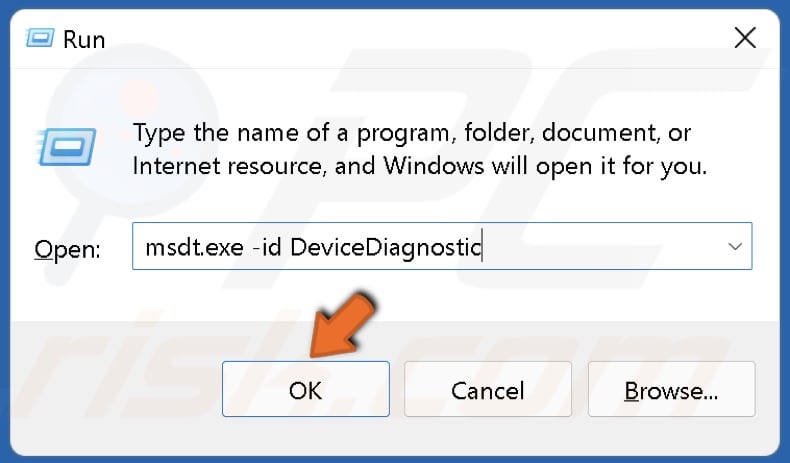
2. In the Run dialog box, type in msdt.exe -id DeviceDiagnostic and click OK.
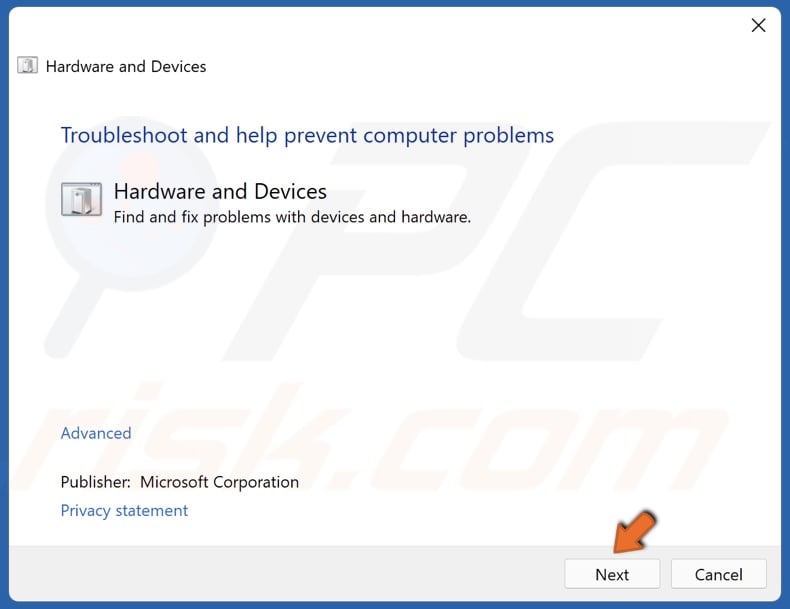
3. Click Next in the Hardware and Devices troubleshooter window.
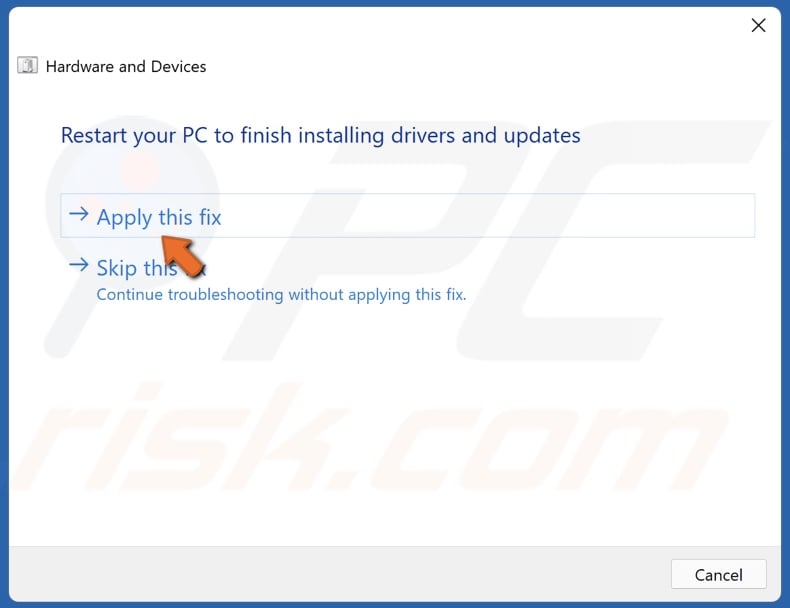
4. Apply the suggested fixes and close the troubleshooter.
[Back to Table of Contents]
Method 3. Set Desktop Window Manager Priority to Normal
1. Hold down Ctrl+Shift+Esc keys to open Task Manager.
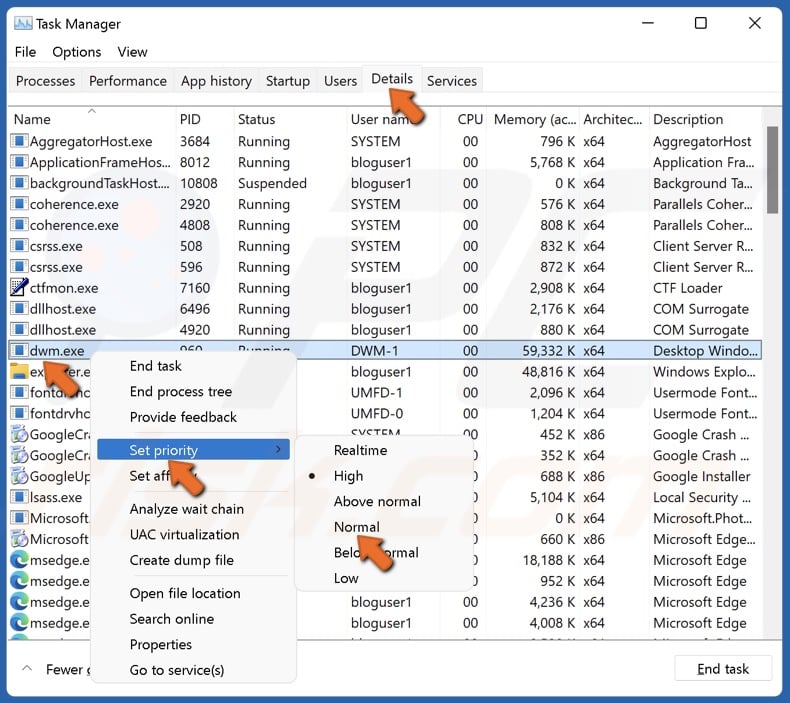
2. Select the Details tab.
3. Find dwm.exe, right-click it, select Set priority, and click Normal.
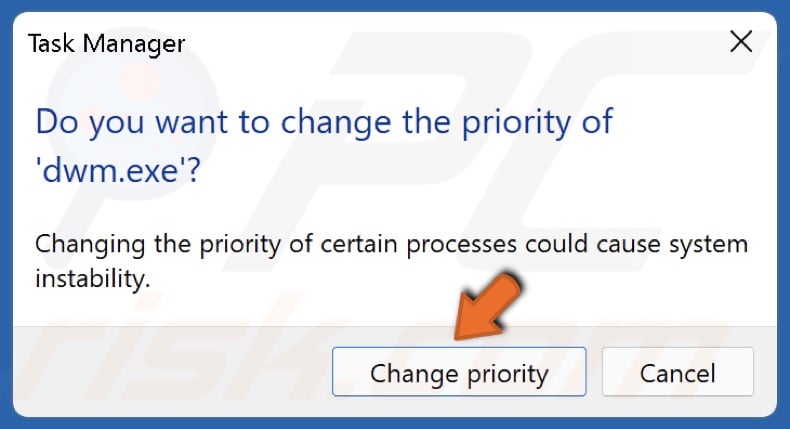
4. Click Change priority to confirm.
[Back to Table of Contents]
Method 4. Turn Off Visual Effects
1. Hold down Windows+R keys to open Run.
2. In the Run dialog box, type in sysdm.cpl and click OK.

3. In the resulting System Properties window, select the Advanced tab.
4. Under the Performance section, click Settings.
5. Tick the Adjust for best performance option.
6. Click Apply and click OK.
7. Alternatively, you can select Custom and only disable the options you want.
If none of the proposed methods work, try turning off Fast startup in Windows 11 Power Options and uninstalling the Xbox Game Bar. If you haven’t tried that already, try changing the background image to a solid color and disabling Transparency effects in Personalization settings.
[Back to Top]
Все способы:
- Способ 1: Обновление драйверов видеокарты
- Способ 2: Параметры быстродействия
- Способ 3: Отключение стороннего ПО
- Способ 4: Отключение «Быстрого запуска»
- Способ 5: Сканирование на вирусы
- Способ 6: Проверка файловой системы
- Вопросы и ответы: 0
Процесс «Диспетчер окон рабочего стола» в Windows (исполняемый файл «dwm.exe») – является системным и отвечает за отображение окон в системе (тени, анимация, прозрачность, управление масштабированием и другие параметры), и обычным способом (например, через «Диспетчер задач») отключить задачу невозможно, поскольку процесс глубоко интегрирован в ОС и необходим для интерфейса. Если же он грузит систему, есть несколько способов исправить ситуацию.
Способ 1: Обновление драйверов видеокарты
Обычно «Диспетчер окон рабочего стола» потребляет небольшое количество ресурсов, до 1% ЦП и не более 100 Мб ОЗУ. Если же нагрузка больше, то это уже не совсем нормально, поэтому в первую очередь попробуйте обновить программное обеспечения для видеокарты. Если же у вас два видеоадаптера (дискретный и интегрированный), инсталлировать актуальные драйверы нужно для обоих компонентов.
О том, как обновить драйверы видеокарты, мы писали ранее более развернуто в отдельных руководствах, причем для адаптеров Nvidia и AMD лучше воспользоваться фирменным программным обеспечением.
Подробнее: Обновление драйвера видеокарты в Windows 11 / Windows 10 / Windows 7

Также рекомендуем ознакомиться с нашим материалом на сайте, где описан порядок действий по переустановке драйвера видеокарты, который предполагает полное удаление файлов программного обеспечения перед чистой инсталляцией компонентов. Это может помочь, если файлы ПО по каким-то причинам повреждены.
Подробнее: Переустанавливаем драйвера видеокарты
Способ 2: Параметры быстродействия
Если у вас действительно недостаточно оперативной памяти на компьютере, вероятно, процесс занимает слишком много ОЗУ именно по этой причине, поэтому можно изменить параметры быстродействия операционной системы:
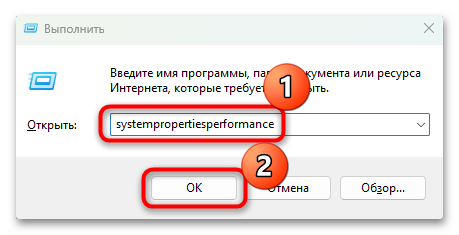
- Одновременно нажмите на клавиши «Win + R», затем в окне «Выполнить» введите запрос
systempropertiesperformanceи кликните по кнопке «ОК». - На вкладке «Визуальные эффекты» отметьте пункт «Обеспечить наилучшее быстродействие», сохраните настройки.
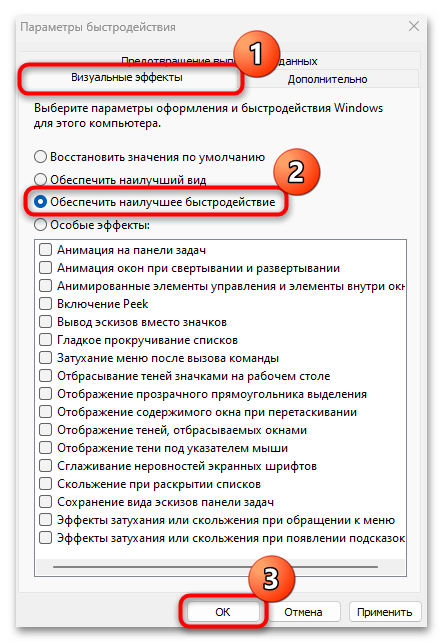
Как видно, при таком режиме все визуальные эффекты интерфейса (например, анимация панели задач, гладкое прокручивание списков и другое) будут отключены, что значительно снизит нагрузку на оперативную память. Чтобы новые параметры быстродействия вступили в силу, необходимо перезагрузить компьютер.
К слову, можете воспользоваться и другими методами, которые позволят освободить ОЗУ, после чего процесс «Диспетчер окон рабочего стола» сможет корректно работать без чрезвычайной нагрузки на систему. Очистка памяти осуществляется с помощью встроенных средств, а также посредством специального софта, и обо всех возможных способах наши авторы ранее писали в отдельных статьях по ссылкам ниже.
Подробнее:
Очистка оперативной памяти на ПК с Windows 11 / Windows 10 / Windows 7
Программы для очистки оперативной памяти
Способ 3: Отключение стороннего ПО
Если ранее вы устанавливали какие-то утилиты или программы, которые предназначены для изменения интерфейса и оформления операционной системы, случается, что именно их работа становится причиной высокого потребления ресурсов со стороны «Диспетчера окон рабочего стола». Лучшим решением в данной ситуации может стать отключение или удаление такого софта, после чего может потребоваться перезагрузка компьютера.
Подробнее: Удаление ненужных программ в Windows 11 / Windows 10 / Windows 7
Способ 4: Отключение «Быстрого запуска»
Если проблема появляется в момент запуска системы, то, скорее всего, причиной может быть активная функция «Быстрый запуск», что актуально для более поздних версий операционной системы. При таком режиме операционка загружается из файла гибернации «hiberfil.sys», и, если он поврежден или работает некорректно, то и Windows будет работать неправильно, например, возникают проблемы с загрузкой драйверов. Чтобы исправить неполадку, следует отключить «Быстрый запуск». Чтобы узнать, как это сделать, переходите к наши отдельным руководствам.
Подробнее: Отключение быстрого запуска в Windows 11 / Windows 10
Способ 5: Сканирование на вирусы
Не исключена ситуация, когда нагрузка на систему является следствием деятельности вирусов. Проверить, так ли это, можно через «Диспетчер задач». Найдите процесс «Диспетчер окон рабочего стола» в списке задач, кликните по нему правой кнопкой мыши и выберите пункт «Открыть расположение файла».
Исполняемый файл «dwm.exe» должен располагаться по адресу C:\Windows\System32. Если же вы обнаружили, что он находится в другом месте, тогда почти наверняка это вредоносная утилита. Просканируйте операционную систему на вирусы, используя встроенные или сторонние средства.
Подробнее: Борьба с компьютерными вирусами
Способ 6: Проверка файловой системы
Если ничего не помогло либо же после обнаружения вирусов, которые, в свою очередь, могли повредить системные файлы, рекомендуем проверить их на целостность либо восстановить состояние Windows.
В операционную систему от Microsoft интегрированы инструменты, позволяющие проверить ОС на наличие поврежденных файлов и восстановить их. Они применяются через консоль «Командная строка» и большинство проблем исправляют в автоматическом режиме.
Подробнее: Восстановление системных файлов в Windows 11 / Windows 10
Кроме того, иногда помогает откат к точке восстановления, если ранее она была создана в тот момент, когда система работала нормально. Проверьте, есть ли такие точки, и вернитесь к состоянию ОС на тот момент, используя штатное средство Windows.
Подробнее: Откат к точке восстановления в Windows 11 / Windows 10
Если ничего не помогло, при этом процесс «Диспетчер окон рабочего стола» продолжает грузить систему, иногда приходится прибегать к более радикальному методу – сбросу до заводских настроек. Учитывайте, что все установленные приложения будут удалены, а пользовательские параметры – сброшены. Но в более поздних версиях ОС предусматривается возможность сброса настроек с сохранением личных данных.
Подробнее: Сброс Windows 11 / Windows 10 / Windows 7 к заводским настройкам
Наша группа в TelegramПолезные советы и помощь
Windows 11/10 PC users can often experience Desktop Window Manager high GPU issues. Desktop Window Manager or DWM.exe is the system manager that generates each element visible on your PC/Laptop. Additionally, it is in charge of stimulating all the visual effects in Windows’ menus, transparency components, wallpapers, themes, thumbnails, and system animations. The inbuilt graphics card is often used by Desktop Window Manager to meet all the needs.
In layman’s terms, “the system function DWM or Desktop Windo ws Manager uses the graphics hardware of your PC/Laptop to display each component of the User Interface you’re interacting with on your monitor/display.”
Also Read: How to fix NVIDIA Container high CPU usage on Windows
According to many users, lately, DWM is consuming a lot of GPU resources even when no resource-intensive applications are active…
Having said that, it can be beneficial to learn the causes of the problem before moving further.
Read Also: 10 Best Free GPU Benchmark Software for Windows
Causes Behind DWM High GPU Usage
Although DWM high GPU consumption is more software-related problem, your PC can experience the issue for a variety of different reasons. Following is a list of the most frequent reasons:
- Hardware-Accelerated GPU scheduling is On.
- The Windows version is outdated.
- The Graphics driver is corrupted or outdated.
- Damaged/Corrupt System files.
- Incorrect settings in the NVIDIAControl Panel.
Even when the PC/Laptop is inactive, users have reported seeing GPU consumption of more than 70%, which is abnormal. DWM typically uses the GPU between 1% and 3% of the total.
Now that you know what’s causing this continue reading to learn how to fix the Desktop Window Manager High GPU usage problem on your computer.
Read Also: How to Speed Up Windows 11 and Improve Performance (15 ways)
Fix Desktop Windows Manager High GPU Usage
No matter what is causing DWM’s high GPU consumption issue, there’re ways to fix it.
1. Keep Your Windows OS Updated
If you haven’t updated your computer in a while, there’s a good chance that a straightforward update may solve your issue.
- Press the Windows key with the key I to open Windows Settings.
- From the left side of the pane, look down and click on the Windows Update option.

- Now hit the Download & Install option for downloading any major or minor updates.

- Then check to see if the problem was solved.
Read Also: Microsoft’s PC Manager – Will It Help Boost PC Performance?
2. Disable Visual Effects
Turning off all visual effects is a useful cure for Desktop Windows Manager using a lot of GPU resources. As a result, your PC should operate more smoothly.
- Press the Search icon from the Taskbar and type Performance of Windows and click on the first option from the results.

- Under the Visual Effects tab, choose the option Adjust for best performance to lower the DWM high GPU usage.


- Then press the Apply button and choose ok.
3. Use Task Manager
The task level is set to “High Priority” which is one of the recognized reasons why DWM consumes all of the GPU memory. You only need to switch the task level to “Efficiency Mode.”
- Press the Ctrl + Shift + Esckeys together to open the Task Manager.
- Under the Processes tab, look for Desktop Window Manager and right-click on it.
- Now from the context menu choose Efficiency mode.

Image Credit: Allthingshow
- Restart your computer to see whether the problem has been fixed.
Read Also: Windows 11’s Task Manager is soon going to get a Search Bar feature
4. Turn Off GPU Hardware-Accelerated GPU scheduling
DWM uses the GPU heavily when GPU Hardware-Accelerated GPU scheduling is on your PC/Laptop. Simply turning off this via Windows Settings has helped many users fix the problem. To do so follow the steps below:
- Press the Windows key with the key I to open Windows Settings.
- From the left side of the pane, look down and click on the System button and then click on Display.

- Now hit the Graphics option under the Related settings options from the left side of the screen.

- To turn off Hardware-Accelerated GPU scheduling, click on the toggle button.

Image Credit: Technewstoday
- To apply the modifications, restart your PC.

Image Credit: Technewstoday
5. Update Your Graphics Driver
The high GPU consumption could be brought on by outdated or corrupted drivers. In this situation, updating the GPU driver will fix the issue. Follow the steps below:
- Press the Windows key with the key X to open the WinX Tap on Device Manager.
- Now double-click on the Display adapter option and right-click on your graphics card.

- Tap on Update driver and then choose Search automatically for drivers.

Read Also: Device Manager not Working on Windows 11? Here’s the Fix! (5 Solutions)
Using specialized software, such as Advanced Driver Updater, can help you avoid taking the steps listed above and maintain regular driver updates for your PC. Follow these steps to use it:
- Download & Install Advanced Driver Updater.
- Open the application and tap on Start Scan Now.

- Now choose your graphics driver and tap on the Update Driver button against it.

- Restart your computer to see whether the DWM high GPU usage has been fixed.
To Wrap This Up
So that’s it for today. You can quickly fix the Desktop Window Manager High GPU Usage problem on your Windows 11 PC by using the solutions listed above. Also, if you know o any other workarounds to resolve the discussed issue then do tell us in the comments below. And for more such troubleshooting guides and tips & tricks related to Windows, Android, iOS, and macOS, follow us on Facebook, Instagram, and YouTube.
Next Read: How to Fix Desktop Window Manager High CPU (DWM.exe)